

Page 1
The Care Free®Ultra
Evaporative
Humidifier
Models 34200 & 34203
Espanol
Voir page 10
ENGLISH
See page 2
©2008 Hunter Fan Co. 41785-01 Rev 05-06-2008
Page 2
©2008 Hunter Fan Co. 41785 Rev 05-06-2008
2
Read and Save These Instructions
The Care Free® Ultra Evaporative Humidifier has a unique,
patented design with several innovative features:
• Wickless Humidifier – Hunter’s exclusive system does not
require a wick to create humidity. Water is transported up the
tube and is dispersed by centrifugal force against the Atomizer. The tiny water particles created from this impact are then
evaporated by the oncoming air stream and the moist air is
released through the exhaust vents beneath the Water Tank.
• Simple Pump System – By dispersing water via centrifugal
force through openings in the funnel pump, stagnant water in
the reservoir is eliminated and the buildup of mineral residue
that can clog conventional pump systems and impede performance is eliminated.
• Built-In Antimicrobial Properties – The plastic parts in this
humidifier and the filter have built-in antimicrobial properties to
inhibit the growth of bacteria, mold and fungi that may affect
these parts.
NOTE: The antimicrobial properties built-into this humidifier do
not extend to the water, humidified air or users. Conduct routine
cleaning and maintenance based upon use and individual
conditions.
• No White Dust – The Care Free® Ultra Evaporative Humidi-
fier produces no white dust that can settle on furniture or be
inhaled.
NOTE: You may notice mineral deposits accumulating in the
tank base or on other components. This is normal and comes
with regular usage conditions. If you would like to remove these
deposits and maintain humidifier performance, please see the
section CLEANING THE HUMIDIFIER AND THE WATER
TANK.
How the Care Free® Ultra
Evaporative Humidifier Works
Important Safety Instructions:
Read all instructions before using this
humidifier.
Thank you for purchasing the Care Free® Ultra Evaporative
Humidifier by Hunter Fan Company. Please read and
save these instructions to receive maximum benefit and
performance from your humidifier.
1. This humidifier may not work properly on an uneven
surface. ALWAYS place this humidifier on a firm, level and
water resistant surface. ALWAYS place the humidifier at
least six (6) inches away from walls and heat sources such
as stoves, radiators or heaters.
2. ALWAYS place the humidifier in an area that is out of
the reach of children.
3. Before using the humidifier, extend the cord and inspect for
any sign of damage. DO NOT use the product if the cord
has been damaged.
4. This product has a polarized plug as a safety feature
(one blade is wider than the other). This plug will fit into
a polarized outlet only one way. If the plug does not fully
fit into the outlet, reverse the plug. If it still does not fit,
contact a qualified electrician. DO NOT attempt to defeat
or override this feature.
5. ALWAYS unplug and empty the humidifier when it is not
in operation or while it is being cleaned.
6. DO NOT tilt or move the humidifier while it is in operation.
Never move the humidifier while there is water in the tank.
Empty the water tank, turn the unit off, and unplug the unit
before moving.
7. In addition to routine maintenance which may be required,
this humidifier requires seasonal cleaning. Refer to and
follow the instructions for CLEANING THE HUMIDIFIER
AND THE WATER TANK.
8. This unit was designed to be used with distilled and/or tap
water. DO NOT add scented oils, perfumes or fragrance
additives to the water.
Page 3
©2008 Hunter Fan Co. 41785 Rev 05-06-2008
3
Assembly of Humidifier Parts
Tape
Figure 1
Figure 2
Lower
Reservoir
Tank
Cap
Upper
Reservoir
Water
Tank
Power
Pack
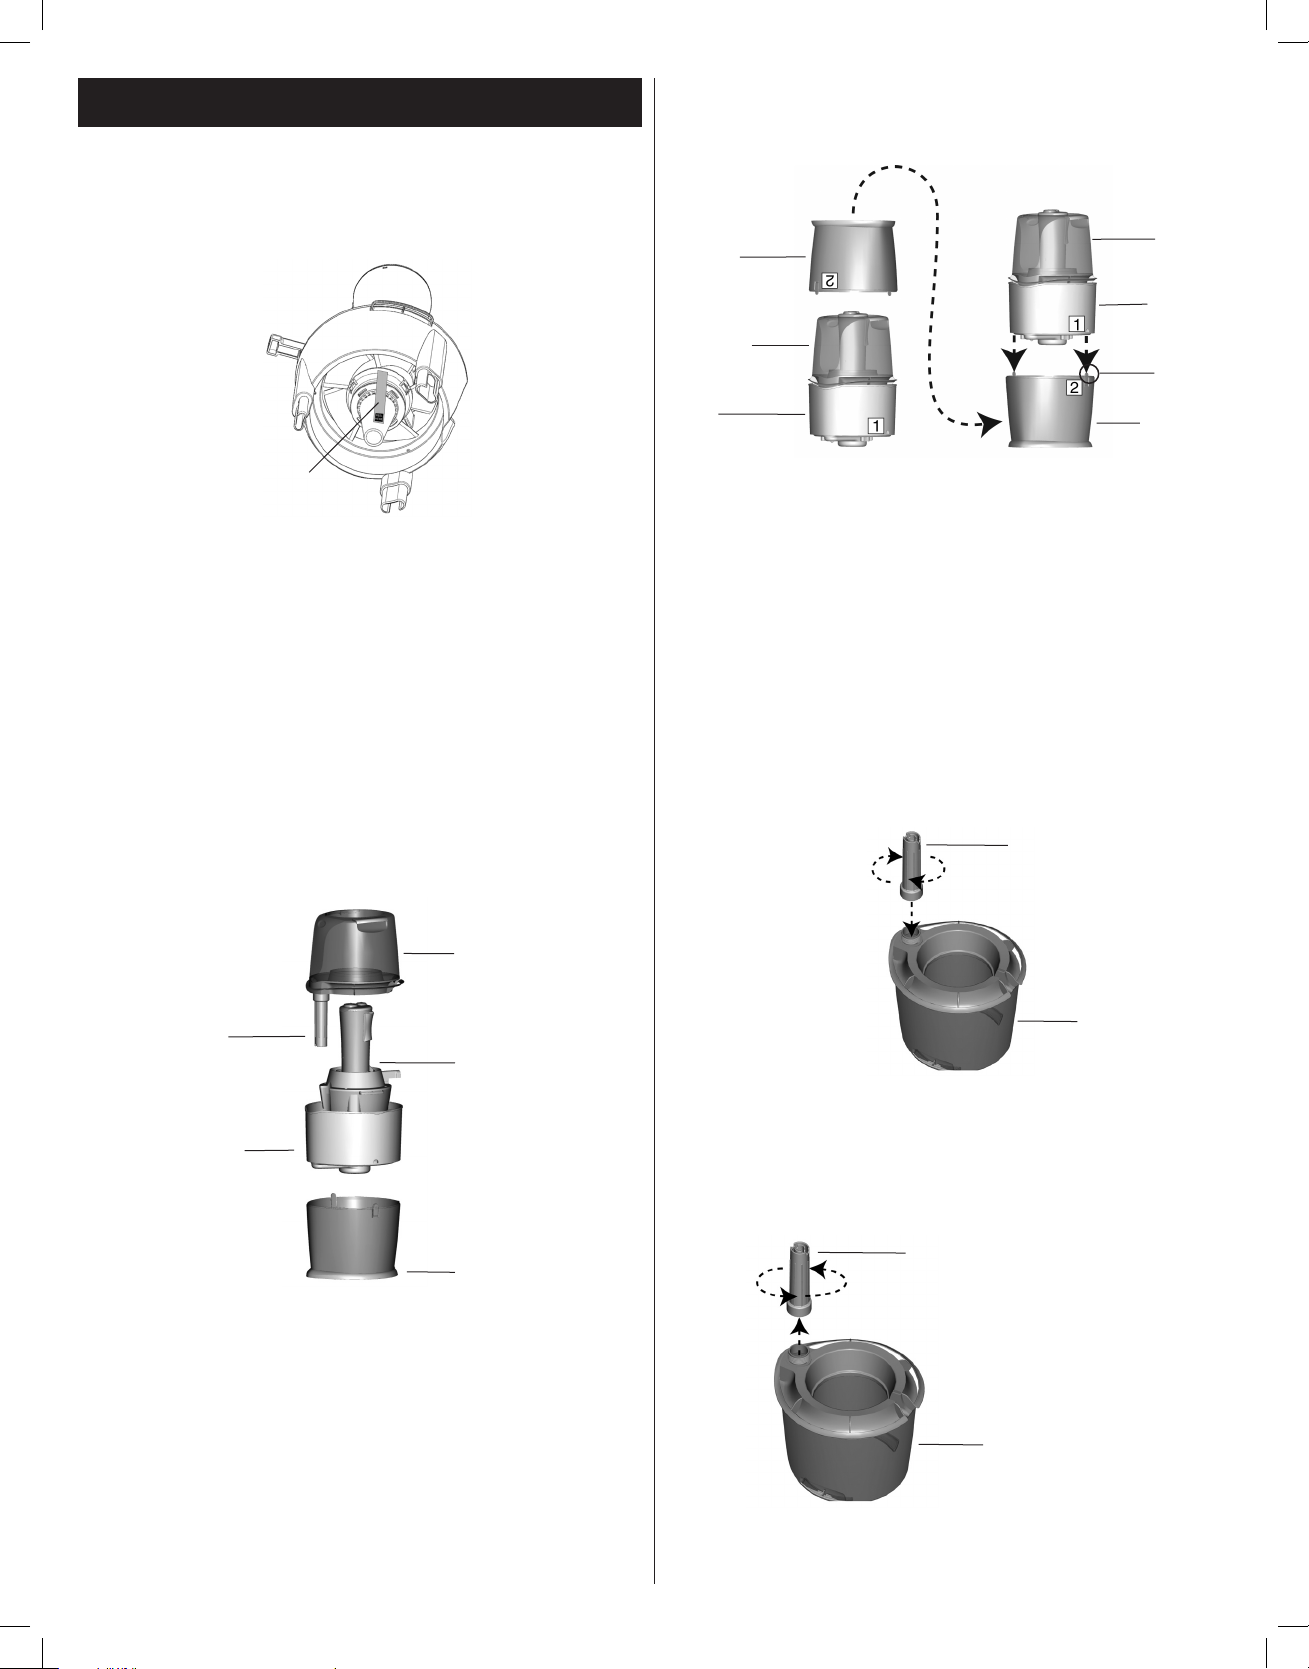
ATTENTION: Before operating the unit, remove the tape strips
located on the bottom of the power pack. These tape strips are
used to secure the pump components during shipment and
should be removed prior to operation. See Figure 1.
1. Remove the Care Free® Ultra Evaporative Humidifier from
its packaging.
2. Select a location for your humidifier. The location should be
flat, hard, water-resistant and at least six (6) inches away
from walls and sources of heat.
HUNTER WILL NOT ACCEPT RESPONSIBILITY FOR
DAMAGE DUE TO WATER SPILLAGE.
3. Remove the Lower Reservoir (marked with the number 2)
from the Water Tank and Upper Reservoir (marked with the
number 1). See Figure 2.
4. Set the Lower Reservoir on the flat, hard surface you have
chosen.
NOTE: Once the unit has been filled with water and is
operating, you should not use the Upper Reservoir handles
or Water Tank handles to pick up and relocate the humidifier
without emptying all water from the humidifier. Prior to moving
Tab
Figure 3
Lower
Reservoir
Water
Tank
Upper
Reservoir
Lower
Reservoir
Water
Tank
Upper
Reservoir
5. Lift the Upper Reservoir (marked with the number 1) and
Water Tank and place them on top of the Lower Reservoir
(marked with the number 2) so that the two tabs in the Lower
Reservoir snap into the Upper Reservoir. See Figure 3.
6. Take the Water Tank to a sink or tub to fill with water.
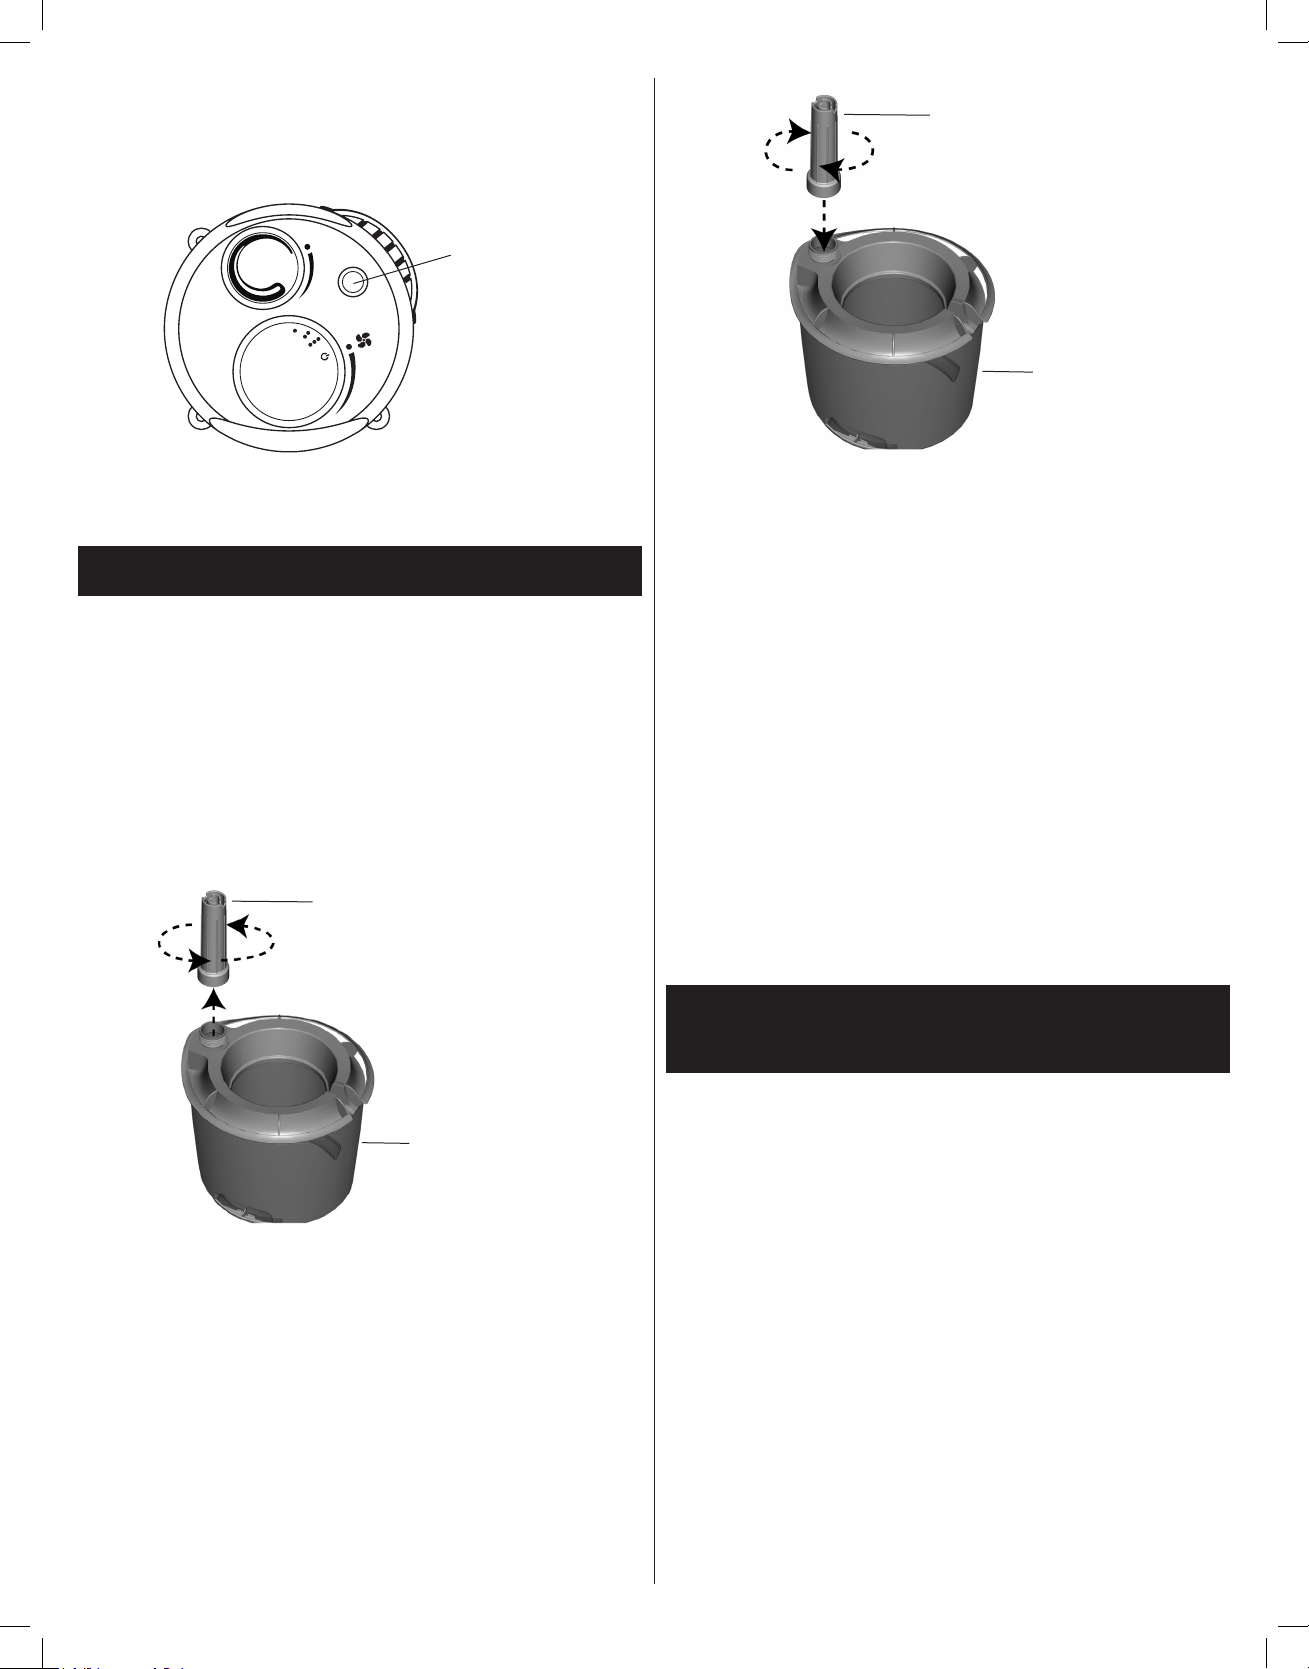
7. Unscrew the Tank Cap by twisting it counterclockwise and fill
the Water Tank with cool water. NEVER USE HOT WATER.
See Figure 4.
Water
Tank
Tank Cap
Figure 4
8. Replace the Tank Cap by screwing it back onto the Water
Tank clockwise. Securely tighten the Tank Cap and make
sure it is properly sealed. See Figure 5.
Water
Tank
Tank Cap
Figure 5
the humidifier, check the water window in the Lower Reservoir
for water. If there is water in the Lower reservoir, remove the
Water Tank and Upper Reservoir and drain all water.
Page 4
©2008 Hunter Fan Co. 41785 Rev 05-06-2008
4
Power
pack
Tank Cap
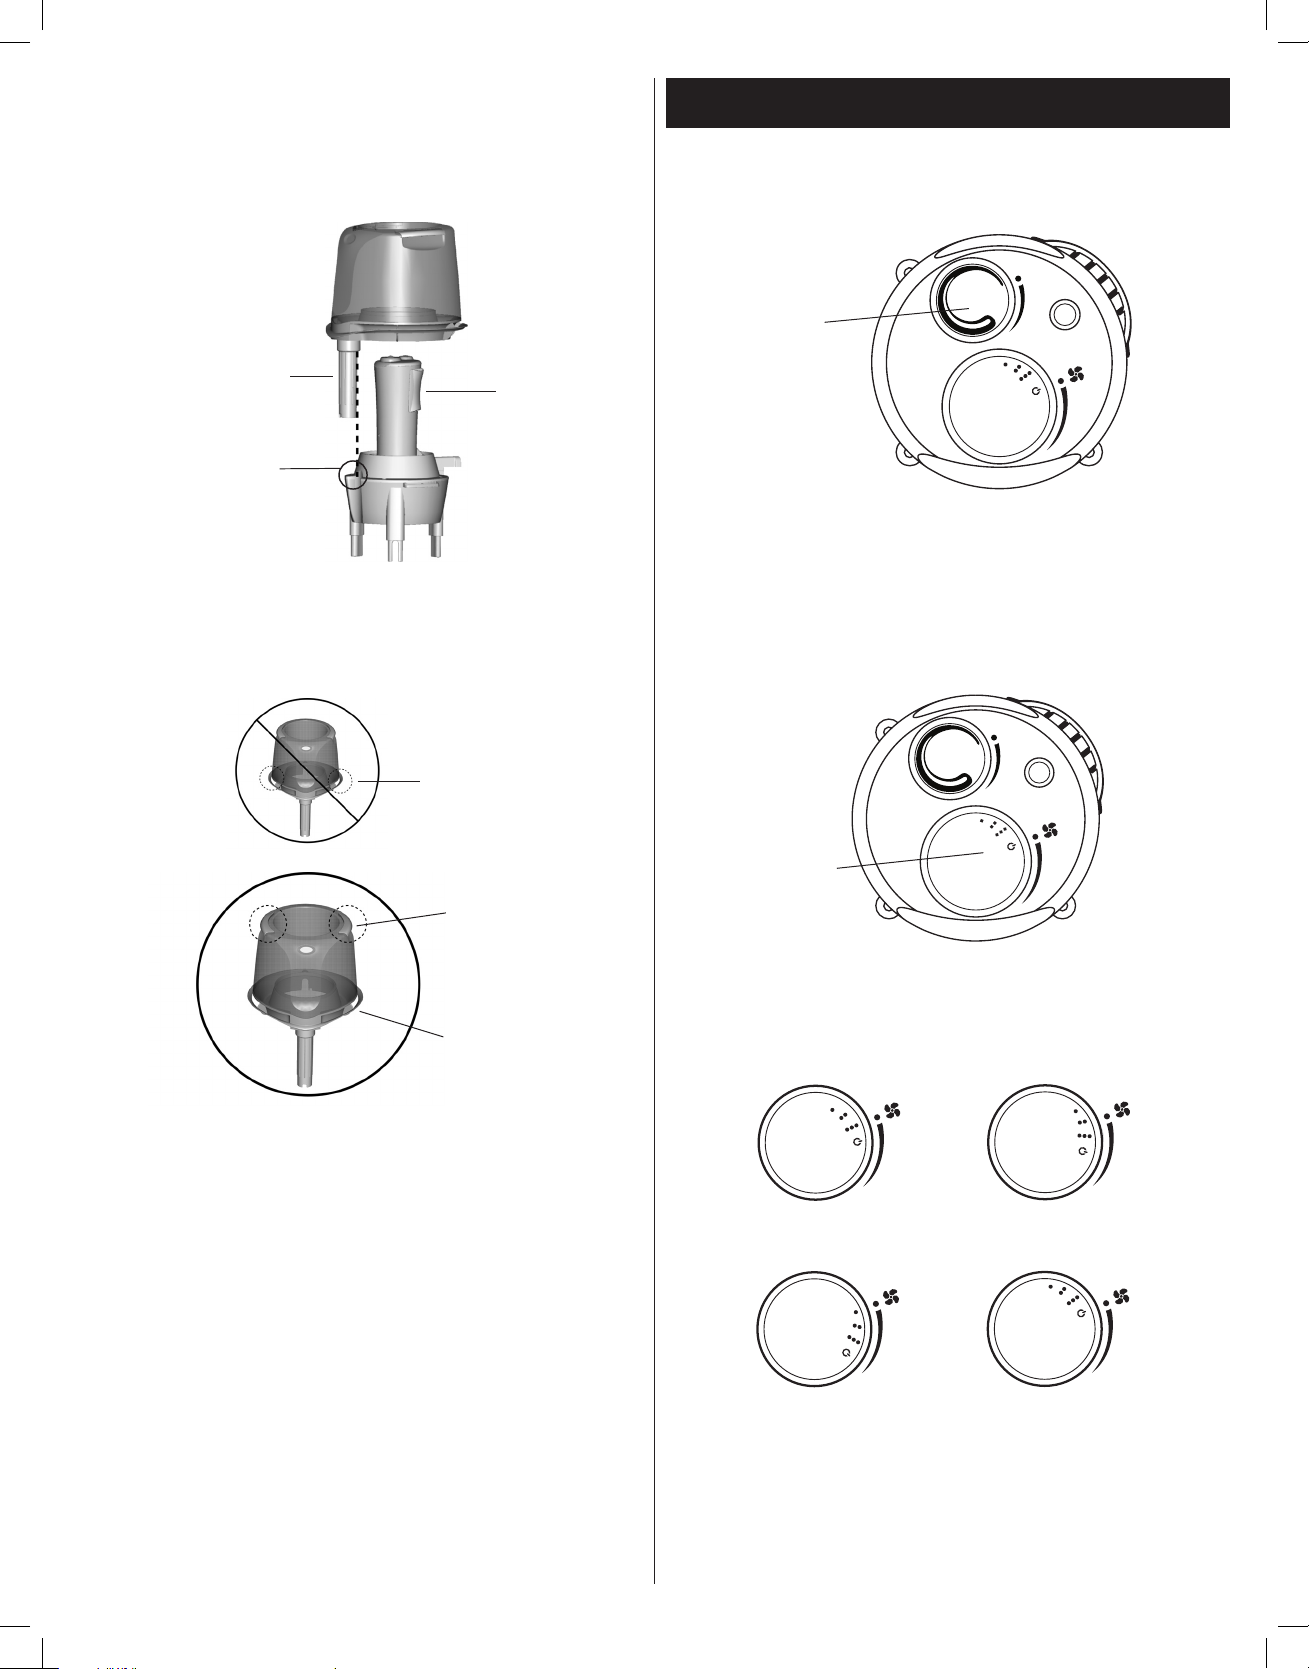
Cut-out area of
power pack
NOTE: Do not carry the Water Tank by the exhaust vents. See
Figure 7.
9. Carrying the Water Tank by the two upper handles on the
top of the Tank, position the Water Tank so that the notch in
the back fits over the power supply cord and the Tank Cap in
front fits into the cut-out area of the Power Pack. See Figure
6.
Figure 6
10. If the Water Tank is properly seated, you will see air
bubbles flowing up into the tank. If you do not see air
bubbles, reposition the Water Tank as instructed above.
Make sure the Power Knob is set to OFF and plug the
humidifier into the wall outlet.
CAUTION: Never plug in the humidifier while your hands are
wet, as electric shock could occur.
11. Thread the power cord through both power cord clips on the
back of the humidifier.
12. Turn the Power Knob to the desired setting.
NOTE: If the Water Tank is not seated properly on the Power
Pack, it will not turn on.
Exhaust
Vents
Figure 7
Do not carry the
water tank by the
exhaust vents.
Upper
Handle
Operating Your Humidifier
1. Adjustable Humidistat – Allows you to adjust the humidity
setting. See Figure 8.
Figure 8
Adjustable
Humidistat
Knob
• Turn the dial to the right to increase humidity.
• Turn the dial to the left to decrease humidity.
2. Power Knob – Allows you to set a desired speed level. See
Figure 9.
Turn the dial to set the speed to High, Medium. Low and Off.
See figure 10.
Power
Knob
Figure 9
high
MEDIUM
LOW
OFF
Figure 10
Page 5
©2008 Hunter Fan Co. 41785 Rev 05-06-2008
5
NiteGlo™ Night
Light Control
(model 34203
only)
Figure 11
3. NiteGlo™ Night Light Control (model 34203 only): Turns the
night light ‘ON’ and ‘OFF’. The night light can be turned on
even if the humidifier fan is turned off. See figure 11.
Refilling The Water Tank
6. Carrying the Water Tank by the two upper handles on the
top of the Tank, position the Water Tank so that the notch in
the back fits over the power supply cord and the Tank Cap in
front fits into the cut-out area of the Power Pack. If the Water
Tank is properly seated, you will see air bubbles flowing up
into the tank. If you do not see air bubbles, reposition the
Water Tank as instructed above.
CAUTION: Never plug in the humidifier while your hands
are wet, as electric shock could occur.
7. Make sure the Power Knob is set to OFF and plug the
humidifier into the wall outlet.
8. Turn the Power Knob to the desired setting.
1. When the water level is low, turn the Power Knob to OFF
and unplug the humidifier.
2. Lift the Water Tank and take it to the sink or a tub to refill.
NOTE: Do not carry the Water Tank by the exhaust vents.
3. Turn the Water Tank over and unscrew the Tank Cap by
twisting it counterclockwise. See Figure 12.
Water
Tank
Tank Cap
Figure 12
4. Empty the Water Tank and refill it with fresh, cool water.
NEVER USE HOT WATER.
5. Replace the Tank Cap by screwing it clockwise onto the
Water Tank. See Figure 13.
Water
Tank
Tank Cap
Figure 13
Cleaning the Humidifier and the
Water Tank
Many regions have hard water with high concentrations of
minerals. When water evaporates from the Care Free® Ultra
Evaporative Humidifier, minerals may be left behind. These
minerals can form a hard white scale which can be removed by
following the cleaning instructions. The frequency of cleaning due
to mineral build-up varies depending on the quality of water you
have.
1. Turn the Power Knob to OFF and unplug the humidifier.
2. Remove the Water Tank and carry it to a sink or a tub.
Unscrew the Tank Cap by twisting it counterclockwise and
empty any water in the Water Tank.
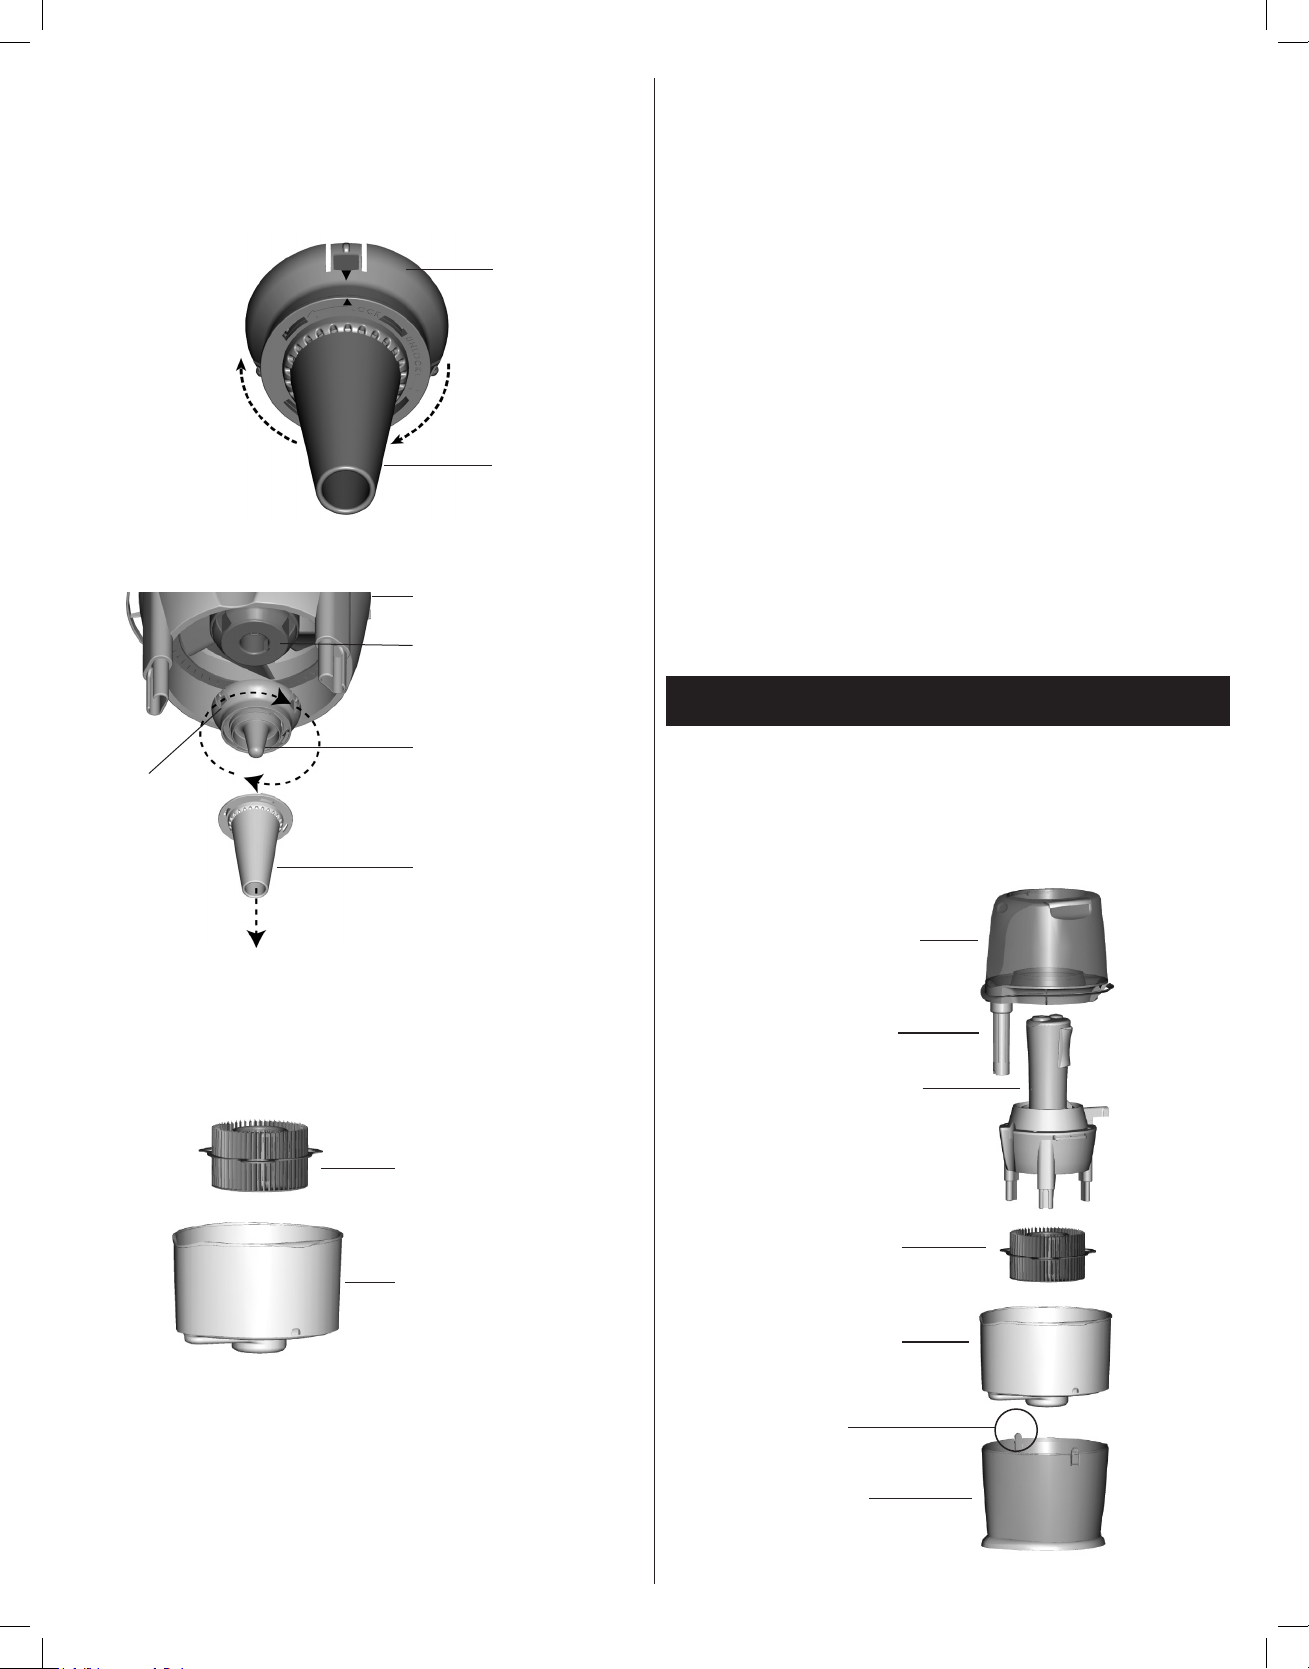
3. Lift the Power Pack and locate the three tabs on the top of
the Funnel Pump Assembly. Press the three tabs in and
remove the Funnel Pump by pulling away from the underside
of the fan blade.
Page 6
©2008 Hunter Fan Co. 41785 Rev 05-06-2008
6
6. Soak the Upper Reservoir, Funnel Pump, Pump Cap, and
Atomizer in a solution of one (1) gallon of water and eight (8)
ounces of vinegar for 30 minutes.
NOTE: If the Atomizer is covered with hard white scale, you
may want to run this component through the dishwasher to
loosen the scale before soaking.
The Atomizer is the only dishwasher-safe component and
may be placed in the top rack only.
7. To clean the Water Tank, fill the tank with one (1) gallon of
water and eight (8) ounces of vinegar. Replace the Tank Cap
tightly and shake the Water Tank vigorously until all interior
surfaces have been exposed to the solution.
8. Rinse the Water Tank several times with cool, clean water.
9. After soaking, rinse the components with clean water several
times. Use a soft cloth or sponge to remove any build-up.
Allow the components to dry completely if you plan to store
the humidifier.
10. To clean the surfaces of the Power Pack, wipe with a dry,
soft cloth.
Atomizer
Upper Reservoir
Funnel
Pump
Pump Cap
4. Remove the Pump Cap from the Funnel Pump by holding the
Pump Cap securely in one hand while twisting the Funnel
Pump in a clockwise direction. This will unlock the two
components. See Figures 14a and 14b.
Figure 14a
Pump Cap
Power Pack
Funnel Pump
Tabs
Fan Blade
Underside
Figure 14b
5. Remove the Atomizer and the Upper Reservoir. See Figure
15.
Figure 15
6. Soak the Upper Reservoir, Funnel Pump, Pump Cap, and
Atomizer in a solution of one (1) gallon of water and eight
(8) ounces of vinegar for 30 minutes.
Reassembly of Humidifier Parts
1. Set the Lower Reservoir on the flat, hard surface you have
chosen.
2. Attach the Upper Reservoir to the Lower Reservoir by
engaging the two tabs on the sides. See Figure 16.
Lower
Reservoir
Water Tank
Tank Cap
Upper Reservoir
Tab
Atomizer
Power Pack
Figure 16
Page 7

©2008 Hunter Fan Co. 41785 Rev 05-06-2008
7
Atomizer
Posts
Pump Cap
Funnel
Pump
Funnel
Pump
Arrows
Pump
Cap
3. Place the Atomizer in the Upper Reservoir, aligning the
three oval holes in the Atomizer with the three prongs in the
Upper Reservoir. The side of the Atomizer with three short
posts should be facing upward. See Figure 17.
Figure 17
4. Assemble the Pump Cap and the Funnel Pump by aligning
the arrows on both components and inserting the Funnel
Pump into the Pump Cap. Twist the Funnel Pump counter-
clockwise until the two components snap together. See
figures 18a and 18b.
Figure 18a
Figure 18b
5. Attach the Funnel Pump Assembly to the Power Pack by
engaging the three tabs on the underside of the fan blade.
See Figure 19.
Power Pack
Funnel Pump
Assembly
Tabs
Fan Blade Underside
Figure 19
6. Place the Power Pack into the Upper Reservoir so that the
three prongs in the Power Pack go through all three holes
in the Atomizer and into the three prongs in the base of the
Upper Reservoir. Make sure the Power Pack is securely
seated and all three prongs are in the proper position. See
Figure 20.
Upper
Reservoir
Power Pack
Atomizer
Holes in the
Atomizer
Figure 20
NOTE: The prongs will only fit into the Upper Reservoir one
way.
7. Follow the directions in the section REFILLING THE WATER
TANK to complete reassembly.
Page 8

©2008 Hunter Fan Co. 41785 Rev 05-06-2008
8
If you wish to move your humidifier to a different location, follow
the instructions as listed below. DO NOT attempt to carry the
humidifier when there is water in the Upper Reservoir, Lower
Reservoir, or the Water Tank.
1. Turn the Power Knob to OFF and unplug the humidifier.
2. Remove the Water Tank from the Upper Reservoir and drain
all water.
3. Remove the Upper Reservoir from the Lower Reservoir and
drain all water.
4. If there is water in the Lower Reservoir, drain all water.
5. Set the Lower Reservoir on the hard, flat surface you have
chosen.
6. Continue assembly as outlined in the section REASSEMBLY
OF HUMIDIFIER PARTS.
Relocating the Humidifier
Troubleshooting
Problem:
Excessive noise.
Solution:
1. Check the Water Tank to make sure it is properly seated on
the Power Pack.
2. Check the Water Tank to make sure there are no bubbles
when the Water Tank is full and running. If there are bubbles,
turn the unit OFF until the bubbling stops. When the bubbling
has stopped, set the unit to the desired speed.
3. Remove and clean the Pump Cap and Funnel Pump. Refer
to the section on CLEANING THE HUMIDIFIER AND THE
WATER TANK.
Problem:
Humidifier not working.
Solution:
1. Make sure the Power Knob is not set to OFF.
2. Adjust the humidity level using the Power Knob and the
Adjustable Humidistat. Once the room reaches the set
humidity level, the humidifier will turn OFF; this is normal.
3. Make sure the Power Pack and Water Tank are both fully
seated in the three tabs on the Upper Reservoir.
4. Make sure the Atomizer is facing the proper direction.
Problem:
Humidifier will not turn on.
Solution:
1. Check the three posts on the top surface of the Atomizer are
properly engaged. The side of the Atomizer with three short
posts should be facing upward.
2. Make sure the Water Tank is properly seated on the Power
Pack.
Problem:
Mineral build-up on the Water Tank or Upper Reservoir.
Solution:
1. Refer to the section on CLEANING THE HUMIDIFIER AND
THE WATER TANK.
Problem:
Humidity output and water usage decreased.
Solution:
1. Make sure the Atomizer is positioned correctly, with the side
with three posts facing upward.
2. Check the Adjustable Humidistat and Power Knob to make
sure they are set to the desired humidity level.
3. Check the Water Tank to make sure there are no bubbles
when the Water Tank is full and running. If there are bubbles,
turn the unit OFF until the bubbling stops. When the bubbling
has stopped, set the unit to the desired speed.
4. Clean any components that have mineral build-up. Refer
to the section on CLEANING THE HUMIDIFIER AND THE
WATER TANK.
Problem:
Excessive water drainage into lower reservoir.
Solution:
1. Make sure the Tank Cap on the Water Tank is tightened
sufficiently and properly sealed.
If you have questions or problems, please call
1-888-830-1326 for assistance before returning the unit to
the retailer.
Page 9

©2008 Hunter Fan Co. 41785 Rev 05-06-2008
9
HUNTER FAN COMPANY
2500 FRISCO AVENUE
MEMPHIS, TN 38114, USA
To learn more about Hunter Fan Company products,
please see our web page at:
www.hunterfan.com
Other Home Comfort Products
from Hunter
Hunter Original
®
QuietFlo™True HEPA Air
Purifier
Programmable Thermostat
Model 34200 34203
Atomizer 96146-01-325 96146-01-325
Funnel Pump 96150-01-325 96150-01-507
Pump Cap 96149-01-325 96149-01-507
Adjustable
Humidistat
Knob
86596-01-325 86596-01-520
Power Knob 86592-01-325 86592-01-520
Tank Cap 96334-01-325 96147-01-325
Water Tank 96333-01-510 96334-02-510
To obtain a service part for your humidifier, call Hunter
Customer Service at 1-888-830-1326 or e-mail us at
Techsupport@hunterfan.com. Please be prepared to tell the
operator the model number of your humidifier, the name of the
part you need to replace, and the part number.
Service Parts
Page 10

El Vaporizador Care
Free® Ultra
Models 34200 & 34203
ENGLISH
See page 2
Espanol
Voir page 10
©2008 Hunter Fan Co. 41785-01 Rev 05-06-2008
Page 11

©2008 Hunter Fan Co. 41785 Rev 05-06-2008
11
El Vaporizador Care Free® Ultra tiene un diseño único patentado con varias características novedosas:
• Vaporizador sin mecha – El sistema exclusivo de Hunter
no necesita una mecha para producir humedad. El agua se
transporta por el tubo y se dispersa por la fuerza centrífuga
contra el atomizador. Las pequeñas partículas de agua producidas por el impacto son evaporadas por la corriente de aire y
el aire húmedo es liberado a través de los ductos de escape
que están debajo del tanque de agua.
• Sistema de bomba sencillo – Al dispersar el agua mediante
la fuerza centrífuga por las aberturas de la bomba de embudo, se elimina el agua estancada en el depósito y el residuo
mineral acumulado que puede obstruir los sistemas de bombas convencionales e impedir un buen rendimiento.
• Propiedades antibacteriales integradas – Las piezas plás-
ticas del vaporizador y el filtro tienen propiedades antibacteriales integradas para evitar el desarrollo de bacterias, moho y
hongos.
NOTA: Las propiedades antibacteriales integradas en el vaporizador no se extienden al agua, al vapor o a los usuarios.
Realice una rutina de limpieza y mantenimiento de acuerdo al
uso y a las condiciones individuales.
• Sin polvo blanco – El Vaporizador Care Free® Ultra no
produce polvo blanco que se puede adherir a los muebles o
se puede inhalar.
NOTA: Es posible que detecte sedimentos minerales acumulados en la base del tanque o en otros componentes. Esto
es un resultado común del uso de la unidad en condiciones
normales. Si quiere quitar estos sedimentos y mantener el
rendimiento del vaporizador, consulte la sección LIMPIAR EL
VAPORIZADOR Y EL TANQUE DE AGUA.
Cómo funciona el
Vaporizador Care Free® Ultra
LeA y guarde estas instrucciones
Instrucciones importantes de
seguridad: lea todas las instrucciones antes de usar este
vaporizador.
Gracias por comprar el Vaporizador Care Free® Ultra de Hunter
Fan Company. Lea y guarde estas instrucciones para obtener
el máximo beneficio y eficiencia de su vaporizador.
1. Es posible que este vaporizador no funcione
correctamente en una superficie irregular. Coloque
SIEMPRE el vaporizador en una superficie firme,
horizontal y resistente al agua. Coloque SIEMPRE el
vaporizador mínimo a seis (6) pulgadas de paredes
y fuentes de calor tales como estufas, radiadores o
calentadores.
2. Coloque SIEMPRE el vaporizador en un área fuera del
alcance de los niños.
3. Antes de usar el vaporizador, extienda el cable y revise
si tiene algún daño. NO use el producto si el cable está
dañado.
4. Este producto cuenta con un enchufe polarizado como
medida de seguridad (una clavija es más ancha que la
otra). Este enchufe entrará de un solo modo en la toma
de corriente polarizada. Si el enchufe no entra en la toma,
invierta el enchufe. Si todavía no entra, contacte a un
electricista calificado. NO intente ignorar o anular esta
característica.
5. Desenchufe y deje vacio SIEMPRE el vaporizador cuando
no está en funcionamiento o mientras lo está limpiando.
6. NO incline ni mueva el vaporizador mientras está en
funcionamiento. Nunca mueva el vaporizador si tiene agua
en el tanque. Vacíe el tanque de agua, apague la unidad y
desenchúfela antes de moverla.
7. Además del mantenimiento de rutina necesario, este
vaporizador necesita de una limpieza habitual. Consulte y
siga las instrucciones para LIMPIAR EL VAPORIZADOR Y
EL TANQUE DE AGUA.
8. El diseño de esta unidad requiere del uso de agua destilada
o agua del grifo. NO añada aceites aromáticos, perfumes o
fragancias al agua.
Page 12

©2008 Hunter Fan Co. 41785 Rev 05-06-2008
12
Armar las piezas del vaporizador
Figura 2
Depósito
inferior
Tapa del
tanque
Depósito
superior
Tanque de
agua
Unidad de
alimentación
Cinta
Figura 1
ATENCIÓN: Antes de operar la unidad, retire la tira de cinta
ubicada en la parte inferior de la unidad de alimentación. Estas
tiras se utilizan para asegurar los componentes de la bomba
durante el envío y deben retirarse antes de la operación. Vea la
figura 1.
1. Saque el Vaporizador Care Free® Ultra de su empaque.
2. Seleccione un lugar para colocar su vaporizador. El lugar debe
ser plano, firme, resistente al agua y que esté mínimo a seis
(6) pulgadas de paredes y fuentes de calor.
HUNTER NO ES RESPONSABLE POR LOS DAÑOS
CAUSADOS POR DERRAMES DE AGUA.
3. Saque el depósito inferior (marcado con el número 2) del
tanque de agua y el depósito superior (marcado con el
número 1). Vea la figura 3.
4. Coloque el depósito inferior en la superficie plana y firme
que seleccionó.
NOTA: Una vez que haya llenado la unidad con agua y esté en
funcionamiento, no debe usar las manijas del depósito superior
o del tanque de agua para levantar y trasladar el vaporizador
sin haber vaciado antes toda el agua del vaporizador. Antes de
mover el vaporizador, revise la ventana en el depósito inferior
para verificar si hay agua. Si hay agua en el depósito inferior,
saque el tanque de agua y el depósito superior y drene toda el
agua.
Figura 3
Pestaña
Depósito
inferior
Tanque de
agua
Depósito
superior
Depósito
inferior
Tanque
de agua
Depósito
superior
5. Levante el depósito superior (marcado con el número 1)
y el tanque de agua y colóquelos encima del depósito
inferior (marcado con el número 2) de tal forma que las dos
pestañas del depósito inferior queden acopladas al depósito
superior. Vea la figura 3.
6. Lleve el tanque de agua a un lavamanos o a una tina para
llenarlo con agua.
7. Desenrosque la tapa del tanque girándola hacia la izquierda
y llene el tanque de agua con agua fresca. NUNCA USE
AGUA CALIENTE. Vea la figura 4.
Tanque de
agua
Tapa del
tanque
Figura 4
8. Coloque de nuevo la tapa del tanque girándola hacia la
derecha. Ajuste firmemente la tapa del tanque y asegúrese
de que está sellada correctamente. Vea la figura 5.
Page 13

©2008 Hunter Fan Co. 41785 Rev 05-06-2008
13
Tanque de
agua
Tapa del
tanque
9. Traslade el tanque de agua sosteniéndolo de las dos
manijas que están en la parte superior del tanque, coloque
el tanque de agua de tal manera que la ranura en la parte
de atrás quede justo sobre el cable eléctrico y que la
tapa del tanque en la parte del frente entre en el área del
interruptor automático de la unidad de alimentación. Vea la
figura 6.
Figura 5
Unidad de
alimentación
Tapa del
tanque
Area del
interruptor
automático de
la unidad de
alimentación
Figura 6
NOTA: No use los ductos de escape para levantar el tanque de
agua. Vea la figura 7.
Ductos de
escape
No use los
ductos de
escape para
levantar el
tanque de agua.
Manijas
superiores
Figura 7
10. Si el tanque de agua está colocado correctamente, verá
burbujas de aire en el tanque. Si no ve burbujas de aire,
reposicione el tanque como se indicó anteriormente.
Asegúrese de que la perilla de energía esté en la posición
APAGADO y enchufe el vaporizador en la toma de
corriente de la pared.
PRECAUCION: Nunca enchufe el vaporizador si tiene
las manos mojadas porque puede recibir una descarga
eléctrica.
11. Inserte el cable eléctrico en los dos broches en la parte de
atrás del vaporizador.
12. Gire la perilla de energía a la posición deseada.
NOTA: Si el tanque de agua no está colocado correctamente
en la unidad de alimentación, la unidad no funcionará.
Operar su vaporizador
Figura 8
Perilla del
medidor de
humedad
ajustable
1. Medidor de humedad ajustable – Permite ajustar el nivel
de humedad. Vea la figura 8.
• Gire el selector hacia la derecha para aumentar el
nivel de humedad.
• Gire el selector hacia la izquierda para disminuir el
nivel de humedad.
2. Perilla de energía – permite ajustar el nivel de velocidad
deseado. Vea la figura 9.
Perilla
de energía
Figura 9
Page 14

©2008 Hunter Fan Co. 41785 Rev 05-06-2008
14
ALTO
MEDIO
BAJO
APAGADO
Figure 10
Control de luz
nocturna NiteGlo™
(solo en
modelo 34203)
Figure 11
3. Control de luz nocturna NiteGlo™ (solo en modelo 34203):
Enciende (ON) y apaga (OFF) la luz nocturna. La luz
nocturna se puede encender aún si el ventilador del
humidificador está apagado. Vea la figura 11.
Gire el selector para ajustar el nivel de velocidad en Alto,
Medio. Bajo y Apagado. Vea la figura 10.
Llenar el tanque de agua
1. Cuando el nivel del agua es bajo, gire la perilla de energía a
la posición APAGADO y desenchufe el vaporizador.
2. Levante el tanque de agua y llévelo al lavamanos o a una
tina para llenarlo de nuevo.
NOTA: No use los ductos de escape para levantar el tanque de
agua.
3. Voltee el tanque de agua y desenrosque la tapa del tanque
girándola hacia la izquierda. Vea la figura 12.
Tanque de
agua
Tapa del
tanque
Tanque de
agua
Tapa del
tanque
4. Vacíe el tanque de agua y llénelo de nuevo con agua fresca.
NUNCA USE AGUA CALIENTE.
5. Coloque de nuevo la tapa del tanque girándola hacia la
derecha. Vea la figura 13.
Figure 12
Figure 13
6. Traslade el tanque de agua sosteniéndolo de las dos
manijas que están en la parte superior del tanque, coloque
el tanque de agua de tal manera que la ranura en la parte de
atrás quede justo sobre el cable eléctrico y que la tapa del
tanque en la parte del frente entre en el área del interruptor
automático de la unidad de alimentación. Si el tanque de
agua está colocado correctamente, verá burbujas de aire en
el tanque. Si no ve burbujas de aire, reposicione el tanque
como se indicó anteriormente.
PRECAUCION: Nunca enchufe el vaporizador si tiene
las manos mojadas porque puede recibir una descarga
eléctrica.
7. Asegúrese de que la perilla de energía esté en la posición
APAGADO y enchufe el vaporizador en la toma de corriente
de la pared.
8. Gire la perilla de energía a la posición deseada.
Page 15

©2008 Hunter Fan Co. 41785 Rev 05-06-2008
15
Limpiar el vaporizador y el tanque de
agua
Tapa de la
bomba
Unidad de
alimentación
Bomba de
embudo
Parte inferior
de la paleta del
ventilador
Pestañas
Figura 14b
Figura 14a
Bomba de
embudo
Tapa de
la bomba
En muchas regiones el agua contiene una alta concentración
de minerales. Cuando el agua se evapora en el Vaporizador
Care Free® Ultra, pueden quedar residuos minerales. Estos
minerales pueden formar una capa blanca y dura que se puede
quitar siguiendo las instrucciones de limpieza. La frecuencia
de la limpieza debido a la acumulación de minerales varía
dependiendo de la calidad de agua que use.
1. Gire la perilla de energía a la posición APAGADO y
desenchufe el vaporizador.
2. Saque el tanque de agua y llévelo al lavamanos o a una tina.
Desenrosque la tapa del tanque girándola hacia la izquierda
y vacíe completamente el tanque de agua.
3. Levante la unidad de alimentación y localice las tres
pestañas en la parte inferior del conjunto de la bomba de
embudo. Haga presión en las tres pestañas y saque la
bomba de embudo tirando de ella hacia afuera de la parte
inferior de la paleta del ventilador.
4. Quite la tapa de la bomba del embudo sosteniendo la tapa
de la bomba firmemente con una mano mientras gira la
bomba de embudo hacia la derecha. Esto destrabará los dos
componentes. Vea las figuras 14a y 14b.
Atomizador
Depósito superior
Figura 15
5. Saque el atomizador y el depósito superior. Vea la figura 15.
6. Sumerja el depósito superior, la bomba de embudo, la capa
de la bomba y el atomizador en una solución de un (1)
galón de agua y ocho (8) onzas de vinagre por 30 minutos.
NOTA: Si el atomizador está cubierto con una capa blanca
y dura, puede usar la máquina lavadora para aflojar la capa
blanca antes de sumergirlo en la solución.
El atomizador es el único componente que se puede lavar
en la máquina lavadora y sólo se puede colocar en la
rejilla superior.
7. Para limpiar el tanque de agua, llene el tanque con un
(1) galón de agua y ocho (8) onzas de vinagre. Coloque
de nuevo la tapa del tanque firmemente y agite el tanque
de agua vigorosamente hasta que todas las superficies
interiores se impregnen de la solución.
8. Enjuague el tanque de agua varias veces con agua fresca y
limpia.
9. Después de sumergirlos, enjuague los componentes con
agua limpia varias veces. Use un paño suave o una esponja
para quitar cualquier acumulación restante. Deje que los
componentes se sequen completamente si va a guardar el
vaporizador.
10. Para limpiar la superficie de la unidad de alimentación, use
un paño suave y seco.
Armar las piezas del vaporizador
1. Coloque el depósito inferior en la superficie plana y firme
que seleccionó.
2. Una el depósito superior con el depósito inferior alineando
las dos pestañas laterales. Vea la figura 16.
Page 16

©2008 Hunter Fan Co. 41785 Rev 05-06-2008
16
Depósito
inferior
Tanque de agua
Tapa del
tanque
Depósito
superior
Pestaña
Atomizador
Unidad de
alimentación
Figura 16
3. Coloque el atomizador en el depósito superior, alinee los
tres orificios ovalados del atomizador con los tres dientes del
depósito superior. El lado del atomizador que tiene los tres
guías cortas debe estar mirando hacia arriba. Vea la figura
17.
Atomizador
Guías
Figura 17
4. Ensamble la tapa de la bomba y la bomba de embudo
alineando las flechas en ambos componentes e insertando
la bomba en la tapa. Tuerza la bomba de embudo a la
izquierda hasta que los dos componentes se encajan a
presión juntos. Vea las figuras 18a y 18b.
Tapa de
la bomba
Bomba
de embudo
Figura 18a
Bomba
de embudo
Flechas
Tapa de
la bomba
Figura 18b
5. Una la bomba de embudo a la unidad de alimentación
acoplando las tres pestañas a la parte inferior de las paletas
del ventilador. Vea la figura 19.
Unidad de
alimentación
Bomba
de embudo
Pestañas
Parte inferior de la
paleta del ventilador
Figura 19
6. Coloque la unidad de alimentación en el depósito superior de
tal manera que los tres dientes de la unidad de alimentación
pasen a través de los tres orificios del atomizador y de los
tres dientes de la base del depósito superior. Asegúrese de
que la unidad de alimentación esté colocada correctamente
y que los tres dientes estén en la posición correcta. Vea la
figura 20.
Page 17

©2008 Hunter Fan Co. 41785 Rev 05-06-2008
17
Si desea trasladar su vaporizador a otro lugar, siga las
instrucciones indicadas a continuación. NO intente trasladar el
vaporizador cuando tiene agua en el depósito superior, en el
depósito inferior o en el tanque de agua.
1. Gire la perilla de energía a la posición APAGADO y
desenchufe el vaporizador.
2. Saque el tanque de agua del depósito superior y drene
completamente el agua.
3. Saque el depósito superior del depósito inferior y drene
completamente el agua.
4. Si hay agua en el depósito inferior, drene completamente el
agua.
5. Coloque el depósito inferior en la superficie plana y firme
que seleccionó.
6. Continúe el armado como se indicó en la sección ARMAR
LAS PIEZAS DEL VAPORIZADOR.
Trasladar el vaporizador
Depósito
superior
Unidad de alimentación
Atomizador
Orificios del
atomizador
NOTA: Los dientes sólo entrarán de un solo modo en el
depósito superior.
7. Consulte las instrucciones en la sección LLENAR EL
TANQUE DE AGUA para completar el armado del
vaporizador.
Localización y solución de problemas
Problema:
Ruido excesivo.
Solución:
1. Revise el tanque de agua para asegurarse de que está
colocado correctamente en la unidad de alimentación.
2. Revise el tanque de agua para asegurarse de que no
hay burbujas cuando el tanque de agua está lleno y en
funcionamiento. Si hay burbujas, apague la unidad hasta
que no se produzcan más burbujas. Cuando ya no se
produzcan más burbujas, ajuste la unidad en el nivel de
velocidad deseado.
3. Quite y limpie la tapa de la bomba y la bomba de embudo.
Consulte la sección LIMPIAR EL VAPORIZADOR Y EL
TANQUE DE AGUA.
Problema:
El vaporizador no funciona.
Solución:
1. Asegúrese de que la perilla de energía no está en la
posición APAGADO.
2. Ajuste el nivel de humedad con la perilla de energía
y el medidor de humedad ajustable. Una vez que la
habitación haya alcanzado el nivel de humedad deseado, el
vaporizador se apagará; esto es normal.
3. Asegúrese de que la unidad de alimentación y el tanque de
agua están completamente asentados en las tres pestañas
del depósito superior.
4. Asegúrese de que el atomizador está mirando en la
dirección correcta.
Problema:
El vaporizador no enciende.
Solución:
1. Revise que las tres guías de la superficie del atomizador estén
alineadas correctamente. El lado del atomizador que tiene las
tres guías debe estar hacia arriba.
2. Asegúrese de que el tanque de agua está asentado
correctamente en la unidad de alimentación.
Problema:
Acumulación de minerales en el tanque de agua y en el
depósito superior.
Solución:
1. Consulte la sección LIMPIAR EL VAPORIZADOR Y EL
TANQUE DE AGUA.
Problema:
Disminución de la producción de vapor y del uso de agua.
Solución:
1. Asegúrese de que el atomizador está colocado
correctamente, con el lado que tiene las tres guías hacia
arriba.
2. Revise el medidor de humedad ajustable y la perilla de energía
para asegurarse de que están en el nivel de humedad deseado.
Page 18

©2008 Hunter Fan Co. 41785 Rev 05-06-2008
18
Para obtener una pieza de servicio para su vaporizador, llame
al Servicio al cliente de Hunter al 1-888-830-1326 o envíenos
un correo electrónico a Techsupport@hunterfan.com. Esté
preparado para proporcionarle al operador el número de
modelo de su vaporizador, el nombre de la pieza que necesita
reemplazar y el número de la pieza.
3. Revise el tanque de agua para asegurarse de
que no se producen burbujas cuando el tanque de agua está
lleno y en funcionamiento. Si se producen burbujas, apague
la unidad hasta que no se produzcan más burbujas. Cuando
ya no se produzcan más burbujas, ajuste la unidad en el
nivel de velocidad deseado.
4. Limpie los componentes que tengan acumulación
de minerales. Consulte la sección LIMPIAR EL
VAPORIZADOR Y EL TANQUE DE AGUA.
Problema:
Drenaje excesivo de agua al depósito inferior.
Solución:
1. Asegúrese de que la tapa del tanque de agua está ajustada
firmemente y que sella correctamente.
Si tiene alguna pregunta o problema, llame al
1-888-830-1326 para obtener ayuda antes de devolver la
unidad al distribuidor.
Piezas de servicio
No. de
modelo
34200 34203
Atomizador
96146-01-325 96146-01-325
Bomba de embudo
96150-01-325 96150-01-507
Tapa de la bomba
96149-01-325 96149-01-507
Perilla del medidor de
humedad ajustable
86596-01-325 86596-01-520
Perilla de energía
86592-01-325 86592-01-520
Tapa del tanque
96334-01-325 96147-01-325
Tanque
de agua
96333-01-510 96334-02-510
Para obtener más información acerca de los productos de
Hunter Fan Company, visite nuestro sitio Web:
www.hunterfan.com
Otros productos de Hunter para
su comodidad en la casa
Hunter Original
®
Puricador de aire
QuietFlo™ True
HEPA
Termostato
programable
Page 19

©2008 Hunter Fan Co. 41785 Rev 05-06-2008
19
HUNTER FAN COMPANY
2500 FRISCO AVENUE
MEMPHIS, TN 38114, USA
Impreso en China
 Loading...