

Page 1
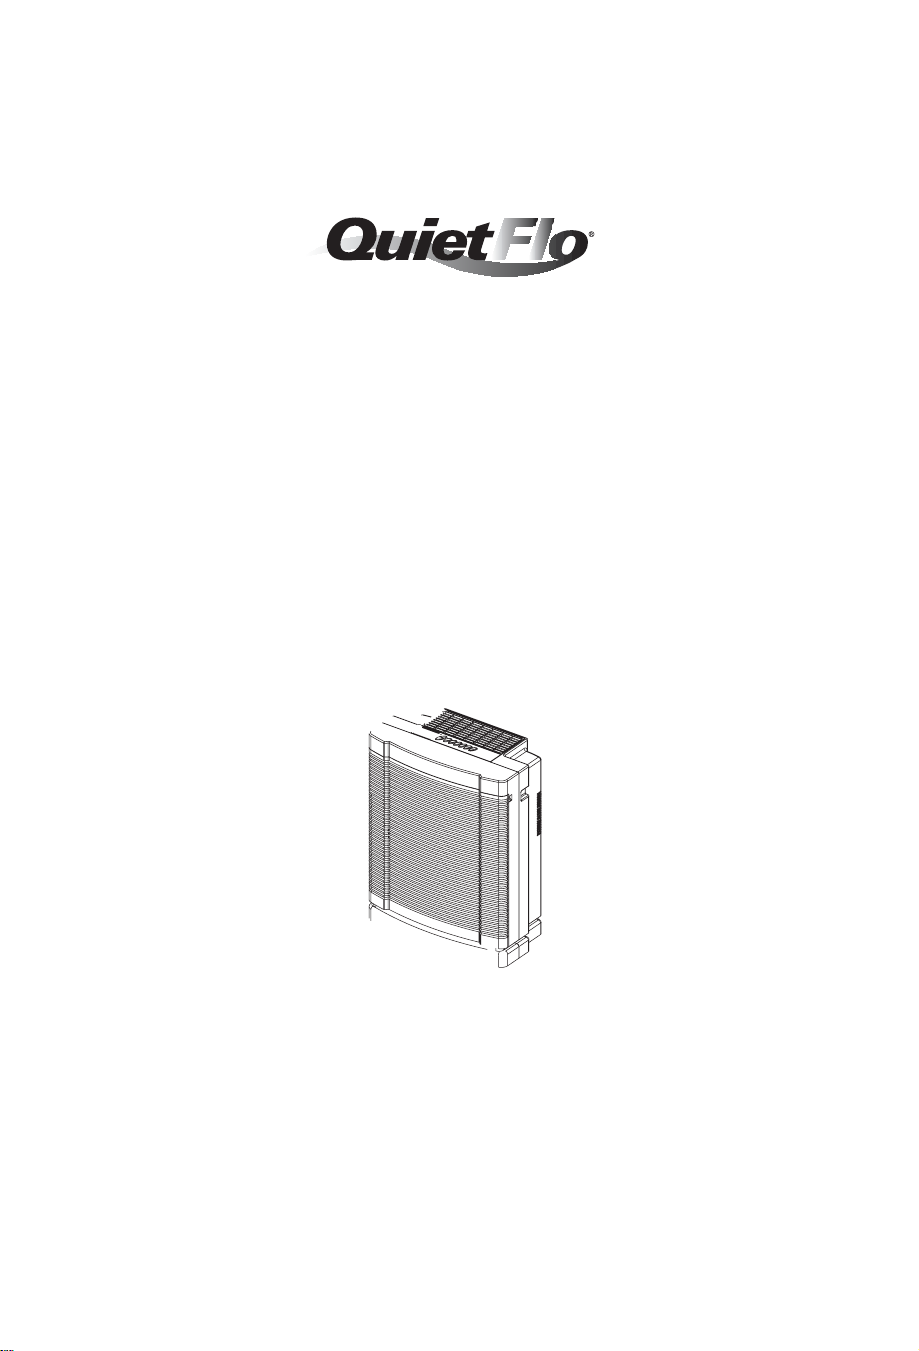
Programmable
HEP A A ir Purifier
Model 30400 & 30401
www.hunterfan.com
Page 2
Table of Contents
Safety Instructions..................................................................................................3
Introduction ............................................................................................................3
Description of Air Filtration System
How the Air Purifier Works............................................................................4
Air Purifier Components ................................................................................4
Display and Control Keys ..............................................................................5
Operation
Initial Operation .............................................................................................6
Display Modes................................................................................................8
Manual and Auto Operating Modes...............................................................9
Override of Auto Mode ................................................................................ 10
Filter Run-time Counters..............................................................................11
Electrical Cord Storage ................................................................................ 11
Programming
Setting Day and Time...................................................................................12
Pre-set Programming....................................................................................13
User Programming .......................................................................................14
Reviewing Programs .................................................................................... 16
Locking/Unlocking the Keypad ...................................................................16
Resetting the Air Purifier .............................................................................17
Air Purifier Maintenance
Cleaning your Air Purifier............................................................................18
Changing the Pre-Filter ................................................................................18
Changing the Filter.......................................................................................19
Obtaining Replacement Filters.....................................................................20
Troubleshooting
Problems and Solutions ................................................................................ 21
Technical Support .........................................................................................21
Warranty Information .........................................................................................22
41451-01 2
41451-01_Rev 8-6-04.pmd 8/5/04, 5:05 PM2
Page 3

SAFETY INSTRUCTIONS
IMPORTANT!
READ ALL INSTRUCTIONS BEFORE USING THIS AIR PURIFIER.
1. This air purifier is designed for use on a flat level floor and may not work properly on
an uneven floor. ALWAYS place the air purifier on a firm level floor. ALWAYS place
the air purifier at least six (6) inches away from walls and heat sources such as stoves,
radiators, or heaters.
2. Place the air purifier in an area that is out of the reach of children.
3. Before using the air purifier, e xtend the cord and inspect for any signs of damage. DO NO T
use the product if the cord has been damaged.
4. This product has a polarized plug (one blade is wider than the other) as a safety feature.
This plug will fit into a polarized outlet only one way. If the plug does not fit fully into the
outlet, reverse the plug. If the plug still does not fit, contact a qualified electrician. DO
NOT attempt to defeat or override this safety feature.
5. ALWAYS UNPLUG the air purifier when it is not in operation, while the filter is being
changed, and while it is being cleaned.
6. DO NOT move or tilt the air purifier while it is in operation. Turn off and unplug
before moving.
7. DO NOT immerse the air purifier in water at any time because permanent damage will
occur. To properly clean your air purifier, follow the instructions in the Maintenance section
of this manual (pg. 18).
READ AND SAVE ALL INSTRUCTIONS.
Introduction
Thank you for purchasing the programmable
Company . You have purchased our latest development in portable air pur ification which has been
designed to improve the quality of the air that you breathe. The follo wing innov ativ e features are
included in your Hunter Air Purifier.
• High Particulate Efficiency: The HEPA filter will remove 99.97% of 0.3 micron particles
from the air that passes through the filter.
• Odor Removal: The acti v ated carbon pre-f ilter helps remov e odors such as cooking, smoke,
and pet smells from the air. It also traps lint, hair, and other large particles to help extend the
life and performance of the HEPA filter.
•Programmable: To help match your lifestyle, this air purifier can be programmed to automati-
cally adjust the blower speed 4 different times each day. You can choose to have the same programs for every d ay of the week or you can ha ve different programs for the weekdays and the weekend.
• Quiet: The air purifier has been designed to operate quietly and efficiently. You can choose
among three speeds to best meet your needs at different times.
•Filter Counters: Filter maintenance is critical to the performance of the air purifier . To help
you determine when to change the filters, the pre-filter and HEPA filter have built in run time
counters that keep track of how long each filter is in use.
41451-01_Rev 8-6-04.pmd 8/5/04, 5:05 PM3
QuietFlo
3 41451-01
®
HEPA Air Purifier from Hunter Fan
Page 4
Description of Air Filtration System
How the
QuietFlo
®
HEPA Air Purifier System Works
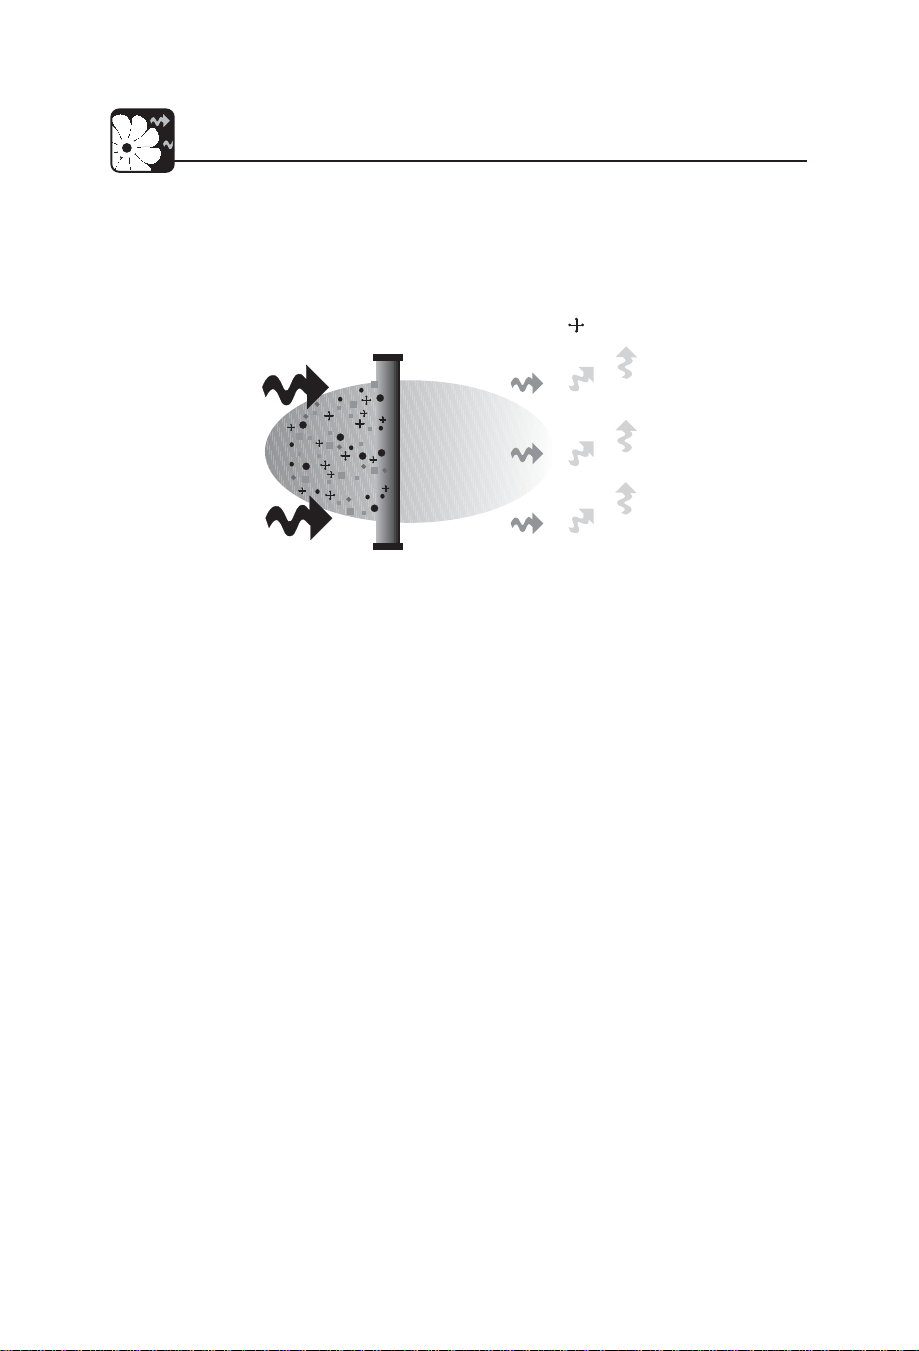
As the air is pulled into the purifier, the acti vated carbon pre-f ilter absorbs odors and catches
large particles. Then, the air travels through the HEPA filter where the smaller particles are
collected. Finally, the clean purified air is released back into the room.
Fig. 1 - Illustration of the Air Filtration System
Air Purifier Components
The exploded view of the air purifier represents the various components for all air purifier
models.
PREFILTER
FRONT
GRILL
HEPA
FILTER
CONTROL
AREA
RECESS FOR
FINGERS TO
PULL OPEN
FRONT GRILL
HOOK
TAPE
GRILL
VENTS
Fig. 2 - Air Purifier Components
41451-01 4
TABS
HOOK
TAPE
Fig. 3 - Inside Surface
of Front Grill
Page 5

Description of Air Filtration System
5 41451-01
Page 6
Operation
Initial Operation
This section provides basic instructions on the use of your air purifier . After following these
initial directions, please continue reading this booklet to learn how to operate the more
advanced features of your air purifier.
Basic Operation of the Air Purifier:
1. Take the air purifier out of the box and remove the clear plastic protective bag.
Place the unit on a firm level floor.
2. Before turning on the air purifier, you need to confirm that the filters are firmly
in place and have not become loose during shipping. To check the filters, first
open the front grill. For Models 30400 and 30401, release the front grill by placing your fingers behind the tabs and pulling forward. For all other models, gently
press the push tabs until the front grill slides pass them and is released. Refer to
Fig. 2 (pg. 4).
3. Next, check the HEPA f ilter by pressing firmly on all four corners of the filter to
ensure that it is fully inserted into the filter opening.
4. The carbon pre-filter is mounted inside the front grill with hook tape. Confirm
that it properly covers the grill vents. Y ou may notice a f ew black particles coming off the pre-filter. Those particles are part of the odor-removing activated carbon and will be collected on the filter during use.
5. Place the front grill back onto the unit. First, line up the tabs on the bottom of
the grill with the openings on the purifier base and then push the top of the
grill forward until it is closed. NOTE: This unit will not operate unless the
grill is in the correct position. The display will read “door” if the grill is not
attached properly.
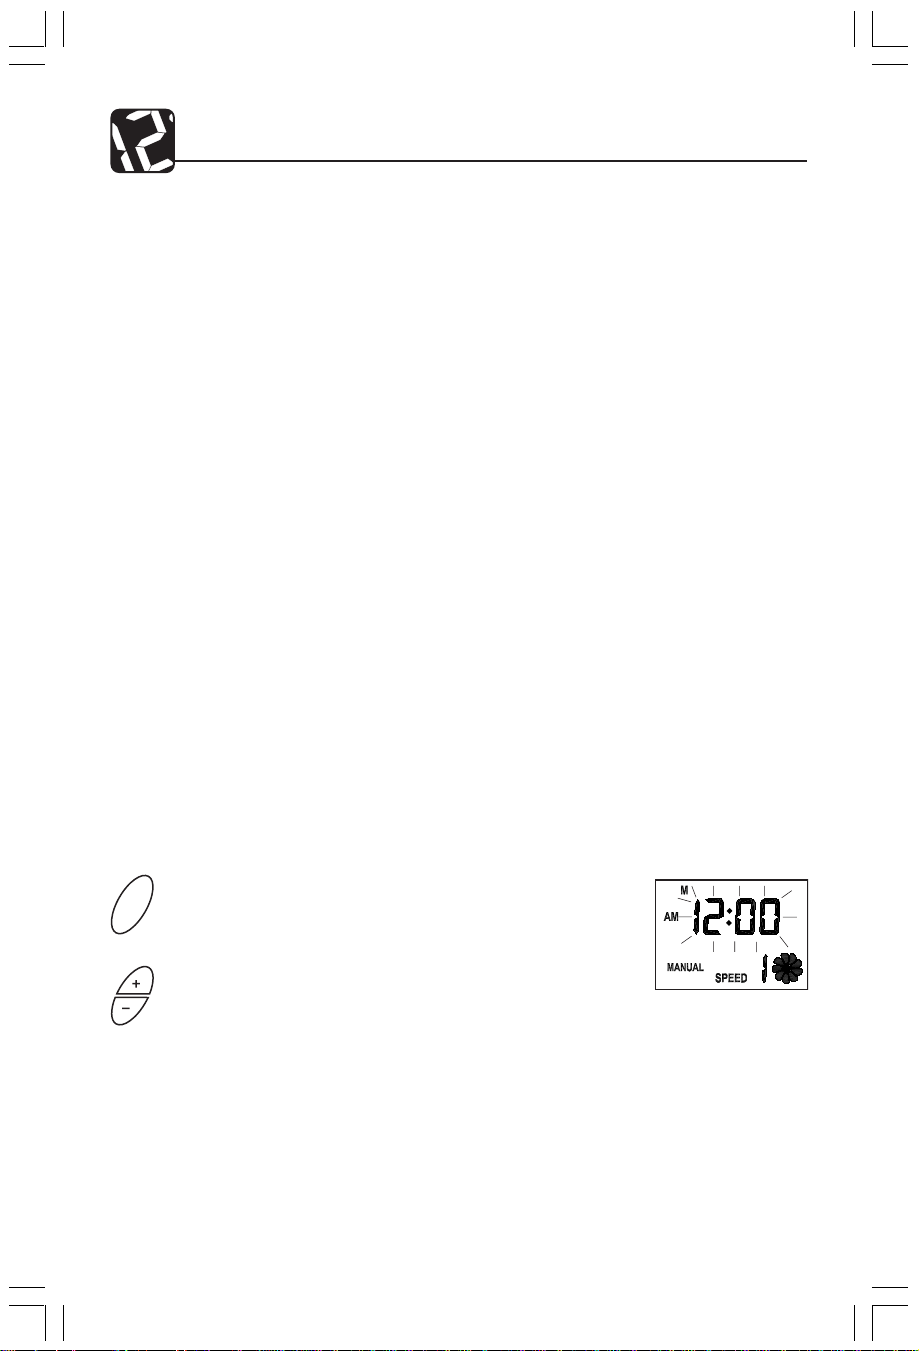
6. Plug the unit into a 120V electrical outlet and press
ON /OFF
the ON/OFF key . The air purif ier will start with a lo w
blower speed.
7. Use the UP/DOWN keys to adjust the blower speed to
the desired level.
Fig. 6
If this is the first time you have used the air purifier or if the air purifier has been without
power for over 12 hours, you will need to set the day and time. The day and time will flash
to indicate that it should be set.
41451-01 6
41451-01_Rev 8-6-04.pmd 8/16/04, 3:16 PM6
Page 7
Operation
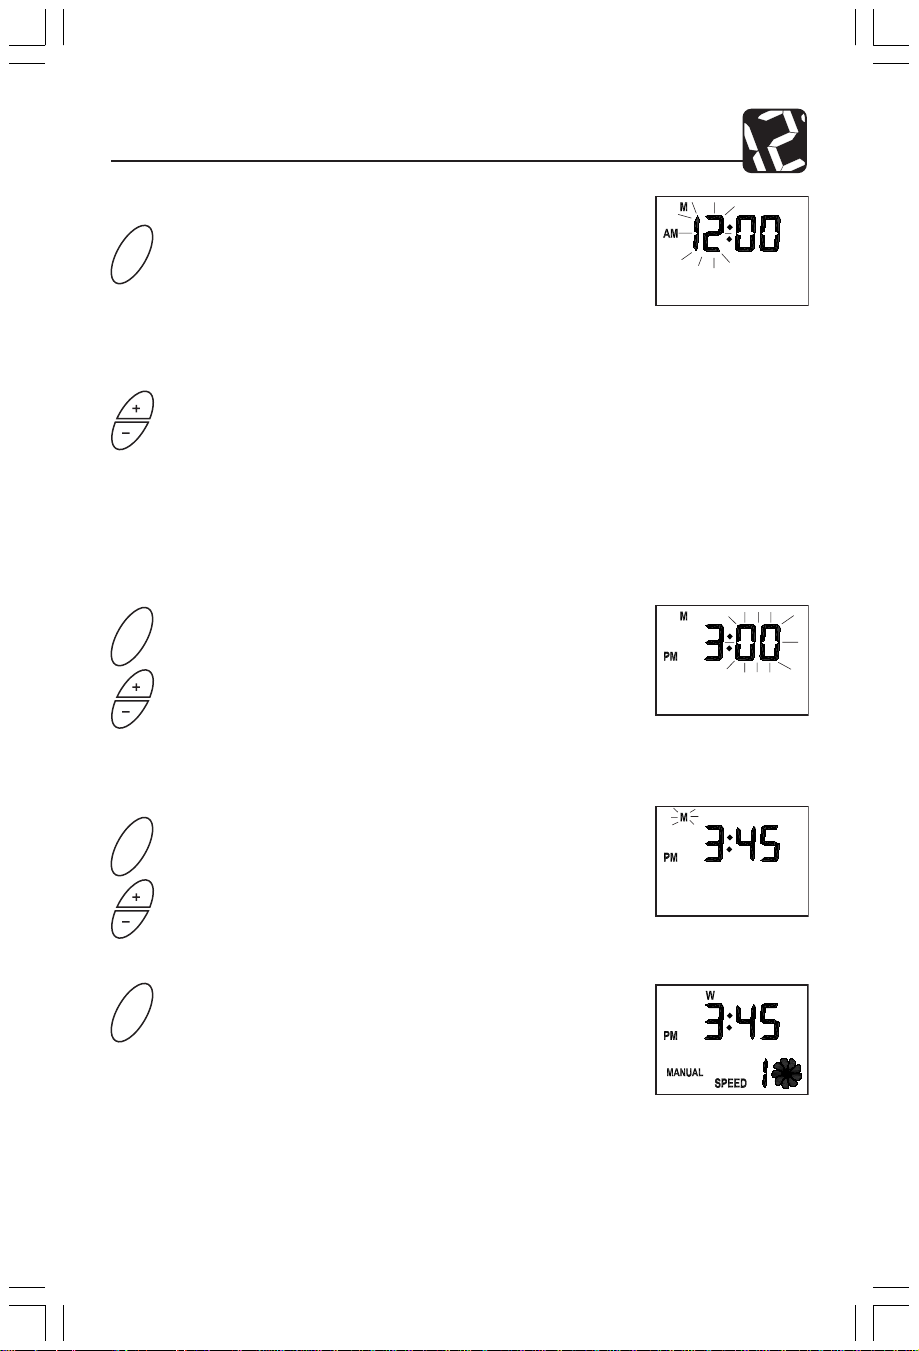
Adjusting Day and Time: (For example, Wednesday at 3:45 pm)
1. To set the day or time, press the DAY/TIME key. All
TIME
DAY/
/T
Y
A
D
display features except the day and time will go blank
and the hour will flash.
2. Use the UP/DOWN keys to adjust the hour. Tapping
the key will advance the hour by increments of one.
Holding down the key will change the hour rapidly.
Note the AM/PM indicator as you cycle through a 24
hour period.
3. Press the DA Y/TIME key again. Now, the minutes will
E
IM
be flashing. Use the UP/DOWN keys to adjust the
minute. Tapping the key will change the minute by
increments of one and holding the key will change
the minute rapidly.
Fig. 7
Fig. 8
E
4. Press the DAY/TIME key to accept the minute setting
IM
/T
Y
A
D
DAY/
41451-01_Rev 8-6-04.pmd 8/5/04, 5:05 PM7
and go to the day of the week. Use the UP/DOWN keys
to set the current day.
5. Press the DAY/TIME key a f inal time to accept the day
TIME
setting and return to Normal mode.
Fig. 9
Fig. 10
7 41451-01
Page 8
Operation
Display Modes
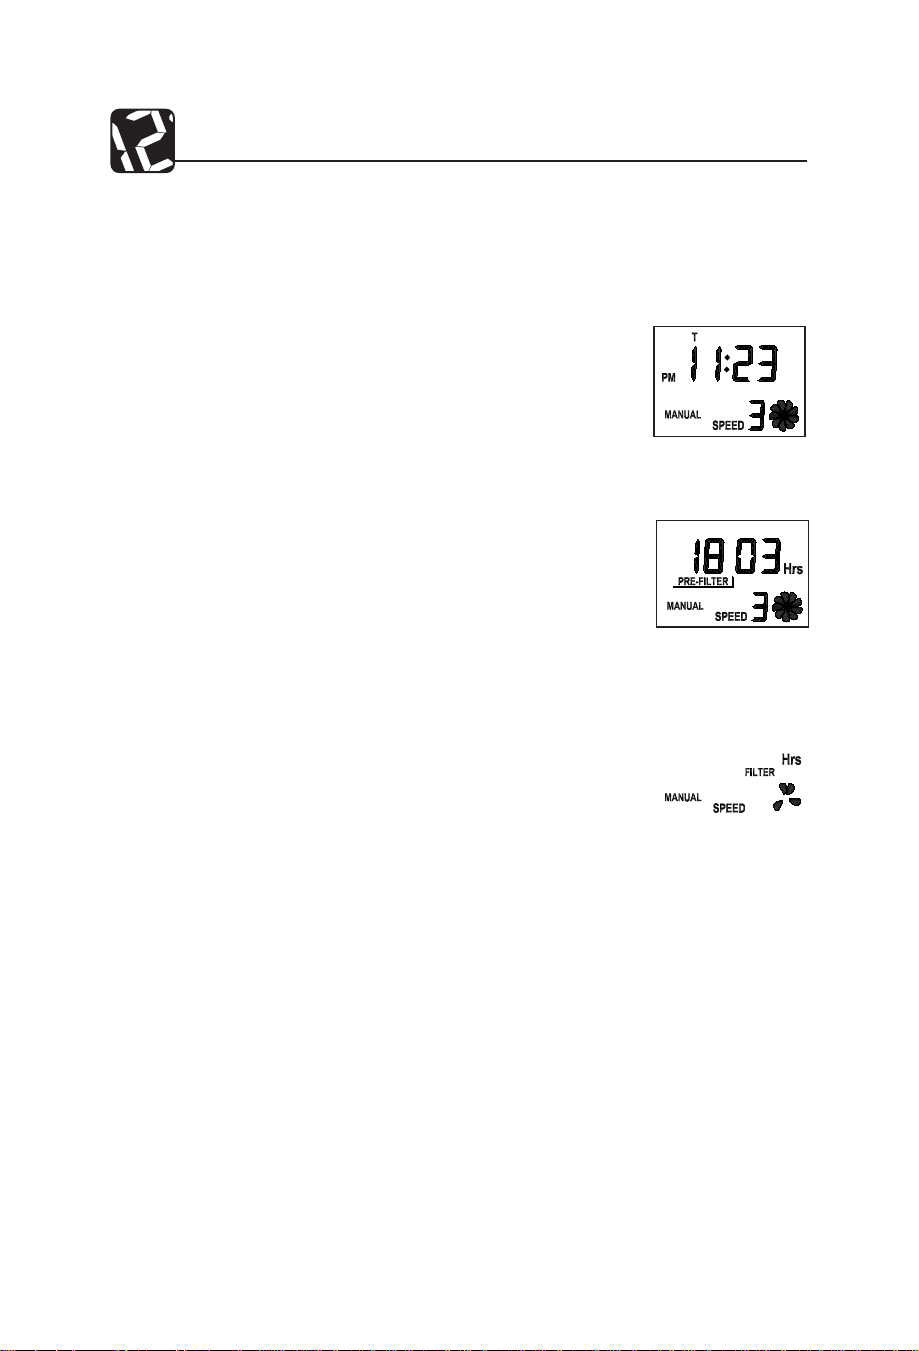
Your air purifier has 3 display modes – Clock Display, Pre-Filter Display, and Filter Display. When the unit is running, the display also provides additional information about the
settings of the air purifier. The features for each mode and how to change modes is described below.
Clock Display: The default mode of the unit is the Clock Display.
In this mode, the day indicator, time, and AM/PM indicator will be
lit. If military time has been chosen (See Setting Day and Time, pg.
12), the AM/PM indicator will not be visible.
Pre-Filter Display: This display shows the number of hours that
the pre-filter has been in use. In addition to the run hours, you will
see the Pre-Filter indicator. If the run hours ha ve reached 2000 hours
(approximately 3 months of use), the Pre-Filter indicator will flash
to show that the pre-filter should be changed. Refer to Filter RunTime Counters for additional information (pg. 11).
Filter Display: The Filter Display mode tells you ho w man y hours
the filter has been in use. In addition to the run hours, you will see
the Filter indicator. If the run-hours have reached 8000 hours (approximately 1 year of use), the Filter indicator will flash to remind
you to check the filter . Refer to Filter Run-T ime Counters for more
details (pg. 11).
Fig. 11
Clock Display
Fig. 12
Pre-Filter Display
Changing Display Mode:
1. To toggle from Clock Display to Pre-Filter Display to Filter Display, press the
DISPLAY key.
2. The DISPLAY key is active any time that the display is visible.
When the air purifier is turned on, the following features are also sho wn. If the unit is turned
off by the On/Off key, these features are not displayed.
• Speed Indicator to show blower setting (0, 1, 2, or 3).
• Animated Blower Wheel will rotate when blower is on.
• Control Mode is indicated by AUTO or MANUAL.
•The Current Program number is visible when the unit is in Auto Mode.
41451-01 8
Page 9
Operation
Manual and Auto Operating Modes
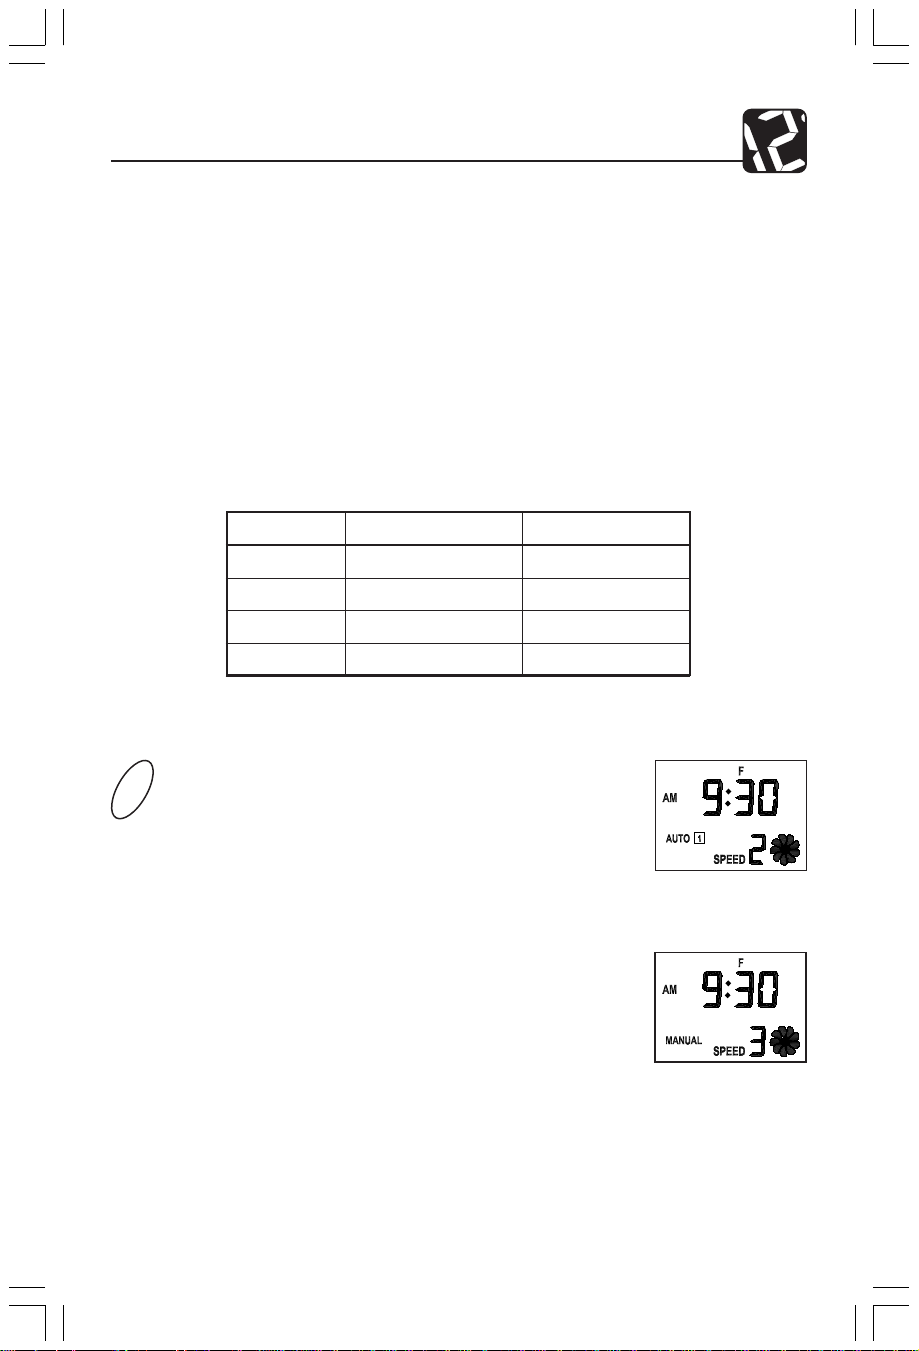
Your Hunter Air Purifier has two distinct operating modes – Manual and Auto. The Manual
Mode allows you to override the control programs that ha ve been set and to hold the settings
until you adjust them. In Manual Mode, the automatic programs are not active. You select
whether the unit is on or off and choose the blower speed. In Auto Mode, your air purif ier is
capable of running 4 separate programs for the weekdays and an additional 4 programs for
the weekend. You can choose to have the same programs for every day or you can have
different programs for the weekdays and the weekend. The air purifier is pre-programmed
for all 7 days of the week as shown below . Refer to User Programming on pg. 14 for instructions on changing the programs.
Table 1: Pre-set Programming Provided for Each Air Purifier
Program Setpoint Time Blower Speed
1 8:00 am 2 (Medium)
2 3:00 pm 3 (High)
3 5:00 pm 2 (Medium)
4 10:00 pm 1 (Low)
To switch between Manual and Auto Modes:
1. To change operating modes, press the AUTO key. The
AUTO
current operating mode will appear on the display (either AUTO or MANUAL).
2. When changed to Auto Mode, the unit will automatically adjust its controls to the appropriate program for
the day and time. When Manual Mode is activ e, the unit
will maintain current settings until you change them.
41451-01_Rev 8-6-04.pmd 8/5/04, 5:05 PM9
Fig. 14
Auto Mode
Fig. 15
Manual Mode
9 41451-01
Page 10
Operation
Override of Auto Mode
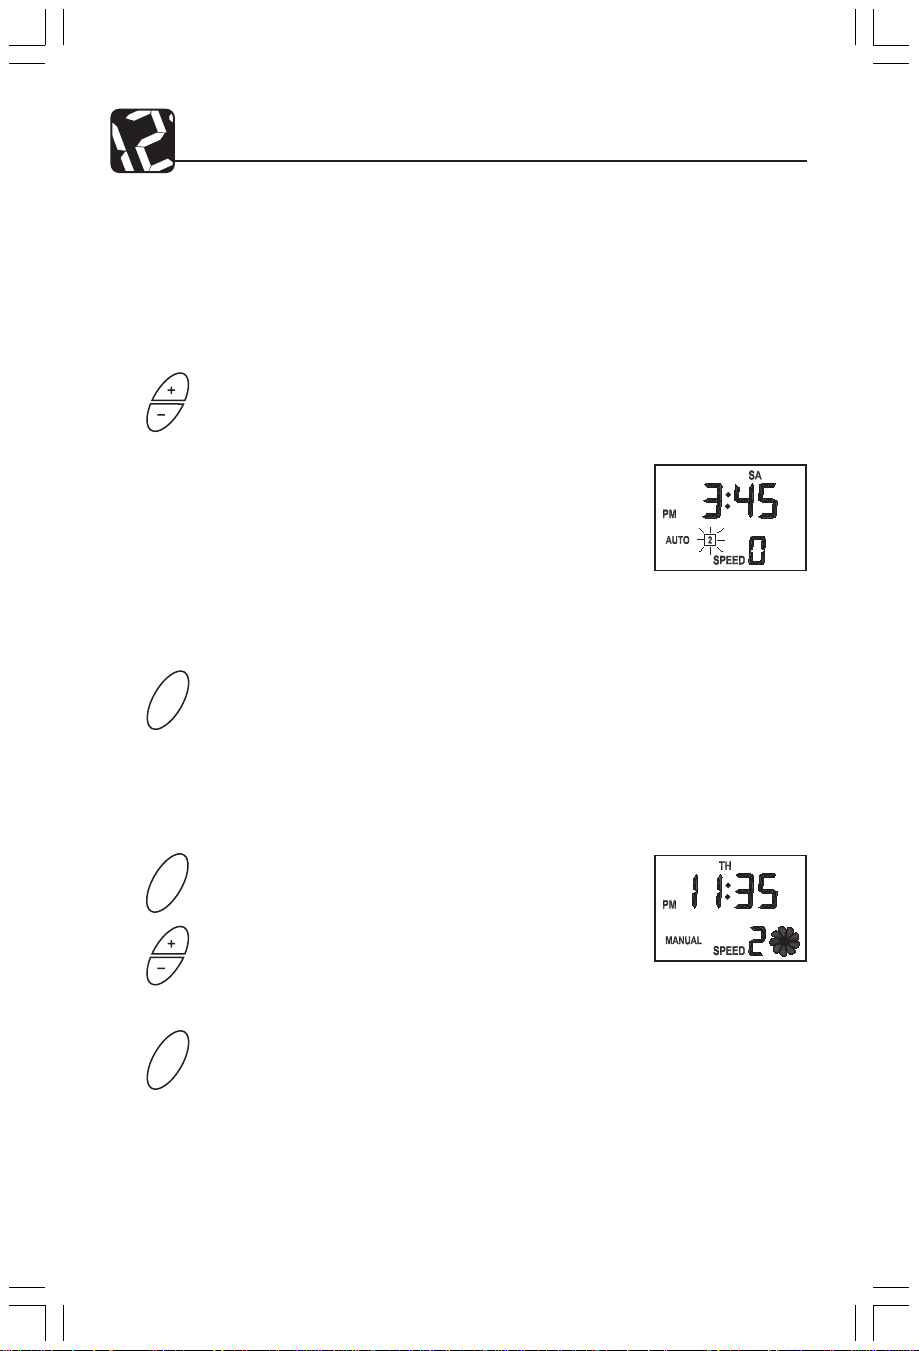
You can use two different methods to override Auto Mode. If you choose temporary override, the air purifier will run at the temporary setting until the next scheduled program change.
Permanent override will remain in effect until you return the unit to auto mode.
Temporary Override
•To temporarily override the settings:
1. While the Auto Mode is active, use the UP/DO WN
keys to adjust the blower speed. T o temporarily turn
the blower off, turn the blo wer speed to 0. This will
allow the program to automatically continue at the
next scheduled program change.
2. The air purifier will automatically adjust to the new
setting. The current program number will flash to
signify the temporary override.
•To end the temporary override:
1. The temporary override will automatically end at
the next scheduled program change.
2. To immediately end the temporary ov erride and re-
O
T
U
A
turn to the program, press the AUT O key twice. The
air purifier will return to Auto Mode and the scheduled program.
Permanent Override
•To begin permanent override:
1. Press the AUTO key to enter manual mode. On the
AUTO
display, you will see the word MANUAL illuminated. This indicates that the programs are no longer
active and the unit is in Manual Mode.
2. Use UP/DOWN keys to adjust the blower speed.
•To end the permanent override:
1. Press the AUTO key. The display will now show
AUTO
the word AUTO.
2. The unit will automatically adjust its controls to the
appropriate program for the day and time.
Fig. 16
Fig. 17
41451-01 10
41451-01_Rev 8-6-04.pmd 8/5/04, 5:05 PM10
Page 11
Operation
Filter Run-Time Counters
The pre-filter and filter are critical to the proper operation of the air purifier. To help you
know when to change the filters, your Hunter Air Purif ier has Filter Run-Time Counters that
will monitor the number of hours your filters have been in use. Although the e xact life of the
filters depends on the environment, the table below gives typical usage times of the filters.
Table 2: Typical Usage Times of the Filters
Filter Type Typical Usage
Activated Carbon Pre-Filter 2000 hours
HEPA Filter 8000 hours
To check the run-hours for each filter:
1. Press the DISPLAY k ey to toggle among the 3 display modes – Clock, Pre-Filter ,
DISPLAY
Although the maximum display value is 9,999 hours, the counters can go indefinitely. To
indicate that the counter is over 9,999 hours, the display will flash. For example, a run time
of 12,000 hours is represented by a flashing 2,000 hours.
The values of the Pre-Filter and Filter Counters are stored in the air purifier’s memory.
The unit may be unplugged and moved without losing the pre-filter and f ilter counter
values.
To properly track filter usage, the Pre-Filter and Filter Counters should be reset each time
the filters are changed. Refer to Changing the Pre-Filter (pg. 18) or Changing the Filter (pg.
19) for instructions on how to reset the counters.
and Filter. The Filter or Pre-Filter indicator will illuminate when the run hours
for that filter are displayed.
2. The display shows the number of run hours since the counter was reset.
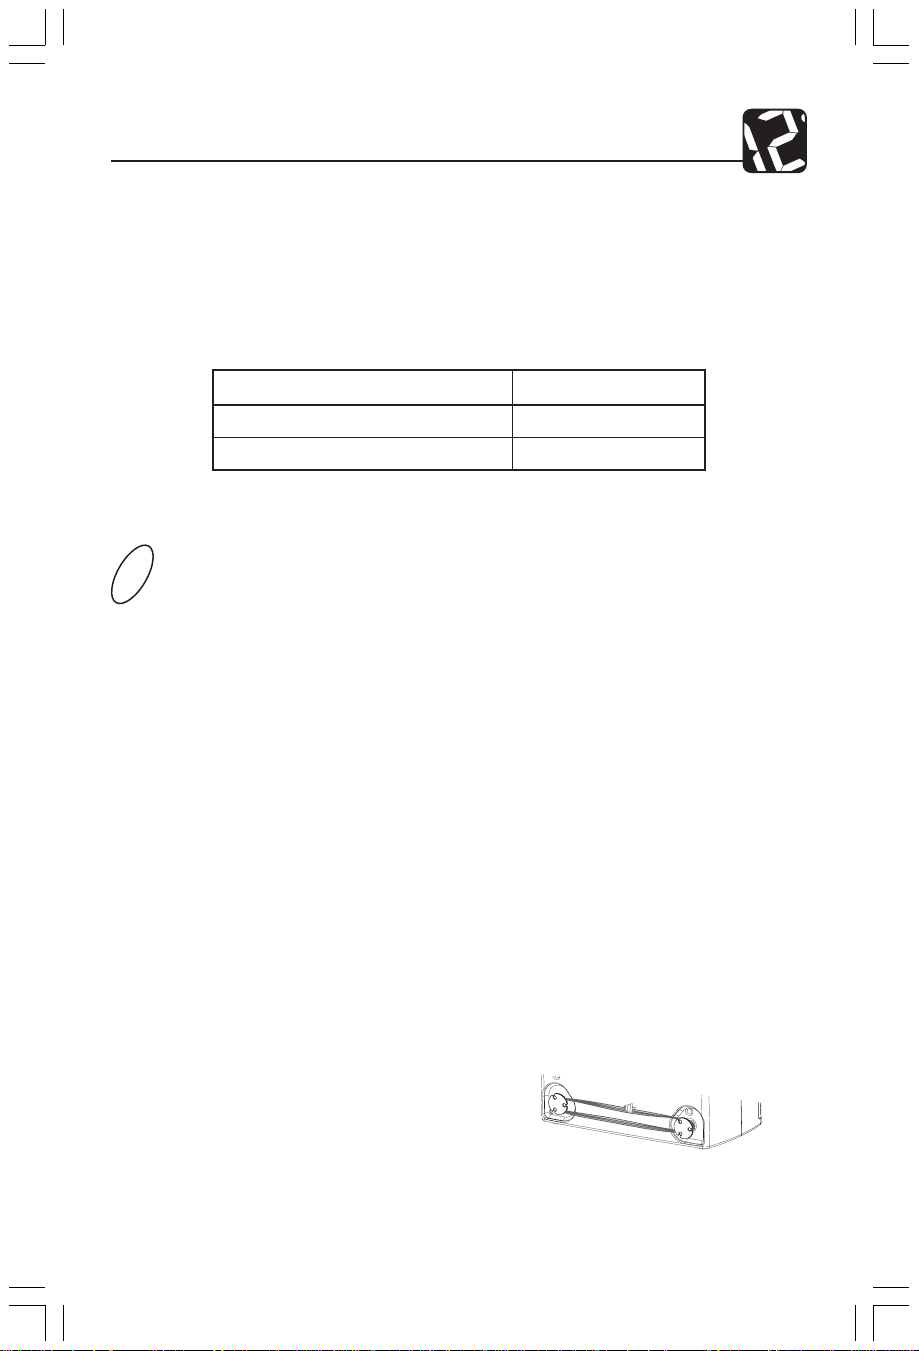
Electrical Cord Storage (Selected Models Only)
For your convenience, some models have cord wrap posts for easy storage of the electrical
cord. The cord wrap posts are located on the back of the air purifier in the bottom corners.
When received, the cord wrap posts will be in the collapsed position. To extend the cord
wrap posts, simply twist approximately 1/8 of a rotation and gently pull outward. The post
will extend approximately 0.5 inches (see Fig. 18).
Once extended, simply wrap the cord around the two
posts until the desired length is obtained.
Fig. 18 - Extended Cord Wrap Posts
11 41451-01
41451-01_Rev 8-6-04.pmd 8/5/04, 5:05 PM11
Page 12
Programming
Setting Day and Time
Setting the correct day and time allows the programs to work effectively and provides a
clock for your reference. Although the instructions for setting the day and time are listed
under Initial Operation, they are repeated below for your convenience.
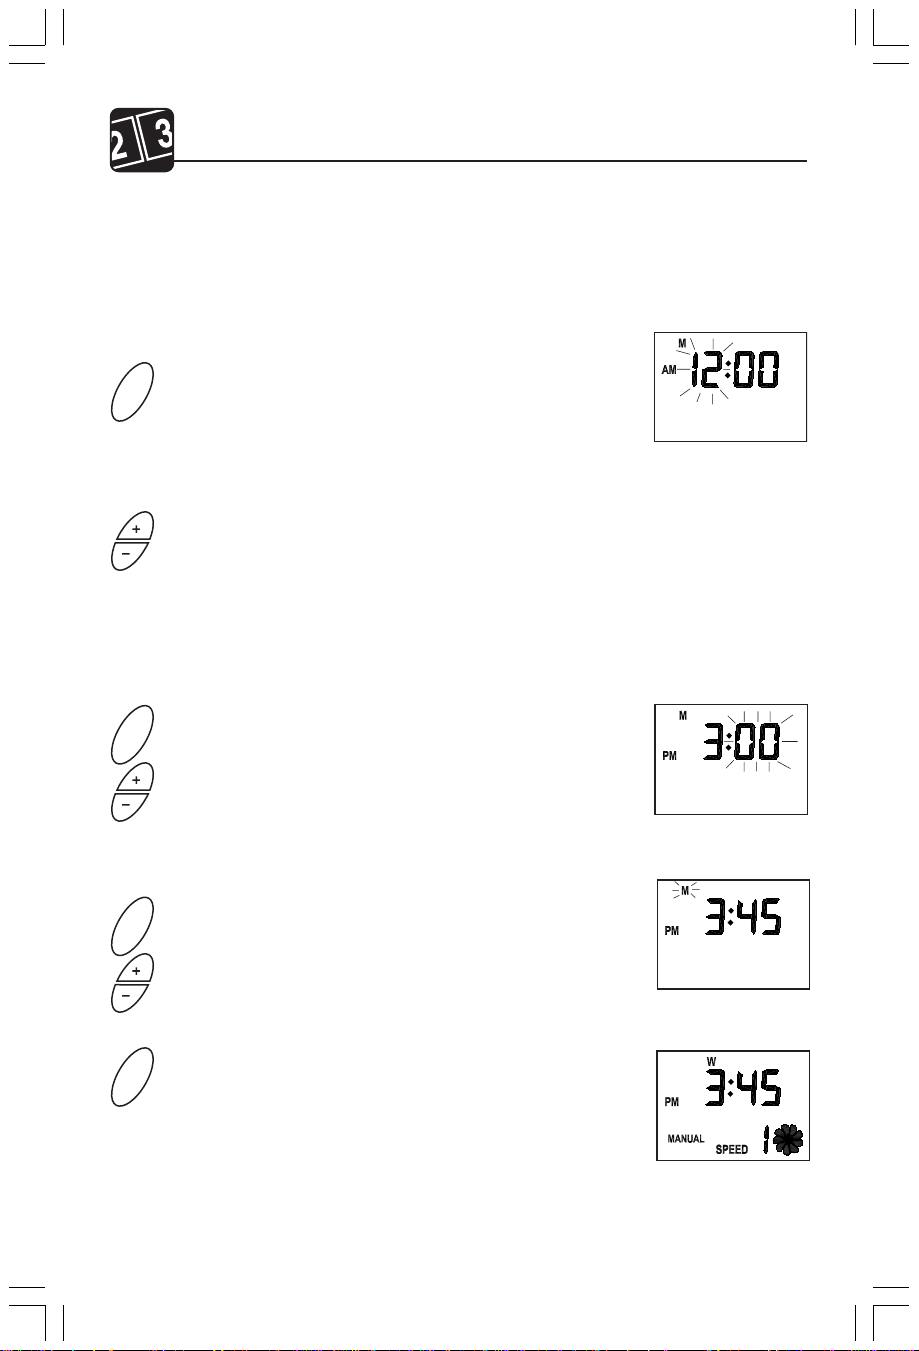
Adjusting Day and Time: (For example, Wednesday at 3:45 pm)
1. To set the day or time, press the DAY/TIME key. All
DAY/TIME
DAY/TIME
display features except the day and time will go blank
and the hour will flash.
Fig. 19
2. Use the UP/DOWN keys to adjust the hour. Tapping
the key will advance the hour by increments of one.
Holding down the key will change the hour rapidly.
Note the AM/PM indicator as you cycle through a 24
hour period.
3. Press the DAY/TIME key again. Now, the minutes will
be flashing. Use the UP/DOWN keys to adjust the
minute. Tapping the key will change the minute by increments of one and holding the key will change the
minute rapidly.
Fig. 20
4. Press the DAY/TIME key to accept the minute setting
DAY/ TIME
and go to the day of the week. Use the UP/DOWN keys
to set the current day.
5. Press the DAY/TIME key a final time to accept the day
DAY/ TIME
41451-01 12
41451-01_Rev 8-6-04.pmd 8/5/04, 5:05 PM12
setting and return to Normal mode.
Fig. 21
Fig. 22
Page 13
Programming
NOTES:
• The clock flashes when the time has not been set.
• At any time while you are setting the Day/Time, you can press the PROGRAM key to
toggle between AM/PM format and military time format.
•To quickly exit the Day/Time setting mode, you can press the DISPLAY key or wait 15
seconds without pressing any keys.
•The time displayed will be frozen in Day/Time setting mode; however , the internal clock
is still running. If no value is changed, then the frozen time will be replaced by the
internal clock when you exit the Day/Time setting mode.
• If the power is lost to the unit, the memory will maintain the clock for at
least 12 hours.
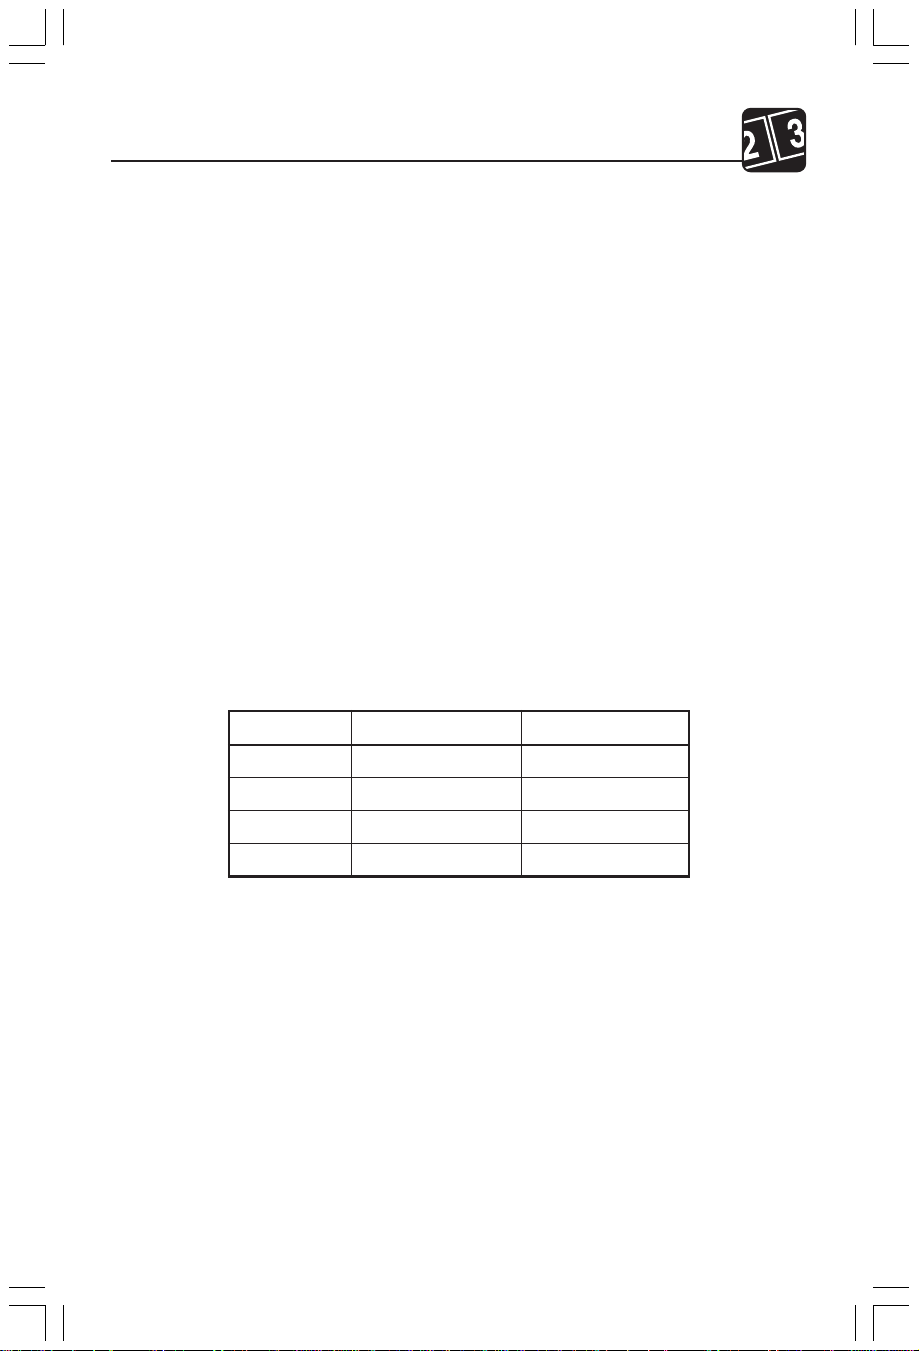
Pre-set Programming
As discussed in the Manual and Auto Operating Modes section of the manual (pg. 9), your
air purifier comes with pre-set programs. For your reference, these programs are listed again
below. When you turn your air purifier to Auto Mode, these programs are active unless you
override them with your personalized programs. Refer to the next section, User Programming, to learn how to input your own programs.
Table 3: Pre-set programming provided for each air purifier.
Program Setpoint Time Blower Speed
1 8:00 am 2 (Medium)
2 3:00 pm 3 (High)
3 5:00 pm 2 (Medium)
4 10:00 pm 1 (Low)
13 41451-01
41451-01_Rev 8-6-04.pmd 8/5/04, 5:05 PM13
Page 14
Programming
User Programming
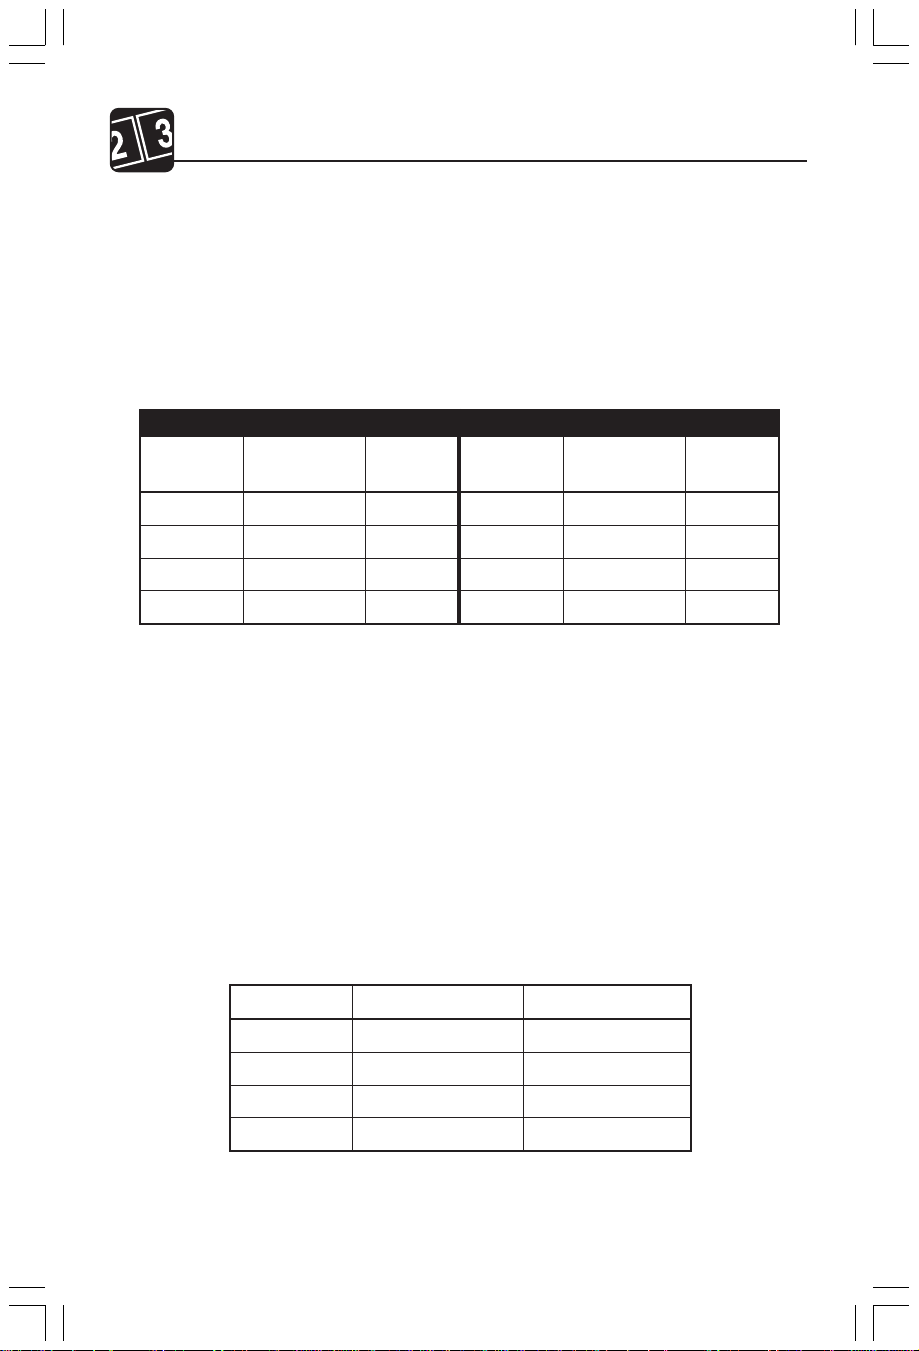
User programming allows you to set when the air purifier is on and what blower speed to
use. You may define up to 4 programs for the weekdays and up to 4 programs for the weekend. Before starting the programming process, first you should determine what times and
blower speeds will best fit your needs. Use the charts below to organize and record the
programs that you desire. Use a pencil so you can revise your records each time you change
the programs.
Table 4
WEEKDAYS
Program Setpoint Blower
Time Speed
1
2
3
4
Program Setpoint Blower
1
2
3
4
WEEKENDS
Time Speed
NOTES:
• Setpoint time is the time at which the blower speed will change. The specified blower
speed will be active until the next setpoint time is reached.
• The setpoint time can only be set in 10 minute increments.
• Blower speed ranges from 0 to 3. Zero indicates that the blower is turned off, a setting of
1 is low, 2 is medium, and 3 represents a blower speed of high.
• If you want the weekdays and the weekends to be identical, you should program both the
weekday programs and the weekend programs with the same values.
• If you use less than 4 programs, set the unused programs identical to one of the other
programs. Table 5 below gives an example where programs 3 and 4 are identical.
Table 5: Using 3 of the 4 Available Programs
Program Setpoint Time Blower Speed
1 8:00 am 3
2 5:00 pm 2
3 9:30 pm 1
4 9:30 pm 1
41451-01 14
41451-01_Rev 8-6-04.pmd 8/5/04, 5:05 PM14
Page 15
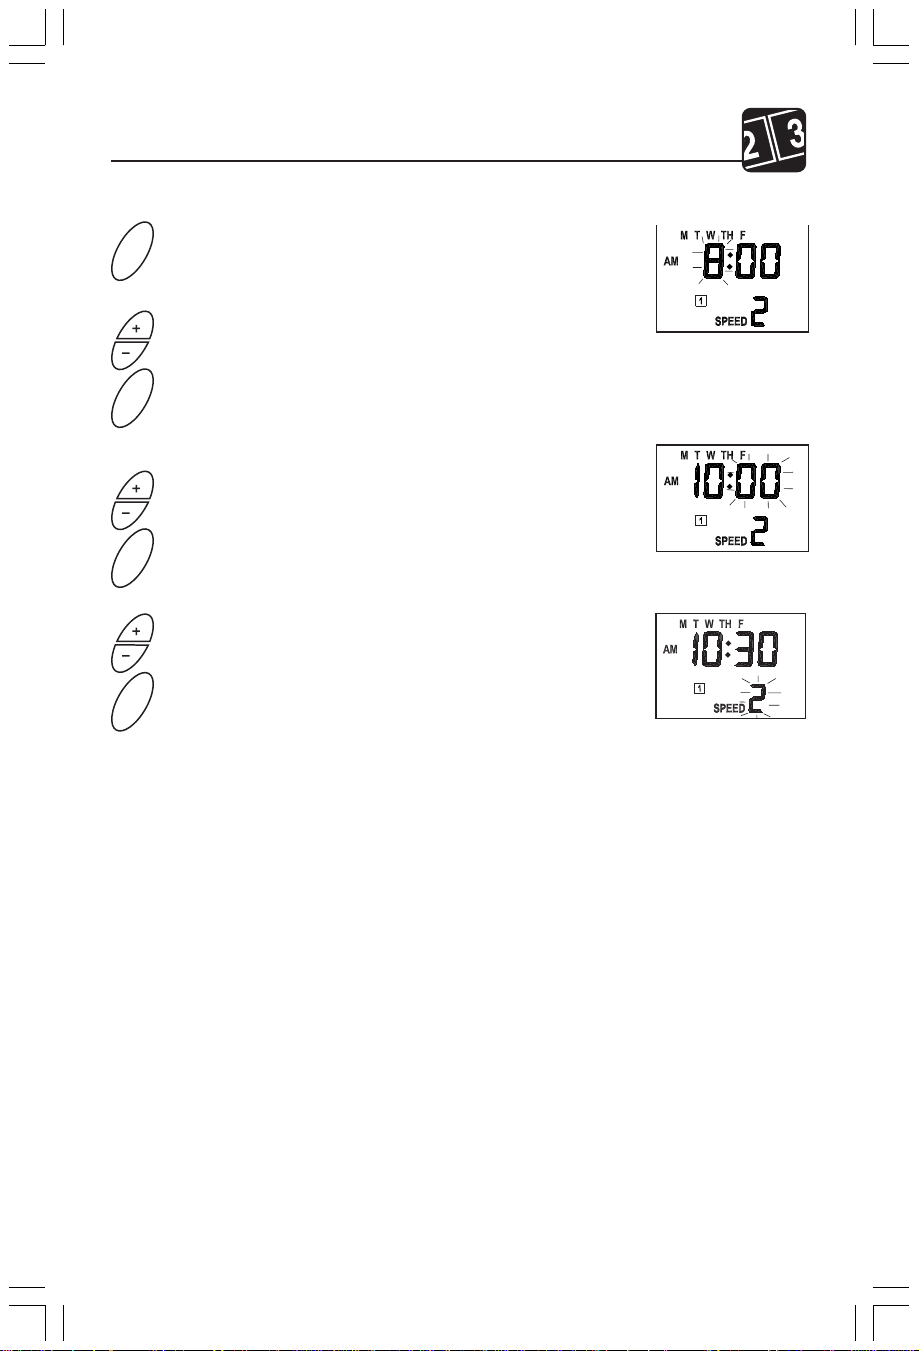
To set or change the programs:
1. Press the PROGRAM key . Program 1 for weekdays will
PROGRAM
be shown with the hour position flashing to denote that
you should set that value now.
2. Use the UP/DOWN keys to adjust the hour setting. Once
set, press the PROGRAM key again.
PROGRAM
3. Now, the minute position will be flashing. Use the UP/
DOWN keys to adjust the minute setting in 10 minute
increments. Press PROGRAM to accept the value.
Programming
Fig. 23
PROGRAM
Fig. 24
4. Finally, the blower speed will be flashing. Use the UP/
DOWN keys to adjust the blo wer speed setting from 0 to
3. Zero indicates that the blower is turned off, a setting of
1 is low , 2 is medium, and 3 represents a blo wer speed of
PROGRAM
high. Press PROGRAM to accept the blower speed setting.
This completes the first program for weekdays.
Fig. 25
5. The display will advance to the second program for
weekdays with the hour position flashing. Follow steps
2 to 4 to set the second program. After setting each program, the display will advance to the next program number. After going through all four weekday programs, the
unit will advance through each of the four weekend programs. The adjustment procedure (steps 2 to 4) is the
same for each program.
NOTES:
•For fast advance of the values, press and hold the UP/DOWN keys for 2 seconds. The
values for program time or blower speed will advance quickly.
•To exit programming mode and return to normal operating mode, either wait 15
seconds without any key presses or press DISPLAY to immediately return to normal
operating mode.
• Once entered, the programs are active and stored in the unit’s memory. You can
unplug and move the air purifier and still retain the programs.
41451-01_Rev 8-6-04.pmd 8/5/04, 5:05 PM15
15 41451-01
Page 16

Programming
Reviewing Programs
You may want to review the programs to confirm that the settings are still acceptable. The
following steps show you how to review the programs.
To review programs:
1. With the air purifier On, press and hold the PROGRAM k ey . After 2 seconds, the
display will advance through the 4 programs for weekdays and then the 4 programs for the weekend. You must hold the PROGRAM key as the display reviews the programs.
2. After viewing all programs, the display will return to normal operating mode and
you can release the key.
NOTE:
• If you review a program that you want to change, simply release the PROGRAM key.
The display will stop on that program and allow you to make changes. Refer to User
Programming (pg. 14) for more details on how to change the values.
Locking/Unlocking the Keypad
Once you enter the desired programs, you may want to lock the keypad to prevent accidental
changing of the programs. When the keypad is locked, all k eys will be disabled. If you press
a key, “Lock” will be displayed on the screen for 1-2 seconds.
To Lock or Unlock the Keypad:
1. To lock the keypad, press and hold the UP/DO WN k eys
simultaneously for 2-3 seconds. The display will read
“Lock” for 1-2 seconds.
2. To unlock the key pad, press and hold the UP/DOWN
keys simultaneously for 2-3 seconds. The keypad will
be functional.
41451-01 16
Page 17

Programming
Resetting the Air Purifier
In the unusual situation that the unit or the display is exhibiting erratic behavior, you may
want to reset the air purifier. Since you will lose all of your programmed settings when the
unit is reset, you should consult the Troubleshooting section (pg. 21) of the manual to resolve the problem before using the Reset Feature. When the unit is reset, the clock, day of
the week, and programs will default to their factory settings and the unit will turn off. The
only information that will be saved is the pr e-f ilter and filter counter v alues. If you still
have problems after resetting the air purifier , please contact Hunter for additional assistance
(refer to Technical Assistance pg. 21).
To Reset the Air Purifier:
1. Using a small pin or paperclip, hold down the RESET key for 2 seconds or until the
display goes blank.
2. Follow the directions in the Programming section of the manual (pg. 12) to update the
day, time, and programs of the unit.
41451-01_Rev 8-6-04.pmd 8/5/04, 5:05 PM17
17 41451-01
Page 18

Air Purifier Maintenance
Cleaning Your Air Purifier
Proper maintenance of your Hunter Air Purifier will help ensure years of trouble free
service.
Follow these steps to properly maintain your air purifier:
1. Approximately every 90 days, the outside of the unit should be cleaned with a soft,
damp cloth.
2. If needed, the front grill can be removed from the unit and cleaned with soapy water.
Simply remove the pre-filter before exposing the grill to water.
3. Follow the instructions in Changing the Pre-Filter and Changing the Filter (pgs. 18 and
19) to determine when and how to replace the filters.
NOTES:
•The air purifier must be unplugged during the cleaning process.
• Be sure the unit is completely dry before plugging in and using.
•Never immerse unit in water.
Changing the Pre-Filter
When the Pre-Filter Counter exceeds 2000 hours (refer to Filter Run-time Counters for
additional information pg. 11), the display will automatically switch to the Pre-Filter Display and the Pre-Filter indicator will flash as a reminder that you should replace the prefilter. To maintain proper odor-removing capability and overall filtration performance, the
pre-filter should be changed every 2000 hours (approximately 3 months of use). If necessary, the pr e-filter can be changed more often. Proper maintenance of the pre-f ilter will help
extend the life of the HEPA filter. Refer to Obtaining Replacement Filters (pg. 20) if you
need help finding replacement filters.
To change the pre-filter and reset the pre-filter counter:
1. First, turn off and unplug the air purifier.
2. Next, remove the front grill. For Models 30400 and 30401, place your fingers in the
recesses on either side of the top of the grill and pull firmly. For all other models,
gently press the push tabs until the front grill slides pass them and is released.
3. The pre-filter is attached to the inside of the grill with hook tape. Pull gently on
the pre-filter to removed it.
4. If needed, use a soft damp cloth to wipe off the grill.
5. Install the new pre-filter by placing it in the grill and pressing gently on the prefilter so that it adheres to the hook tape. You may notice a few black particles
coming off the pre-filter. Those particles are part of the odor-removing activated
carbon and will be collected on the filter during regular use.
41451-01 18
41451-01_Rev 8-6-04.pmd 8/5/04, 5:05 PM18
Page 19

Air Purifier Maintenance
19 41451-01
Page 20
Air Purifier Maintenance
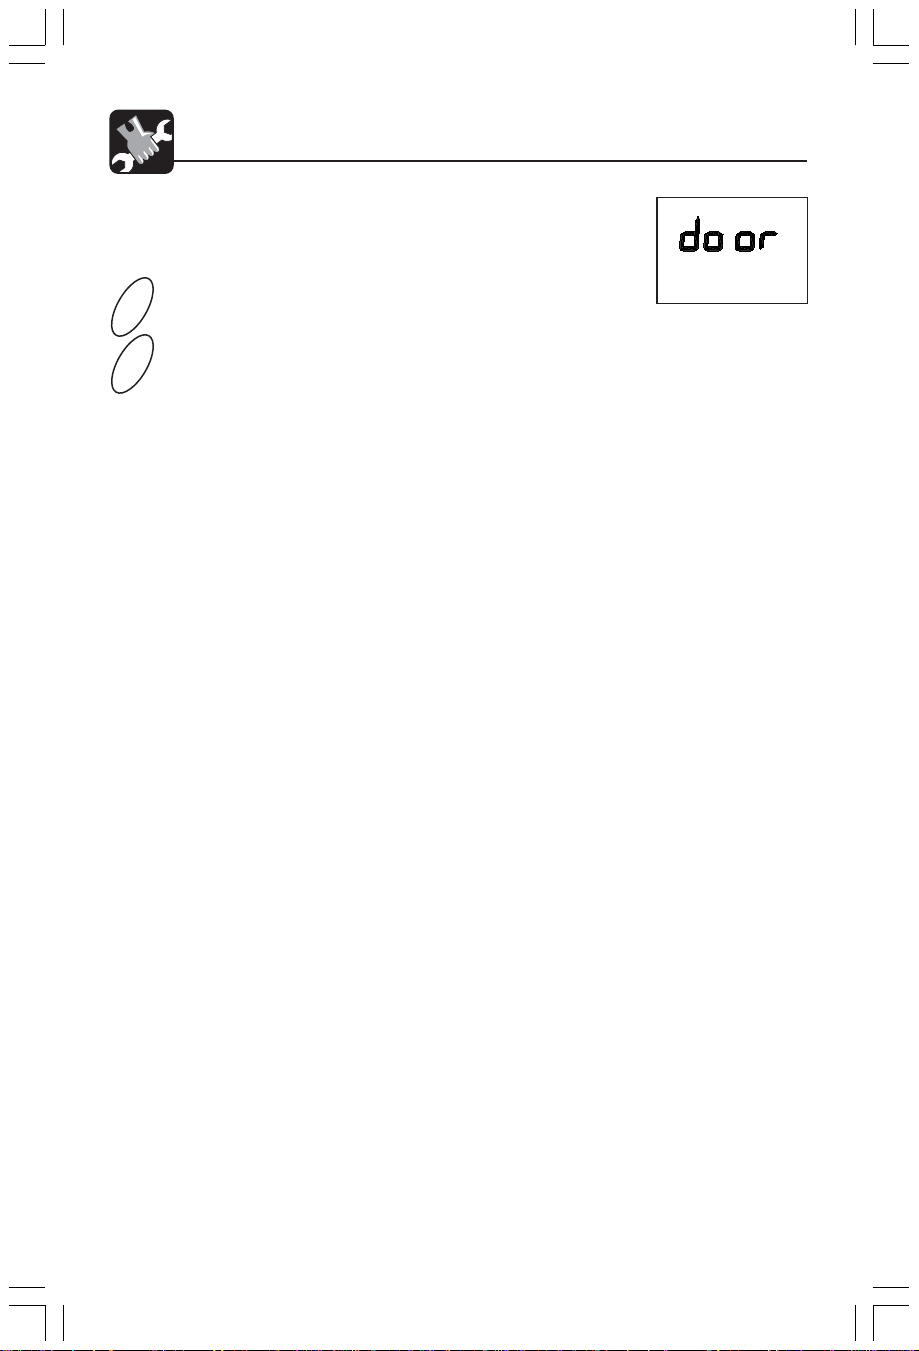
6. Plug in the unit. NOTE: This unit will not operate un-
less the grill is in the correct position. The display will
read “door” if the grill is not attached properly.
7. To reset the filter counter, press the DISPLAY key until
DISPLAY
the filter counter is displayed. Then, hold the FILTER
RESET key for 2 seconds. The filter counter will return
to zero and resume counting.
FILTER RST
Obtaining Replacement Filters
To obtain replacement filters for your air purifier, first determine your model number
by looking at the information label on the back of the air purifier. The model number
will be listed on the label. Then, call 1-800-4HUNTER for your nearest retailer or Hunter
Customer Service at 1-800-313-3326 (CAN 1-888-855-8300) to order directly. To order online, visit our Website at www.hunterfan.com. To ensure that you obtain the correct filters, please find your model number below that specifies the correct replacement
filters.
Hunter Air Purifier Model No.:.......................... 30130
Pre-Filter Replacement Model No.:................... 30901
HEPA Filter Replacement Model No.: .............. 30936
Fig. 28
Hunter Air Purifier Model No.:.......................... 30170, 30175, 30185
Pre-Filter Replacement Model No.:................... 30901
HEPA Filter Replacement Model No.: .............. 30938
Hunter Air Purifier Model No.:.......................... 30400, 30401
Pre-Filter Replacement Model No.:................... 30901
HEPA Filter Replacement Model No.: .............. 30940
41451-01 20
41451-01_Rev 8-6-04.pmd 8/5/04, 5:05 PM20
Page 21
Problem Solutions
Troubleshooting
1. No Display
2. Display reads “door.”
3. Program number
is flashing.
4. Programs are
not running.
5. Time is not correct
6. Keypad does not work or
display reads “Lock.”
7. Erratic Display or
Operation.
• Confirm that the unit is plugged in.
• Check the installation of the front grill.
• Reset the air purifier. (See Resetting the Air Purifier
on pg. 17.)
•The front grill is not attached properly. Remove grill from
unit and re-attach. (See Initial Operation on pg. 6.)
• Unit is in temporary program override mode. Refer to
Override of Auto Mode on pg. 10.
• Confirm that the unit is in Auto Mode. The Auto
indicator should be lit and a program number should be
illuminated. (See Auto Mode on pg. 9.)
•Review program settings to confirm program set
points. (See Reviewing Programs on pg. 16 for
additional information.)
• Check that the proper display is chosen. (See Display
Modes on pg. 8).
• Set the time. (See Setting the Day/Time on pg. 12.)
•Key pad has been locked to prevent accidental changes
to the programs. (See Keypad Lock on pg. 16 to unlock
the key pad.)
• Reset the air purifier. (See Resetting the Air Purifier
on pg. 17.)
8. Filter and/or Pre-filter
Indicator is Flashing.
9. Unit has reduced air flow
or increased noise.
•The Filter and/or Pre-Filter Counters have reached the
estimated usage times. Check and replace filters if needed.
(Refer to Filter and Pre-Filter Counters on pg. 11.)
•The filter is clogged and should be changed. (Refer to
Changing the Filter on pg. 19.)
Technical Support
If you have any additional questions or problems with your Hunter air purif ier , please call 1888-830-1326 from 8:00 am to 5:00 pm Central Time or contact us over the Internet at
www.hunterfan.com.
21 41451-01
41451-01_Rev 8-6-04.pmd 8/5/04, 5:05 PM21
Page 22

Warranty
QuietFlo
5 YEAR LIMITED WARRANTY
Hunter Fan Company
®
True HEPA Air Purifier
The Hunter Fan Company makes the following limited warranty to the original residential
user or consumer purchaser of the
If any part of your
QuietFlo
QuietFlo
®
True HEPA Air Purifier motor or control panel fails during
®
True HEPA Air Purifier:
the first five (5) years from the date of installation due to a defect in material or workmanship, we will provide a replacement Air Purifier free of charge. Installation is deemed to
occur at the date of purchase.
If the Air Purif ier cord or front grille fails an y time within one (1) year after installation due
to a defect in material or workmanship, we will replace or, at our option, repair the unit free
of charge at our nearest service centre or at our Service Department in Memphis, T ennessee.
You will be responsible for all parts and labor costs after this one-year period.
USE OF A NON-HUNTER FILTER WILL INVALIDATE THIS WARRANTY. IF THE
ORIGINAL RESIDENTIAL USER OR CONSUMER PURCHASER CEASES TO OWN
THE AIR PURIFIER, THIS WARRANTY AND ANY IMPLIED WARRANTY WHICH
THEN REMAINS IN EFFECT, INCLUDING BUT NOT LIMITED TO ANY IMPLIED
WARRANTY OF MERCHANTABILITY OR FITNESS FOR A P AR TICULAR PURPOSE,
ARE VOIDED.
NO WARRANTY, EXPRESSED OR IMPLIED, INCLUDING ANY WARRANTY OF
MERCHANTABILITY OR FITNESS FOR A PARTICULAR PURPOSE, IS MADE IN
RESPECT TO THE FILTER MATERIAL OR CARBON FILTER.
THIS WARRANTY IS IN LIEU OF ALL OTHER EXPRESS WARRANTIES. THE DURATION OF ANY IMPLIED WARRANTY INCLUDING BUT NOT LIMITED TO ANY
IMPLIED WARRANTY OF MERCHANTABILITY OR FITNESS FOR A PARTICULAR
PURPOSE, IN RESPECT TO THE MO TOR IS EXPRESSLY LIMITED TO THE PERIOD
OF THE EXPRESS WARRANTY SET FORTH ABOVE.
This warranty is voided if the air purifier is not purchased and used in the USA or Canada.
This warranty excludes and does not cover defects, malfunctions or f ailures of the Air Puri-
fier which were caused by repairs by persons not authorized by us, use of parts or accessories not authorized by us, mishandling, modifications, or damage to the Air Purifier while in
your possession, or unreasonable use, including failure to provide reasonable and necessary
maintenance. This warranty does not cover Air Purifiers used in commercial applications.
There are no express or implied warranties as to commercial purchasers or users.
To obtain service, contact the nearest Hunter authorized service centre or the Hunter Fan
Company Service Department, 2500 Frisco Avenue, Memphis, Tennessee 38114, 1-888830-1326. For the name of our nearest authorized Hunter Fan Company Service Centre,
41451-01 22
41451-01_Rev 8-6-04.pmd 8/5/04, 5:05 PM22
Page 23

Warranty
write to the Hunter Fan Company at the preceding address. You will be responsible for
insurance and freight or other transportation to our factory service center . We will return the
Air Purifier freight prepaid. The Air Purifier should be properly packaged to avoid damage
in transit since we will not be responsible for any such damage. Proof of purchase is required when requesting warranty service. The purchaser must present sales receipt or other
document that establishes proof of purchase.
IN NO EVENT SHALL HUNTER FAN COMPANY BE LIABLE FOR DIRECT, INDIRECT, SPECIAL CONSEQUENTIAL OR INCIDENTAL DAMAGES IN EXCESS OF
THE PURCHASE PRICE OF THE AIR PURIFIER. YOUR SOLE REMEDY WILL BE
REPAIR OR REPLACEMENT AS PROVIDED ABOVE.
SOME AMERICAN STATES AND CANADIAN PROVINCES DO NOT ALLOW:
• LIMITATIONS ON HOW LONG AN IMPLIED WARRANTY LASTS;
• THE EXCLUSION OR LIMITATION OF DIRECT, INDIRECT SPECIAL, INCIDENTAL OR CONSEQUENTIAL DAMAGES;
SO THE ABOVE LIMITATIONS MAY NOT APPLY TO YOU.
THIS WARRANTY GIVES YOU SPECIFIC LEGAL RIGHTS AND YOU MAY ALSO
HAVE OTHER RIGHTS WHICH VARY FROM STATE TO STATE OR PROVINCE TO
PROVINCE.
41451-01_Rev 8-6-04.pmd 8/5/04, 5:05 PM23
23 41451-01
Page 24
Other Home Comfort Products from Hunter
The Care-Free
Humidifier
To learn more about Hunter Fan Company products, please see our Web page at:
™
Programmable
Thermostat
www.hunterfan.com
 Loading...