

HunterDouglas Vignette, Vignette EasyRise, Vignette UltraGlide, Vignette LiteRise Installation Operation Care
Page 1
Installation • Operation • Care
Vignette® Modern Roman Shades
Tiered™ Style
EasyRise™, LiteRise®, and UltraGlide
Operating Systems
®
Page 2

CONTENTS
Getting Started:
Product View — Vignette® Tiered™ Style Shades .................................1
Product View — Vignette Tiered Style Top-Down/Bottom-Up Shades ....2
Tools and Fasteners Needed ..............................................................3
Installation:
Installation Overview .........................................................................4
Mount the Installation Brackets — Inside Mount .................................5
Mount the Installation Brackets — Outside Mount ..............................6
Mount the Installation Brackets — EndMount ....................................8
Install the Shade ...............................................................................8
™
Attach the Universal Cord Tensioner — EasyRise
®
Cord Adjustment — UltraGlide
Shades Only ......................................9
Shades Only .........9
Attach the Magnetic Hold-Down Brackets (Optional) .........................10
Operation:
Operate the Shade .........................................................................11
Troubleshooting ..............................................................................13
Care:
Removing the Shade .......................................................................15
Cleaning Procedures .......................................................................15
Child Safety:
Cord Loop Shades ...........................................................................17
Warning .........................................................................................17
Questions?
Call the Hunter Douglas Customer Information Center at
1-888-501-8364.
© 2015 Hunter Douglas. All rights reserved. All trademarks used herein are the property of Hunter Douglas.
Page 3
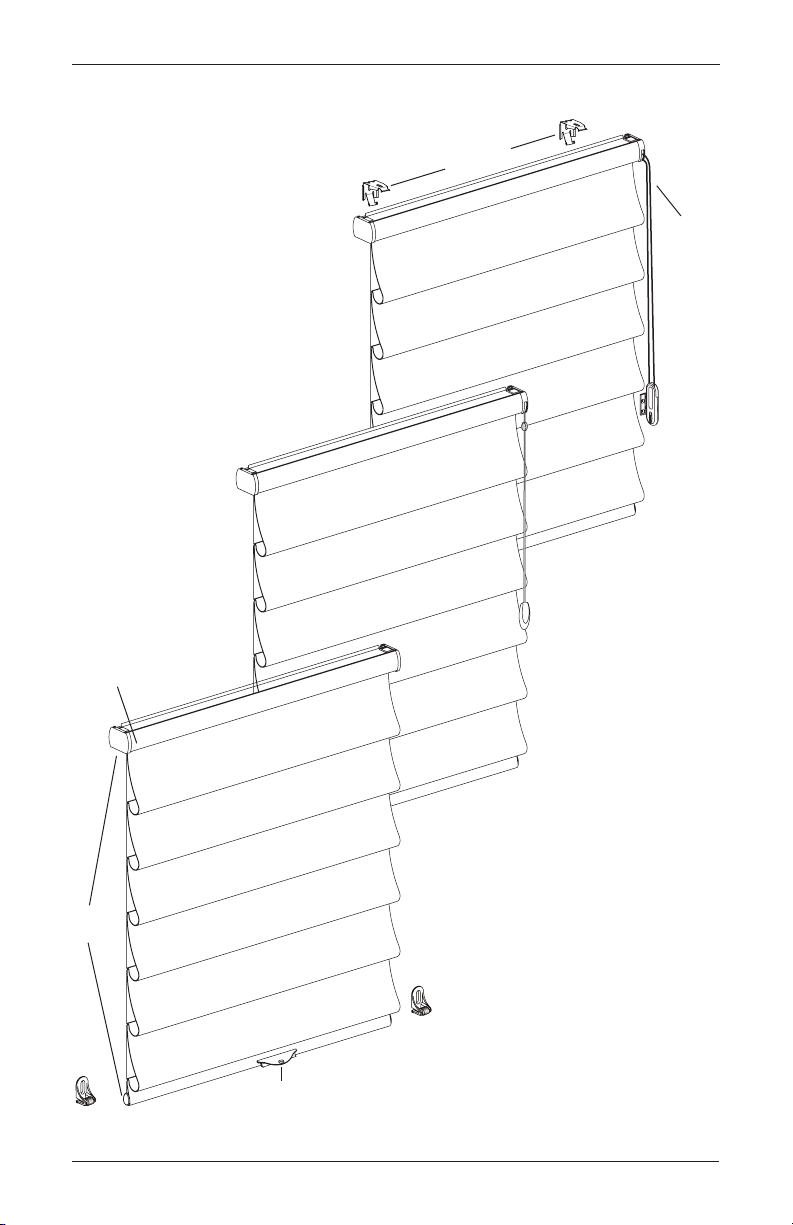
Product View — Tiered™ Style Shades
Caps
F
ensioner
GETTING STARTED
Installation Brackets
Cord
Loop
Cord
T
and
Bracket
™
EasyRise
abric-Covered
Headrail
End
Handle
Not Shown: Two-On-One Headrail Shade
LiteRise
UltraGlide
Magnetic Hold-Down Bracket
®
®
(Optional)
1
Page 4
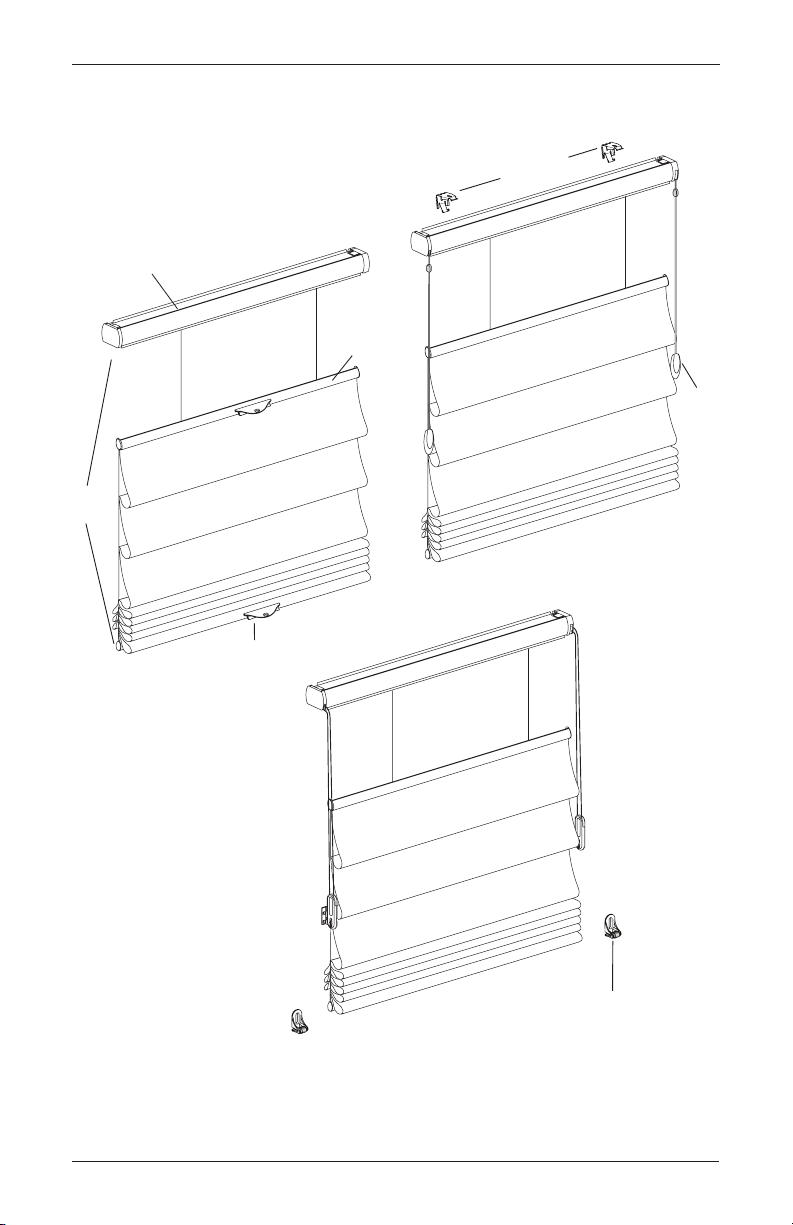
GETTING STARTED
assel
Caps
Product View — Tiered™ Style Top-Down/Bottom-Up Shades
Installation
Brackets
Headrail
Middle Rail
T
End
Handle
Tensioner
LiteRise
Top-Down/Bottom Up
Cord
Loop
Cord
and
Bracket
®
UltraGlide
Top-Down/Bottom Up
®
™
EasyRise
Top-Down/Bottom Up
Magnetic
Hold-Down
Bracket
(Optional)
2
Page 5
GETTING STARTED
Each Extension Bracket)
Thank you for purchasing Hunter Douglas Vignette® Tiered™ Modern Roman Shades. With
proper installation, operation and care, your new shades will provide years of beauty and
performance.
Please thoroughly review this instruction booklet and the enclosed packing list before beginning
the installation. If your shade has a protective plastic cover on the fabric-covered headrail, keep
the plastic in place until the shade is installed.
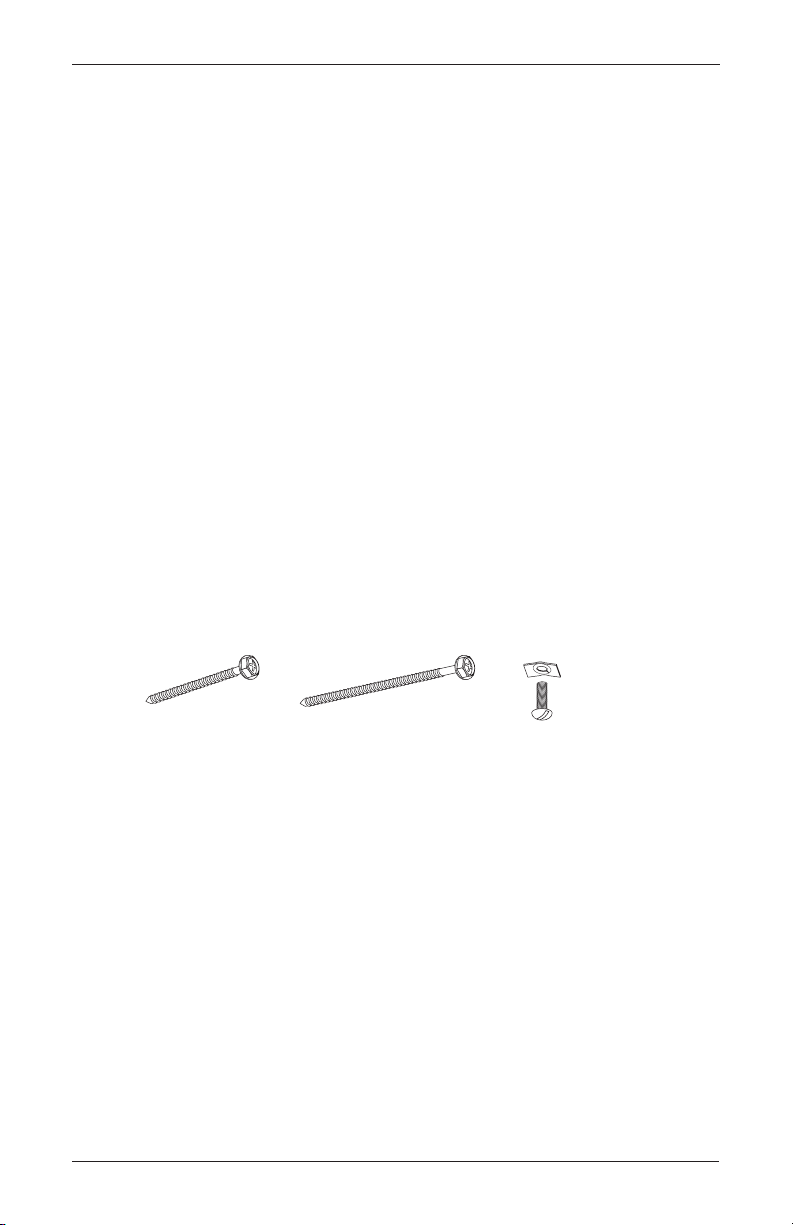
Tools and Fasteners Needed
■ Flat blade and Phillips screwdrivers
■ Measuring tape and pencil
■ Level (laser level is recommended)
3
■ Power drill,
In addition, you will need fasteners designed to work with your specific mounting surface(s).
■ #6 Hex Head Screws (Provided). Two 1
■ Longer Hex Head Screws (Not Provided). If using spacer blocks, use #6 screws long
enough for a secure attachment. Add
■ Speed Nuts and Screws (Provided). Extension brackets come with speed nuts and screws.
■ Drywall Anchors (Not Provided). Use drywall anchors when mounting into drywall.
/32" drill bit, and 1/4" hex driver
1
/2" length for each spacer block.
1
/2" screws are provided per installation bracket.
#6 x 11/2"
Hex Head Screw
(Provided)
Longer #6 Hex Head Screw
for Use with Spacer Blocks
(Not Provided)
Speed Nut
and Screw
(Two Provided with
3
Page 6

INSTALLATION
Installation
Molding
Installation Overview
■ Your order will include the correct number of installation brackets for your shade width, as
shown in the table below.
Bracket
Shade Width
12" – 38" 2
1
/8" – 72" 3
38
1
/8" – 96" 4
72
961/8" – 120" 5
1
/8" – 140" 6
120
Mounting Types and Window Terminology
If the installation brackets are mounted correctly, the rest of the installation process follows
easily. To prepare for this important first step, review the mounting types and basic window
terminology illustrated below.
Head Jamb
Brackets
Required
Jamb Jamb
Collectively, the sill and
jambs are called the
“window casement.”
Sill
Inside Mount
Shade fits within
window opening.
■ Refer to the appropriate page below based on your order:
➤ Inside Mount — Page 5
➤ Outside Mount — Page 6
➤ End Mount — Page 8
4
Outside Mount
Shade mounts outside
window opening.
Page 7
INSTALLATION
Installation Brackets
2"
Fully Recessed
Mounting Depth
Standard Tiered Fabric = 23/4"
Tiered Architella Fabric = 3"
Raised Folds
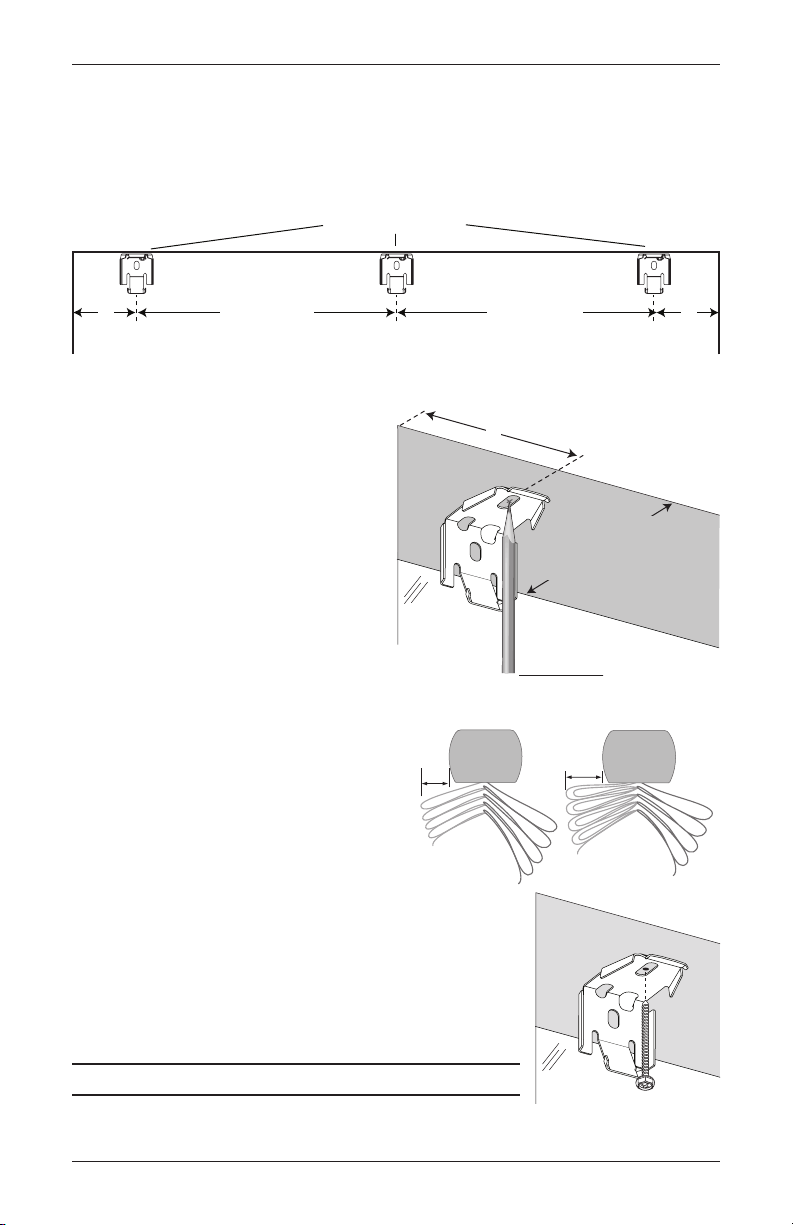
Mount the Installation Brackets — Inside Mount
■ Mark 2" from each jamb for bracket location.
➤ If more than two installation brackets came with your order, space additional bracket(s)
evenly between the two end brackets. Mount into wood whenever possible.
2"
Jambs
Space Evenly
Space Evenly
■ Center the brackets on your marks and mark the location of the screw holes.
➤ The minimum casement depth
required for installation brackets
(including the rear fabric fold
5
clearance) is 1
™
Tiered
/8" for standard
or 17/8" for Tiered Architella®.
➤ The minimum casement depth
required for a fully recessed mountis
3
/4" for standard Tiered or 3" for
2
Tiered Architella.
➤ For rear fabric fold clearance, there
3
must be
bracket for standard Tiered or 1"
/4" clearance behind the
Standard Vignette
Tiered
clearance behind the bracket
for Tiered Architella.
3
/4"
IMPORTANT: The front edges of the
installation brackets must be aligned to
eachother.
3
■ Drill the screw holes using a
/32" drill bit.
CAUTION: Use drywall anchors when
mounting into drywall.
■ Use a level to check that the mounting surface is level.
Shim the brackets if necessary.
■ Attach the installation brackets using the screws provided.
2"
Jambs
Vignette Tiered
Architella
1"
Proceed to “Install the Shade” on page8.
5
Page 8
INSTALLATION
Headrail End Marks
End Mark
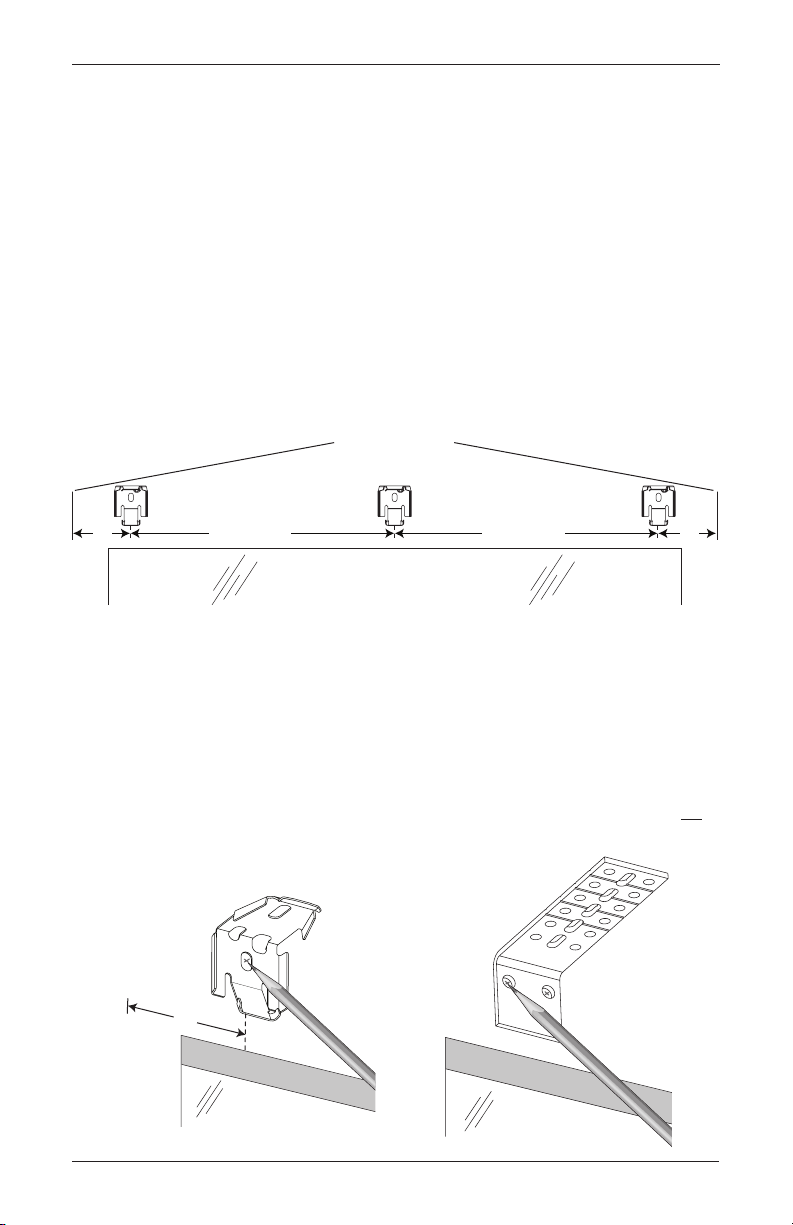
Mount the Installation Brackets — Outside Mount
IMPORTANT: Spacer blocks are recommended to project the installation brackets away from
the mounting surface for rear fabric clearance. Add
®
Architella
.
■ Center the shade over the window opening at the desired height. Use a pencil to lightly mark
each end of the headrail on the mounting surface.
➤ Alternatively, measure the width of the headrail and use that width to mark the headrail
end points over the window opening.
■ Mark 2" from each end of the headrail.
➤ If more than two installation brackets came with your order, space them evenly between
the two end brackets and mark their location. Mount into wood whenever possible.
3
/4" for standard Tiered™ or 1" for Tiered
2" 2"
Window Opening
Space EvenlySpace Evenly
■ Center the brackets on your marks, then mark each of the screwholes.
➤ A minimum 1" flat vertical surface is required to mount the brackets.
➤ The top of the installation brackets or extension brackets should be at the desired shade
height. The brackets should be level and aligned.
➤ When using extension brackets, mark two screw holes per bracket.
CAUTION: The rear of the brackets must be flush against a flat mounting surface. Do not
mount brackets oncurved molding.
Headrail
2"
6
Page 9
INSTALLATION
Spacer
Installation
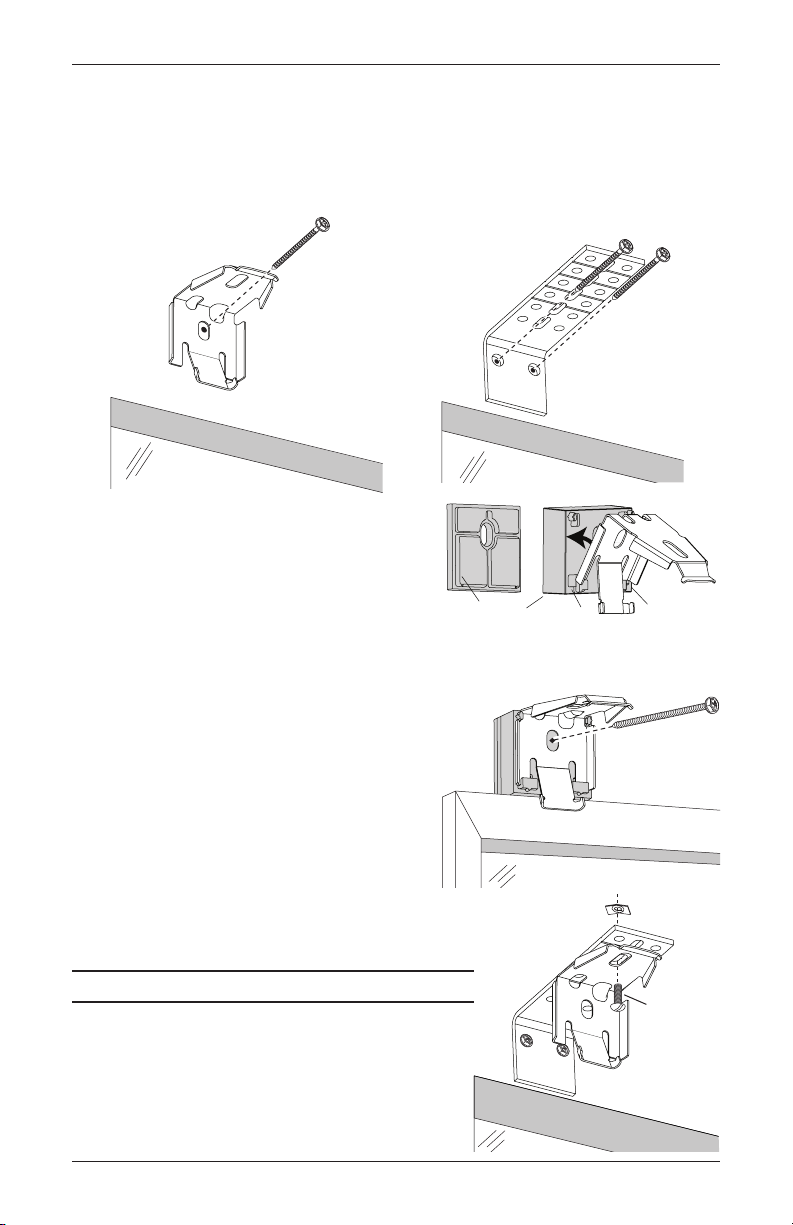
■ Drill the screw holes using a 3/32" drill bit.
CAUTION: Use drywall anchors when mounting into drywall.
■ Attach the installation or extension brackets using the screws provided.
IMPORTANT: The front edges of the installation brackets must be level and aligned to
each other.
■ If using the recommended spacer blocks, first
1
attach the installation bracket to a
/2" spacer
block before stacking additional spacer blocks
together.
➤ Insert the legs of the installation bracket into
the tabs on the spacer block.
➤ Then rotate the installation bracket back.
■ Attach the spacer blocks/installation bracket
to a flat vertical mounting surface with
#6mounting screws long enough for asecure
installation.
1
➤ A maximum of 1
/2" of spacer blocks per
installation bracket is allowed.
■ If using extension brackets, attach an installation
bracket to the underside of each extension
bracket using the provided screws and speed nuts.
Proceed to “Install the Shade” on page8.
blocks may
be stacked.
Blocks
Spacer
Tab
Tab
Bracket
Speed Nut
Screw
7
Page 10
INSTALLATION
Front of the bracket
into the bracket.
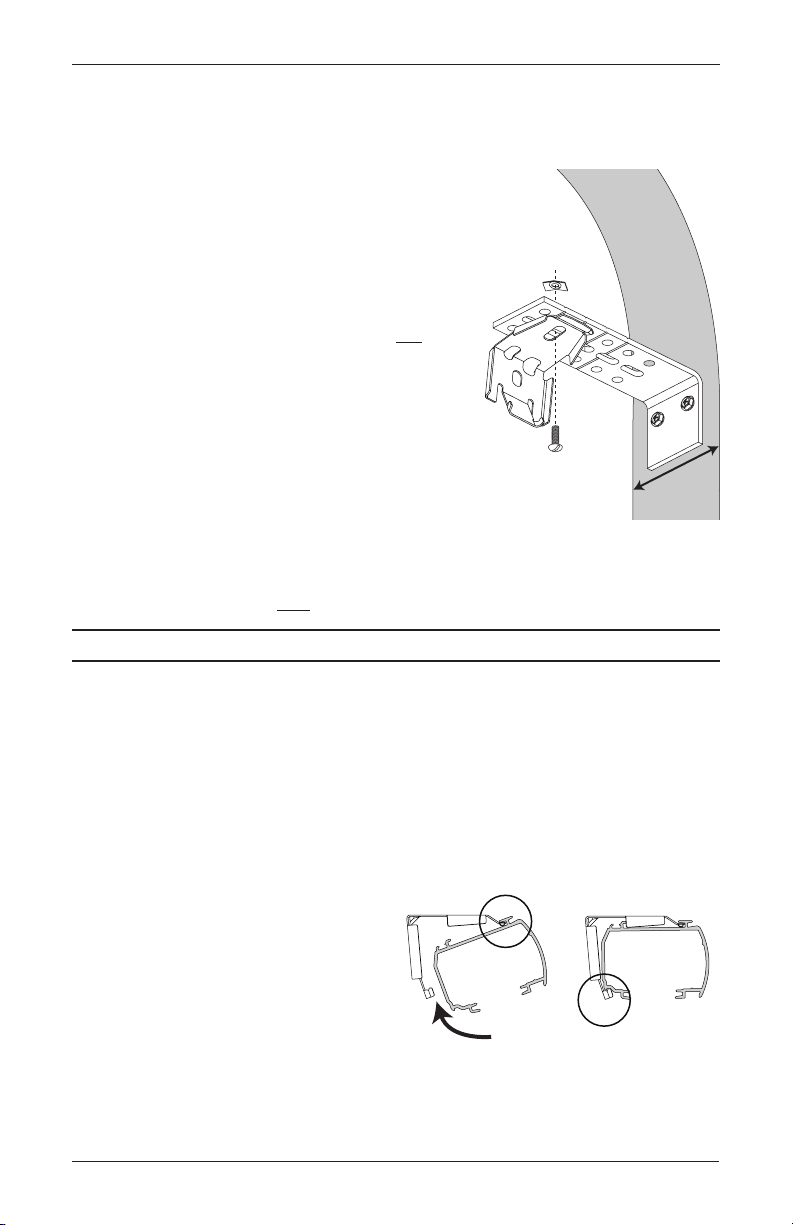
Mount the Installation Brackets — EndMount
End mount the headrail when conventional mounting techniques will not work — for example,
in an arched window. Allow for rear fabric clearance.
1
■ Mount the extension brackets on a surface at least 1
➤ The top of the extension brackets should be at the
desired shade height. The brackets should be level
and aligned.
CAUTION: The rear of the extension brackets must
be flush against a flat mounting surface. Do not
mount the extension brackets onthe curved surface
of the arch opening.
■ Mark two screw holes per bracket.
■ Attach the extension brackets using the screwsprovided.
IMPORTANT: Use a level to check that the mounting
surface is level. Shim the brackets if necessary.
■ Attach the installation brackets to the underside of the extension brackets using the
provided screws and speednuts.
CAUTION: Both brackets must be installed at the same depth and height.
/2" wide.
Speed
Nut
Screw
11/2"
Minimum
Proceed to “Install the Shade” below.
Install the Shade
■ Peel back the top edge of the protective covering from the top of the headrail.
■ Lower the fabric about 6" before installing the shade.
IMPORTANT: To avoid damage to the fabric, make sure the fabric is not caught between
the headrail and the installation bracket.
■ Position the shade so that the front faces you.
■ Slip the headrail into the installation
brackets so the front of the bracket slides
under the front groove on the top of
theheadrail.
■ Gently roll the back of the headrail up and
push back to snap it into the bracket.
■ Remove the protective covering from the
headrail.
8
fits under groove.
Bracket
Headrail
Back of the
headrail snaps
Page 11
INSTALLATION
Screw
Hole
Indicator
Line
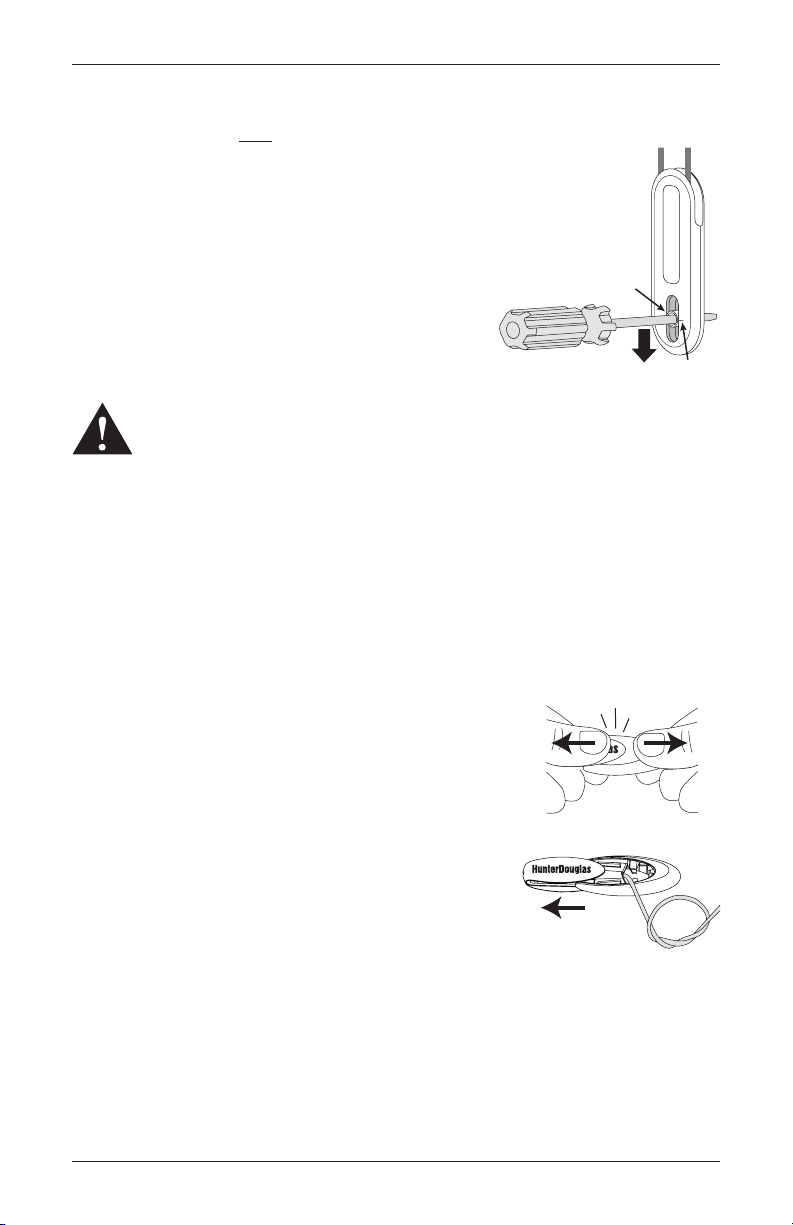
Attach the Universal Cord Tensioner — EasyRise™ Shades Only
Before you proceed, you must first slide the cord tensioner(s) to the bottom of the cordloop.
■ Insert a small screwdriver, punch, or awl through the screw hole at the bottom
of the cord tensioner.
■ Move the screw hole down to the indicator line to release the safety
mechanism.
■ Slide the cord tensioner down to the bottom of the cordloop.
■ Attach the cord tensioner(s) according to the instructions
provided with the Universal Cord Tensioner Installation Kit.
WARNING: It is imperative that the cord tensioner(s) be properly secured to
the wall or window frame to reduce children’s access to the cord loop.
Young children can strangle in cord loops. They can also wrap cords around
their necks and strangle.
CAUTION: The shade will not operate properly unless the cord tensioner(s)
is secured. A Universal Cord Tensioner Installation Kit has been included
with your shade. Follow the instructions in the kit to correctly secure the
cordtensioner(s).
Cord Adjustment — UltraGlide® Shades Only
Adjusting the tassel to eye level will decrease the amount of pulls needed to raise and lower
theshade. This will also enhance child and pet safety.
To Shorten the Tassel Cord
■ Grasp both parts of the tassel (the colored cover and the
frosted body).
■ Squeeze the tassel cover with your thumb and forefinger
(at the “s” in the HunterDouglas logo).
■ Separate and slide the tassel cover off from the tassel body.
■ Pull out the knotted end of the tasselcord.
■ Tie the cord at the desired shorter length using a double knot.
■ Trim the tassel cord below the knot.
■ Pull the trimmed knot up inside the tassel.
■ Squeeze the tassel cover while sliding it back onto the tassel body.
IMPORTANT: After reassembling, be sure there are no gaps between the two components.
Check that they do not pull apart easily. The tassel cover should be securely seated into the
tassel body.
Tassel
Cover
Tassel
Body
Tassel
Cord
9
Page 12
INSTALLATION
Outside Mount
Inside Mount
Adjust the
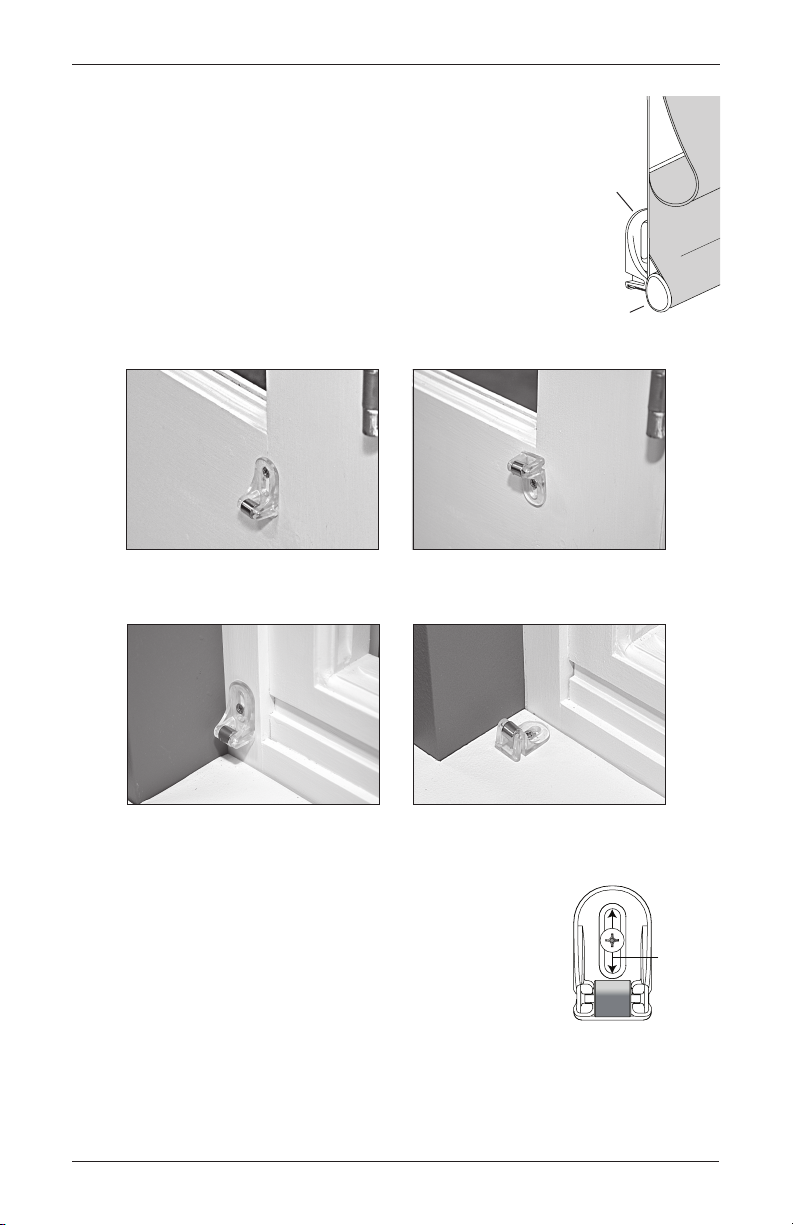
Attach the Magnetic Hold-Down Brackets (Optional)
■ Lower the shade until it is fully lowered.
■ Attach the magnetic hold-down bracket onto the bottom rail just
inside the end cap, oriented as shown.
■ Mark the screw location using one of the mounting options shown
below.
➤ The screw should be placed in the middle of the channel. This
will allow for adjustment.
Preferred Alternate
Hold-Down
Bracket
End
Cap
■ Drill the screw holes using a
CAUTION: Use drywall anchors when mounting into drywall.
■ Attach the hold-down brackets to the mounting surface using
the screws provided.
■ If necessary, adjust the bracket height by loosening the screw and
sliding the bracket up or down.
10
Preferred Alternate
3
/32" drill bit.
bracket
using the
channel.
Page 13
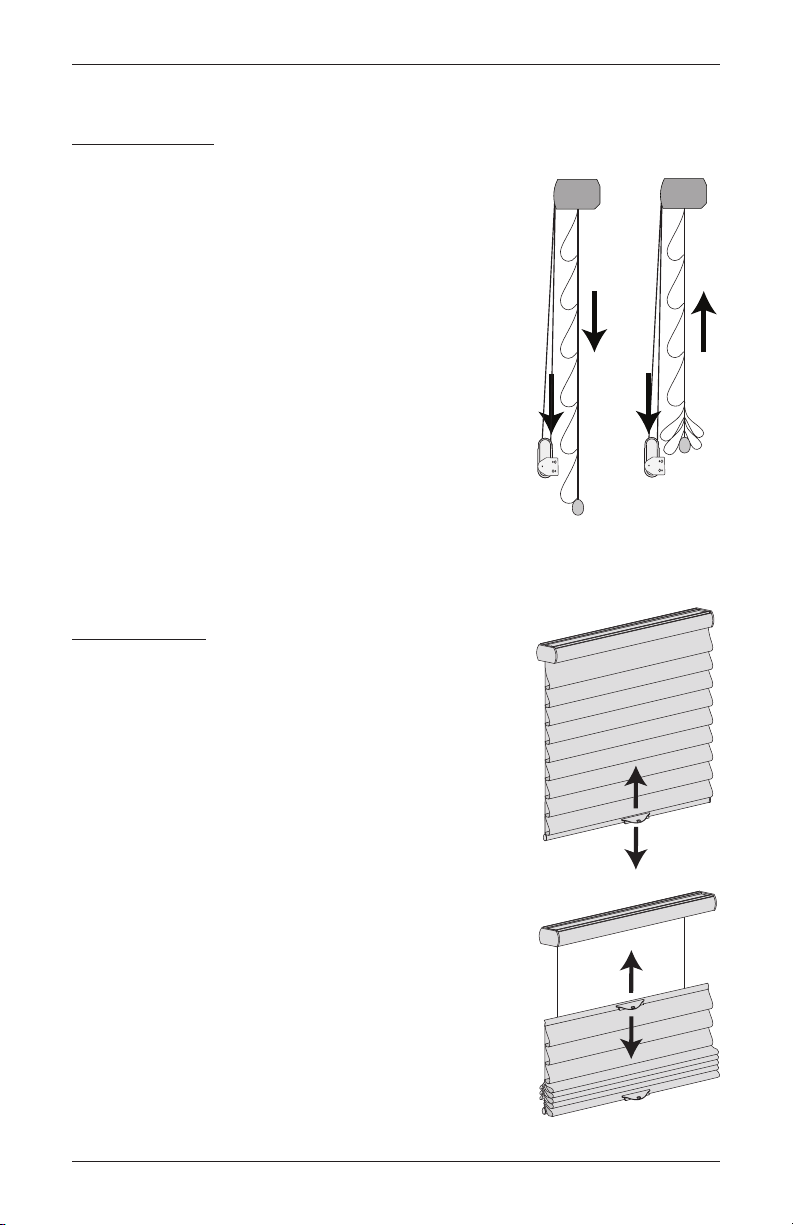
Operate the Shade
Lower Raise
™
EasyRise
To Lower the Shade:
■ Pull down on the rear cord of the cord loop to lower the shade.
To Raise the Shade:
■ Pull down on the front cord of the cord loop to raise the shade.
Top-Down/Bottom-Up Shades:
■ The left cord controls the bottom rail. The right cord controls
LiteRise® Shades
To Lower the Shade:
■ Slowly and steadily pull down on the bottom rail handle.
To Raise the Shade:
■ Slowly and steadily push up on the bottom rail handle. Allow
Top-Down/Bottom-Up Shades:
■ Raise or lower the middle rail by slowly and steadily pushing
Shades
IMPORTANT: If the cord tensioner moves with the cord, you
have not secured it to the wall or window frame. You must do
so for the shade to operate properly. See the Universal Cord
Tensioner Installation Instructions in the kit included with
yourshade.
the middle rail.
IMPORTANT: You must first lower the bottom rail before
lowering the middle rail. Likewise, you must first raise the middle rail before raising the
bottom rail.
the shade to stack evenly.
up or pulling down on the middle rail handle.
IMPORTANT: You must first lower the bottom rail before
lowering the middle rail. Likewise, you must first raise the
middle rail before raising the bottom rail.
OPERATION
11
Page 14

OPERATION
To Lower:
Pull the cord
toward the
center, click
and release.
Allow the cord to retract between strokes.
To stop the shade while lowering, move the cord
back toward the vertical position and give a slight
downward pull, engaging the locking mechanism.
UltraGlide® Shades
CAUTION: To avoid damage to the shade or personal injury, do not let go of the cord until it is
fully retracted.
To Lower the Shade:
■ Pull the cord toward the center of the shade
at a 45° angle. A locking mechanism at the
top of the cord releases with a “click”. The
shade automatically lowers as you allow the
cord to retract, releasing the tension.
■ To stop the shade while lowering, move the
cord back toward the vertical position and
give a slight downward pull, until the locking
mechanism engages.
■ If the shade hits an obstruction as it is lowered, it will stop and the internal cords may
become misaligned. This may cause the shade to be angled or tilted when fully raised. If this
occurs, do the following:
➤ Raise the shade slightly.
➤ Lower the shade completely to the sill. In some cases, pull gently on the bottom rail to
get it to drop completely.
IMPORTANT: If the shade is tilted when fully raised, do not pull harder on the cord. It does
not correct the tilt and may make it worse. See “Troubleshooting” starting on page13.
NOTE: On inside mount shades, the bottom rail and fabric folds may rest on the sill.
To Lower:
Pull the cord
toward the
center, click
and release.
To stop the shade while lowering, move the cord
back toward the vertical position and give a slight
downward pull, engaging the locking mechanism.
To Raise the Shade:
■ Pull the cord straight down using short
evenstrokes.
➤ With each stroke the shade partially raises.
➤ Allow the cord to retract after each
downward stroke.
➤ Use multiple strokes until the shade
reaches the desired position.
™
NOTE: Tiered
UltraGlide shades stop below
the first fold in the fuly raised position to provide clearance for cord operation.
Top-Down/Bottom-Up Shades:
■ Theleft cord controls the bottom rail. Theright cord controls the middle rail.
IMPORTANT: You must first lower the bottom rail before lowering the middle rail. Likewise,
you must first raise the middle rail before raising the bottom rail.
12
To Raise:
Pull the
cord straight
down with
short strokes.
Page 15
OPERATION
Troubleshooting
Problem The shade is hard to raise or lower, or will not raise or lower.
Solution Check that the headrail and installation brackets are level and aligned in the
window. Level the headrail by shimming the installation brackets, if necessary.
Make sure the fabric is not caught in the installationbrackets.
™
EasyRise
See Universal Cord Tensioner Installation Instructions in the kit included with
your shade.
EasyRise shades: Check that cord loop is not pinched or tangled.
UltraGlide
fabric folds.
LiteRise
Problem The fabric folds gather unevenly or seem to wrinkle.
Solution Slowly lower the shade and raise the shade again.
NOTE: This is inherent on narrow shades when fully stacked.
Problem The shade will not snap into the installation brackets.
shades: Check that the cord tensioner is mounted correctly.
®
shades: As you pull the cord, check that the cord is clearing the
®
shades: Pull down on the handle to engage the shade for operation.
Solution Check that the installation brackets are aligned and level. Level the headrail by
shimming the installation brackets, if necessary.
Check that the headrail is properly aligned in the installation brackets, see
“Install the Shade” on page 8.
Check that the fabric is not caught in the brackets.
Problem The front fabric appears to cling to the back fabric.
Solution Lightly apply a static spray for home furnishings. Follow the manufacturer’s
directions. If necessary, reapply the static spray each time the shade is
professionally cleaned. Allow the shade to dry in the fully lowered position.
13
Page 16

OPERATION
Problem EasyRise™ shades only: The universal cord tensioner has climbed to the
headrail.
Solution Pull down on the spring to relieve tension and pull the
universal cord tensioner to the bottom of the cord loop.
Properly mount the cord tensioner. See “Attach the
Universal Cord Tensioner — EasyRise Shades Only”
on page 9 and/ or the instructions included with
your Universal Cord Tensioner Installation Kit.
Problem EasyRise shades only: The shade raises at different rates when the cord is
pulled.
Solution Depending on the size and weight of the shades, the clutch ratios may be
different. More cord travel is required with larger shades than with smaller
shades. This is completely normal, and not a defect of the product.
Problem The shade raises or lowers unevenly, or the bottom rail is uneven when fully
raised.
Universal
Cord
Tensioner
Indicator
Line
Solution Check that the headrail is level. Level the headrail by shimming the installation
brackets, if necessary.
®
Problem UltraGlide
shades only: Shades do not stack fully to the top.
Solution Check that the headrail is level. Level the headrail by shimming the installation
brackets, if necessary.
14
Page 17

CARE
Removing the Shade
■ While holding the headrail, lower the shade
approximately 4".
Back of
Shade
■ Push back on the bottom tab of the installation
bracket using your thumb or a flat blade
screwdriver to release the bottom edge of
theheadrail.
■ After releasing the bottom edge, roll the back of the
headrail down and out from the bracket.
Tab
Roll the headrail
➋
down and out
from the bracket.
Push back against
➊
your thumb or flat
blade screwdriver.
the tab using
Cleaning Procedures
Vignette® Modern Roman Shades are made of an anti-static, dust-resistant fabric which repels
dirt and dust. For most fabrics, the options below are available if your shade needs cleaning.
Dusting
■ Regular light dusting with a feather duster is all the cleaning needed in most circumstances.
Vacuuming
■ Use a hand-held vacuum with low suction for more thorough dust removal.
Compressed Air / Hair Dryer (Cool Setting)
■ Blow dirt and debris from within the fabric folds using clean, compressed air.
Spot-Cleaning
■ Prepare a solution of warm water and mild detergent.
■ Dampen a clean cloth in the solution and wring it out.
■ Place a dry, clean cloth behind the spot between the face fabric and the back fabric.
■ Dab the spot with the dampened cloth until it is removed. Non-oil-based baby wipes may be
used on more stubborn stains. Do not rub the fabric.
■ Allow the shade to dry in the completely lowered position.
15
Page 18

CARE
Ultrasonic Cleaning
Vignette® Modern Roman Shades can be ultrasonically cleaned by a professional.
CAUTION: Do not ultrasonically clean the headrail, midrail, or bottom rail fabric; or any roomdarkening shades.
■ Specify that a mild detergent solution be used.
■ Never immerse the fabric-covered headrail or bottom rail into the solution.
■ Allow the shade to dry in the completely lowered position.
Injection / Extraction Cleaning
Vignette Modern Roman Shades can be cleaned by a professional using the injection/extraction
method of deep cleaning.
CAUTION: Do not use the injection/extraction method of deep cleaning on the headrail or
bottom rail fabric.
■ Specify the dry cleaning method only.
■ Pretreat heavy stains.
Steaming
CAUTION: Do not steam the headrail, midrail, or bottom rail fabric.
■ Steam the face fabric from the bottom to the top, making sure to get steam under each
fabric fold. Be careful not to saturate the fabric with steam.
■ Allow the shade to dry completely before raising it.
A Note on Textiles
As with all textiles, Vignette fabrics are subject to some inherent variations in the fabric weave.
Subtle dye-lot variations, puckering, or wrinkling fall within textile industry standards and should
be considered as normal, acceptable quality. Additionally, there will be slight differences in
pattern alignment from the fabric on the rails to the fabric of the shade, which do not detract
from the product’s appeal.
Variations in color and or pattern are unique characteristics that contribute to the classic beauty
of theshade.
16
Page 19

CHILD SAFETY
For more safety information call 1-888-501-8364
in the U.S. or 1-866-662-0666 in Canada.
WARNING
Warning
■ Young children can STRANGLE in cord loops. They can also wrap cords around
their necks and STRANGLE.
■ Always keep cords out of the reach of children.
■ Move cribs, playpens and other furniture away from cords. Children can climb
furniture to get to cords.
■ Do not tie cords together. Make sure cords do not twist together and create aloop.
Cord Loop Shades
■ Attach the cord tensioner on the cord loop to the wall or window
casement. See “Attach the Universal Cord Tensioner (UCT)” on
page 9. This can prevent children from pulling cord loops around
their necks.
■ Hunter Douglas provides a cord tensioner installation kit with
instructions for attaching the cord tensioner. For the shade to
operate properly, the cord tensioner must be correctly mounted
and secured.
■ Fasteners provided in the cord tensioner installation kit may not
be appropriate for all mounting surfaces. Use appropriate anchors
for the mounting surface conditions.
■ Only Hunter Douglas supplied cord tensioners and hardware
should be used. Replacement parts may be obtained by
contacting theHunter Douglas Customer Information Center
at 1-888-501-8364.
NOTE: The warning labels on the bottom rails of corded window coverings contain
important safety information. These warning labels are designed to be permanent, in
accordance with the industry’s safety standards, and must not be removed.
17
Page 20

The Hunter Douglas® Lifetime Guarantee is an expression of our desire to provide a thoroughly satisfying
experience when selecting, purchasing and living with your window fashion produc ts. If you are not thoroughly
satisfied, simply contact Hunter Douglas at (888) 501-8364 or visit hunterdouglas.com. In support of this policy
of consumer satisfaction, we offer our Lifetime Limited Warranty as described below.
COVERED
BY A LIFETIME LIMITED WA RRANTY
• Hunter Douglas window fashion products are
covered for defects in materials, workmanship
or failure to operate for as long as the original
retail purchaser owns the product (unless shorter
periods are provided below).
• All internal mechanisms.
• Components and brackets.
• Fabric delamination.
• Operational cords for a full 7 years from the
date of purchase.
• Repairs and/or replacements will be made with
like or similar parts or products.
• Hunter Douglas motorization components are
covered for 5 years from the date of purchase.
• Any conditions caused by normal wear and tear.
• Abuse, accidents, misuse or alterations to the
• Exposure to the elements (sun damage, wind,
• Failure to follow our instructions with respect
• Shipping charges, cost of removal and reinstallation.
NOT COVERED
BY A LIFETIME LIMITED WA RRANTY
product.
water/moisture) and discoloration or fading
over time.
to measurement, proper installation, cleaning
or maintenance.
Hunter Douglas (or its licensed fabricator/distributor) will repair or replace the
window fashion product or components found to be defective.
TO OBTA IN WARRANTY SERV ICE
1. Contact your original dealer (place of purchase) for warranty assistance.
2. Visit hunterdouglas.com for additional warranty information, frequently asked questions and access to service locations.
3. Contact Hunter Douglas at (888) 501-8364 for technical support, certain parts free of charge, for assistance in obtaining
warranty service or for further explanation of our warranty.
NOTE: In no event shall Hunter Douglas or its licensed fabricators/distributors be liable or responsible for incidental
or consequential damages or for any other indirect damage, loss, cost or expense. Some states do not allow the exclusion or
limitation of incidental or consequential damages, so the above exclusion or limitation may not apply to you. This warranty
gives you specific legal rights, and you may also have other rights which vary from state to state.
Different warranty periods and terms apply for commercial products and applications.
5106149000
5/15
Page 21

Installation • Operation • Care
Vignette® Modern Roman Shades
Traversed™ with Vertiglide
™
Moveable Stack Option
Page 22

CONTENTS
Getting Started:
Product View — Side Stack ........................................... 1
Product View — Split Stack ........................................... 2
Tools and Fasteners Needed .......................................... 3
Installation:
Installation Overview ..................................................... 4
Outside Mount Procedures ............................................ 6
Mount the Installation Brackets .............................. 6
Install the Headrail ................................................ 8
Install the Shade into the Headrail .......................... 9
Inside Mount Procedures ............................................. 11
Mount the Installation Brackets ............................ 11
Assemble the Shade ........................................... 12
Install the Headrail .............................................. 14
Attach the Handle(s) .................................................... 15
Secure the Cords with the Cord Anchor ........................ 15
Complete the Installation ............................................. 18
Operation:
Operate the Shade ...................................................... 20
Troubleshooting .......................................................... 21
Care:
Removing the Shade (If Necessary) .............................. 23
Cleaning Procedures ................................................... 23
Questions?
Call the Hunter Douglas Customer Information Center at
1-888-501-8364.
© 2015 Hunter Douglas. All rights reserved. All trademarks used herein are the property of Hunter Douglas.
Page 23

Product View — Moveable Stack Option: Side Stack
(Right Stack Shown)
Headrail
End
Cap
Cord
Anchors
Moving
Rail
Trike
Installation
Brackets
Trike
Roller
Trike
GETTING STARTED
End
Cap
Cord
Anchor
Return
(Optional;
O.B. Only)
Secondary
Rail
Secondary
Rail Handle
(Optional)
Moving
Rail
Handle
Bracket
Stabilizer
Plate
Snaplock
Magnetic
Hold-Down
Bracket Kit
1
Page 24

GETTING STARTED
Product View — Moveable Stack Option: Split Stack
End
Cap
Cord
Anchor
Return
(Optional;
O.B. Only)
Secondary
Rail
Secondary
Rail
Handle
(Optional)
Headrail
Trike
Roller
Installation
Brackets
Trike
Cord
Anchors
Moving
Handle
Stop Plate
(Inside Headrail)
Rail
Trike
Trike
End
Cap
Cord
Anchor
Return
(Optional;
O.B. Only)
Secondary
Rail
Secondary
Rail
Handle
(Optional)
Bracket
Stabilizer
Plate
Snaplock
Magnetic
Hold-Down
Bracket Kit
2
Page 25

GETTING STARTED
(Stationary Rail Stabilizer)
(Installation Bracket/Spacer Block)
Thank you for purchasing Vignette® Modern Roman Shades Traversed™ with Vertglide™. With
proper installation, operation, and care, your new shades will provide years of beauty and
performance.
Please thoroughly review this instruction booklet and the enclosed packing list before beginning
the installation. If your shade has a protective plastic cover on the fabric covered headrail, keep
the plastic in place until the shade is installed.
Tools and Fasteners Needed
■ Allen wrench (provided) ■ Hex driver 1/4"
■ Flat blade and Phillips screwdrivers ■ Level (laser level is recommended)
■ Measuring tape and pencil ■ Needlenose pliers
■ Power drill, 3/32" drill bit ■ Painter’s tape
In addition, you will need fasteners designed to work with your specific mounting surface(s).
■ #6 Hex Head Screws (Provided). One 2" screw is provided per installation bracket and
spacer block. Two 11/2" screws are provided per rail stabilizer kit.
■ Drywall Anchors (Not Provided). Use drywall anchors when mounting into drywall.
#6 x 2"
Hex Head Screw
#6 x 11/2"
Hex Head Screw
IMPORTANT: Vignette Traversed with Vertiglide shades are recommended for professional
installation only. Wider shades may require additional installers.
3
Page 26

INSTALLATION
Traversed with Vertiglide Moveable Stack Design
Primary
Moving Rails
Secondary
Rails
1 1
2 2
Installation Overview
Installation for Traversed™ with Vertglide™ Moveable Stack shades varies based on the shade’s
mounting type and the design to be installed.
Mounting Types and Window Terminology
■ Review the mounting types and basic window terminology illustrated below.
➤ There are different installation procedures for outside mount and inside mount shades.
➤ For ceiling mount applications, refer to the inside mount instructions.
Trim or Molding
Head
Jamb
Jamb Jamb
Floor or Sill
Outside Mount
Shade mounts outside
door or window opening.
Inside Mount
Shade fits within door
or window opening.
Shade Designs
■ Determine which Traversed with Vertiglide Moveable Stack design you are installing: left
stack, right stack, or split stack (center opening).
Left
Stack
Split Stack
(Center Opening)
Right
Stack
4
Page 27

INSTALLATION
Installation
Installation Brackets Required
■ The number of installation brackets required varies
with headrail width, as shown in the table. One spacer
block is provided with each installation bracket.
Bracket
Spacer
Block
Shade
Width
36" – 60" 2 3
601/8" – 84" 3 4
841/8" – 120" 4 5
1201/8" – 192" 6 6
1921/8" – 240" 8 8
2401/8" – 312" — 10
3121/8" – 384" — 12
Side
Stack
Unpack the Shade
The headrail and shade fabric panel(s) will arrive in separate boxes. To unpack the headrail,
simply remove the packaging. Follow the instructions below to unpack the fabric panel(s).
■ Carefully remove the shade from the plastic.
■ Unpack the bottom of the shade.
➤ Remove the packing rail and hangers from the
bottom of the shade. The bottom is the side
without cords or colored tape.
■ Unpack the top of the shade.
➤ Peel back the plastic tape from the packing rail
at the top of the shade.
➤ Peel away the colored tape securing the cords
to the packing rail.
➤ Leave the remaining colored tape which secures
the cords. This tape will be removed later.
➤ Slide the packing rail from the shade.
➤ Lay the shade face up on a clean surface.
Bottom
Packing Rail
Top Packing Rail
Split
Stack
Next Step
■ Refer to the page below based on your shade mounting type:
➤ Outside Mount — Page 6
➤ Inside Mount/Ceiling Mount — Page 11
5
Page 28

INSTALLATION — Outside Mount
Headrail End Marks
Two-Piece Headrails
Headrail End Marks
Floor
OUTSIDE MOUNT PROCEDURES
Mount the Installation Brackets
■ Add 1/2" to the ordered height (found on the label
inside the headrail), and measure that total distance
from the floor.
➤ Position the top of the brackets at this height for
the minimum recommended 1/2" floor clearance.
➤ Add more to the ordered height if more floor
clearance is desired.
■ Center the headrail over the window opening at the marked height. Use a pencil to lightly
mark each end of the headrail.
➤ Alternatively, measure the width of the headrail. Use this width to mark the headrail end
points over the window opening.
➤ If a side stack shade was measured to accommodate for the stackback, position the
headrail so that the window remains completely uncovered when the shade is in the fully
opened position.
NOTE: Be sure that when the shade is drawn fully closed, the window is completely
covered.
■ Mark 2" from each end of the headrail.
➤ If more than two installation brackets came with your order, space additional bracket(s)
evenly (or at least every 36") and mark their locations.
Ordered
Height
1
+
/2"
Bracket
2" 2"
2" 4" 2"
6
Space Evenly Space Evenly
Window Opening
➤ Two-piece headrails: Place a bracket 4" from the center on both sides. Space
additional bracket(s) evenly (or at least every 36") and mark their locations.
Split
4"
Window Opening
Space EvenlySpace Evenly
Page 29

INSTALLATION — Outside Mount
Tab
■ Center the brackets on your marks and mark the screw holes.
➤ A minimum of 11/4" flat vertical
surface is required to mount the
brackets.
CAUTION: The rear of the brackets
must be flush against a flat mounting
surface. Do not mount brackets
oncurved molding.
■ Drill the screw holes using a 3/32" drill bit.
CAUTION: Use drywall anchors when mounting into drywall.
■ Attach the installation brackets to the mounting surface using
the 2" screws provided.
IMPORTANT: The tops of the brackets must be level with
their front edges aligned.
■ If using spacer blocks, attach them to the installation brackets (if not already attached).
IMPORTANT: A maximum of one 1/2" spacer block can be used per installation bracket.
➤ Break off and discard the 1/8" shim, if attached to the
spacer block.
➤ Insert the legs of the installation bracket into the tabs
on the spacer block.
➤ Then rotate the installation bracket back to snap it in
place.
■ Attach the installation brackets and spacer blocks using the 2" mounting screws provided.
Headrail
End Mark
2"
Tab
Headrail
End Mark
Spacer
Block
2"
7
Page 30

INSTALLATION — Outside Mount
The front of the installation
snaps into the bracket.
Install the Headrail
■ Split stack only: Headrails may arrive in two separate pieces depending on ordered width.
If so, connect the two pieces with a joining plate and center the stop plate over the seam.
➤ Insert the joining plate into the top back channel of one of the headrail pieces. The tabs
on the joining plate are slightly angled. Place the joining plate so that the tabs angle
down toward the headrail in order to secure each rail piece.
➤ Slide the second rail piece onto the joining plate and stop plate.
➤ Position the split stack stop plate so it is centered on the joint between the headrails.
Tighten the stop plate screws using the provided Allen wrench.
➤ Peel back the protective plastic covering from the front of the headrail about an inch on
either side of the joint.
➤ Attach the fabric tab. Remove the adhesive backing from the tab and press it in place
over the split on the front of theheadrail.
Tabs Angled
Down Toward
Joining Plate
Headrail
Stop Plate
■ Slip the headrail onto the installation brackets, until the front of each bracket fits under the
groove of theheadrail.
■ Rotate the back of the headrail up and push back to snap it into the bracket.
bracket fits under the groove.
Headrail
The back of the headrail
8
Fabric Tab
Page 31

Retur
End Cap
Slide Retur
into Channel
Stabilizer
Snaplock
INSTALLATION — Outside Mount
Install the Shade into the Headrail
Prepare the Optional Return(s)
■ If you ordered optional return(s), insert the
return(s) into the bottom of the secondary rail(s).
➤ Slide the return into the channel on the
secondary rail until it is flush with the
bottom end cap.
➤ The entire return is illustrated in the
“Product Views” on pages 1 and 2.
■ Insert the stabilizer plate and snaplock into the bottom of
the secondary rail(s).
➤ Slide the stabilizer plate into the channel on the
secondary rail as shown.
➤ Install the snaplock into the channel under the stabilizer
plate to hold the stabilizer plate in place.
n
n
Bottom
Back of
Secondary
Rail
Insert the Primary Moving Rail Trike into the Headrail
NOTE: With split stack designs, fully complete the installation of one shade panel before
starting the second panel.
■ Review the illustration showing the channels where the trike rollers and fabric carrier rollers
fit into the headrail.
Trike
Fabric
Carrier
Rollers
Front of
Headrail
■ With the front of the fabric facing you, locate the
primary moving rail trike.
➤ Insert the trike’s side rollers into the
headrail, as illustrated.
IMPORTANT: Be sure the cords are routed
Trike
Rollers
First Fabric
Carrier Roller
to the outside of the trike before sliding the
trike side rollers into the headrail. Be careful
not to pinch the cords.
NOTE: One cord anchor is attached to each
of the three cords. With side stack designs,
the cords are routed through the headrail
end cap.
➤ Install the first fabric carrier roller after the trike side rollers, before sliding on the top
roller on the end of the trike.
➤ After installing the first fabric carrier roller, continue sliding the trike into the headrail
until the top roller on the end of the trike fits under the center channel.
Plate
Cords
Moving
Rail
9
Page 32

INSTALLATION — Outside Mount
Install the Fabric Carrier Rollers into the Headrail
■ Hook each of the remaining rollers (except the last
one) into the correct channel of the headrail.
➤ Carefully push back the fabric in order to see
each roller.
➤ Hook the bottom of the roller into the lower part of
the channel and then rock the top of the roller into
the top part of the channel.
Insert the Secondary Rail Trike into the Headrail
■ Insert the trike’s top roller.
■ Then insert the last fabric carrier roller.
■ Finally, insert the trike’s side rollers.
IMPORTANT: Be careful not to pinch the cords.
Avoid twisting the cords.
NOTE: The cords from the secondary rail are routed
through the headrail end cap.
Proceed to “Attach the Handle(s)” on page 15.
Headrail
Cutaway
Roller in
Channel
Last Fabric
Carrier Roller
Secondary
Rail Trike
10
Page 33

INSTALLATION — Inside Mount
Two-Piece Headrails
INSIDE MOUNT PROCEDURES
Mount the Installation Brackets
■ Mark the head jamb 2" from each side jamb.
➤ If more than two installation brackets came with your order, space additional bracket(s)
evenly (or at least every 36") and mark their locations.
Head Jamb
2" 2"
Jamb Jamb
➤ Two-piece headrails: Place a bracket 4" from the center on both sides. Space
additional bracket(s) evenly (or at least every 36") and mark their locations.
2" 4" 2"
Jamb Jamb
Space Evenly Space Evenly
Split
4"
Space EvenlySpace Evenly
■ Center the brackets on your marks and mark the
screw holes.
■ Drill the screw holes using a 3/32" drill bit.
CAUTION: Use drywall anchors when mounting
into drywall.
■ Attach the installation brackets to the mounting
surface using the screws provided.
IMPORTANT: The front edges of the brackets
must be level with their front edges aligned.
➤ A minimum depth of 11/2" is required to mount
the brackets.
➤ A depth of 41/2" is required for fully recessed
mounting with the shade drawn closed, or
51/2" with the shade stacked open.
2"
11
Page 34

INSTALLATION — Inside Mount
Assemble the Shade
With inside-mounted applications, the shade is pre-assembled before the headrail is installed.
Lay out all the components for assembly on a clean, cloth-covered surface. Position the headrail
near the top of the vertical rails.
Assemble the Headrail (Two-Piece Headrails Only)
■ Split stack only: Headrails may arrive in two separate pieces depending on ordered width.
The two pieces are connected with a joining plate.
➤ Insert the joining plate into the top back channel of one of the headrail pieces. The tabs
on the joining plate are slightly angled. Place the joining plate so that the tabs angle
down toward the headrail.
➤ Slide the joining plate completely onto the headrail so that no part of it protrudes.
➤ If the stop plate is protruding from one of the headrail pieces, slide it all they way into the
headrail so that it does not protrude. Loosen the screws with the provided Allen wrench,
if necessary.
Tabs Angled
Down Toward
Joining Plate
Headrail
Stop Plate
➤ Position the two headrail sections so that they abut in the center.
➤ Using a flat blade screwdriver, center the joining plate between the two headrail sections.
Be careful not to damage the fabric-covered headrail.
➤ Position the stop plate so it is centered on the joint between the headrails. Tighten the
stop plate screws using the provided Allen wrench.
Center Over Split
12
Page 35

INSTALLATION — Inside Mount
Stabilizer
Snaplock
Prepare the Secondary Rail(s)
■ Insert the stabilizer plate and snaplock into the bottom of
the secondary rail(s).
➤ Slide the stabilizer plate into the channel on the
secondary rail as shown.
➤ Install the snaplock into the channel under the stabilizer
plate to hold the stabilizer plate in place.
Back of
Secondary
Rail
Insert the Primary Moving Rail Trike into the Headrail
NOTE: With split stack designs, fully complete the installation of one shade panel before
starting the second panel.
■ Review the illustration showing the channels where the trike rollers and fabric carrier rollers
fit into the headrail.
■ With the front of the fabric facing you, locate the primary moving rail trike.
➤ Insert the trike’s side rollers into the
headrail, as illustrated.
IMPORTANT: Be sure the cords are routed
to the outside of the trike before sliding the
trike side rollers into the headrail. Be careful
not to pinch the cords.
Trike
Rollers
First Fabric
Carrier Roller
NOTE: One cord anchor is attached to each
of the three cords. With side stack designs,
the cords are routed through the headrail
end cap.
➤ Install the first fabric carrier roller after the
trike side rollers, before sliding on the top
roller on the end of the trike.
➤ After installing the first fabric carrier roller, continue sliding the trike into the headrail
until the top roller on the end of the trike fits under the center channel.
Trike
Fabric
Carrier
Rollers
Front of
Headrail
Plate
Cords
Moving
Rail
Install the Fabric Carrier Rollers into the Headrail
■ Hook each of the remaining rollers (except the last
one) into the correct channel of the headrail.
➤ Carefully push back the fabric in order to see
each roller.
➤ Hook the bottom of the roller into the lower part of
the channel and then rock the top of the roller into
the top part of the channel.
Headrail
Cutaway
Roller in
Channel
13
Page 36

INSTALLATION — Inside Mount
Insert the Secondary Rail Trike into the Headrail
■ Insert the trike’s top roller.
■ Then insert the last fabric carrier roller.
■ Finally, insert the trike’s side rollers.
IMPORTANT: Be careful not to pinch the cords. Avoid
twisting the cords.
NOTE: The cords from the secondary rail are routed
through the headrail end cap.
Secondary
Rail Trike
Last Fabric
Carrier Roller
Attach the end caps
■ Loosen the screw on each end cap until it is flush with the top.
■ Push the end caps into place on the headrail. Hold the cords below the end caps when
installing them. Be careful not to pinch the cords.
■ If necessary, tap the end caps in place with a rubber mallet.
■ Tighten the end cap screws.
Install the Headrail
IMPORTANT: Because the fabric is pre-installed into the headrail, more than one installer may
be needed to mount the headrail into the installation brackets.
■ Remove the protective plastic covering from the
front of the headrail.
■ Two-piece headrails only: Attach the fabric tab.
Remove the adhesive backing from the tab and press
it in place over the split on the front of theheadrail.
■ Gather the vertical rails and fabric panel(s) to the center of the headrail.
■ Carefully lift and move the headrail, vertical rails, and fabric to the window or door opening.
■ Slip the headrail onto the installation brackets, until the front of each bracket fits under the
groove of theheadrail.
■ Rotate the back of the headrail up and push back to snap it into the bracket.
The front of the installation
bracket fits under the groove.
Fabric Tab
14
Headrail
The back of the headrail
snaps into the bracket.
Proceed to “Attach the Handle(s)” on page 15.
Page 37

Attach the Handle(s)
r
Marks
Front
Channel
Cord
Anchor
Bottom View
Handles are standard for primary moving rails (one for side
stack and two for split stack). Handles are optional for the
secondary rails. If a handle is ordered for the secondary
rail(s), a clear base plate will be installed on each secondary
rail, as well as on the primary moving rail(s).
■ Slide the handle down onto the clear base plate until it
snaps into place.
INSTALLATION
Secure the Cords with the Cord Anchors
■ Remove the colored tape securing the cords.
Cord
Ancho
IMPORTANT: The cords must hang freely with no twists. If the cords are twisted, straighten
them out before proceeding.
Side Stack
■ Close the shade within 6" of each end. Adjust the position of the rails as needed when
installing the cord anchors.
■ Attach the end caps on outside mount shades. (End caps on inside mount shades should
already have been installed.)
➤ Loosen the screw on each end cap until it is flush with the top.
➤ Push the end caps into place on the headrail. Hold the cords below the end cap on the
moving rail side when installing it. Be careful not to pinch or twist the cords.
➤ If necessary, tap the end caps in place with a rubber mallet.
➤ Tighten the screw on both end caps.
■ Locate the cord anchor connected to the three cords coming
from the top of the secondary rail.
➤ To secure the cord anchor, first locate the two marks on
the front channel of the headrail near the stacking end.
➤ Hook the cord anchor between the two marks on the front
channel.
➤ Use the provided Allen wrench to tighten the cord anchor
just until snug to secure it to the channel.
IMPORTANT: The three cords attached to the cord anchor
may need minor tension adjustment. Final cord adjustment
will be explained later in these instructions.
Cord Anchor
in Front
Channel
Tighten with
Allen Wrench
15
Page 38

Cord
Channel
Marks
Front
Channel
Cord
Anchor
Bottom View
Bottom View
3
2
INSTALLATION
■ Secure the three cord anchors attached to the individual cords routed through the non-
stacking side end cap. Be sure that the cords are not twisted before beginning.
➤ Start with the cord anchor that has the shortest cord. Hook the anchor between the first
set of marks in the front channel of the headrail and secure it using the Allen wrench.
➤ Install the cord anchor with the next shortest cord in a similar manner.
➤ Finally, install the cord anchor with the longest cord.
IMPORTANT: Make sure that the cords do not twist together.
Front Channel
1
Proceed to “Complete the Installation” on page 18.
Split Stack
NOTE: Each fabric panel has its own set of cord tensioners. Install all four cord tensioners for
one panel before installing the cord tensioners for the other panel.
■ Move the vertical rails of each panel within 6" of each end and 6" of the stop plate in the
center of the rail. Adjust the position of the rails as needed when installing the cord anchors.
■ Attach the end caps on outside mount shades. (End caps on inside mount shades should
already have been installed.)
➤ Loosen the screw on each end cap until it is flush with the top.
➤ Push the end caps into place on the headrail. Hold the cords below the end cap on the
moving rail side when installing it. Be careful not to pinch or twist the cords.
➤ If necessary, tap the end caps in place with a rubber mallet.
➤ Tighten the screw on both end caps.
■ Locate the single cord anchor connected to the three cords coming from the top of the
secondary rail.
➤ To secure the cord anchor, first locate the two marks on
the front channel of the headrail near the stacking end.
➤ Hook the cord anchor between the two marks on the front
channel.
➤ Use the provided Allen wrench to tighten the cord anchor
just until snug to secure it to the channel.
IMPORTANT: The three cords attached to the cord anchor
may need minor tension adjustment. Final cord adjustment
will be explained later in these instructions.
16
Anchor
in Front
Tighten with
Allen Wrench
Page 39

INSTALLATION
Marks
Front
Channel
Cord
Anchor
Bottom View
Bottom View
3
2
■ Route the three cords
with individual cord anchors
attached through the stop
plate. A single cord is shown in
the illustration for clarity.
1) Slide the cords from the trike up the
angled back slot of the split stack stop plate,
positioning them into the circular holder.
2) Slide the cords up the frontchannel so that
they exit the smaller circular hole in the front
of the stop plate.
3) Secure the three cord anchors to the front channel as
described in the following procedure.
■ Secure the three cord anchors attached to the individual cords routed through the stop
plate. Be sure that the cords are not twisted before beginning.
➤ Start with the cord anchor that has the shortest cord. Hook the anchor between the first
set of marks closest to the stop plate and secure it using the Allen wrench.
➤ Install the cord anchor with the next shortest cord in a similar manner.
➤ Finally, install the cord anchor with the longest cord.
IMPORTANT: Make sure that the cords do not twist together.
1
Cords
from Trike
2
3
Front Channel
1
Proceed to “Complete the Installation” on page 18.
17
Page 40

INSTALLATION
Complete the Installation
Remove the Covering from the Headrail
■ Gently peel the clear covering from the fabric-covered headrail.
Inspect the Folds
■ If the first fabric fold does not hang as well as others, see “Troubleshooting” on page 22.
Perform the Final Cord Adjustment
■ Open and close the fabric panel(s) several times.
■ To make final cord adjustments, loosen and re-tighten the cord anchors one at a time.
➤ Gently pull the cords until you feel a slight resistance. Do not over-tension.
■ Again, open and close the fabric panel(s) several times. The rails should slide easily, yet hold
their position anywhere along the headrail.
■ Re-adjust the cords as needed. Increase tension in the cords if the rails do not hold their
position. Reduce tension in the cords if the rails are difficult to move.
Attach Magnetic Hold-Down Brackets (Optional)
Magnetic hold-down brackets hold the secondary rail(s) flush with the end of the headrail.
■ Determine where to attach the hold-down brackets.
➤ Outside mount: Slide the secondary rail to the end of the headrail. Mark the edge of
the rail on the mounting surface. Slide the rail away from the end of the headrail and
measure 3/4" in from your mark (toward the shade). Mark this location.
➤ Inside mount: Slide the secondary rail to the end of the headrail. Mark the rear edge of
the rail on the jamb. Slide the rail away from the jamb and measure 3/8" back from your
mark (toward the glass). Mark this location.
18
Outside Mount
Edge of
Secondary
3
/4"
Hold-Down
Bracket
Centerline
Rail
Inside Mount
3
/8"
JambWall
Rear Edge of
Secondary
Rail
Hold-Down
Bracket
Centerline
Page 41

INSTALLATION
Adjust the
■ Determine the height to mount the hold-down brackets.
➤ Slide the snaplock to the bottom of the
secondary rail(s).
➤ Check that the stabilizer plate is resting
on the snaplock. The top of the stabilizer
plate is the minimum height at which
the magnet top of the hold-down
brackets can be installed.
➤ The hold-down brackets may be mounted higher if desired. The stabilizer plate can be
raised to the higher height by sliding the snaplock higher up the secondary rail.
■ Position the hold-down bracket at the proper height, centered on your mark with the magnet
on top. Mark the screw location. The screw should be placed in the middle of the bracket
channel to allow for adjustment.
■ Drill the screw hole using a 3/32" drill bit.
■ Attach the hold-down bracket to the mounting surface using
the screws provided.
■ Check that the bracket is positioned correctly to hold the secondary
rail. If necessary, adjust the bracket location using the channel.
Stabilizer
Plate
Snaplock
Minimum Height of
Hold-Down Bracket
bracket
using the
channel.
Magnetic hold-down
bracket installed (outside
mount shown)
19
Page 42

OPERATION
Operate the Shade
For better support and smoother operation, as well as to avoid soiling the fabric, use the
handle(s) when opening and closing the shade. If handles were ordered for the secondary rail(s),
both the primary moving rail(s) and the secondary rail(s) can be used to position the fabric panel
anywhere along its travel with any degree of closure.
NOTE: With a split stack shade, each panel operates independently.
■ To operate the shade, simply use the handle(s) to slide the vertical rail(s). Allow the shade to
stack evenly.
Test Operation
■ Open and close the shade several times.
■ If the shade does not operate smoothly or if the vertical rail(s) do not hold their position, see
“Perform the Final Cord Adjustment” on page 18.
20
Page 43

Troubleshooting
OPERATION
Problem
Solution
Problem
Solution
Problem
Solution
Problem
Solution
Problem
Solution
The shade will not fit into the installation brackets.
Check that the installation brackets are level and aligned, and be sure the heads
of the screws are flush against the installation bracket.
Check that the headrail is completely inserted into the installation brackets. See
“Install the Headrail” on page 8 (outside mount) or page 14 (inside mount).
The shade binds or moves with difficulty.
Check that the cords are notpinched and all rollers are positioned in the
headrail channel.
Adjust the cord anchors. See “Perform the Final Cord Adjustment” on page 18.
The cords are loose or sagging.
See “Perform the Final Cord Adjustment” on page 18.
The top of the secondary rail does not stay in position.
Install magnetic hold-down brackets (see page 18).
A primary moving rail or secondary rail is not vertical.
Adjust the vertical alignment by turning the
set screw located under the trike’s center
roller. Use the provided Allen wrench.
If the cords have become too loose or
too tight after the above adjustment, see
“Perform the Final Cord Adjustment” on
page 18.
Trike
Turn to Adjust
Moving Rail
21
Page 44

OPERATION
Problem
Solution
The first fabric fold does not hang as well as the others.
Install the optional roller onto the first fold (closest to the moving rail). The
optional roller is found in your parts bag.
■ Remove the current first roller from the channel and allow it to hang.
■ Place the optional roller into the channel above the removed roller (clear of
the trike). Slide the optional roller to position it above its hole.
Rear View
Hole for
Optional
Roller
Trike
Roller
Removed
from Channel
Optional RollerChannel
■ Push the stem of the optional roller through the hole and press the clip onto
the stem to secure the roller in place.
22
Optional Roller
Press Clip
onto Stem
■ Place the second roller back into the channel.
Page 45

CARE
Removing the Shade (If Necessary)
Remove the Fabric Panel(s) (Outside Mount Only)
■ Unscrew and remove the end caps.
■ Loosen and remove all cord anchors from the front channel of the headrail.
■ Slide the panel(s) out of the headrail.
Remove the Headrail
■ Open the shade if the fabric is still installed.
■ While holding the headrail, push back on the bottom
tab of each installation bracket using a small flat
blade screwdriver. This releases the bottom edge
of the headrail.
■ Rotate the back of the headrail down and out from
the brackets.
Flat Blade
Screwdriver
Cleaning Procedures
Hunter Douglas Vignette® Modern Roman Shades are made of an anti-static, dust-resistant
fabric that repels dirt and dust. For most fabrics, the following cleaning options are available.
Dusting
■ Regular light dusting with a feather duster is all the cleaning needed in most circumstances.
Vacuuming
■ Use a hand-held vacuum with low suction for more thorough dust removal.
Compressed Air / Hair Dryer (Cool Setting)
■ Blow dirt and debris from within the fabric folds using clean, compressed air.
Spot-Cleaning
■ Prepare a solution of warm water and mild detergent.
■ Dampen a clean cloth in the solution and wring it out.
■ Place a dry, clean cloth behind the spot between the face fabric and the back fabric.
■ Dab the spot with the dampened cloth until it is removed. Non-oil based baby wipes may be
used on stubborn stains. Do not rub the fabric.
■ Allow the shade to dry in the completely closed position.
23
Page 46

CARE
Injection/Extraction Cleaning
Vignette® Modern Roman Shades can be cleaned by a professional using the injection/extraction
method of deep cleaning.
CAUTION: Do not use the injection/extraction method of deep cleaning on the headrail or
vertical rail fabric.
■ Specify the dry cleaning method only.
■ Pre-treat heavy stains.
Steaming
CAUTION: Do not steam the headrail or vertical rail fabric.
■ Close the shade.
■ Steam the face fabric from the bottom to the top, making sure to get steam between each
fabric fold. Be careful not to saturate the fabric with steam.
■ Allow the shade to dry completely before opening it.
A Note on Textiles
As with all textiles, Vignette fabrics are subject to some inherent variations in the fabric weave.
Subtle dye-lot variations, puckering, or wrinkling fall within textile industry standards and should
be considered as normal, acceptable quality. Additionally, there will be slight differences in
pattern alignment from the fabric on the rails to the fabric of the shade. Pattern alignment is
not guaranteed with split stack applications. These characteristics do not detract from the
product’s appeal.
Variations in color pattern are unique characteristics that contribute to the classic beauty of
the shade.
24
Page 47

Page 48

The Hunter Douglas® Lifetime Guarantee is an expression of our desire to provide a thoroughly satisfying
experience when selecting, purchasing and living with your window fashion produc ts. If you are not thoroughly
satisfied, simply contact Hunter Douglas at (888) 501-8364 or visit hunterdouglas.com. In support of this policy
of consumer satisfaction, we offer our Lifetime Limited Warranty as described below.
COVERED
BY A LIFETIME LIMITED WA RRANTY
• Hunter Douglas window fashion products are
covered for defects in materials, workmanship
or failure to operate for as long as the original
retail purchaser owns the product (unless shorter
periods are provided below).
• All internal mechanisms.
• Components and brackets.
• Fabric delamination.
• Operational cords for a full 7 years from the
date of purchase.
• Repairs and/or replacements will be made with
like or similar parts or products.
• Hunter Douglas motorization components are
covered for 5 years from the date of purchase.
• Any conditions caused by normal wear and tear.
• Abuse, accidents, misuse or alterations to the
• Exposure to the elements (sun damage, wind,
• Failure to follow our instructions with respect
• Shipping charges, cost of removal and reinstallation.
NOT COVERED
BY A LIFETIME LIMITED WA RRANTY
product.
water/moisture) and discoloration or fading
over time.
to measurement, proper installation, cleaning
or maintenance.
Hunter Douglas (or its licensed fabricator/distributor) will repair or replace the
window fashion product or components found to be defective.
TO OBTA IN WARRANTY SERV ICE
1. Contact your original dealer (place of purchase) for warranty assistance.
2. Visit hunterdouglas.com for additional warranty information, frequently asked questions and access to service locations.
3. Contact Hunter Douglas at (888) 501-8364 for technical support, certain parts free of charge, for assistance in obtaining
warranty service or for further explanation of our warranty.
NOTE: In no event shall Hunter Douglas or its licensed fabricators/distributors be liable or responsible for incidental
or consequential damages or for any other indirect damage, loss, cost or expense. Some states do not allow the exclusion or
limitation of incidental or consequential damages, so the above exclusion or limitation may not apply to you. This warranty
gives you specific legal rights, and you may also have other rights which vary from state to state.
Different warranty periods and terms apply for commercial products and applications.
5/155106146000
 Loading...