

Page 1
Installation InstructionS
RB 500 Motorized Roller Shades
4" Fascia Coupled
Series 5-287–216
Compatible Motors
LT50 RA 525A2
LT50 Altus RTS 525A2
Sonesse 50 RTS 506S2
Sonesse 50 DCT 506S2
Sonesse 50 RA 506S2
Sonesse 50 RS485 506S2
Sonesse 50 RTS 510S2
Sonesse 50 DCT 510S2
Sonesse 50 RA 510S2
Sonesse 50 RS485 510S2
Sonesse ULTRA 50 RTS 506A2
Sonesse ULTRA 50 RA 506A2
Sonesse ULTRA 50 RS485 506A2
LT50 RS485 515S2
LT50 RS485 535A2
Sonesse ULTRA 50 DC RTS 504A8
Sonesse 50 DC RS485 504A8
Sonesse 30 RTS
Sonesse 30 DCT
Sonesse 30 RS485
1
Page 2

Installation
b
a
c
Install the clutch bracket and intermediate bracket
first.
a) recess b) ceiling c) wall
1
2
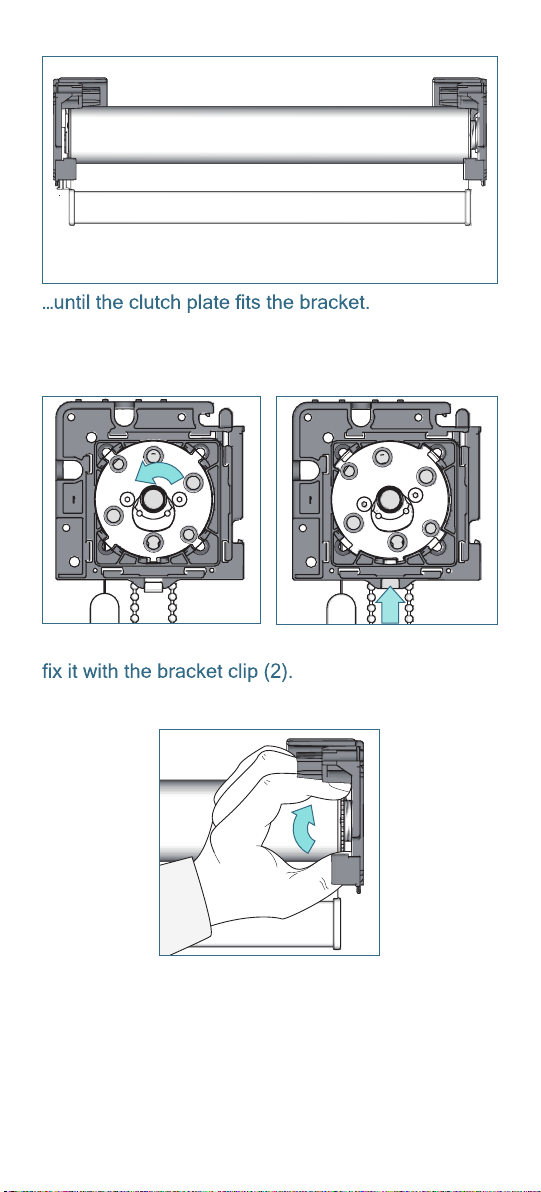
Insert the Plate L into the intermediate bracket.
Turn the Plate L in the rolling off direction(1) and
secure with the locking .)2(pilc
Not necessary when using bracket with leveler.
1
2
Place the shade with the idle end onto the bracket.
Push the shade against tube bearing plug and lift it up ...
2
Page 3
1
2
Turn the blind (10°) in the rolling off direction (1) and
Fix the blind by turning the locking ring against the
bearing.
3
Page 4

Option: Leveller
To adjust skewing, put the provided Allen key into
the screw of the leveller and turn it left or right to
move the blind up and down. Support lifting of large
heavy blinds with the palm of your hand.
4
Page 5

5
Installation: Coupled shade
.
Use a pair of pliers to break off the stopper from the
intermediate bracket.
Install the outer bracket with the screws provided.
Slide the aligner or the connector set through the
intermediate bracket into the tube bearing plug.
Page 6

Place the tube with plug connector on the aligner or
6
connector set head.
2
1
click
Press the tube bearing plug, lift the roller shade
and snap it into the bracket.
To align the bottom hem
2
bars, pull the shade away
1
3
from aligner set (1), turn shade to line up bottom
hembars together (2). Release shade to secure
position (3). Not possible when using connector set.
Page 7

Secure shade band by turning the locking ring
7
on tube bearing plug furthest away from the bracket.
Option: Leveler
To adjust skewing, put the provided Allen key into
the screw of the leveler and turn it left or right to
move the shade up and down. Support lifting of large
heavy roller shades with the palm of your hand.
Place the fascia in the bracket. Make sure that
the fascia slides under the nose of the bracket.
Page 8

click
8
Push the fascia to snap it into the bracket.
Slide the
bracket covers onto the brackets.
Removal
Place the screw driver under the bracket cover, turn
the screw driver and slide the bracket cover from the
bracket.
Page 9

2
9
1
Press the bottom of the fascia upwards (1)
and pull it outwards (2).
Unfasten the locking ring. Slide a screw driver
between locking ring and bracket and push the tube
bearing plug
in the
aligner/connector
direction.
Move the roller shade downwards out of the bracket. Pull the aligner or connector out of the idle end.
Page 10

Connect the motor and all controls in accordance
with all safety standards.
10
 Loading...