

HunterDouglas Provenance Woven Wood Shades with PowerView Motorization Installation Operation And Care

Provenance® Woven Wood Shades
PowerView™ Motorization
Installation • Operation • Care

CONTENTS
© 2016 Hunter Douglas. All rights reserved. All trademarks used herein are the property of Hunter Douglas or
their respective owners.
Getting Started:
Product View ............................................................................ 1
Tools and Fasteners Needed ...................................................... 2
Installation:
Installation Overview ................................................................ 2
STEP 1 — Install the Brackets ................................................... 3
Mount the Installation Brackets — Inside Mount ......................... 4
Mount the Installation Brackets — Outside Mount ...................... 5
STEP 2 — Install the Shade ...................................................... 7
Attach the Optional Components ................................................ 8
STEP 3 — Connect the Power Source ........................................ 9
Operation:
Testing the Shade ................................................................... 14
Using the PowerView
™
Remote ................................................ 14
Resetting the Shade (If Necessary) ........................................... 16
Troubleshooting ...................................................................... 17
Care:
Removing the Shade (If Necessary) .......................................... 19
Removing the Crestover™ Valance (If Necessary) ..................... 19
Cleaning Procedures ............................................................... 20
Child Safety:
Warning ................................................................................. 21
Declarations .......................................................................... 22
Warranty .....................................................................Back Cover
Questions?
Call the Hunter Douglas Customer Information Center at
1-888-501-8364.

GETTING STARTED
1
Product View
Satellite Battery Pack or
DC Power Supply (Optional)
Attached
Battery Wand
(Standard)
DC Power Supply
UltraGlide
®
Shade
Installation
Brackets
Return
Sticky
Tape
Note:
Returns available on outside mount only.
Not shown: Top-Down/Bottom-Up shades and independent operable liner.

2
GETTING STARTED
Thank you for purchasing Hunter Douglas Provenance® Woven Wood Shades with PowerView™
Motorization. With proper installation, operation, and care, your new shades will provide years of
beauty and performance.
Please thoroughly review this instruction booklet and the enclosed packing list before beginning
the installation.
Tools and Fasteners Needed
■ Flat blade and Phillips screwdrivers
■ Measuring tape and pencil
■ Level (laser level is recommended)
■ Power drill,
3
/32" drill bit, and 1/4" hex driver
In addition, you will need fasteners designed to work with your specific mounting surface(s).
■ #6 x 1
1
/2" Hex Head Screws (Provided). Two 11/2" screws are provided per installation
bracket.
■ Speed Nuts and Screws (Provided). If ordered, extension brackets come with speed nuts
and screws.
■ Drywall Anchor (Not Provided). Use drywall anchors when mounting into drywall.
■ #6 x 2" Hex Head Screws (Provided). If using spacer blocks, two 2" screws are provided
per installation bracket.
Installation Overview
To install your shade, you will need to perform the following three steps:
STEP 1: Install the Brackets
STEP 2: Install the Shade
STEP 3: Connect the Power Source
Speed Nut
and Screw
(Provided with Each
Optional Extension Bracket)
#6 x 11/2"
Hex Head Screw
(Provided)
#6 x 2" Hex Head Screw
Provided with Each
Spacer Block
INSTALLATION
3
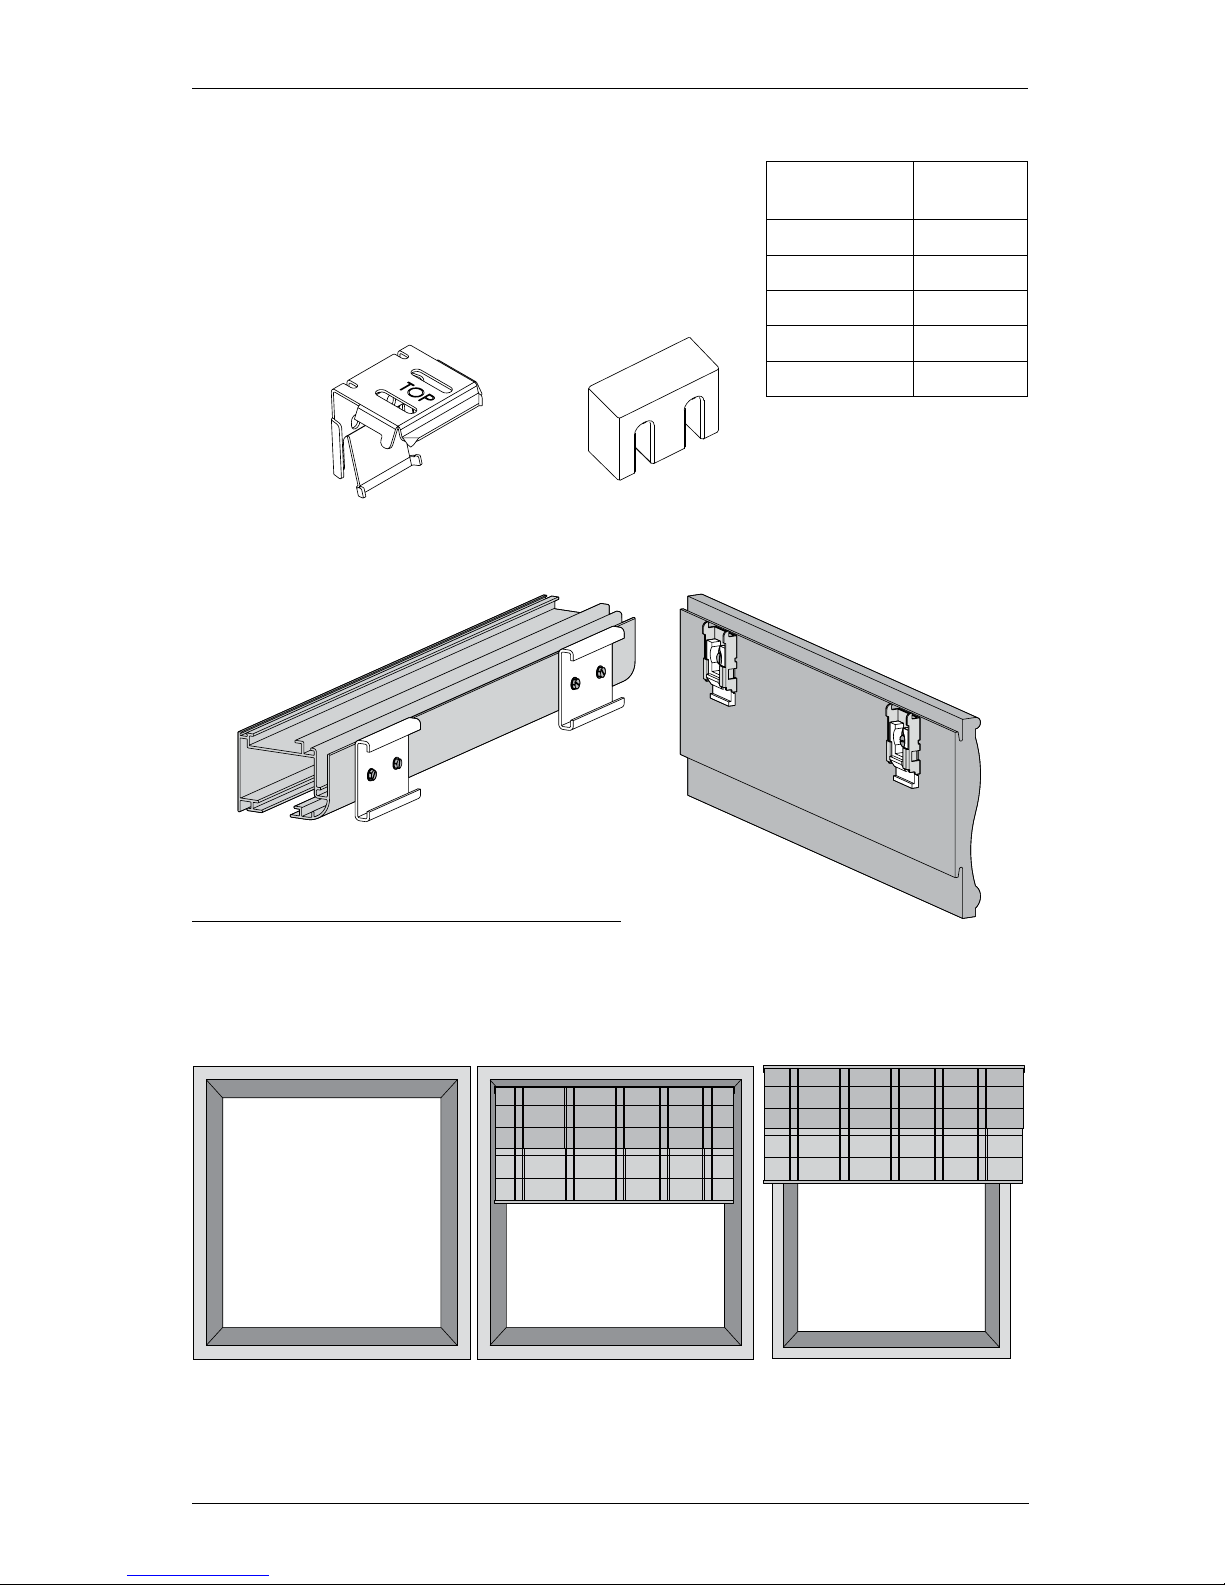
STEP 1 — Install the Brackets
■ The number of installation brackets required varies
with headrail width, as shown in the table.
Important: One
5
/8" spacer block per installation
bracket is required for outside mount shades using the
battery wand clip.
■ Crestover
™
Valance (Optional):
➤ Brackets are already attached to your shade and valance.
Mounting Types and Window Terminology
If the installation brackets are mounted correctly, the rest of the installation process follows
easily. To prepare for this important first step, review the mounting types and basic window
terminology illustrated below.
■ Refer to the appropriate page below based on your order:
➤ Inside Mount — Page 4
➤ Outside Mount — Page 5
Installation
Bracket
Spacer
Block
Shade/Valance
Width
Brackets
Required
15" – 36" 2
36
1
/8" – 72" 3
72
1
/8" – 108" 4
108
1
/8" – 120" 5
120
1
/8" – 144" 6
Headrail
Valance
Outside Mount
Shade mounts outside
window opening.
Inside Mount
Shade fits within
window opening.
Collectively, the sill and
jambs are called the
“window casement.”
Molding
Head Jamb
Sill
Jamb Jamb

INSTALLATION
4
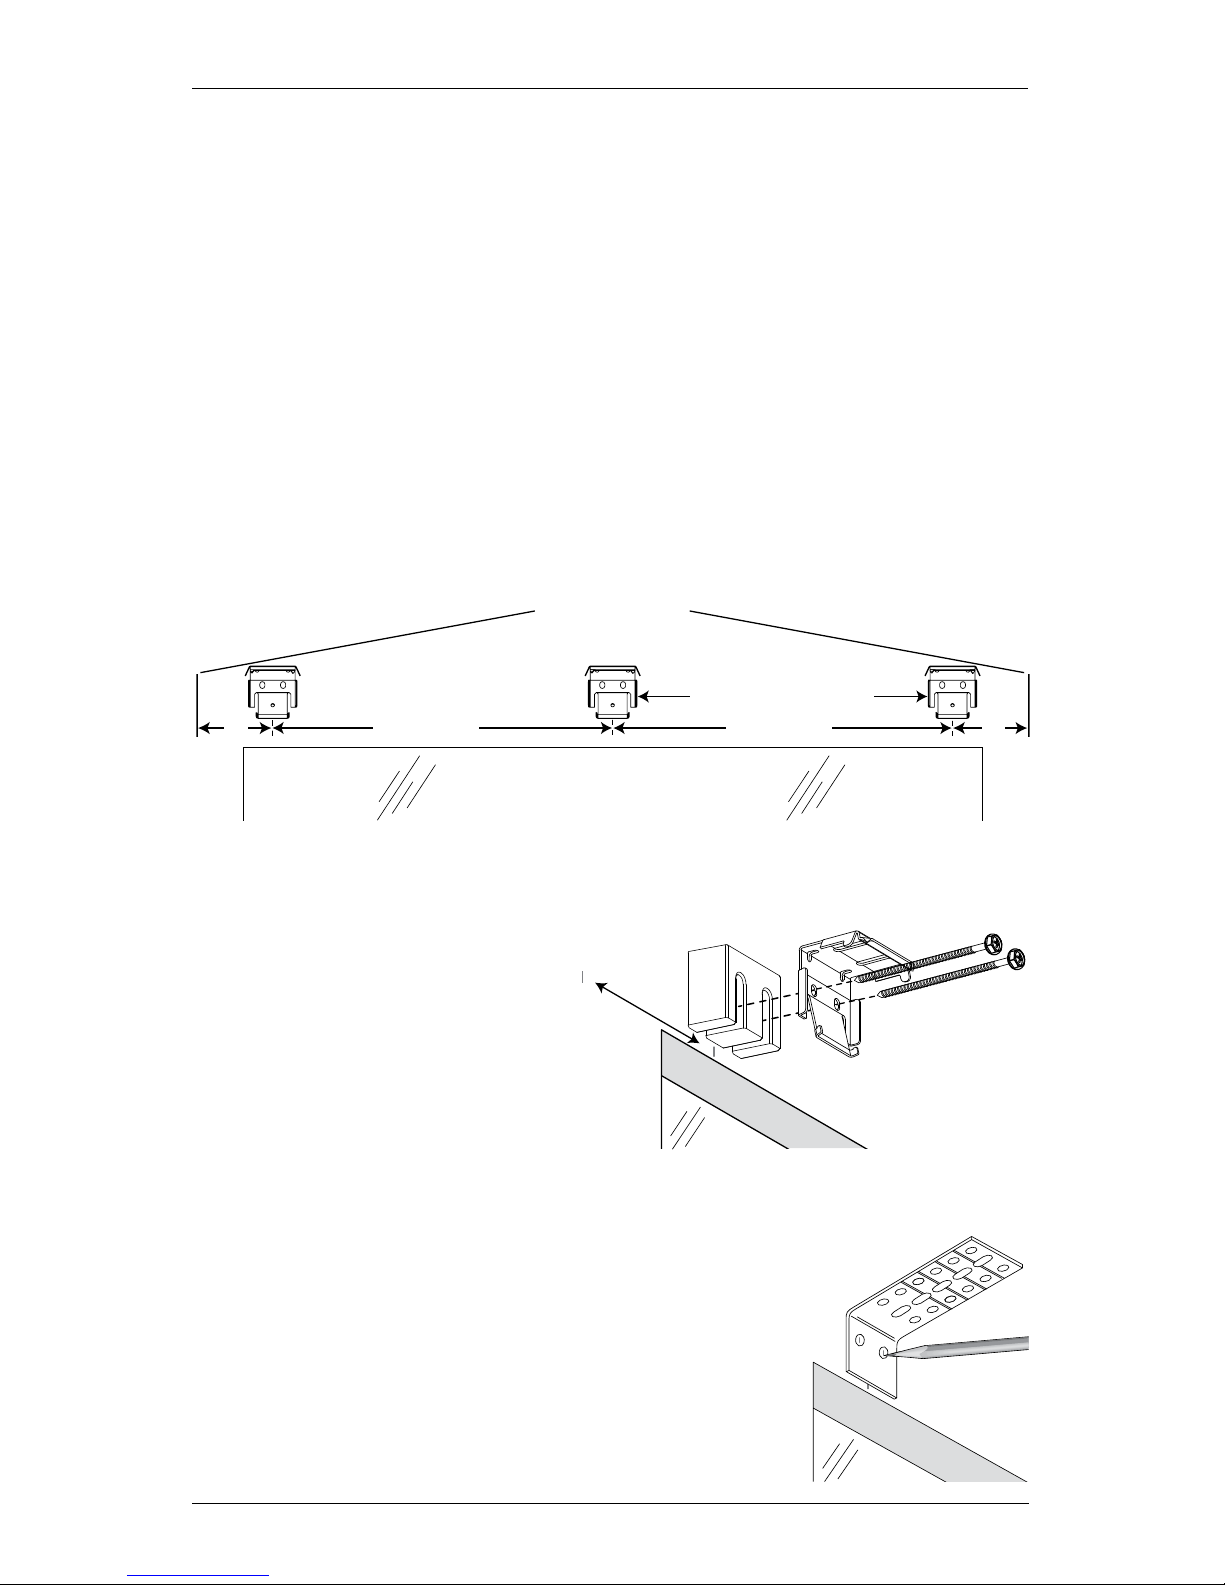
Mount the Installation Brackets — Inside Mount
■ Mark 2" in from each jamb.
➤ If more than two installation brackets came with your order, space additional bracket(s)
evenly between the two end brackets and mark their location. Mount into wood
whenever possible.
➤ With shades using a battery wand, there must be a minimum of 15½" between brackets
at the motor end.
➤ With shades using two battery wands, there must be a minimum of 18" between
brackets at the motor end.
■ Center the brackets on your marks, then mark each of the screw holes.
➤ For fully recessed and minimum mounting depth based on your order options, see the
illustration on the next page.
Important: The front edges of the installation brackets must be level and aligned.
■ Drill the screw holes using a
3
/32" drill bit.
■ Attach the installation brackets using the screws provided.
➤ Check that the mounting surface is level and the brackets are aligned. If mounting to a
heavily textured surface, shim the brackets, if needed.
Important: Use drywall anchors when mounting into drywall.
Proceed to “STEP 2 — Install the Shade” on page 7.
2" 2"Space EvenlySpace Evenly
Jamb Jamb
Jamb
Motor
End
Jamb
Shades with Attached Battery Wand(s) (Top View)
Space Evenly
2" 2"
Space Evenly
Min. of 15½" for a Battery Wand or
18" for Two Battery Wands
on the Motor End
INSTALLATION
5
Mount the Installation Brackets — Outside Mount
The standard shade has an attached battery wand requiring spacer blocks to be used with the
installation brackets. If using a DC power supply or satellite battery pack, spacer blocks are
not required.
■ Center the headrail over the window opening at the desired height. Use a pencil to lightly
mark each end of the headrail.
➤ Alternatively, measure the width of the headrail and use that width to mark the headrail
end points over the window opening.
■ Mark 2" in from each end of the headrail.
➤ If more than two installation brackets came with your order, space additional bracket(s)
evenly between the two end brackets and mark their location. Allow a minimum of 15
1
/2"
for one battery wand and 18" for two battery wands from the motor end for the battery
wand. Mount into wood whenever possible.
■ Center the brackets on your marks and mark the screw holes.
➤ A minimum of 1
3
/4" flat
vertical surface is required to
mount the brackets.
➤ For shades with attached
battery wand clip, place a
spacer block behind each
installation bracket to allow
for the extra space needed for
these components.
➤ The top of the installation brackets should be at the desired shade height.
Important: The brackets should be level and aligned.
■ Extension brackets provide up to 1
1
/2" of clearance.
If used, center the brackets on your marks and mark
the screw holes.
■ Drill the screw holes using a
3
/32" drill bit.
Important: Use drywall anchors when mounting into drywall.
Headrail End Marks
Window Opening
2" 2"
Space EvenlySpace Evenly
Min. of 15½" for a Battery Wand or
18" for Two Battery Wands
on the Motor End
2"
Installation
Bracket
Spacer
Block
Headrail
End Mark
Extension
Bracket

INSTALLATION
6
Bracket
Battery Wand
Bracket
11/2" Minimum Inside Mount
3
5
/8" Fully Recessed Mount
Bracket
Battery Wand
Wall
3" Fully Recessed Mount
Bracket
With Attached Battery Wand —
5
/
8
"
Needed for Rear Clearance
Satellite Battery Pack or DC Power Supply (Optional)
7
/
8
"
Min Inside Mount
5
/8"
5
/8"
35/8"
3"
INSTALLATION
7
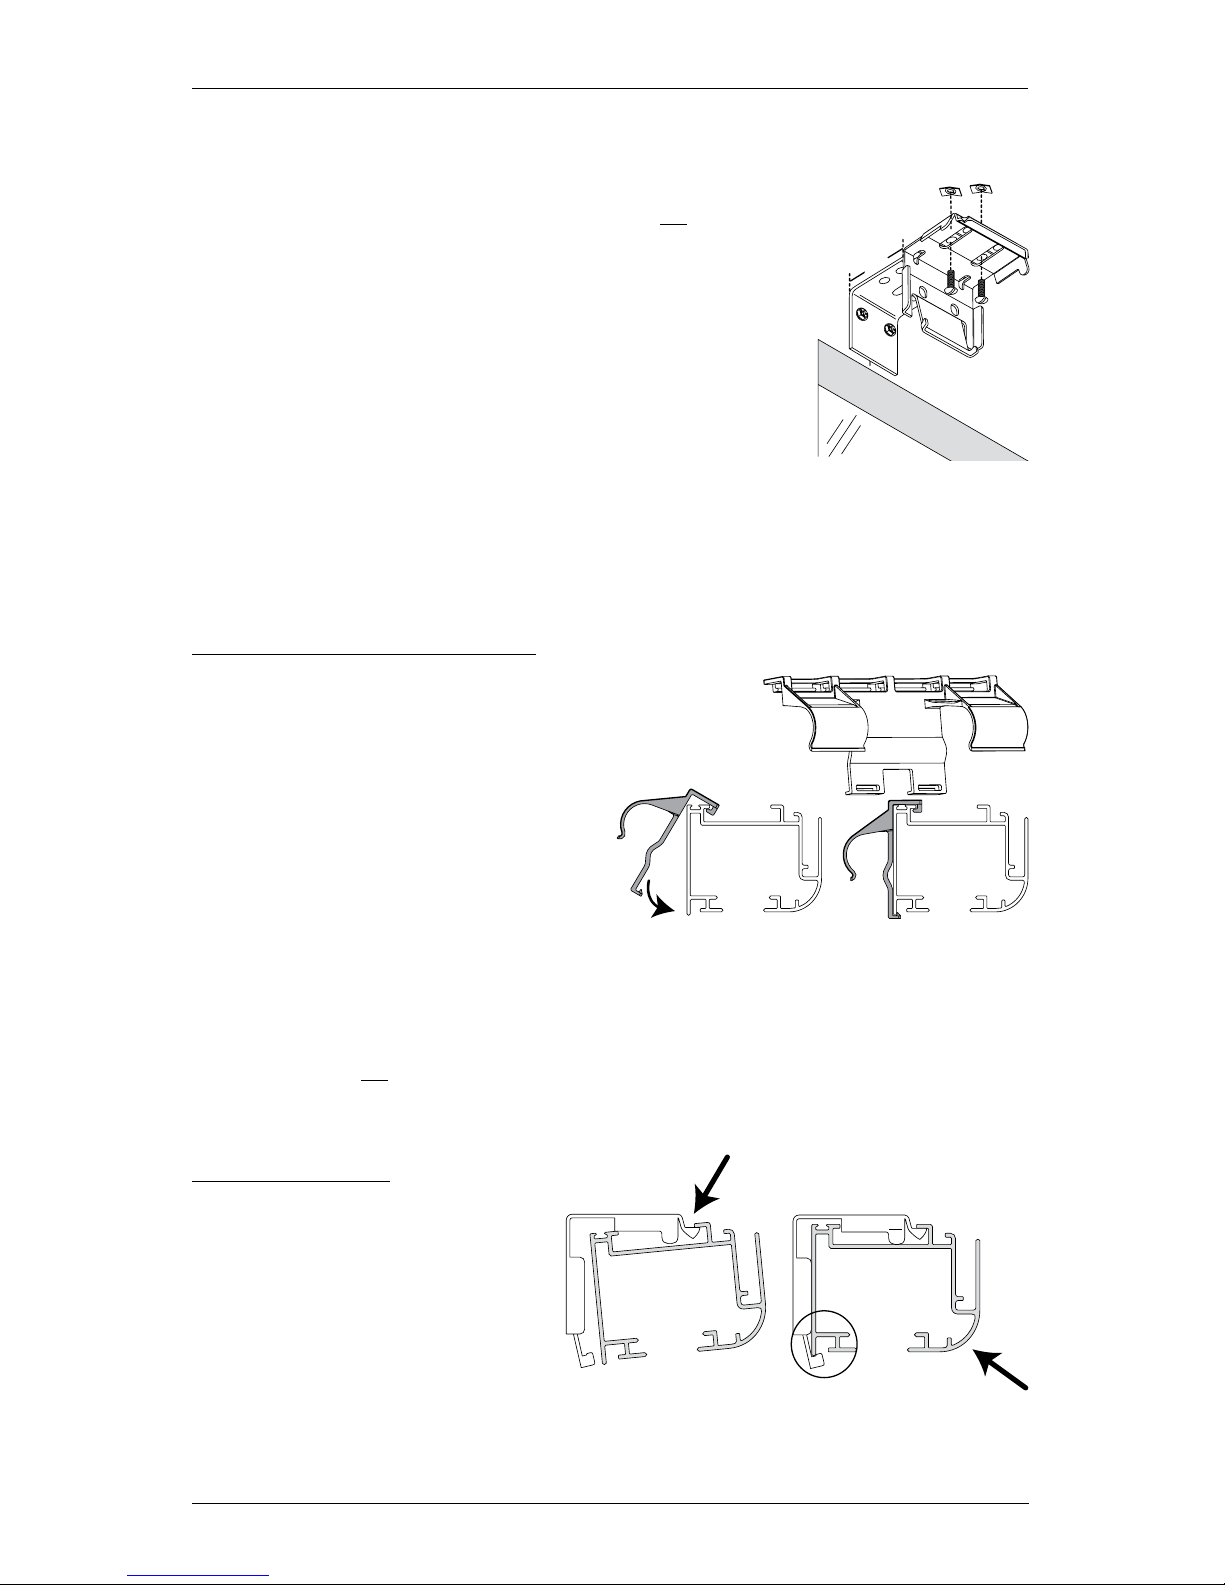
■ Attach the installation/extension brackets using the screws provided.
CautIon: The rear of the installation/extension brackets
must be flush against a flat mounting surface. Do not mount
installation brackets oncurved molding.
■ When using extension brackets, attach the installation
brackets using the screws andspeed nuts provided.
Important: For shades with attached battery wand, leave
at least
5
/8" between the wall side of the extension bracket
and the back of the installation bracket.
Important: If your shade was ordered with a Crestover
™
Valance, see “If Your Ordered the Crestover™ Valance...” on page 8.
STEP 2 — Install the Shade
If You Have a Battery Wand Clip...
■ Attach the battery wand clip to the headrail.
Important: Position the clip so that
the battery wand will be between
installation brackets.
■ Hook the battery wand clip onto the back
channel ofthe headrail.
■ Rotate the clip down until it snaps
into place.
CautIon: Be sure the power cable does not become pinched by the brackets or headrail
during installation; damage or overheating of components couldresult.
CautIon: Do not connect the battery wand to the power cable prior to installing
the shade.
Mount the Headrail
■ With the headrail slightly tilted,
insert the front lip of the headrail
onto the front lip of the installation
bracket.
■ Push the headrail back and up until
its bottom lip snaps into bottom tab
on the installation bracket.
5
/8"
Minimum Required
for Attached
Battery Wand
Battery Wand Clip
Battery
W
and Clip
Headrail
Insert Front
Lip of Headrail
onto Bracket
Bottom
Tab
Push Up
and Back
 Loading...