

Page 1
This guide will help getting you started with your Powerview® purchase.
supply).
step 5
MANUAL
Powerview® Quick Start Guide Gen 2
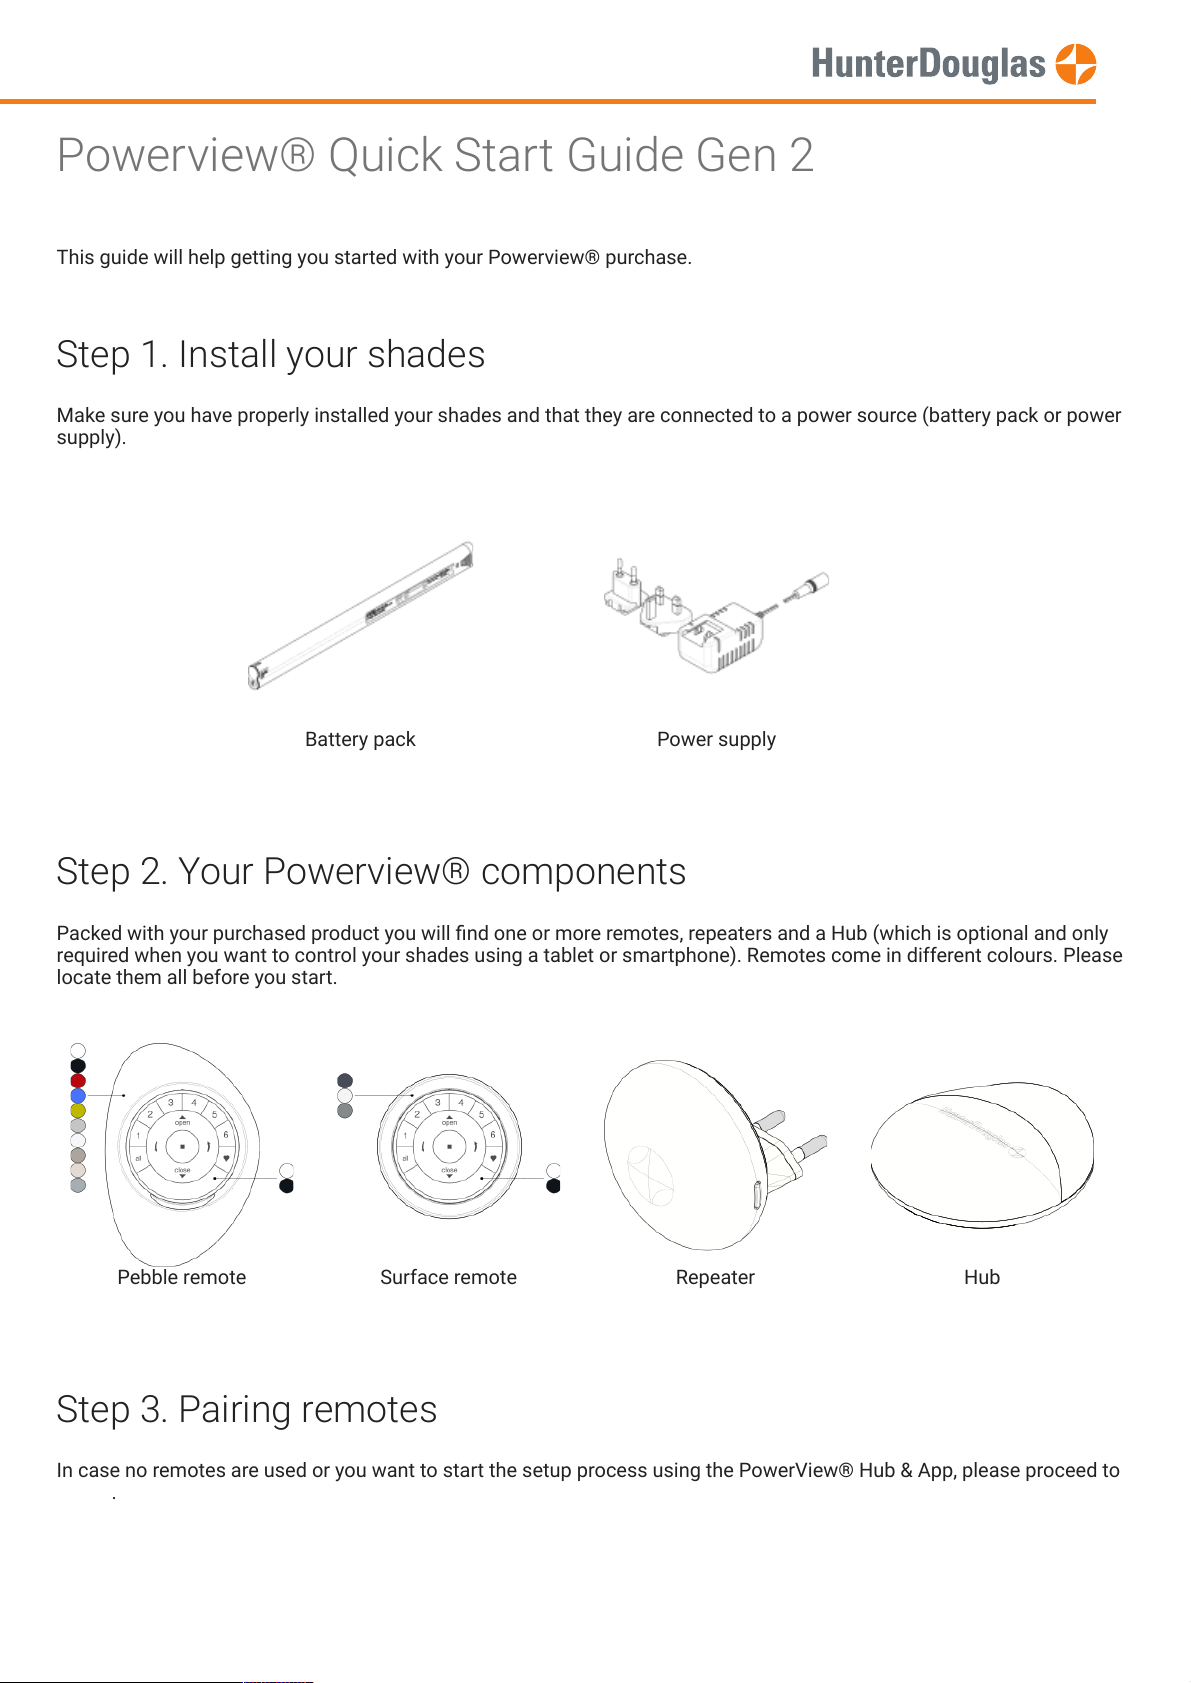
Step 1. Install your shades
Make sure you have properly installed your shades and that they are connected to a power source (battery pack or power
Battery pack Power supply
Step 2. Your Powerview® components
Packed with your purchased product you will nd one or more remotes, repeaters and a Hub (which is optional and only
required when you want to control your shades using a tablet or smartphone). Remotes come in different colours. Please
locate them all before you start.
Pebble remote Surface remote Repeater Hub
Step 3. Pairing remotes
In case no remotes are used or you want to start the setup process using the PowerView® Hub & App, please proceed to
.
Page 1 of 23 version: 1.1
Page 2
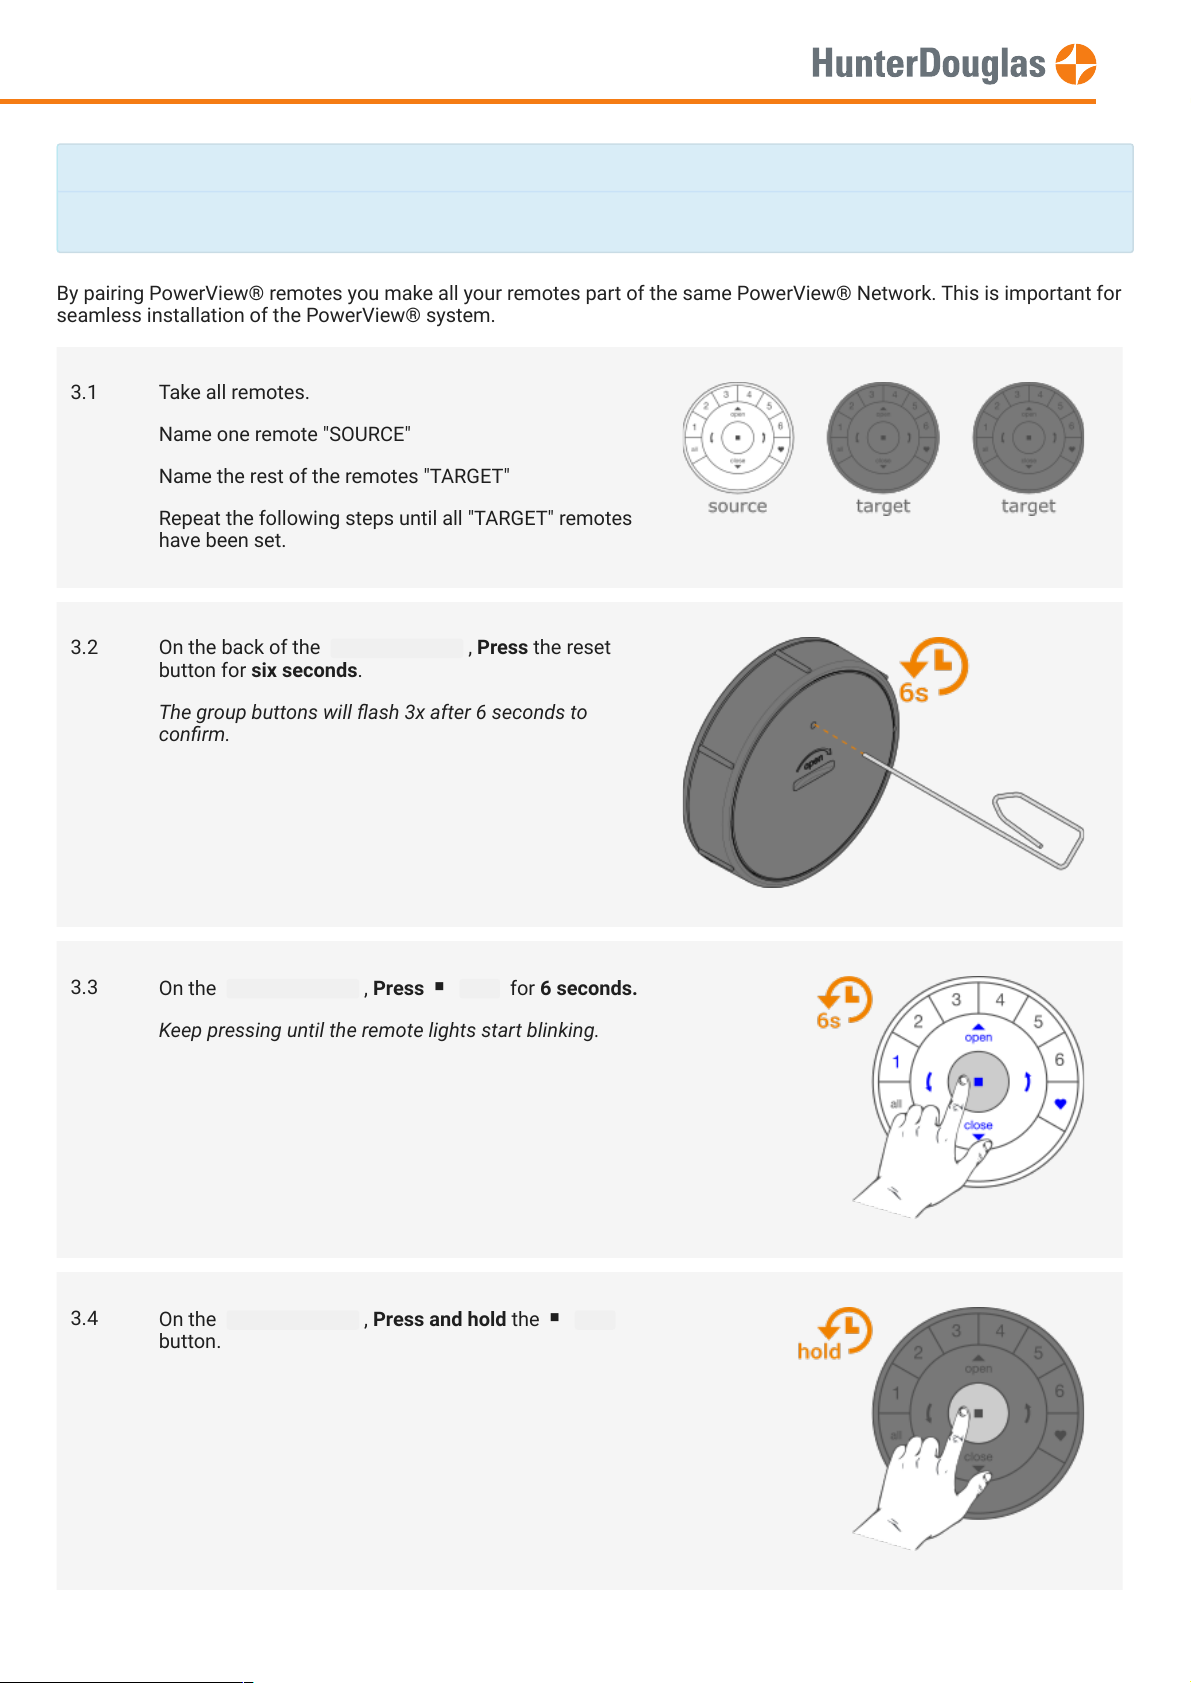
seamless installation of the PowerView® system.
Note
If you only have one remote, please proceed to
step 4
.
MANUAL
By pairing PowerView® remotes you make all your remotes part of the same PowerView® Network. This is important for
3.1 Take all remotes.
Name one remote "SOURCE"
Name the rest of the remotes "TARGET"
Repeat the following steps until all "TARGET" remotes
have been set.
3.2 On the back of the target remote , Press the reset
button for six seconds.
3.3
The group buttons will ash 3x after 6 seconds to
conrm.
On the source remote , Press stop for 6 seconds.
Keep pressing until the remote lights start blinking.
3.4
On the target remote , Press and hold the stop
button.
Page 2 of 23 version: 1.1
Page 3
A Remote can control 6 groups of shades (buttons 1 to 6). The instructions below assign a shade to
MANUAL
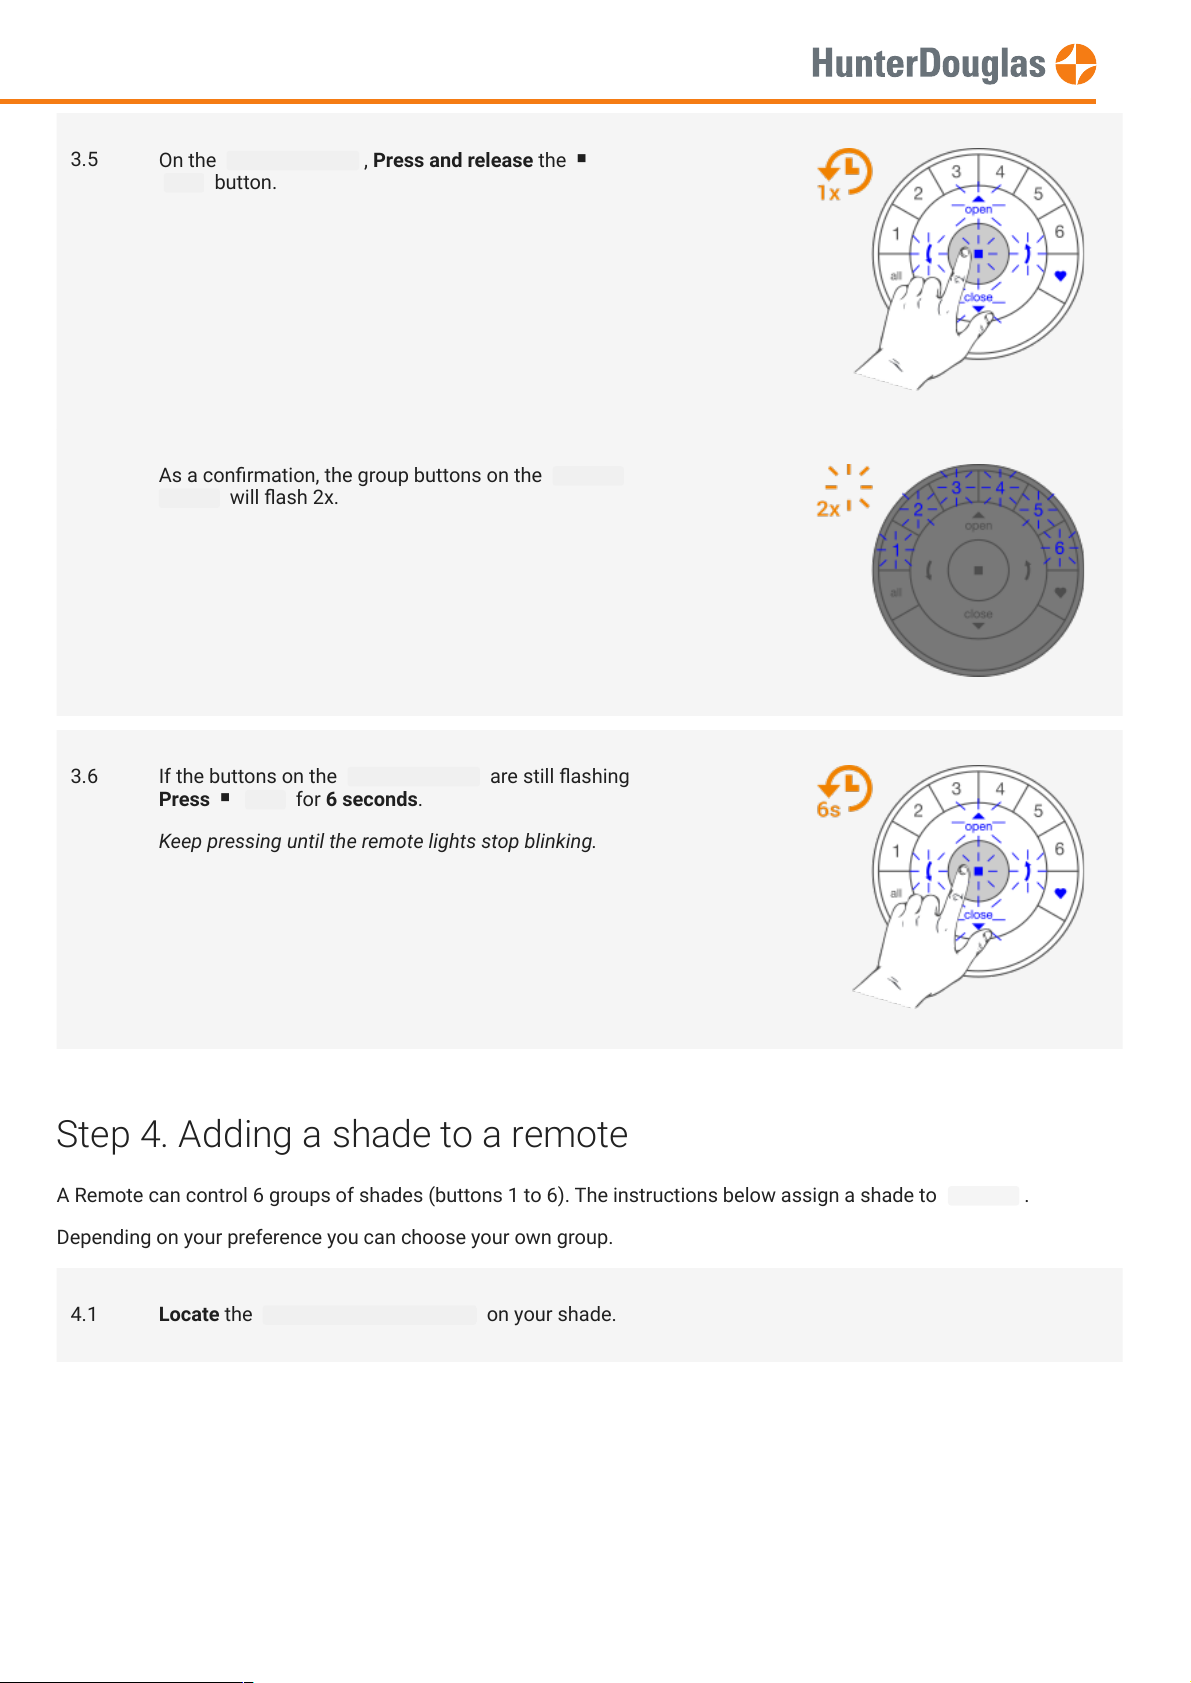
3.5
On the source remote , Press and release the
stop button.
As a conrmation, the group buttons on the target
remote will ash 2x.
3.6 If the buttons on the source remote are still ashing
Press stop for 6 seconds.
Keep pressing until the remote lights stop blinking.
Step 4. Adding a shade to a remote
Depending on your preference you can choose your own group.
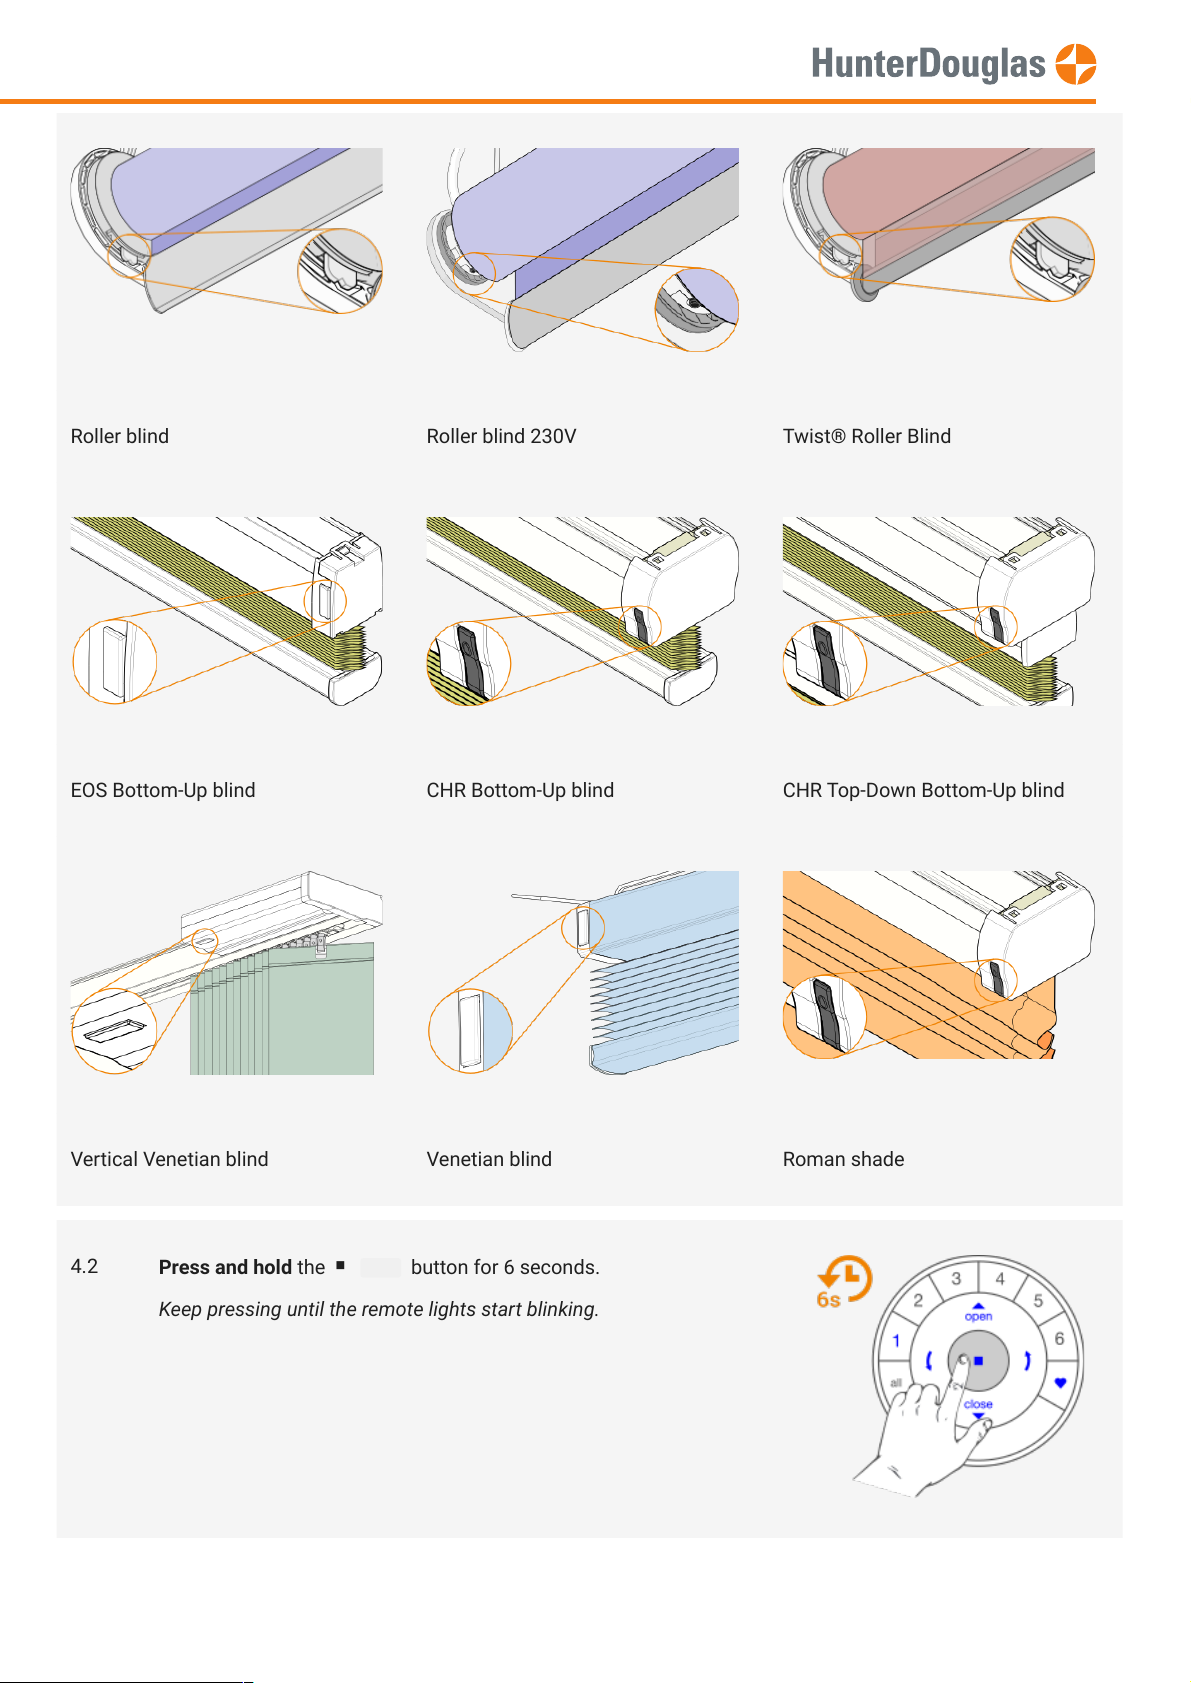
4.1 Locate the manual control button on your shade.
group 1 .
Page 3 of 23 version: 1.1
Page 4
MANUAL
Roller blind Roller blind 230V Twist® Roller Blind
EOS Bottom-Up blind CHR Bottom-Up blind CHR Top-Down Bottom-Up blind
Vertical Venetian blind Venetian blind Roman shade
4.2
Page 4 of 23 version: 1.1
Press and hold the stop button for 6 seconds.
Keep pressing until the remote lights start blinking.
Page 5
MANUAL
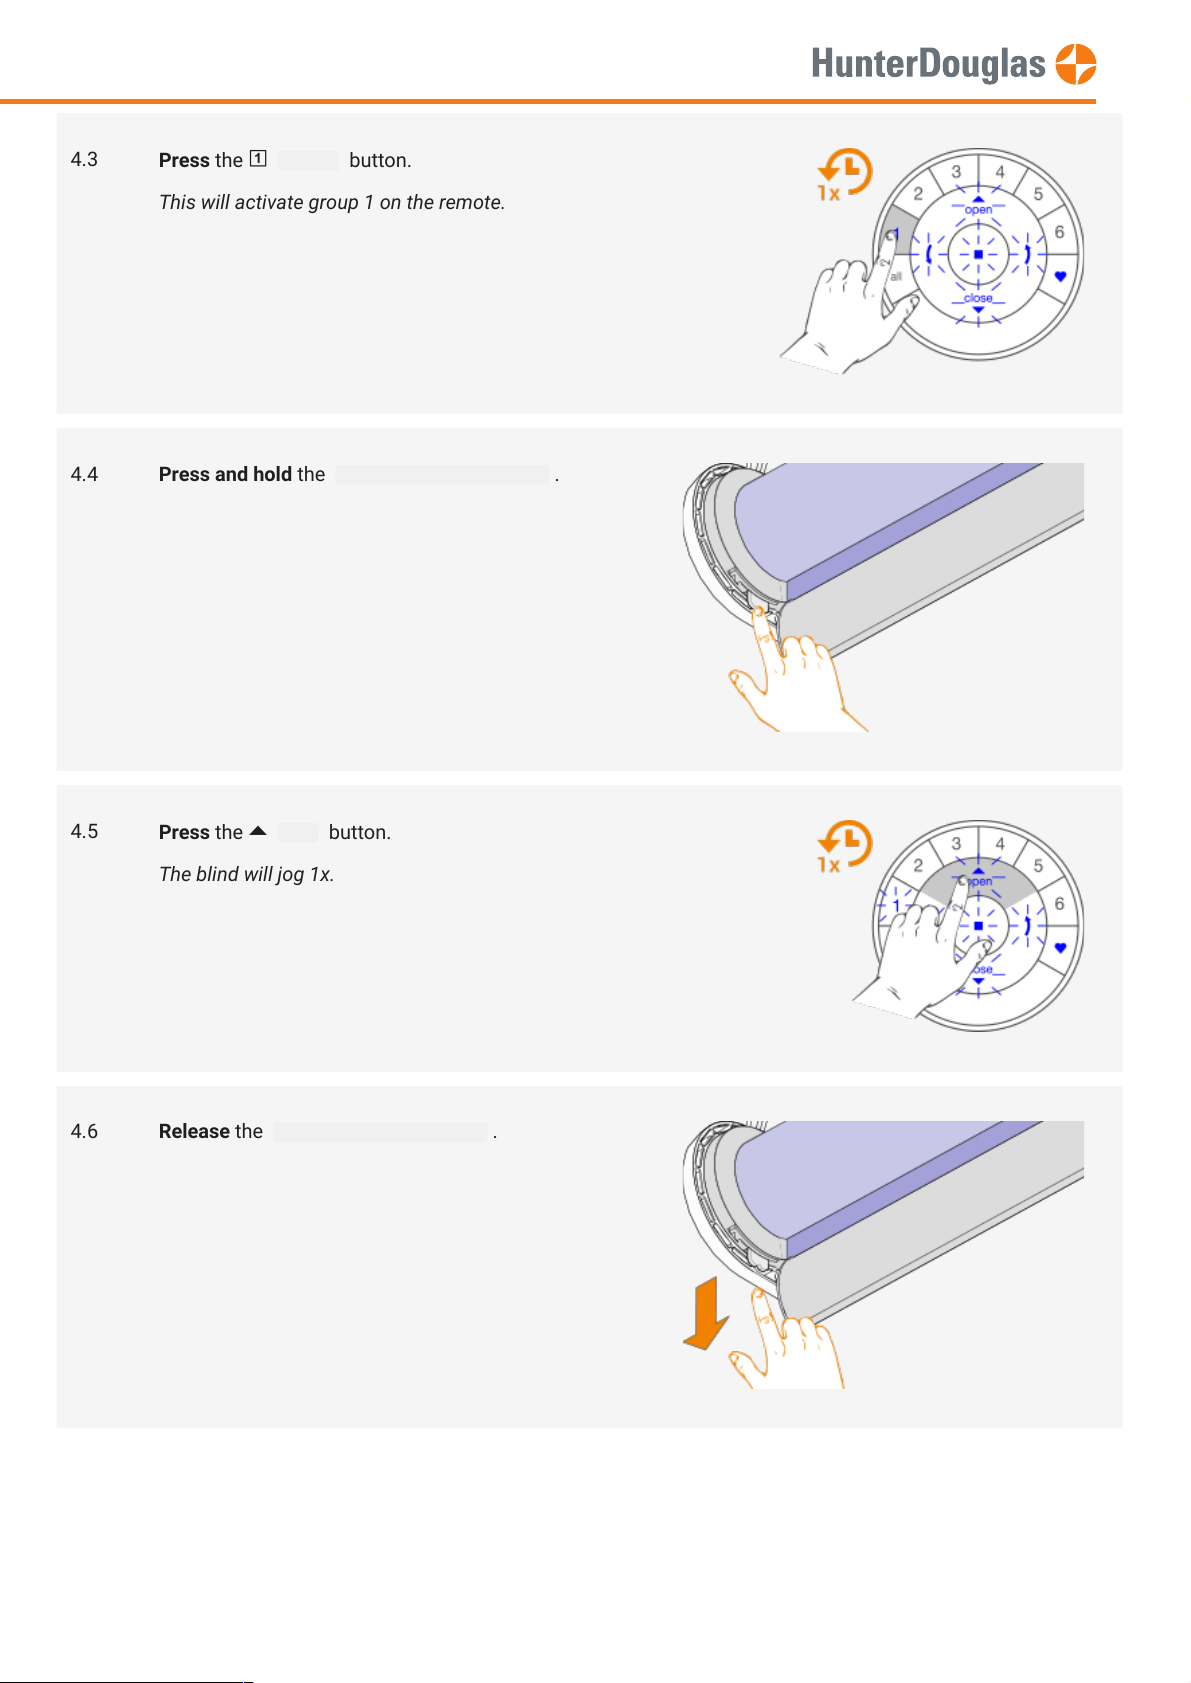
4.3
4.4 Press and hold the manual control button .
Press the group1 button.
This will activate group 1 on the remote.
4.5
4.6 Release the manual control button .
Press the open button.
The blind will jog 1x.
Page 5 of 23 version: 1.1
Page 6
MANUAL
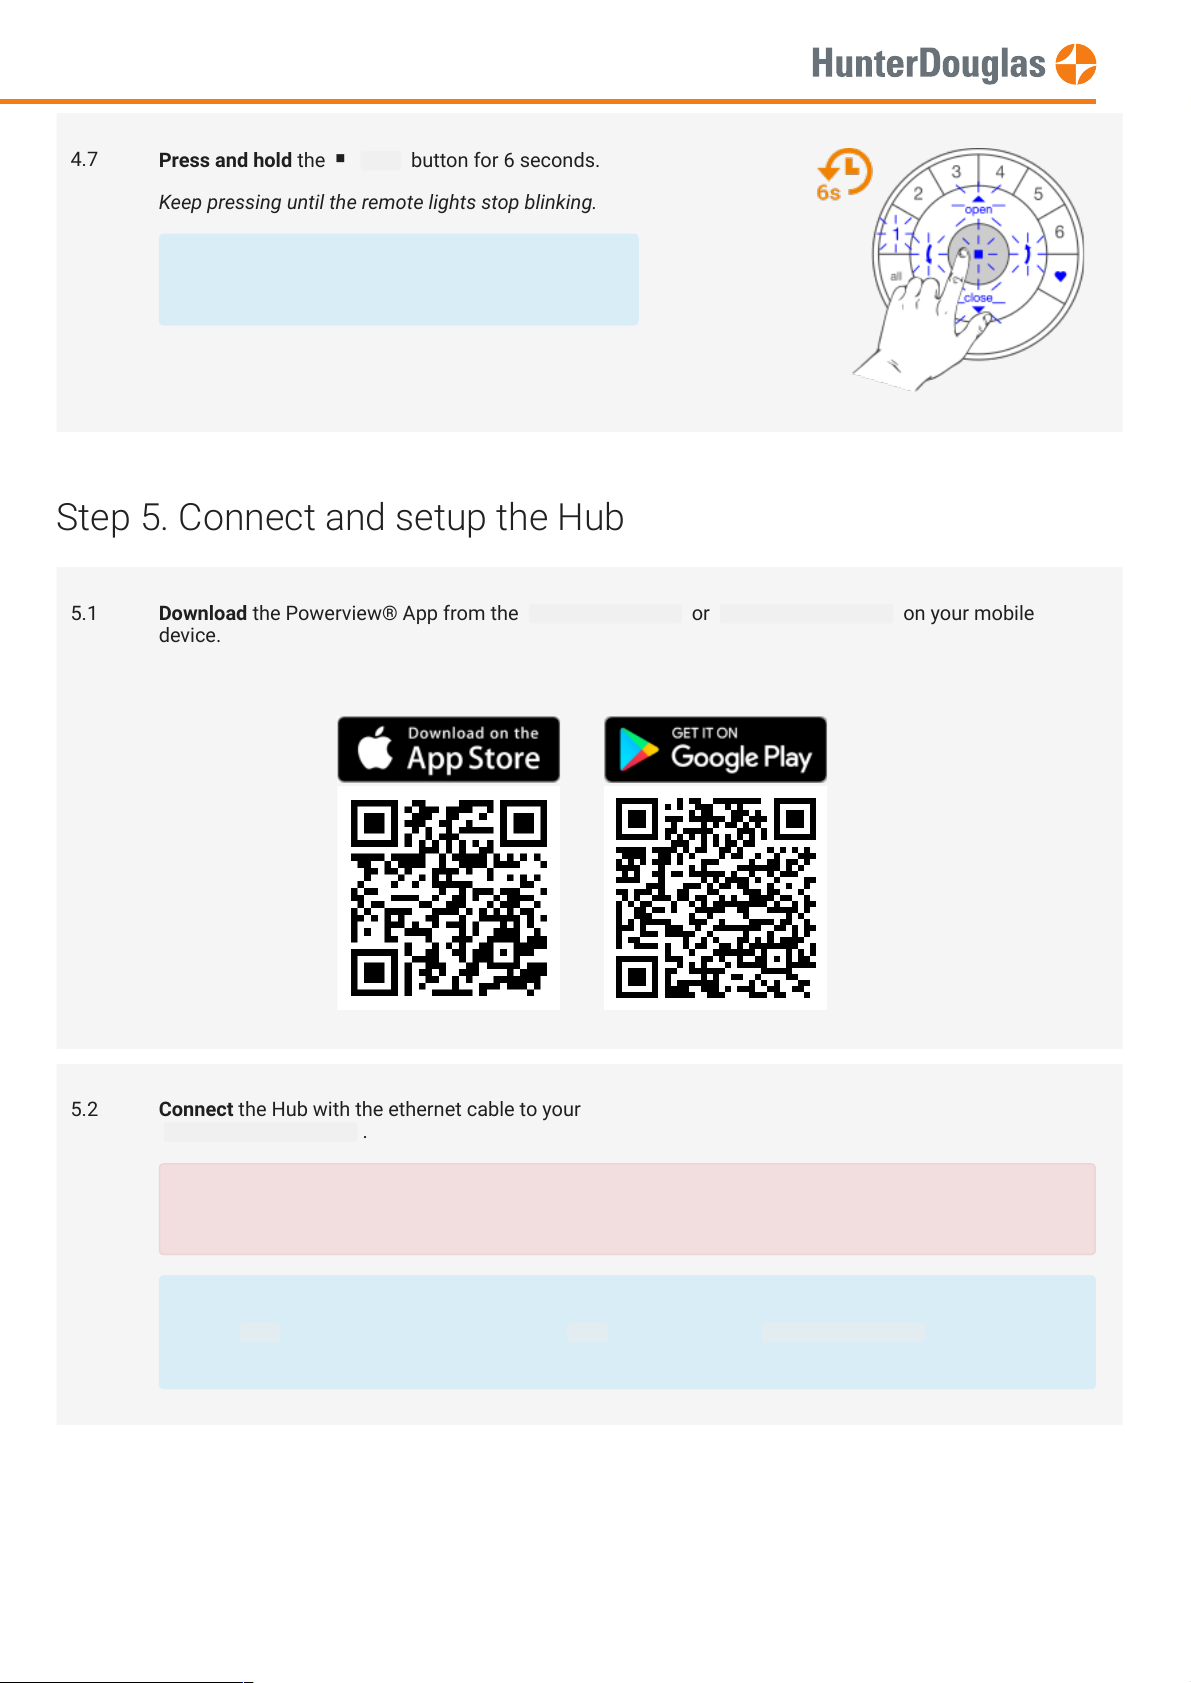
4.7
Press and hold the stop button for 6 seconds.
Keep pressing until the remote lights stop blinking.
The remote will exit programming mode
automatically after 20 seconds.
Step 5. Connect and setup the Hub
5.1 Download the Powerview® App from the Apple App store or Google Play store on your mobile
device.
5.2 Connect the Hub with the ethernet cable to your
home network router .
Put the ethernet cable into an empty LAN port.
Do not use the WAN port!
After Hub setup has nished, you can wirelessly connect your Hub to your WiFi network.
Open Menu > Select your Hub > Select the info button > Select Hub Wi-Fi Set Up and follow the
wizard.
Page 6 of 23 version: 1.1
Page 7
MANUAL
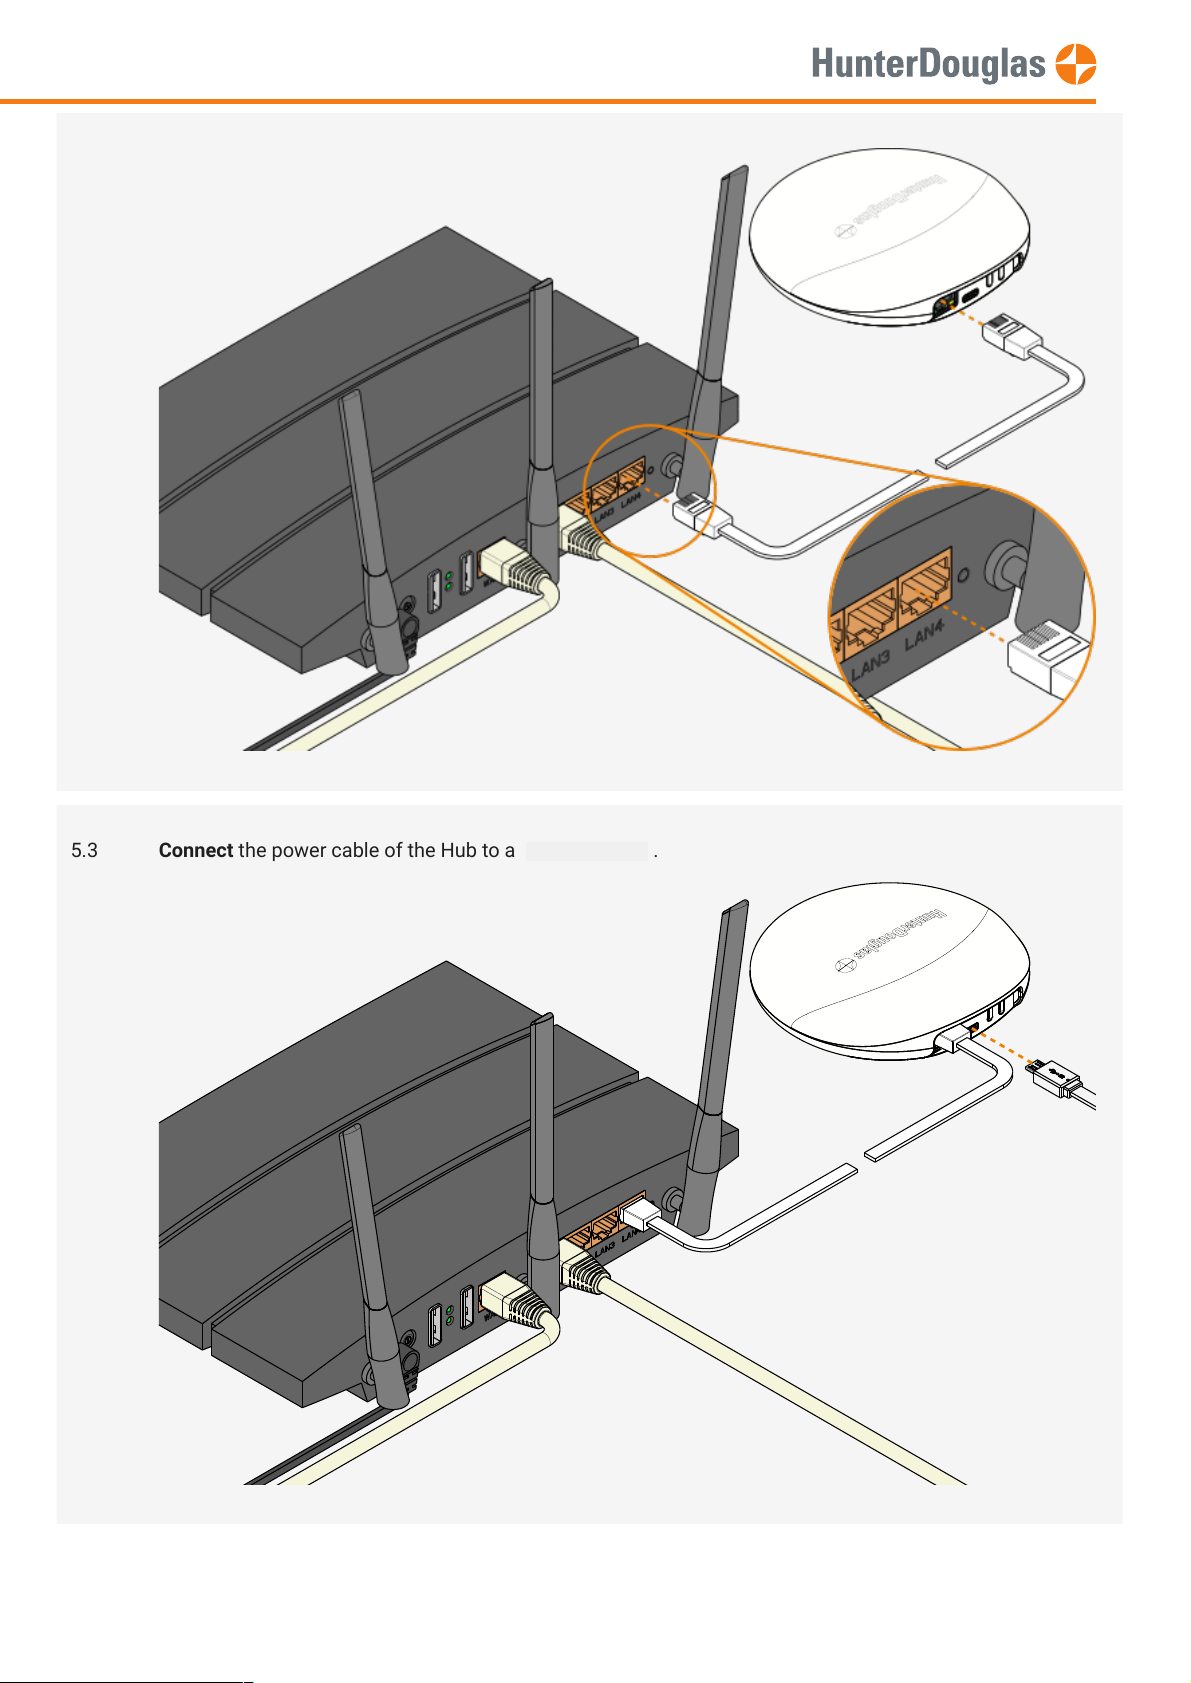
5.3 Connect the power cable of the Hub to a power outlet .
Page 7 of 23 version: 1.1
Page 8

MANUAL
5.4 Watch out for the colour of the LED.
The Hub is ready to be discovered within the App when the LED is Blinking Amber
5.5 Open the app and select Connect to Hub .
The app will start looking for an available Hub.
Make sure your mobile device and the PowerView® Hub are
connected to the same home network.
5.6 When your Hub has been discovered, select Set Up to start
conguring the Hub.
Page 8 of 23 version: 1.1
Page 9

MANUAL
5.7 Select New Setup .
Note 1
If you already have a Gen 1 Hub installed in your
PowerView® network, select Migrate from an Existing
Hub and follow the in App instructions to Transfer Gen 1
Hub data to the new Gen 2 Hub.
Note 2
If you already have a Gen 2 Hub installed in your
PowerView® network and created a Hub backup, select
Set Up from Hub Backup and follow the onscreen
instructions.
5.8 Enter a Hub Name and press Next .
Page 9 of 23 version: 1.1
Page 10

MANUAL
5.9 Select Pair with PowerView® Remotes .
5.10 Choose 1 remote.
In this quick start guide we select one remote, regardless of the
amount of remotes you have.
5.11 Follow the onscreen instructions to add the Hub to
your Powerview® network.
The Hub is added when the LED is Solid Blue
Page 10 of 23 version: 1.1
Page 11

App. Preferably put the Repeater halfway between the unresponsive shade and the Hub/Remote control location. The
or a PowerView® Remote.
MANUAL
5.12 You can now start discovering blinds.
Hub led behaviour
Hub status LED behaviour
Power On Solid Aqua
Bootup Blinking Aqua
Downloading & applying rmware update Solid Amber
Ready to connect to a wi network Solid Magenta
Ready to join a PowerView network Blinking Amber
Connect to a PowerView network. Normal operation Solid Blue
Transmitting a PowerView signal Flashing Blue
Secondary hub. Connected to PowerView network. Normal operation Solid Green
Secondary hub. Transmitting a PowerView network. Flashing green
No IP address Solid red
Step 6. Install Repeaters
Installation of a Repeater is necessary when your shade is not responding to a command from your Remote control or
Repeater can be connected to the existing PowerView® Network using the PowerView® App (follow in App instructions),
Page 11 of 23 version: 1.1
Page 12

Pro-Tip
Check the range of the Hub
Your Hub should be able to reach each shade in the house. Use your remote from the same
location as your Hub to
operate
your shades. If some shades do not respond, add or relocate a repeater and check again.
To
Optimize the range
of your Gen2 Hub you can place it in a central location of your home where it can reach the majority
of your blinds.
MANUAL
6.1 Plug a new Repeater into a power outlet .
The Repeater light slowly blinks amber.
Page 12 of 23 version: 1.1
Page 13

7.1. Operate a blind
Operating a blind or shade is product specic. Each product has its own unique way of moving up or down, moving left or
Note
As an example, a
will be used in the next chapters to demonstrate the procedures explained.
The same principle is valid for all PowerView® blinds or shades.
MANUAL
6.2
6.3
Press and hold the stop button for 6 seconds.
Keep pressing until the remote lights start blinking.
Keep the Remote within 50cm from the Repeater and press the stop button.
The Repeater light will stop blinking and turns off.
6.4 The Repeater has been added to your Powerview® network.
Step 7. Additional actions
right, tilting its vanes, moving quickly/slowly up or down etc.
Page 13 of 23 version: 1.1
Page 14

MANUAL
Select the blind's group button.
For example, group 1 button.
Select the all button instead of group 1 to move all
shades from all 6 groups on the remote.
The
group
button will light up.
Press the open button.
Press the stop button.
Press the close button.
Blinds assigned to
open.
group 1
will
Blinds assigned to
stop.
group 1
will
Blinds assigned to
close.
group 1
will
Page 14 of 23 version: 1.1
Page 15

7.2. Set a favourite position
MANUAL
Press the favourite button.
Press the arrow up button.
Press the arrow down button.
Blinds assigned to
to their favourite position.
group 1
will go
Blinds assigned to
open or slowly move open.
group 1
will tilt
Blinds assigned to
down or slowly move closed.
group 1
will tilt
7.2.1 Select the blind's group button.
The
group
button will light up.
Page 15 of 23 version: 1.1
Page 16

IMPORTANT
Watch out to perform steps 7.2.4 and 7.2.5 within 3 seconds!
MANUAL
7.2.2 Move the blind to the desired favourite position.
Use the
open
move the blind.
,
stop
and
close
buttons to
7.2.3
Press and hold the stop button for 6 seconds.
Keep pressing until the remote lights start blinking.
DO NOT select a group on the remote!
Page 16 of 23 version: 1.1
Page 17

MANUAL
7.2.4 Press and hold the manual control button .
7.2.5
7.2.6 Release the manual control button .
Press the favourite button.
The blind will jog 1x to acknowledge the favourite
position is set. And will indicate green LED
Page 17 of 23 version: 1.1
Page 18

7.3. Remove a shade from a group
MANUAL
7.2.7 The favourite position is set!
If your remote is still blinking, Press the stop button
for 6 seconds.
Keep pressing until the remote lights stop blinking.
Removing a shade from a group on a remote will unlink the shade from the remote. It will not remove the shade from the
Powerview® network.
7.3.1
Page 18 of 23 version: 1.1
Press and hold the stop button for 6 seconds.
Keep pressing until the remote lights start blinking.
Page 19

IMPORTANT
Watch out to perform steps 7.3.3 and 7.3.4 within 3 seconds!
MANUAL
7.3.2 Select the blind's group button.
For example, group 1 button.
The
group
button will light up.
7.3.3 Press and hold the manual control button .
7.3.4
Press the close button.
The blind will jog 1x to acknowledge it has been
removed from the remote.
Page 19 of 23 version: 1.1
Page 20

7.5. Install a Scene Controller
A Scene Controller works in combination with the Powerview® App. It can activate scenes which are created in the App.
MANUAL
7.3.5 Release the manual control button .
7.3.6 The blind is removed from the remote!
7.5.1 Start the App and open the side menu.
If your remote is still blinking, Press the stop button
for 6 seconds.
Keep pressing until the remote lights stop blinking.
Page 20 of 23 version: 1.1
Page 21

7.6. Erase Hub data
This procedure will remove the Hub from the PowerView® network. All data inside (e.g. blinds, scenes, settings etc.) will
Warning
Erasing the Hub data will permanently delete all data stored inside the Hub and will put the Hub in its
setting.
The PowerView® network (blinds and remotes), connected to the Hub, will remain untouched.
All scene controllers will stop working.
This action cannot be undone.
MANUAL
7.5.2 Select Accessories and Scene Controllers .
Follow the App instructions.
be permanently deleted.
7.6.1 Locate the Reset button on the back of the Hub.
Page 21 of 23 version: 1.1
Page 22

MANUAL
7.6.2 Press and hold the Reset button for 6 seconds.
Keep pressing until the LED turns off.
7.6.3 The Hub will reboot . All data on the hub has been
erased .
Wait for the hub to start Blinking Amber
The Hub is ready to be added to a PowerView®
network.
Follow Step 5. Connect and setup the Hub.
Page 22 of 23 version: 1.1
Page 23

its products and services, and to discontinue any product or service. Buyers should obtain the latest relevant information before placing orders and
should verify that such information is current and complete. All products (also referred to herein as "components") are sold subject to Hunter Douglas’
terms and conditions of sale supplied at the time of order acknowledgment. Hunter Douglas warrants performance of its components to the
specications applicable at the time of sale, in accordance with its standard warranty terms. Testing and other quality control techniques are used to the
extent Hunter Douglas deems necessary to support this warranty. Except where mandated by applicable law, testing of all parameters of each
component is not necessarily performed. Hunter Douglas assumes no liability for applications assistance or the design of Buyers' products. Buyers are
responsible for their products, applications and interfaces using Hunter Douglas components. To minimize the risks associated with Buyers' products
and applications, Buyers should provide adequate design and operating safeguards. Hunter Douglas does not warrant or represent that any license,
either express or implied, is granted under any patent right, copyright, mask work right, or other intellectual property right relating to any combination,
machine, or process in which Hunter Douglas components or services are used. Information published by Hunter Douglas regarding third-party products
or services does not constitute a license to use such products or services or a warranty or endorsement thereof. Use of such information may require a
license from a third party under the patents or other intellectual property of the third party, or a license from Hunter Douglas under the patents or other
intellectual property of Hunter Douglas. Reproduction of Hunter Douglas information in Hunter Douglas data sheets is permissible only if reproduction is
without alteration and is accompanied by all associated warranties, conditions, limitations, and notices. Hunter Douglas is not responsible or liable for
any altered documentation. Information of third parties may be subject to additional restrictions. Resale of Hunter Douglas components or services with
statements different from or beyond the parameters stated by Hunter Douglas for that component or service voids all express and any implied
warranties for the associated Hunter Douglas component or service and is an unfair and deceptive business practice. Hunter Douglas is not responsible
or liable for any such statements. Buyers acknowledge and agree that they are solely responsible for compliance with all legal, regulatory and safety-
related requirements concerning its products, and any use of Hunter Douglas components in its applications, notwithstanding any applications-related
information or support that may be provided by Hunter Douglas. Buyers represent and agree that they have all the necessary expertise to create and
implement safeguards which anticipate dangerous consequences of failures, monitor failures and their consequences, lessen the likelihood of failures
that might cause harm and take appropriate remedial actions. Buyers fully indemnify Hunter Douglas and its representatives against any damages
arising out of the use of any Hunter Douglas components in safety-critical applications.
MANUAL
Important notice
Page 23 of 23 version: 1.1
 Loading...