

Page 1
Installation • Operation • Care
Designer Roller and
Designer Screen Shades
Standard and Cassette Cordless Lifting System
Page 2

CONTENTS
Getting Started:
Product Views ................................................................................................... 1
Tools and Fasteners Needed .............................................................................. 3
Installation Overview ......................................................................................... 3
Installation:
Mounting Types and Window Terminology ........................................................... 4
Mount the Installation Brackets — Inside or Ceiling Mount for Standard Shades ... 4
Mount the Installation Brackets — Outside Mount for Standard Shades ............... 5
Mount the Installation Brackets — Inside or Ceiling Mount for Cordless Cassette .. 6
Mount the Installation Brackets — Outside Mount for Cordless Cassette .............. 7
Install the Shade ............................................................................................... 8
Install the Shade Pull ......................................................................................... 9
Attach the Standard Hold-Down Brackets (Optional) ............................................ 9
Attach the Magnetic Hold-Down Brackets (Optional) ......................................... 10
Operation:
Operate the Shade .......................................................................................... 11
Shade Adjustment ........................................................................................... 11
Troubleshooting .............................................................................................. 13
Care:
Removing the Shade (If Necessary) .................................................................. 14
Cleaning Procedures ....................................................................................... 14
Questions?
Call the Hunter Douglas Customer Information Center at
1-888-501-8364.
© 2012 Hunter Douglas. All trademarks used herein are the property of Hunter Douglas.
Page 3
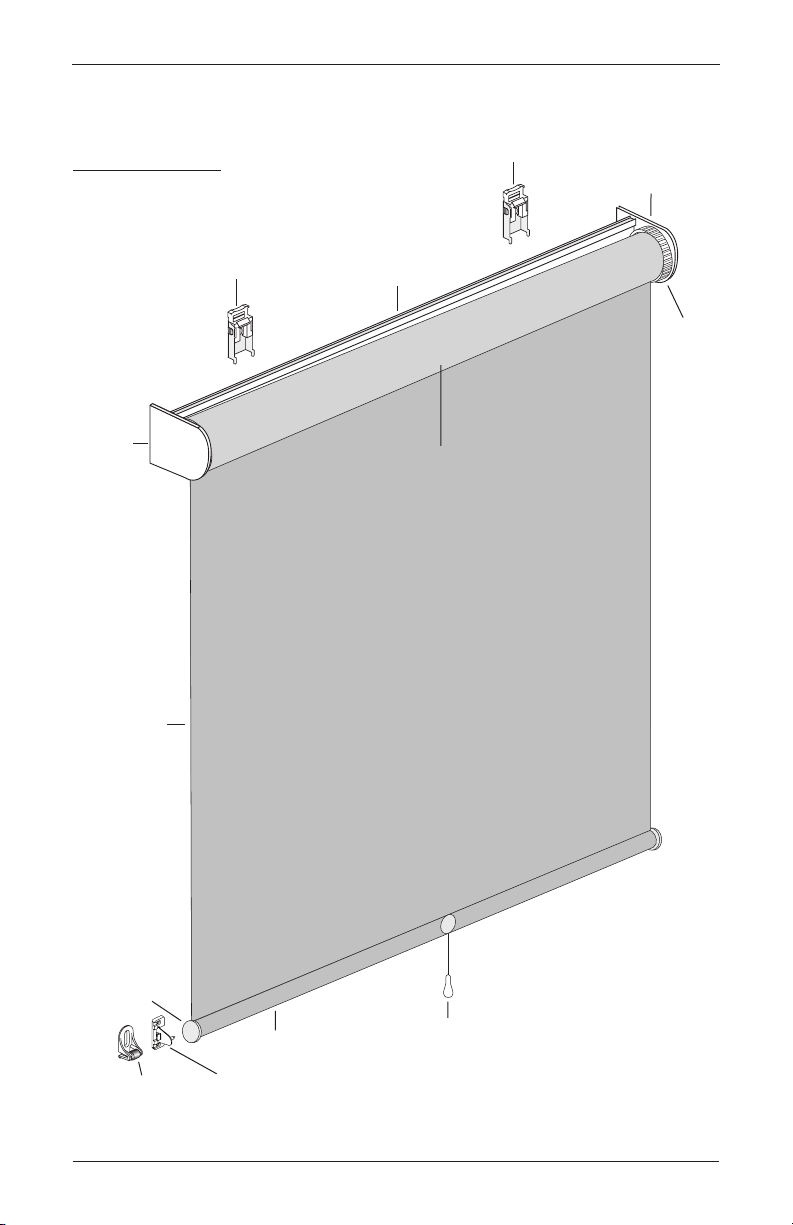
Product Views
Bracket
Bracket
Mounting Profile
Left Side
Holder
Standard Cordless
Fabric
Bottom Bar
End Cap
Bottom Bar
Right Side
Holder
Stop
Controller
Shade Pull
(Not Attached
when Delivered)
Roller Tube
Magnetic
Hold-Down
Bracket
(Optional)
Standard
Hold-Down
Bracket
(Optional)
GETTING STARTED
Standard Cordless
1
Page 4
GETTING STARTED
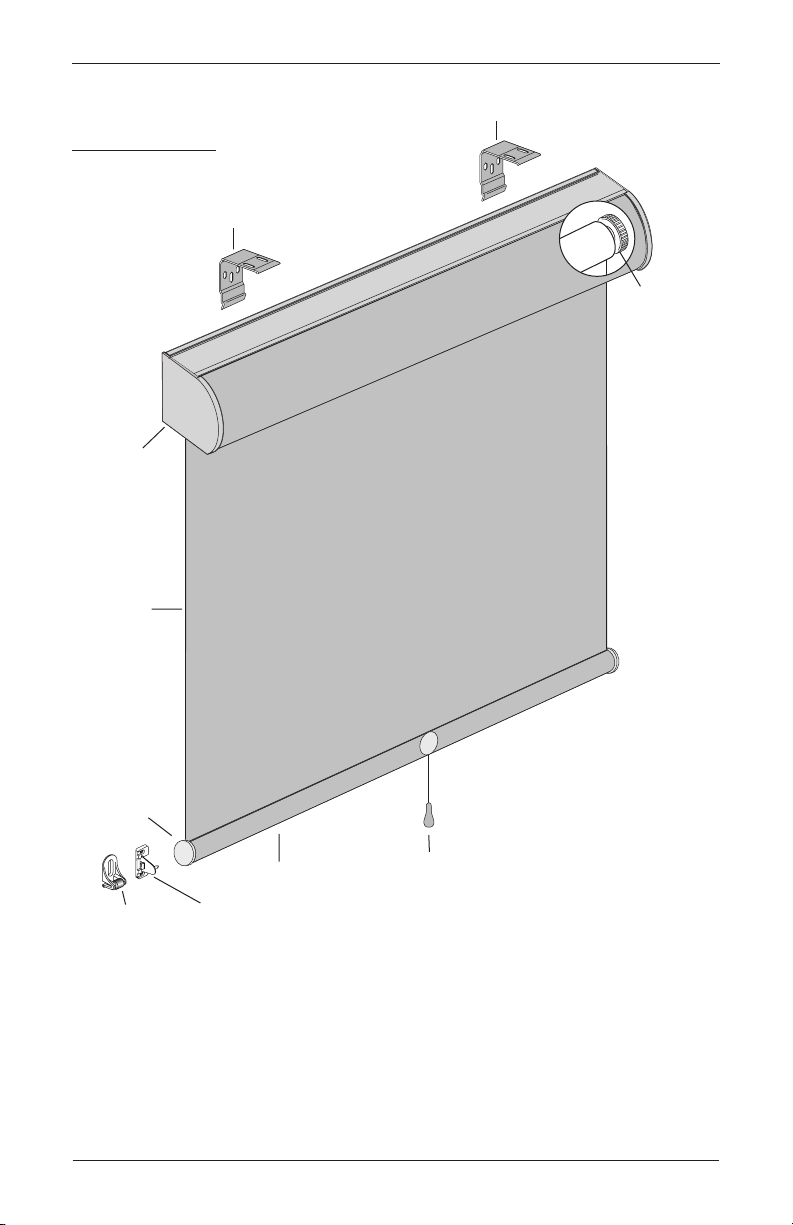
Product Views
Cassette Cordless
Cassette
Fabric
Bracket
Bracket
Stop
Controller
Bottom Bar
End Cap
Magnetic
Hold-Down
Bracket
(Optional)
2
Standard
Hold-Down
Bracket
(Optional)
Bottom Bar
Shade Pull
(Not Attached
when Delivered)
Page 5
GETTING STARTED
Cassette Cordless Shades
Thank you for purchasing Hunter Douglas Designer Roller and Designer Sceen Shades. With
proper installation, operation, and care, your new shades will provide years of beauty and
performance. Please thoroughly review this instruction booklet before beginning the installation.
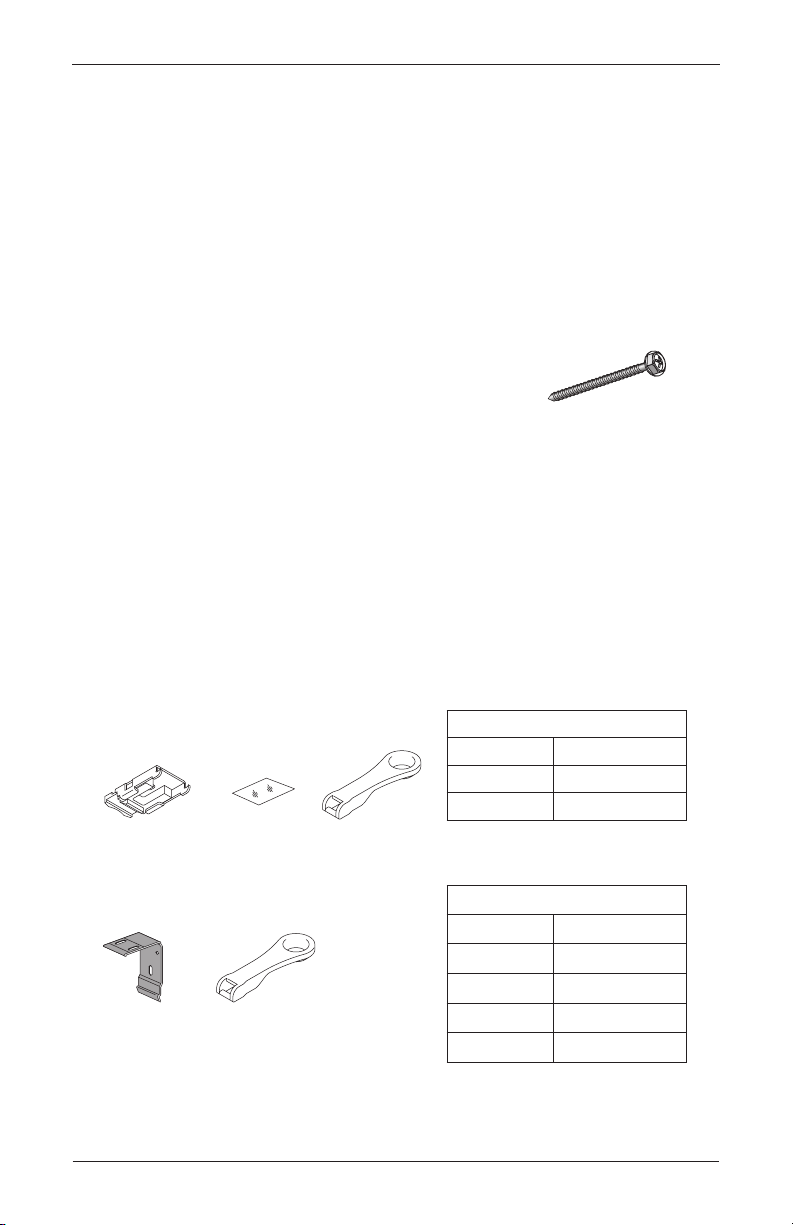
Tools and Fasteners Needed
■ Flat blade and Phillips screwdriver ■ Level (laser level is recommended)
■ Measuring tape and pencil ■ Power drill, 3∕32" drill bit and a
1
∕4" hex driver
In addition, you will need fasteners designed to work with your specific mounting surface(s).
■ #6 Hex Head Screws (Provided). Two 11∕2" screws are
provided per installation bracket.
■ Drywall Anchor (Not Provided). Use drywall anchors when
mounting into drywall.
#6 x 1½"
Hex Head Screw
(Provided)
Installation Overview
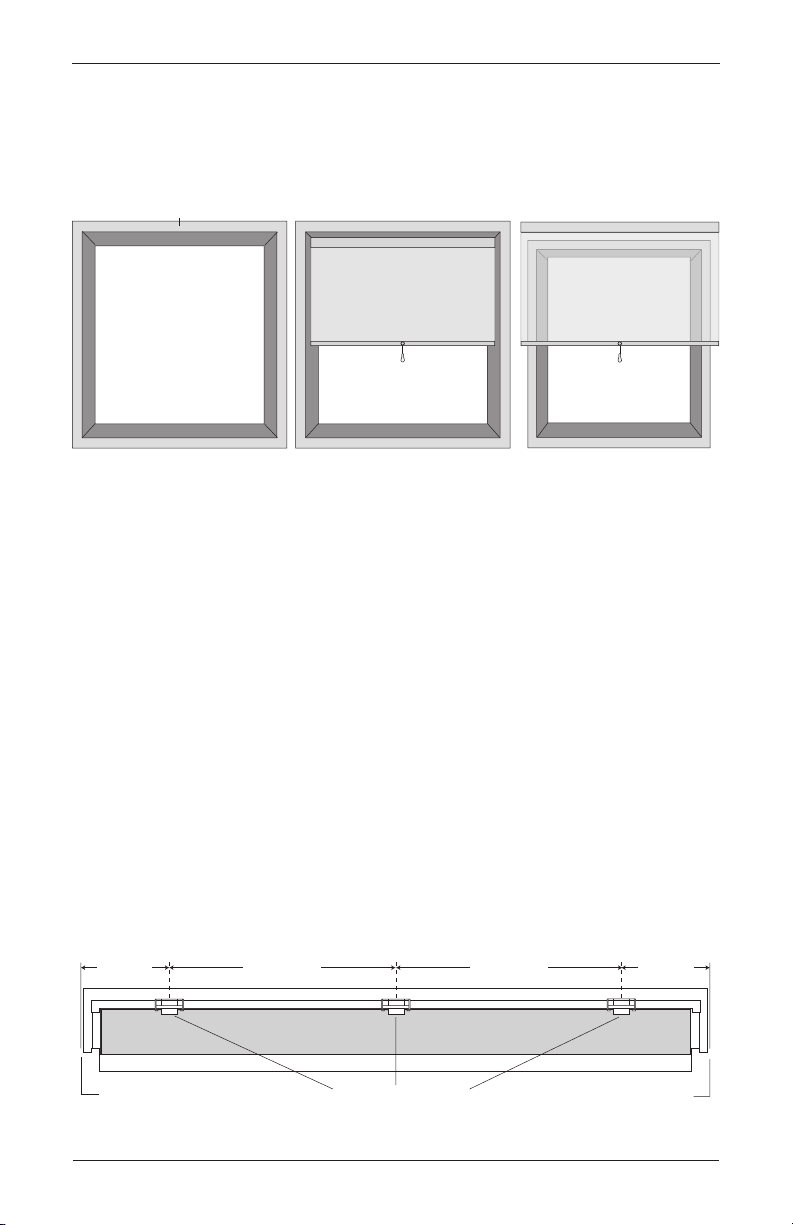
■ Your order will include installation brackets specific to your shade.
➤ The number of installation brackets required varies with shade width, as shown in
the tables below.
CAUTION: Keep the “Do not remove until installation” paper wrap in place, until the
shade is completely installed. These instructions will remind you when to remove
the wrap.
Standard Cordless Shades
Standard
Installation Bracket
Installation Bracket
Temporary
Positioning Tape
WinderCassette
Winder
Standard Cordless Shades
Shade Width Brackets Required
12" – 55" 2
1
/8" – 79" 3
55
Cassette Cordless Shades
Shade Width Brackets Required
Up to 36" 2
1
/8" – 72" 3
36
1
/8" – 90" 4
72
1
/8" – 120" 5
90
3
Page 6
INSTALLATION
Molding
Mounting Types and Window Terminology
If the installation brackets are mounted correctly, the rest of the installation process will follow
easily. To prepare for this important first step, review the mounting types and basic window
terminology illustrated below.
Head Jamb
Jamb Jamb
Collectively, the sill and
jambs are called the
“window casement.”
Sill
Inside Mount
Shade fits within
window opening.
■ Refer to the appropriate page below based on your order:
➤ Inside or Ceiling Mount for Standard Shades, see below.
➤ Outside Mount for Standard Shades, see page 5.
➤ Inside or Ceiling Mount for Cassette Shades, see page 6.
➤ Outside Mount for Cassette Shades, see page 7.
Outside Mount
Shade mounts outside
window opening.
Mount the Installation Brackets — Inside or Ceiling Mount for
Standard Shades
IMPORTANT: To ensure the bracket is mounted properly, the white tab should be toward
the room.
■ Mark 11/2" – 3" from each jamb for bracket location.
➤ If more than two installation brackets came with your order, space additional bracket(s)
evenly between the two end brackets and mark their location. Mount into wood
whenever possible.
11/2" – 3"
4
Jamb
Space Evenly Space Evenly
Installation Brackets
11/2" – 3"
Jamb
Page 7

INSTALLATION
Mounting Profile End Marks
■ Center the brackets on your marks and mark the screw holes.
➤ The minimum depth required for mounting is 15∕8". For fully recessed mounting, the
mounting depth varies with the diameter of the fabric roll when the shade is fully raised.
■ Use a 3∕32" drill bit to drill holes for the mounting screws.
IMPORTANT: Use drywall anchors when mounting into drywall. Drywall anchors are
not provided.
■ Attach the installation brackets using the screws provided.
➤ If necessary, use the temporary positioning tape to position the brackets.
IMPORTANT: The front edges of the installation brackets must be level and aligned to
eachother.
■ Proceed to “Install the Shade” on page 8.
Mount the Installation Brackets — Outside Mount for Standard Shades
■ Center the mounting profile over the window opening at the desired height. Use a pencil to
lightly mark each end of the mounting profile.
➤ Alternatively, measure the width of the mounting profile and use that width to mark the
mounting profile end points over the window opening.
11/2" – 3" 11/2" – 3"
Window Opening
Space EvenlySpace Evenly
■ Mark 11/2" – 3" from each end of themounting profile.
➤ If more than two installation brackets came with your order, space additional bracket(s)
evenly between the two end brackets and mark their location. Mount into studs
whenever possible.
■ Center the brackets on your marks and mark the screw holes.
IMPORTANT: The rear of the brackets must be flush against a flat mounting surface. Do
not mount brackets oncurved molding.
■ Use a 3∕32" drill bit to drill holes for the mounting screws.
IMPORTANT: Use drywall anchors when mounting into drywall. Drywall anchors are
not provided.
5
Page 8

INSTALLATION
■ Attach the installation brackets using the screws provided.
IMPORTANT: The front edges of the installation brackets must be level and aligned to
eachother.
■ Proceed to “Install the Shade” on page 8.
Mount the Installation Brackets — Inside or Ceiling Mount for
Cordless Cassette
■ Mark 2" in from each jamb for bracket location.
➤ If more than two installation brackets came with your order, space additional bracket(s)
evenly between the two end brackets and mark their location. Mount into studs
whenever possible.
2"
Installation Brackets Jamb Jamb
Space EvenlySpace Evenly
■ Center the brackets on your marks and mark the screw holes.
➤ The minimum depth required for mounting is 21∕4". For fully recessed mounting, 4¼" is
required.
■ Use a 3∕32" drill bit to drill holes for the mounting screws.
IMPORTANT: Use drywall anchors when mounting into drywall.
2"
Drywall anchors are not provided.
■ Attach the installation brackets using the screws provided.
IMPORTANT: The front edges of the installation brackets must
be level and aligned to eachother.
■ Proceed to “Install the Shade” on page 8.
2"
6
Page 9

INSTALLATION
Cassette End Marks
Mount the Installation Brackets — Outside Mount for Cordless Cassette
■ Center the cassette over the window opening at the desired height. Use a pencil to lightly
mark each end of the cassette.
➤ Alternatively, measure the width of the cassette and use that width to mark the mounting
profile end points over the window opening.
2"
Window Opening
Space EvenlySpace Evenly
■ Mark 2" from each end of thecassette.
➤ If more than two installation brackets came with your order, space additional bracket(s)
evenly between the two end brackets and mark their location. Mount into studs
whenever possible.
■ Center the brackets on your marks and mark the screw holes.
IMPORTANT: The rear of the brackets must be flush
against a flat mounting surface. Do not mount brackets
oncurved molding.
■ Use a 3∕32" drill bit to drill holes for the mounting screws.
2"
IMPORTANT: Use drywall anchors when mounting
into drywall. Drywall anchors are not provided.
■ Attach the installation brackets using the screws provided.
IMPORTANT: The front edges of the installation brackets must be level and aligned to
eachother.
2"
7
Page 10

INSTALLATION
Inside or Ceiling Mount Outside Mount
Cassette
Install the Shade
Standard Installation
The groove on the top of the mounting profile fits into the hooks on the installation brackets.
Hook
Bracket
Mounting
Profile
■ Install the shade into the installation brackets.
➤ Hold the shade so the bottom bar fabric side faces you.
➤ Hook the back groove of the mounting profile onto the hooks of the installation brackets.
Bracket
Hook
Mounting
Profile
➤ Rotate the mounting profile toward the white tabs of the installation brackets. Push the
set bar until tabs lock into place. You will hear a loud click when each bracket is securely
in place.
Cassette Installation
■ Angle the cassette back and then align
the cassette under the front lip of the
bracket.
■ Push the cassette back to snap it into the
lower lip of the bracket.
8
Front
Lip
Bracket
Page 11

Install the Shade Pull
The shade pull is not attached when delivered.
■ Detach the screw from the shade pull. Insert the screw through the
bottom bar so the screw head is on the back side of the bottom bar.
■ Attach the shade pull with the screw.
■ After the shade is properly installed, remove the “Do not remove
until installation” paper from the roll.
Attach the Standard Hold-Down Brackets (Optional)
The standard hold-down brackets may be used with outside
mount shades only.
■ With the shade fully lowered, insert the pin on the hold-down
bracket into the hole on the bottom rail endcap.
■ Mark the hole locations on the mounting surface.
■ Center the hold-down brackets over the mounting
hole locations and check their alignment. Attach using
twoscrews.
INSTALLATION
IMPORTANT: Disconnect the bottom rail from the hold-down brackets to raise the shade.
9
Page 12

INSTALLATION
Outside Mount
Attach the Magnetic Hold-Down Brackets (Optional)
■ Lower the shade.
■ Place the magnetic hold-down bracket onto the bottom rail just
inside the end cap, oriented as shown.
■ Hold the bracket while opening and closing the shade slightly
(it may be necessary to have someone assist you). Adjust the
bracket to the best overall position using the mounting options
shown below.
Bottom
Rail
Hold-Down
Bracket
Preferred Alternate
Inside Mount
Preferred Alternate
■ Mark the screw location.
➤ The screw should be placed in the middle of the channel. This will allow for adjustment.
■ Drill the screw holes using a 3/32" drill bit.
■ Attach the hold-down brackets to the mounting surface using
the screws provided.
■ If necessary, adjust the bracket location in the channel for best
operation.
10
If necessary,
adjust the
bracket in the
channel.
Page 13

Operate the Shade
Dial
Lowering the Shade
■ Pull down and release. The shade stops
where released.
Raising the Shade
■ Pull the shade down about an inch and
release. The shade rises and stops.
OPERATION
Shade Adjustment
Stop Height Adjustment
The upper level stop height can be adjusted on shades wider than 24". Generally, the shade
stops when it is completely rolled up. By using a stop controller, the shade can be adjusted to
stop before reaching the top. The stop controller is also useful for aligning multiple side-bysideshades.
■ Completely roll up the shade.
■ Turn the dial clockwise to lower the fabric level or dial
counter-clockwise to raise the fabric level.
■ Lower and raise the shade. Repeat the previous step
until the stop height is at the desiredlevel.
CAUTION: When the shade is pulled too hard, the bottom of the shade may flip over the
top of the roller tube. To fix this, turn the roller tube manually by hand.
Stop
Controller
11
Page 14

OPERATION
Detach Roller
Turn Counter-
Clockwise
Pull roller out
from right side
holder.
Speed Adjustment
If slight changes in the speed are desired:
■ Completely raise the shade.
■ Turn the left side holder counter-clockwise until it stops.
■ Remove the roller from the mounting profile by pulling it out from the right side holder.
IMPORTANT: Remove the shade slowly with both hands.
■ Lay shade on a flat surface.
■ Place the winder onto the black knob on the left side of the roller.
■ For faster roll-up:
➤ Turn 1-2 times clockwise as pictured while pulling
the winder.
Winder
While Pulling
■ For slower roll-up:
■ Replace the roller by aligning it in the right side holder.
■ Slide the left side black knob into the side holder. The red side of the knob should be
■ Turn the left side holder clockwise until it stops.
12
Turn Clockwise
➤ While pulling the winder, turn a half-turn clockwise, then turn 1-2 times
counter-clockwise.
While Pulling
Half-Turn Clockwise
Turn Counter-Clockwise
While Pulling
facing up.
WARNING: The winder does not turn if it is not pulled. Do not turn it more than two turns.
Hold the winder securely, otherwise it may slip from the knob and cause injury.
Page 15

Troubleshooting
Problem Solution
The shade does not roll up,
or it rolls too slowly.
The shade does not lower. ■ Check that the window is square by measuring the
■ Check that the mounting brackets are level.
■ Roll-up speed can be adjusted. See “Speed
Adjustment” on page 12.
diagonals.
■ Check that the left side holder dial is closed. The shade
will not operate if it is in the open position.
CAUTION: Do not disassemble or modify the mechanism
inside the roll tube.
OPERATION
I have several shades, and
the side holders are different
sizes.
■ Shade holder size is determined by the length of the
shade and size of the roll.
13
Page 16

CARE
Removing the Shade (If Necessary)
Standard Cordless Shade
■ Fully raise the shade.
■ While holding the shade, push in the white tab on each bracket to release.
Cordless with Cassette Shade
■ Insert the tip of a flat head screwdriver into the
screwdriver slot provided on the bracket.
■ Press down to release the cassette.
■ Roll the cassette forward and then down to remove.
Insert a
screwdriver
to release
the cassette.
Cleaning Procedures
The following options are available if your shade needs cleaning.
Dusting
■ Regular light dusting with a feather duster or soft cloth is all the cleaning that is needed in
most circumstances.
Vacuuming
■ Use a hand-held vacuum with low suction for more thorough dust removal.
CAUTION: Do not clean with harsh detergents.
For more cleaning methods specific to your roller shade fabric, please consult your
Hunter Douglas dealer.
14
Page 17

Page 18

Page 19

Notes
Page 20

The Hunter Douglas® Lifetime Guarantee is an expression of our desire to provide a thoroughly satisfying
experience when selecting, purchasing and living with your window fashion produc ts. If you are not thoroughly
satisfied, simply contact Hunter Douglas at (888) 501-8364 or visit hunterdouglas.com. In support of this policy
of consumer satisfaction, we offer our Lifetime Limited Warranty as described below.
COVERED
BY A LIFETIME LIMITED WA RRANTY
• Hunter Douglas window fashion products are
covered for defects in materials, workmanship
or failure to operate for as long as the original
retail purchaser owns the product (unless shorter
periods are provided below).
• All internal mechanisms.
• Components and brackets.
• Fabric delamination.
• Operational cords for a full 7 years from the
date of purchase.
• Repairs and/or replacements will be made with
like or similar parts or products.
• Hunter Douglas motorization components are
covered for 5 years from the date of purchase.
• Any conditions caused by normal wear and tear.
• Abuse, accidents, misuse or alterations to the
• Exposure to the elements (sun damage, wind,
• Failure to follow our instructions with respect
• Shipping charges, cost of removal and reinstallation.
NOT COVERED
BY A LIFETIME LIMITED WA RRANTY
product.
water/moisture) and discoloration or fading
over time.
to measurement, proper installation, cleaning
or maintenance.
Hunter Douglas (or its licensed fabricator/distributor) will repair or replace the
window fashion product or components found to be defective.
TO OBTA IN WARRANTY SERV ICE
1. Contact your original dealer (place of purchase) for warranty assistance.
2. Visit hunterdouglas.com for additional warranty information, frequently asked questions and access to service locations.
3. Contact Hunter Douglas at (888) 501-8364 for technical suppor t, certain parts free of charge, for assistance in obtaining
warranty service or for further explanation of our warranty.
NOTE: In no event shall Hunter Douglas or its licensed fabricators/distributors be liable or responsible for incidental
or consequential damages or for any other indirect damage, loss, cost or expense. Some states do not allow the exclusion or
limitation of incidental or consequential damages, so the above exclusion or limitation may not apply to you. This warranty
gives you specific legal rights, and you may also have other rights which vary from state to state.
Different warranty periods and terms apply for commercial products and applications.
5/12LIT888315
 Loading...