

Page 1

XCORE
SEASONAL ADJUSTMENT
WATER DAYS
START TIMES
SYSTEM OFF
CURRENT TIME/DAY
RUN TIMES
ACTIVE
SENSOR BYPASS
RUN
MANUAL-ONE STATION
Residential Irrigation Controller
Owner’s Manual and
Programming Instructions
Page 2
SEASONAL ADJUSTMENT
WATER DAYS
START TIMES
SYSTEM OFF
CURRENT TIME/DAY
RUN TIMES
ACTIVE
SENSOR BYPASS
RUN
MANUAL SINGLE STATION
Page 3
TABLE OF CONTENTS
XCORE COMPONENTS ...................................................................4
MOUNTING THE CONTROLLER TO WALL .......................................8
CONNECTING VALVES AND TRANSFORMER .................................9
ACTIVATING THE BATTERY .......................................................... 10
REPLACING THE BATTERY ........................................................... 10
CONNECTING A MASTER VALVE .................................................... 11
CONNECTING A PUMP START RELAY ............................................12
CONNECTING A HUNTER “CLIK” WEATHER SENSOR ...................13
Testing the Weather Sensor ........................................................13
Manually Bypassing the Weather Sensor ....................................13
CONNECTING A HUNTER SOLAR SYNC ET SENSOR ................. 14
Installing Solar Sync Sensor ....................................................... 14
Installing the Wireless Solar Sync ............................................. 14
Solar Sync Settings .................................................................... 14
Region
Water Adjustment
Uninstalling a Solar Sync Sensor ................................................ 14
Calibration/Setup .......................................................................17
SOLAR SYNC DELAY FEATURE ...................................................18
CONNECTING A HUNTER REMOTE ................................................19
Connecting to a Hunter Remote (not included) ...........................19
To install the SmartPort connector ..............................................19
POWER FAILURES ......................................................................19
PROGRAMMING THE CONTROLLER ............................................20
Setting the Date and Time .....................................................21
Setting the Program Start Time(s) .........................................21
..................................................................................15
.................................................................16
Eliminating a Program Start Time ...............................................21
Setting Station Run Times ......................................................21
Setting Days To Water ...........................................................21
Selecting Specic Days of the Week to Water .............................21
Selecting Odd or Even Days to Water .........................................22
Selecting Interval Watering .................................................22
Setting Event Day(s) O .............................................................22
Automatic Watering ............................................................... 22
System O ........................................................................... 22
Programmable Rain O ..............................................................23
Seasonal Adjustment ............................................................ 23
Manually Run a Single Station 1 .............................................23
One-Touch Manual Start and Advance .......................................24
ADVANCED FEATURES ..............................................................25
Programmable Sensor Override ................................................. 25
Test Program of All Stations ....................................................... 25
Hunter Quick Check Diagnostics ............................................... 25
Easy Retrieve™ Program Memory ..............................................26
Programmable Delay Between Stations .....................................26
Resetting Controller / Clearing Controllers Memory ..................26
Clik Delay Instructions ................................................................ 27
TROUBLESHOOTING GUIDE ..........................................................30
SPECIFICATIONS ........................................................................... 33
Operating Specications ............................................................ 33
Electrical Specications .............................................................. 33
Explanation of Symbols .............................................................. 33
CERTIFICATE OF CONFORMITY TO EUROPEAN DIRECTIVES ..34
3
Page 4

XCORE COMPONENTS
LCD Display
1
2
3 Station Number
4 Program Designator
5 Day of the Week
6 Interval Watering
7 Odd/Even Watering
8 Flashing Sprinkler
9
10
11
12
13
14
Run Times
Start Times
System O
Umbrella
Seasonal Adjustment
Rain Drop
Crossed Rain Drop
Calendar
Allows user to set each valve station run time from 1 minute to 4 hours
Allows 1 to 4 start times to be set in each program
Indicates currently selected station number
Identies program (A, B, or C) in use
Identies day of the week
Identies month when programming current date
Identies if Odd or Even watering has been selected
Indicates that watering is taking place
Allows user to discontinue all programs and watering. Also allows the user to set the programmable
“rain o,” which stops watering for a period from 1 to 7 days.
Indicates that the rain sensor is active
Allows the user to make run time changes according to the seasons without reprogramming the controller.
Bars on the le allow quick visual reference to the seasonal adjustment percentage. When using Solar Sync
ET Sensor, will display seasonal adjust updated daily by sensor.
Indicates watering will occur on the selected day
Indicates the watering will NOT occur on the selected day
Indicates interval watering schedule has been programmed. Icon also appears when programming the
current day
4
Page 5
XCORE COMPONENTS
Wiring Compartment
15 Lithium Battery
16 Internal Junction Box Junction box in outdoor models for making AC power connections
17 Terminal Strip Use to attach transformer, sensor, and valve wires from their source to the controller
18 Reset Button Use to reset the controller (located on right side of controller)
19 REM Allows for connection of Hunter SmartPort
20 Sensor Bypass Switch
Control Buttons
Button Increases the selected item ashing in the display
Button Decreases the selected item ashing in the display
Button
Button
Button
The replaceable lithium battery (included) allows the controller to be programmed in the absence
of AC power. In addition, the battery will provide power for backup timekeeping in the event of a
power outage.
®
and Hunter Remote Controls
Ignores “Clik” weather sensor input when in Bypass position
Returns selected ashing display to previous item
Advances the selected ashing display to the next item
Selects program A, B, or C for dierent watering zone requirements
55
Page 6

XCORE COMPONENTS
Indoor Model
Note: Plug may
look dierent from
illustration
Outdoor Model
(Internal Transformer
Included)
Terminal
block for -E
(International
6
models only)
6
Page 7

XCORE COMPONENTS
Dial Settings
Run Normal dial position for all controller automatic and manual operation
Current Time/Day
Start Times
Run Times
Water Days
Seasonal Adjustment
Manual-One Station
1
System O
SOLAR SYNC Settings
External Transformer (Indoor Model Only)
Allows current day and clock time to be set
Allows 1 to 4 start times to be set in each program
Allows user to set each valve station run time from 1 minute to 4 hours
Allows the user to select interval days to water
Allows user to make run time changes according to the seasons without reprogramming the controller.
Bars on the le allow quick visual reference to the seasonal adjustment percentage.
Allows user to activate a one-time watering of a single valve
Allows user to discontinue all programs and watering. Also allows the user to set the programmable
“rain o,” which stops watering for a period from 1 to 7 days
Allows user to program settings when using Solar Sync ET Sensor
A plug in transformer is provided to supply AC power to the controller
7
Page 8
MOUNTING THE CONTROLLER TO WALL
Note: The indoor version of the X-Core is not water-
proof or weather-resistant, and must be installed indoors
or in a protected area.
1. Secure one screw into the wall. Install screw anchors if attaching
to drywall or masonry wall.
2. Slide the keyhole on top of the controller over the screw.
3. Secure the controller in place by installing screws in the holes
below the terminal strip.
NOTE:Do not plug transformer into power source until
controller is mounted and all valve wiring has
been connected.
NOTE: For XC - x01 - A: If the supply cord is damaged, it
must be replaced by the manufacturer or service agent,
or a similarly qualied person in order to
avoid hazard.
NOTE: The door on outdoor units must remain closed
for maximum water resistance.
B
A
C
8
Page 9

CONNECTING VALVES AND TRANSFORMER
Installation of the X-Core should only be done by trained personnel.
1. Route valve wires between the control valve location and controller.
2. At valves, attach a common wire to either solenoid wire on all
valves. This is most commonly a white colored wire. Attach a
separate control wire to the remaining wire of each valve. All
wire connections should be done using waterproof connectors.
3. Route the valve wires through the conduit. Attach the conduit
through the bottom right side of the controller.
4. Secure the white valve common wire to the C (Common) screw
on the terminal strip. Attach each of the individual valve control
wires to the appropriate station terminals and tighten their
screws.
5. Indoor Models: route the transformer cable through the hole on
the le side of the controller and connect the wires to the two
screws marked 24 VAC.
Outdoor Models: transformer wires are already connected to the
AC terminals so all that is required is to connect primary power
to the junction box (see below).
NOTE: X-Core outdoor models are water and
weather-resistant throughout document. Connecting
the outdoor X-Core to primary AC power should only be
done by a licensed electrician following all local codes.
Improper installation could result in shock or re hazard.
Valve 4
Valve 3
BAT
Valve 2
Valve 1
Connect the two transformer
wires to the two AC Terminals
High Voltage Wiring (Outdoor Model only)
Valve
Wires
Valve Common Wire
1. Route AC power cable and conduit through the ½" (13 mm)
conduit opening on the le side bottom of the cabinet.
2. Connect one wire to each of the two wires inside the junction
box. The ground wire should be connected to the green wire.
Wire nuts are provided to make these connections.
Note: For –E models only: Connect the wires to the AC
terminal block inside the junction box. AC supply wires must
be 14 AWG (1.85 mm) or larger with appropriate circuit breaker
for the wire size. A switch or circuit-breaker shall be included
in the building installation (in close proximity to the controller,
within easy reach of the operator) and marked as the disconnecting device for the equipment.
3. Replace the junction box cover.
9
Page 10
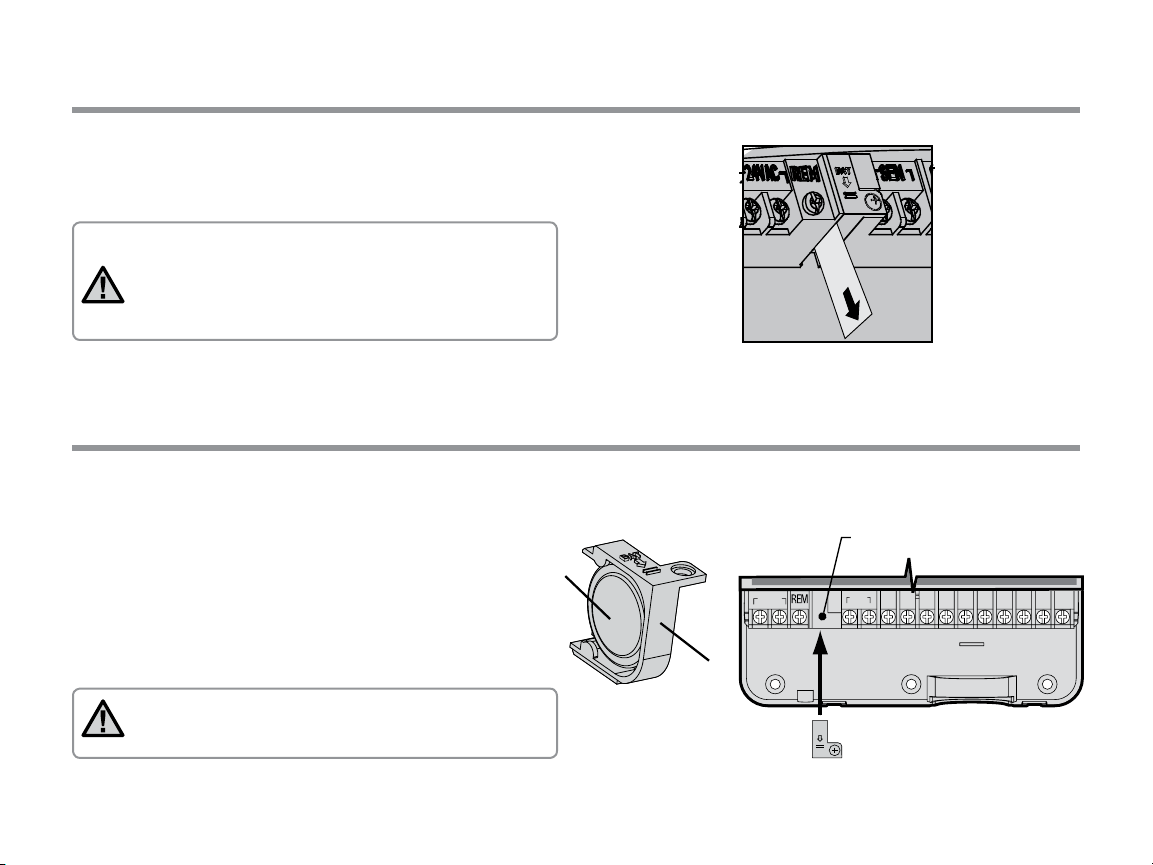
ACTIVATING THE BATTERY
Battery Compartment
Lithium Battery
Aer installing your X-Core, make sure to remove the battery
contact insulator to allow the X-Core to keep time in the event of
a power outage.
CAUTION:
RISK OF EXPLOSION IF BATTERY IS REPLACED BY AN
INCORRECT TYPE. DISPOSE OF USED BATTERIES ACCORDING TO THE INSTRUCTIONS.
REPLACING THE BATTERY
A high-energy lithium battery is included with your X-Core
controller. The battery allows the user to remotely program the
controller without connecting AC power. It is also used to keep
the current time and day during power outage conditions.
To replace the battery:
1. Remove the screw from the battery holder.
2. Slide the battery holder down to access the battery.
3. Remove and replace the new battery into the battery holder
and reinstall the battery holder.
NOTE: This positive(+) side of the battery should face
the inside of the battery holder.
Battery
(--)
Battery type: CR2032 3V
(+)
Holder
24VA C
SEN C P 1 2 3 4 5 6 7 8
BAT
10
Page 11
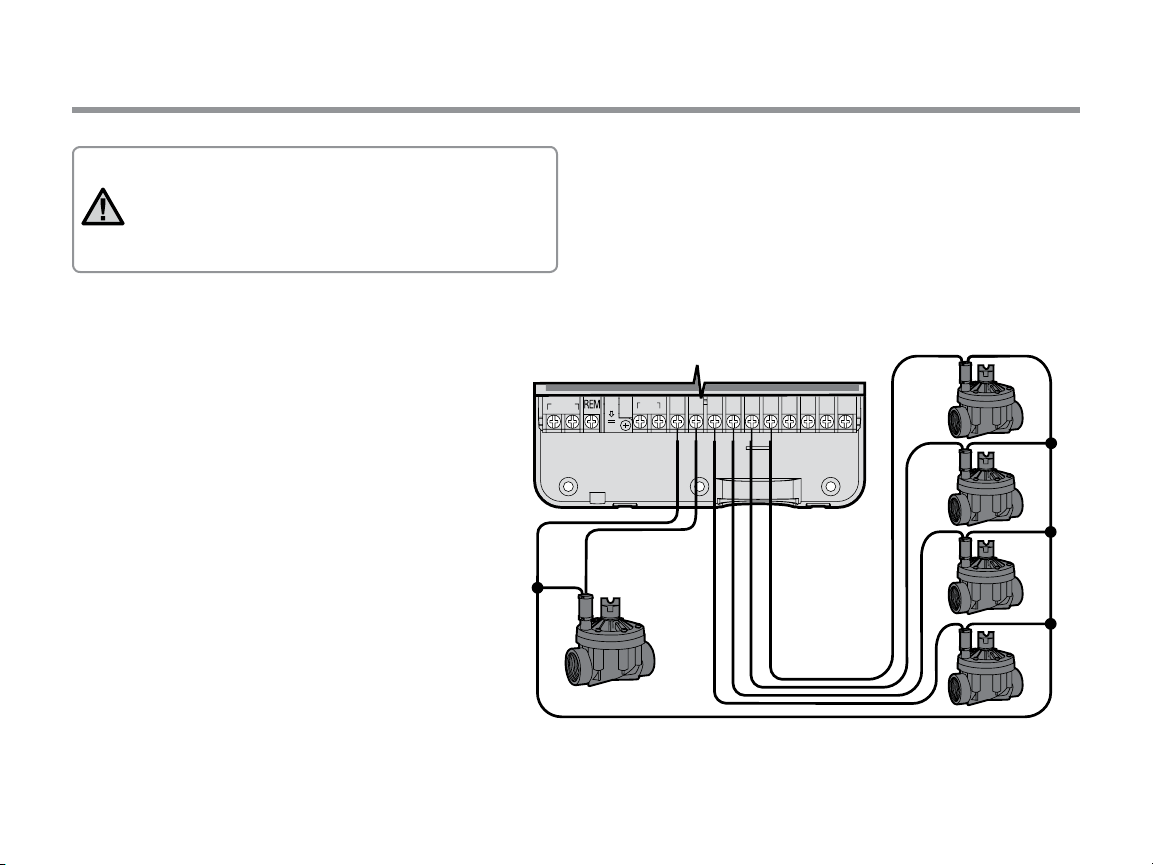
CONNECTING A MASTER VALVE
NOTE: Complete this section only if you have a
master valve installed in your irrigation system. A
master valve is a “normally closed” valve installed at the
supply point of the main line that opens only when the
controller initiates a watering program.
1.
At the Master Valve, attach the common wire to either solenoid
wire of the valve. Attach a separate control wire to the remaining
solenoid wire.
2. The common wire should be attached to the C terminal inside the
controller. The other wire coming from the master valve should
be attached to the P terminal inside the controller. Tighten each
terminal screw.
Valve 4
24VA C
SENCP12345678
BAT
Master
Valve Wire
Master Valve
Valve 3
Valve 2
Valve 1
Valve Wires
Valve Common Wire
11
Page 12

PSR Series
Pump Start Relay
SEASONAL ADJUSTMENT
WATER DAYS
ALL
MANUAL-ALL STATIONS
START TIMES
SYSTEM OFF
CURRENT TIME/DAY
RUN TIMES
ACTIVE
SENSOR BYPASS
RUN
CONNECTING A PUMP START RELAY
NOTE: Complete this section only if you have a
pump start relay installed. A pump start relay is
a device that uses a signal from the controller to
actuate a separate electrical circuit to energize a pump
to provide water to your system.
The controller should be mounted at least a 15 (4.5 m) away from
both the pump start relay and pump to minimize any potential
electrical interference.
1. Route a pair of wires from the pump relay into the controller.
2. Connect a common wire to the C (common - typically a white
wire) terminal inside the controller and connect the remaining
wire from the pump start relay to the P (Pump) terminal.
Relay holding current draw must not exceed 0.3 A. Do not connect
the controller directly to the pump or damage to the controller
will result.
http://www.hunterindustries.com/support/controllers/pumpstart-relay
START TIMES
15 ft Minimum (4.5 m)
To Pump
12
Page 13

CONNECTING A HUNTER “CLIK” WEATHER SENSOR
SEN C P 1 2 3 4 5 6 7 8
REM
24VA C
BAT
/DAY
ACTIVE
BYPASS
A Hunter weather sensor or other micro-switch type weather
sensors can be connected to the X-Core. The purpose of this sensor
is to stop automatic watering when weather conditions dictate.
1. Remove the metal jumper plate that is attached across the two
SEN terminals inside the controller.
2. Connect one wire to one SEN terminal and the other wire to the
other SEN terminal.
When the weather sensor has
deactivated automatic watering, the
OFF, and icon will appear on the
display.
Testing the Weather Sensor
The X-Core provides simplied testing of a rain sensor when the
sensor is wired into the sensor circuit. You can manually test proper
operation of the rain sensor by running a AUTO CYCLE or by
activating the system using the One Touch AUTO CYCLE. During
the Manual cycle, pressing the Top spindle on the Mini-Clik® will
interrupt watering.
Manually Bypassing the Weather Sensor
If the rain sensor is interrupting irrigation,
you can bypass it by using the bypass switch
on the front of the controller. Slide the
switch to the SENSOR BYPASS position to
disable the rain sensor from the system to
allow for controller operation. When using
the MANUAL – ONE STATION function, the
controller will automatically bypass sensor inputs for the selected
time. Once complete, the controller will default to selected settings.
NOTE: Enabling the Sensor Bypass switch has no
eect on the seasonal adjust updates from the Solar
Sync sensor. It will, however, bypass the Rain Clik
and Freeze - Clik functionality of the sensor.
13
Page 14
CONNECTING A HUNTER SOLAR SYNC ET SENSOR
The X-Core is compatible with the Solar Sync and Wireless Solar
Sync systems. Solar Sync is a sensor system that will automatically
adjust the X-Core controller’s watering schedule (based on changes
in local climate condition) by using the Seasonal Adjust function. The
Solar Sync uses a solar and temperature sensor to determine evapotranspiration (ET), or the rate at which plants and turf use water, and
also includes Hunter Rain Clik and Freeze Clik technology that will
shut down irrigation when it rains and/or during freezing conditions.
NOTE: Solar Sync will apply a default seasonal adjust
value of 100% until the rst full day (24 - hour period)
of weather measurements have been received from the
sensor.
NOTE: Enabling the Sensor Bypass switch has no eect
on the seasonal adjust updates from the Solar Sync sensor. It will, however, bypass the Rain Clik and Freeze Clik
functionality of the sensor.
NOTE: The Solar Sync module is not required for
installation using the X-core Controller.
Installing Solar Sync Sensor
Connect the Green and Black wire from the Solar Sync Sensor to the
“SEN” wiring terminals on the X-Core controller, similar to picture
on page 11. It does not matter which
wire connects to which terminal. Turn
the dial to the “Solar Sync Settings”
position. The display will initially show
dashed lines and then will show the
default Region setting (3) on the le
14
and the default Water Adjustment setting (5) on the right. Adjust
the Region as needed by using the
button to advance to the right to adjust the Water Adjust setting as
needed (see page 14 for explanation of Water Adjust setting).
and buttons . Use the
Installing the Wireless Solar Sync
Connect the Green and Black wire from the Wireless Solar Sync
Receiver to the “SEN” wiring terminals on the X-Core controller. It
does not matter which wire connects to which terminal. Turn the dial
to the “Solar Sync Settings” position. The display will initially show
dashed lines and then will show the default Region setting (3) on
the le and the default Water Adjustment setting (5) on the right.
Adjust the region as needed by using the and buttons (refer to
page 15 for explanation of Solar Sync
Region setting). Use the button
to advance to the right to adjust the
Water Adjust setting as needed (see
page 16 for explanation of Water
Adjust setting).
Solar Sync Settings
Once the Solar Sync sensor is connected to the X-Core controller,
two numbers will appear in the display when the dial is turned to the
Solar Sync Settings position. The number on the le of the screen is
the Region setting, and the number on the right on the screen is the
Water Adjustment setting (as shown above).
Page 15

CONNECTING A HUNTER SOLAR SYNC ET SENSOR
• U.S. Northern States
• Coastal Regions
If the average July ET is
< 0.17" (4.3 mm) per day
If the average temperature for July is
65°– 75°
(18°C – 24°C)
If the average temperature for July is
75° – 85°
(24°C – 29°C)
• Mountains
• U.S. Northern Inland States
If the average July ET is 0.18" – 0.23"
(4.6 mm – 5.8 mm) per day
• U.S. Southern States
• Inland/High Desert
If the average July ET is 0.24" – 0.29"
(6.1 mm – 7.4 mm) per day
If the average temperature for July is
85° – 95°
(29°C – 35°C)
• Deserts
If the average July ET is > 0.30"
(7.6 mm) per day
If the average temperature for July is
95° – 105°
(35°C – 41°C)
* For Southern hemisphere locations, use the month of January.
Region
1
Region
2
Region
3
Region
4
IF ANY OF THE CHOICES IN THE ROWS APPLY TO YOUR SITUATION, THEN THAT IS YOUR REGION SETTING CHOICE.
A B C
Region
For accurate Solar Sync measurements, the controller needs to
be programmed for the average peak season ET for your region. Use
the table below to determine your region.
The table will assist you in identifying the type of region you live
in. There are four basic ET regions, each with descriptions of the
region, along with typical ET and temperature characteristics. It is
recommended that, if possible, the region be chosen based upon
average July ET or peak summer ET (inches/mm per day).
Use the following table for choosing your region (reference below).
You can use methods A, B or C to help you choose which region is
best for your area:
A: Based upon the ET of your region using the average July ET
or peak summer ET (inches/mm per day). This is the preferred
option when selecting your region.
B: Based upon the temperature for your region using the average
July or the driest month high temperature (not the highest
temperature for July).
C: Based upon the general description of your region.
15
Page 16

CONNECTING A HUNTER SOLAR SYNC ET SENSOR
Water Adjustment
The Water Adjustment is a 1 to 10 scale that allows for easy
adjustment of the Seasonal Adjust value from the Solar Sync
ET Sensor. Upon installation of the Solar Sync ET Sensor, it is
recommended that the Water Adjustment setting stay at the default
value of 5. However, aer installation, if you nd that the seasonal
adjust value is lower or higher than expected, the Water Adjustment
value can be modied to modify the Seasonal Adjust output value.
See Calibration/Setup on page 17 for explanation of how to use
Water Adjustment scale to ne - tune seasonal adjust output value.
NOTE: If an individual zone is “wetter” or “drier” than
the rest of the system, simply increase or
decrease the amount of run time on the controller.
Uninstalling a Solar Sync Sensor
If a Solar Sync sensor has been installed on the X-Core controller,
then the seasonal adjust value used by the controller will be
calculated from the weather data supplied by the Solar Sync sensor.
If it is decided that the Solar Sync sensor will no longer be used
with the X-Core controller, it must be uninstalled. If the Solar Sync
sensor is not uninstalled, the controller will not allow the seasonal
adjust value to be manually changed. For example, if the seasonal
adjust value shown on the controller was 50% when the Solar Sync
sensor was removed, it will remain 50% until the Solar Sync sensor is
uninstalled.
To uninstall the Solar Sync sensor, simply disconnect the green and
black wires from the controller terminal and then turn the dial to
the “Solar Sync Settings” position. The display should show dashes,
indicating that the controller no longer recognizes the Solar Sync
sensor for calculation of seasonal adjustment. Now the seasonal
adjust value can be changed manually by turning the knob to the
“Seasonal Adjust” position and using the or button to adjust
the value.
16
Page 17

CONNECTING A HUNTER SOLAR SYNC ET SENSOR
Calibration/Setup
Aer Solar Sync has been installed and programmed, it is recommended to allow the system to run for a few days at the initial setting.
Because of the variety in site conditions (including sensor location, amount of direct sunlight available to the sensor, reective heat from
surrounding structures, etc), the initial setting may require adjustment in order to arrive at the desired performance. The calibration
of the Solar Sync to a particular site can easily be accomplished by adjusting the Region and/or Water Adjustment settings. The instructions
below outline this process:
1. Install Solar Sync sensor
2. Program Region and allow system to operate at initial setting for a minimum of 3 days (see page 15 for instructions on how to determine
proper Region setting).
3. Observe the Seasonal Adjust on the controller. If the Seasonal Adjust amount appears to be lower or higher than expected for that time of
year, the Solar Sync settings need to be adjusted.
a. Seasonal Adjust too low: Turn the dial to the Solar Sync settings position. Increase the value on the Water Adjustment scale (10 is max). Once
the setting is changed, the controller will immediately be updated with the new Seasonal Adjust %. Increase the Water Adjustment setting
until the desired Seasonal Adjust % is shown. If you max out the Water Adjustment scale at 10 and still require more Seasonal Adjust, move
down to the next lower Region (from Region 4 to 3, for example).
b. Seasonal Adjust too high: Turn the dial to the Solar Sync settings position. Decrease the value on the Water Adjustment scale (default setting
is 5). Once the setting is changed, the controller will immediately be updated with the new Seasonal Adjust %. Decrease the Water Adjustment
setting until the desired Seasonal Adjust % is shown. If you minimize the Water Adjustment scale down to 1 and still require a reduction in
Seasonal Adjust, move up to the next Region (from Region 2 to 3, for example).
Station Run Times: It is important to understand that Solar Sync provides a global seasonal adjustment to the controller. This means that
all station run times will be modied by the seasonal adjust percentage shown. When programming the controller, the run times should be
entered that represent peak season watering schedules. If the Solar Sync is adjusting to the appropriate seasonal adjust value but the run time
for a particular station appears to be too long/short, adjust the station run time in the controller program.
17
Page 18

SOLAR SYNC DELAY FEATURE
Solar Sync Delay for X-CORE
The delay feature is accessible only aer the installation
of the Solar Sync. The Solar Sync Delay feature allows the user to
postpone seasonal adjustment changes from being made
by Solar Sync for up to 99 days.
While the Solar Sync Delay is active, the Solar Sync will continue to
collect and store data.
Operation:
To access the Solar Sync Delay setting:
1. Place the dial in the RUN position; press and hold the button,
rotate the dial to the Solar Sync position then release the
button. The following screen will be presented: d:XX (where d
indicates days and XX indicates the number of days
to be delayed).
2. Press the or button to increase/decrease the number
of days the delay should run. Once the desired number of days
is displayed, move the dial back to the RUN position to activate
the delay.
NOTE: The number of days remaining will not be
displayed on the RUN screen. To check if the Delay
feature is active, open the Solar Sync Delay menu
and check the days displayed. If 1 or more days are
displayed, then Solar Sync Delay is active, if 00 is
displayed, then Solar Sync Delay is not active.
To change the existing Delay days setting:
1. Open the Solar Sync Delay menu by pressing the button and
rotating the dial to Solar Sync Settings and release the
button.
2. Use the + or - keys to modify the number of days until desired
numbers of delay days is displayed. (Setting the days to 00 turns
Solar Sync Delay to OFF.)
3. Return the dial to the RUN position for the changes to
take eect.
While Solar Sync Delay is active, the Solar Sync will continue
to gather weather information and calculate the Seasonal
Adjust Value. The updated seasonal adjust will be applied once the
Solar Sync Delay days reach 00.
18
Page 19

CONNECTING A HUNTER REMOTE
Connecting to a Hunter Remote (not included)
The X-Core Controller is compatible with Hunter Remote Controls
(not included). The SmartPort® wiring harness (included with all
Hunter Remotes) allows for fast and easy use of the Hunter controls.
The Hunter remotes make it possible for you to operate the system
without having to walk back and forth to the controller.
To install the SmartPort connector
1. Install a ⁄" Female threaded “Tee” in
the eld wiring conduit (not included)
approximately 12 inches below the
X-Core.
2. Feed the red, white, and blue wires
of the harness through the base of
the “Tee” and into the wiring
compartment as shown.
3. Screw the SmartPort harness
NOTE: P/N 258200 can be used as
an alternate method to mount the
SmartPort connector.
To Controller
1
/2" Thread
Pre-assembled Assembled
POWER FAILURES
housing into the “Tee” as shown.
4. Attach the red, white, and blue SmartPort wires to the
controller terminal as shown below:
• Red wire to le side “24 VAC” terminal
• White wire to right side “24 VAC” terminal
• Blue wire to “REM” terminal
SEN C P 1 2 3 4 5 6 7 8
red
24VA C
blue
white
Due to the possibility of power failures, the controller has non-volatile memory. Programmed information will never be lost due to a power
outage. The lithium battery will keep the correct time without AC power. Normal watering will resume when AC power is restored.
19
Page 20

PROGRAMMING THE CONTROLLER
The X-Core display shows the time and day when the controller is
idle. The display changes when the dial is rotated to indicate the
specic programming information to enter. When programming, the
ashing portion of the display can be changed by pressing the
buttons. To change something that is not ashing, press the
or buttons until the desired eld is ashing.
Three programs A, B, and C, each with the ability to have four daily
start times, permit plants with dierent watering requirements to be
separated on dierent day schedules.
or
Setting the Date and Time
1. Turn the dial to the CURRENT TIME/DAY position.
2. The current year will be ashing. Use the or buttons to
change the year. Aer setting the year, press the button to
proceed to setting the month.
3. The month and day will be in the display. The month will be ashing and the icon will be displayed. Use the or
buttons to change the month. Press the button to proceed
to setting the day.
4. The day will be ashing and the icon will be displayed. Use
the or buttons to change the day. Press the button to
proceed to setting the time.
5. The time will be displayed. Use the and buttons to select
AM, PM, or 24 hour. Press the button to move to hours. Hours
will be ashing. Use the and buttons to change the hour
shown on the display. Press the button to move to minute.
Minutes will be ashing. Use the and buttons to change
the minutes shown on the display. The date, day, and time have
now been set.
NOTE: A basic programming rule is that whatever
symbol or character is ashing will be the item
programmed. For instance, if the hour is ashing
when setting the time, the hour can be changed or
programmed. For illustration purposes in this manual,
ashing characters are in GRAY type.
CURRENT TIME/DA Y
12
31
20
Page 21

PROGRAMMING THE CONTROLLER
Setting the Program Start Time(s)
1. Turn the dial to the START TIMES position.
2. The factory preset is set on program A. If
necessary, you can select program B, or C
by pressing the button.
3. Use the or button to change the start
time. (The start times advance in 15 -
minute increments).
4. Press the button to add an additional start time, or button
for the next program.
NOTE: One start time will activate all stations sequentially
in that program. This eliminates the need to enter each
station’s start time. Multiple start times in a program can be
used for separate morning, aernoon, or evening watering
cycles. Start times may be entered in any order. The X-Core
will automatically sort them.
Eliminating a Program Start Time
With the dial set to START TIMES position,
push the or button until you reach 12:00
AM (Midnight). From here, push the button
once to reach the OFF position.
Press the right arrow to eliminate a second
start time.
START TIMES
START TIMES
Setting Station Run Times
1. Turn the dial to RUN TIMES position.
2. The display will show the last program
selected (A, B, or C), the station number
selected, icon, and the station will
be ashing. You can switch to another
program by pressing the button.
3. Use the or button to change the station run time on the display.
You can set the run times from 0 to 4 hours.
4. Press the button to advance to the next station.
RUN TIMES
Setting Days To Water
1. Turn the dial to the WATER DAYS position.
2. The display will show the last program
selected (A, B, or C). You can switch to
another program by pressing the button.
3. The controller will display the seven days of the week (MO, TU,
WE, TH, FR, SA, SU). Each day will have a icon or a icon
above the day. The icon would represent an “On” water day,
while a icon would represent an “O” watering day.
WATER DAYS
Selecting Specic Days of the Week
to Water
1. With the cursor on a specic day (the
cursor will always start with MO), press
the button to activate a particular day of the week to water.
Press the button to cancel watering for that day. Aer pressing a
button the cursor automatically advances to the next day.
2. Repeat step 1 until all desired days have been selected.
The selected days will show a to indicate their status is ON. The
last is the last day of watering for that program.
21
Page 22

PROGRAMMING THE CONTROLLER
SYSTEM OFF
Selecting Odd or Even Days to Water
This feature uses numbered day(s) of the month for watering
instead of specic days of the week (odd days: 1st, 3rd, 5th, etc.;
even days: 2nd, 4th, 6th, etc.).
1. Press the right arrow until the cursor
is over SU.
2. If odd day watering is desired, turn
the dial back to the run position.
3. If even day watering is desired, press the
button once. The icon and EVEN
will be displayed. You can move back and
forth from ODD to EVEN by pressing the
buttons.
NOTE: The 31st of any month and February 29th are always
“o” days if Odd watering is selected.
Selecting Interval Watering
With this option you can select interval watering from 1 to 31 days.
1. With the cursor on EVEN or ODD, press the button once and the
icon will appear and a 1 ashing in the display. Interval watering
schedule appears on the display.
2. Press the or button to select the
number of days between watering
days (from 1 to 31 days). This is called
the interval.
The controller will water the selected
program at the next start time and will then water at the interval
programmed.
MON TUE WED THU FR SAT SUN ODD EVEN
22
Setting Event Day(s) O
The X-Core allows you to program a No Water Day(s). This feature
is useful to inhibit watering on specic day(s). For example, if you
always mow the lawn on Saturdays, you would designate Saturday
as a No Water Day so that you are not mowing wet grass.
1. Turn the dial to the WATER DAYS position.
2. Enter an interval watering schedule as described on page 21.
3. Press the button to scroll to the No Water Days at the bottom
of the display. MO will be ashing.
4. Use the button until the cursor is at the day of the week you
wish to set as a No Water Day.
5. Press the button to set this day as a no water day. The will
illuminate over this day.
6. Repeat steps 4 and 5 until all desired event day(s) are o.
NOTE: You also have the option in the interval
watering schedule to program Odd or Even days o.
Automatic Watering
Aer programming the X-Core, set the dial to the
RUN position to enable automatic execution of all
selected watering programs and start times.
RUN
System O
Valves currently watering will be shut o aer
the dial is turned to the SYSTEM OFF position
for two seconds. All active programs are
discontinued and watering is stopped. To return
the controller to normal automatic operation,
simply return the dial to the RUN position.
Page 23

PROGRAMMING THE CONTROLLER
SEASONAL
Programmable Rain O
SYSTEM OFF
This feature permits the user to stop all
programmed waterings for a designated period
from 1 to 7 days. At the end of the programmed
rain o period, the controller will resume
normal automatic operation.
1. Turn the dial to the SYSTEM OFF
position. Wait for OFF to be displayed.
2. Press the button as many times as
needed to set the number of days o
(up to 7 days).
3. Turn the dial back to the RUN position at
which OFF, a number, the and icons
will be displayed.
The days o remaining will decrease at
midnight each day. When it goes to zero,
the display will show normal time of day
and normal irrigation will resume at the
next scheduled start time.
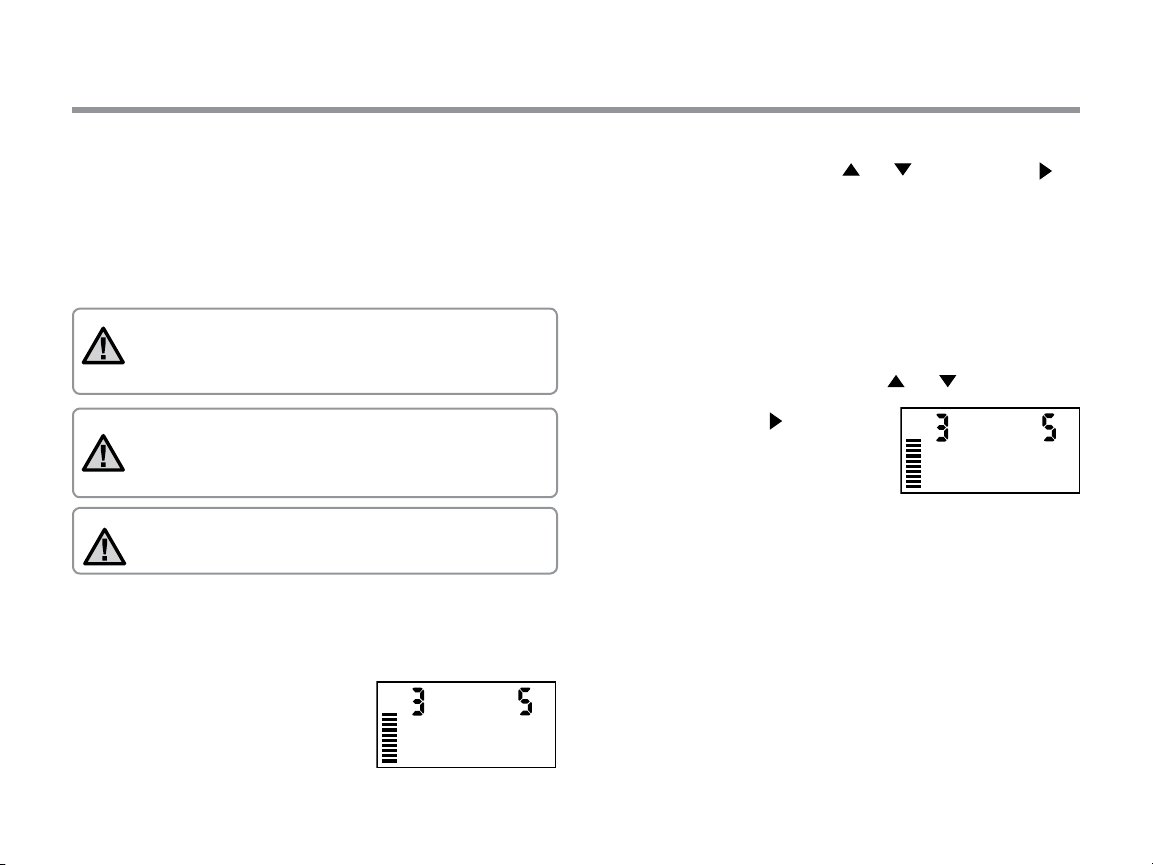
Seasonal Adjustment
Seasonal Adjustment is used to make global run time changes
without reprogramming the entire
controller. To use the Seasonal Adjustment
feature:
1. Turn the dial to the SEASONAL
ADJUSTMENT position.
2. The display will now show a ashing
number followed by a %, as well as the
bar graph which always remains on the
display. Press the or button to
ADJUSTMENT
adjust the percentage of the seasonal adjustment. Each bar on the
graph represents 10%. This feature can adjust the controller from
10% to 150% of the original program.
To view the adjusted run times, simply turn the dial to the RUN
TIMES position, the displayed run time will be updated accordingly
as the seasonal adjustment is made.
NOTE:
RUN
When using a Hunter “Clik” weather sensor, the Seasonal
The controlle should always be initially
programmed in the 100% position.
Adjustment value can be adjusted as described.
When using the Solar Sync ET sensor, the Seasonal Adjustment
value is automatically updated daily based on the Solar Sync sensor.
The Solar Sync ET sensor measures weather patterns, determines
the optimal Seasonal Adjustment value, and then updates the
controller on a daily basis. This value can be overridden manually by
pressing the
or buttons to the desired Seasonal Adjustment
value. However, it is important to understand that the manually
adjusted Seasonal Adjustment value will be replaced at midnight
by the new updated value from the Solar Sync sensor.
To revert to a manually adjusted mode, the Solar Sync sensor must
be uninstalled. See page 14 for instructions on how to uninstall the
Solar Sync sensor.
Manually Run a Single Station
1
1. Turn dial to MANUAL –
ONE STATION position.
2. Station run time will ash in the display. Use the button to
move to the desired station. You may use the or button to
select the amount of time for a station to water.
23
Page 24

PROGRAMMING THE CONTROLLER
3. Turn the dial clockwise to the RUN position to run
the station (only the designated station will water, then the
controller will return to automatic mode with no change to the
previously set program). Also see One - Touch Manual Start and
Advance.
MANUAL-ONE STATION
1
One - Touch Manual Start and Advance
You can also activate all stations to water without using the dial.
1. Hold down the button for 2 seconds.
2. This feature automatically defaults to program A. You can select
program B or C by pressing the button.
3. The station number will be ashing. Press the button to scroll
through the stations and use the or button to adjust station
run times. (If no buttons are pressed for a few seconds during
step 2 or 3, the controller will automatically begin watering).
4. Press the button scroll to the station you wish to begin with.
Aer a 2 - second pause, the program will begin. At any time
during the manual cycle, you can use the or buttons to navigate from station to station manually.
24
Page 25

ADVANCED FEATURES
Programmable Sensor Override
The X-Core allows the user to program the controller so that the
sensor disables watering on only desired stations. For example,
patio gardens that have pots under overhangs and roofs may not
receive water when it rains and will continue to need to be watered
during periods of rain. To program sensor override:
1. Turn the dial to the RUN position.
2. Press and hold the button down while turning the
dial to START TIMES position.
3. Release the button. At this point, the display will
show the station number, ON, and the icon, will
be ashing.
4. Press the or button to enable or
disable the sensor for the station shown.
ON = Sensor enabled
OFF = Sensor disabled (will allow watering)
5. Use the or buttons to scroll to the next
When the X-Core receives an input from the sensor to disable
watering, the display will indicate those stations that have been
programmed to override the sensor. A station that is running in
the sensor override mode will ash the
(will suspend irrigation)
station that you would like to program the
sensor override.
NOTE: The controller default is for the sensor to
disable watering on all zones when rain occurs.
and icons alternately.
Sensor Enable
Sensor Disabled
RUN
Test Program of All Stations
The X-Core allows the user a simplied method for running a
test program. This feature will operate each station in numerical
sequence, from the lowest to the highest.
1. With the dial in the RUN position, press and hold the
button. The station number will be displayed and the time will
be ashing for two seconds.
2. Use the or buttons to set the run time from 1 to 15
minutes. The run time needs to be entered only once.
3. Aer a - 2 second pause, the test program will start.
Hunter Quick Check Diagnostics
This feature allows you to quickly diagnose wiring problems with
your controller. Instead of having to check each eld wiring circuit
for potential problems, you can use the Hunter Quick Check circuit
test procedure. To initiate the Quick Check test procedure:
1. Press the , , , and buttons simultaneously. In the
standby mode, the LCD will display all segments.
2. Press the button once to begin the Quick Check procedure.
Within seconds, the system searches all stations for detecting
any circuit problems. When a eld wiring short is detected, an
ERR symbol preceded by the station number will momentarily
ash on the display. Aer the Quick Check completes running
the circuit diagnostic procedure, the controller returns to the
automatic watering mode.
25
Page 26

ADVANCED FEATURES
Easy Retrieve Program Memory
The X-Core is capable of saving the preferred watering program
into memory for retrieval at a later time. This feature allows for a
quick way of resetting the controller to the original programmed
watering schedule.
To save the program into the memory
1. With the dial in the RUN position, press and hold the and
buttons for 5 seconds. The display will scroll three segments
from le to right across the display indicating the program is
being saved into memory.
2. Release the and buttons.
To retrieve a program that was previously saved into memory.
1. With the dial in the RUN position, press and hold the and
buttons for 5 seconds. The display will scroll three segments
from right to le across the display indicating the program is
being saved into memory.
2. Release the and buttons.
Programmable Delay Between Stations
This feature allows the user to insert a delay between stations when
one station turns o and the next one turns on.
1. Start with the dial in the RUN position.
2. Press and hold the button down while turning the dial to the
RUN TIMES position.
3. Release the button. At this point the display will show a delay
time for all stations in seconds, which will be ashing.
4. Press the or buttons to increase or decrease the delay time
between 0 seconds to 4 hours.
5. Return the dial to the RUN position.
Resetting Controller / Clearing Controllers Memory
If you feel you have misprogrammed the controller, there is a
process that will reset the memory to the factory defaults and erase
all programs and data that have been entered into the controller.
1. Press and hold the button.
2. While holding the button, press and release button on the
right - hand side of the controller.
3. Continue holding button until time 12:00 am is displayed (this
takes about 8 seconds).
Reset
26
Page 27

CLIK DELAY INSTRUCTIONS
Clik Delay Feature
This feature allows the user to delay programmed waterings for a
designated period (from 1-7 days) AFTER a Clik Event ends. At the
end of the Programmed Clik Delay period, the controller will resume
normal automatic irrigation.
1. Turn the dial to the RUN Position
2. Press and hold the button for 3 seconds, then turn the
dial to the OFF position
3. Release the button. The display will show the program mable Clik Delay.
SENSOR DAYS LEFT
SENSOR DAYS LEFT
An active Clik Delay can be cancelled by turning the dial to the OFF
position, waiting for OFF to stop ashing, then turning the dial back
to the RUN position.
Any station that is set to override sensor, as well as Lighting Programs, will operate during a Clik Delay event.
4. Press the
5. Return the dial to the RUN position. Clik Delay is set.
Aer a Clik Event ends (rain sensor changes from wet to dry) the
Clik Delay feature will become active and the screen will display Clik
Delay duration. The day countdown will occur 24 hours aer the
start of Clik Delay.
button to set Clik Delay duration (from 1 to 7 days).
NOTE: Use caution when using the
programmable Clik Delay feature with Hunter
Wind-Clik, Freeze-Clik, Soil- Clik, and freeze
component of Solar Sync and Rain/Freeze Clik as the
Clik Delay will become active AFTER Clik Event from
these devices.
27
Page 28

HIDDEN FEATURES CONTINUED
Cycle and Soak
The Cycle and Soak feature allows you to split a station’s run time
into more usable, shorter watering durations. This feature is useful
when applying water to slopes and tight soils because it automatically applies water more slowly, helping to prevent runo from
occurring. You should enter the Cycle time as a fraction of the
station’s watering time, and the Soak time as the minimum number
of minutes required before watering can occur again for the next
Cycle. The total number of cycles is determined by taking the total
programmed station run time and dividing it by the Cycle time.
Accessing the Cycle and Soak Menu:
The Cycle and Soak feature is accessed by placing the dial
in the RUN position, pressing and holding the button for 3 seconds; while holding the button rotate the dial to the RUN TIME
dial position, then release the button.
Example of Cycle screen upon
entering
Example of Cycle screen with
only minutes
Setting the Cycle Time:
Initially Station 1 will be displayed. To access other stations, press
the or button.
Once the desired station is displayed, use the o r button to
increase or decrease the Cycle time. The user can set the time from
1 minute to 4 hours in 1 - minute increments or to OFF if no Cycle is
desired.
NOTE: Before 1 hour, only minutes are displayed
(e.g. 36). At 1 hour or above, the display will change
to include the hour digit (e.g. 1:13 and 4:00).
If a station’s Run Time is less than or equal to the
Cycle time, then no Cycle will be applied.
Example of Cycle screen with
hours included
28
Page 29

HIDDEN FEATURES CONTINUED
Accessing the Soak Menu:
Once the desired Cycle times for each station have been programmed, the Cycle time can be accessed by pressing the
button.
The station will remain the same as was previously displayed
under the Cycle time (i.e. if station is displayed in the Cycle
menu then Station will be displayed upon pressing the
button).
NOTE: The Soak menu cannot be accessed
without a programmed Cycle time.
Setting the Soak Time:
To access the other stations, press the or button.
NOTE: When changing the stations, if a
station without a Cycle time is encountered,
the screen will revert back to the Cycle time.
Move to the next station with a Cycle Time
and press the button to return.
Once the desired station is displayed, the user can use
the or button to increase or decrease the Soak time.
The user can set the Soak time from minute to hours
in - minute increments.
NOTE: Before hour, only minutes are
displayed (e.g. ). At hour or above, the
display will change to include the hour digit
(e.g. : and :).
Example of Soak screen with
only minutes
Example of Soak screen with
hours included
Cycle and Soak Situations:
Station 1 requires 20 minutes of watering, but aer
5 minutes, runo occurs. However, aer 10 minutes
all the water is absorbed. The solution would be to
program 20 minutes for the station run
time, 5 minutes for the Cycle time, and
10 minutes for the Soak time.
The soak time is a minimum amount.
The soak time may be longer amount
depending on the remaining run times.
Station cycle running
29
Page 30

TROUBLESHOOTING GUIDE
Problem Causes Solutions
The controller is continuously watering Too many start times have been
There is no display Check AC power wiring Correct any errors
The display reads “No AC” There is no AC power present (the
Display reads “O,
Rain sensor will not shut o the system • Defective rain sensor
Frozen display, or showing incorrect
information
Display shows “ERR” with a number
(1 to 8)
”
programmed
controller is not receiving any power)
The rain sensor is interrupting irrigation
or the sensor jumper has been removed
• Jumper was not removed when sensor
was installed
• Stations have been programmed to
override the sensor
Power surge Reset the controller per page 24 “Clearing Controller
Short in the valve wiring circuit, or
faulty solenoid on the station number
indicated
Display shows “P ERR” • Faulty pump relay or master
valve wiring
• Incompatible or defective relay or
solenoid
• Undersized wire to the pump relay or
master valve
Only one start time is necessary to activate a program
(refer to Setting the Program Start Times on page 18)
Check to see if the transformer is properly installed
Slide the rain sensor bypass switch to the BYPASS
position to bypass the rain sensor circuit, or reinstall
the jumper
• Verify operation of rain sensor and proper wiring
• Remove jumper from the sensor terminals
• Reprogram the sensor override to enable the sensor
(see page 11)
Memory/Resetting the Controller”
Check wire circuit or solenoid for the valve number
indicated. Repair short or replace solenoid. Press any
button to clear the “ERR” from the display
• Check wiring to relay or master valve solenoid. Press
any button to clear the “P ERR” from the display
• Check electrical specication for the pump relay.
Do not exceed controller's electrical rating. Replace
if defective
• Replace wire with larger gauge wire
30
Page 31

TROUBLESHOOTING GUIDE
Problem Causes Solutions
Display shows a station is running but
the
and icons are ashing
Automatic irrigation does not start at
the start time and controller is not in the
System O mode
The display shows dashes when the dial
is in the Solar Sync Settings position
Run times for a particular station are
too short/too long when using a Solar
Sync sensor
Seasonal Adjust seems low • Region too high
The sensor is interrupting irrigation,
however the station has been
programmed to override the sensor
• AM/PM of time of day not set correctly
• AM/PM of start time not set correctly
• Start Time is disabled (set for O)
• Controller is not receiving AC power
• The Solar Sync sensor is not connected
to the controller
• The Solar Sync sensor wires may have
a break in them or a bad connection
Program Run Time too long/short Solar Sync provides a global seasonal adjustment to the
• Water Adjustment too low
• Location of sensor does not allow for
full sun
Check the sensor override status (see page 23)
• Correct AM/PM of time of day
• Correct AM/PM of start time
• See Setting Program Start Times (see page 18)
• Check AC power connections
Connect the Solar Sync to the “SEN” positions on the
wiring terminal. The display will then show the Region and
Water Adjustment setting.
controller. If a particular station has run times too long
or too short, make the appropriate adjustment to the
program in the controller. Make sure to change seasonal
adjust back to 100% before making changes to program
run times. Do this by turning the dial to the Seasonal
Adjust position and increasing/decreasing the value
to 100%.
Increase the value on the Water Adjustment scale
(the default setting is 5). If you max out on the Water
Adjustment scale at 10 and still require more seasonal
adjustment, move down one Region (from 4 to 3, for
example) and start at Water Adjustment setting 5. Solar
Sync will immediately update the Seasonal Adjust on the
controller. If it is still too high, repeat the adjustment until
the desired seasonal adjust is showing on the controller.
31
Page 32

TROUBLESHOOTING GUIDE
Problem Causes Solutions
Seasonal Adjust seems high • Region too low
• Water Adjustment setting too high
Solar Sync still sending Seasonal Adjust
when Controller Bypass switch is in the
“Bypass” position
Solar Sync’s automated Seasonal
Adjustment cannot be deactivated by
the Bypass switch. The Bypass switch
only controls the Rain/Freeze shuto
function of the Solar Sync.
Decrease the value of the Water Adjustment setting.
If you minimize the Water Adjustment scale at 1 and
still require reduced seasonal adjustment, move up one
Region (from 2 to 3, for example) and start at Water
Adjustment setting 5. Solar Sync will immediately update
the Seasonal Adjust on the Controller. If it is still too high,
repeat the adjustment until the desired seasonal adjust is
showing on the controller.
32
Page 33

SPECIFICATIONS
Operating Specications
• Station Run Times: 0 to 4 hours in 1-minute increments
• 3 Independent Watering Programs
• Start Times: 4 per day per program for up to 12 daily starts
• Watering Schedule: 365-day calendar, interval watering,
odd/even watering
• AM/PM, 24-hour clock
• Simple manual operation
• Sensor override by station
• Programmable rain delay (1 to 7 days)
• Manual Seasonal Adjustment (10% to 150%)
• Automatic Seasonal Adjustment using Solar Sync sensor
• Sensor bypass switch
• X-Core-x00i for indoor use. X-Core-x00 for outdoor use
• Sea level to 6500 (2000 m) at -13˚ F to 140˚ F (-25° C to 60° C)
Dimensions
Indoor Cabinet Outdoor Cabinet
• Height: 6.5” (16.5 cm) • Height: 8.625” (22 cm)
• Width: 5.75” (14.6 cm) • Width: 7” (17.8 cm)
• Depth: 2” (5 cm) • • Depth: 3.75” (9.5 cm)
Electrical Specications
• Transformer input 120 VAC ±10% 60 Hz
(230 VAC ±10% 50/60 Hz International Models)
• Transformer Output: 24 VAC 1.0 amp
• Station Output: 0.56 amps per station
• Maximum Output: 0.90 amps (includes master valve)
• Battery: 3 V Lithium (included) used for remote programming
and backup timekeeping. Use CR2032 3-volt.
• Electronic short circuit protection
• Non-volatile memory for program data
• UL Listed
• Model X-Core-x00 has an IP2X Rating
• Clean only with a cloth dampened with mild soap and water
Explanation of Symbols
= AC
= Consult Documentation
= Hazardous Voltages Present
= Ground
33
Page 34

CERTIFICATE OF CONFORMITY TO EUROPEAN DIRECTIVES
Hunter Industries declares that the irrigation controller Model X-Core complies with the standards of the European Directives of
“electromagnetic compatibility” 87/336/EEC and “low voltage” 73/23/EEC.
__________________________________
Senior Regulatory Compliance Engineer
This product should not be used for anything other than what is described in this document. This product should only be serviced by trained
and authorized personnel.
FCC part 15:
This equipment has been tested and found to comply with the limits for a Class B digital device, pursuant to part 15 of the FCC Rules. These
limits are designed to provide reasonable protection against harmful interference in a residential installation. This equipment generates, uses
and can radiate radio frequency energy and, if not installed and used in accordance with the instructions, may cause harmful interference to
radio communications. However, there is no guarantee that interference will not occur in a particular installation. If this equipment does cause
harmful interference to radio or television reception, which can be determined by turning the equipment o and on, the user is encouraged to
try to correct the interference by one or more of the following measures:
• Reorient or relocate the receiving antenna
• Increase the separation between the equipment and receiver
• Connect the equipment into an outlet on a circuit dierent from that to which the receiver is connected
• Consult the dealer or an experienced radio/TV technician for help
34
Page 35

Page 36

Hunter Industries Incorporated
© Hunter Industries Incorporated
Diamond Street • San Marcos, California USA LIT- G EN /
www.hunterindustries.com
 Loading...