

Page 1
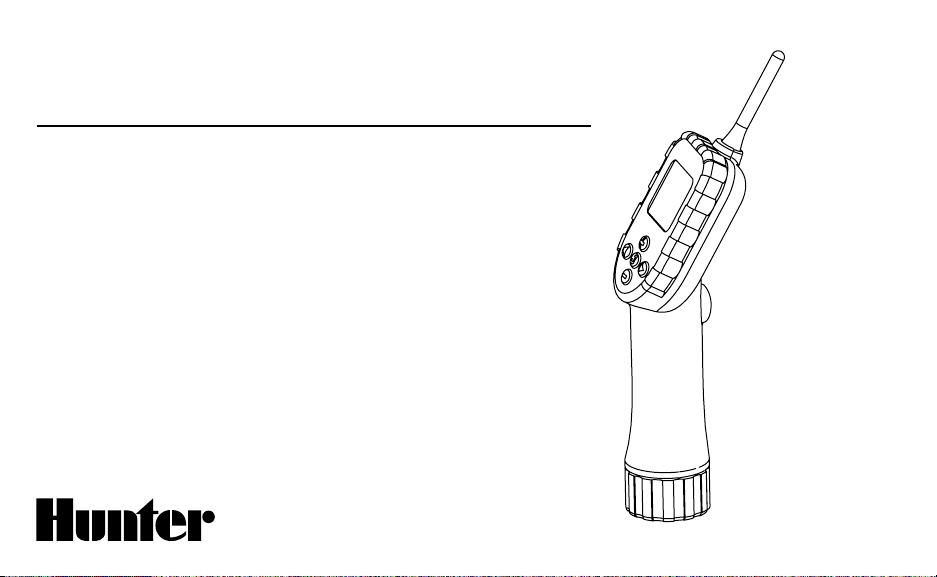
WVP
Wireless Valve Programmer
Programmer for use with WVC
Multi-Station Battery Powered
Irrigation Controllers
Owner’s Manual and
Installation Instructions
®
Page 2

Page 3

TABLE OF CONTENTS .....................................................................................
Introduction ................................................................................................................................................................... 1
WVP Components ...........................................................................................................................................................
WVP Features ................................................................................................................................................................. 5
Installing the Batter y ......................................................................................................................................................
WVP Display ..................................................................................................................................................................
Setting Up the WVP ........................................................................................................................................................ 8
Programming the WVP ................................................................................................................................................... 8
Transmitting/Receiving Data .......................................................................................................................................... 13
Batter y Life Indicator .................................................................................................................................................... 16
Troubleshooting Guide .................................................................................................................................................. 17
FCC Notice ................................................................................................................................................................... 19
2
6
7
Page 4

Page 5

INTRODUCTION ...............................................................................................
The Wireless Valve Program me r (W VP) is par t of the Hunter wi reless battery powere d controller fa mily. T he WVP is a
hand-held programmer that allows you to create watering programs and conduct manual operat ions with Hunter Wireless
Valve Controllers (W VC) in the field. Because t he WVP retrieves and transmits data via radio sig nals, you never have to
open a valve box to check the status or program your c ontrollers .
Hunter’s wireless battery powered irrigation systems are ideal for commercial/municipal applications such as street and
highway landscaping, medians, parks, construction sites, and other areas that do not have access to power.
The WVP can r etrieve the cur rent program and battery life st at us of individual W VC controllers. Programming and
manua l ope rations are conducte d with t he pr ess of a button from up to 100 feet away from the WVC. The following
instructions pr ovide deta iled information on using your WV P. Please refer to your W VC Owner’s Manual for information
on installi ng and setting up your WVC control lers.
1
Page 6
WVP COMPONENTS ........................................................................................
15
This section provides a brief overview of some of the
components on the WVP. Each item will be discussed in
further detail later; however, this section can be helpful in
getting acquainted with the different options available. A
key feature of the WVP is its clear, easy-to-use push button
design that makes programming a simple task. All essential
keypad functions are clearly marked to avoid confusion
that’s characteristic with many other battery powered
controllers.
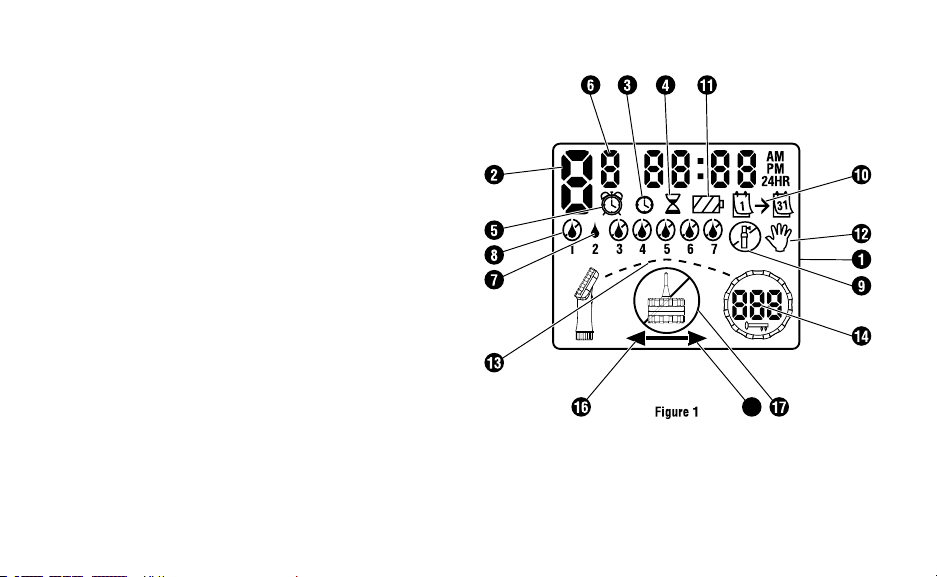
LCD Display (Figure 1)
1. Main Display – Indicates all programmed information.
2.
Station Number – Indicates the station number being
programmed.
Current Time/Day – Icon indicates when current day
3.
and clock are being set.
4. Run Times – Icon indicates when Run Times are being
set. Allows user to set run times from 1 minute to 4
hours.
5.
Start Times – Icon indicates when Start Times are
being set. Allows the user to set 1 to 9 start times.
2
Start Time Number – Indicates the start time number
6.
from 1 to 9.
7.
Water Days – Allows the user to select individual days
to water or a selected number of days between waterings (interval).
Page 7
8. Crossed Rain Drop – Indicates that watering will NOT
occur on a selected day.
Crossed Sprinkler – Indicates that watering is sus-
9.
pended.
10. Calendar – Indicates interval watering schedule is
being programmed. Allows the user to program 1 to 31
days between waterings.
11.
Battery Status – Indicates the remaining life of the bat-
ter y in the WVC.
Manual Watering – Icon indicates when manual water-
12.
ing is programmed. Allows the user to activate the
station manually.
13.
Communication Occurring – Segments will display in
sequence when initial communication is being made
with the WVC.
Identification Code – A unique ID to establish radio
14.
contact with an individual WVC.
15. Transmit – Arrow indicates that data is to be transmitted to the WVC.
16.
Receive – Arrow indicates that data is to be retrieved
from the WVC.
17.
No Contact – Indicates that no contact was made with
the WVC.
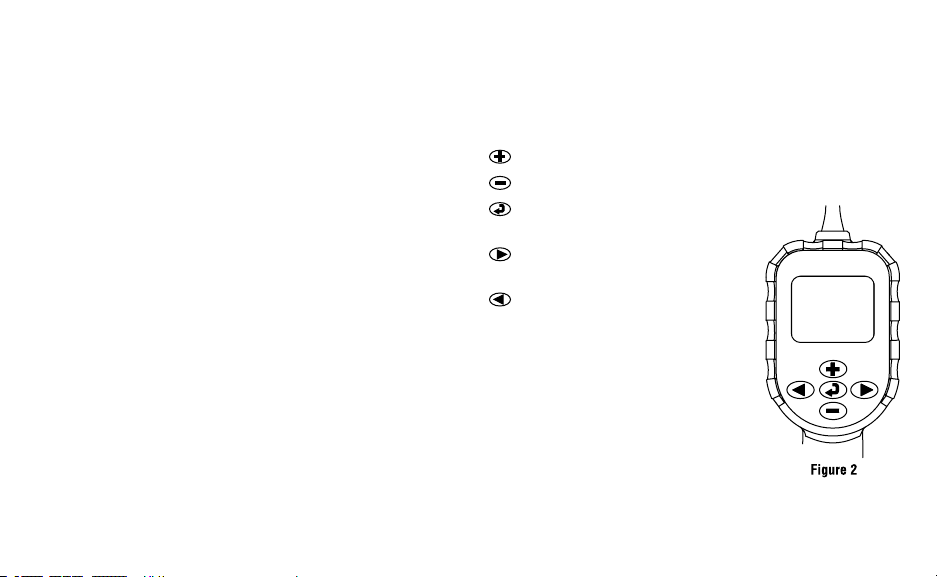
Control Buttons (Figure 2)
Button – Increases the selected flashing display.
Button – Decreases the selected flashing display.
Button – Selects programming
function.
Button – Advances the selected
flashing display to the next item.
Button – Navigates the selected
flashing display back to the
previous item.
3
Page 8
18
19
20
WVP COMPONENTS (continued) ..................................................................
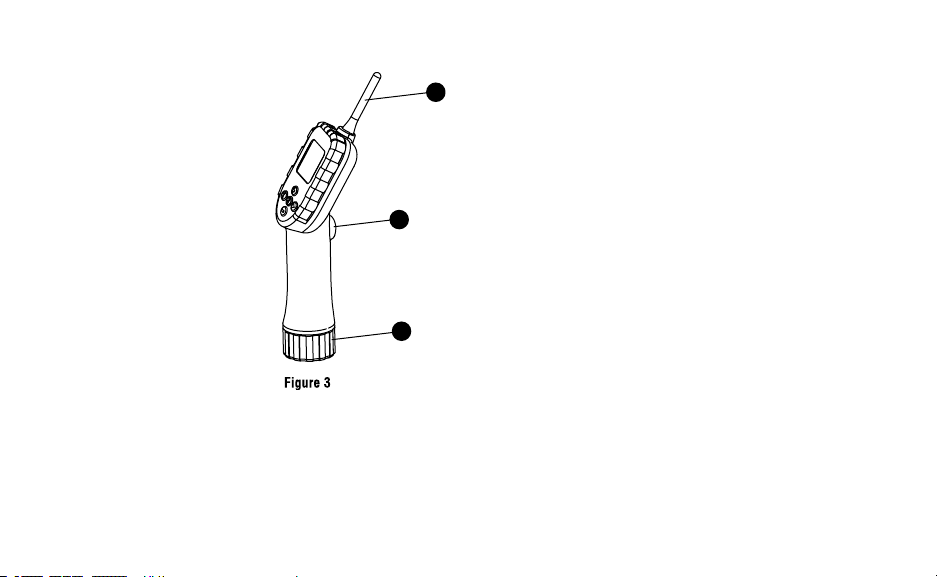
Other Components (Figure 3)
18. Transmit/Receive Button –
Transmit/Retrieve program
information.
19.
Battery Compartment –
Accepts standard 9-volt
alkaline batter y.
20. External Antennae – Flexible
external antennae for radio
communication.
4
Page 9

WVP FEATURES ...............................................................................................
Some of the features of the WVP include:
• Simple, push button programming
• Large Liquid Cr ystal Display (LCD) with easy to understand icons
• Radio communication WVC controllers up to
100 feet away
• Operates on standard 9-volt alkaline battery
• Days-of-the-week watering schedule
• Up to 9 start times per day
• Run times from 1 minute to 4 hours
• Manual watering
• Low battery status shows status of life of the battery in
the WVP and WVC
5
Page 10

INSTALLING THE BATTERY ...........................................................................
The WVP is powered by a standard 9-volt alkaline battery.
Under normal conditions the battery should provide at least
one full year of service.
Note: The WVP has non-volatile memor y
which allows the battery to be removed without losing any program information.
To install the battery (Figure 4):
1. Unscrew the batter y cap on
the bottom of the handle to
gain access to the battery
compartment.
2. Snap the batter y on to the
connector and slide the
batter y into the battery
compartment with the con
nector toward the inside of
the WVP handle.
3. Reinstall the battery cap.
The WVP can now be used to
program your controller.
6
-
Page 11

WVP DISPLAY ...................................................................................................
Before you begin programming the WVP, take some time
to learn about the features available and how program
information is created. The large LCD display on the WVP
is split into two areas: Programming and Communication.
The upper portion of the LCD display is used for creating or
changing program related information. The lower portion
of the display is used to establish radio contact with WVC
controllers, send/retrieve program information, conduct
manual watering, and establish unique addresses for each
controller.
Pressing the
modes of operation in the following order: 1) Current Time/
Date, 2) Set Time/Date, 3) Set Watering Start Times, 4) Set
Run Times, 5) Set Water Days, and 6) System Off Mode.
When creating or changing program information, the
flashing portion of the display can be changed by pressing
or buttons. To change something that is not
the
flashing, press the or buttons until the desired field
is flashing.
The Transmit/Receive button on the handle of the WVP
is used for navigating to and from the communication
function on the display, initiating communication with
a WVC, setting the WVC unique identification code, and
transmitting/receiving data with a WVC. If the Transmit/
Receive button is pressed at any time during one of the
programming modes mentioned above, then the lower half
or communication mode of the display will be activated.
Pressing it again returns the unit to the programming
mode.
After one minute of inactivity the WVP display will go blank
to conser ve battery power. Press any button to reactivate
the display.
button will step through the programming
7
Page 12

SETTING UP THE WVP ...................................................................................
The WVP is simple to program. The easy-to-understand
push button design allows you to step through the process
of programming and activate manual watering with the press
of a button. Prior to performing any programming, you need
to set up your WVP with the current date and time.
Setting the Date and Time
1. While in the programming
mode, press the button
until the Set Current Time/
Day icon is displayed.
2. Hours will be flashing.
Press the
to change the hour shown on the display.
or button
Press the
3. Minutes will be flashing. Use the
change the minutes shown on the display. Press the
to proceed to select AM, PM or 24 hour time.
4. The time will be displayed, and the time of day flashing.
Press the
Press the to proceed to setting the day of the week.
5. The number 1 will be flashing indicating the first day of
the week. Press the or buttons to select the day
of the week (1 through 7) corresponding to the day.
Your WVP is ready to use to program your WVC.
to proceed to setting the minutes.
or button to
or button to select AM, PM or 24 hour.
PROGRAMMING THE WVP ............................................................................
The WVP utilizes an independent station programming
method for establishing watering schedules. Each station
on a single WVC controller will run independent of one
another. Stations can also be programmed to run simul
taneously. When programming a new watering schedule,
each station must be programmed with its own start time,
run time, and water day(s). The following steps provide
8
additional information on programming your controller(s).
button allows you to quickly navigate among the
The
programming modes. A programming icon will indicate
each of the following programming modes:
Current Time/Date, Set Start Time, Set Run Time,
Set Water Days, and System Off.
Page 13

Station Number
Start Time
Number
Setting Watering Start Times
1. Push the button until the
Start Watering Times icon is
displayed. The display will
show the station number,
(larger size number to the
left of the Start Time icon)
start time number (smaller
size number to the right of
the station number) and the
start time. The start time will
be flashing.
2. Press the
Use the or button to change the station number
3. Press the to navigate to the start time number. Use
the or button to change the start time number.
4. Press the
or button to enter a start time (the start time will
advance in 15 minute increments). Hold either button
down for 1 second to change times rapidly. Up to 9
start times can be programmed for each station number.
If the start times are the same for any of the stations, these
zones will operate simultaneously. If the start times are
button to navigate to the station number.
to navigate to the start time. Use the
unique for each of the stations, any stations that overlap in
run times, will be stacked chronologically.
Eliminating a Start Time
With the display in the watering
Start Time mode, push the or
button until you reach 12:00
AM (midnight). From here push
the button once to reach the
OFF position. (For example, the
figure to the right indicates that
start time number two for station
number one is off.)
NOTE: If a station has all 9 start times turned
off, then the station is off.
NOTE: When you leave the start time setup,
all start times will be re-arranged in chrono logical order.
9
Page 14

PROGRAMMING THE WVP (continued) ......................................................
Setting the Run Time (Length of Watering)
1. Press the button until the
Run Time icon is displayed.
2. The display will show the
station number and the last
run time entered will be
blinking.
3. Use the
change the station run time
on the display from 1 minute to 4 hours.
4. Use the
5. Repeat steps 3 and 4 for each station.
or button to
button to navigate the next station.
Setting Days to Water
1. Push the button until the Water Days icon
is displayed.
2. For each station, the WVP will display either specific
days to water or interval watering.
10
Selecting Specific Days of the Week to Water
For specific day of the week
watering, the station number and
7 days of the week with a icon
or a icon above the numbered
day will be displayed. The icon
would represent an “ON” watering day, while the icon would
represent an “OFF” watering day.
1. Press the
2. With the
starts with 1), press the button to activate a particular day of the week to water. Press the button to
cancel watering for that day. After pressing a button the
cursor automatically advances to the next day.
3. Repeat step 1 until all desired days have been selected.
The selected days will show with a
status “ON”. The last is the last watering day for the
program.
4. Repeat steps 1 through 3 for each station.
button to navigate to the desired station.
cursor on a specific day (the cursor always
to indicate their
Page 15

NOTE: If specific days of the week watering
is selected, make sure the specific days to
water mode is displayed prior to navigating
to the next station.
Selecting Interval Watering
With this option you can select
interval watering from 1 to 31
days.
1. Use the
gate to the desired station.
2. With the
press the button once.
The inter val watering icon
3. Press the or button to select the number of
days between watering days (1 to 31). This is called the
interval. Pressing the at anytime during the interval
setup will advance back to specific days of the week
to water.
button to navi-
cursor on day 7,
will be displayed along with the interval (flashing).
NOTE: If interval watering is selected, make
sure the interval mode is displayed prior to
navigating to the next station.
The controller will water the next Start Time and will then
water at the inter val programmed.
System Off
The system off function will turn
your WVC controller off, stopping all automatic watering until
turned back on with your WVP.
To turn the WVC off:
1. Use the
off icon is displayed. After
flashing for a few seconds,
the word “OFF” will appear in the display.
2. Squeeze the Transmit/Receive button on the WVP once
to move to communication mode (lower part of LCD),
use the
pointed toward the WVC icon, then squeeze and hold
the Transmit/Receive button on the WVP. The WVP will
beep twice indicating that the “OFF” command is being
button until the
and buttons to make sure the arrow is
11
Page 16

PROGRAMMING THE WVP (continued) ......................................................
sent to the WVC. It will beep twice again indicating the
command was successfully received by the WVC.
To turn the WVC on:
1. While in the programming mode (upper part of the
LCD), press the
day is displayed.
2. Squeeze the Transmit/Receive button once to move
to communication mode (lower part of LCD), use the
and buttons to make sure the arrow is pointed
toward the WVC, then squeeze and hold the Transmit/
Receive button on the WVP. The WVP will beep twice
indicating that the “ON” command has been sent to the
WVC. It will beep twice again indicating the command
was successfully received by the WVC.
Tip: Use the retrieve program function (see page 14)
to identify if WVC has been turned off in the field. After
retrieving the program, a controller that has been turned off
will display the system off
button until the current time and
icon on the WVP display.
Programmable Rain Off
This feature permits the user to stop all programmed
waterings for a designated period from 1 to 7 days. At the
12
end of the programmable rain off period, the controller will
resume normal automatic operation.
1. Press the
System Off icon and OFF is
displayed.
2. Press the
will be displayed. The 1 will
be blinking at this point.
3. Press the
times as needed to set the
number of days off desired (up to 7).
4. Press the button once. The number of days off will
stop flashing.
5. Squeeze the Transmit/Receive button once to move to
communication mode.
6. Use the and buttons to make sure the arrow is
pointed towards the WVC indicating Transmit mode.
7. Squeeze and hold the Transmit/Receive button. The
WVP will beep twice indicating the command is being
sent to the WVC. It will beep twice again to indicate
that the WVC has received the command.
button until the
button and a 1
button as many
Page 17

TRANSMITTING/RECEIVING DATA ..............................................................
WVP
WVC
All program information and manual watering is conducted
with the WVP and individual WVC controllers using radio
signals. Under normal conditions, these operations can be
conducted up to 100 feet from the controller. The Trans mit/Receive button on the handle of the WVP is used to
establish radio contact to transmit and receive data.
NOTE: Although you can use the WVP to
program multiple WVC controllers, you can
only transmit and Receive data to and from
one WVC at a time.
It is recommended procedure to first retrieve the program
from a WVC, review and make necessar y changes, and then
transmit the new program back to the WVC.
Entering the WVC Identification Code
Each WVC controller has a unique 3-digit identification code
that is established during the installation of the controller.
This unique code allows for added security and radio operation of individual controllers on a site that has multiple WVC
controllers. To establish radio contact with a WVC, you must
know the unique identification code that was established
during the initial setup of the WVC controller (refer to the
WVC Owner’s Manual for information on setting or changing
the identification code for your
controller).
1. Press the Transmit/Receive
button on the WVP handle.
The lower portion of the
display will illuminate. The
Transmit/Receive arrow will
be flashing.
2. Use the or button to enter the unique WVC
identification code from 0 to 999.
13
Page 18

TRANSMITTING/RECEIVING DATA (continued) ........................................
Transmitting Programs
Once the WVC 3-digit identification code is entered into the WVP:
1. Use the
(The arrow will be flashing).
2. Squeeze and hold the Transmit/Receive button on the
handle of the WVP for 2 seconds. The WVP will beep
twice indicating that communication is taking place.
3. After a few seconds, dashed
lines will appear on the
display indicating that radio
communication is being
made with the WVC. When
the last dashed line illumi nates, data transmission is
completed and the WVP will
beep twice indicating that
data transmission was successful.
If for any reason if radio connect was not successful,
the WVP will produce a single two second beep and the
No Contact icon will be displayed in the middle of the
display for a brief period.
14
button to select the transmit function.
If you are experiencing problems contacting the WVC, make
sure you are using the correct
identification code. If com munication problems persist,
try moving closer to the WVC
to improve radio contact. The
range of the signal will be up to
100 ft. with the WVC installed
in the valve box. Actual performance varies depending upon
the installation and the surrounding terrain.
Retrieving Programs
Once the WVC 3-digit identification code is entered into the WVP:
1. Press the
WVP to select the receive
function (the will be
flashing).
2. Squeeze and hold the Trans
mit/Receive button on the
handle of the WVP for 2 seconds. The WVP will beep
twice indicating that communication is taking place.
button on the
-
Page 19

3. Dashed lines will appear on the display indicating that
radio communication is being made with the WVC.
When the last dashed line illuminates, data transmission is completed and the WVP will beep twice indicating that data transmission was successful.
4. All current program information and batter y life status
from the WVC can now be reviewed with the WVP by
squeezing the transmit/receive button once, which
returns the unit to programming mode.
Manual Watering Operation
To activate a Manual Watering:
1. With the current time/day
showing in the display press
and hold the
display the Manual Watering
icon. The station number will
also be displayed.
2. Use the
navigate to the station that you would like to manually
activate.
3. Use the
run time from 1 minute to 4 hours.
button to
button to
or button to adjust the manual water
4. While in the Manual Watering mode, squeeze and hold
the Transmit/Receive button for 2 seconds to initiate
the manual watering cycle.
5. Repeat step 1 through 4 to manually activate additional
stations.
To suspend Manual Watering:
1. With the current time/day showing in the display, press
and hold the button to enter the manual off mode.
2. Use the button to navigate to the station you would
like to turn off.
3. While in the manual off mode, squeeze and hold the
Transmit/Receive button for 2 seconds to deactivate the
manual cycle for the station selected.
4. Repeat steps 1 through 3 to turn off additional stations.
15
Page 20

BATTERY LIFE INDICATOR ............................................................................
Battery Low
Fully Charged
The battery life indicator
icon is a quick way to
determine the remaining
life of the batter y installed
in any individual WVC
controllers. The WVP
will retrieve the batter y
life information from the
WVC when programs are
retrieved (see Retrieving Programs). A fully charged battery will show all three
segment of the batter y dark. As the battery is expended, the
segments will appear as outlines.
After retrieving battery life information from the WVC,
the battery life indicator will display the WVC information
until the WVP LCD goes blank due to inactivity. The next
time the WVP display comes on it will provide battery life
information for the battery in the WVP.
16
Page 21

TROUBLESHOOTING GUIDE ..........................................................................
Problem Causes Solutions
No display on WVP.
Display is off.
Press any button for 1 second.
Automatic irrigation does
not start at start time.
Rain sensor does not
suspend watering.
Controller waters more than
one time.
Battery is dead.
Controller in System Off mode.
AM/PM of time of day not set
correctly.
AM/PM of start time not set correctly.
Faulty wire connection(s) at solenoid.
Rain sensor defective or miswired. Verify proper operation of the rain
Too many start times have been
entered.
Replace battery.
Re-enable watering (see pg.12).
Correct AM/PM of time of day.
Correct AM/PM of start time.
Recheck wiring to solenoid.
sensor and wire connections.
Recheck start times.
17
Page 22

TROUBLESHOOTING GUIDE (continued) .....................................................
Problem Causes Solutions
No contact icon is displayed when
transmitting or receiving data.
Wrong 3-digit WVC identification
code entered.
Reenter correct identification code in
WVP. (Reference WVC owner’s manual
for establishing WVC I.D.)
Out of range.
Battery dead in WVC.
18
Move closer to WVC and attempt to
establish contact.
Replace WVC battery.
Page 23

FCC NOTICE .......................................................................................................
This notice applies only to model WVP
FCC ID: M3UWVP
This equipment has been tested and found to comply with the limits for class B digital device, pursuant to part 15 of the
FCC Rules. These limits are designed to provide reasonable protection against harmful interference in a residential instal
lation. This equipment generates, uses and can radiate radio frequency energy and if not installed and used in accordance
with the instructions, may cause harmful interference to radio communications. However, there is no guarantee that
interference will not occur in a particular installation. If this equipment does cause harmful interference to radio or television reception, which can be determined by turning the equipment off and on, the user is encouraged to tr y to correct the
interference by one or more of the following measures:
• Reorient or relocate the receiving antenna
• Increase the separation between the equipment and the antenna
• Consult the dealer or an experienced radio/TV technician for help
The user is cautioned that changes and modifications made to the equipment without the approval of the manufacturer
could void the user’s authority to operate this equipment.
-
19
Page 24

INDUSTRY OF CANADA NOTICE ...................................................................
This notice applies only to model WVP
IC: 2772 – WVP
The term “IC:” before the certification/registration number only signifies that the Industry of Canada technical specifica
tions were met.
Operation is subject to the following two conditions: (1) this device may not cause interference, and (2) this device must
accept any interference, including interference that may cause undesired operation of the device.
-
CE NOTICE .........................................................................................................
CE Notice: this notice applies only to model WVP-E
Important Notice:
Low power RF product operating in 869.700-870.000MHz
band for indoor or outdoor home and commercial use.
AUS
F D GR IRE
I LUX NL P
E S UK
Hunter Industries Incorporated • The Irrigation Innovators © 2005 Hunter Industries Incorporated
1940 Diamond Street • San Marcos, California 92078
www.HunterIndustries.com
B DK FIN
Member states in the EU with restrictive
use for this product are crossed out.
P/N 700913 LIT-356 5/05
 Loading...