

Page 1

A
ROAM XL
Commercial Remote Control
ROAM XL Commercial Remote Control
Owner’s Manual and Programming Instructions
NEW
Page 2

B
TABLE OF CONTENTS
INTRODUCTION. . . . . . . . . . . . . . . . . . . . . . . . . . . . . . . . . .2
ROAM XL COMPONENTS ........................3
TRANSMITTER
RECEIVER
SmartPort
®
WIRING HARNESS/SMARTPORT®
CONNECTION KIT ...............................6
INSTALLING THE ROAM XL REMOTE
WIRING HARNESS ...............................7
WIRING THE SMARTPORT® TO
HUNTER CONTROLLERS .........................9
SRC Controller SmartPort Installation
X-Core Controller SmartPort Installation
Pro-C Controller SmartPort Installation
ICC Controller SmartPort Installation
TYPICAL INSTALLATIONS .......................11
Receiver Mounted Indoors
Receiver Mounted Outdoors
MAXIMIZING OPERATING RANGE ..............12
EXTENDING WIRING ON
SMARTPORT® HARNESS ........................13
INSTALLING THE TRANSMITTER BATTERIES ....14
CHANGING THE REMOTE ACTIVATED
STATION RUN TIME .............................15
CHANGING THE TRANSMITTER ADDRESS ......16
Page 3

1
CHANGING THE MAXIMUM NUMBER
OF STATIONS ...................................17
Switching Between Residential
and Commercial Modes
SRC/X-Core/Pro-C/ICC/I-Core/
I-Core Dual Controllers
ACC/ACC Decoder Controllers
PREPARING THE RECEIVER FOR USE ...........19
CHANGING THE RECEIVER ADDRESS ...........20
ACTIVATING A STATION WITH THE
ROAM XL REMOTE SYSTEM ....................21
Activating a Program with the ROAM XL
OPERATING RANGE .............................24
To insure optimum radio coverage
TROUBLESHOOTING GUIDE ....................26
SPECIFICATIONS ................................27
Operating Specications
Electrical Specications
Default Settings
Dimensions
NOTES ..........................................28
TABLE OF CONTENTS
Page 4

2
INTRODUCTION
There’s no need to walk back to the controller to
start and stop a manual watering cycle when doing
maintenance or repair work on your irrigation system.
Winterization can be done quickly and easily with one
worker instead of two. No more going back to the
garage to start or stop a manual irrigation cycle.
Hunter is pleased to offer the ROAM XL Remote
Control System for use on Hunter controllers
equipped with a SmartPort® connection. The ROAM
XL can offer you features other remotes can’t, at a
price you can afford.
The ROAM XL transmitter is made of sturdy die cast
aluminum and outdoor grade plastic. It features a
large LCD and simple push button operation. Don’t
let its size fool you. While it’s small enough to t in
your pocket, it has an open eld range of up to 2
miles (3 km).
The large LCD display and simple ve-button control
make the ROAM XL a snap to use. Simply press the
or keys to display the station or program you
want to turn on or off, then press the or button–
what could be easier? Don’t worry about forgetting
to turn off the ROAM XL. After several minutes of
inactivity the unit turns itself off to extend battery
life. The unit can be turned back on by touching any
button. Four AAA alkaline batteries will last an entire
season for a contractor, and years for a homeowner.
We believe the ROAM XL is the simplest remote
control available. It is so easy to use that you will
need this booklet very little after installation. If you
do have a question, keep this in a safe place for easy
reference.
Congratulations—your life just got a little easier!
Page 5
3
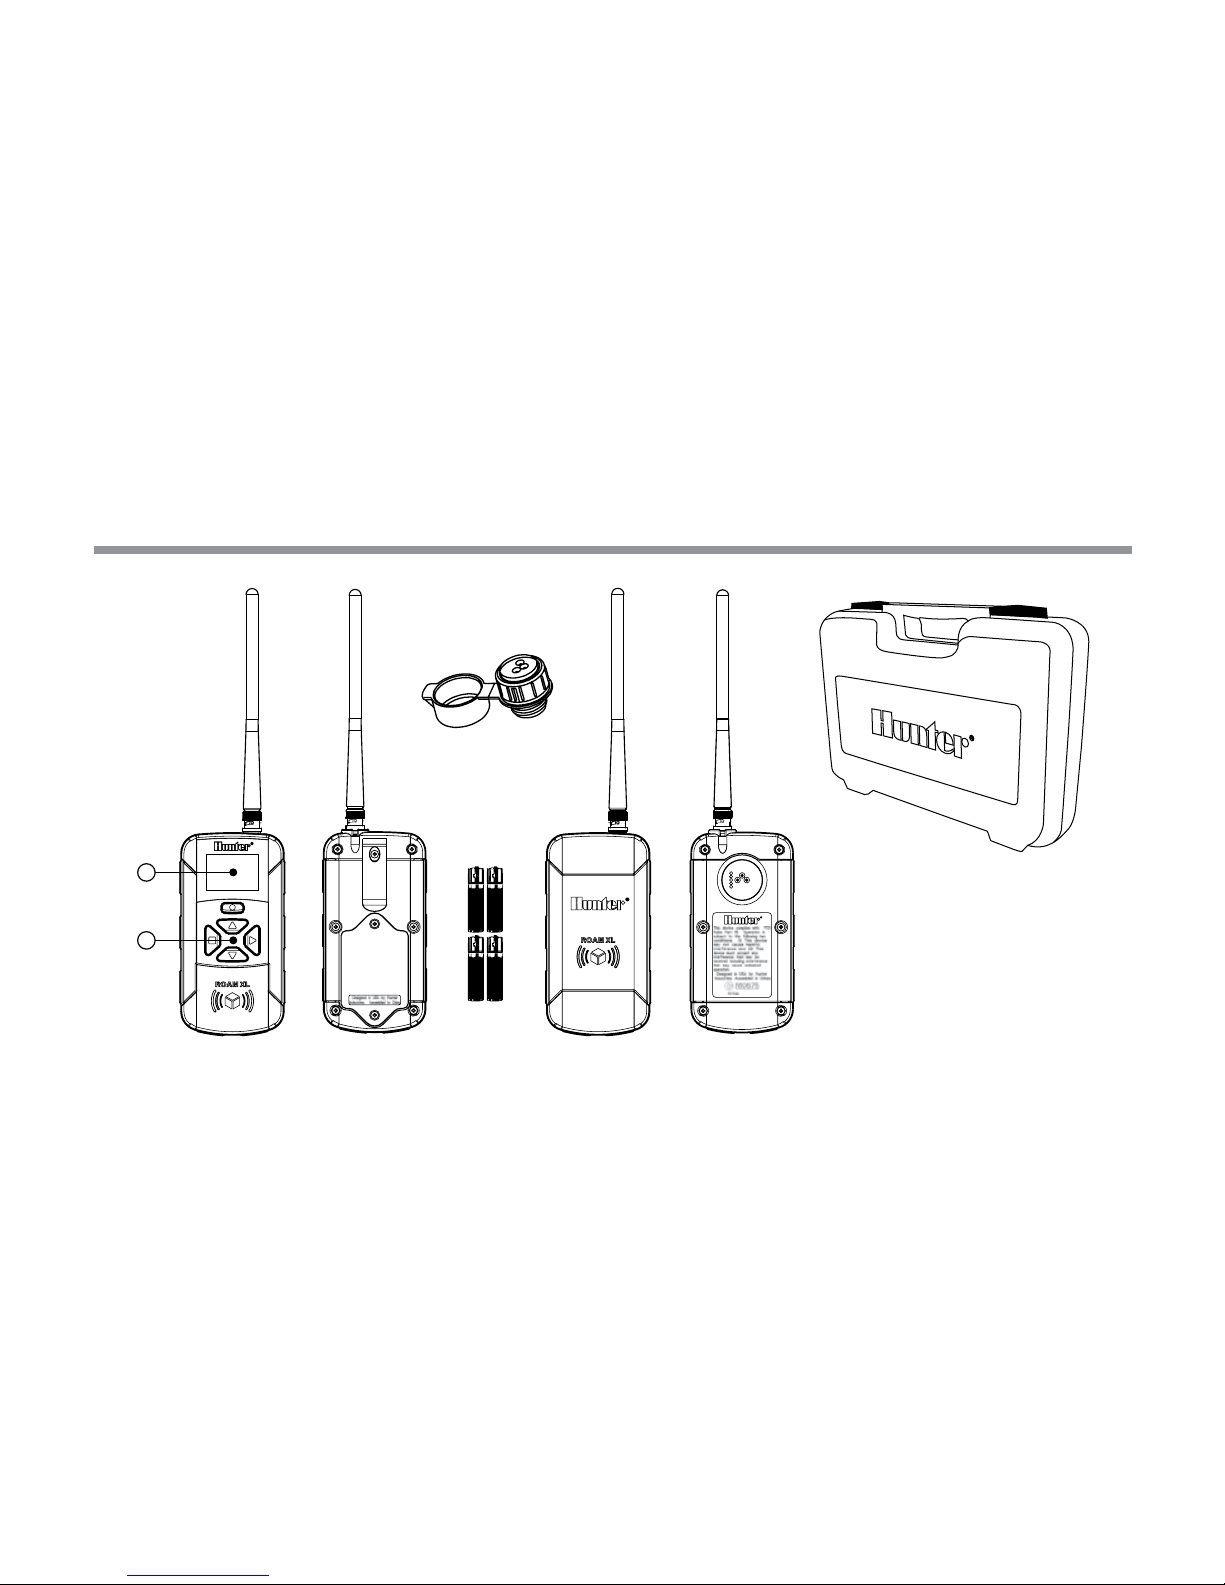
ROAM XL COMPONENTS
B
A
TRANSMITTER
SMARTPORT™
RECEIVER
AAA
CARRYING CASE
Page 6

4
ROAM XL COMPONENTS
This section will give you a brief description of the
components that make up the ROAM XL. Each item
will be discussed in further detail later. However, this
section can be helpful in getting acquainted with the
Transmitter, Receiver, and SmartPort®.
TRANSMITTER
A. LCD Display
1. Run Time – Indicates the station run time is
being set.
2. Transmit – Indicates that the transmitter is
transmitting the programmed data to the receiver.
3. Max Station Number – Indicates station
number (1–48 Residential, 1–240 Commercial).
On – Indicates Transmitter is turning on the
selected station or program.
Off – Indicates transmitter is turning off any
running station or program.
PA, PB, PC – Indicates program selected.
P1, P2... – Demonstrates differences between
residential programs and commercial programs.
4.
Address – Indicates that a new address for
transmitting between the Transmitter and the
Receiver is being set.
5. Battery – Indicates how much battery power
is left.
B. Control Buttons
6.
– Increases the selected functions.
7. – Decreases the selected functions.
Page 7

5
ROAM XL COMPONENTS
8. – Turns on the selected functions.
9. – Turns off the selected functions.
10. – Scrolls between functions, or access
address screen.
Other
11. Battery Cover – Covers compartment for four
AAA alkaline batteries.
RECEIVER
12. SmartPort® Outlet (Male) – Outlet on back of
Receiver that plugs into the SmartPort® harness.
13. Antenna – Receives signals from Transmitter from
up to 2 miles (3 km).
SmartPort
®
14. SmartPort® Outlet (Female) – Outlet on front of
SmartPort® that plugs into the ROAM XL Receiver
or other Hunter product.
15. Rubber Cover – Protects SmartPort® from dirt
and weather.
16. Control Wires – Red, white, and blue wires
that connect to the terminal strip area of the
controller.
a
a
NOTE: ROAM XL Transmitters may
also be used with existing Hunter
ICR-R receivers.
Page 8

6
WIRING HARNESS/SMARTPORT® CONNECTION KIT
To use the ROAM XL Remote Control System, your
controller must be equipped with the SmartPort®
wiring/harness connection kit. This wiring harness
provides the connection port where the ROAM XL
receiver is attached.
The SmartPort® wiring harness is included with the
purchase of the ROAM XL. Additional SmartPort
wiring harnesses may be purchased separately to
allow you to use the transmitter and receiver with
additional Hunter controllers.
The SmartPort Wiring Harness is not required with
Hunter ACC and I-Core commercial controllers.
These units are pre-wired with a SmartPort connector
already installed.
Page 9

7
INSTALLING THE ROAM XL REMOTE WIRING HARNESS
1. Install a ½" female threaded “Tee” in the eld
wiring conduit approximately 12" (30 cm) from
the controller.
2. Feed the red, white, and blue wires of the
SmartPort® through the base of the “Tee” and
into the controller wiring compartment as shown
in Figure 1.
a
a
NOTE: While the SmartPort® has
a protective cover to allow for
outdoor installation, the ROAM
XL Receiver should only be used
outdoors on a temporary basis.
The Receiver is not designed for
permanent outdoor mounting!
3. Screw the SmartPort
®
housing into the “Tee” (or
other tting) as shown in Figure 1.
Page 10

8
INSTALLING THE ROAM XL REMOTE WIRING HARNESS
4. Route wiring harness into controller housing.
Attach the red wire to the rst AC screw slot.
Attach the white wire to the other AC screw slot,
and attach the blue wire to the R (or REM on
some controllers) as shown in Figure 2.
1
/2" Thread
To Controller
Pre-assembled Assembled
Figure 1.
a
a
NOTE: Turn controller power off rst,
before wiring the harness.
Page 11

9
WIRING THE SMARTPORT® TO HUNTER CONTROLLERS
SRC Controller SmartPort Installation
Access the terminal strip area and attach the red wire
to the left AC screw slot, attach the white wire to the
next AC screw slot and attach the blue wire to the
screw slot marked “R”.
AC AC RRSCMV 123 456
White
Blue
Red
X-Core Controller SmartPort Installation
Access the terminal strip area and attach the red wire
to the left side "24 VAC" slot, attach the white wire
to the right "24 VAC" slot and attach the blue wire to
the screw slot marked "REM".
SEN C P 1 2 3 4 5 6 7 8
24VA C
red
white
blue
Page 12

10
WIRING THE SMARTPORT® TO HUNTER CONTROLLERS
Pro-C Controller SmartPort Installation
Access the terminal strip area on the main module and
attach the red wire to the bottommost AC screw slot,
attach the white wire to the upper AC screw slot and
attach the blue wire to the screw slot marked “REM”.
Red
Blue
White
ICC Controller SmartPort Installation
Access the terminal strip area on the power module and
attach the red wire to the bottommost AC screw slot,
attach the white wire to the upper AC screw slot and
attach the blue wire to the screw slot marked “REM”.
Blue
White
Red
a
a
NOTE: Hunter ACC and I-Core
controllers are provided with the
SmartPort® factory installed.
Page 13

11
TYPICAL INSTALLATIONS
Receiver Mounted Indoors
This installation is ideal for situations when the ROAM
XL system will be left permanently connected to the
controller in an indoor area.
Receiver Mounted Outdoors
This installation is ideal for situations where a
contractor desires the ability to access and operate
a controller from outside of a locked building or
garage. However, the ROAM XL receiver must be
removed from the SmartPort
®
and the weather
resistant cap placed back on the outlet after each use.
Controller
Receiver
Outdoor Installation
(Temporary Connection
of Receiver Only)
Indoor Installation
Page 14

12
MAXIMIZING OPERATING RANGE
There are many factors that inuence operating
range. Listed below are a few things you can do to
assure that you get the maximum range possible.
1. Do not install the SmartPort® near large metal
objects such as power meters, water pipes, and
aluminum siding.
2. Do not install the SmartPort® in a basement or
underground location. The higher the location
the better chance of strong reception.
3. For maximum range in all directions, the receiver
should be pointed straight up (vertically). The
receiver should NOT be mounted horizontally.
4. When operating transmitter, hold the transmitter
as vertical as possible and face in the direction
of the receiver, especially if it is several hundred
meters away.
Page 15

13
EXTENDING WIRING ON SMARTPORT® HARNESS
Use a special shielded cable to connect the
SmartPort® to the controller if installing the connector
more than 2m (6 ft.) of wire from the controller.
The use of shielded cable will reduce the potential
for radio and electrical interference. The SmartPort
should never be installed more than 15 m (50 ft.)
metres away from the controller.
For easiest installation, order a Hunter SRR-SCWH
SmartPort® wiring harness with a full 7.6 m (25 ft.) of
shielded cable.
HUNTER SRR-SCWH
WIRING HARNESS
SRC TERMINAL BLOCK
BLUE
WHITE
RED
BLUE
WHITE
RED
AC AC RRS
HUNTER SRR-SCWH WIRING HARNESS
BLUE
WHITE
RED
ICC TERMINAL BLOCK
BLUE
WHITE
RED
AC
AC
R
RS
HUNTER SRR-SCWH WIRING HARNESS
BLUE
WHITE
RED
PRO-C TERMINAL BLOCK
BLUE
WHITE
RED
SEN
SEN
REM
AC2
AC1
GRD
Page 16

14
INSTALLING THE TRANSMITTER BATTERIES
The ROAM XL transmitter requires 4 AAA alkaline
batteries. To install the batteries, remove the two
screws holding the battery on the back of the
transmitter. Drop the batteries into the battery
compartment and replace the door. Your transmitter
is now ready to operate.
Remove these
Page 17

15
CHANGING THE REMOTE ACTIVATED STATION RUN TIME
Adjust the amount of time that a station will run
before it has been turned on by your ROAM
XL System. This does not affect the run time
programmed into your controller. There are 10 preset
run times: 1 minute to 90 minutes.
To change the Remote Activated Station Run Time:
1. If the unit is off (no display), power the transmitter
up by pressing and holding any button for 5
seconds. The transmitter will rst display the
active station.
2. Press the Mode button twice and the Run
Time icon will be displayed (default is 1
minutes). If more than 5 seconds go by without a
button being pressed, the Transmitter will revert
to displaying the active station.
3. Use the and buttons to change the Run
Time to any of the 10 settings ranging from 1 to
90 minutes. Then do not touch any of the buttons
for 5 seconds and the display will return to the
active station.
Page 18

16
CHANGING THE TRANSMITTER ADDRESS
Both the ROAM XL Transmitter and Receiver have an
“address” that they use when communicating. If the
addresses do not match, the receiver will ignore the
transmission.
Your ROAM XL comes from the factory with both the
Transmitter and the Receiver address set to 1. You
may change the address to any value from 0 through
127 for added security. Note that if you change the
Transmitter address, the Receiver must “learn” the
new address as described in “Preparing the Receiver
for Use” section.
To change the Transmitter's address, follow the
steps below:
1. If the unit is off (no display), power the transmitter up
by pressing and holding any button until the active
station appears.
2. Press and hold the Mode button for
approximately 5 seconds, until the Address Key
icon appears.
3. Use the and buttons to change the
address to any value between 0 and 127. Then
do not touch any of the buttons for 5 seconds
and the display will return back to the active
station.
Page 19

17
CHANGING THE MAXIMUM NUMBER OF STATIONS
Your ROAM XL transmitter has two operating modes,
Residential and Commercial (for ACC controllers).
These settings determine which controllers the
remote will work with, as well as the maximum
possible station size.
The ROAM XL transmitter comes from the factory
set to Residential mode, with the maximum number
of stations set to 15. You should set the maximum
number of stations for the number of stations your
controller actually has.
Residential mode will operate a maximum of 48
stations. This setting is used with SRC, X-Core, Pro-C,
ICC, or I-Core (including Dual) controllers.
Commercial mode will operate a maximum of 240
stations. This setting is required to operate with
Hunter ACC controllers.
It is possible to switch the tranmitter between modes,
to operate residential controllers on certain sites, and
ACC controllers on others.
Switching Between Residential and
Commercial Modes
1. Press add hold the Mode button until the key
icon is displayed.
2. Press the right arrow button once. An rE
(Residential Mode) or Co (Commercial Mode)
will be displayed.
3. Use the Up arrow button to change modes.
Page 20

18
CHANGING THE MAXIMUM NUMBER OF STATIONS
Set the maximum station number as follows:
1. If the unit is off (no display), power the transmitter
up by pressing and holding any button until the
display appears.
2. Press the Mode button three times, until the
Station icon is displayed.
3. Use the and buttons to change the
maximum station number. Then, do not press any
buttons for 5 seconds and the display will return
to the active station number.
4. You may now change the active setting to any
station in the new station range.
SRC/X-Core/Pro-C/ICC/I-Core/
I-Core Dual Controllers
In residential mode, the maximum number of stations
is from 1 to 48. The ROAM XL also provides the user
with the ability to operate programs (A, B, C, D).
ACC/ACC Decoder Controllers
In commercial mode, the maximum station number
240 allows the user to control up to 240 stations and
15 programs (programs are displayed with a P and
program number ex: P5).
a
a NOTE: When the ROAM XL transmitter
is set in the Commercial Mode, the
ROAM XL will only communicate with
ACC. To operate other Hunter
controllers (SRC, X-Core, Pro-C, ICC, and
I-Core) with your remote, change the
transmitter back to Residential Mode.
Page 21

19
PREPARING THE RECEIVER FOR USE
Your ROAM XL System is pre-addressed to work
right out of the box. However, if you changed the
Transmitter address as described in the section,
Preparing the Transmitter For Use", you must allow
the Receiver to learn the new address.
This can be done by performing the simple steps on
the next page.
a
a
NOTE: Once a new address is
learned, the only way to remove the
address from the Receiver memory
is to repeat the steps, to learn a
different address.
a
a
NOTE: The ROAM XL remote receiver
should not be permanently installed
in an outdoor or unsheltered location.
Page 22

20
CHANGING THE RECEIVER ADDRESS
1. Before setting the receiver address, make sure
that the transmitter address is set to the address
you would like to use.
2. Plug the receiver into a SmartPort® connected
to a powered controller. When this is done, the
receiver will beep 4 times.
3. Once the receiver beeps 4 times, you have
approximately 7 seconds to send the new
address to the receiver. Press either the or
button on your transmitter to connect.
4. The receiver will beep 4 additional times
indicating that it has learned the new transmitter
address and will respond only to that address
from this point on. If 8 seconds expire before the
or button is pressed, the receiver will beep
twice and retain its original address.
a
a The ROAM XL transmitter may also be
used with existing ICR-R receivers, if they
are addressed to work with one another.
Hold the green button on the ICR-R
receiver, while plugging it into the
SmartPort.
Immediately after it beeps 4 times,
transmit with the ROAM XL to set the
new address.
Page 23

21
ACTIVATING A STATION WITH THE ROAM XL REMOTE SYSTEM
The ROAM XL System will allow you to remotely turn
on and off any station on your Hunter controller with
the press of a button. Once on, the station will run for
the run time you have designated in the transmitter.
To remotely activate a station or program:
1. Plug the receiver into a SmartPort® that is
connected to a powered controller. The receiver
will beep 4 times followed by a 8-second pause
and two beeps.
2. If your transmitter is not on (no display), wake it
up by pressing and holding any button until the
display appears. The Transmitter will start up, and
then display the active station.
3. Use the and buttons to display the
station you would like to start, or press the Mode
button once to display programs.
4. Press the button to start the station or program.
The Transmitter will display the Transmit icon .
If you are near the receiver, you will hear it beep
two times. The Transmitter display will alternate
between "On" and the selected Station or
Program. This indicates that the Receiver has
received the command.
5. Press the button to turn off ALL stations or
programs that are on, including stations or
programs that were turned on by the controller.
The display will show the Transmit icon and the
receiver will beep again twice. The Transmitter
display will alternate between "OFF" and the
selected Station or Program. The ROAM XL
System is designed to turn on one station at a time
(unless you activate a program). Therefore, turning
a station on while another station is operating will
cause the operating station to turn off (does not
apply to the I-Core or ACC).
Page 24

22
ACTIVATING A PROGRAM WITH THE ROAM XL REMOTE SYSTEM
a
a
NOTE: ROAM XL can activate any
station on the residential controllers,
regardless of whether the dial is in
the SYSTEM OFF, RUN, or RUN/
BYPASS SENSOR modes. If a sensor
is connected and active, ROAM XL
will not operate stations until the
BYPASS SENSOR switch is selected.
The remote will operate ACC and
I-Core controllers in any dial position,
regardless of sensor state.
Activating a Program with the ROAM XL
You can maunally start a complete program in your
controller by selecting the applicable Program. In
the Residential mode, the ROAM XL can operate
Programs A, B, C, or D. In the Commercial mode, the
ROAM XL can operate Programs 1–15. Programs 1
through 6 would activate Programs A through F in the
ACC controller.
To start a Program manually from the remote, the
controller must already have a Program set up with
run times.
1. Press and hold the Mode button until the
station number appears.
2. Press the Mode button again and Programs
will be displayed.
Page 25

23
ACTIVATING A STATION WITH THE ROAM XL REMOTE SYSTEM
3. Use the and arrows to select the
program you would like to start manually.
4. Press the button to send the signal to turn the
controller On.
The receiver will beep twice, and the Transmitter
display will alternate between "On" and the selected
Program letter or number.
Page 26

24
OPERATING RANGE
ROAM XL has a maximum effective operating range of
approximately 2 miles/3.5 km.
“Maximum effective range” assumes level ground and
clear terrain. No guarantee is made that this range is
achievable on any given site.
ROAM XL has the maximum permissible operating
power allowed by the United States Federal
Communications Commission (FCC). However,
the actual range on any given installation will be
determined by the characteristics of the site.
Hills, buildings, and other obstructions will reduce
the operating range of the remote. Brick, stone, or
metal buildings will reduce range more than lighter
residential structures.
To insure optimum radio coverage:
• Replace the AAA batteries when the display
indicates they are weakening, and keep spares on
hand.
• Outdoor placement of the receiver and antenna
will generally out-perform indoor placement.
• Always use approved Hunter SmartPort wiring
harnesses to extend the receiver location. They
are shielded to resist interference from other
devices.
• Elevate the receiver and antenna for best coverage.
• Avoid placing the receiver and antenna behind
metal objects.
• When possible, avoid standing behind obstacles
or inside buildings while using the transmitter.
Page 27

25
OPERATING RANGE
• Do not modify the transmitter or receiver in any way!
ROAM XL has been carefully designed to provide the
best remote coverage possible within the regulations
that govern wireless devices.
Page 28

26
TROUBLESHOOTING GUIDE
PROBLEM CAUSES SOLUTIONS
Transmitter display is blank. Transmitter is Off.
Battery is dead.
Press the MODE button for 5 seconds.
Replace battery.
Can’t access all the desired stations on the
transmitter.
Maximum station number is set wrong. See “Changing the Maximum Station.”
Receiver doesn’t beep 4 times after
plugging it into the SmartPort
®
.
SmartPort is not connected properly.
Controller has no power.
Recheck SmartPort
®
wiring.
Check controller power.
Receiver won’t respond to Transmitter. Receiver and Transmitter addresses don’t match. Relearn address at Receiver.
Transmitter display stays on. Transmitter will turn off automatically. Wait approximately 5 minutes without pressing
any buttons. Transmitter will “fall asleep.”
“ERR” message in controller display when
controller is in the run position.
SmartPort
®
wiring leads have been extended
and are receiving electrical or radio interference.
Replace lengthened wire with shielded cable
to reduce radio interference. Use Hunter
SRR-SCWH. See “Extending Wiring on
SmartPort
®
Harness.”
Receiver does not receive signal from
remote held at close range.
Mismatch of addresses in transmitter and
receiver.
Reset address of receiver.
Remote has short range. Check for interference causes. See “Maximizing Operating Range.”
Page 29

27
SPECIFICATIONS
Operating Specications
• Address Range: 0–127
• Maximum stations supported: 48 Residential
Protocol, 240 Commercial Protocol
• Run Time: 10 settings from 1–90 minutes
• Range: up to 2 miles* (3 km*)
Electrical Specications
• Power Source Transmitter: 4 AAA alkaline batteries
• System Operating Frequency: 27 MHz band
Default Settings
• Address: 1
• Number of Stations: 15 (may be varied from 1–240)
• Run Time: 1 minutes
Dimensions
Transmitter (w/o antenna): Height: 7" (17.8 cm)
Width: 2¼" (5.71 cm)
Depth: 1¼" (3.17 cm)
Receiver (w/o antenna): Height: 7" (17.8 cm)
Width: 2¼" (5.71 cm)
Depth: 1" (2.54 cm)
*See “Operating Range” for more information.
Page 30

28
NOTES
Page 31

29
Page 32

Hunter Industries Incorporated • The Irrigation Innovators
© 2012 Hunter Industries Incorporated
1940 Diamond Street • San Marcos, California 92078 USA LIT-586 6/12
www.hunterindustries.com
 Loading...