

Page 1

Commercial Irrigation Controller
RAIN SENSOR
ACTIVE BYPASS
SYSTEM OFF
MANUAL OPERATION
SETTINGS
ADVANCED FEATURES
SET SENSOR OPERATION
CYCLE AND SOAK
SET CURRENT DATE / TIME
SET PROGRAM START TIMES
SET STATION RUN TIMES
SET DAYS TO WATER
SET SEASONAL ADJUSTMENT
SET PUMP OPERATION
Owner’s Manual and Installation Instructions
IC-600PL 6-station Controller expandable to 30 stations, Plastic Cabinet
IC-600M 6-station Controller expandable to 42 stations, Metal Cabinet
IC-600PP 6-station Controller expandable to 42 stations, Plastic Pedestal
IC-600SS 6-station Controller expandable to 42 stations, Stainless Steel
Page 2

SET CURRENT DATE / TIME
SET PROGRAM START TIMES
SET STATION RUN TIMES
SET DAYS TO WATER
SET SEASONAL ADJUSTMENT
SET PUMP OPERATION
Page 3

TABLE OF CONTENTS
INTRODUCTION ........................................................................................... 2
I-CORE INTERFACE AND KEY COMPONENTS ............................................. 2
I-CORE WIRING COMPARTMENT AND INTERIOR ........................................ 3
MOUNTING THE CONTROLLER TO WALL .................................................... 4
Wall Mount for Plastic and Metal Cabinet .................................................... 4
MOUNTING THE CONTROLLER (METAL PEDESTAL) .................................... 5
Pedestal Mount for Metal/Stainless Cabinet ................................................ 5
MOUNTING THE CONTROLLER (PLASTIC PEDESTAL) .................................. 5
Plastic Pedestal Mounting ........................................................................... 5
CONNECTING AC POWER ........................................................................... 6
For 120V Operation.................................................................................... 6
For 230V Operation.................................................................................... 6
CONNECTING EARTH GROUND .................................................................. 7
CONNECTING THE POWER AND STATION MODULES ................................ 8
Station Module Installation ......................................................................... 8
Power Module Installation .......................................................................... 8
CONNECTING VALVE WIRES ........................................................................ 9
Connecting Station Valve Wires .................................................................. 9
Connecting a Master Valve or Pump Start Relay ........................................... 9
CONNECTING A WEATHER SENSOR (OPTIONAL AND NOT INCLUDED) .. 10
Bypassing the Sensor(s) ............................................................................ 10
Sensor Bypass Switch ............................................................................... 10
CONNECTING A HUNTER SOLAR SYNC .................................................... 11
CONNECTING A FLOW SENSOR (OPTIONAL) ........................................... 12
CONNECTING A REMOTE CONTROL (OPTIONAL) .................................... 13
POWER FAILURES ....................................................................................... 14
QUICK START .............................................................................................. 14
CONTROLLER PROGRAMMING.................................................................. 15
Setting Current Date and Time ................................................................. 15
Setting Program Start Times ..................................................................... 15
Setting Station Run Times
(Length of Watering for Each Station)
Selecting Specic Days of the Week to Water ............................................ 16
Selecting Odd or Even Days to Water ...................................................... 16
Selecting Interval Watering ....................................................................... 16
Set Seasonal Adjustment .......................................................................... 17
Set Pump Operation ................................................................................. 18
Cycle and Soak ........................................................................................ 18
Set Sensor Operation ............................................................................... 18
Manual Program ....................................................................................... 20
Manual Station ......................................................................................... 20
Learn Expected Flow ................................................................................ 20
System Off ............................................................................................... 21
ADVANCED FEATURES ............................................................................... 22
Set Language ........................................................................................... 22
Set Units .................................................................................................. 22
Sensor Conguration ................................................................................ 22
Sensor Options ........................................................................................ 22
Congure a non-Hunter Flow Sensor ......................................................... 22
Flow Operation ........................................................................................ 23
Station Delay ........................................................................................... 24
No Water Window .................................................................................... 24
Firmware Info ........................................................................................... 24
Easy Retrieve™ Memory ............................................................................ 24
To save your watering program into memory: ............................................ 25
To restore the saved program: .................................................................. 25
Total Watering Time ................................................................................. 25
Erase All .................................................................................................. 25
LCD Adjust .............................................................................................. 26
Flow Totalizer ........................................................................................... 26
Solar Sync Delay....................................................................................... 26
PROGRAMMING SOLAR SYNC SETTINGS .................................................. 27
Programming Region & +/– Water Adjustment Setting .............................. 27
Clearing ET memory ................................................................................. 28
Check Sensor ........................................................................................... 28
........................................................ 15
Programming Solar Sync Delay ................................................................. 28
HIDDEN FEATURES ..................................................................................... 29
Programmable Rain Off ............................................................................ 29
One Touch Manual Start and Advance ...................................................... 29
Test Program Operation ........................................................................... 29
Complete Flow Monitoring Procedure ....................................................... 29
CONTROLLER DIAGNOSTICS AND TROUBLESHOOTING .......................... 31
System Status Dashboard ......................................................................... 31
Sensor Status ........................................................................................... 31
Station Status ........................................................................................... 31
Flow Status .............................................................................................. 31
HUNTER QUICK CHECK
TROUBLESHOOTING .................................................................................. 34
I-CORE: INSTITUTIONAL/COMMERCIAL CONTROLLER
(IC-600PL & IC601PL) – PLASTIC CABINET
I-CORE: INSTITUTIONAL/COMMERCIAL CONTROLLER
(IC-800M & IC-800SS) – METAL CABINET
I-CORE PLASTIC PEDESTAL ........................................................................ 38
SPECIFICATIONS ......................................................................................... 39
Operating Specications .......................................................................... 39
Electrical Specications ............................................................................ 39
Dimensions .............................................................................................. 39
Default Settings ....................................................................................... 39
FCC NOTICE ............................................................................................... 39
™
........................................................................... 33
................................................. 36
................................................... 37
1
Page 4

INTRODUCTION
2
The Hunter I-Core controller is a full-featured controller for demanding commercial and high-end residential applications. Versatility is what makes the I-Core
one of Hunter’s highest performing irrigation controllers.
I-Core features include:
• Modular design expandable from 6 to 30 stations
(plastic cabinet) and 6 to 42 stations (metal/stainless cabinet)
• 4 fully independent programs
• Diagnostic Dashboard™ monitors system operation and provides
real-time sensor and controller status
• Real-time ow monitoring
• Remote control ready with factory installed SmartPort
• Seasonal adjustment independent by program: Can be set globally,
monthly, or through Solar Sync
• Water Window Manager™: User dened hours when watering is
allowed
• Easy Retrieve™ Memory: Saves preferred program in memory
• Large, backlit display for easy programming
• Multi-language programming capability
• Automatic short circuit protection
• Built in Solar Sync capability
®
Note:
- This product should not be used for anything other than what is
described in this document.
- This product should only be serviced by trained and authorized personnel.
- This product is designed for continuous outdoor use from 0˚ F/-18 ˚ C
to 140˚ F/60˚ C.
- These units have an IP44 rating.
- This controller is not intended for use by young children or inrm
persons without supervision; young children should be supervised to
ensure that they do not play with the appliance.
I-CORE INTERFACE AND KEY COMPONENTS
1.
LCD Display
2.
+ Button
3.
– Button
4. ▲ ▼ (Up and Down Arrow Buttons) – Used to move up and down
through adjustable functions in various screens, and change selections
in certain screens
5. ◄ ► (Left and Right Arrow Buttons) – Used to move left and right
in various screens, and change important selections such as Stations,
Start Times, and Water Days
6.
PRG
and also starts the test program
7.
Programming Dial
of the I-Core. The most basic automatic watering is set up in the rst 4
dial positions
8.
Rain Sensor Bypass Switch
one is installed
9.
System Status Dashboard
information regarding sensor status, valve operation, and ow
monitoring
10.
Removable Facepack
controller for remote programming
– Backlit, adjustable contrast display
– Increases ashing value depending on function
– Decreases ashing value depending on function
(Program Button) – Selects one of the automatic Programs (A–D),
– Used to access all of the programming functions
– Allows user to bypass weather sensor if
– LED lights provide system status
– I-Core facepack can be removed from
9
1
5
3
4
6
8
RAIN SENSOR
ACTIVE BYPASS
MANUAL OPERATION
ADVANCED FEATURES
SET SENSOR OPERATION
SYSTEM OFF
SETTINGS
CYCLE AND SOAK
SET CURRENT DATE / TIME
SET PROGRAM START TIMES
SET STATION RUN TIMES
SET DAYS TO WATER
SET SEASONAL ADJUSTMENT
SET PUMP OPERATION
7
10
2
Page 5

S1 S1 S2 S2 CC
GND AC1AC2 REM C
P/MV
I-CORE WIRING COMPARTMENT AND INTERIOR
1.
Battery Compartment
controller without AC power.
2.
Battery Compartment
installed (location is on the back of the facepack).
3. Release for Facepack – Pull on the release tab and the facepack can be removed from the facepack frame.
4. Ribbon Cable – Cable that transmits information between the facepack and the inner controller assembly.
5. Slide Lock Bar for Output Modules – Sliding the Slide Lock Bar turns the controller’s power on or off. Permits the addition or removal of output
modules and locks the modules into place in the Power On position.
6. Power Module – This module provides power to the controller. This module must be in place for the controller to operate.
7. Station Module(s) – The addition of 6 station modules allows the ability to expand your I-Core from 6 to 30 stations (plastic cabinet) and 6 to 42
stations (metal cabinet and plastic pedestal). Each station module corresponds to six station screw terminals.
8. Power and Accessory Terminals – Connections for Power, Sensors, Pump/Master Valve, and other accessory connections.
9. Station Terminals – Connections for station wires; only terminals with corresponding Station Output Modules will be active and recognized by the
controller.
10. Communication Port – Connection for future use with Central Control Communications.
11. Earth Ground Lug – For connection of earth ground copper wire (for surge protection only). Do not connect valve commons or the incoming service
ground wire.
12. Transformer – A transformer is installed in the controller to supply 24VAC power to the controller. Transformer allows for either 120VAC or 230VAC
connections.
13. AC Wiring Compartment (Junction Box) – For connection of 120/230VAC power.
14. Conduit Opening – 1 to 1 ½" (25 mm to 38 mm) for eld wiring into controller.
(9-volt alkaline battery) – The alkaline battery (not included) keeps time during power outages. The user may also program the
(CR2032 3-volt lithium) – The lithium battery provides backup timekeeping during power outages and when the 9-volt is not
15. SmartPort® – Integrated connector for ICR/SRR/ROAM receiver (on side of cabinet).
Explanation of Symbols
AC
Consult Documentation
Hazardous Voltage Present
Double Insulated
8
6
4
2
3
1
7
5
15
10
11
9
12
13
14
3
Page 6

MOUNTING THE CONTROLLER TO WALL
S1 S1 S2 S2 CC
GND AC1AC2 REM C
P/MV
Wall Mount for Plastic and Metal Cabinet
All necessary mounting hardware is included with your controller and
should be suitable for most installations.
Tools required:
• Long drill bit and extension Philips screwdriver or bit (for use with long
extension) – magnetic recommended Wire strippers
NOTE: This controller must be installed in compliance
with local electrical codes.
A
B
C
Location Requirement: A) A switch or circuit-breaker shall be included in
building installations; B) the switch or breaker shall be in close proximity
to the controller and within easy reach of the operator; C) the switch or
breaker shall be marked as the disconnecting device for the controller;
D) the switch or circuit breaker used must comply with IEC 60947-1 and
IEC 60947-3.
Select a location for your controller that can be easily accessible, has
a at wall surface, and is within close proximity to a 120VAC(10A) or
230/240VAC(5A) power source.
In outdoor installations, avoid direct exposure to sprinkler spray. Shaded or
partially shaded areas are preferable to prolonged direct sunlight.
1. Using the enclosed mounting template, mark the mounting hole
locations on the wall. It should be mounted at eye level if possible.
2. Drill a ¼" (6 mm) hole at each mark.
3. Install screw anchors into holes if attaching the controller to drywall,
masonry, or plaster walls.
4. Open the controller and inner door. The inner door will swing out of
the way to provide full access to the controller mounting holes.
5. Holding the controller cabinet, line up the holes in the cabinet with
the wall anchors or pilot holes.
6. Drive a screw through each hole and secure snugly but do not
over tighten.
7.
OPTIONAL:
Locate the positioning hanger in the upper center of the
controller (A). Install one screw (B) in this hanger position and hang
the controller from the keyhole slot. Place a level on the top of the
controller cabinet and level. Locate and drive a screw in each of the
remaining screw holes (C), and secure snuggly but do not over tighten
the screws.
4
Page 7

MOUNTING THE CONTROLLER (METAL PEDESTAL)
AC Power Wire S/P
Pedestal Mount for Metal/Stainless Cabinet
Location Requirement:
building installations; B) the switch or breaker shall be in close proximity
to the controller, and within easy reach of the operator; C) the switch or
breaker shall be marked as the disconnecting device for the controller; D)
the switch or circuit breaker used must comply with IEC 60947-1 and IEC
60947-3.
Select a location for your controller that can be easily accessible, and is
within close proximity to a 120VAC(10A) or 230/240VAC(5A) power source.
1. Set concrete forms using the installation instructions provided with the
controller. Allow 2"(50 mm) of the conduit sweep above the surface of
the concrete pad.
2. Assemble the mounting template. Twist one nut on each of the four
J-bolts and slide each bolt through the template. Put a washer and
nut on each J-bolt to secure it to the template (allow 2 ½" [64 mm] of
thread protruding above each nut).
3. Level the mounting template before the concrete sets. Uneven
surfaces may cause the pedestal to distort, preventing proper sealing
of the doors.
4. Allow the concrete to cure for at least 24 hours. After the concrete
sets, remove the nuts and washers from the four J-bolts, and slide the
pedestal over the bolts. Secure the pedestal to the bolts using the
enclosed washers and nuts.
A) A switch or circuit-breaker shall be included in
³∕8" (9.5 mm) Mounting Nut (8)
8" (9.5 mm) Mounting Nut (8)
³∕
5. Remove the door and faceplate of the I-Core and attach the metal
cabinet of the I-Core to the top of the pedestal using the enclosed
hardware in the pedestal.
6. Replace the pedestal door rst and then replace the faceplate and the
cabinet door. The pedestal door cannot be removed or replaced when
the cabinet door is closed.
½" (13 mm)Conduit Nut
½" (13 mm)Conduit Nut
¾" (20 mm)Washer (4)
2" (50 mm)Conduit Nut
2" (50 mm)Conduit Nut
Mounting Plate
MOUNTING THE CONTROLLER (PLASTIC PEDESTAL)
Plastic Pedestal Mounting
Location Requirement:
building installations; B) the switch or breaker shall be in close proximity
to the controller, and within easy reach of the operator; C) the switch or
breaker shall be marked as the disconnecting device for the controller; D)
the switch or circuit breaker used must comply with IEC 60947-1 and IEC
60947-3.
Select a location for your controller that can be easily accessible, and is
within close proximity to a 120VAC(10A) or 230/240VAC(5A) power source.
1. Set concrete forms using the installation instructions provided with the
controller. Allow 2"(50 mm) of the conduit sweep above the surface of
the concrete pad.
2. Assemble the mounting template. Twist one nut on each of the four
J-bolts and slide each bolt through the template. Put a washer and
nut on each J-bolt to secure it to the template (allow 2 ½" [64 mm] of
thread protruding above each nut).
3. Level the mounting template before the concrete sets. It is important
with plastic pedestals to ensure a smooth mounting surface. Uneven
surfaces may cause the pedestal to distort, preventing proper sealing
of the doors.
4. Allow the concrete to cure for at least 24 hours. After the concrete
sets, remove the nuts and washers from the four J-bolts, and slide the
pedestal over the bolts. Secure the pedestal to the bolts using the
enclosed washers and nuts.
A) A switch or circuit-breaker shall be included in
(3" [7.6 cm] Max Above Concrete)
21" (53 cm) Min
4" (10 cm)
12.50" (31.8 cm)
26" Min (66 cm)
Thread Length 2.50" (6.4 cm) Min
Above Concrete
Field Wiring
(3" [7.6 cm] Max Above Concrete)
Template
5" (12.7 cm)
5
Page 8

CONNECTING AC POWER
NOTE: It is recommended that a licensed electrician perform the following power installation.
The I-Core can operate with either 120VAC or 230VAC power. Supply wires must be 14AWG or larger.
1. Turn AC power off at the source, and verify that it is off.
2. Remove the cover from the junction box.
3. Strip approximately ½" (13 mm) of insulation from the end of each of the AC power wires.
4. Route the wires through the conduit opening inside the junction box.
Do NOT connect the primary AC 120/230V electrical ground wire to the earth ground lug.
For 120V Operation
1. Connect the incoming black power wire (HOT) with the black wire lead
from the transformer.
2. Connect the incoming white wire (NEUTRAL) with the blue lead from
the transformer.
3. Connect the incoming green wire (GROUND) with the green and
yellow wire from the transformer.
4. Cap the unused brown wire coming from the transformer. Replace
cover of the junction box and screw into place.
Junction Box without Terminal Strip (120 Volt)
230 Brown Wire
(230 Volt)
Black Wire
120 Black Wire
(120 Volt)
Blue Wire
(Neutral)
White Wire
(Neutral)
For 230V Operation
1. Connect the incoming brown power wire (HOT) with the brown wire
lead from the transformer.
2. Connect the incoming blue wire (NEUTRAL) with the blue lead from
the transformer.
3. Connect the incoming green wire (GROUND) with the green and
yellow wire from the transformer.
4. Cap the unused black wire coming from the transformer. Replace
cover of the junction box and screw into place.
Junction Box with Terminal Strip (230 Volt)
230 Brown Wire
(230 Volt)
120 Black Wire
(120 Volt)
Blue Wire
(Neutral)
Brown Wire
(230 Volt)
Blue Wire
(Neutral)
Green Wire
(Ground)
6
Green Wire
(Ground)
Green Wire
(Ground)
Green Wire
(Ground)
Page 9

CONNECTING EARTH GROUND
S1 S1 S2 S2 C C
GND AC1 AC2 REM C
P/MV
The I-Core features a ground lug, which is isolated from the primary AC power, and is used to ground incoming surges from the
communications and output valve wires.
Do NOT connect the primary AC 120/230V electrical ground wire to the
earth ground lug.
1. Use #10 (6 mm) or #8 (10 mm) bare wire to connect the controller
to the ground rod. Route the earth ground wire into the wiring
compartment through the 1 ½" conduit opening at the bottom of the
cabinet. Do not route the ground wire through the same conduit as
the incoming primary AC power.
2. Loosen the ground lug screw; insert the ground wire into the ground
lug and tighten the screw to secure the ground wire. Do not over
tighten.
Acceptable grounding consists of an 8' (2.5 m) copper-clad rod or stake, or
a 4" x 96" (100 mm x 240 cm) copper plate, or both, placed in the earth at
least 8' (2.5m) away from the controller, and with the ground wire at right
angles to the communications and valve wires, if possible. Ideal grounding
resistance would be 10 Ohms or less as measured with a “megger”
or similar device. Please consult the ASIC reference for more detailed
information on proper grounding techniques.
Ground Wire
7
Page 10
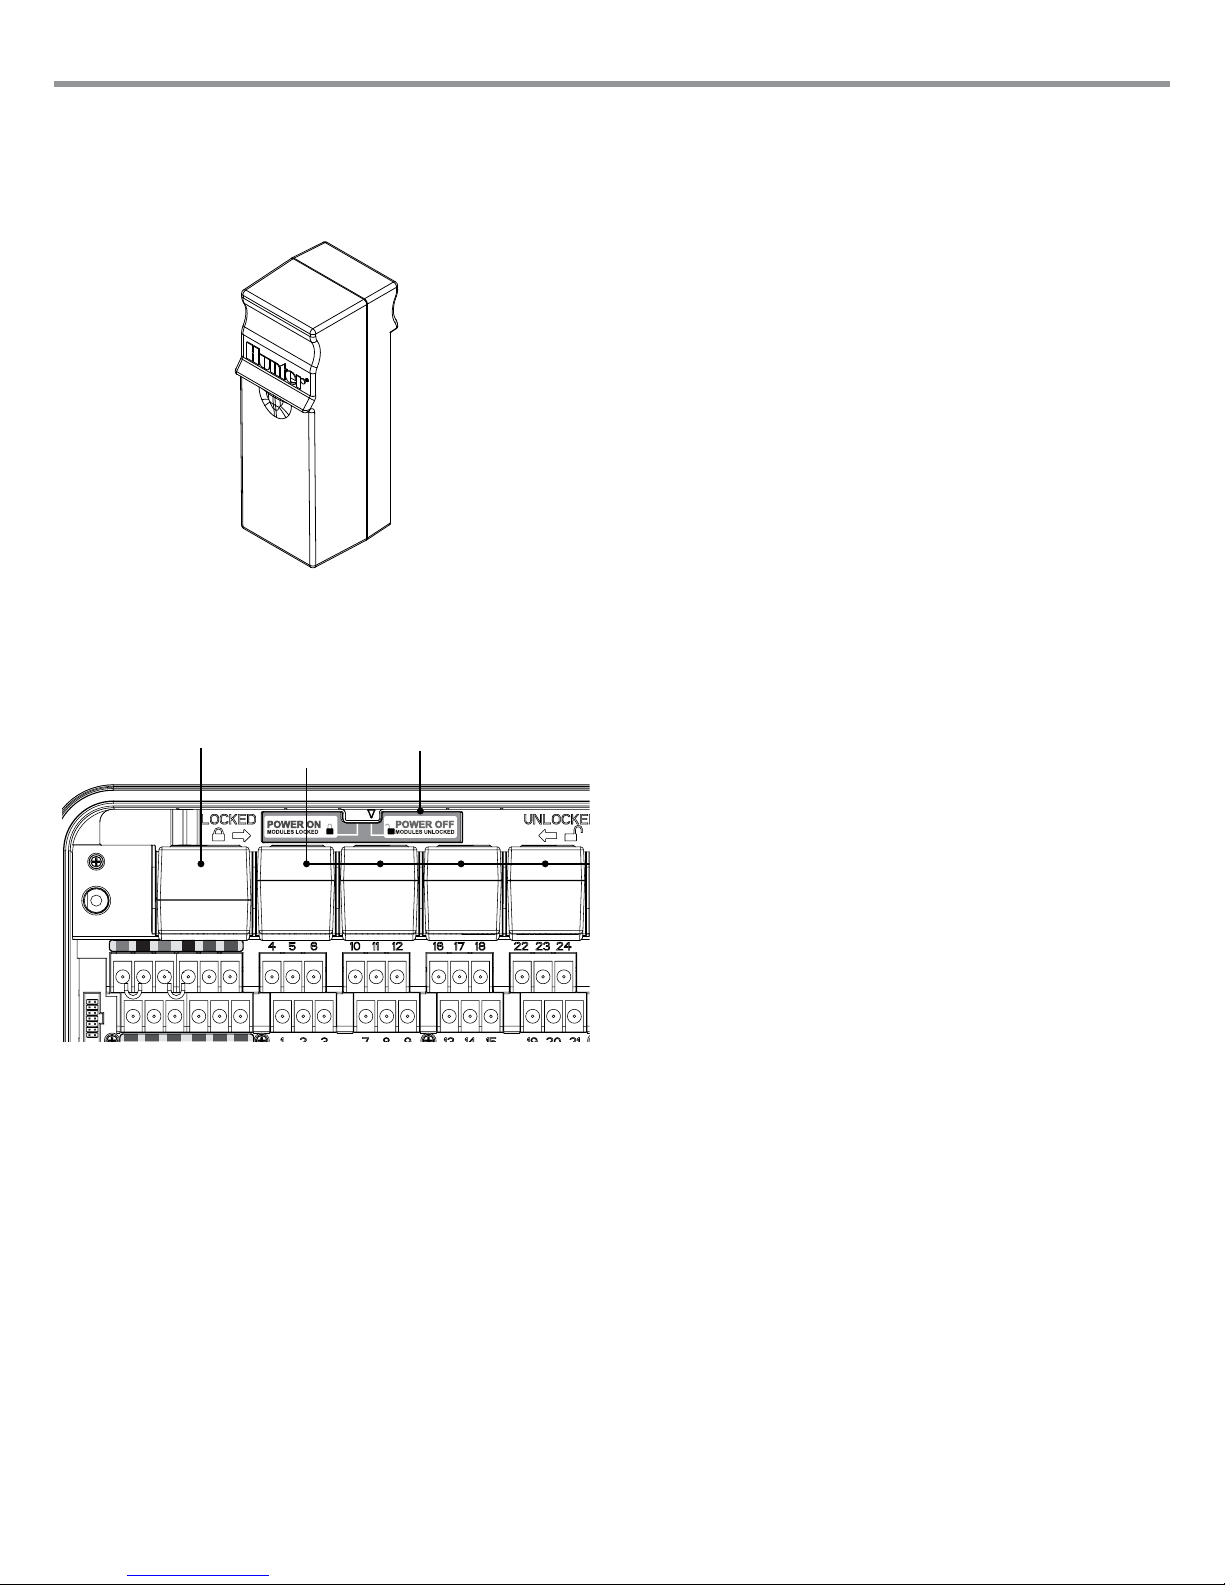
CONNECTING THE POWER AND STATION MODULES
S1 S1 S2 S2 CC
The I-Core controller is supplied with one factory installed power module
and one station module for six stations. Additional station modules may be
added in six station increments to expand the controller’s station capability.
The plastic cabinet I-Core can be expanded to a size of 30 stations, and the
metal cabinet and plastic pedestal I-Core can expand to 42 stations.
STATION MODULE
Power Module
Station Modules
Slide Lock
Station Module Installation
1. Open the inner facepack door and locate the Slide Lock. Move the
Slide Lock bar to the POWER OFF position.
2. The module needs to be inserted into the rst open module slot
position from the left or next available position in the back of the
controller. Do not skip slots by leaving them empty.
3. Insert the module with the gold tab on the top of the module facing
up. Slide the module straight in until it clicks into place.
4. Slide the Slide Lock into the POWER ON position.
5. The controller will automatically identify any new modules that have
been added. You can turn the dial to SET STATION RUN TIMES to
conrm the correct number of stations have been acknowledged.
Power Module Installation
The I-Core power module supplies power to the facepack and accessory
terminals. It typically does not need to be removed, however can be
replaced for servicing.
1. To install the Power Module, open the inner facepack door,
and locate the module lock bar. Move the Slide Lock bar to the
POWER OFF position.
2. Insert the power module into the rst slot position from the left, with
the gold tab on the top of the module facing up. Slide the module
straight in until it clicks into place.
3. Move the Slide Lock to the POWER ON position.
4. The Power Module must be in place in order for the controller to
operate and function.
8
Page 11

CONNECTING VALVE WIRES
S2 C C
REM C
P/MV
S1 S1 S2 S2 C C
GND AC1 AC2 REM C
P/MV
Connecting Station Valve Wires
Each station module that has been inserted has a grouping of six station
screw terminals corresponding to that particular expansion slot. Once a
station module is installed in a module slot, the station screw terminals
assigned to that module, which are located directly below the station
module, become active.
Each station output is rated for 0.56A max, or enough to operate two
Hunter AC solenoids simultaneously.
1. Route valve wires between control valve location and the controller.
2. At the valves, attach a common wire to either solenoid wire of all the
valves. This is most commonly a white colored wire. Attach a separate
control wire to the remaining wire of each valve. All valve wire splice
connections should be done using waterproof connectors.
3. Open the faceplate at the controller to expose the numbered station
terminals.
4. Route valve wires through the conduit and attach the conduit to the
controller at the 1 ½" (37.5 mm) opening at the bottom of the cabinet.
5. Strip ½" (13 mm) of insulation from the ends of all the wires. Secure
the valve common wire to one of three C (Common) terminals located
of the Power and Accessory terminals. All three common terminals are
active, so the valve common wire may be connected to either one.
Attach all the individual valve control wires to the appropriate station
terminals.
Valve
Wires
Valve 4
The Master Valve or Pump Start Relay connection is located on the
bottom row of the Power and Accessory Terminals, and is labeled P/MV.
This terminal will supply 24 VAC, 0.32A max, for a single Master Valve
solenoid. For a Pump Start Relay, the relay holding current draw must
not exceed 0.28 amps. If using a Pump Start Relay, it is recommended
that the controller be mounted at least 15' (4.5 m) away from both the
pump start relay and the pump. When a pump is to be operated by
the controller, a pump start relay must be used. Do not connect the
controller directly to the pump — damage to controller will result.
1. Route valve wires between Master Valve or Pump Start Relay location
and the controller.
2. At the Master Valve, attach a common wire to either solenoid wire of
the valve. Attach a separate control wire to the remaining solenoid
wire. At the Pump Start Relay, attach either wire to one of the yellow
wires coming from the Pump Start Relay. Attach the remaining wire to
the other yellow wire at the Relay. All wire splice connections should
be done using waterproof connectors.
3. Open the inner facepack door at the controller.
4. Route the valve wires into the controller via the eld
wire conduit.
5. Connect either wire from the Master Valve or Pump start Relay to the
P/MV terminal located on the bottom row of the Power and Accessory
terminals. Connect the remaining wire to the C (Common) terminal
that is located directly to the left of the P/MV terminal.
The Master Valve or Pump Start Relay can be activated according to a
particular station. The conguration of assigning the Master Valve or Pump
Start Relay according to a particular station will be covered in the Set Pump
Operation (pg. 18).
Valve 3
Valve 2
Valve 1
Valve Common Wire
Connecting a Master Valve or Pump Start Relay
Complete this section only if you have a Master Valve or Pump Start Relay
installed. The I-Core controller works with a normally closed master valve
that is typically installed at the supply point of the main line that opens only
when the automatic system is activated. A pump start relay is an electrical
device that uses the irrigation controller to activate a pump to provide
water to your system.
To P/MV or
Pump Start Relay
9
Page 12

CONNECTING A WEATHER SENSOR (OPTIONAL AND NOT INCLUDED)
S1 S1 S2 S2 C C
GND AC1 AC2 REM C
P/MV
The I-Core controller has the ability of connecting two Hunter Sensors
(three with I-Core Metal) including:
• Mini-Clik
®
• Rain Clik™
(including Wireless Rain Clik, Wireless Rain Freeze-Clik)
• Freeze-Clik
• Wind-Clik
®
®
• Mini-Weather Station (MWS)
• Solar Sync and Wireless Solar Sync ET Sensor
With the I-Core controller, Clik sensors can be programmed to shut down
individual stations, not necessarily the entire controller. Each sensor can be
given its own response instructions according to each station. Hunter Clik
sensors are usually normally closed, and open on alarm. This signals the
controller to suspend watering when precipitation, freeze or wind events
occur. The sensor connects directly to the sensor terminals, which also
allows you to override the sensor by using the Rain Sensor bypass switch
on the face of the controller.
1. To connect Clik sensors, locate the 2 pairs of sensor terminals in the
Power and Accessory Terminal section, labeled S1, S1 and S2, S2 (S3
available on I-Core Metal).
2. Route the wires from the Clik sensor through any of the available
knockouts into the controller cabinet.
3. The sensor connections are made in dedicated pairs. Remove the
sensor jumper wire from one pair of S1 or S2 terminals. Attach one
sensor wire to each of the two S1
or S2 terminals.
4. To connect the Wireless Rain Clik or Wireless Rain Freeze Clik, the
blue and white wires will be connected to the corresponding sensor
terminal as stated above: One into the rst S1 terminal and the other
into the second S1 terminal. Connect one of the yellow wires to the
AC1 terminal and the other yellow wire to the AC2 terminal.
Bypassing the Sensor(s)
If the rain sensor is ACTIVE and automatic or manual operation is required,
simply move the Bypass switch to Bypass.
Weather Sensor
If the rain sensor switch is left in the ACTIVE position but no sensor is
connected and the jumper wire has been removed, the display on the
I-Core will indicate that the sensor is ACTIVE. This will also be indicated
in the System Status dashboard to the left of the display. The sensor light
will be illuminated RED for ACTIVE, thus having an open circuit. As long as
the sensor is in the ACTIVE mode, any station that has been programmed
to the ACTIVE sensor will not be allowed to water, and will be put into
Suspend mode. If you do not have a sensor and want to eliminate this
possible problem, simply keep the rain sensor switch in the bypass mode,
or install the jumper wire between the sensor terminals if it has been
removed.
Programming of the sensors will be discussed in the Set Sensor Operation
section of Programming and Operation (pg. 18).
Sensor Bypass Switch
This switch will either enable or disable a Rain or Freeze sensor that has
been connected to the controller. When the switch is in the Active position,
the controller will adhere to the state of the sensor and shut down irrigation
if the sensor is in an open state. If the sensor is in a closed state, the
controller will operate as normal. If the sensor is in an open state, but you
would like your automatic irrigation to operate as normal, simply move the
switch to the Bypass position. The sensor will now be overridden and the
controller will operate as programmed.
Once the Sensor Bypass Switch is in the Active position the System Status
Dashboard will acknowledge the switch is in the Active position, and the
Sensor Status light will light up. If the sensor is in an open state, the System
Status Sensor light will be Red. If the sensor is in a closed state, the System
Status Sensor light will be Green.
If you do not have a sensor installed, the position of the Rain Sensor switch
can be in either the Active or the Bypass mode. This is true as long as
the jumper wire connecting the two sensor terminals remain in place. If a
jumper wire has been removed, it will be necessary to keep the Rain Sensor
switch in the Bypass mode, otherwise no automatic irrigation will occur.
10
Page 13

S1 S1 S2 S2 C C
GND AC1 AC2 REM C
P/MV
CONNECTING A HUNTER SOLAR SYNC
The Solar Sync is a “smart“ control system that, when connected to the
I-Core, will automatically adjust your controller’s station run times based
upon changes in local climate conditions. The Solar Sync incorporates a
solar and temperature sensor to determine evapotranspiration, also known
as ET. It also utilizes a Rain Clik and Freeze-Clik to shut down your irrigation
when conditions arise.
The I-Core now has the Solar Sync software built into the controller. New
I-Core controllers with built in Solar Sync are easily identied by the new
SOLAR SYNC SETTINGS dial position on the facepack. Because the new
I-Core has built in Solar Sync software, the Solar Sync Sensor is the only
item to be connected to the controller. The Solar Sync module will not be
used and is not compatible with I-Core controllers that have Solar Sync
software built in.
1. To connect the Solar Sync Sensor route the black and green sensor
wires into the controller and connect them to the two S1 terminal
positions. It does not matter which wire goes to which S1 terminal, but
the S1 terminal must be used when connecting a Solar Sync sensor.
2. Mount the Solar Sync sensor in a location that receives as much
sunlight as possible for best results. (see Solar Sync owner’s manual for
more details on sensor location)
3. The Solar Sync Sensor must now be assigned to the SEN1 location
in the controller. Turn the dial to the ADVANCED FEATURES position.
4. Use the ▼ button to scroll to Sensor Conguration and press the +
button.
5. In the SEN1 position use the + button to scroll through the options
until Solar Sync is shown. The I-Core now recognizes that a Solar Sync
sensor has been connected.
SOLAR SYNC Module
Do not install
If connecting a
Wireless Solar Sync
to the I-Core, steps 1-5 are the same
except in step 1, you will be connecting the green and black wires from
the Wireless Solar Sync Receiver to the S1 terminal positions. The Wireless
Solar Sync Receiver then communicates with the Wireless Sensor.
The Solar Sync can be programmed to adjust station run times by program.
To set the I-Core to Solar Sync Adjust mode:
1. Turn the dial to Set Seasonal Adjustment. Use the PRG Button to
select the desired program.
2. Press the +/– button to select By Solar Sync Seasonal Adjust mode.
Repeat for other programs if needed (See Sensor Conguration on
page 22).
Once a Solar Sync is connected and programmed the station run times
will be adjusted according to the ndings of the Solar Sync. The Solar
Sync will automatically adjust station run times and can be programmed
independently for each of the four I-Core programs. The Rain Clik and
Freeze-Clik sensor incorporated in the Solar Sync can be programmed by
station which is discussed in the Set Sensor Operation section.
SOLAR SYNC Sensor
Black
Green
11
Page 14

CONNECTING A FLOW SENSOR (OPTIONAL)
S1 S1 S2 S2 C C
GND AC1 AC2 REM C
P/MV
The I-Core is designed to operate primarily with the Hunter HFS Flow
Sensors. However, some non-Hunter ow sensors can be used.
1. To connect a Hunter HFS Flow Sensor, route the pair of 18 AWG
(1 mm) wires from the sensor into the cabinet (max distance of
1,000 ft.).
2. Locate a pair of S1 or S2 (S3 available on I-Core Metal) sensor red and
black terminals on the Power and Accessories Terminals. Remove the
jumper wire from one pair or S1 or S2 terminals. You may use either
pair of S1 or S2 sensor terminals for a ow sensor. Connect the red
wire from the HFS to the red terminal, and the black wire from the HFS
to the black terminal.
3. I-Core allows you to connect two ow sensors at one time. In that
case, one of the ow sensors would connect to the red S1 terminal
and the black S1 terminal, while the second ow sensor would
connect to the red S2 terminal and the black S2 terminal.
NOTE: I-Core has only one Pump/Master Valve output.
If 2 ow sensors are used on 2 different points of
connection, only one of them will have a master valve
available for alarm shutdowns unless the single PMV is
congured to operate 2 master valves simultaneously.
Black Wire
Red Wire
Flow setup, learning, and conguration will be described later in the manual
under Advanced Features (pg. 22). A complete step by step Flow Monitoring
procedure is also available in the Hidden Features section (pg. 29).
NOTE: If a ow sensor is going to be connected to the
controller and ow will be monitored, there is critical
information that needs to be read in the Controller
Diagnostics and Troubleshooting section under System
Status Dashboard Flow. It is very important to
understand how the controller will monitor ow under
certain circumstances and what diagnostic testing will
be performed in alarm situations.
HFS
Hunter HFS
12
Page 15

CONNECTING A REMOTE CONTROL (OPTIONAL)
The I-Core controller has factory installed SmartPort®. This provides a
remote ready connection for Hunter ICR, ROAM, and SRR remotes.
To connect a remote, remove the weather resistant rubber cover on the
SmartPort, align the remote receiver’s pins with the connector, and push
rmly until the receiver is fully seated. Refer to the remote control owner's
manual for further information on how to operate your Hunter remote.
The I-Core can overlap remote commands allowing up to ve valves to
run simultaneously. Therefore, if a station is being operated and a remote
command is sent to activate another station, that station will not turn off
the existing station, but run both stations simultaneously.
If ve valves are running and a new remote command is received to start
another event, the command will be ignored. No new remote commands
will be accepted until one of the ve events completes watering. I-Core
can run automatic programs and manual stations simultaneously. Each
command will be displayed on the screen, indicating the event is watering,
in the order the event took place.
Remote commands will also be allowed if the controller is in the OFF
position. With the dial in the OFF position, the controller will respond to
single station or program manual commands. In the OFF position, the
display will not indicate that a station is watering; you will only see the
System Status Dashboard Light turn green next to Station, indicating that
there is a station running. When the controller receives a Manual Program
remote command, the controller will only activate the stations within the
Program. If a station within the Program is programmed to a sensor that is
Active, that particular station will not operate and will be put into suspend
mode. The controller will count down that station’s programmed run time
without actually running the station.
If there are stations within the program that follow this station numerically
and are NOT programmed to the sensor, these stations will run and the
controller will observe the remote command and follow through the rest of
the program. The programming of stations to a sensor will be discussed in
the Set Sensor Operation section of the manual (pg. 18).
Receiver
Transmitter
13
Page 16

POWER FAILURES
Due to the possibility of power failures, the I-Core has nonvolatile memory
to preserve programming data indenitely. The 9-volt battery is required
for programming of the controller in the absense of AC power. Both the
9-volt battery and lithium battery (if a 9-volt battery is not installed), will
maintain the current time and day during power outages. If the power goes
out, the display will acknowledge there is No A/C Power. No stations will
water if the display reads No A/C Power, until AC power is restored to the
controller.
QUICK START
The I-Core controller offers maximum scheduling exibility including
four programs, each with up to eight daily start times, permitting plants
with different watering requirements to be separated on different day
schedules. Multiple start times permit morning, afternoon, and evening
watering, perfect for the establishment of new lawns and thirsty annual
owers. A built in 365-day calendar clock accommodates odd/even
watering restrictions without requiring monthly reprogramming. You may
simply designate days of the week you want to water for ease or use the
convenient interval day watering. All of this and more will be explained in
detail throughout the programming and operation section. You will begin
to notice just how easy the I-Core programming can be and the capabilities
of advanced features the I-Core offers to set this controller apart from its
competition.
The following are basic programming instructions to initially program
your I-Core controller. If more complex programming is required, please
reference the I-Core Programming following this page.
1. Set Current Date/Time: Use the ◄ and ► buttons to navigate, and
the + / – buttons to change the ashing selection to the correct Date
and Time.
2. Set Program Start Times: Each automatic program has 8 start
times available. Use the ◄ and ► buttons to navigate through the
different start times, and the + / – buttons to change the time. The
time changes in 15 minute increments, and by holding down the
+ / – buttons the time will scroll faster. Use the PRG button to select
individual programs.
NOTE: The number shown on the screen does not
indicate a station number, but indicates an individual
start time for that particular Program.
5. Set Pump Operation (optional): The Pump/Master Valve output may
be set by station. If a Pump/Master Valve is in use you need to make
sure the stations are set to On. If no Pump/Master Valve is in use, this
is not required. The ◄ and ► buttons scroll through the stations and
the + / – buttons set the stations to On or Off.
6. Return the Dial to the Run Position: This is all that is required for
the most basic operations. The I-Core will water automatically in any
dial position except OFF, with the previous steps discussed being
programmed.
7. Test Program: The test program will start every station in the
controller sequentially, in numerical order, for the specied time. Turn
the dial to the RUN position. Hold down the PRG button for three
seconds. The screen will change automatically and display station
number 1 and a ashing run time of 0:00. Enter the desired run time in
hours: minutes by using the + / – buttons. Within ve seconds the test
program will begin. Test program will operate stations in sequential
order.
8. Manual Start: With the dial in the RUN position, there is a shortcut
to manually start a program. Press and hold the ► button. The screen
will change and indicate station 1 and the programmed run time
for Program A. If you would like to change the Program you want
to manually run, release the ► button and press the PRG button to
change the Program selection. The manual program will start in a few
seconds.
3. Set Station Run Times: This dial position allows you to assign a
station’s run time with a particular program. If you need to change
the program, you are assigning a station run time, simply press the
PRG button. Use ◄ and ► buttons to navigate through the station
numbers, and the + / – buttons to change the length of run time in
hours: minutes.
4. Set Days to Water: Use the PRG button to select the Program. Use
the ▲ or ▼ buttons to move the ► cursor next to a day, and then use
the + / – buttons to indicate a water day or a non water day. When
using Days of the Week scheduling, a will indicate a water day, and
a _ will indicate a No-Water Day. The ◄ and ► arrow buttons will
change the schedule type, including Days of the Week, Odd/Even
Days, and Interval Watering.
NOTE: For Days of the Week scheduling, a check mark
indicates a water day, and no check mark indicates a
non water day. When programming Odd/Even and
Interval watering schedules, the X that appears next to
the day will indicate a non water day for that schedule,
and all other days with no X will be available water days
depending on the schedule programmed.
14
Page 17

CONTROLLER PROGRAMMING
Setting Current Date and Time
The SET CURRENT DATE AND TIME dial position allows you to set the
current date and time in your I-Core controller.
1. Turn the dial to the SET CURRENT DATE/TIME position.
2. The year will be ashing in the display. Use the + / – button to change
the year. Press the ► button to proceed.
3. The month will be ashing. Use the + / – button to change the month.
Press the ► button to proceed.
4. The day will be ashing. Use the + / – button to change the day. Press
the ► button to proceed and set the time.
5. Use the + / – button to select AM, PM, or 24 HR. Press the ► button.
6. Use the + / – button to set the hour. Press the ► to set the minutes.
Use the + / – button to change the minutes until they are correct. The
correct date and time have now been set. Always return the dial to the
RUN position when you are nished programming the controller.
Setting Program Start Times
The SET PROGRAM START TIMES mode allows you to program start times
for each of the four programs (A, B, C, or D) independently. Up to eight
start times per day can be set for each program.
NOTE: Two programs are allowed to run at the same
time if there Start Times coincide or overlap. This is an
important element to consider when programming the
Start Times if the hydraulics of your system do not allow
for more than one station to run at the same time.
1. Turn the dial to the SET PROGRAM START TIMES position.
2. Program A and start time 1 will be displayed. If necessary, you can
select Program B, C, or D by pressing the PRG button.
3. The program start time will be ashing. Use the + / – button to
change the start time. The time will change in 15 minute increments.
Press the ► button to select an additional start time if you would
like more than one watering cycle per day to occur for that program.
Programs A, B, C have eight start times per day, while program D has
16 start times. Press the PRG button to change between programs A,
B, C, and D to assign a start time to the particular program.
4. To eliminate a program start time turn the dial to the SET PROGRAM
START TIMES position, use the PRG button to select the program and
the ► button to select the start time you would like to eliminate. Press
the + / – button until you reach 12:00 AM. Press the – button once more
and the display will show dashed lines --:--, indicating no start time.
If a program start time is skipped (for example, a start time is set for 1 and
3), the start time will be accepted, but when returning to this dial position,
the start times will be moved to sequential order (the Start Time 3 will be
moved to 2).
If an earlier start time is set for a higher-numbered start (for example,
start time 1 is set to 4:00 AM, and start time 2 is set to 3:00 AM), when
returning to this dial position the start times will have been reorganized in
chronological order. The lowest numbered start time will always have the
earliest time of day (in the example, the start time 1 will be at 3:00 AM and
start time 2 at 4:00 AM).
NOTE: One start time will activate all stations
sequentially that are assigned to a program. Multiple
start times are typically used when separate morning,
afternoon, or evening watering cycles are required. You
cannot enter a start time for each station. If you only
want to water your stations once a day within a particular
program, you would only program start time 1. The rest
of the start times 2 through 8 would be left blank --:--.
The I-Core controller has the ability to operate ve Hunter valves at one
time, and, therefore, allows for more than one program to run at the same
time. Only two programs can be allowed to run concurrently. If you set two
programs to have the same start time, or their start times overlap, both
programs will run concurrently. This is a great feature if you have a short
water window and the available water to feed multiple stations; however, it
could become an issue if the ow of your irrigation system cannot support
operating multiple stations at the same time.
If you do not have the available water to operate multiple stations at one
time, you will need to consider and calculate when each program will nish,
or review the Total Watering Time for each program within the ADVANCED
FEATURES dial position. Each Program’s Start Time must be programmed
to start after the previous Program nishes in order to eliminate the
possibility of multiple Programs watering at once.
Setting Station Run Times
(Length of Watering for Each Station)
The SET STATION RUN TIMES mode allows you to enter a length of run
time for each station assigned to a particular program. Each station that
has a run time associated with a program will be activated and operate one
after another sequentially with each start time for that program.
1. Turn the dial to the SET STATION RUN TIMES position.
2. The display will show the station number and program. Use the PRG
button to select a program.
3. Use the + / – button to change the station run time on the display.
4. Use the ► button to advance to the next station for which you would
like to enter a run time.
5. When nished entering run times, rotate the dial to the RUN position.
By pressing the PRG button, you can move between programs while
staying on the same station. However, it is recommended that one program
is completed before going on to the next program.
15
Page 18

CONTROLLER PROGRAMMING (CONTINUED)
NOTE: When entering run times the Seasonal Adjusted
run time will be displayed in the lower right corner of
the display. The default Seasonal Adjustment setting is
100%. If the ACTUAL value is different from the
PROGRAMMED value, the Seasonal Adjustment has
been changed from the default of 100% to a new value.
The ACTUAL run time is the duration the station will water based upon the
seasonal adjustment value. Detailed information on Seasonal Adjustment
can be found in the Set Seasonal Adjustment section (pg. 17).
Setting Days to Water
SET DAYS TO WATER mode allows you to select days you would like to
water for each program independently.
1. Turn the dial to SET DAYS TO WATER position.
2. Program A water days will be displayed. Use the PRG button to select
your desired program (A, B, C, or D).
3. Use the ◄ and ► button to change from 1) Specic Days of the Week;
2) Odd Day Watering; 3) Even Day Watering; or 4) Interval Day
Watering. Each program can only be assigned one type of water day
option at a time.
Selecting Odd or Even Days to Water
This feature uses numbered days of the month for watering instead of
specic days of the week. (For example, Odd Days 1st, 3rd, 5th, etc. and
Even Days 2nd, 4th, 6th, etc.)
1. Turn the dial to SET DAYS TO WATER position.
2. Use the PRG button to select your desired program (A, B, C, or D).
3. Press the ◄ and ► button until Odd Days watering or Even Days
watering is shown on the display.
4. In either the Odd or Even Days mode, there will be a **NO WATER
DAYS** description ashing on the display. Within the Odd or Even
mode you can select days that watering will NOT take place. This is a
feature that is frequently used to omit watering on a specic day, for
example, a mowing day. Press the ▲ or ▼ buttons to move through
the days of the week and press the + button for the days that you DO
NOT want to water. By pressing the + button on a specic day, an X
will appear indicting that the day is a Non-Water Day.
Selecting Specic Days of the Week to Water
1. Turn the dial to SET DAYS TO WATER position.
2. Use the PRG button to select your desired program (A, B, C, or D).
3. Use the ◄ and ► button to select Days of The Week watering mode.
Water Days will be displayed at the bottom of the screen. With the
cursor on Monday, press the + button to activate the day or the –
button to cancel watering for that day. A indicates a water day, and
a _ indicates a non-water day. After pressing the + / – button on a
specic day the cursor will automatically move to the next day. Press
the ▲ or ▼ buttons to move quickly to a specic day without making
a water or non water selection.
This is program specic so you will need to repeat these steps for each
required program.
5. To change a Non-Water Day, use the ▲ or ▼ buttons to go to that
day and press the – button. The X will disappear, and the day will be
available for Odd or Even watering again.
NOTE: The 31st of any month and February 29th are
always “OFF” days when Odd watering is selected.
Selecting Interval Watering
This feature is convenient if you want to have a more consistent watering
schedule without having to worry about the day of the week or the date.
The interval number you select is the actual interval of days on which
watering will occur. For example, if you have an interval of 3 days watering
every third day. The days remaining (Remaining) indicates how many days
until the next watering occurs. For example, if you select interval 3 with 1
days remaining, watering will begin tomorrow at the scheduled time. At
midnight the days remaining will change from 1 to 0, indicating that the
controller will water that day.
1. Turn the dial to the SET DAYS TO WATER position.
2. Use the PRG button to select your desired program
(A, B, C, or D).
3. Press the ◄ and ► button until Interval Days is displayed. The
Interval will be ashing. Use the + / – button to select the interval of
days on which watering will occur.
4. Press the ▼ button once to program days remaining, if required. One
day remaining means it will begin watering the next day.
16
Page 19

CONTROLLER PROGRAMMING (CONTINUED)
5. In the Interval Watering mode, there will be a No Water Days
description on the display. Within the Interval Watering mode you
can select days that watering will not take place. This is a feature that
is frequently used to omit watering on a specic day, for example, a
mowing day. Press the ▼ button until the cursor points to Monday.
Once the cursor points to Monday the No Water Days description will
start ashing. Press the ▲ or ▼ buttons to move through the days of
the week and press the + button for the days that you DO NOT want
to water. By pressing the + button on a specic day, an X will appear
indicting that the day is a Non-Water day.
6. To change a No Water Day, use the ▲ or ▼ buttons to go to that
day and press the – button. The X will disappear, and the day will be
available for Interval watering again.
7. After programming water days, rotate the dial back to the RUN
position.
Set Seasonal Adjustment
Seasonal Adjustment is used to make run time changes without having to
reprogram all of the individual station run times. This feature is perfect for
making small changes that are necessary as weather conditions change due
to seasonality. For example, during hotter times of the year, your landscape
may require a bit more water. Seasonal adjust can be increased so that
stations will run longer than the programmed time. Conversely, as fall
approaches, the seasonal adjust can be reduced to allow for shorter station
watering durations.
There are three separate seasonal adjust modes that can be used
independently for each Program. Again, the selections are by program,
and the steps need to be taken for each program:
Global Seasonal Adjust (PRG Global) – This selection is a program global
seasonal adjustment, which increases or decreases station run times by
a xed %. All stations that have a run time within the Program will be
adjusted according to the Global Seasonal Adjust value.
Monthly Seasonal Adjust (By Month) – All of the seasonal adjustment
values for the full year can be programmed into the controller at one time.
Each month, the controller will switch to the new seasonal adjust value.
1. Turn the dial to SET SEASONAL ADJUSTMENT. Use the PRG button
to select the desired program.
2. Press the + / – button to select By Month seasonal adjust mode.
3. While in the By Month mode, press the ▼ button and the seasonal
adjust valve forJanuary will start ashing, and the ► cursor will
indicate January.
4. Press the + / – button to increase or decrease the seasonal adjust
value between 0 and 300% for the month selected, which will affect all
the stations for the Program you have selected.
5. By pressing the ▲ or ▼ buttons, you may scroll through the months to
select the specic month you want to adjust.
1. Turn the dial to SET SEASONAL ADJUSTMENT. Use the PRG button
to select the desired program.
2. Press the + / – button to select the PRG Global seasonal adjust mode.
3. While in the PRG Global mode, press the ▼ button and the
percentage will start ashing.
4. Press the + / – button to increase or decrease the global seasonal
adjust value between 0 and 300%, which will affect all the stations
within the program you have selected.
Solar Sync Adjust (By Solar Sync) – This mode allows seasonal adjustment
to occur on a daily basis when a Hunter Solar Sync is connected to the
controller. This provides for the maximum amount of water saving while
promoting healthy plant material. Solar Sync will change the seasonal
adjust % daily based upon weather conditions.
1. Turn the dial to SET SEASONAL ADJUSTMENT. Use the PRG button
to select the desired program.
2. Press the + / – button to select By Solar Sync seasonal adjust mode.
17
Page 20

CONTROLLER PROGRAMMING (CONTINUED)
The Solar Sync will take over and the percentage will change according to
the ndings of the Solar Sync sensor. If you set seasonal adjust mode to
Solar Sync and you DO NOT have a Solar Sync connected, the controller
will automatically keep the seasonal adjust percentage at 100%.
There are also further steps in programming of the I-Core to assign the
Solar Sync, Rain, and Freeze sensor to shut down specic stations. This will
be detailed in this manual under Advanced Features, Sensor Conguration,
and Set Sensor Operation.
Set Pump Operation
The default is for all stations is Pump/Master Valve circuit ON. The Pump/
Master Valve circuit can be set ON or OFF by station, regardless of which
program the station is assigned. This feature may be utilized on systems
where it is desirable for a booster pump to operate with certain zones.
It could also be used for systems that have two points of connection and
some valves need a master valve/pump start to turn on and other valves
operate on a different water source that do not need the master valve/
pump start.
To Set Pump Operation:
1. Turn the dial to SET PUMP OPERATION position.
2. Press the ◄ and ► buttons to select a particular station.
3. Use the + / – button to turn the Pump/Master Valve circuit ON or OFF
for a specic station.
4. When nished, turn the dial back to the RUN position.
Cycle and Soak
The Cycle and Soak feature allows you to split a station’s run time into more
usable, shorter watering durations. This feature is useful when applying
water to slopes and tight soils because it automatically applies water more
slowly, helping to prevent run off from occurring. You should enter the
Cycle time as a fraction of the station’s watering time, and the Soak time as
the minimum number of minutes required before watering can occur again
for the next Cycle. The total number of cycles is determined by taking the
total programmed station run time and dividing it by the Cycle time.
Example: Station 1 requires 20 minutes of watering, but after 5 minutes,
runoff occurs. However, after 10 minutes all the water is absorbed.
The solution would be to program 20 minutes for the station run time,
5 minutes for the Cycle time, and 10 minutes for the Soak time.
3. Cycle will ash OFF. Use the + / – button to set the Cycle time. You
may select a maximum Cycle time of up to 60 minutes.
4. Press the ▼ button to set the Soak time. Use the + / – button to set
the Soak time. You may select a maximum Soak time of up to 120
minutes.
5. Rotate the dial to the RUN position when nished programming all
Cycle and Soak times for yourdesired stations.
It may be benecial to understand how the cycle and soak application
process works. For example, Station 1 has been programmed to have a
5 minute cycle time and a 10 minute soak time. Station 1 may not exactly
come back on for its second cycle immediately after 10 minutes of soaking.
If there are other stations within the program that have run time after
Station 1, the program in numerical order will continue to run each station
that has a run time in the Program before it goes back to Station 1 for
another cycle. The Program will water each station for its programmed run
time or rst cycle time, before it looks back at station 1 to complete its
cycle and soak. If no other stations in the Program have a cycle and soak
programmed, then Station 1 will continue with its second cycle after all
stations have completed and then go into cycle and soak one after another
until the total run time has completed.
Set Sensor Operation
The SET SENSOR OPERATION dial position is specically used to set
a response for a sensor to a station. The I-Core controller is capable of
monitoring two individual Clik-type sensors, including the Solar Sync rain/
freeze sensor. You may have a combination of two Clik sensors, one Clik
sensor and one ow sensor, one Clik sensor and a Solar Sync rain/freeze
sensor, or two ow sensors. The I-Core Metal version controller has an
additional sensor terminal, allowing up to 3 sensors to be installed and
programmed. Additional programming assignment of the sensor(s) to
stations MUST be done in order for the sensors to shutdown irrigation.
The programming of the two available sensor inputs is described in the
Advanced Features section under Sensor Conguration (see pg. 22) and
must be completed prior to setting sensor operation.
NOTE: If using a Solar Sync it will show as a Clik sensor.
There is not a special distinction or selection for the
Solar Sync, and will be described as a Clik sensor for the
remainder of this section.
If two Clik sensors are installed, the display in the SET SENSOR
OPERATION dial position will allow you to program a response for each
sensor according to a particular station. A Sensor Response will either
show a , indicating that the sensor will shut down irrigation, or _ ,
indicating that the station will ignore the state of the sensor and continue in
its normal operation.
NOTE: If using a Solar Sync, the Solar Sync sensor
terminal will automatically be used for both Rain and
Freeze inputs as well as weather adjustment
information. The display will show which sensor has
caused a shutdown.
1.
Turn the dial to CYCLE AND SOAK position
2. Use the ◄ and ► buttons to select the station that you would like to
program Cycle and Soak.
18
Page 21

CONTROLLER PROGRAMMING (CONTINUED)
Both sensors programmed for Station 1
Sensor 1 only programmed for Station 1
Rotate the dial to the SET SENSOR OPERATION position.
1. Use the ◄ and ► buttons to select the station that you would like to
program a sensor response.
2. The default is to have the sensor input active for each station,
therefore indicating a . The cursor will be ashing on either SEN1 or
SEN 2. Use the + button to enable sensor operation or the – button to
disable the sensor.
3. Rotate the dial to the RUN position when nished programming
sensor operation for the desired stations.
If you have two ow sensors congured to each one of the sensor
terminals, you will not be given the option to select a response for a
weather sensor. When you turn the dial to SET SENSOR OPERATION, the
screen will display No Clik or WRC. The conguration of the Flow sensors
will be discussed in the ADVANCED FEATURES dial position.
Sensor 2 only programmed for Station 1
No sensor programmed for Station 1
Rotate the dial to the SET SENSOR OPERATION position.
1. Use the ◄ and ► buttons to select the station that you would like to
program a sensor response.
2. The default is to have the sensor input active for each station,
therefore indicating a . The ► cursor will be ashing on SEN1.
Use the + button to enable sensor operation or the – button to
disable the sensor.
3. Once SEN1 has been programmed the ► cursor will move to SEN2.
Use the + / – button to enable or disable SEN2 for the station.
4. Rotate the dial to the RUN position when nished programming
sensor operation for the desired stations.
If one Clik sensor and one Flow sensor are installed, the screen in Set
Sensor Operation will show only one option of selecting a sensor response
for the one Clik Sensor. The Clik sensor will either appear as SEN1 or SEN2,
depending on which sensor terminals that Clik sensor was connected. You
will give the sensor a if you want the sensor to shut down irrigation, or
a _ if you do not want the irrigation to shut down in the case of a sensor
state change. The ow sensor conguration will not appear as an option to
change in the Set Sensor Operation screen. The programming of the Flow
sensor will be done in the ADVANCED FEATURES dial position and will be
discussed further in that section.
SEN 2 is congured for a Flow Sensor
SEN 1 and SEN 2 are congured for Flow Sensors
Once you have installed and programmed a sensor and set a response
to your desired stations, the controller will acknowledge the state of the
sensor. When the sensor is Inactive or in a closed state, the System Status
Dashboard will have a green light next to Sensor, indicating that irrigation
will occur as normal. If the sensor is in the Active mode or open state, the
controller will display a red light in the System Status Dashboard next to
Sensor. This indicates that the sensor is active and certain automatic irrigation will not occur. When a sensor becomes active the controller will also
indicate the status of the sensor on the display in the RUN position.
Once a sensor becomes active, the controller will put irrigation in a
suspend mode. The controller will acknowledge a program’s start time and
the display will indicate where the program would be watering. However,
whether or not the station is set to respond to the sensor will determine if
the station turns on or not. If the station is set to respond to the sensor, the
display will count down the stations run time and indicate that the station is
Suspended. If the sensor state changes and becomes inactivate, the station
will resume watering at the given run time on the screen. If a station is not
set to respond to a sensor, the station will water as normal and ignore the
state of the sensor.
SEN 1 is congured for a Flow Sensor
A remote single station command will override the sensor state, whether
the station is set to respond or not, and that station will water for the
desired run time. When you activate a manual program command by
19
Page 22

CONTROLLER PROGRAMMING (CONTINUED)
a remote, the controller will acknowledge the stations that have been
programmed to respond to a sensor and those stations will not water and
be in Suspend Mode.
The same rules apply for activating a station or program manually by
turning the dial to the manual position. A manual single station will override
an active sensor; however, a manual program will adhere to the rules of
shutting down irrigation if the station within the program is set to respond
to the sensor.
Manual Operation
This dial position enables immediate operation of either a single station
or an automatic program. It also is used to Learn Expected Flow, which
is a key element in ow monitoring. You may run more than one manual
program or station at the same time, because the I-Core has the ability to
run up to ve stations or events at once. To initiate multiple events, you
will need to turn the dial from MANUAL OPERATION to RUN and then
return to the MANUAL OPERATION dial position to begin the initiation
of another event. Use the ▲ or ▼ buttons to navigate through the manual
feature selections. When the ► cursor is pointing to the selection you want,
simply press the + button to select the feature.
5. After the manual program begins, you may also use the ► button to
scroll to a particular station or advance to a station more quickly. It is
important to know that once you advance to the next station by using
the ► button you will not be able to return to the previous station.
Manual Station
Manual Station allows any individual station to be started immediately.
1. Use the ◄ or ► buttons to select a particular station.
2. Use the + button to increase the ashing run time on the screen until
the desired run time is achieved. You can assign a run time from 1
minute to 12 hours.
3. Turn the dial to RUN, and the station will begin irrigating.
Up to ve Hunter valves can be operated simultaneously.
Learn Expected Flow
This feature is used to learn station ows and is the nal element that needs
to be programmed in the controller in order for ow monitoring to occur.
You may learn expected ows by particular stations, or you may learn all
the stations at once. It is important that the following programming steps
must be completed before you are able to learn ow: (1) You must select
a ow sensor in the Sensor Conguration screen in Advanced Features; (2)
You must program the station ow to be monitored, which is found in the
Flow Operation screen in Advanced Features; and (3) The station must have
a programmed run time in the SET STATION RUN TIMES dial position.
A complete Flow Monitoring procedure will be discussed in the Flow
Monitoring section in the manual (pg. 29).
Manual Program
This will allow an entire program to be run immediately to be started at any
station. It is important to know that if a particular station is selected as the
starting point it will run from that that point, to the end. The manual will not
go back and run the stations that were initially skipped in the program.
1. Press the PRG button to select the program you would like to run.
2. Turn the dial to RUN to start the program at the beginning. Each
station will run for its automatic programmed time (including cycle
and soak) settings, and the stations with no run time in the selected
program will be skipped. You may increase the run time for the rst
station in the manual sequence, however, each station following will
run for its automatic program time.
3. To start later in the program at a higher numbered station, use the ◄
or ► buttons to select the station you want the manual to start on.
4. Turn the dial to RUN and the manual program will begin from the
desired station. The manual will continue until the last station in the
Program and then stop.
If a sensor is not selected in the Sensor Conguration screen, a station’s ow
is not set to be monitored or stations do not have programmed run times,
the controller will not allow you to learn expected ow. If the user has not
selected a ow sensor in the Sensor Conguration screen, the controller will
display No Flow Sensor while in the Learn Expected Flow screen.
20
Page 23

CONTROLLER PROGRAMMING (CONTINUED)
If the user has not selected a station’s ow to be monitored the controller
will display No Flow Station, as well as No Runtime even if there is a run
time associated with the stations.
If the user has not programmed station run times in the SET STATION RUN
TIMES screen, the display will read No Runtime.
If each one of these key aspects have NOT been programmed, the display
will indicate each missing link of the Learn Expected Flow process.
Once the correct station number is displayed, turn the dial to Run. Again,
the controller will go into its diagnostic ow testing for that particular station.
The controller will activate the station and the learning process may take up
to a minute. Once the controller has Learned Expected Flow the controller
will shut the stations down and the controller will go back to the main
current date/time screen.
After completing the learning process, you can review the Expected Flow
for each station. Rotate the dial to Advanced Features and use the button
to select ow operation. The expected ow will now be displayed. The
Expected Flow may be changed manually in this screen, or you may relearn
any of the stations ow by repeating the process just discussed. This will be
necessary if additional heads have been added, heads have been removed,
or nozzles have been changed to a station, which will all adjust the ow.
System Off
To completely stop all irrigation, including any stations which are already
running, turn the dial to the System OFF position. Within a few seconds a
large OFF will appear in the display and any stations which were running
will be shut down, and no new automatic irrigation will be allowed to start.
Once these settings have been entered, the controller will allow for Learn
Expected Flow.
If you want to Learn Expected Flow for All Stations, simply turn the dial to
Run. The controller will go into diagnostic testing of the actual ow for each
station that has been previously programmed to have its ow monitored.
This may take approximately one minute for each station’s ow to be
learned. It is important to know that during the learning process the station
will actually turn on and water in the eld.
If you want to learn the ow of a specic station, use the ◄ or ► buttons to
select the station that you would like to learn the ow for.
It is also possible to set a programmable period that the controller
will remain off in the System Off dial position. This is known as
the Programmable Rain Off feature, which will be discussed in the
Programmable Rain Off section.
A command to operate the controller from a hand-held remote (SRR, ICR,
ROAM) will activate the controller while the dial is the System Off position.
This is true for a remote single station command or a remote Program
command. The display will continue to show OFF, however the command
will be accepted and the controller will begin watering the station or
Program.
21
Page 24

ADVANCED FEATURES
Advanced features can be accessed by turning the dial to the ADVANCED
FEATURES dial posiiton. Use the ▲ or ▼ buttons to navigate through
the Advanced Feature selections. When the ► cursor is pointing to the
selection you want, simply press the + button to select the feature. Use the
◄ button to go back to the previous menu. A detailed description of each
selection within the Advanced Features are provided below.
Advanced Features
Set Language
This feature allows you to customize the displayed language to English,
Spanish, French, German, Portuguese, or Italian.
1. Turn the dial to the Advanced Features position. Use the ▲ and ▼ to
select Set Language and use the + button to enter.
2. Use the ▲ or ▼ buttons to navigate through the language selections.
3. Press the + button when the ► cursor is next to the language you want.
Sensor Options
Flow Sensors
Clik sensor With the ► button pointing
HFS 100
(1" Schedule 40 Sensor Body)
HFS 150
(1 ½" Schedule 40 Sensor Body)
HFS 158
(1 ½" Schedule 480 Sensor Body)
HFS 200
(2" Schedule 40 Sensor Body)
HFS 208
(2" Schedule 80 Sensor Body)
HFS 300
(3" Schedule 40 Sensor Body)
HFS 308
(3" Schedule 80 Sensor Body)
HFS 400
(4" Schedule 40 Sensor Body)
Custom 1, Custom 2, and Custom 3
By selecting a Clik sensor as an option for SEN1 or SEN2 within the Sensor
Conguration screen, you will now be allowed to select by station one or
both of the Clik Sensor selections to shut down irrigation in the Set Sensor
Operation screen, which was previously discussed.
The factory presets for SEN1 and SEN2 will be programmed as Clik
sensors. If you do not have a sensor wired into the controller the settings
under Sensor Conguration may be ignored. As long as the jumper wires
connect the two sensor terminals together inside the controller, the circuit
will remain closed, and the sensor will not false alarm or cause the irrigation
to shutdown.
to SEN1, press the + / –
button to scroll through the
possible choices. When you
nd the selection or sensor
that correlates with the
sensor you have wired into
SEN1 terminals, simply leave
it on that choice.
Set Units
This function allows you to set the unit of measure to either English or Metric.
1. Turn the dial to the ADVANCED FEATURES position. Use the ▲ and
▼ to Set Units and use the + button to enter.
2. Use the ▲ or ▼ buttons to select English (GPM) or Metric (LPM).
3. Press the + button when the ► cursor is next to the unit of measure
you prefer.
Sensor Conguration
It is important to complete this step in Advanced Features if you are going
to be connecting a sensor to the controller. If you are not going to be
connecting a sensor to the controller this section may be skipped. The
Sensor Congure feature allows you to program the SEN1 or SEN2 terminals
to accept a Hunter Clik-type sensor, a Solar Sync sensor, an HFS ow sensor,
or a non-Hunter ow sensor. It is important to program the correct ow
sensor size. HFS sensors are always installed in a Hunter FCT tting, and
selecting the correct tting size automatically sets calibration for the sensor.
Turn the dial to the ADVANCED FEATURES position. Use the ▲ and ▼ to
select Sensor Conguration and use the + button to enter.
SEN 1 & 2 - Clik-TypE SENSorS
SEN 1 - Clik-TypE
SEN 2 - Flow SENSor (HFS FCT100)
SEN 1 - Flow SENSor (HFS FCT100)
SEN 2 - Clik-TypE SENSor
SEN 1 & 2 - Flow SENSorS (HFS FCT100)
Congure a non-Hunter Flow Sensor
Custom 1, Custom 2, or Custom 3 can be selected to program a non-Hunter
ow sensor. Press the ► button when you have the Custom choice
selected. The controller will allow the ability to program the K-Factor and
Offset specied by the ow sensor manufacturer (please consult Hunter
for compatible ow sensors).
22
Page 25

ADVANCED FEATURES (CONTINUED)
Use the ▲ or ▼ buttons and the ◄ and ► buttons to navigate through
the Custom, K-Factor, and Offset screen. Once you navigate to a number,
it will ash. The number may be changed by pressing the + / – button to
either increase or decrease the value. Once you have completed entering
the K-Factor and Offset specied by the manufacturer of the ow sensor,
use the ▼ button to return to the main Sensor Conguration screen.
If an HFS sensor has been selected and programmed in the Sensor
Conguration screen, the main RUN screen will indicate a ashing ow rate
anytime a station is irrigating. If the station's ow has not been learned or the
station has not been enabled for ow monitoring, which will be discussed
in the Flow Operation and Manual Operation section, the screen will still
indicate a total ow of 0.0 GPM because the HFS has been selected.
• Expected Flow – the amount of ow expected for that station in
Gallons Per Minute (GPM )or Liters Per Minute (LPM)
• Overow – Can be set from 110% to 300% of Expected Flow. During
system operation, if the station ow exceeds the Overow limit, the
controller will shut the system down and begin diagnostic testing. For
example, if the expected ow is 20 GPM and the overow is set to
115%, the actual ow would need to exceed 15% (3 gallons) of the
expected ow. Therefore, the station would need to exceed 23 GPM
before the controller would go into overow alarm.
• Underow – Can be set from 10% to 100% of Expected Flow. During
system operation, if the actual station ow falls below the Underow
limit, the controller will shut the system down. For example, if the
expected ow is 20 GPM and the underow is set to 50%, the actual
ow would need to underow by 50% (10 gallons) of the expected
ow. Therefore, the station would need to ow at a minimum of 10
GPM before the controller would go into an underow alarm.
• Start Delay – Can be set from 5 seconds to 10 minutes. The Start
Delay prevents premature system shutdown due to erratic ow within
the mainline by providing a delay before the system shutdown occurs.
It allows the system to stabilize prior to shutting the system down
during Overow and Underow conditions.
After the station has been enabled, press the ▼ button to select any of
the features mentioned above. With the ► cursor pointing to the ow
characteristic, press the + / – button to increase or decrease the value until
the desired number is reached.
Flow Operation
The Flow Operation feature allows you to program ow monitoring
functions for each station. You can program the controller to either monitor
ow for a station or not monitor ow for a station.
1.
Turn the dial to the ADVANCED FEATURES position. Use the ▲ and
▼ to select Flow Operation and use the + button to enter.
2. Use the ◄ and ► buttons to navigate to the station you would like
to program.
3. The cursor will be displayed next to Monitored. Use the + / – button
to enable or disable ow monitoring for that station.
If ow monitoring is enabled (Yes), you will be given the ability to change
certain characteristics of each stations monitored ow. As soon as the
station is enabled the new screen will appear with the following selections:
If ow monitoring is enabled for a specic station, the factory preset
values will be displayed. The expected ow will be blank, because the
actual learning process has not taken place. The learning process will be
discussed in the Manual Operation, Learn Expected Flow section. Overow
will be 115%, underow will be 50%, and the preset Start Delay will be set
to 1 minute.
Flow Operation is necessary to program in order for the controller to know
which stations to monitor. Important additional steps that need to be taken
to complete the ow monitoring setup. A ow sensor needs to be assigned
in the Sensor Conguration screen, and the stations set to be monitored
need their ows to be learned. These steps are required in order for ow
monitoring to occur.
If a station has been enabled for ow monitoring, it is important to know
that the System Status Dashboard ow light will become active for that
station. If the other components to complete the ow monitoring process
have not been programmed, but the station’s ow has been enabled, the
System Status Flow light will light Green indicating a normal ow.
A detailed description of what happens in the case of an overow or
underow is discussed in the controller Diagnostics and Troubleshooting
section under System Status Dashboard, Flow. It is very important to read
and understand this description before ow monitoring occurs.
23
Page 26

ADVANCED FEATURES (CONTINUED)
Station Delay
This feature allows the user to insert a delay time between when one station
turns off and the next station turns on. This is very helpful on systems with
slow closing valves, or on pump systems that are operating near maximum
ow or have slow well recovery. Different time delays between stations can
be set according to each Program (from 1 second to 9 hours).
EXP: STATION DELAY FOR PROGRAM A 2 MINUTES
Turn the dial to the ADVANCED FEATURES position. Use the ▲ and ▼
buttons select Staion Delay and press the + button to enter the Station
Delay screen. While in the Station Delay screen press the + / – button
to increase or decrease the delay time between stations according to a
Program. Use the PRG button to change between Programs A, B, C, or D.
No Water Window
This feature provides the user the ability to disable automatic watering
during certain times of the day specic to a Program.
1. Turn the dial to the ADVANCED FEATURES position. Use the ▲ and
▼ to select No Water Window and use the + button to enter.
2. With the ► cursor next to Start, use the + / – button to set the start of
the No Water Window.
The program will continue to count down the run times associated with the
program. If the No Water Window expires and the program is still counting
down a run time, the controller will begin watering at that point in time.
Once the program nishes and the display returns to the current date and
time screen, a fault message will be displayed indicating irrigation has
violated the No Water Window and which program was in violation.
This message is displayed to make you aware that irrigation has been missed
or Suspended and supplemental watering may be necessary to make up the
missed irrigation that has occurred during the No Water Window. A manual
single station that is activated remotely or at the controller will override the
No Water Window and be allowed to water.
Firmware Info
This feature shows the revision of rmware loaded into the I-Core controller.
3. Use the ▼ button to select the End time.
4. With the ► cursor next to End, use the + or – button to set the end of
the No Water Window.
For example: if the No Water Window Start is set at 8:00 AM and the No Water
Window End is set at 5:00 PM, the controller will not irrigate during the period
of the day between 8:00 AM to 5:00 PM. Press the PRG button to change
Programs to set a different No Water Window period for each program.
If an automatic Program or Manual Program overlaps and runs into a No
Water Window period, the controller will Suspend the watering of the
Program being run.
24
Easy Retrieve™ Memory
The Easy Retrieve feature allows you to save your preferred watering
program and settings into memory for retrieval at a later time. This
feature allows for a quick way of resetting the controller to the original
programmed watering schedule if for some reason the programming was
tampered with.
Page 27

ADVANCED FEATURES (CONTINUED)
To save your watering program into memory:
1. Turn the dial to the ADVANCED FEATURES position. Use the ▲ and
▼ to select Easy Retrieve Memory and use the + button to enter.
2. Use the ▲ or ▼ buttons to place the ► cursor next to Save.
3. Press the + button once, then press and hold the + button to conrm
that you want to save the current programming as the Easy Retrieve
program. The display will ask you to please wait, and when the Easy
Retrieve program has successfully been saved the display will indicate
it is done.
To restore the saved program:
1. Use the ▲ or ▼ buttons to place the ► cursor next to Restore.
Total Watering Time
The Total Watering Time feature displays the total run time of all stations
in a particular Program. The total time shown is only a representation for
each Start Time within the Program and not an accumulation of all the Start
Times added together. The controller acknowledges which stations have a
run time associated with each program, and adds all the station’s run times
together to equal the total run time or watering duration for that Program.
Total Watering Time does not take into consideration any Cycle and Soak
and Station Delay times that will occur during irrigation.
1. Turn the dial to the ADVANCED FEATURES position. Use the ▲ and
▼ to select Total Watering Time and use the + button to enter.
2. The total watering time will be displayed for the current program
shown. Press the PRG button to display total watering time for other
programs.
Erase All
The Erase All feature will erase all of the controller’s memory and set
everything back to factory presets. Once you perform an Erase All,
all programming will be erased, including the Easy Retrieve saved
programming. Erase All is usually performed when you would like to
reprogram the controller from the beginning.
2. Press the + button once, then press and hold the + button to conrm
that you want to retrieve the restored Easy Retrieve programming. The
display will ask you to please wait, and when the Easy Retrieve program
has successfully been restored, the display will indicate it is done.
If you erase the controller’s memory by using the Erase All feature found in
Advanced Features, which will be discussed in a few sections, the controller
will revert back to factory presets, and you will NOT be able to retrieve the
Easy Retrieved saved programming. The Easy Retrieve program that was
saved will be overwritten and lost.
1. Turn the dial to the ADVANCED FEATURES position. Use the ▲ and
▼ to select Erase All and use the + button to enter.
2. Press and hold the + button to erase all memory from the controller.
The display will briey inform you to please wait and then indicate when
the reset is done.
25
Page 28

ADVANCED FEATURES (CONTINUED)
LCD Adjust
The LCD Adjust feature allows you to increase or decrease the contrast of
the display. This is helpful to make the display more visible in varying light
conditions. You may adjust the contrast of the screen until you are able to
read it effectively.
1. Turn the dial to the ADVANCED FEATURES position. Use the ▲ and
▼ buttons to select LCD Adjust and use the + button to enter.
2. Press the + button to increase the contrast or press the – button to
decrease the contrast until your desired contrast level is achieved.
Flow Totalizer
The Flow Totalizer feature provides a running total of all the gallons or liters
of water used. This is an accumulation of automatic programs, manuals,
remote starts, and any other water that triggers the ow meter, including
leaks in the system. Within the Flow Totalizer screen, you will be given two
start points or references from which the ow calculations will be recorded.
These reference points will be indicated as point A and point B. You may
reset either reference point at any time. This is helpful if you would like
to keep track of the gallons for the year and also for the month. At the
beginning of the year you may reset point A, and the controller will start
recording from that point in time. At the end of each month, record the
total gallons used for point B and simply reset the reference point on B to
start recording the gallons for a new month.
Turn the dial to the ADVANCED FEATURES position. Use the ▲ and ▼
buttons to select Flow Totalizer and use the + button to enter.
The ► cursor will be pointing to A when you initialize the Flow Totalizing
screen. It will show the date of when the point of reference was started and
also the running total of the gallons of water.
Use the ▼ button to select point B. The ► cursor will be displayed next to
point B. To reset reference point B, press and hold the + button, the date
will change to the current date and the gallons will be set back to 0.
NOTE: The Flow Totalizer feature will not be reset if an
Erase All is performed. This ensures that the ow data
will not be lost during a reset of the controller.
Solar Sync Delay
I-Core with built in Solar Sync has the ability to delay the automatic, daily
update of the seasonal adjustment value from Solar Sync for up to 99 days.
This option may be an advantage to users who do not want the program
run times to be adjusted by Solar Sync until after a set seeding or over
watering period. The Solar Sync Delay function allows the controller to
operate with a manually set seasonal adjustment value during the delay
period so that programs assigned to the Solar Sync Seasonal Adjustment
(see Seasonal Adjustment setting on pg. 17) will use this seasonal
adjustment value until the delay period is over. Once the delay period is
over, the programs assigned to Solar Sync will be adjusted based on the
daily update from the Solar Sync weather data.
1. Turn the dial to the ADVANCED FEATURES dial position.
2. Use the ▲ and ▼ buttons to scroll to the Solar Sync Delay position.
Press the + button to enter.
3. Use the + and – buttons to set number of days of delay. The default
setting is 0 (no delay)
4. Use the ▲ and ▼ buttons to scroll to the Seasonal Adjust During
Delay position. Use the + and – buttons to modify the Seasonal Adjust
during delay (if desired) from the default setting
of 100%.
If you would like to reset this reference point, press and hold the + button
while the ► cursor is pointing to A. The date will change to the current
date, and the gallons will be set back to 0.
26
Page 29

PROGRAMMING SOLAR SYNC SETTINGS
The table will assist you in identifying the type of region you live
in. There are four basic ET regions, each with descriptions of the
region, along with typical ET and temperature characteristics. It is
recommended that, if possible, the region be chosen based upon
average July ET or peak summer ET (inches/mm per day).
Use the following table for choosing your region (reference below).
You can use
your area:
A:
Based upon the ET of your region using the
peak summer ET (inches/mm per day). This is the preferred option
when selecting your region.
B:
Based upon the temperature for your region using the
July or the driest month high temperature (not the highest
temperature for July).
C:
Based upon the general description of your region.
Programming Region & +/– Water Adjustment Setting
After the Solar Sync sensor is connected and assigned to the controller,
the Region setting will need to be programmed.
1. Turn the dial to the SOLAR SYNC SETTINGS position. The number
on the left of the screen is the Region setting, and the number on the
right is the +/– Water Adjustment settings.
A, B
or C to help you choose which region is best for
average
July ET or
average
2. Set the Region (1, 2, 3, or 4) by using the + or – buttons. For accurate
Solar Sync measurements, the Region needs to be programmed for the
typical peak ET for your area. Use the table to determine your Region.
(see the Solar Sync owner’s manual for more details on Region)
3. Set the +/– Water Adjustment by using the ► button to move to
the number on the right side of the screen. Use the + or – button to
set the value any number between 1–10. The default setting is 5. It
is recommended to leave the +/– Water Adjustment setting at the
default 5 setting after install. Adjustments to this value can be made to
alter the Solar Sync seasonal adjustment value if more/less is desired.
(see the Solar Sync owner’s manual for more details on using the
+/– Water Adjustment)
IF ANY OF THE CHOICES IN THE ROWS APPLY TO YOUR SITUATION, THEN THAT IS YOUR REGION SETTING CHOICE.
A B C
Region
1
Region
2
Region
3
Region
4
* For Southern hemisphere locations, use the month of January.
If the average July ET is
< 0.17” (4.3 mm) per day
If the average July ET is 0.18” – 0.23”
(4.6 mm – 5.8 mm) per day
If the average July ET is 0.24” – 0.29”
(6.1 mm – 7.4 mm) per day
If the average July ET is > 0.30”
(7.6 mm) per day
If the average temperature for July is
65°– 75°
If the average temperature for July is
75° – 85°
If the average temperature for July is
85° – 95°
If the average temperature for July is
95° – 105°
(18°C – 24°C)
(24°C – 29°C)
(29°C – 35°C)
(35°C – 41°C)
• U.S. Northern States
• Coastal Regions
• Mountains
• U.S. Northern Inland States
• U.S. Southern States
• Inland/High Desert
• Deserts
27
Page 30

PROGRAMMING SOLAR SYNC SETTINGS (CONTINUED)
Clearing ET memory
1. Once the Solar Sync Sensor is installed the controller will begin
collecting ET data. This ET data can be erased/cleared if desired.
2. Turn the dial to the SOLAR SYNC SETTINGS dial position.
3. Use the ▲ and ▼ buttons until the cursor is at Clear ET History.
4. Press the + button to. The following will be shown on the display, clear
ET History and Press + to conrm.
5. Press and hold the + button to clear the ET history saved in the controller.
Check Sensor
This will allow the user to perform a communications check with the Solar
Sync Sensor.
1. Turn the dial to the SOLAR SYNC SETTINGS dial position.
2. Use the ▲ or ▼ buttons until the cursor is at Check Sensor.
3. Press the + button. The controller will perform the communications
check with the Sensor and show one of the following responses:
a. Upgrade power module – the controller is using a power module
that is not compatible with the built-in Solar Sync. Replace the
Power module with one that is version 2.1 or later.
b. Sensor OK – Solar Sync Sensor has been installed and is
operating correctly
c. Sensor failed – Solar Sync Sensor is not installed, not enabled,
or is not operating correctly.
Programming Solar Sync Delay
I-Core with built in Solar Sync has the ability to delay the automatic, daily
update of the seasonal adjustment value from Solar Sync for up to 99 days.
This option may be an advantage to users who do not want the program
run times to be adjusted by Solar Sync until after a set seeding or over
watering period. The Solar Sync Delay function allows the controller to
operate with a manually set seasonal adjustment value during the delay
period so that programs assigned to the Solar Sync Seasonal Adjustment
(See Set Seasonal Adjustment on page 17) will use this seasonal
adjustment value until the delay period is over. Once the delay period is
over, the programs assigned to Solar Sync will be adjusted based on the
daily update from the Solar Sync weather data.
1. Turn the dial to the ADVANCED FEATURES dial position.
2. Use the ▲ and ▼ buttons to scroll to the Solar Sync Delay position.
Press the + button to enter.
3. Use the + and – buttons to set number of days of delay. The default
setting is 0 (no delay)
4. Use the ▲ and ▼ buttons to scroll to the Seasonal Adjust During
Delay position. Use the + and – buttons to modify the Seasonal Adjust
during delay (if desired) from the default setting
of 100%.
NOTE: The Solar Sync Sensor must be enabled for this
function to work. If the Solar Sync Sensor has not been
enabled, “Sensor Failed” will show on the display. To
enable the Solar Sync Sensor, follow instructions in
section “Sensor Conguration” for Solar Sync.
Assigning Solar Sync to programs
Once Solar Sync is installed it must be assigned to a program in order for
that program’s run times to be modied using the Solar Sync seasonal
adjustment value. Even if no programs are assigned to Solar Sync seasonal
adjustment, the controller will continue to collect the Solar Sync ET data.
(See Set Seasonal Adjustment section under Solar Sync Adjust for details.)
28
Page 31

HIDDEN FEATURES
Programmable Rain Off
The Programmable Rain Off allows the user to set period of time in which
the controller will be turned off, after which the system will automatically
return to automatic irrigation. This is useful for halting irrigation when
weather fronts or conditions are expected to persist for several days.
To set a Programmable Rain Off duration:
1. Turn the dial to the OFF position.
2. While the controller is in the SYSTEM OFF dial position, press the
+ / – button. The controller will immediately go into the Remaining
Days mode. Continue using the + / – button until you reach the
desired number of days you want the irrigation to be off before
automatic irrigation will resume. You may select a Programmable Rain
Off from 1 to 180 days.
The stations run time will be ashing. Use the ◄ or ► buttons to select the
station within the program you would like the manual to begin with, and
use the + / – button to select a different run time for the particular station
number you have on the screen. Any stations following the rst station
activated will run for their automatic programmed run times.
After no more buttons are pressed, the controller will automatically begin
watering. After the manual program begins, you may also use the ► button
to scroll to a particular station or advance to a station more quickly.
Test Program Operation
The I-Core has a quick test program that will run all stations for a selectable
period of time, in numerical order. The test is an easy way to walk
through every station in the system to verify proper operation, or perform
diagnostics. It also features a quick advance for stepping through stations
with the ◄ or ► button.
1. With the dial in the RUN position, press and hold the PRG button for
approximately three seconds.
2. The Test Program screen will appear with Station 1 and a ashing run
time of 0:00.
3. Turn the dial back to the RUN position. The display at the RUN
position will then show the number of days for the Programmable
Off setting. This will count down each day at midnight, showing the
remaining days until automatic irrigation will resume.
Remote commands will act the same in the Programmable Rain Off setting,
as they do in the SYSTEM OFF dial position. Manual single station and
manual program remote commands will activate the controller and run.
As soon as you turn the dial back to the SYSTEM OFF position the
Programmable Rain Off will be erased, and you will have to reprogram
the Remaining Days. It is important to leave the dial in the Run position to
maintain the Programmable Rain Off setting.
One Touch Manual Start and Advance
This feature allows the user to start a manual program, similar to activating
a Manual Program at the MANUAL OPERATION dial position, but without
having to turn the dial. It will activate all the stations within the Program for
the given programmed run time they were assigned.
With the dial in the RUN position, press and hold the ► button.
The controller will default to Program A. You can select Program B, C, or D
by pressing the PRG button.
3. Use the + button to increase the ashing test run time from 1 minute
to 15 minutes. Each station will run for this selected run time.
4. Press the ► button to select which station the Test program will
begin with.
5. The Test program will begin running in 3 seconds if no further buttons
are pressed.
6. Once the Test program is running, the stations can be advanced or
reversed without waiting for the run times to complete. Press the ►
button to step up one station immediately. Press the ◄ button to back
up one station and this will restart the previous station with a new Test
run time.
Complete Flow Monitoring Procedure
This is a complete step by step procedure to set up and initialize ow
monitoring for the I-Core controller. There are multiple programming
steps that need to be completed in order for the monitoring of station’s
ows to occur. It is important to complete all of the steps for accurate ow
monitoring.
1. Before any ow programming takes place, you must have
programmed automatic station run times under Set Station Run
times for the stations you would like to learn ow. The learning
process will not occur until station run times are programmed, as the
controller does not recognize the station until it has a programmed
runtime.
2. Turn the dial to ADVANCED FEATURES. Use the ▼ button to move
the ► cursor next to Sensor Conguration, press the + button.
3. Use the + / – button until the correct HFS FCT size is displayed. A list
of sizes and descriptions can be found in the Set Conguration section
in Advanced Features. Enter the HFS FCT size for SEN1 or SEN2
according to which sensor terminals you have the ow sensor wired. If
you are installing two ow sensors, both SEN1 and SEN2 will have to be
programmed for each ow sensor.
29
Page 32

HIDDEN FEATURES (CONTINUED)
4. For non-Hunter ow sensors, Custom 1, Custom 2, or Custom 3 (Metal
Version I-Core) can be selected as a ow sensor type. With custom
selected, press the ► button to program the K-Factor and Offset that is
specic to that sensor, specied by the ow sensor manufacturer.
5. Use the ▲or ▼ buttons and the ◄ or ► buttons to navigate through
the Custom, K-Factor, and Offset screen. Once you navigate to a
particular number and it starts ashing, the number may be changed,
press the + / – button to either increase or decrease the value. Once
you have completed entering the K-Factor and Offset specied by
the manufacturer of the ow sensor, use the ▼ button to return to the
main Sensor Conguration screen.
6. Use the ◄ button to return to the Advanced Features main screen, or
move the dial from ADVANCED FEATURES and simply return the dial
back to Advanced Features. Use the ▼ button to move the ► cursor
next to Flow Operation, press the + button.
7. The display will show Station 1 Flow Monitored and a ashing NO.
A selection of NO will indicate that this station’s ow will NOT be
monitored. Press the + button, and the value will change to YES.
This selection will allow for this station’s ow to be monitored. If ow
monitoring is enabled (Yes), a new screen will appear with important
characteristics of each stations monitored ow. Use the ◄ or ►
buttons to scroll through the station numbers and assign YES or NO
for the stations ow monitoring.
The Learn Expected Flow display will also indicate if there is a problem with
any programming. If station run times were not programmed in the Set
Station Run Times screen, the controller will display No Runtime in the
Learn Expected Flow screen.
If no stations were set to have their ows monitored in the Flow Operation
section of Advanced Features, the controller will display No Flow Station as
well as No Runtime in the Learn Expected Flow screen.
If no HFS FCT size was programmed in the Sensor Conguration section of
Advanced Features, the controller will display No Flow Sensor in the Learn
Expected Flow screen.
8. Turn the dial to MANUAL OPERATION. Use the ▼ button to move
the ► cursor next to Learn Expected Flow, press the + button.
9. If you would like to learn the ow for All Stations, simply turn the
dial to RUN. The controller will learn all the stations that have been
programmed for their ows to be monitored, and have programmed
run times. The learning process will actually activate each station
automatically, operating each station approximately one minute
to learn the ow rate. Once all the stations have been learned,
the controller will return to its automatic programming and ow
monitoring will be active.
30
Once ow monitoring has been established, the rules that apply to an
overow or underow condition are very important to understand. There
is a diagnostic testing procedure the controller will activate to determine
if there is an overow or underow condition. A complete description of
the process is explained in the Controller Diagnostics and Troubleshooting
section under System Status Dashboard, Flow. It is important to read this
section in order to understand the ow monitoring process.
Page 33

CONTROLLER DIAGNOSTICS AND TROUBLESHOOTING
System Status Dashboard
The System Status Dashboard is a quick reference indicator that uses LED
lights to provide system status information regarding sensor status, valve
operation, and ow monitoring.
Sensor Status
The Sensor System Status lights indicate if a sensor is Inactivate (closed
state) or Active (open state). If the controller senses on either the SEN1
or SEN2 terminals an Active condition, a RED light will be displayed. A
message will also be displayed indicating which sensor is Active.
If a station has been programmed to acknowledge the sensor in the
SET SENSOR OPERATION dial position, the controller will suspend the
watering of those stations.
Station Status
The Station System Status light monitors and indicates whether a station
is operating normally or if an overcurrent condition for a particular station
has occurred. The overcurrent condition indicates that either too many
solenoids are connected or the eld wiring or solenoid has a problem,
causing an unacceptably high level of current.
Any time a station is activated and is operating satisfactorily the Station
Status Light will be GREEN. If the controller senses an overcurrent for a
particular station, the Station Status Light will begin to ash RED. If you
observe the Station Status Light ashing RED, the display will provide a
fault message.
The number displayed next to the word Fault is the actual station number
that the overcurrent condition occurred. Simply press the – button to
dismiss the Fault message, and reset the Station Status light. Further
troubleshooting will be required to correct the issue causing the station
fault(s).
Flow Status
The Flow System Status light identies whether a station has an acceptable
ow or whether overow condition is occurring. A station’s ow monitoring
MUST be set to YES in the Flow Operation section of Advanced Features
before the Flow System Status light will acknowledge acceptable ow
of the station. Once this has been established, the Sensor light will light
GREEN for an acceptable ow, or a ashing RED for an overow or
underow condition.
If the I-Core senses an overow or underow condition after the Start Delay
has elapsed, the Sensor Status Light will turn solid RED, and the controller
will go into diagnostic testing to determine if the station has an overow or
underow condition.
If the controller senses closed circuits across the sensor terminals, the
Sensor status light will be GREEN, indicating an Inactive sensor. All
programmable watering schedules will proceed as normal.
If no sensors are connected to the controller, as long as the jumper wires
remain connected to their respective sensor terminals, the Sensor Status
light will always be green.
If the Rain Sensor Bypass switch is moved to the Bypass position, the
controller will no longer light up the Sensor Status Dashboard light. Any
Clik type sensor that is connected to the controller will be ignored, and
watering will resume as normal.
The controller will shut down the station and put it into pause mode for
approximately one minute to allow for erratic ow to settle.
31
Page 34

CONTROLLER DIAGNOSTICS AND TROUBLESHOOTING (CONTINUED)
Once a minute has passed, the controller will again activate the station (the
display will still indicate that it is Isolating the Flow Alarm). After the Start
Up delay has elapsed, if the station ow resembles the learned ow, the
controller will continue to run the station for the given programmed run
time, and the Sensor Status Light will change to GREEN. If the station ow
does not correct itself and an overow or underow condition persists after
running the station for a second time for the programmed Start Delay, the
controller will shutdown the station and the station will not restart. The Flow
Status light will then ash RED, and the controller will display an overow
message and indicate which station number.
If a ow sensor is selected, stations are set to be monitored, and their ow
has been learned, the controller will light the Flow Status light GREEN
anytime an acceptable ow is monitored. A ashing RED light indicates an
unacceptable ow is occurring.
The I-Core can activate stations simultaneously. After the Start Delay
elapses for the ow monitored station, if the controller detects overow,
it will initiate a diagnostic testing procedure. The display will read
Isolating Flow Alarm, Please Wait...
The I-Core will shut down all stations for one minute and allow the water
to settle in the irrigation lines. After the one minute passes the controller
will reactivate a station whose ow is being monitored for the programmed
Start Delay time. The controller will acknowledge the ow and determine
if it is acceptable or not. If the ow is acceptable for the monitored station,
the controller will again activate the station whose ow is NOT monitored
after the Start Delay has elapsed. Once this second station whose ow is
NOT monitored activates, the controller will again sense an overow and
begin the diagnostic testing again. This will be a repeating process until the
station run time’s elapse or do not coincide with each other due to different
run times.
If during the diagnostic testing the controller determines that the station’s
ow, which should be monitored, is in an overow or underow condition,
the controller will shut down the station and not allow it to restart.
The station, whose ow is NOT monitored, will continue to run for its
programmed run time.
Stations that are set to NOT monitored will be displayed by the Flow
Status Light differently. A station set to be NOT monitored will NOT
activate the Flow Status light and turn it GREEN when the station starts
running. However, after ve minutes of the station running, the controller
will acknowledge that there is ow, and the Flow Status light will light solid
RED, indicating an unscheduled ow.
A station not monitored will not be shut down. The controller will detect
the ow and determine it as a unscheduled ow.
NOTE: The I-Core controller has the ability to run two
programs at the same time, which may allow for the
possibility of one station to run whose ow is set to be
monitored and a second station to run concurrently
whose ow is set to be NOT monitored. In the rare
instance that this occurs, the controller will not be able
to differentiate which stations ow the sensor should be
monitoring, and will cause the controller to detect an
overow condition.
32
Page 35

HUNTER QUICK CHECK
The Hunter Quick Check is an efcient and effective way to diagnose
problems in the eld. Instead of having to physically check each eld wiring
circuit for potential problems, the user can run the Hunter Quick Check
circuit test procedure. This circuit diagnostic procedure is very benecial to
quickly identify “shorts” commonly caused by faulty solenoids or when a
bare common wire touches a bare station control wire.
To initiate Hunter Quick Check: With the dial in the RUN position,
press and hold the +, –, ◄ or ► buttons for approximately two seconds
and then release.
After a few seconds, the display will show a number 1. Press the + button.
The screen will initially show a number 20 and within one second,
the Hunter Quick check will begin.
™
The controller will begin searching all stations in an effort to detect a high
current path through the station terminals. If a eld wiring short is detected
on a station, the controller will display a fault message for each faulty
station.
33
Page 36

TROUBLESHOOTING
Problem Causes Solutions
No display. Check AC power to controller.
14-Pin connector is not fully connected.
Module locking bar is in the Power Off
position.
The display reads NO A/C Power. No AC power present to operate
controller/valves.
Fix power supply.
Connect ribbon cable on back of facepack door.
Slide the module locking bar into the Power On position.
Check to see if the transformer is properly installed or power is
coming out of it.
Display reads Fault
(OVERFLOW OR UNDERFLOW).
Possible station short.
Display reads sensor is active. The rain sensor is interrupting
Station does not irrigate. Field wiring or solenoid problem. Perform Manual Single–Station start and observe display and
The controller does not irrigate
automatically.
Overow/Underow alarm has
occurred.
irrigation or not installed.
Possible programming errors.
Sensor shutdown.
Programmable Off in effect.
Time/Date errors.
Check system for problems.
Check solenoid and eld wiring.
Slide the Rain Sensor switch on front panel to the bypass position
to bypass rain sensor.
Check to make sure the jumper wire is connecting the sensor
terminals if no rain sensor is being used.
Station Status light.
If Station Status light is RED, check solenoid and led wiring,
including COM wires. Station outputs must not exceed 0.56A Max.
Verify all programs Days to water, start Times, and Station Run Times.
Check display for fault indication.
Check display for OFF days.
Verify controller time and date, including AM/PM/24 settings.
34
Page 37

TROUBLESHOOTING
Problem Causes Solutions
Rain or other Clik sensor does not shut
down system.
Incorrect sensor type or connection
(Jumper installed).
Incorrect sensor settings for stations.
Use one normally-closed Clik-type sensor per sensor ports.
Verify that one wire from each sensor is to each SEN1 or SEN2
terminals. Remove Jumper wire.
Turn dial to SET SENSOR OPERATION and verify correct
response for each station to the sensor.
The controller repeats a program or
continuously waters even when it should not
be on / controller cycles over and over.
Controller does not recognize output module
(station size shown is incorrect).
Solar Sync Adjusting too low Solar Sync Setting need to be adjusted Make sure controller dial is in the RUN position. Increase the
Solar Sync Adjusting too high Solar Sync Setting need to be adjusted Make sure controller dial is in the RUN position. Decrease the
Too many start times
(user programming error).
Module seated incorrectly.
Module slot skipped.
Station output module overloaded.
Only one start time per active Program is required.
Refer to “Set Program Start Time” instructions.
Verify that modules are seated all the way back in the wiring
compartment and module lock is ON.
Verify that no module slots have been skipped from left to right.
Swap with known good module in the same position. If new
module works in the position, replace the old module. If new
known good module also fails to be recognized, check gold
contacts for dirt, corrosion, or pests.
value on the Water Adjustment scale (10 is max). Once the setting
is changed, the controller will immediately be updated with the
new Seasonal Adjust %. Increase the Water Adjustment setting
until the desired Seasonal Adjust % is shown.
Water Adjustment scale at 10 and still require more Seasonal
Adjust, move down to the next lower Region (from Region 4 to 3,
for example)
value on the Water Adjustment scale (default setting is 5). Once
the setting is changed, the controller will immediately be updated
with the new Seasonal Adjust %. Decrease the Water Adjustment
setting until the desired Seasonal Adjust % is shown.
minimize the Water Adjustment scale down to 1 and still require
a reduction in Seasonal Adjust, move up the next Region (from
Region 2 to 3, for example)
.
.
If you max out the
If you
35
Page 38

I-CORE: INSTITUTIONAL/COMMERCIAL CONTROLLER
(IC-600PL & IC601PL) – PLASTIC CABINET
Item Description Catalog No.
Front Panel 124705
1
Knob 129300
2
Rear Cabinet 117805
3
Door Without Lock, Plastic I-Core 131305
4
Lock & Key Set 387300
5
Key Set (2) 122516
6
6-Station Expansion Module ICM600
7
48 Station DUAL Module DUAL48M
8
Transformer 154628
9
Junction Box 123800
10
Junction Box Cover 124000
11
Smart Port Wiring Harness
12
25' Shielded Cable
SRR-SCWH
Power Module 121405
Ribbon Cable, Plastic I-Core 130800
I-Core Mounting Template LIT-548
Hanging Door Card English LIT-506
Owners Manual English LIT-502
Spanish INT-895
International Kit
(Includes Owners
Manual)
French INT-894
Italian INT-896
German INT-898
Portuguese INT-897
1
RAIN SENSOR
ACTIVE BYPASS
SYSTEM OFF
MANUAL OPERATION
SETTINGS
ADVANCED FEATURES
SET SENSOR OPERATION
CYCLE AND SOAK
SET CURRENT DATE / TIME
SET PROGRAM START TIMES
SET STATION RUN TIMES
SET DAYS TO WATER
SET SEASONAL ADJUSTMENT
SET PUMP OPERATION
2
3
4
6
5
36
7
8
9
10
11
12
Page 39

I-CORE: INSTITUTIONAL/COMMERCIAL CONTROLLER
(IC-800M & IC-800SS) – METAL CABINET
Item Description Catalog No.
1
Front Panel 124705
2
Knob 129300
Door Without Lock, Metal I-Core 125500
3
4
Lock & Key set 387300
5
Key Set (2) 122516
6
Rear Cabinet 118700
6 Station Expansion Module ICM600
7
48 Station DUAL Module DUAL48M
8
Transformer 154628
9
Junction Box 123800
10
Junction Box Cover 124000
11
Smart Port Wiring Harness
12
25' Shielded Cable
SRR-SCWH
Power Module 121405
Ribbon Cable, Metal/Stainless I-Core 130810
I-Core Mounting Template LIT-548
Hanging Door Card English LIT-506
Owners Manual English LIT-502
Spanish INT-895
International Kit
(Includes Owners
Manual)
French INT-894
Italian INT-896
German INT-898
Portuguese INT-897
6
3
1
RAIN SENSOR
ACTIVE BYPASS
SYSTEM OFF
MANUAL OPERATION
SETTINGS
ADVANCED FEATURES
SET SENSOR OPERATION
CYCLE AND SOAK
SET CURRENT DATE / TIME
SET DAYS TO WATER
SET SEASONAL ADJUSTMENT
SET PUMP OPERATION
SET PROGRAM START TIMES
SET STATION RUN TIMES
2
4
5
7
8
9
10
12
11
37
Page 40

3
2
4
I-CORE PLASTIC PEDESTAL
Item Description Catalog No.
1
I-Core Front Panel 12475
2
Lid 552200
Hinge Pin 558400
3
4
Access Door 553200
5
6
7
8
9
10
Lock & Key Set 558800
Key Set (2) 122516
SmartPort Bracket 576000
Mounting Template 558600
Mounting Hardware 420200
Smart Port Wiring Harness
25' Shielded Cable
SRR-SCWH
Ribbon Cable - Plastic Ped I-Core 130815
Mounting Kit 581700
Owners Manual English LIT-502
Spanish INT-895
International Kit
(Includes Owners
Manual)
French INT-894
Italian INT-896
German INT-898
Portuguese INT-897
10
5
6
7
8
9
38
Page 41

SPECIFICATIONS
Operating Specications
• Station Run Time: 1 minute to 12 hours (in 1-minute increments) on programs A, B, C, D.
• Start Times: 8 per day, per program (A, B, C), 16 per day (D), for up to 40 daily starts.
• Watering Schedule: 7-day calendar, interval watering up to a 31-day interval or true odd or even day programming, made possible by the 365-day
clock/calendar.
Electrical Specications
• Transformer Input: 120 VAC, 60Hz (230 VAC, 50/60 Hz International Use)
• Transformer Output: 25 VAC, 1.5 amp
• Station Output: 24VAC, 0.56 amps per station
• Maximum Output: 24VAC, 1.4 amps (includes Master Valve Circuit)
• Battery Backup: 9-volt alkaline battery (not included) used only for time keeping during power outages, the nonvolatile memory maintains program
information.
Dimensions
• Plastic Cabinet
Height: 11" (28 cm)
Width: 12" (30.5 cm)
Depth: 3¾" (9.5 cm)
• Metal/Stainless Cabinet
Height: 15¾" (40 cm)
Width: 11
Depth: 4½" (11.4 cm)
• Plastic Pedestal
Height: 38" (96 cm)
Width: 20 ½" (52 cm)
Depth: 15" (38 cm)
3
/8" (29 cm)
Default Settings
All stations are set to zero run time. This controller has a non-volatile memory that retains all entered program data even during power outages, without
need for a battery.
FCC NOTICE
This controller generates radio frequency energy and may cause interference to radio and television reception. It has been type tested and found to comply
with the limits for a Class B computing device in accordance with the specications in Subpart J of Part 15 of FCC Rules, which are designed to provide
reasonable protection against such interference in a residential installation. However, there is no guarantee that interference will not occur in a particular
installation. If this equipment does cause interference to radio or television reception, which can be determined by turning the equipment off and on, the
user is encouraged to try to correct the interference by one or more of the following measures:
• Reorient the receiving antenna.
• Move the controller away from the receiver.
• Plug the controller into a different outlet so that controller and receiver are on different branch circuits.
If necessary, the user should consult the dealer or an experienced radio/television technician for additional suggestions. The user may nd the following
booklet prepared by the Federal Communications Commission helpful: “How to Identify and Resolve Radio-TV Interference Problems.” This booklet is
available from the U.S. Government Printing Ofce, Washington, D.C., Stock No. 004-000-00345-4 (price – $2.00 postpaid).
39
Page 42

NOTES
___________________________________________________________________________________________________________________________________________
___________________________________________________________________________________________________________________________________________
___________________________________________________________________________________________________________________________________________
___________________________________________________________________________________________________________________________________________
___________________________________________________________________________________________________________________________________________
___________________________________________________________________________________________________________________________________________
___________________________________________________________________________________________________________________________________________
___________________________________________________________________________________________________________________________________________
___________________________________________________________________________________________________________________________________________
___________________________________________________________________________________________________________________________________________
___________________________________________________________________________________________________________________________________________
___________________________________________________________________________________________________________________________________________
___________________________________________________________________________________________________________________________________________
___________________________________________________________________________________________________________________________________________
___________________________________________________________________________________________________________________________________________
___________________________________________________________________________________________________________________________________________
___________________________________________________________________________________________________________________________________________
___________________________________________________________________________________________________________________________________________
___________________________________________________________________________________________________________________________________________
___________________________________________________________________________________________________________________________________________
___________________________________________________________________________________________________________________________________________
___________________________________________________________________________________________________________________________________________
___________________________________________________________________________________________________________________________________________
___________________________________________________________________________________________________________________________________________
___________________________________________________________________________________________________________________________________________
___________________________________________________________________________________________________________________________________________
___________________________________________________________________________________________________________________________________________
___________________________________________________________________________________________________________________________________________
___________________________________________________________________________________________________________________________________________
___________________________________________________________________________________________________________________________________________
___________________________________________________________________________________________________________________________________________
___________________________________________________________________________________________________________________________________________
___________________________________________________________________________________________________________________________________________
___________________________________________________________________________________________________________________________________________
___________________________________________________________________________________________________________________________________________
___________________________________________________________________________________________________________________________________________
40
Page 43

41
Page 44

Hunter Industries Incorporated • The Irrigation Innovators
© 2011 Hunter Industries Incorporated
1940 Diamond Street • San Marcos, California 92078 USA LIT-502 A 3/11
www.hunterindustries.com
 Loading...