

Hunter 43057 Owner's Manual

HEAT PUMP
DIGITAL THERMOSTAT
Wire Labeling
• CAUTION! TURN OFF POWER TO THE HEAT
PUMP SYSTEM BEFORE YOU ATTEMPT TO
ACCESS THE THERMOSTAT’S WIRING.
• IMPORTANT! BEFORE DISCONNECTING ANY
WIRES FROM THE EXISTING THERMOSTAT,
APPLY THE PROVIDED SELF-ADHESIVE LABELS
TO THE WIRES.
• Use the information in Table 1 below and the
provided adhesive labels to label the wires. IGNORE
THE COLOR OF THE WIRES since these do not
always comply with the standard.
Connect Wires and Mount Thermostat to
Wallplate
• Match and connect the labeled wires to the
appropriate coded terminal screws on the wallplate.
See Figure 4. Ignore any wires which may be present,
but which were not connected to the old thermostat.
R, V-VR, or VR-R R
Model 43057 Owners Instructions
Y, Y1, or M Y1
Y2 Y2
W1, W2, or W-U W2
IMPORTANT INFORMATION
1.This thermostat is designed to work on the following systems:
• Single-Stage Heat Pump
• Multi-stage Heat Pump (up to 2 heating and 2
cooling)
E E
G or F G
O or R O
B B
L or X L
C, X, or B C (Required)
2.Temperature Range This thermostat can be set be-
tween 45°F and 95°F (7°C and 35°C). However, it will
display room temperatures from 30°F to 99°F (0°C and
37°C). “HI” will be displayed if the temperature is higher
than 99°F (37°C), and “LO” will be displayed if the temperature is lower than 30°F (0°C).This thermostat will
automatically cut off in Heat mode if the temperature
rises above 95°F (35°C), and automatically cut off in
Cool mode if the temperature drops below 40°F (4°C).
3.Compressor Protection This thermostat provides a
3.5 minute delay after shutting off the cooling system
before it can be restarted. This feature will prevent
damage to your compressor caused by rapid cycling.
It does not prevent a rapid compressor restart due to
short power outages.
INSTALLATION
What You Need
This thermostat includes two #8 slotted screws and two
wall anchors for mounting. To install your thermostat,
you should have the following tools and materials.
• Slotted screwdriver(s)
• Small Philips screwdriver
• Hammer
• Electric drill and 3/16” bit
If the terminal letter
on the existing
thermostat is. . .
. . .then mark the
wire with adhesive
label
Table 1
• After labeling the wires, disconnect them from the
existing thermostat terminals.
• Remove existing wallplate. To make sure wires do
not fall back into wall opening, you may want to
secure them to the wall.
• If the hole in wall is larger than necessary for wires,
seal the hole with insulating material so that no hot or
cold air can enter the back of the thermostat from the
wall. This air could cause a false thermostat reading.
• A wiring diagram is included in the Wiring Diagram
section at the end of these instructions.
Mount Wallplate
• Remove the wallplate from the thermostat by pressing
the release tab on the bottom of the thermostat. See
Figure 2.
Terminal Screws
Figure 4
• Be sure to tighten the terminal screws securely, as
a loose wire could cause operational problems with
your system or thermostat.
• Push excess wire back into the hole to prevent
interference when installing the thermostat to the
wallplate.
• Set the System Switch to “off”, and the Fan Switch to
“auto”.
• On the back of the thermostat are the System Set-Up
Switches. See Figure 5. If the heat pump system has
an electric auxiliary system, then slide the #1 switch
to HE position. If the heat pump system has a gas
auxiliary system, then slide #1 switch to the HG
position.
To set up the LCD display to show the temperature
in Fahrenheit, slide the #2 switch to the F position.
To set up the LCD display to show the temperature in
Celsius, then slide the #2 switch to the C position.
System Set-Up
Switches
Remove Old Thermostat
CAUTION! Turn off the power to the heat pump
system at the main power panel or at the heat
pump system.
IMPORTANT: Do not remove any wiring from the existing thermostat before reading these instructions
carefully. Wires must be labeled prior to removal.
Remove existing thermostat cover and thermostat. See
Figure 1. Some thermostats will have screws or other
locking devices that must rst be removed. Once the
wall mounting plate is exposed, look for wires.
If wires are not visible, they may be connected to the
back of the wallplate. Again, look for screws, tabs, etc.
Some models have doors that open to expose wires
and mounting screws. See Figure 1.
Figure 1
Release Tab
Figure 2
• Position wallplate on wall and pull existing wires
through the large opening, then level for appearance.
If the existing mounting holes from the old wallplate
line up with the slots in the new wallplate, then use
the exisitng holes. If the exisitng holes do not line up
with the slots in your new wallplate, then mark the
wall for holes for the provided plastic anchors.
• Drill holes with 3/16” bit and gently tap anchors into
the holes until ush with wall.
• Reposition wallplate, pulling wires through large
opening. Insert provided mounting screws into wall
anchor and tighten. See Figure 3.
Figure 5
• Insert the tabs on top of the thermostat body into the
slots at the top of the wallplate. Press the bottom of
the thermostat body into the snap on the bottom of
the wallplate. (NOTE: Do not force the thermostat
onto the wallplate, as the terminal pins may be
damaged. If it does not snap properly, the thermostat
may not work.)
• Turn on power to the heat pump system.
• If the wiring to the thermostat has been correctly
connected, and if the thermostat has been correctly
mounted to the wallplate, then the LCD Display
should show the indoor room temperature.
THERMOSTAT CONTROLS
• Open the thermostat’s front cover. See Figure 6.
Figure 3
Figure 6
Form No. 41982 03/10/06
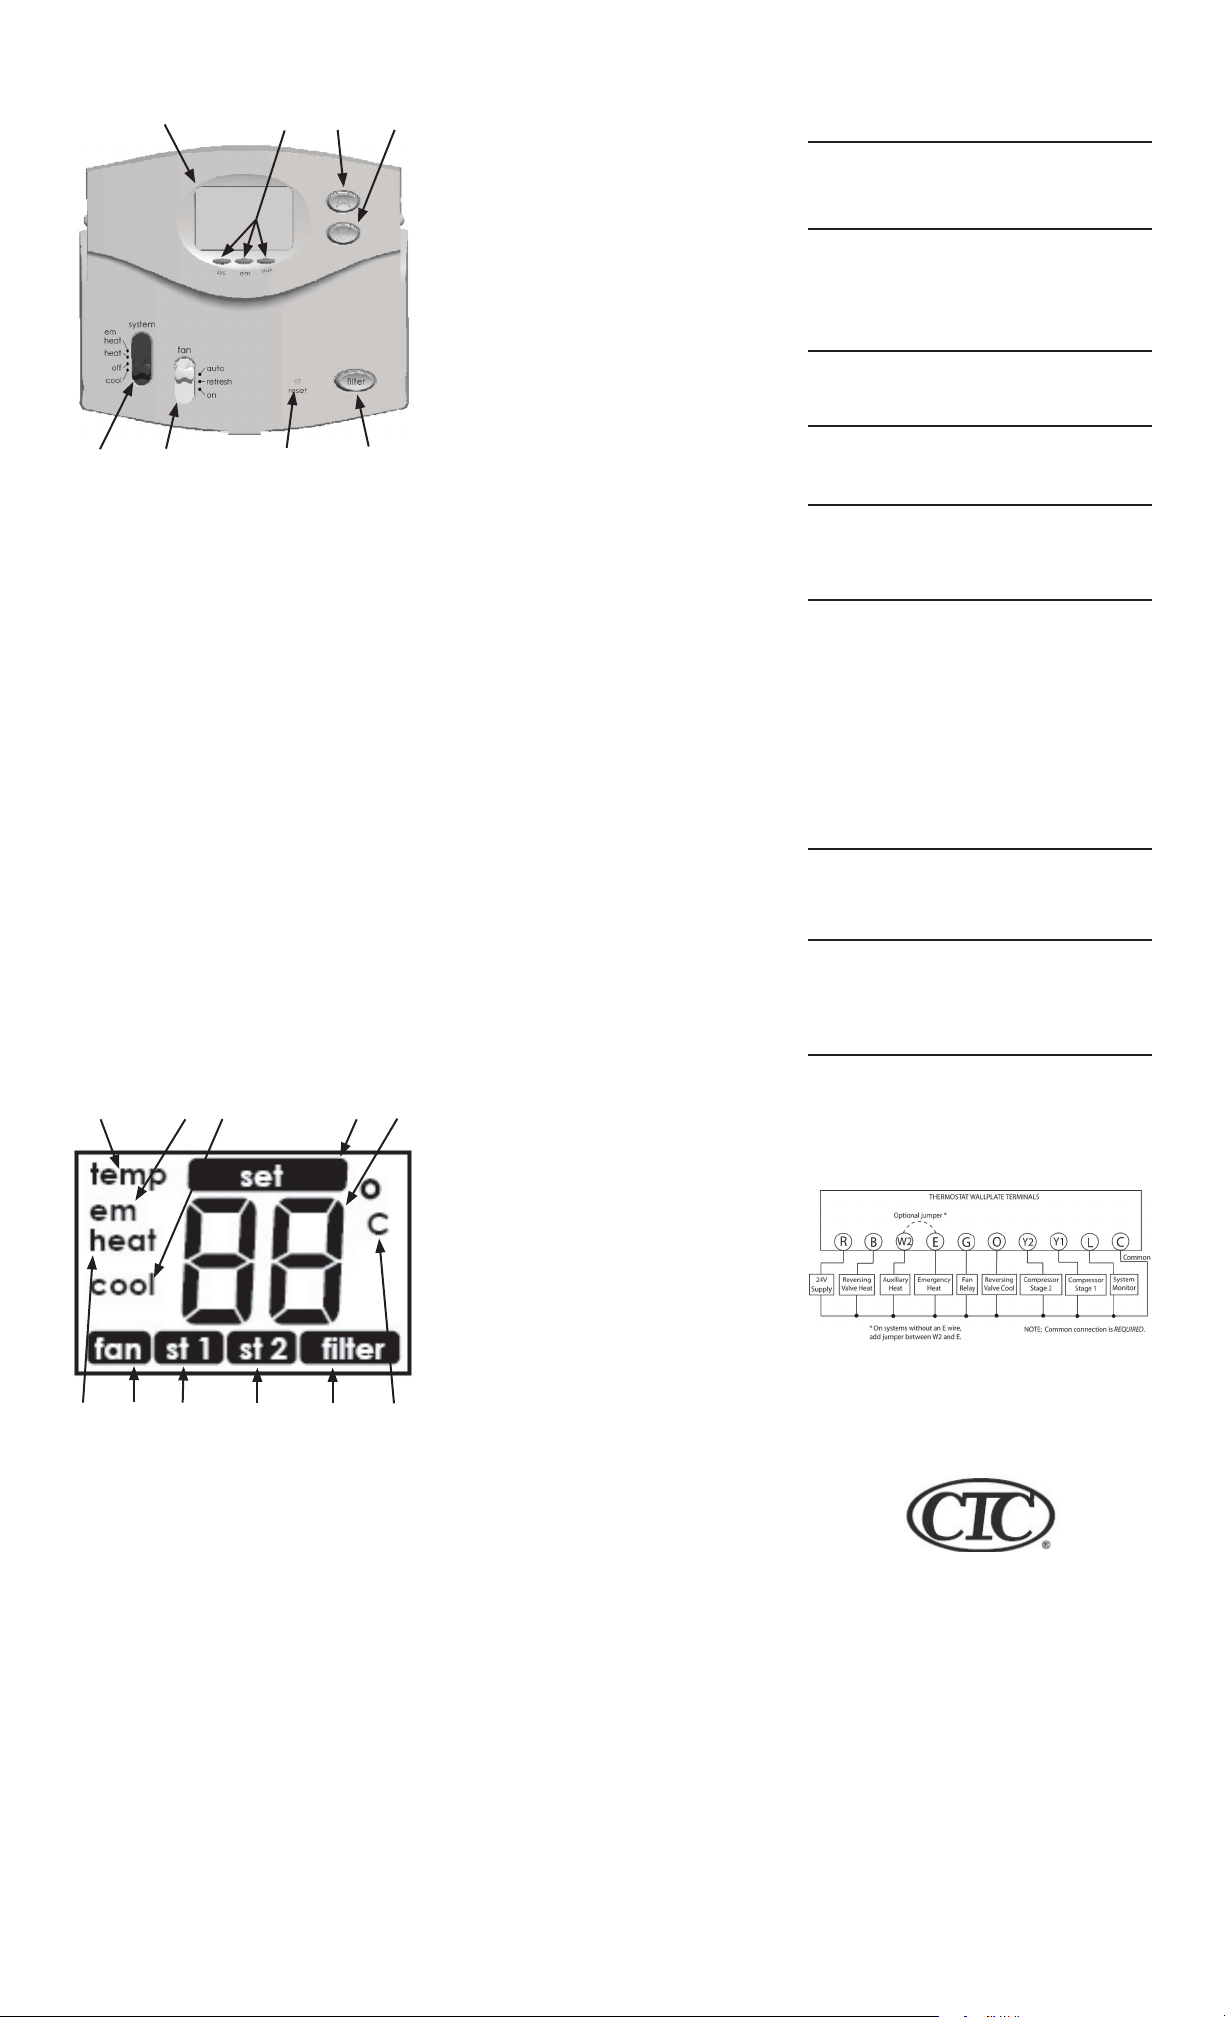
Switches and Buttons
A
H
FG
B C D E
Figure 7
A LCD Readout - displays indoor temperature, set
temperature, and information about the heat pump
system’s operation and status.
B System Switch - “em heat” is the Emergency Heat.
NOTE: The Emergency Heat Mode is not an energy
saving mode, so use it only when necessary. “heat”
is the normal heat mode. “off” turns the system off.
“cool” is the normal cooling mode.
C Fan Switch - In Auto mode, the fan runs when the
system is on for heating or cooling. The Refresh
mode sets the fan to run automatically at intervals
of 10, 15, 20, or 30 minutes out of every hour when
the system is not running for heating or cooling. In
the On mode, the fan runs continuously regardless of
system status.
D Reset button - push the Reset button with the end of
a paper clip to reset the thermostat and return to its
previous settings.
E Filter button - resets the lter time counter.
F Down button - used to change the temperature
setting and the option settings.
G Up button - used to change the temperature setting
and the option settings.
H System LED’s - for heat pump systems that have
fault detection capabilities, the “sys” LED glows red
when the thermostat has detected a fault through the
L terminal connection from the heat pump. The “em”
LED glows red when Emergency Heat is turned on.
The “aux” LED glows green when the auxiliary heat
is turned on.
LCD Display
K
A
J
I
H
Review the Set Temperature
1. Slide the “system” switch to either the “heat” position
or the “cool” position.
2. Press either the Up or Down button for less than one
second. The LCD Display will show “temp”, “set”, and
the set temperature.
Change the Set Temperature
1. Press and hold either the Up or Down button for more
than one second. The LCD Display will show “temp”,
“set”, the set temperature.
2. To raise the Set Temperature, press the Up button. To
lower the Set Temperature, press the Down Button.
Heating or Cooling
1. To set the system for Heating, slide the “system”
switch to “heat”. To set the system for Cooling, slide
the “system” switch to “cool”.
2. Slide the “fan” switch to “auto”, refresh”, or “on”.
Setting Options
The following Options are available on your thermostat:
1. 1st stage span - The factory setting for Stage
1 heating and cooling is 1, meaning that your
thermostat will cycle at 1°F (0.5°C) above and
below the set temperature in Stage 1. If the system
is cycling too fast or too slow, then the Span can be
adjusted to change the cycle time.
2. 2nd stage span - The second or auxiliary stage
turns on when the rst stage does not have enough
capacity to reach the set temperature. The factory
setting for Stage 2 is 1 (2°F, 1°C).
3. The Residual Cooling Fan Delay Setting - Sets the
fan to run for 0, 30, 60, or 90 seconds after the
compressor turns off in the cooling mode.
4. The Refresh Cycle Time - Sets the fan to run
automatically at intervals of 10, 15, 20, or 30 minutes
to circulate air when the system is not running for
heating or cooling.
To access the Option Mode and set the Span setting of
the 1st stage:
1. Press the Up and Down buttons at the same time
and hold them for three seconds. The LCD Display
will show “st 1”, “set”, and the 1st stage Span setting,
either 1 (factory setting), 2, or 3, meaning that
the Span setting is at 1°F (0.5°C), 2° (1°C), or 3°
(1.5°C).
2. Press the Up button to increase the 1st stage Span
setting, which will cause your system to run longer.
Press the Down button to decrease the 1st stage
Span setting, which will cause your system to run
To set the Span setting of the 2nd stage:
1. Press the Up and Down buttons at the same time
again and hold them for three seconds. The LCD
Display will show “st 2”, “set”, and the 2nd stage
Span setting, either 1 (factory setting), 2, 3, 4, or 5,
meaning that the Span setting is at 2°F (1°C), 3°F
(1.5°C), 4°F (2°C), 5°F (2.5°C), or 6°F (3°C).
2. Press the Up button to increase the 2nd stage Span
setting. Press the Down button to decrease the 2nd
stage Span setting.
To set the Residual Cooling Fan Delay:
1. Press the Up and Down buttons at the same time
again and hold them for three seconds. The LCD
Display will show “cool”, “set”, and the current
Residual Cooling Fan Delay time in seconds (0, 30,
60, or 90).
2. Press the Up button to increase the Residual Cooling
Fan Delay time. Press the Down button to decrease
TROUBLESHOOTING
Problem
Scrambled or
double display
(numbers over
numbers)
LCD Display is
blank
Auto/Fan does
not turn on
Fan runs
continuously
Erratic display
Heating or cooling does not go
on or off
System
continues to
operate in the
Off position
Thermostat
permanently
reads “HI”, “LO”
or “E1” after
pressing the
Reset button
If you experience any other problems, call CTC Technical Support at
1-800-676-7861 from 8am to 5pm Central Time.
Solution
1. Remove the clear Mylar decal
form the LCD Display.
1. Check wiring connections. A
Common (C) wire is required for
operation.
2. Press and hold the Reset button
for two seconds with the tip of a
paper clip.
1. Move the #1 System Set-Up
Switch (HG/HE) to the opposite
position.
1. Check the Fan Switch. The fan
will run continuously if the Fan
switch is in the “on” position.
1. Press and hold the Reset button
for two seconds with the tip of a
paper clip. The thermostat will
need to be re-programmed.
1. Ensure the System Switch is
in the desired position (“heat”,
“cool”, “em heat”).
2. There may be as much as a 4
minute Compressor protection
delay before the Heat or Cool
system turns on - wait and
check.
3. Check your circuit breakers
and switches to ensure there is
power to the system.
4. Make sure your furnace blower
door is closed properly.
1. Replace thermostat.
1. Replace thermostat.
WIRING DIAGRAM
C D
B
E
F
G
Figure 8
A temp - the large number being displayed is either the
indoor temperature or the set temperature.
B heat - normal heat is turned on.
C fan - indicates the fan is running.
D st 1 - comes on when you set the Stage 1 heat and
cool span.
E st 2 - comes on when you set the Stage 2 heat and
cool span.
F Filter button - resets the lter time counter.
G C - the temperature being displayed is Celsius. Select
either Celsius or Fahrenheit with the #2 System SetUp Switch. NOTE: The LCD Display DOES NOT
show an “F” for Fahrenheit.
H alpha-numeric - displays temperature (either indoor
or set)
I set - the large number being displayed is the set
value (temperature, Stage 1 span, Stage 2 span,
Residual Cooling Fan Delay, or the Refresh Fan
Cycle time).
J cool - normal cooling is turned on.
K em - emergency heat is turned on.
NOTE: With the “system” switch in the “off” position, if
you press the Up or Down button, the LCD Display will
show “OF”.
To set the Refresh Cycle Time:
1. Press the Up and Down buttons at the same time
again and hold them for three seconds. The LCD
Display will show “fan”, “set”, and the current Refresh
Cycle Time in minutes (10, 15, 20, or 30).
2. Press the Up button to increase the Refresh Cycle
Time. Press the Down button to decrease the
Refresh Cycle Time.
Filter Reminder
The LCD Display will show “lter” after every 400 hours
of fan operation, as a reminder to change the HVAC
system’s lter as soon as possible.
Resetting Your Thermostat
Should the thermostat’s previous settings be desired,
use the tip of a paper clip to press the “reset” button.
NOTE: Pressing the Reset button reverts the thermostat to its previous settings, NOT the factory settings.
A Hunter Fan Company
Climate Technology Corp.
2500 FRISCO AVENUE
MEMPHIS, TN 38114
© 2006, Climate Technology Corp.
Form No. 41982 03/10/06
 Loading...