


Evaporative Humidier
Model 32200
See page 2
ENGLISH
Vea la página 13
ESPAÑOL
Read and save these instructions.
www.hunterfan.com
43001-01 04/27/2007 1 © 2007 Hu nter Fan Co.

READ AND SAVE THESE INSTRUCTIONS
Important Safety Instructions:
Read all instructions before
using this humidier.
1. This humidifier may not work properly
on an uneven surface. ALWAYS place this
humidier on a rm, level, and water resistant surface. ALWAYS place the humidier
at least six (6) inches away from walls and
heat sources such as stoves, radiators, or
heaters.
2. ALWAYS place the humidier in an area that
is out of the reach of children.
3. Before using the humidier, extend the cord
and inspect for any signs of damage. DO
NOT use the product if the cord has been
damaged.
4. This product has a polarized plug (one
blade is wider than the other) as a safety
feature. This plug will t into a polarized
outlet only one way. If the plug does not t
fully into the outlet, reverse the plug. If it still
does not t, contact a qualied electrician.
DO NOT attempt to defeat or override this
safety feature.
5. ALWAYS UNPLUG AND EMPTY the humidier when it is not in operation or while it is
being cleaned.
6. DO NOT tilt or move the humidier while it
is in operation. Never move the humidier
while there is water in the tank. Empty the
water tank, turn o, and unplug the unit
before moving.
7. In addition to routine maintenance which
may be required, this humidier requires
seasonal cleaning. Refer to and follow
CLEANING THE HUMIDIFIER AND THE WATER TANK instructions.
Thank you for purchasing The Care Free®
Humidifier Evaporative Humidifier by
Hunter Fan Company. Please read and save
these instructions to receive the maximum
benet and performance from your humidier.
How The Hunter®
Evaporative Humidier Works
The Hunter® Evaporative Humidier has a unique patented design with several innovative features:
• Built-in Antimicrobial Properties – The plastic parts and the lter have built-in antimicrobial properties to inhibit the growth of bacteria, mold and fungi that may aect these parts.
• No White Dust – The Hunter® Evaporative Humidier produces no white dust that can settle on
furniture or be inhaled.
NOTE: This product contains antimicrobial properties which are built-in to inhibit the growth of
bacteria which may aect the plastic and lter in the humidier. These properties do not extend
to the water, humidied air or users. Conduct routine cleaning and maintenance based upon use
and individual conditions.
NOTE: You may notice mineral deposits accumulating in the tank base. This is normal and does
not aect performance. If you would like to clean these deposits away, please see CLEANING THE
HUMIDIFIER AND WATER TANK.
43001-01 04/27/2007 2 © 2007 Hu nter Fan Co.
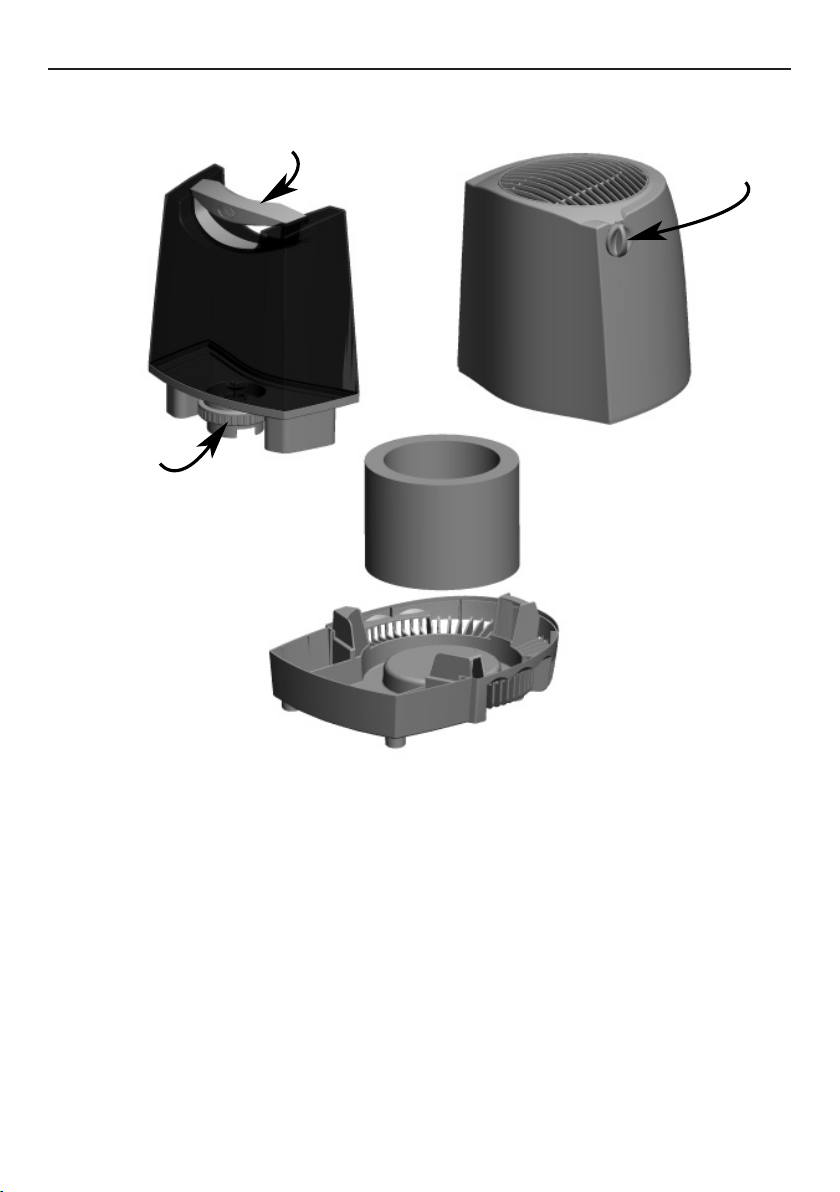
Humidier Parts
Water Tank
Tank Fill Cap
Tank Tote
Base
Power/Speed
Control
Main Housing
Wick
Figure 1
43001-01 04/27/2007 3 © 2007 Hu nter Fan Co.
Using Your Humidier
1. Remove the Hunter® Evaporative Humidier from its packaging.
2. Place the humidier on a hard, at, water resistant surface. Always place the humidier at least
six (6) inches away from walls and sources of heat.
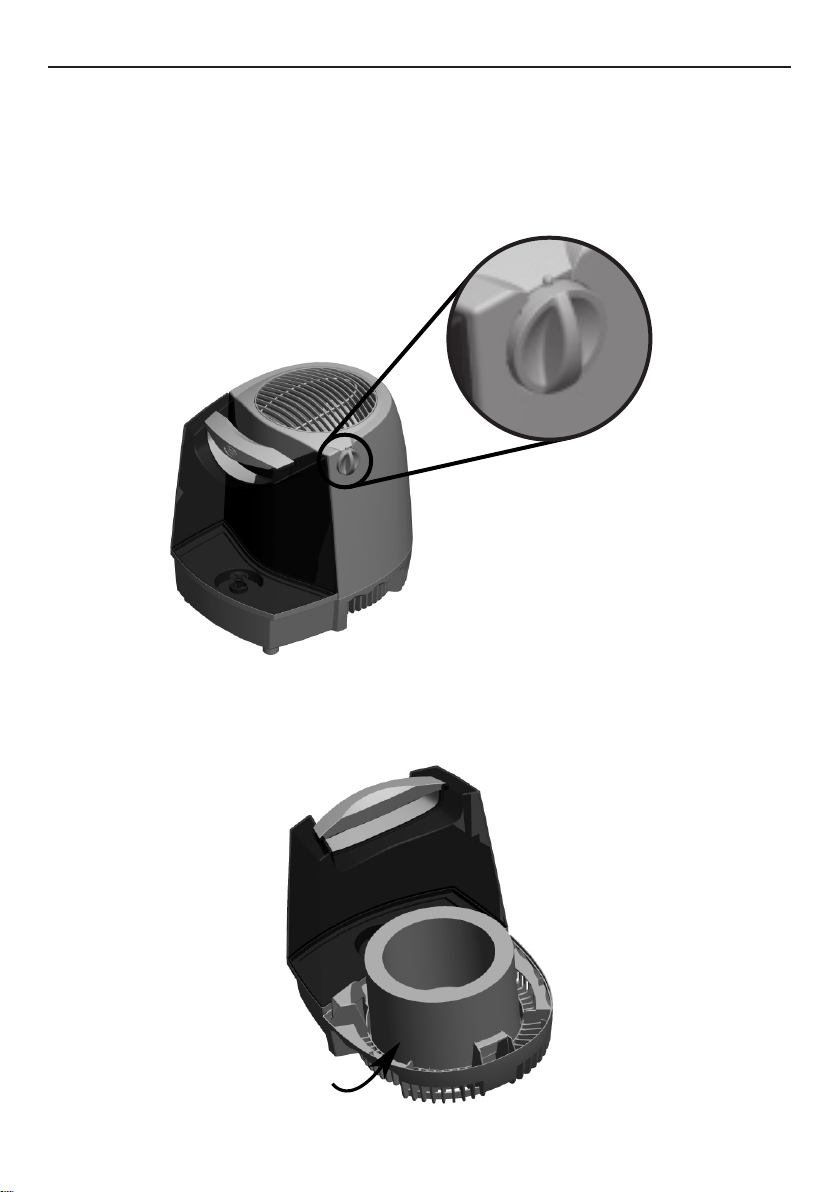
3. Make sure the Power/Speed Control is in the ‘OFF’ position. NOTE: The Power/Speed Control should
always be o before unplugging the humidier, moving the humidier, or relling the water tank.
See Figure 2.
F
F
O
Power/Speed Control
Figure 2
4. Lift the Main Housing to ensure the Wick is properly seated, resting on the bottom of the base and
not tilted or otherwise out of position. See Figure 3. Place the Main Housing back on the Base.
Wick, properly
seated
Figure 3
43001-01 04/27/2007 4 © 2007 Hu nter Fan Co.
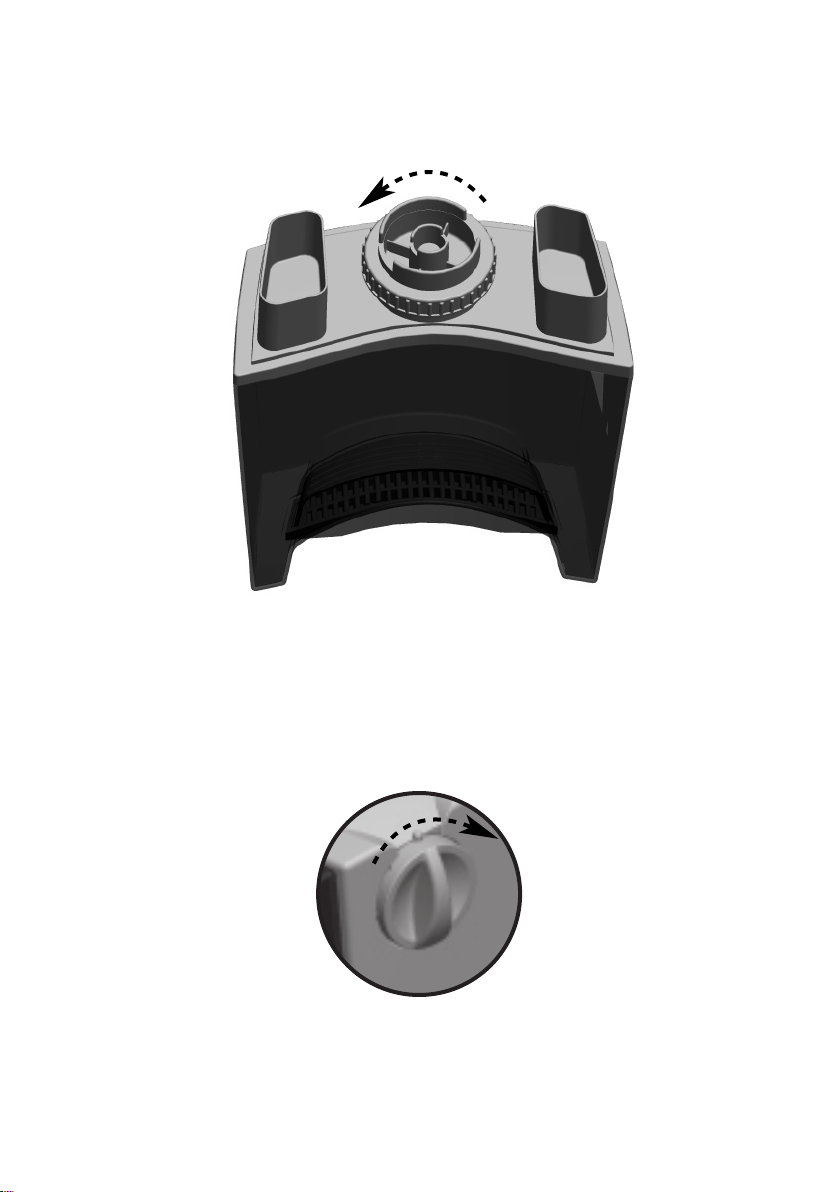
4. Grasp the Water Tank by its Tank Tote and remove it from the Base.
5. Turn the Water Tank upside-down and remove the Tank Fill Cap. See Figure 4.
Twist to open
Figure 4
6. Fill the Water Tank with water, return the Tank Fill Cap to its position and tighten it, and return the
Water tank to the Base.
7. Plug the humidier’s Power Cord into a standard household power outlet.
8. Turn the Power/Speed Control to your desired humidier fan speed. See Figure 5.
F
F
O
Figure 5
43001-01 04/27/2007 5 © 2007 Hu nter Fan Co.

Relling The Water Tank
1. When the water tank level is low, turn the humidier ‘OFF’, and unplug.
2. Remove the tank and take it to the sink or tub to rell.
3. Turn the tank upside down and unscrew the tank cap by turning it counterclockwise. Empty the tank,
rell with fresh cool water (never use hot water), and replace the tank cap. Be sure not to overll the
tank as water damage may occur to furniture or ooring due to spillage. HUNTER WILL NOT ACCEPT
RESPONSIBILITY FOR DAMAGE TO PROPERTY CAUSED BY WATER SPILLAGE.
4. Carry the tank back to the humidier. Turn the tank upright and place it on the humidier. Be sure
that the tank is seated properly in the base. If the tank is properly located on the base, you will
see air bubbles owing up into the tank.
Cleaning The Humidier And The Water Tank
Many regions have hard water with high concentrations of minerals. When water evaporates from The
Hunter® Evaporative Humidier, minerals may be left behind. These minerals can form a hard white
scale which can be removed by following the cleaning instructions. The frequency of cleaning due
to mineral build up can vary depending upon the quality of water you may have.
Refer to Figure 1 for part names.
1. Turn the humidier ‘OFF’ and unplug the unit.
2. Lift the main housing and remove the water dispersion tray and the wick. The motor is attached
to the main housing. Do not place the motor near water. Do not use a wet towel on the motor or
motor housing as electrical shock may occur.
3. Replace the humidier’s wick every 4 - 8 weeks or when it has turned brown.
4. Remove the water tank from the base and empty any water that is left in the tank. Soak the base
in a mixture of one (1) gallon of water and eight (8) ounces of vinegar for 20 minutes. The base is
dishwasher safe.
5. After soaking, wipe the base with a soft cloth or sponge to remove any mineral build up. Rinse
with clean water several times. If you are planning on storing the humidier, be sure the base
is completely dry.
6. Fill the water tank with one (1) gallon of water and eight ounces of undiluted white vinegar. Replace the tank cap and shake the tank vigorously until all interior surfaces of the tank have been
exposed to the water/vinegar mixture.
7. Empty the tank of the water/vinegar mixture. Rinse it several times with clean water and then
replace the tank cap. If you are planning on storing the humidier, dry it inside and out, leaving
the cap o to allow the tank to completely dry. Continue to clean the other parts of your humidier.
8. Wipe the surfaces of the main housing with a soft cloth.
9. Once all the parts are clean, reassemble the humidier, and follow the USING YOUR
HUMIDIFIER to continue use. If you are storing the humidier, make sure the parts are completely
dry, reassemble, and store in a dry location.
43001-01 04/27/2007 6 © 2007 Hu nter Fan Co.

Replacing the Humidier Wick
NOTE: The humidier’s Wick is made of paper and is NOT washable.
Over time, minerals in your water will build up in the humidier’s Wick, degrading its ability to absorb
water and reducing the humidier’s output. Therefore, you should replace the humidier’s Wick every
4 - 8 weeks, depending on the hardness of your water.
1. Turn the humidier ‘OFF’ and unplug the unit.
2. Lift the Main Housing, remove it from the Base, and set it aside.
3. Grasp the humidier Wick, hold it over the base, and squeeze the water from it. This will keep
water from dripping onto your oor. You may also want to wrap the Wick in a towel to keep it
from dripping while you transport it to disposal.
4. Replace the old Wick with a new Hunter humidier Wick, number 31911. New Wicks are available
at your local Hunter retailer or at www.hunterfan.com.
5. Ensure the Wick is properly seated, resting on the bottom of the base and not tilted or otherwise
out of position.
6. Return the Main Housing to its position on the Base. Make certain the Main Housing is properly
seated on the Base.
7. Plug the humidier’s Power Cord into a standard household power outlet and turn the Power/Speed
Control to your desired setting.
43001-01 04/27/2007 7 © 2007 Hu nter Fan Co.

Service Parts
To obtain a service part for your humidier, call customer service at 1-888-830-1326 or e-mail us at
techsupport@hunterfan.com. Please be prepared to tell the operator the model number of your
humidier and the name of the part you need to replace and the part number. Refer to Figure 1 for
part names.
Model No.
32200
Base
97676
Water
Tank
97678 76257
Knob A
Tank Cap
87843
Filter
31911
43001-01 04/27/2007 8 © 2007 Hu nter Fan Co.
 Loading...