

Hunter 19018, 19019, 19169 Installation Manual
WARNING
ADVERTENCIA
AVERTISSEMENT
ENGLISH
NOTICE
PREPARING FOR INSTALLATION
Carefully remove all contents from the carton. Shut off the power at the circuit breaker and completely remove the old
xture from the ceiling, including the old mounting bracket. Remove the new mounting bracket assembly from the
bag. Then remove decorative nuts (H) from mounting screws (A). Mounting plate (B) contains several pairs of threaded
holes. Find the pair of holes that matches the spacing on the holes on the xtures canopy. Place the mounting plate
(B) over the junction box so that mounting screws (A) and nuts (C) are visible. Pull the house wires through the center
of mounting plate (B). Secure mounting plate (B) to the junction box by tightening the screws (D). Adjust the position
of mounting screws (A) so that mounting screws (A) can be exposed 5-6 mm after passing through the canopy (F).
Once the ideal position of mounting screws (A) has been conrmed, tighten nuts (C) on mounting screws (A) under the
mounting plate to ensure that mounting screws (A) are in place.
ASSEMBLING THE FIXTURE
There are 4 12-inch rods (K), and 1 6-inch rod (L) included for each xture. Determine the correct number of rods
needed for proper hanging height. To lengthen the xture, add additional rods. To shorten the xture, trim the wires to
desired length. Leave at least 8 to 10 inches of wire in addition to the desired length and slide any excess rods off the
xture’s wiring to discard. Keep in mind that you must use at least one rod to hang the xture. Thread the wires through
the rods and pull the wires until taut before connecting the rods together. Screw rod onto threaded post (O) on the
xture. Screw the threaded post of the top rod to swivel post (I) of canopy (F). Pull the xture wires through the top of
the canopy.
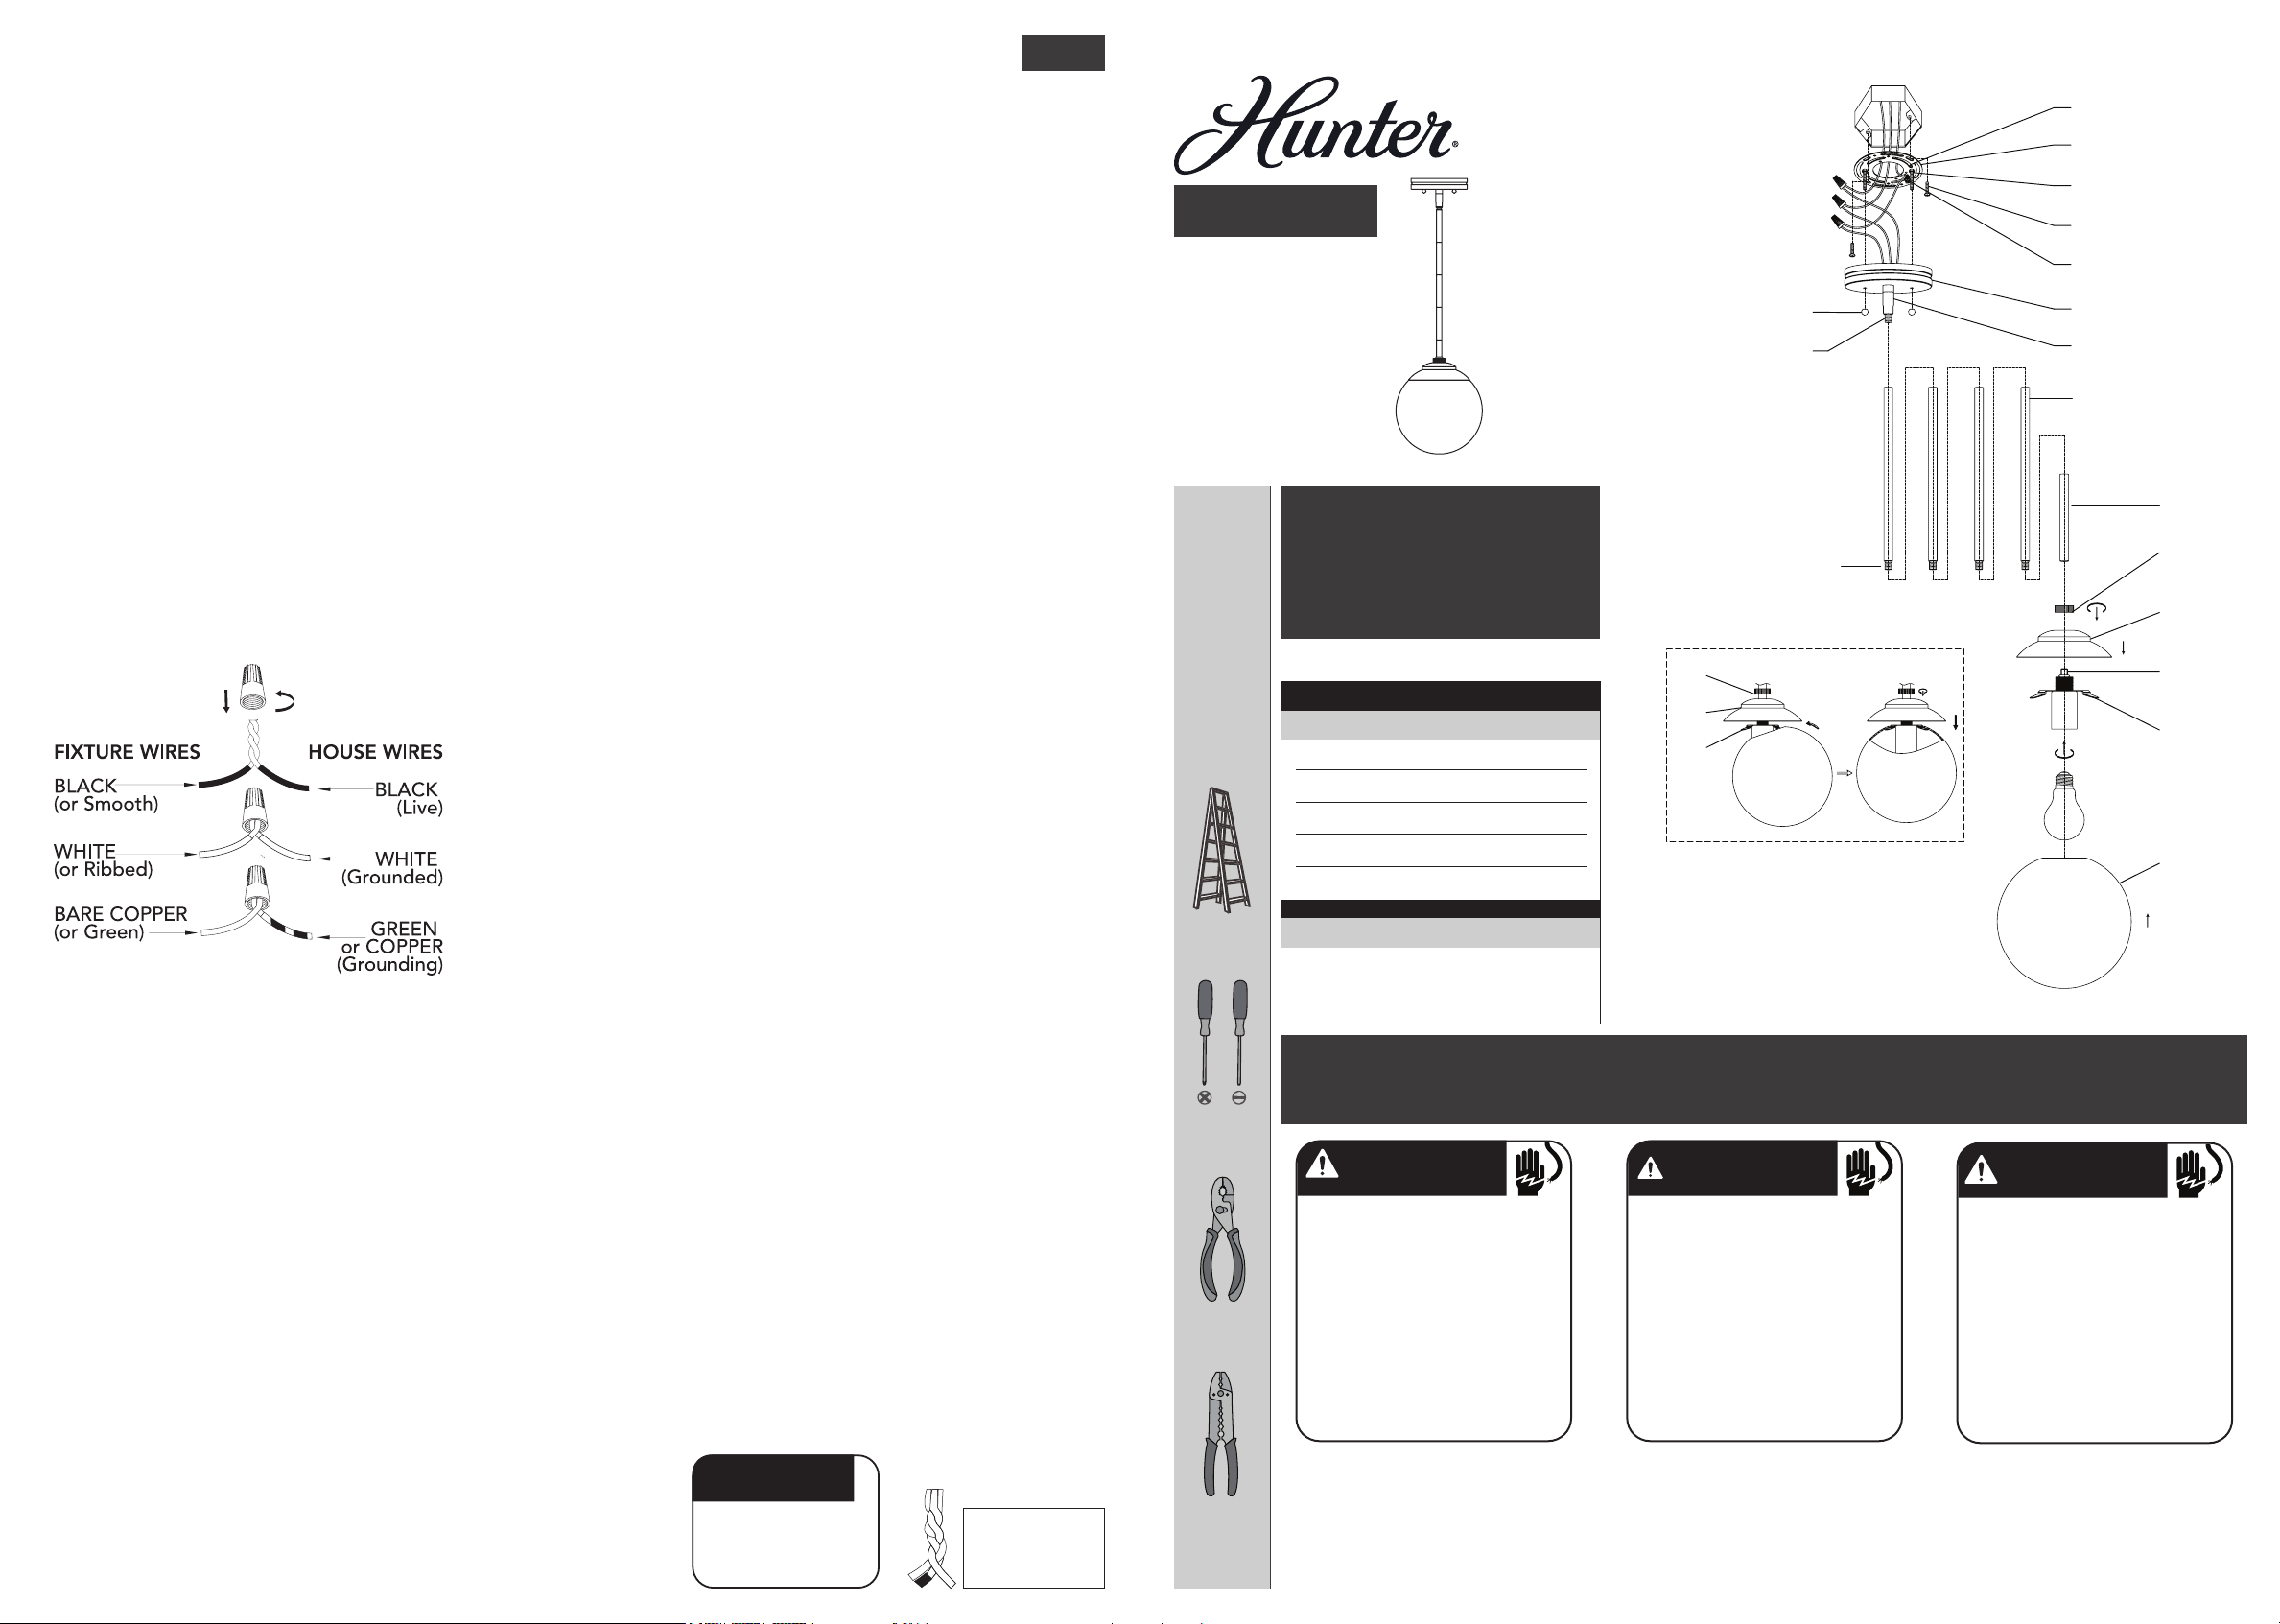
CONNECTING THE WIRES
Have a helper support the xture’s weight while completing the
wiring. Attach the xture’s wires to the power supply wires from the
junction box. Connect black to black (Live); white to white (grounded);
grounding to grounding (green or copper). Twist the ends of the wire
pairs together. Then, twist on a wire connector. Make sure all twists are
in the same direction. Loop xture’s ground wire around grounding
screw (E) and tighten. If there is no ground wire (green or copper) from
the junction box, contact a qualied electrician.
Hepburn
For Models:
Para los Modelos:
Pour les Modèles:
19018
19019
19169
Here are the
tools you’ll
need to
complete your
installation:
Estas son las
herramientas
que usted
necesitará para
completar su
instalación:
Voici les outils
dont vous
aurez besoin
pour réaliser
l’installation:
Ladder
Escalera
Échelle
1
Light Pendant
1
Luz Colgante
1
Lumière Chaînette
Fixture weight ±2 lbs:
Peso ±2 lb:
Poids xe ±2 lbs:
Hardware Service Kit/Kit De Mantenimiento Del Equipo/Trousse De
Part #/Pieza #/Pièce #
KC07101864
KC07101893
KC07101214
Part #/Pieza #/Pièce # Model/Modelo/ Modèle
KA28701045
Maintenance Quincaillerie
Glass/Domo De Vidrio/Verre
4.2 lbs (1.90 kg)
19018
19019
19169
19018
19019
19069
Finish/Finish/FiniModel/Modelo/Modèle
Painted Modern Brass/Bronce
Moderno Pintado/Laiton
Moderne Peint
Matte White/Blanco Mate/
Blanc Mat
Brushed Nickel/Níquel Pulido/
Nickel Brossé
Type/Tipo/Type
Cased White Glass/
Pantalla de Vidrio Blanco/
Verre Blanc
M
N
P
H
©2021 Hunter Fan Co.
ML001
r_0208211
A
B
C
D
E
F
I
G
K
L
J
M
N
O
P
Q
FINISHING THE INSTALLATION
Raise canopy (F) to mounting plate (B) and position mounting screws (A) so that they protrude through the openings of
canopy (F). Secure canopy (F) in place with decorative nuts (H). Install light bulb (not included) in accordance with the
xture’s specications. Do not exceed the recommended wattage.
Unscrew the ring (M) and move the cover (N) back to keep a distance with metal piece (P). Put the metal piece (P) into
the glass (Q) and adjust until both ends are in contact with the glass and the at base is parallel with the glass opening.
Then tighten the ring (M) to x the cover (N) and glass (Q). Your installation is now complete. Turn on the power and
test the xture.
CLEANING TIPS
Treat the xture gently! Regular cleaning will reduce the need for deep cleaning. For regular cleaning, turn off the light
and wipe down the xture with a clean lint-free cotton or microber cloth. Never spray cleaner directly onto the xture.
In order to use a 12in rod by
itself you must rst remove
the post from the 6in rod and
install it on one of the ends of
the 12in rod.
Hunter Pro Tip:
Twist or tape wire
ends together to make
it easier to thread
through downrod
Screwdriver
Destornilladore
Tournevis
Pliers
Alicates
Pince
Wire Strippers
Pelacables
Pince à dénuder
INSTRUCCIONES DE INSTALACIÓN/ INSTRUCTIONS D’INSTALLATION
•
• To avoid possible electrical shock, before
installing your light xture, disconnect the power
by turning off the circuit breakers to the outlet box
associated with the wall switch location.
• The lighting xture must be grounded. If the
ground wire for the installation site is not present,
immediately STOP installation and consult a
qualied electrician.
• All wiring must be in accordance with national
and local electrical codes ANSI/NFPA 70. If you
are unfamiliar with wiring or in doubt, consult a
qualied electrician.
READ AND SAVE THESE INSTRUCTIONS
These instructions are provided for your safety. It
is very important that they are read carefully and
completely before beginning installation of the
lighting xture.
INSTALLATION INSTRUCTIONS
•
• Para evitar una posible descarga eléctrica, antes
de instalar su lámpara, desconecte la energía
apagando los interruptores automáticos (breakers)
que alimentan la caja de salida asociada con la
ubicación del interruptor de pared.
• L’appareil d’éclairage doit être mis à la terre.
Si le l de terre du lieu d’installation n’est pas
présent, ARRÊTEZ immédiatement l’installation et
consultez un électricien qualié.
• Todo el cableado debe realizarse de acuerdo con
los códigos eléctricos locales y nacionales ANSI/
NFPA 70. Si no está familiarizado con el cableado,
o si tiene duda, consulte a un electricista calicado.
LEA Y GUARDE ESTAS INSTRUCCIONES
Estas instrucciones se proporcionan para su
seguridad. Es muy importante leerlas detenidamente y completamente antes de comenzar la
instalación de la lámpara.
•
• Pour éviter tout choc électrique, avant d’installer
le luminaire, coupez le courant en éteignant les
disjoncteurs de la boîte électrique associée à
l’interrupteur mural.
•
Le luminaire doit être mis à la terre. Si le l
de terre du lieu d’installation n’est pas présent,
ARRÊTER immédiatement l’installation et
consulter un électricien qualié.
•
Tout le câblage doit être conforme aux codes
électriques nationaux et locaux en vigueur et à la
norme ANSI/NFPA70. Si vous n'avez pas l'habitude
de faire ce câblage ou en cas de doute, adressez-
vous à un électricien qualié.
LISEZ ET CONSERVEZ CES INSTRUCTIONS
Ces instructions sont fournies pour votre sécurité.
Il est très important de les lire attentivement dans
leur intégralité avant d’entreprendre l’installation
du luminaire.
AVISO
AVIS
PREPARACIÓN PARA LA INSTALACIÓN
ESPAÑOL
PRÉPARATION AVANT L’INSTALLATION
FRANÇAISE
Saque cuidadosamente todo el contenido de la caja de cartón. Desconecte la energía mediante el interruptor
automático (breaker) y remueva completamente la lámpara vieja del techo, incluyendo el soporte de montaje viejo.
Saque el conjunto de soporte de montaje nuevo de la bolsa. Luego quite las tuercas decorativas (H) de los tornillos
de montaje (A). La placa de montaje (B) contiene varios pares de oricios roscados. Encuentre el par de oricios que
coincide con el espaciado de los oricios de la campana (F) de la lámpara. Coloque la placa de montaje (B) sobre la
caja de conexiones de modo que los tornillos de montaje (A) y las tuercas (C) sean visibles. Jale los alambres de la casa
a través del centro de la placa de montaje (B). Asegure la placa de montaje (B) a la caja de conexiones apretando los
tornillos (D). Ajuste la posición de los tornillos de montaje (A) de modo que los tornillos de montaje (A) puedan quedar
expuestos 5 a 6 mm después de pasar a través de la campana (F). Una vez que se haya conrmado la posición ideal de
los tornillos de montaje (A), apriete las tuercas (C) en los tornillos de montaje (A) debajo de la placa de montaje para
garantizar que los tornillos de montaje (A) estén en su sitio.
ENSAMBLAJE DE LA LÁMPARA
Hay 4 barras de 12 pulgadas (K) y 1 barra de 6 pulgadas (L) incluidas para cada lámpara. Determine la cantidad correcta
de barras necesarias para obtener la altura de colgado apropiada. Para alargar la lámpara, agregue barras adicionales.
Para acortar la lámpara, corte los alambres hasta la longitud deseada. Deje al menos 8 a 10 pulgadas (20 a 25 cm)
de alambre adicionales a la longitud deseada y deslice cualquier barra sobrante fuera de los alambres de la lámpara,
para desecharla. Tenga en cuenta que usted debe utilizar al menos una barra para colgar la lámpara. Pase los alambres
a través de las barras y jale los alambres hasta que queden tensos antes de conectar las barras. Atornille la barra en
el vástago roscado (O) de la lámpara. Atornille el extremo roscado de la barra superior al vástago giratorio (I) de la
campana (F). Jale los alambres de la lámpara a través de la parte superior de la campana.
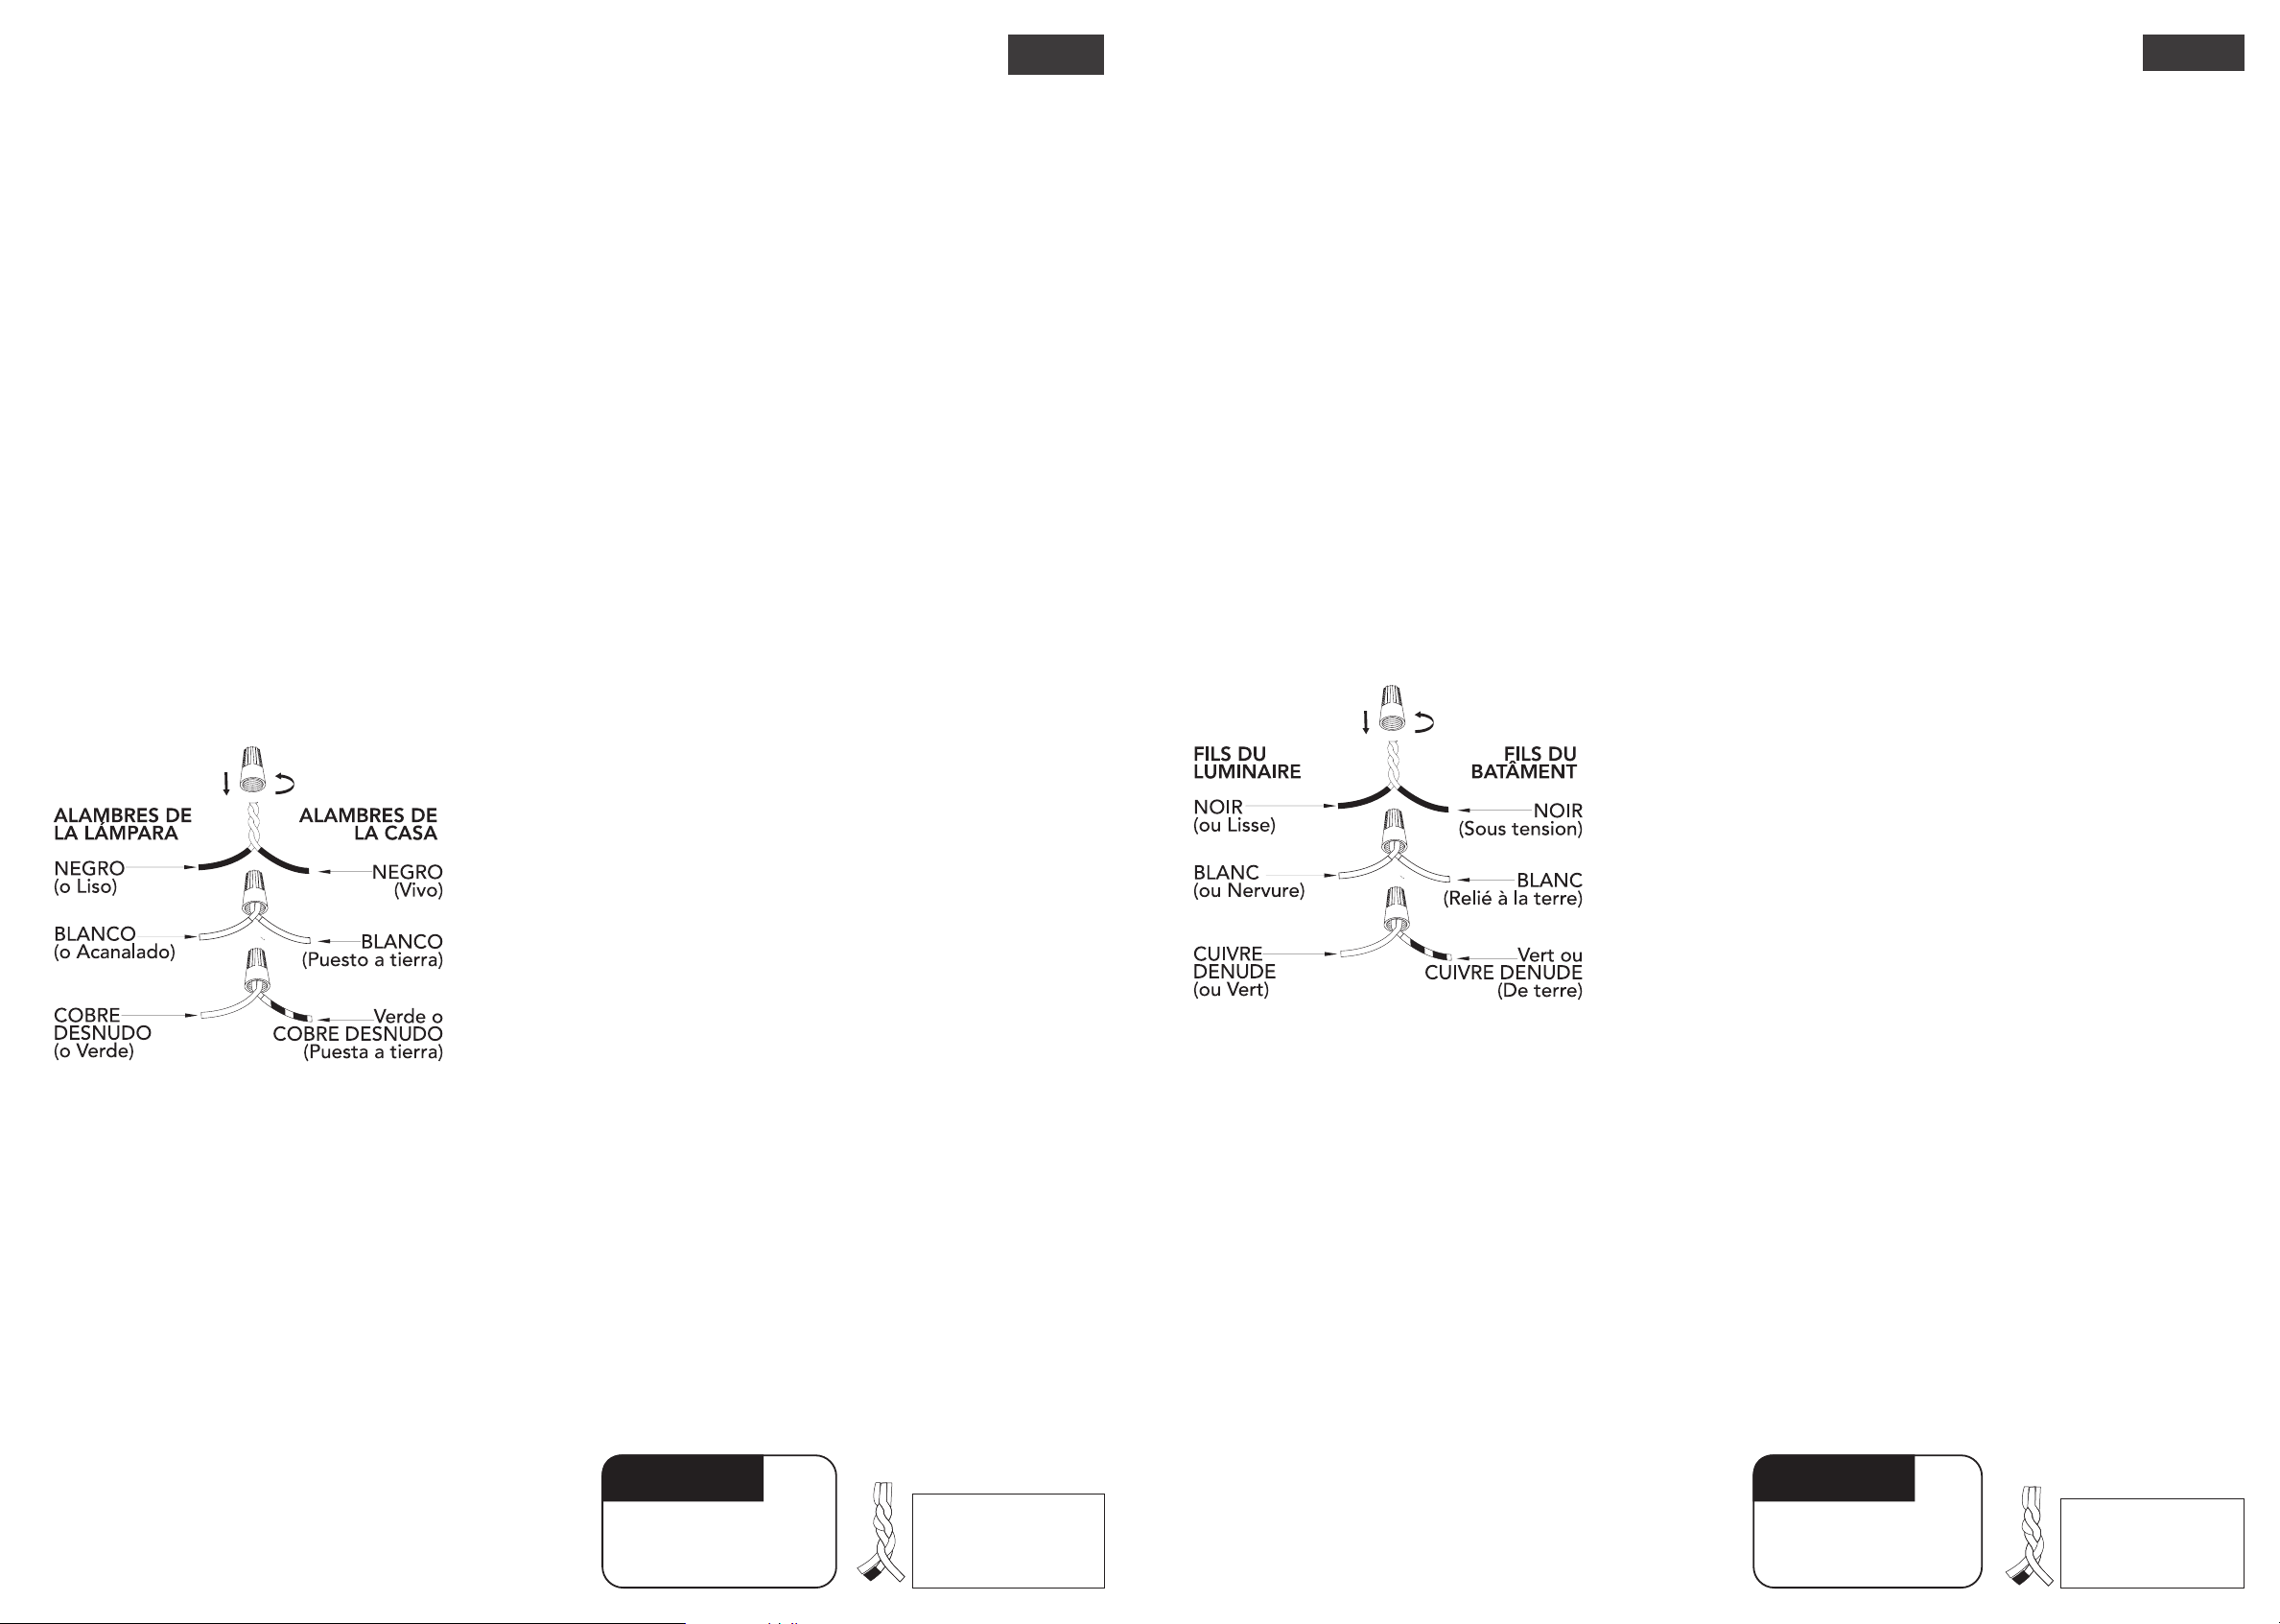
CONEXIÓN DE LOS CABLES
Solicite a un ayudante que soporte el peso de la lámpara mientras se
realiza la conexión de los alambres. Conecte los alambres de la lámpara
con los alambres de suministro de energía procedentes de la caja de
conexiones. Conecte negro con negro (vivo); blanco con blanco (conectado
a tierra); conexión a tierra con conexión a tierra (verde o cobre). Enrolle
(retuerza) los extremos de los pares de alambres para unirlos. Luego,
gírelos dentro de un conector de alambres. Asegúrese de que todos los
giros se realicen en la misma dirección. Enrolle el cable de acero de la
lámpara alrededor del tornillo de puesta a tierra (E) y ajústelo. Si no hay
alambre de conexión a tierra (verde o cobre) procedente de la caja de
conexiones, comuníquese con un electricista calicado.
FINALIZACIÓN DE LA INSTALACIÓN
Levante la campana (F) hacia la placa de montaje (B) y coloque los tornillos de montaje (A) de modo que sobresalgan a través
de las aberturas de la campana (F). Asegure la campana (F) en su sitio utilizando las tuercas decorativas (H). Instale el foco (no
incluido) de acuerdo con las especicaciones de la lámpara. No exceda el vatiaje (watts) recomendado.
Desatornille el anillo (M) y mueva la cubierta (N) hacia atrás para mantener una distancia con la pieza metálica (P). Coloque la
pieza metálica (P) dentro de la pantalla de vidrio (Q) y ajuste hasta que ambos extremos estén en contacto con la pantalla de
vidrio y la base plana esté paralela a la abertura de la pantalla de vidrio. Luego apriete el anillo (M) para jar la cubierta (N) y la
pantalla de vidrio (Q). Ahora su instalación está nalizada. Encienda la energía y pruebe la lámpara.
SUGERENCIAS DE LIMPIEZA
¡Trate con cuidado la lámpara! La limpieza periódica reducirá
la necesidad de una limpieza profunda. Para la limpieza
periódica, apague la lámpara y limpie la lámpara con un
trapo limpio de microbra o de algodón sin pelusas. Nunca
rocíe limpiador directamente sobre la lámpara.
Para utilizar una barra de 12
pulgadas sola, usted primero debe
quitar el vástago de la barra de 6
pulgadas e instalarlo en uno de los
extremos de la barra de 12 pulgadas.
Consejo de Hunter Pro:
Enrosque (retuerza) o sujete
con cinta los extremos de los
cables para unirlos, para que
sea más fácil pasarlos a través
del tubo de soporte
Retirez soigneusement tout le contenu de la boîte. Coupez le courant au niveau du disjoncteur et retirez complètement
l’ancien luminaire du plafond, y compris l’ancien support de montage. Extirpez de l’emballage le nouveau support de
montage. Retirez les écrous décoratifs (H) des vis de montage (A). La plaque de montage (B) contient plusieurs paires
de trous letés. Trouvez la paire de trous qui correspond à l’espacement des trous du pavillon. Placez la plaque de
montage (B) sur la boîte de jonction de sorte que les vis de montage (A) et les écrous (C) soient visibles. Tirez les ls à
travers le centre de la plaque de montage (B). Fixez la plaque de montage (B) à la boîte de jonction en serrant les vis
(D). Ajustez la position des vis de montage (A) de manière à ce que ces vis (A) soit exposées sur 5 à 6 mm après avoir
traversé le pavillon (F). Une fois que vous avez déterminé la position idéale pour les vis de montage (A), serrez les
écrous (C) sur les vis de montage (A) sous la plaque, en vous assurant que les vis de montage (A) sont en place.
ASSEMBLAGE DU LUMINAIRE
Chaque luminaire inclut 4 tiges de 30 cm/12 po (K) et 1 tige de 15 cm/6 po (L). Déterminez le nombre de tiges
nécessaires selon la hauteur de suspension souhaitée. Pour allonger le luminaire, ajoutez des tiges supplémentaires.
Pour raccourcir le luminaire, coupez les ls à la longueur désirée. Laissez au moins 20 à 25 cm (8 à 10 po) de l au-delà
de la longueur souhaitée, et faites glisser les tiges en excès hors du câblage du luminaire pour les jeter. Notez bien
qu’il faut au moins une tige pour suspendre le luminaire. Passez les ls à travers les tiges et tirez les ls jusqu’à ce
qu’ils soient tendus avant de les relier entre eux. Vissez la tige sur le montant leté (O) du luminaire. Vissez le montant
leté de la tige supérieure au montant (I) du pavillon (F). Tirez les ls du luminaire par le haut du pavillon.
RACCORDEMENT DES FILS
Demandez à une personne de soutenir le poids du luminaire lorsque vous
procédez au câblage. Fixez les ls du luminaire aux ls d’alimentation
électrique de la boîte de jonction. Connectez le l noir au l noir (sous
tension) ; le l blanc au l blanc (connecté à la terre) ; le l de terre au l
de terre (vert ou cuivre). Torsadez l’extrémité des paires pour les connecter
ensemble. Placez ensuite ces ls torsadés sous un capuchon de connexion.
Veillez à ce que la torsion soit toujours dans la même direction. Enroulez le
l de terre de l’appareil autour de la vis de mise à la terre (E) et serrez. S’il
n’y a pas de l de terre (vert ou cuivre) dans la boîte de jonction, adressezvous à un électricien qualié.
FIN DE L’INSTALLATION
Soulevez le pavillon (F) jusqu’à la plaque de montage (B) et positionnez les vis de montage (A) de sorte qu’elles
dépassent du pavillon (F). Fixez le pavillon (F) en place avec des écrous décoratifs (H). Installez une ampoule (non
incluse) conformément aux spécications du luminaire. Ne pas dépasser la puissance recommandée.
Dévissez la bague (M) et déplacez le socle (N) vers l’arrière pour l’éloigner de la pièce en métal (P). Insérez la pièce en
métal (P) dans le globe (Q) de sorte que ses deux extrémités soient en contact avec le verre et que la partie plate soit
parallèle à l’ouverture du globe. Serrez ensuite la bague (M) pour xer le socle (N) et le globe (Q). Votre installation est
désormais terminée. Allumez l’appareil et testez le luminaire.
CONSEILS DE NETTOYAGE
Manipulez le luminaire avec précaution ! Un nettoyage régulier vous épargnera le besoin de faire souvent un
nettoyage en profondeur. Lors d’un nettoyage régulier, éteignez la lumière et essuyez le luminaire avec un chiffon
propre en coton ou en microbre non pelucheux. Ne jamais
vaporiser un produit nettoyant directement sur le luminaire.
Si vous souhaitez utiliser uniquement
une tige de 12 pouces, retirez au
préalable le montant de la tige de 6
pouces et installez-le sur l’une des
extrémités de la tige de 12 pouces.
Conseil Pro Hunter:
Torsadez ou enveloppez de
ruban adhésif les extrémités
des ls an de faciliter leur
enlage dans la tige de
suspension.
 Loading...