

Hunt Electronic HVRM-T1600Q, HVRM-T800Q, HVRMT400M, HVRM-T1600M, HVRM-T800M Install & User's Manual

HVRM-T1600M / T800M / T400M,
T1600Q / T800Q
Install & User’s Guide
English

Install&User Manual
1
Introduction
Thank you for purchasing a HUNT digital video recorder.
This manual is for HVRM-T1600Q, HVRM-T800Q, HVRM-T1600M, HVRM-T800M, HVRM-
T400M. Before product installation and operation, please become thoroughly familiar with this
user manual and other manuals referenced by this manual.
This user manual and the software and hardware described here are protected by copyright law.
With the exception of copying for general use within fair use, copying and reprinting the user
manual, either partially or in entirety, or translating it into another language without the consent
of HUNT Inc. is strictly prohibited.
This specification may change without prior notice for improvement of product performance.
Product Warranty and Limits of Responsibility
The manufacturer does not assume any responsibility concerning the sale of this product and
does not delegate any right to any third party to take any responsibility on its behalf. The
product warranty does not cover cases of accidents, negligence, alteration, misuse or abuse.
No warranty is offered for any attachments or parts not supplied by the manufacturer.
Malfunctions due to negligence by the user
Deliberate disassembly and replacement by the user
Connection of a power source other than a properly rated power source
Malfunctions caused by natural disasters (fire, flood, tidal wave, etc.)
Replacement of expendable parts (HDD, FAN, etc.)
※ The warranty period for the HDD and Fan is one year after purchase.
This product is not for exclusive use of crime prevention but for assistance in cases as
fire or theft. We take no responsibility for damage from any incident.

Install&User Manual
2
Caution
As this equipment undergone EMC registration and suitable for business purpose, distributors
and users are aware of this point.
FCC Compliance Statement
Caution : Any changes or modifications in construction of this device which are not expressly
approved the party responsible for compliance could void the user's authority to operate the
equipment.
NOTE : This equipment has been tested and found to comply with the limits for a Class A
digital device, pursuant to part 15 of the FCC Rules. These limits are designed to provide
reasonable protection against harmful interference when the equipment is operated in a
commercial environment. This equipment generates, uses, and can radiate radio frequency
energy and, if not installed and used in accordance with the instruction manual, may cause
harmful interference to radio communications, Operation of this equipment in a residential
area is likely to cause harmful interference in which case the user will be required to correct
the interference at his own expense.
Warning
This is a class A product. In a domestic environment this product may cause radio interference
in which case the user may be required to take adequate measures
Warning
1. Risk of Explosion if Battery is replaced by an Incorrect Type. Dispose of Used Batteries
According to the Instructions
2. In case of changing built-in lithum battery, it should be replaced as same or kindred one to
prevent a danger of explosion. Since old batteries could be a factor of environment
contamination, be cautios to treat them.
3. Do not throw the batteries to fire or heating. Neither short circuiut or disassembly is
prohibited.
4. Do not charge the batteries provided with Remote Controller

Install&User Manual
3
Important Notice
1. Do not place heavy objects on the top of the product.
2. This equipment is indoor use and all the communication wiring are limited to inside of the
building
3. Product is for indoor use. It is not weatherproof. Use product with referring to its
environmental specifications (Temperature & Humidity). To clean the product, gently wipe the
outside with a clean dry cloth.
4. Product uses AC power of 110V ~ 240V. Be cautious not to cause electric damages to
product.
5. Be careful not to drop the product. Physical shocks may harm the product including internal
HDD. In addition, be sure the product is secured after installation.
6. Product is made of metal. Therefore you can hurt human beings if you throw it to them or hit
on them. When installing product, be cautious to locate on safe places where children are
unreachable.
7. If Product does not operate properly, please contact the closest HUNT distributor for after
sales service. Tampering or disassembling the product will void the warranty.
8. Security surveillance laws may differ for each country. Therefore, please contact the local
region first to avoid any surveillance law violations.
9. "Rack Mount Instructions - The following or similar
rack-mount instructions are included with the installation instructions:
A) Elevated Operating Ambient - If installed in a closed or multi-unit rack assembly, the
operating ambient temperature of the rack environment may be greater than room ambient.

Install&User Manual
4
Therefore, consideration should be given to installing the equipment in an environment
compatible with the maximum ambient temperature (Tma) specified by the manufacturer.
B) Reduced Air Flow - Installation of the equipment in a rack should be such that the amount
of air flow required for safe operation of the equipment is not compromised.
C) Mechanical Loading - Mounting of the equipment in the rack should be such that a
hazardous condition is not achieved due to uneven mechanical loading.
D) Circuit Overloading - Consideration should be given to the connection of the equipment to
the supply circuit and the effect that overloading of the circuits might have on overcurrent
protection and supply wiring. Appropriate consideration of equipment nameplate ratings
should be used when addressing this concern.
E) Reliable Earthing - Reliable earthing of rack-mounted equipment should be maintained.
Particular attention should be given to supply connections other than direct connections to
the branch circuit (e.g. use of power strips)."
Experience and technical skills are needed for the installation of this product as an improper
installation may cause fire, electric shocks, or defects. Any installation job should be performed
by the vendor you purchased this product from.
The content of this manual can differ according to firmware or Software upgrading, and the
standard and appearance of products may be changed for the improvement of quality without
an advance notice.

Install&User Manual
5
Contents
INTRODUCTION ............................................................................... 1
KEY FEATURES ........................................................................... 10
INSTALL MANUAL....................................................................... 13
1. FEATURE ................................................................................. 13
1.1 Supplied Accessories ................................................................................................. 13
1.1.1. HVRM-T1600M/ T800M/ T400M ......................................................................... 13
1.1.2. HVRM-T1600Q/ T800Q ...................................................................................... 14
1.2. Description & Function ............................................................................................... 15
1.2.1. Front ................................................................................................................... 15
1.2.2. Rear ................................................................................................................... 19
1.2.3. REMOTE CONTROLLER ................................................................................... 22
2. INSTALLATION ........................................................................ 24
2.1 Installation and Connection ........................................................................................ 24
2.1.1 Connecting & Running ........................................................................................ 24
2.2 Running OSD menu................................................................................................... 28
2.2.1 OSD menu configuration ..................................................................................... 28
2.2.2 Setting remote controller ..................................................................................... 29
2.2.3 Install examples .................................................................................................. 30
2.2.4 Basic Setting ...................................................................................................... 33
2.3 Connecting and configuring DIO ports........................................................................ 37
2.3.4 HDD ................................................................................................................... 49
2.3.5 Remote monitor and control ................................................................................ 51
2.3.6 External device connection ................................................................................. 52

Install&User Manual
6
USER MANUAL ........................................................................... 54
3 MENU USE .............................................................................. 54
3.1 Menu Structure .......................................................................................................... 54
3.2 Function Menu ........................................................................................................... 54
3.3 Factory Reset ............................................................................................................ 55
4 MONITORING .......................................................................... 61
4.1 Basic Screen ............................................................................................................. 61
4.2 Single Fll Screen Mode .............................................................................................. 61
4.3 Multi Screen Mode ..................................................................................................... 61
4.4 Screen Description .................................................................................................... 62
4.5 Auto Switch Mode ...................................................................................................... 62
4.5.1 System Standard Mode ...................................................................................... 62
4.5.2 User Sequence Mode ......................................................................................... 63
4.6 Event Screen ............................................................................................................. 63
4.7 Zoom Screen Mode ................................................................................................... 64
4.8 Pause Live Screen .................................................................................................... 64
4.9 PTZ Control ............................................................................................................... 65
4.9.1 Pan/Tilt .................................................................................................................... 66
4.9.2 Zoom/Focus............................................................................................................. 66
4.9.3 Load Preset ............................................................................................................. 66
4.9.4 Save Preset ............................................................................................................. 66
4.9.5 Auxiliary On ............................................................................................................. 67
4.9.6 Auxiliary Off ............................................................................................................. 67
4.9.7 Menu ....................................................................................................................... 67

Install&User Manual
7
5 PLAYBACK ............................................................................. 68
5.1 Playback Mode .......................................................................................................... 68
5.1.1 Playback on Standard monitor (16 / 9 / 4 division) ............................................... 68
5.1.2 Playback function ............................................................................................... 68
5.2 SEARCH MODE ........................................................................................................ 69
5.2.1 Time Search ....................................................................................................... 69
5.2.2 Schedule Search ................................................................................................ 69
5.2.3 Event Search ...................................................................................................... 70
5.2.4 Thumbnail Search............................................................................................... 71
5.3 Copy.......................................................................................................................... 72
5.3.1 CD/DVD ............................................................................................................. 72
5.3.2 RE4 .................................................................................................................... 73
5.3.3 AVI ..................................................................................................................... 74
6. CONFIGURATION .................................................................... 75
6.1 Recording Structure ................................................................................................... 75
6.2 System Setup ............................................................................................................ 75
6.2.1 Date/Time ........................................................................................................... 75
6.2.2 Disk .................................................................................................................... 78
6.2.3 User Setup ......................................................................................................... 80
6.2.4 Utility .................................................................................................................. 82
6.3 Network ..................................................................................................................... 86
6.3.1 xDSL .................................................................................................................. 88
6.3.2 WRS ................................................................................................................... 88
6.3.3 Radius ..................................................................................................................... 89
6.4 Device Setup ............................................................................................................. 90
6.4.1 Camera Setup .................................................................................................... 90
6.4.2 Monitor Setup ..................................................................................................... 92
6.4.3 Audio Setup ........................................................................................................ 93
6.4.4 Text Setup .......................................................................................................... 94

Install&User Manual
8
6.4.5 Serial Setup ........................................................................................................ 95
6.5 Event Setup ............................................................................................................... 97
6.5.1 Event Check ....................................................................................................... 97
6.5.2 Sync Event ......................................................................................................... 98
6.5.3 Motion Detection ............................................................................................. 103
6.5.4 Sensor ............................................................................................................ 104
6.5.5 Preset ............................................................................................................. 104
6.6 Recording setup .................................................................................................... 105
6.6.1 Program setup ................................................................................................ 105
6.6.2 Manual/Schedule recording setup ................................................................... 107
7. WEB VIEWER ....................................................................111
7.1 System requriement............................................................................................... 111
7.2 Login ..................................................................................................................... 111
7.3 User Setup ............................................................................................................ 112
7.4 Browser available .................................................................................................. 112
7.5 Monitor .................................................................................................................. 113
7.5.1 Screen division and changing video position ................................................... 113
7.5.2 Move to Playback ........................................................................................... 114
7.5.3 Channel On/Off ............................................................................................... 115
7.5.4 Sensor Indication ............................................................................................ 115
7.5.5 Relay opeartion .............................................................................................. 115
7.5.6 Using microphone ........................................................................................... 115
7.5.7 Event data ...................................................................................................... 116
1.2.1. Video Recording & Save saving ...................................................................... 116
7.5.8 UsingPTZ ....................................................................................................... 117
7.5.9 Using Audio .................................................................................................... 118
7.5.10 Closing Video Channel ................................................................................... 118
7.6 Playback................................................................................................................ 119
1.2.2. Video Division & Changing Channel ................................................................ 119
7.6.1 Image recording .............................................................................................. 119

Install&User Manual
9
7.6.2 Printing ........................................................................................................... 120
7.6.3 Backup ........................................................................................................... 120
7.6.4 Web Monitor ................................................................................................... 121
7.6.5 Channel On/Off ............................................................................................... 121
7.6.6 Saving time & Checking Rec. Capacity ........................................................... 121
7.6.7 Searching Calander ............................................................................................. 121
7.6.8. Functional function at the buttom of monitor .................................................... 122
8 JAVA VIEWER ......................................................................123
9 USER MANUAL FOR MOBILE VIEWER ............................124
9.1 Log-In page ........................................................................................................... 124
9.2 Monitoring page ..................................................................................................... 124
TROUBLE SHOOTING .............................................................126
AVAILABLE HDD ......................................................................128
COMPATITABLE CD/DVD LIST ...............................................129
SPECIFICATION........................................................................129
HVRM-T1600M, HVRM-T800M, HVRM-T400M ................................................................ 129
HVRM-T1600Q/ T 800Q ................................................................................................... 131
PRODUCT SIZE ........................................................................135

Install&User Manual
10
KEY FEATURES
Monitoring Screen
Supprots real live video with high resolution per each channel and variable display mode.
Real H.264 Video
Varianble display mode
HVRM-T1600M : 1/4/9/10/16 channel mode
HVRM-T800M : 1/4/9 channel mode
HVRM-T400M : 1/4 channel mode
HVRM-T1600Q : 1/4/9/10/16 channel mode
HVRM-T800Q : 1/4/9 channel mode
Auto Switching
HVRM-T1600M : Composite x 2, DVI x 1
HVRM-T800M : Composite x 2, DVI x 1
HVRM-T400M : Composite x 2, DVI x 1
HVRM-T1600Q : Composite x 2, VGA x 1
HVRM-T800Q : Composite x 2, VGA x 1
Audio Recording
Supprots real-time audio input and recording
Simultaneous 4ch audio input & recording available
Input : 4Ch, Output : 1ch (Rear)
Simultaneous audio recording and playback available

Install&User Manual
11
Recording
It supports max. 480ips/HVRM-T1600M, HVRM-T1600Q, 240ips/HVRM-T800M, HVRM-
T800Q, 120ips/HVRM-T400M
recording at High-Resolution (H.264) and available to record max. 5
seconds before triggering an event. Also, convert function is available protecing privacy.
H.264 Video recording with High-Quality
HVRM-T1600M : CIF(360x240) 480ips
HVRM-T800M : HALF(704x240) 240ips
HVRM-T400M : D1 (704x480) 120ips
HVRM-T1600Q : CIF(360x240) 480ips
HVRM-T800Q : HALF(704x240) 240ips
Supprots manual & schedule recording
Video loss detection
Supprots archiving event list(Sensor, Video Loss, Motion detection, Text)
Available record Max 5 seconds before triggering an event per each channel
Search/ Playback
It supports variable and convenient functions for search & playback
Play back by time, date, Channel
Easy and convenient search using mouse
Pre/post search from a freeze frame
Play back by Event (Sensor, Video Loss, Motion Detection, Text
Easy & convenient search using Remote Controller & Jog/Shuttle
(except HVRM-T1600Q, HVRM-T800Q)
Back up device
It is available to backup to DVD-R, CD-R, USB memory by user’s choice.

Install&User Manual
12
(HVRM-T1600Q, HVRM-T800Q is available as an option.)
Supprots various back up device : DVD-R, CD-R, USB memory
Extention HDD Storage (External extention Storage device)
Network
It supports variable network like LAN, XDSL and easily control from remote site using PC
client viewer.
E-mail notification thru. TCP/IP, DHCP in case of triggering an event
Live monitoring form remote site (Whole screen or available to select quad
screen
Available to playback, recording, search and DVR management thru.
network viewer in PC
Available to record, search & playback by time from remote site.
Supprots 10/100Mbps Ethernet/xDSL
Multiple DVR connection
Etc.
Supports User friendly GUI and mouse function
Easy and simple firmware upgrade thru. USB memory
Recorded data back up thru. USB port
PTZ Control (SPEED DOME), PRESET fucntion
Available to control up to 16 DVRs with one remote controller
Install&User Manual
13
Install Manual
1. Feature
1.1 Supplied Accessories
Unpack and check all the items as below
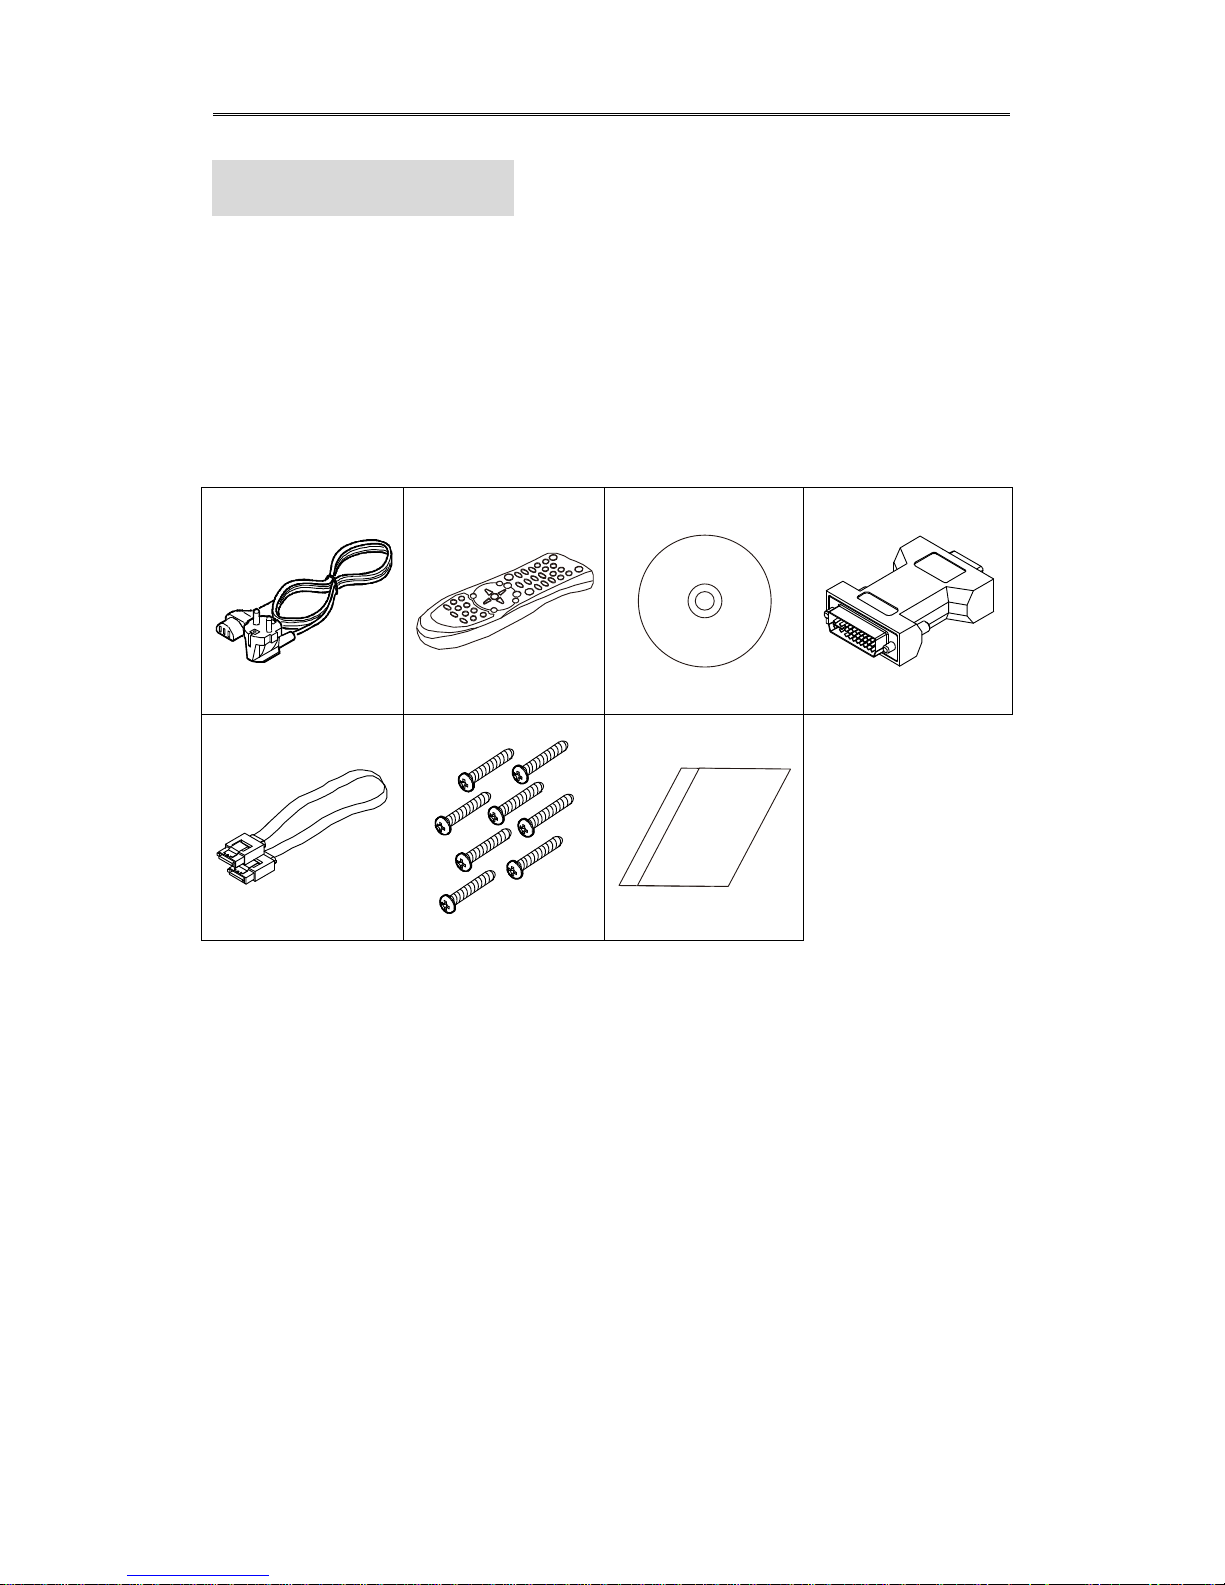
1.1.1. HVRM-T1600M/ T800M/ T400M
AC Cord, Remocon, Setup CD, DVI Converter, SATA Cable, HDD Fixing Screw, Quick Guide
Install&User Manual
14
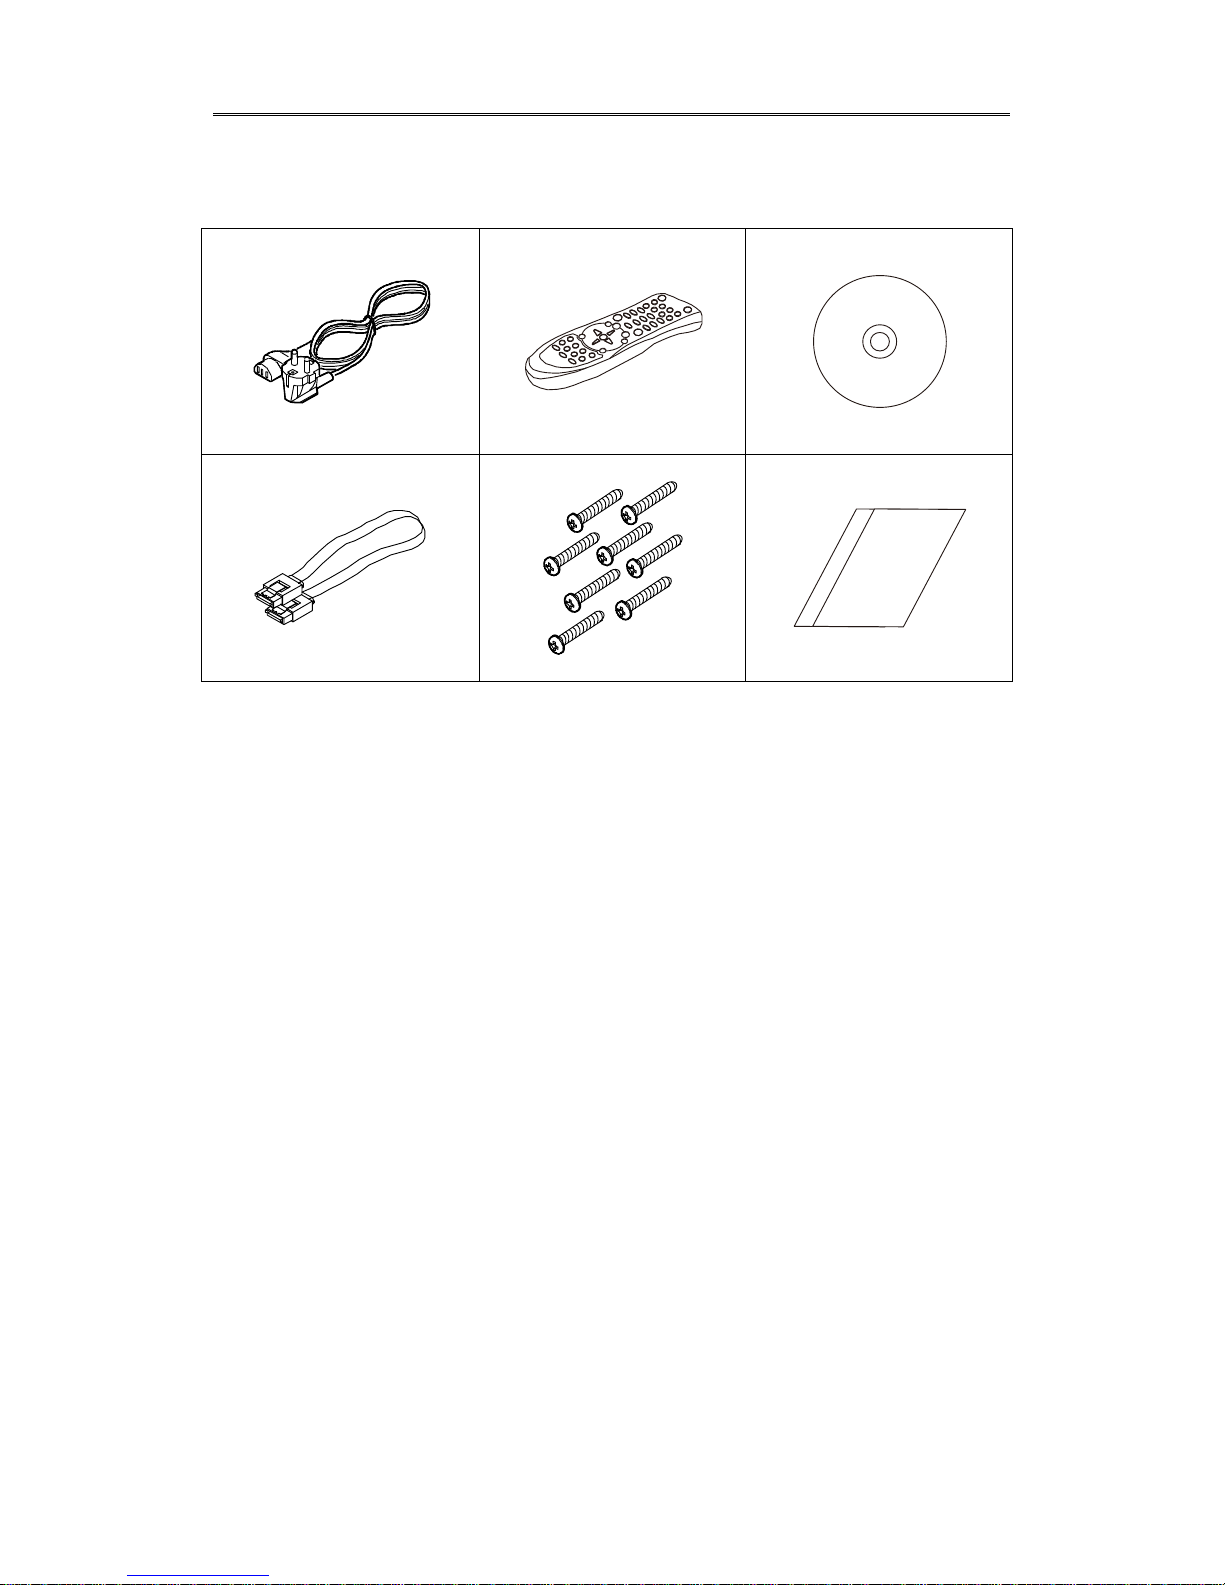
1.1.2. HVRM-T1600Q/ T800Q
AC Cord, Remocon, Setup CD, SATA Cable, HDD Fixing Screw, Quick Guide
Install&User Manual
15
1.2. Description & Function
1.2.1. Front
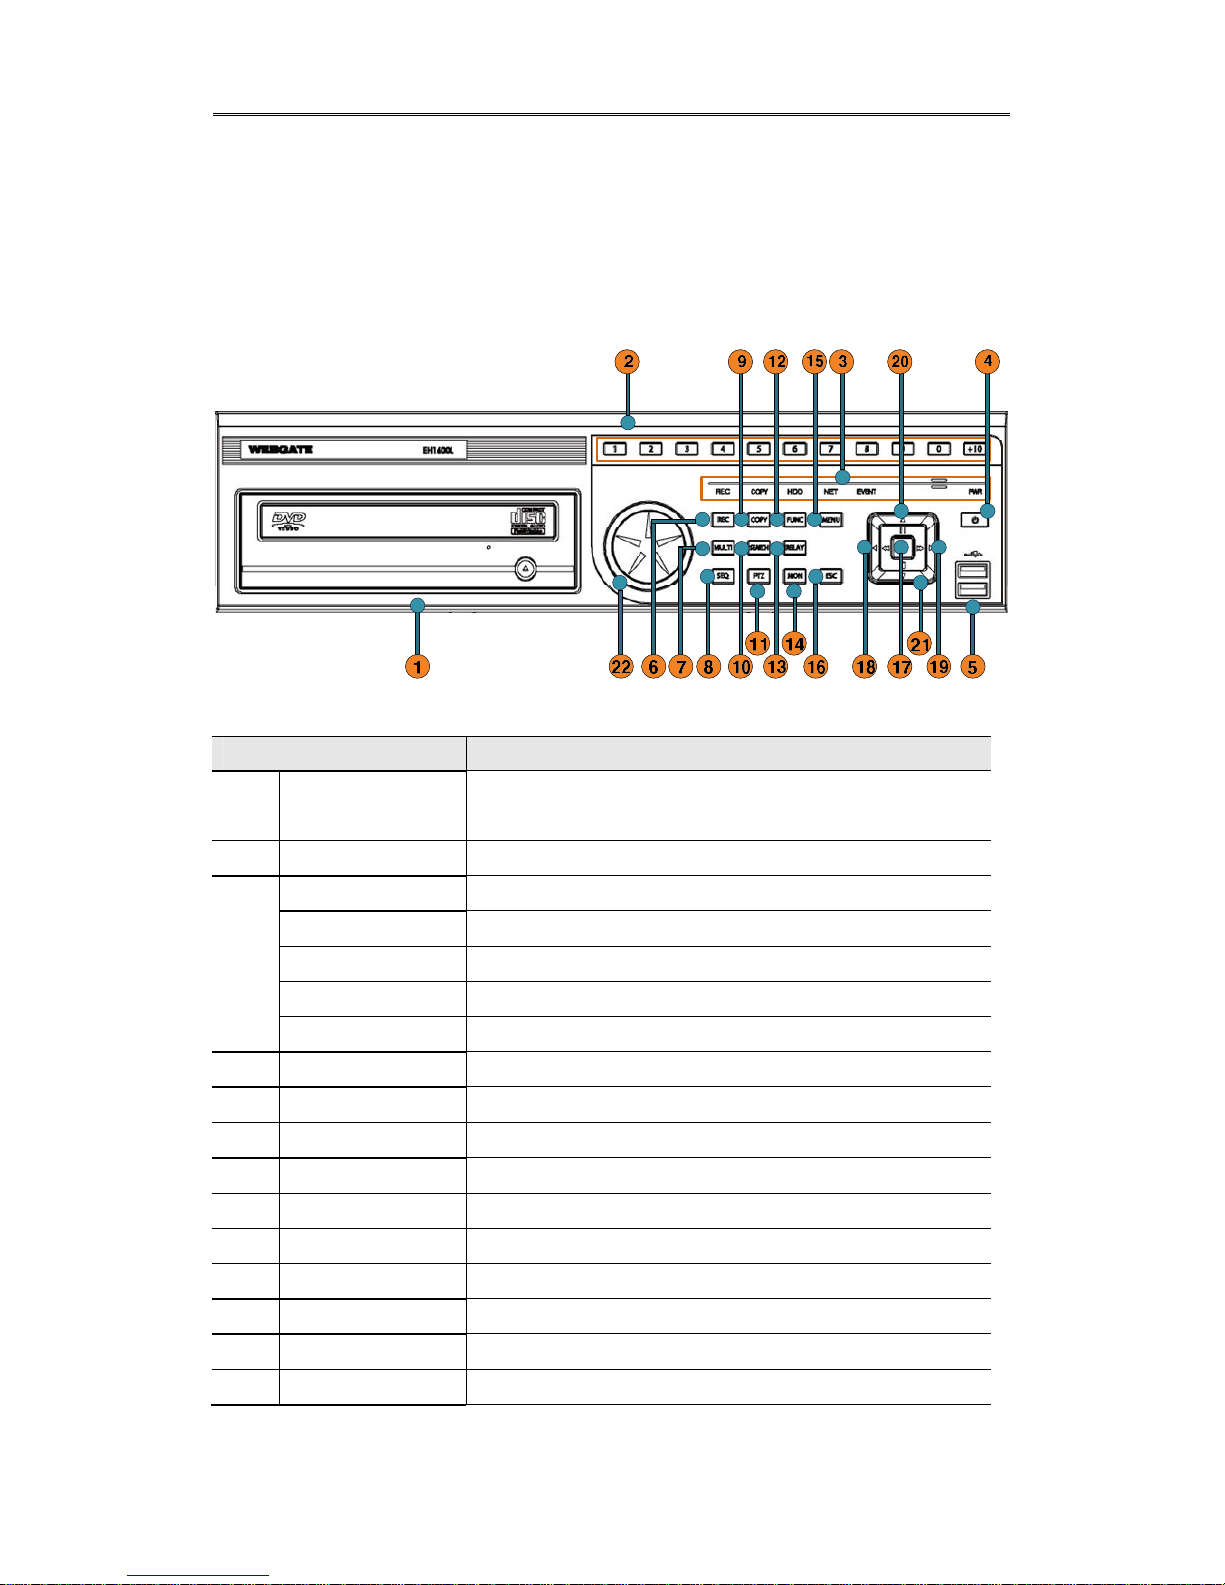
1.2.1.1. HVRM-T1600M/ T800M/ T400M Front
Item Description
1
DVD-Multi (For
Back up)
Back up use for recorded data by DVD/CD media
2 Channel Button To select video input channel
3
REC LED Displays recording status
COPY LED Displays copy status
HDD LED Displays HDD running.
NETWORK LED Displays network connection
EVENT LED Displays event detection
4 Power Turn on/ off power
5 USB port Use connecting USB memory or Mouse
6 REC To start or stop manual recording
7 Multi To change DVISION in live or playback mode
8 SEQ To run or stop user sequence
9 Copy To enter copy mode
10 Search To enter search mode
11 PTZ To start PTZ function or stop
12 Func To enter function mode
13 Relay Manual On/Off button for relay

Install&User Manual
16
14 Mon To change Monitor/ Stop
15 Menu To enter menu
16 ESC To escape from menu or close pop-up window
17
Enter/Play To enter playback mode or select menu
18 ◀/REW To move or select in menu and change replay speed to
reverse direction in playback mode
19 ▶/FWD To move or select in menu and change replay speed to
forward direction in playback mode
20 ▲/Pause To move or select in menu and pause live/ replay video
21 ▼/Stop To stop replay in playback mode
22
Jog/ Shuttle
STEP function control, Playback direction change,
Playback speed control
Install&User Manual
17
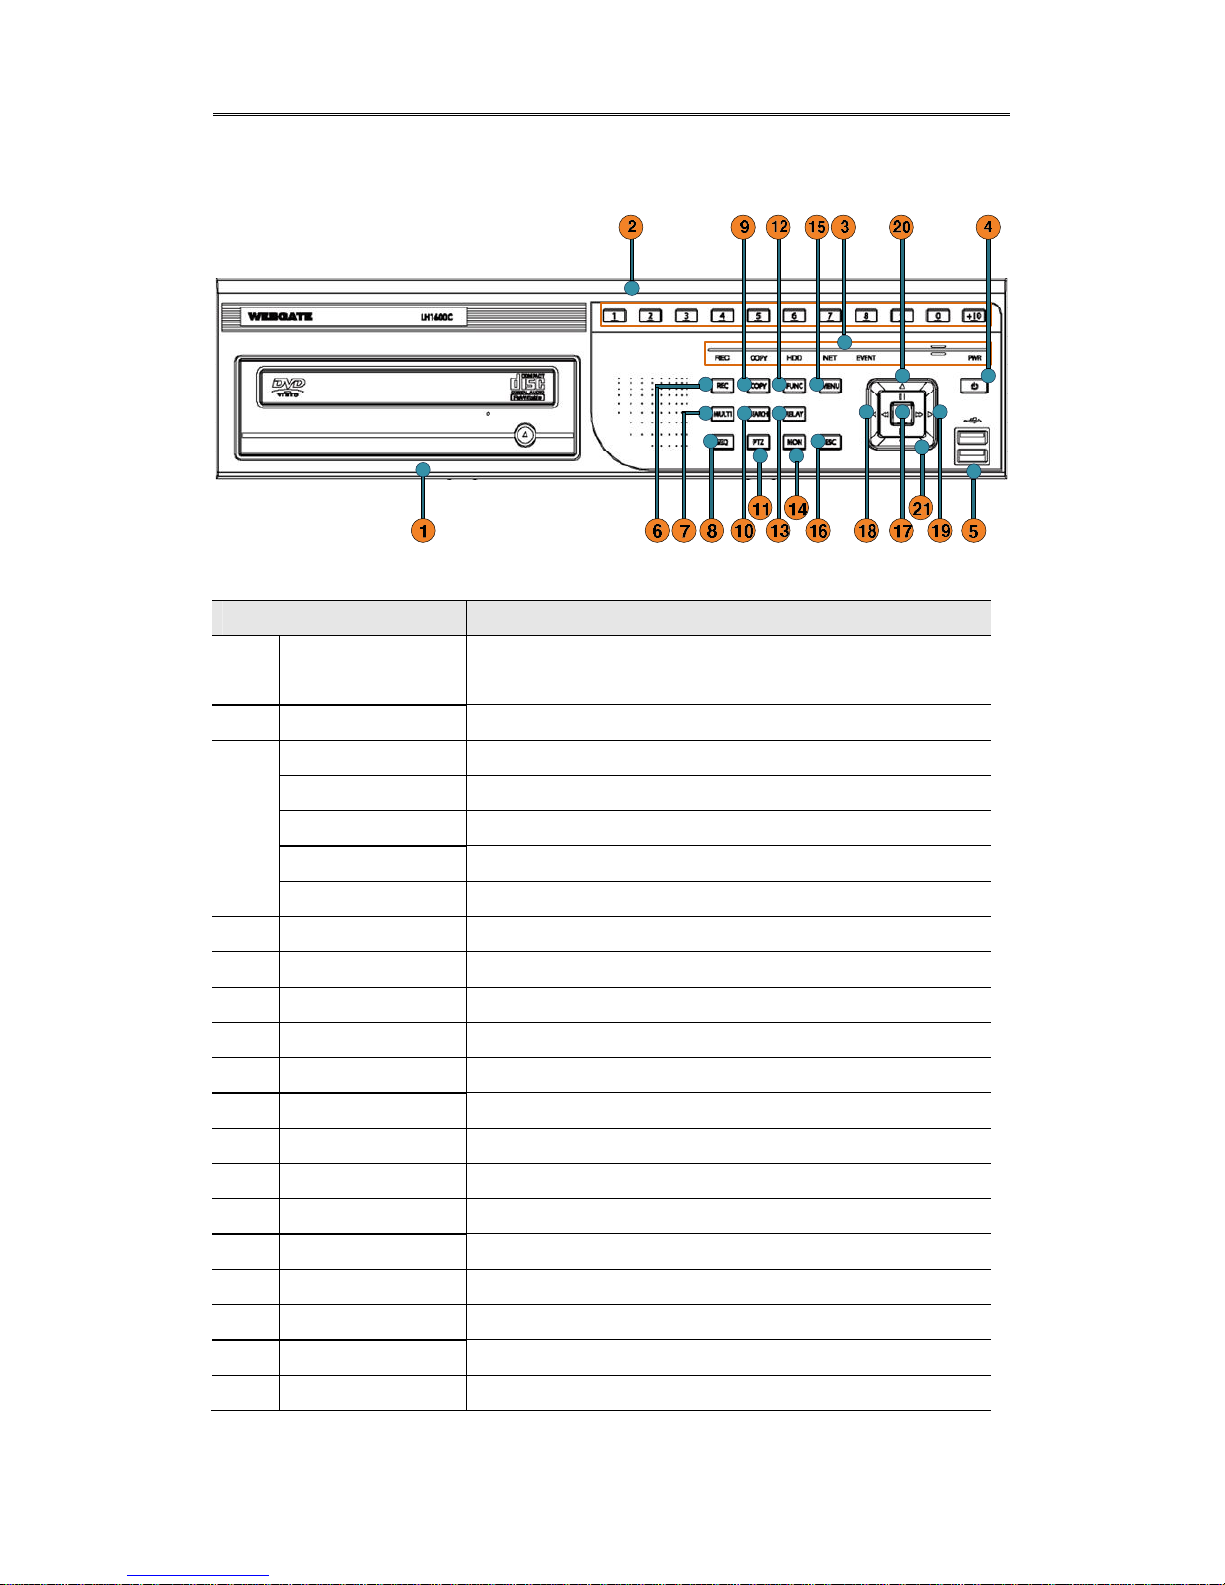
1.2.1.2. HVRM-T1600Q/ T800Q Front
Item Description
1
DVD-Multi (For
Back up)
Back up use for recorded data by DVD/CD media
2 Channel Button To select video input channel
3
REC LED Displays recording status
COPY LED Displays copy status
HDD LED Displays HDD running.
NETWORK LED Displays network connection
EVENT LED Displays event detection
4 Power Turn on/ off power
5 USB port Use connecting USB memory or Mouse
6 REC To start or stop manual recording
7 Multi To change DVISION in live or playback mode
8 SEQ To run or stop user sequence
9 Copy To enter copy mode
10 Search To enter search mode
11 PTZ To start PTZ function or stop
12 Func To enter function mode
13 Relay Manual On/Off button for relay
14 Mon To change Monitor/ Stop
15 Menu To enter menu
16 ESC To escape from menu or close pop-up window
17
Enter/Play To enter playback mode or select menu

Install&User Manual
18
18 ◀/REW To move or select in menu and change replay speed to
reverse direction in playback mode
19 ▶/FWD To move or select in menu and change replay speed to
forward direction in playback mode
20 ▲/Pause To move or select in menu and pause live/ replay video
21 ▼/Stop To stop replay in playback mode
Install&User Manual
19
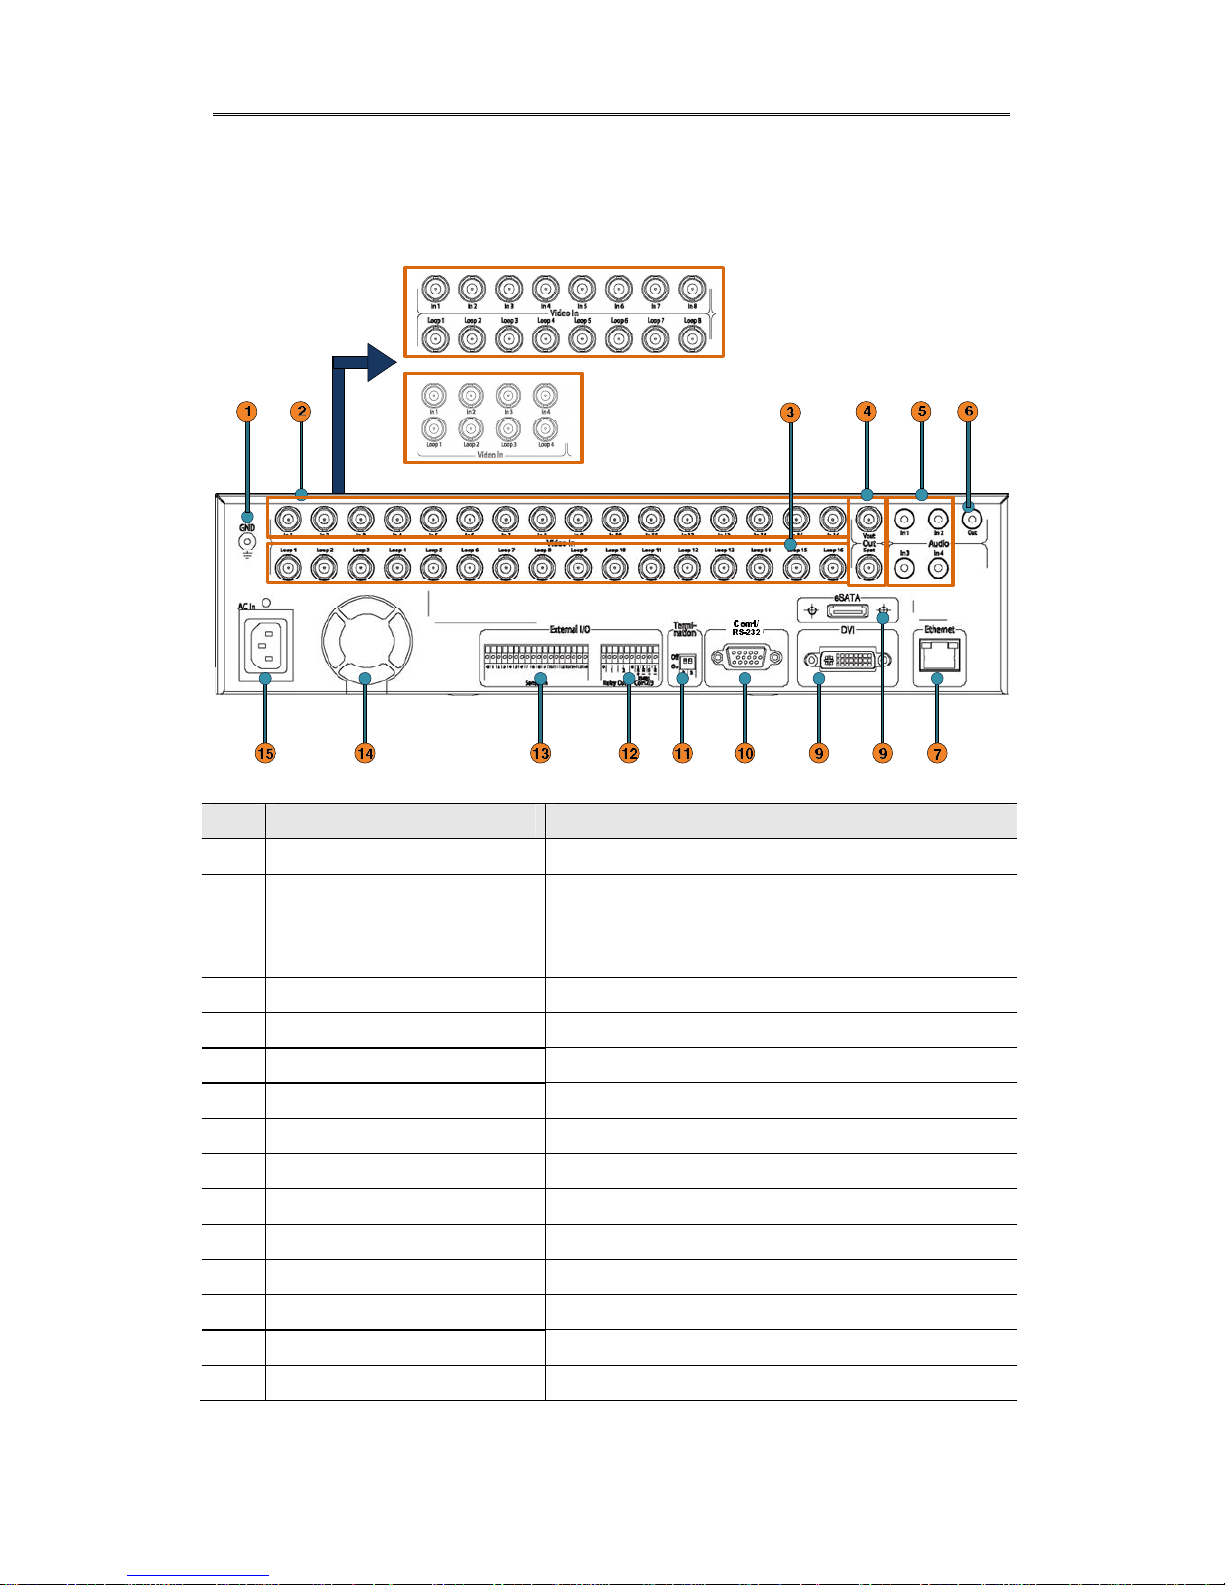
1.2.2. Rear
1.2.2.1. HVRM-T1600M/ T800M/ T400M REAR
번호
Input/ Output name Descrtiption
1 Ground Ground between DVR & external device
2 CH1~16 BNC input for camera connection
HVRM-T1600M : 16EA, HVRM-T800M : 8EA,
HVRM
T400M : 4EA
3 Loop out BNC output(Loop) for camera connection
4 Monitor/ Spot BNC connection for monitor output
5 Audio Input(RCA) RCA connection for Audio input
6 Audio Output Speaker output terminal
7 Ethernet For network connection (RJ-45)
8 eSATA eSATA external storage connection
9 DVI OUTPUT Output for DVI monitor connection
10 RS-232C D-Sub Text equipment, Keyboard connection
11 Termination Ohm Termination Ohm for Com2, Com3
12 Relay/Serial Connection for Relay and Serial(RS-485)
13 Sensor IN Input for external sensor
14 FAN Cooling system against over heating

Install&User Manual
20
번호
Input/ Output name Descrtiption
1 Ground Ground between DVR & external device
15 Power connector Socket for AC100V~AC240V power cord
Install&User Manual
21
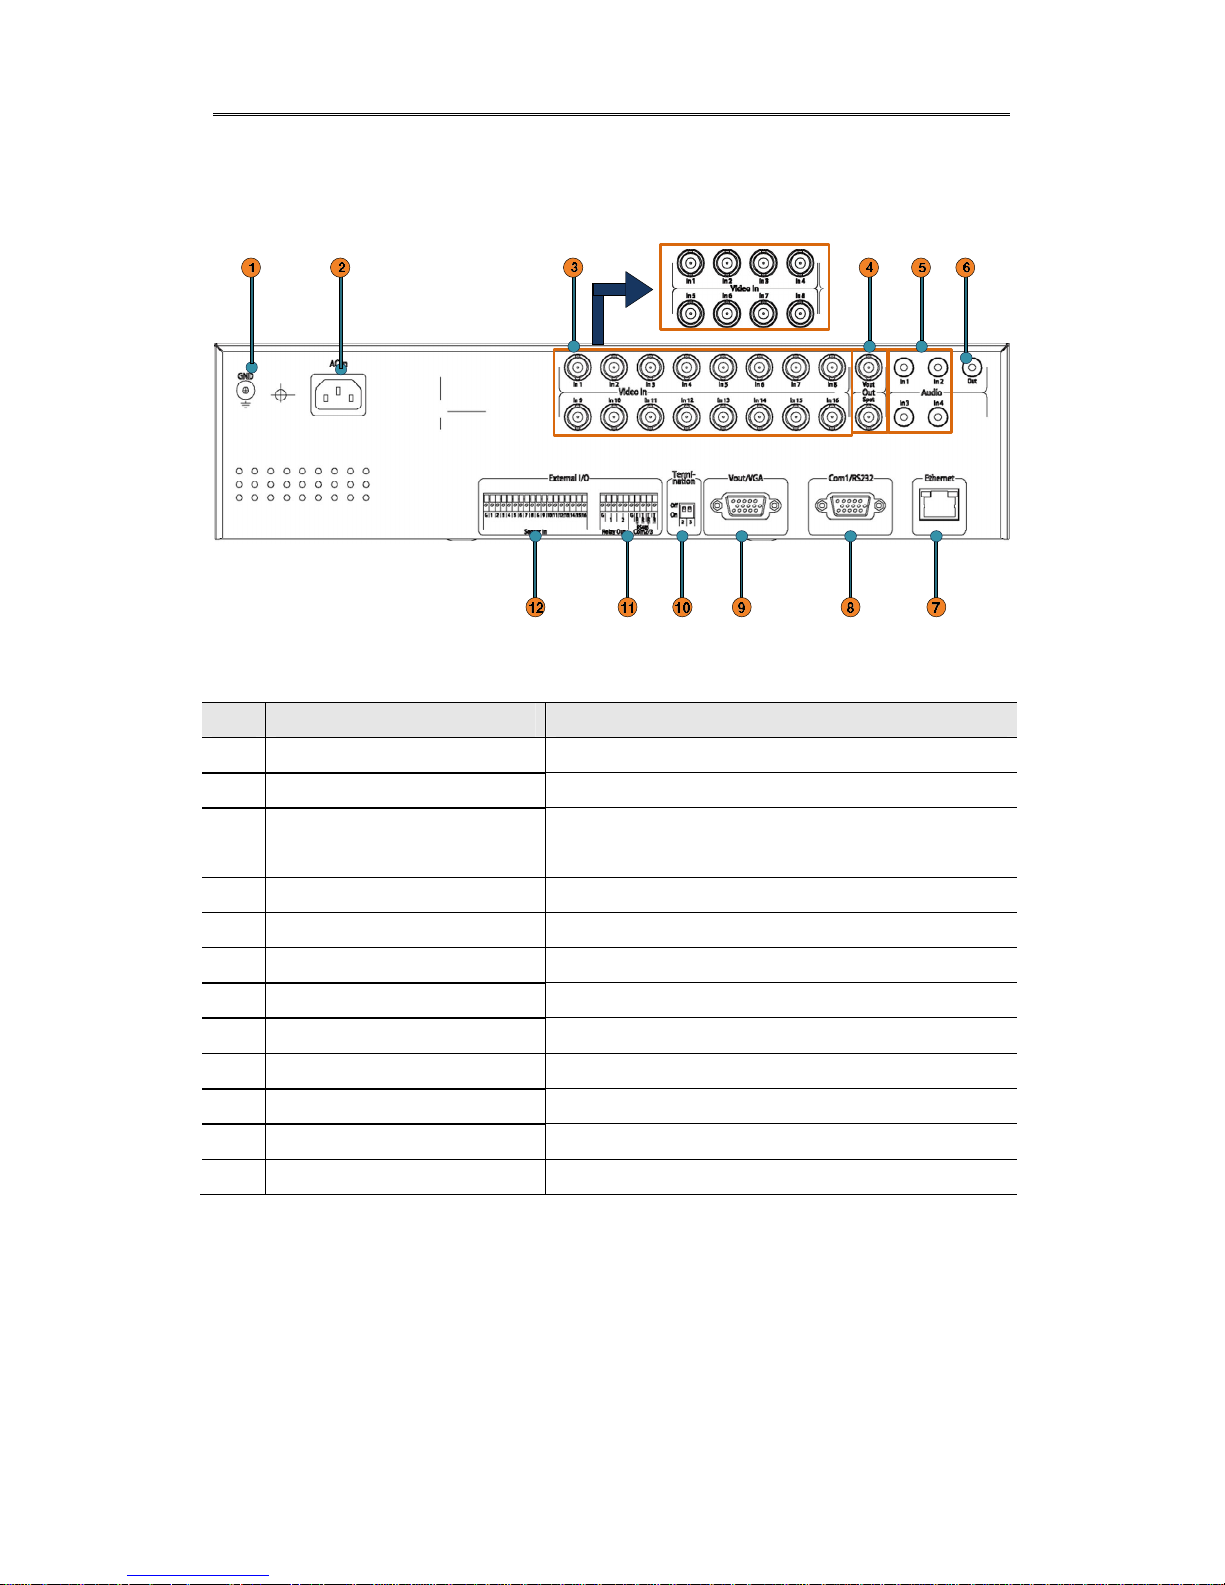
1.2.2.2. HVRM-T1600Q/ T800Q REAR
번호
Input/ Output name Descrtiption
1 Ground Ground between DVR & external device
2 Power connector Socket for AC100V~AC240V power cord
3 CH1~16 BNC input for camera connection
HVRM-T1600Q : 16EA, HVRM-T800Q : 8EA
4 Monitor/ Spot BNC connection for monitor output
5 Audio Input(RCA) RCA connection for Audio input
6 Audio Output Speaker output terminal
7 Ethernet For network connection (RJ-45)
8 RS-232C D-Sub Text equipment, Keyboard connection
9 VGA OUTPUT Output for VGA monitor connection
10 Termination Ohm Termination Ohm for Com2, Com3
11 Relay/Serial Connection for Relay and Serial(RS-485)
12 Sensor IN Input for external sensor
Install&User Manual
22
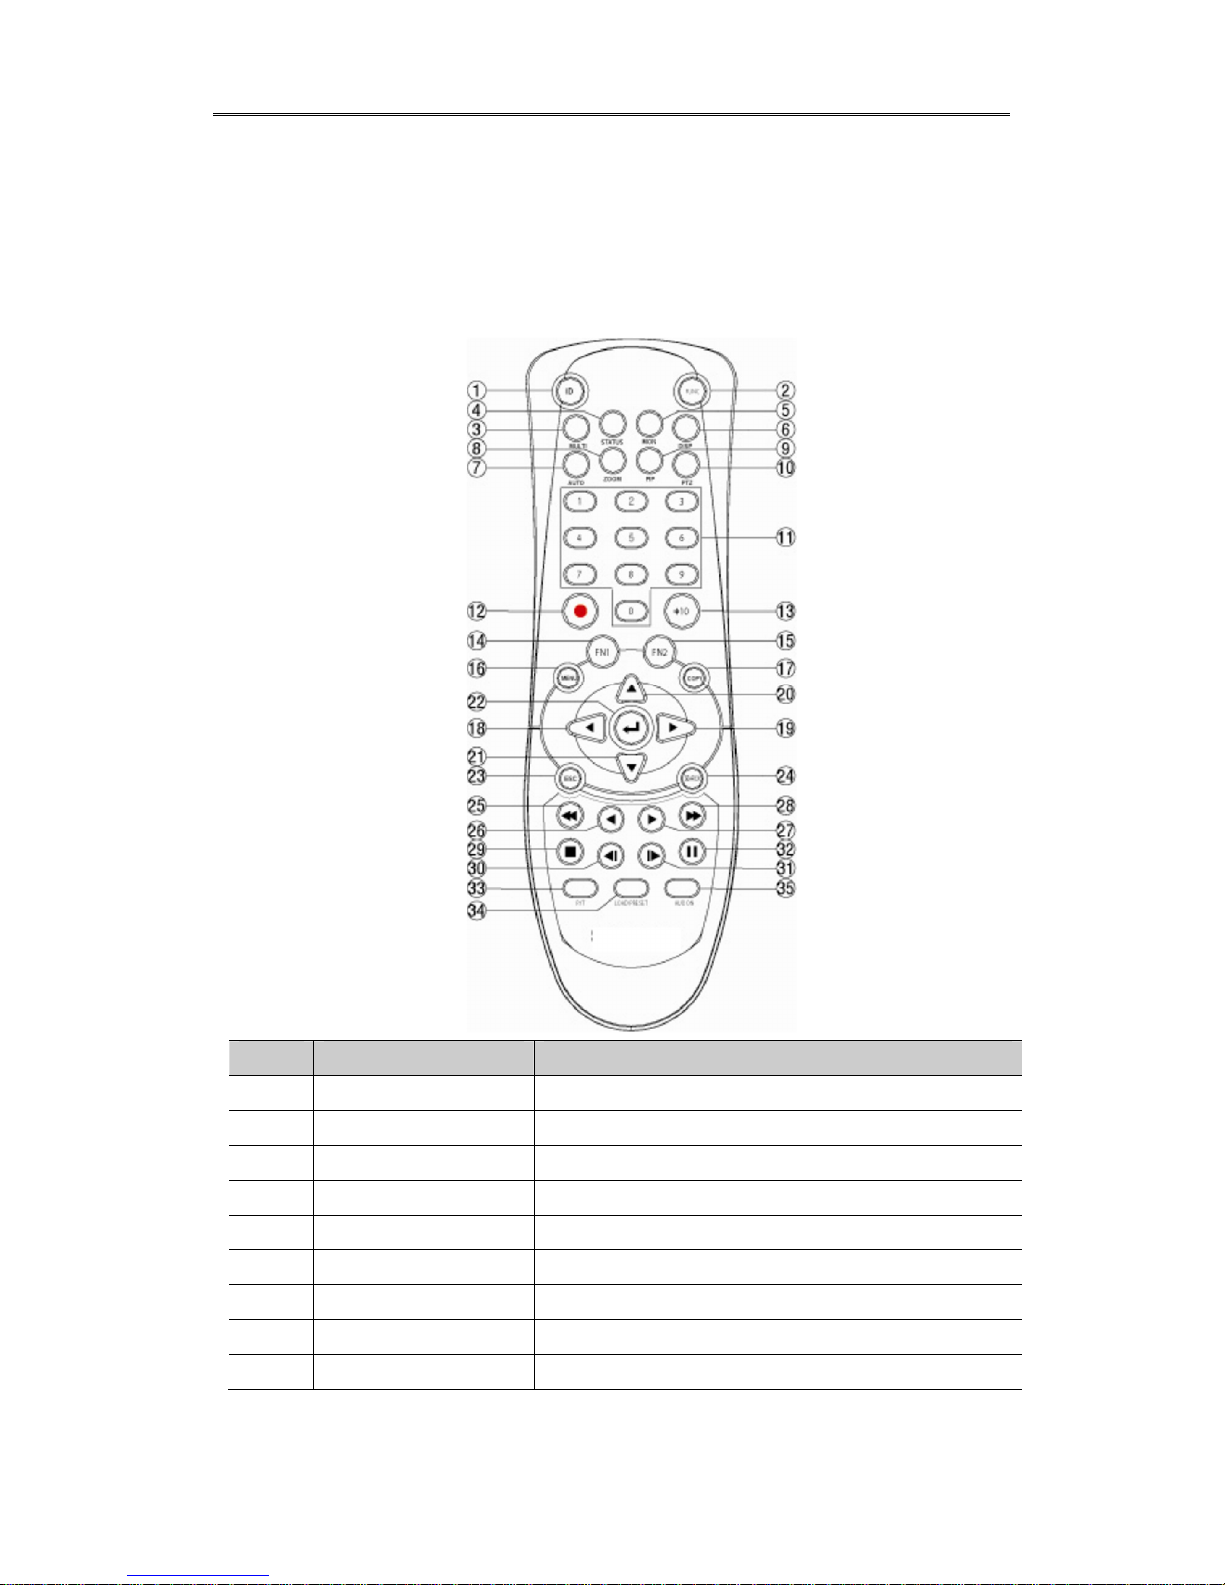
1.2.3. REMOTE CONTROLLER
It is available to use all functions of DVR. If several DVR are set with unique ID numbers,
they can be controlled with one remote controller. To use remote controller, it is necessary
to set ID first which want use. Keep pressing ID button repetedely (Up to Max. 16 times)
and use it matching DVR & ID.
No. Iten Description
1 ID To select Remote Controller ID
2 LOCK Not use
3 COPY To indicate copy menu, copy recorded data to USB
4 BACKUP Not use
5 RELAY ON To manually ON
6 RELAY OFF To manually OFF
7 SEQ Auto sequencing
8 MULTI To change division
9 ZOOM To run digital zoom

Install&User Manual
23
10 SEARCH To indicate search menu
11 CHANNEL BUTTON To select channel
12 SELECT Not use
13 +10 In case of selecting over 10
(+10 + 1)
14 FN1 Not use
15 FN2 Not use
16 MENU Covert to menu screen
17 HELP Not use
18 ◀/REW Move setting menu to left direction/REW
19 ▶/FWD Move setting menu to right direction/FWD
20 ▲/PAUSE Move setting menu to top direction/PAUSE
21 ▼ Move setting menu to bottom direction/STOP
22 ENTER/PLAY Menu selection/Playback
23 ENTER To select menu
24 EXIT To cancel setting, escape from menu
25 FAST REWIND(◀◀) Speedy replay to reverse direction
26 REWIND PLAY(◀) Replay to reverse direction
27 FORWARD PLAY(▶) Repleay to forward direction
28 FAST FORWARD
(▶▶)
Speedy replay to forward direction
29 STOP( ) To stop replay
30 STEP REVERSE(◀l) Replay to reverse direction by each frame
31 STEP FORWARD (l▶) Replay to forward direction by each frame
32 PAUSE(ll) To freeze playback
33 P/T PAN/TILT Control
34 LOAD PRESET To read preset
35 AUX ON Auxiliary ON
Install&User Manual
24
2. Installation
2.1 Installation and Connection
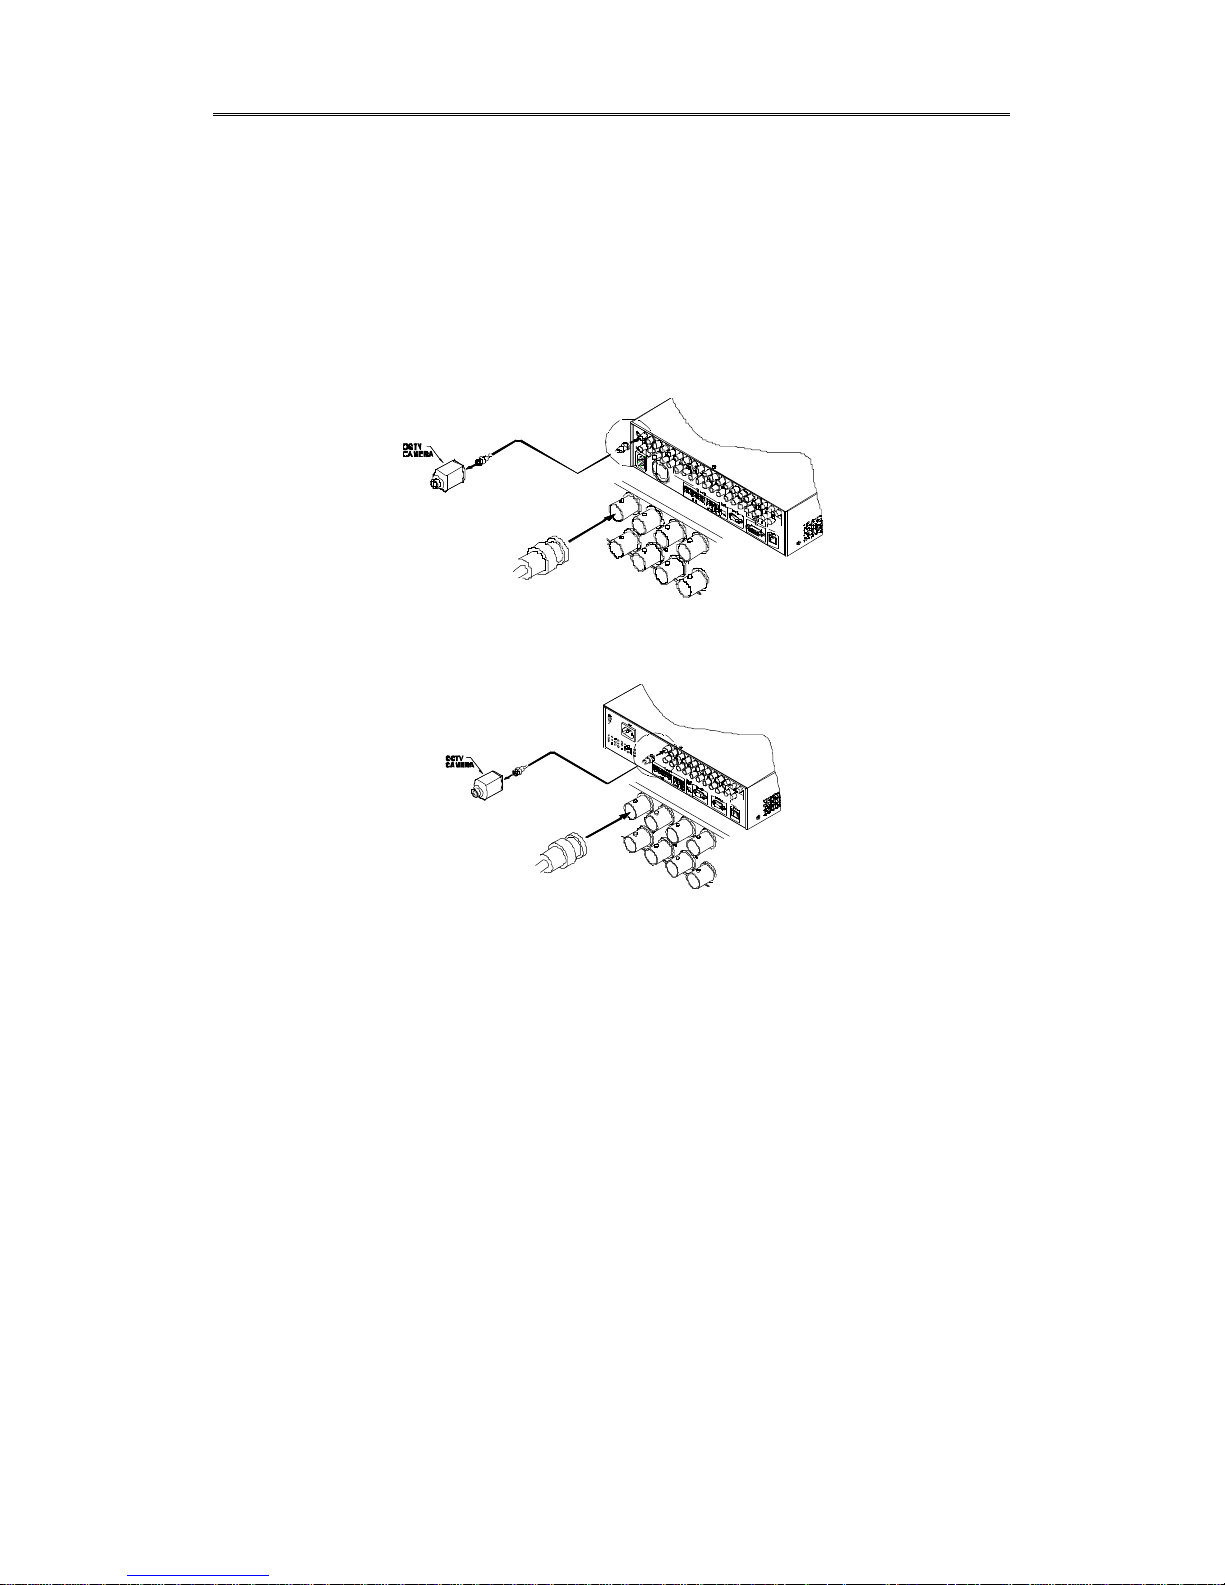
2.1.1 Connecting & Running
2.1.1.1 Connecting camera
Connect CCTV camera to DVR with BNC cable as below
[HVRM-T1600M/ T800M/ T400M]
[HVRM-T1600Q/ T800Q]
- The video type for all channels should be either NTSC or PAL, not be combined both
- DVR sets video signal’s impedance (75Ω) automatically. Impedence is set as 75 Ω basically. If
connecting a dvice to video output, impedance will be “Hi-z” status.
- Video Type (NTSC/PAL) should be changed after booting DVR. The order of camera
recognition follows ch1 through Ch16 camera amd 1st recognized camera type leads other
camera type.
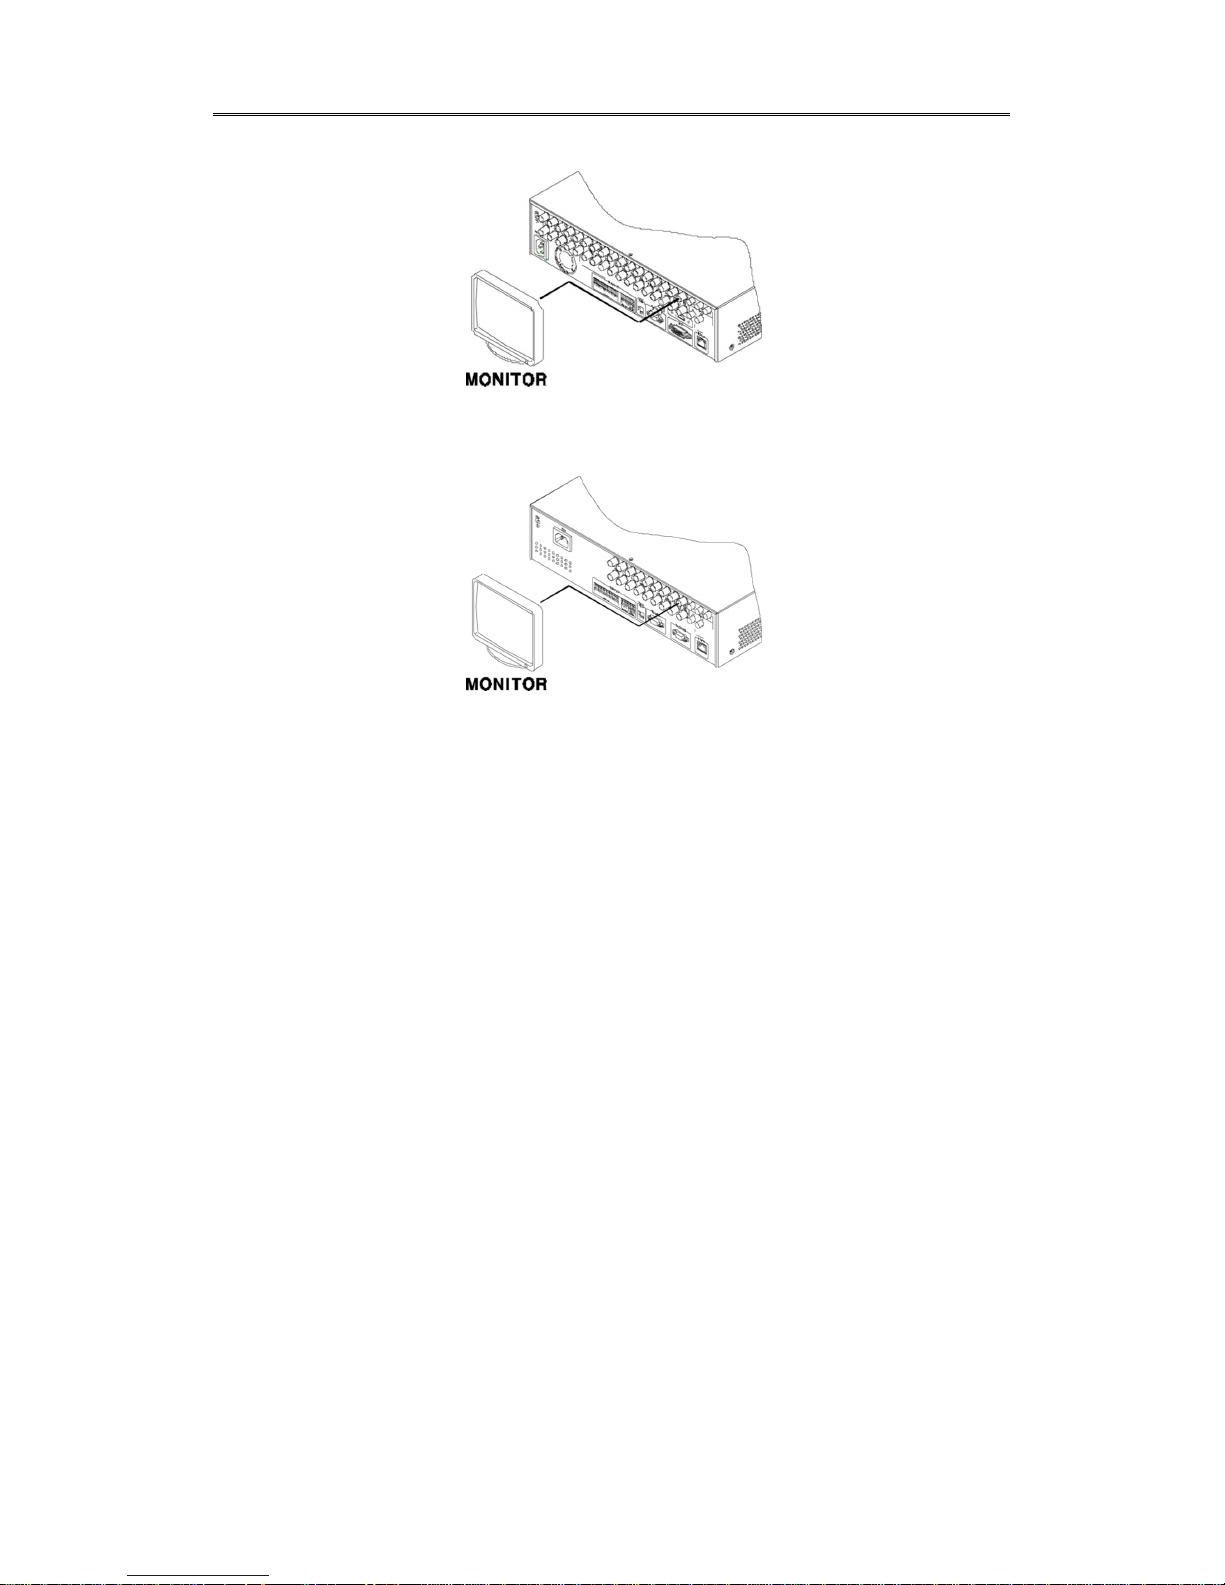
2.1.1.2 Connecting monitor
Connect CCTV monitor to DVR with BNC cable as below.
Will be able to connect BNC, DVI and VGA.
Install&User Manual
25
[HVRM-T1600M/ T800M/ T400M]
[HVRM-T1600Q/ T800Q]

Install&User Manual
26
2.1.1.3 Connecting Audio
Connect audio signal to DVR with using RCA cable or D-SUB as below;
[HVRM-T1600M/ T800M/ T400M]
[HVRM-T1600Q/ T800Q]
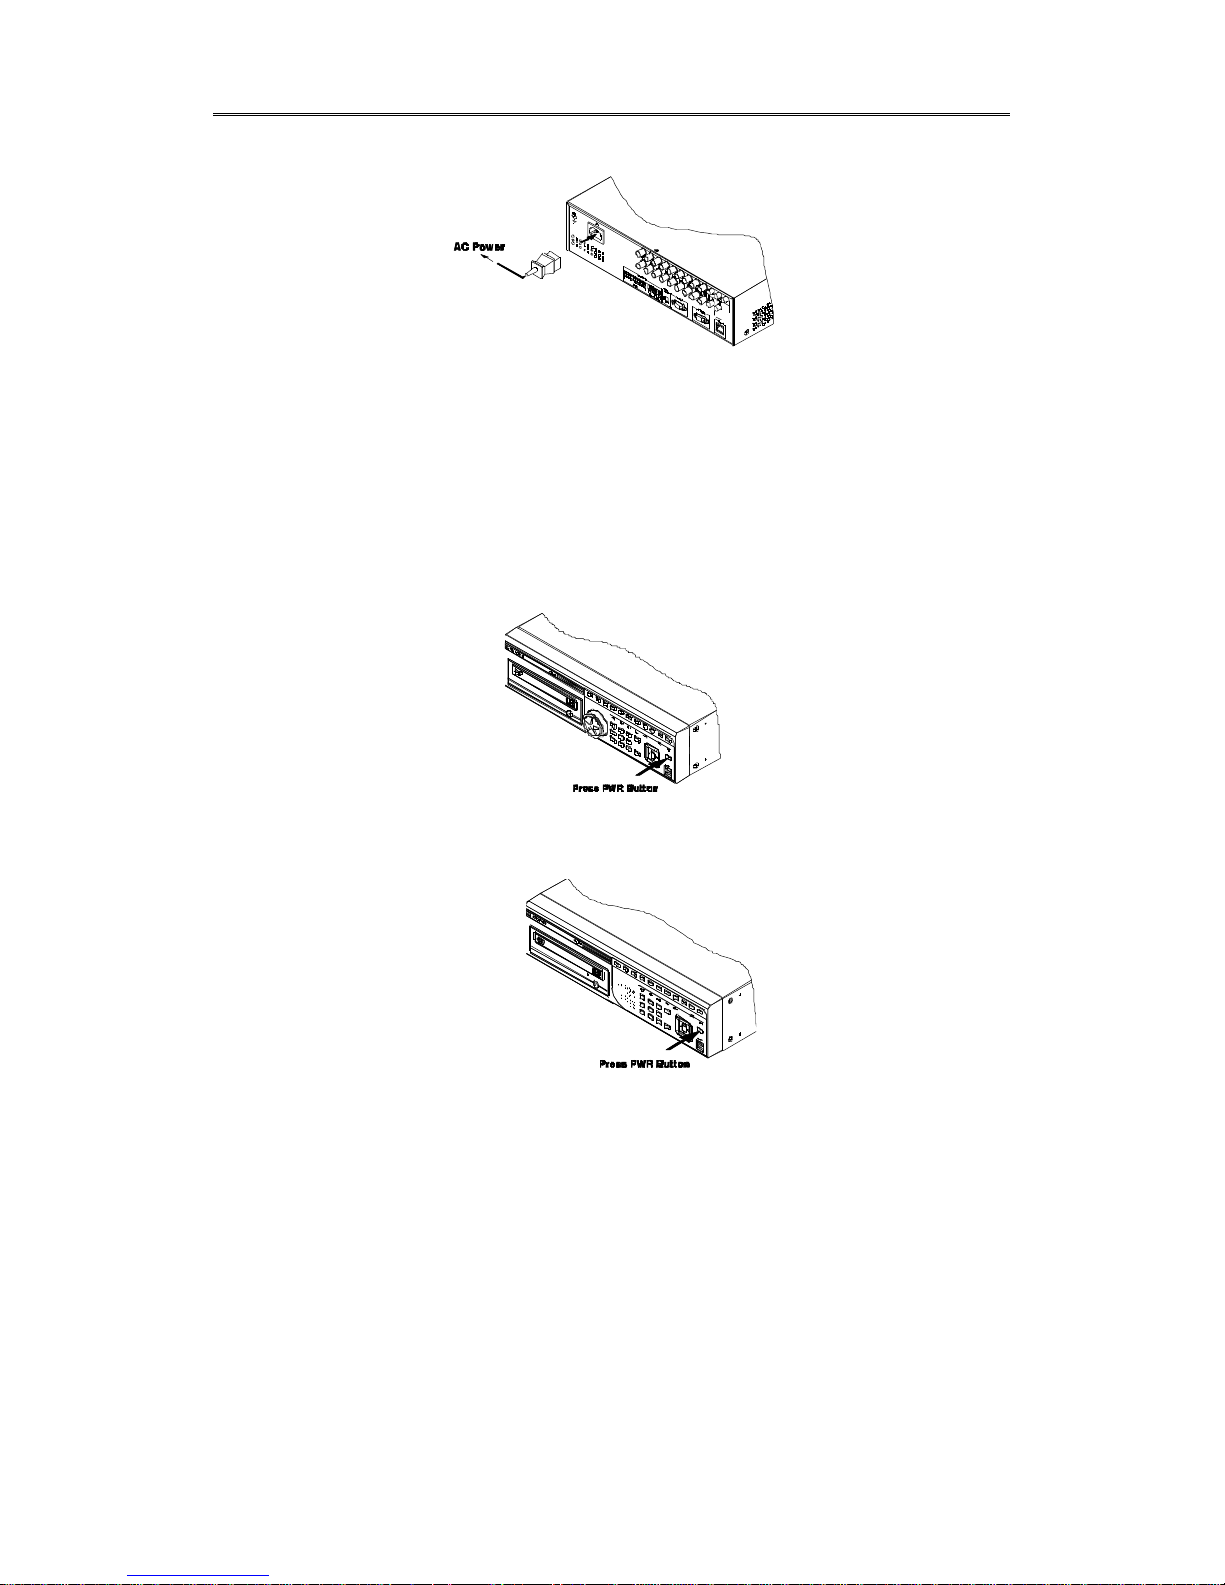
2.1.1.4 Supplying Power
Connect power cable as below;
[HVRM-T1600M/ T800M/ T400M]
Install&User Manual
27
[HVRM-T1600Q/ T800Q]
- When supplying power, DVR starts booting automatically.
- In order to cut off power, press power switch on DVR front during 5 seconds, then select
“YES” after appearing a pop-up window.
- For supplying power again, push the Power button.
[HVRM-T1600M/ T800M/ T400M]
[HVRM-T1600Q/ T800Q]
Install&User Manual
28
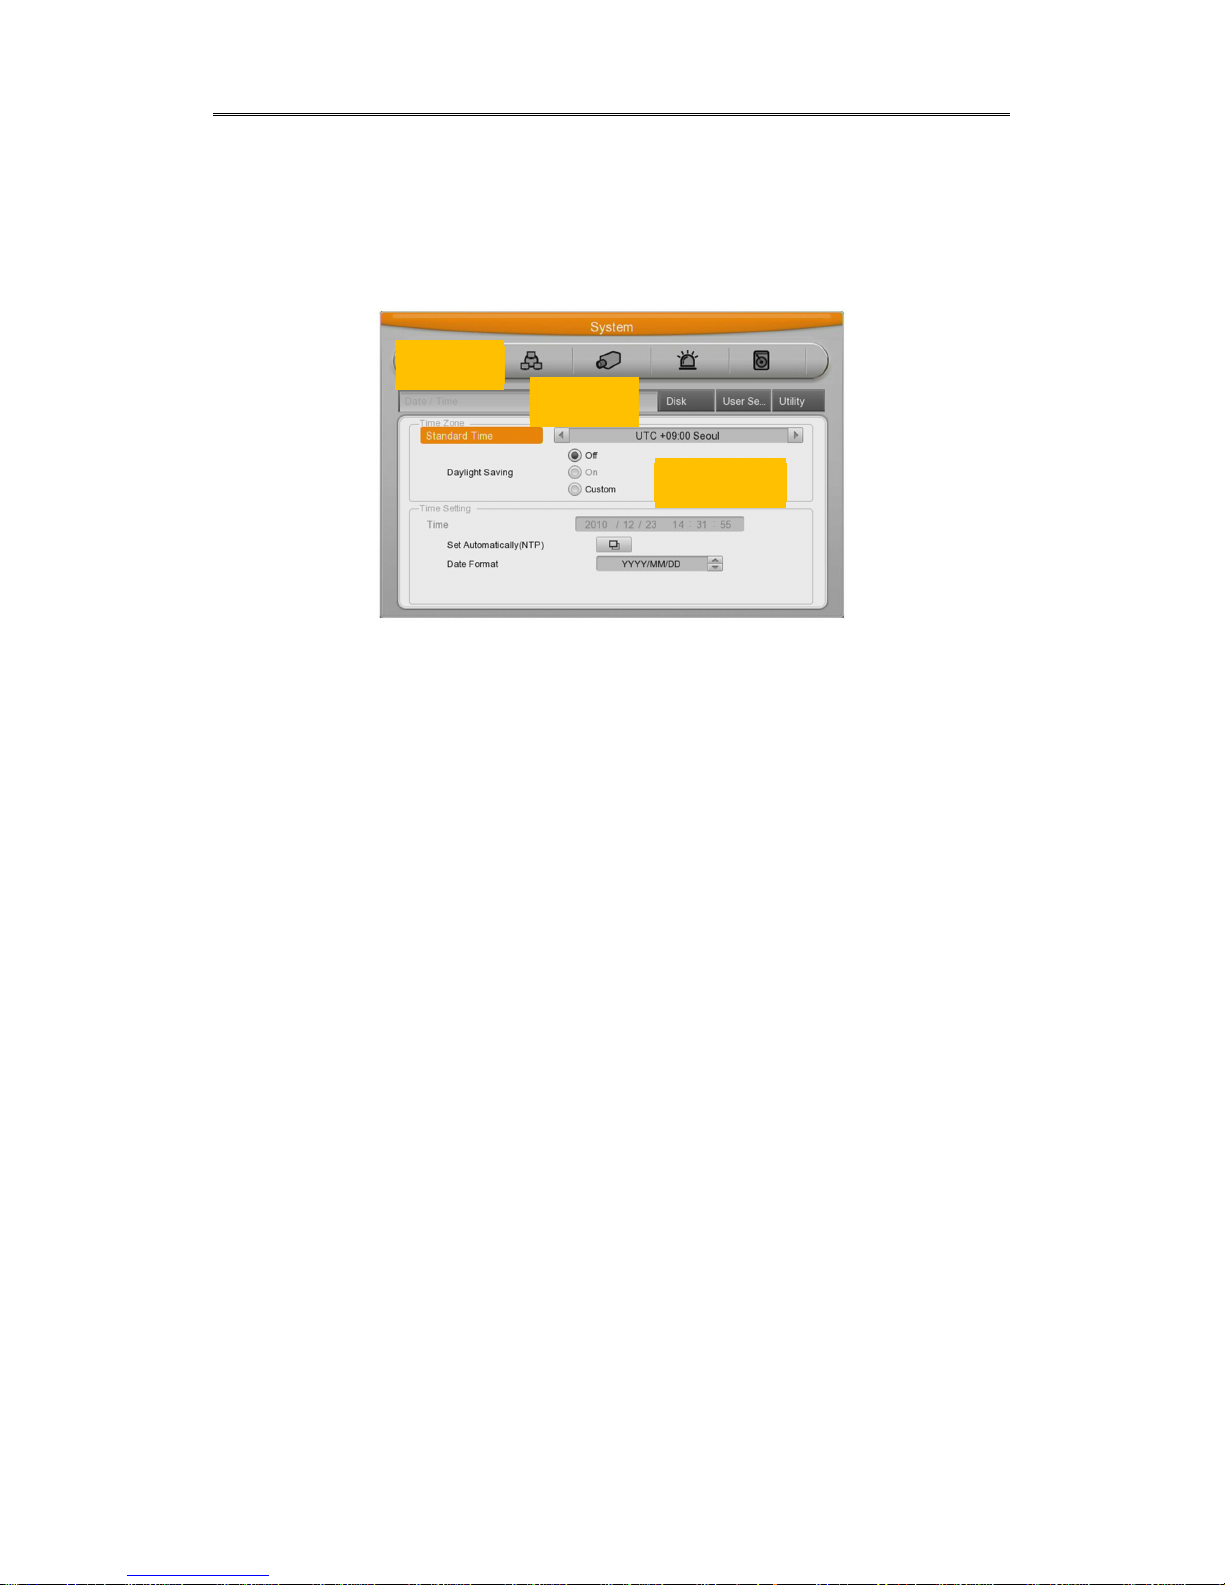
2.2 Running OSD menu
2.2.1 OSD menu configuration
Press [MENU] in keypad of front to open configuration menu as below;
(1) Main Menu : The selected tab is show in bright color and the related sub-menu will be
shown left- below the tab. To move to the previous/next tab, use the [◀/▶] arrow buttons. To
move to a sub-menu press the [Enter] key.
(2) Sub-menu : The selected sub-menu is shown as tab title and the related setting will be
shown. To move to the previous/next tab, use the [◀/▶▲/▼] arrow buttons. To move to the
related setting press [Enter]. To move to upper main menu, press [ESC] button.
(3) Setting page : The selected tab is shown as orange, To move to the previous/next tab, use
the [◀/▶] or [▲/▼] arrow button and press [Enter] key for value setting. Whn setting value is a
word, a dialogue box to edit the word will be open. When setting value is number, it should be
set with using [◀/▶] or [▲/▼]. Press [ESC] button when the value is set and also [ESC] button
is available to upper sub-menu.
2.2.1.1 Dialogue box to edit a word
Dialogue box to edit a word is image shown as below; It is available to input both word and
bumber.
Main Menu
Sub Menu
Configuration
Install&User Manual
29
.
Keep pressing [▲/▼], [◀/▶] arrow button until the word is looking for and press Enter. In case
of deleting input word press [], spacing words press [] button. To exit from dialogue box,
press [Enter] after finishing word input.
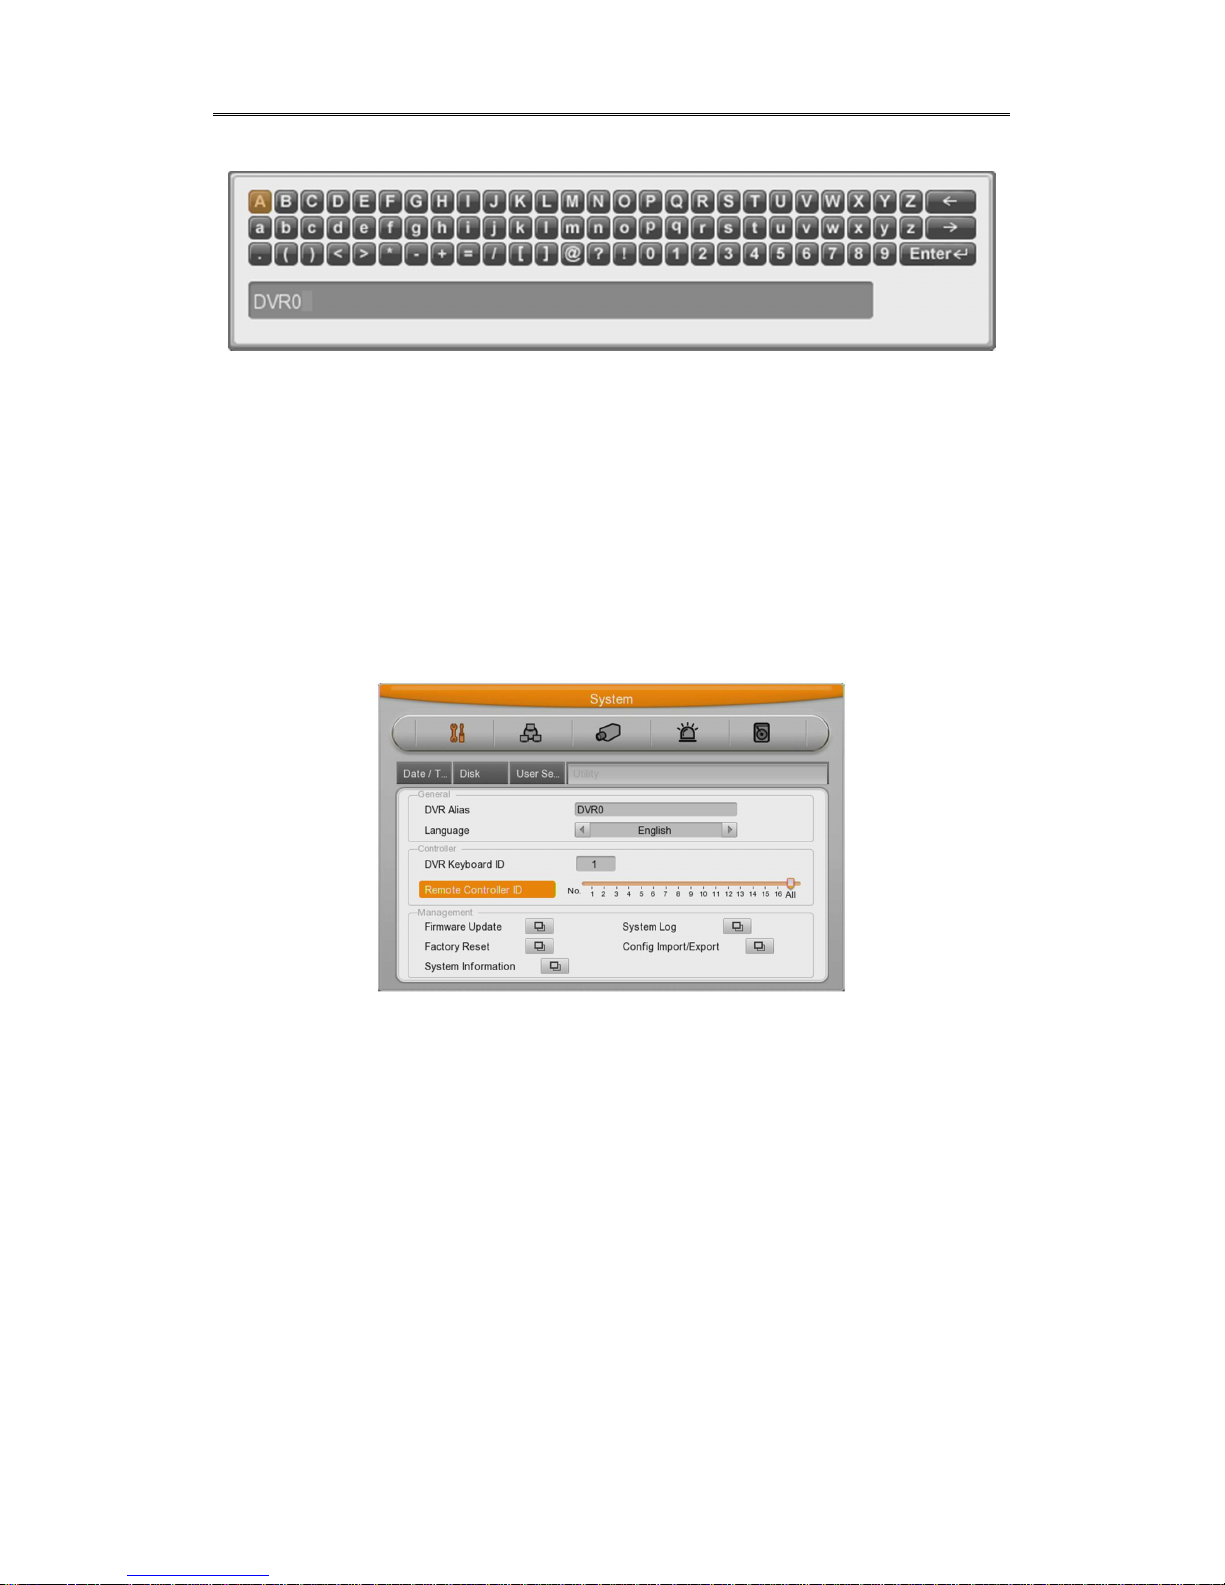
2.2.2 Setting remote controller
2.2.2.1 Setting ID of DVR
When controlling several DVRs with one remote controller, set Remote Control ID as follws;
(1) Press the [MENU] button
(2) [▶] Select “system” with using [▶] arrow button and press [Enter] or [▼] button
(3) [▼] Select “Utility” with using [▶] arrow button and press [Enter] button.
(4) Select “Remote Control ID” and press [Enter]
(5) [◀/▶] Select a value using [◀/▶] arrow buttons and press [ESC]
(6) Press the [ESC] button to return to the monitor mode.
<Reference>
Up to 16DVRs can be controlled with a single remote controller.
When not using remote controller, set the Remote Control ID as “Off”
 Loading...