

Hunt Electronic HVRM-S400E Installation Manual

HVRM-S400E
Installation Guide

FCC Compliance Statement
Caution : Any changes or modifications in construction of this device which are not expressly
approved the party responsible for compliance could void the user's authority to operate the
equipment.
NOTE : This equipment has been tested and found to comply with the limits for a Class B digital
device, pursuant to part 15 of the FCC Rules. These limits are designed to provide reasonable
protection against harmful interference in a residential installation. This equipment generates, uses
and can radiate radio frequency energy and, if not installed and used in accordance with the
instructions, may cause harmful interference to radio communications, However, there is no guarantee
that interference will not occur in a particular installation. If this equipment does cause harmful
interference to radio or television reception, which can be determined by turning the equipment off
and on, the user is encouraged to try to correct the interference by one or more of the following
measures:
- Reorient or relocate the receiving antenna.
- Increase the separation between the equipment and receiver.
- Connect the equipment into an outlet on a circuit different from that to which the receiver is
connected.
- Consult the dealer or an experienced radio/TV technician for help.
CAUTION
1. Danger of explosion if battery is incorrectly replaced. Replace only with the same or equivalent type.
2. Disposal of used batteries according to the general recommendations against the environmental
pollution.
3. Do not throw the batteries into a fire, and do not heat, short-circuit or attempt to disassemble the
batteries.
4. Do not attempt to recharge the batteries.

Important Notice
1. Do not place heavy objects on the top of the HVRM-S400E.
2. HVRM-S400E is for indoor use. It is not weatherproof. Use HVRM-S400E with referring to its
environmental specifications (Temperature & Humidity). To clean the HVRM-S400E, gently wipe the
outside with a clean dry cloth.
3. Be sure to use a DC adapter that is provided by HUNT ELECTRONIC USA INC. Connecting HVRM-
S400E directly to an AC current will cause electric damages to HVRM-S400E.
4. Be careful not to drop the HVRM-S400E. Physical shocks may harm the product. In addition, be sure
the HVRM-S400E is secured after installation.
5. HVRM-S400E is made of metal. Therefore you can hurt human beings if you throw it to them or hit on
them. When installing HVRM-S400E, be cautious to locate on safe places where children are
unreachable.
6. If HVRM-S400E does not operate properly, please contact the closest HUNT ELECTRONIC USA
INC. distributor for after sales service. Tampering or disassembling the product will void the warranty.
7. Security surveillance laws may differ for each country. Therefore, please contact the local region first
to avoid any surveillance law violations.
8. Video input type is automatically detected as NTSC or PAL. The order of detection starts from 1 to 4
camera by the first detected camera’s input type. Both NTSC and PAL type cannot support
simultaneously.
You have to install and connect camera for the automatic detected video type before turning on HVRM-
S400E power.
9. It supports Recording resolution CIF/Half/Full D1. Based on NTSC, CIF 30fps, Half D1 15fps, Full D1
supports 7.5fps. When recording Full D1 setting, video shaking could happen with device which supports
interlace mode in Video output.
The contents of this manual can be modified in accordance with Firmware or Software upgrade. In the
interest of continually improving products, approval & outlook can be modified without prior notice.

Contents
1. Introduction ......................................................................................................................... 6
1.1. Digital video recorder for security applications................................................................... 6
1.2. Features ......................................................................................................................... 6
1.3. Unpacking...................................................................................................................... 7
1.3.1. Package contents...................................................................................................... 7
2. Installation........................................................................................................................... 7
2.1. Connections ................................................................................................................... 7
2.2. First-time use................................................................................................................ 10
2.2.1. Quick Setup Menu ................................................................................................. 10
3. Operating instructions........................................................................................................ 13
3.1. Front panel controls....................................................................................................... 13
3.2. Viewing pictures ........................................................................................................... 15
3.2.1. Quad screen .......................................................................................................... 15
3.2.2. Full screen ............................................................................................................ 15
3.2.3. Sequence .............................................................................................................. 15
3.2.4. Zoom.................................................................................................................... 15
3.3. Live, playback, copy/backup and search modes ................................................................ 15
3.3.1. Live mode............................................................................................................. 15
3.3.2. Playback mode ...................................................................................................... 16
3.3.3. Copy / Backup mode .............................................................................................. 16
3.3.4. Search mode.......................................................................................................... 17
4. Menu system ...................................................................................................................... 18
4.1. Overview of the menu system......................................................................................... 18
4.1.1. Accessing the menu from the unit ............................................................................ 18
4.2. Quick Setup >............................................................................................................... 19
4.3. Camera > ..................................................................................................................... 21
4.4. Recording > ................................................................................................................. 22
4.5. Event Source > ............................................................................................................. 24
4.6. System >...................................................................................................................... 25
4

4.7. Profiles > ..................................................................................................................... 36
4.8. Utility >....................................................................................................................... 38
5. Connecting external device with serial port ......................................................................... 39
5.1. Connecting text input device .......................................................................................... 40
5.2. Connecting PAN/TILT/ZOOM ....................................................................................... 41
5.2.1. Connecting between HVRM-S400E and SPD1800 .................................................... 41
5.2.1.1. Set PTZ on HVRM-S400E............................................................................... 42
5.2.1.2. Viewing with connected PTZ ........................................................................... 44
5.2.1.2.1. Controlling pan / tilt ...................................................................................................44
5.2.1.2.2. Controlling zoom / focus............................................................................................44
5.2.1.2.3. Using load preset........................................................................................................44
5.2.1.2.4. Using save preset........................................................................................................45
5.2.1.2.5. Using clear preset .......................................................................................................45
5.2.1.2.6. Using auxiliary on ......................................................................................................45
5.2.1.2.7. Using auxiliary off......................................................................................................45
6. Using the Control Center Lite ............................................................................................. 46
6.1. Getting Started.............................................................................................................. 46
6.1.1. System requirements .............................................................................................. 46
6.2. Installing the Program ................................................................................................... 46
6.3. How to Log in .............................................................................................................. 47
6.4. Configuration Tool ........................................................................................................ 48
6.5. Monitor........................................................................................................................ 48
6.6. Playback ...................................................................................................................... 49
Adding or Replacing of HDD at Removable HDD-Rack.............................................................. 51
Recommended HDD ................................................................................................................ 51
HDD Installation Procedure...................................................................................................... 51
HDD Registration and Format ................................................................................................... 54
How to recognize manufacturing date ........................................................................................ 55
Technical specifications.............................................................................................................. 56
5

1. Introduction
1.1. Digital video recorder for security applications
The HVRM-S400E is a video recording system that can record up to four camera signals with associated audio
signals while simultaneously providing live multi screen viewing and playback. The unit has comprehensive
search and playback facilities for viewing stored video. Once set up, all recording takes place in the
background without requiring operator intervention. The maximum recording rate is 120 (NTSC) and 100
(PAL) images per second in total.
The unit also has extensive alarm handling functions, including motion detection in user-definable areas of the
image on any camera input. Input alarms and video loss are also treated as alarm signals.
The unit can be easily operated and programmed via the front panel control keys and on-screen display menu
system. A monitor output provides full-screen and quad screen viewing. USB supports easy archiving of video.
Via a network, PC-based applications can be used for live viewing, playback and configuration. The HVRM-
S400E includes an archive player for stand-alone PC playback. Authenticity can be checked with the remote
PC software.
Looping video inputs with automatic termination switches, a video output, alarm inputs and outputs, and an
Ethernet connector are on the rear panel. The monitor output provides a CVBS video signal in either NTSC or
PA L.
1.2. Features
The HVRM-S400E has the following features:
z Small file sizes using MPEG-4-based compression.
z Four video and four audio inputs.
z Simultaneous recording and playback.
z Real-time recording on all channels.
z Easy archiving of video with USB.
z Remote access and control via LAN, WAN, DSL.
z Full-screen and quad display capabilities in live and playback modes.
z Motion detection.
z Four switching (alarm) inputs and four alarm outputs.
z Video loss detection.
z Audible alarm.
z PTZ Control
6

1.3. Unpacking
Check the package for visible damage. If any items appear to have been damaged in shipment, notify the
shipping company. Unpack carefully. This is electronic equipment and should be handled with care to prevent
damage to the unit. Do not attempt to use the unit if any components are damaged. If any items are missing,
notify your Customer Service Representative or HUNT ELECTRONIC USA INC. Sales Representative.
The shipping carton is the safest container in which to transport the unit. Save it and all packing materials for
future use. If the unit must be returned, use the original packing materials.
1.3.1. Package contents
Check for the following items:
z Digital Video Recorder.
z HVRM-S400E Installation Guide
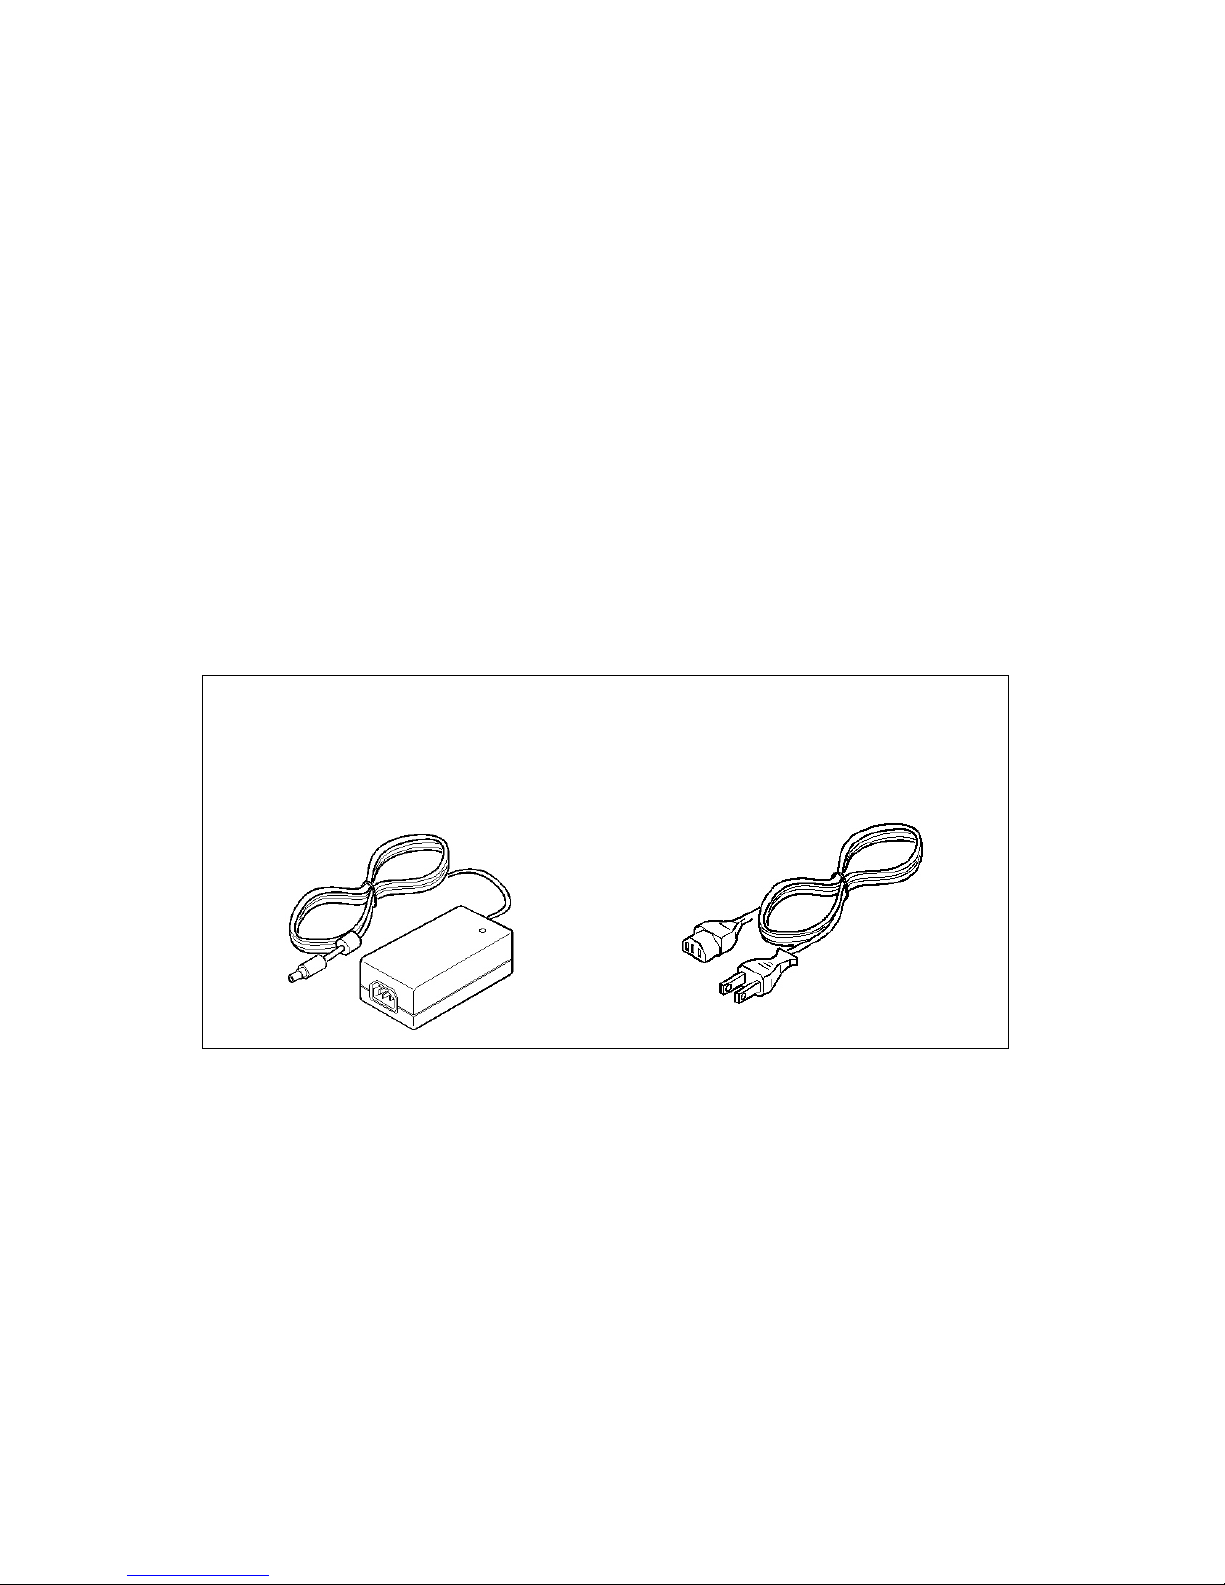
z 12V DC Adaptor with AC cord.
z A CD-ROM with the software and the manuals.
z LAN Cable (Cross)
2. Installation
To install the HVRM-S400E make the connections described below and then enter the relevant data in the
quick setup menu.
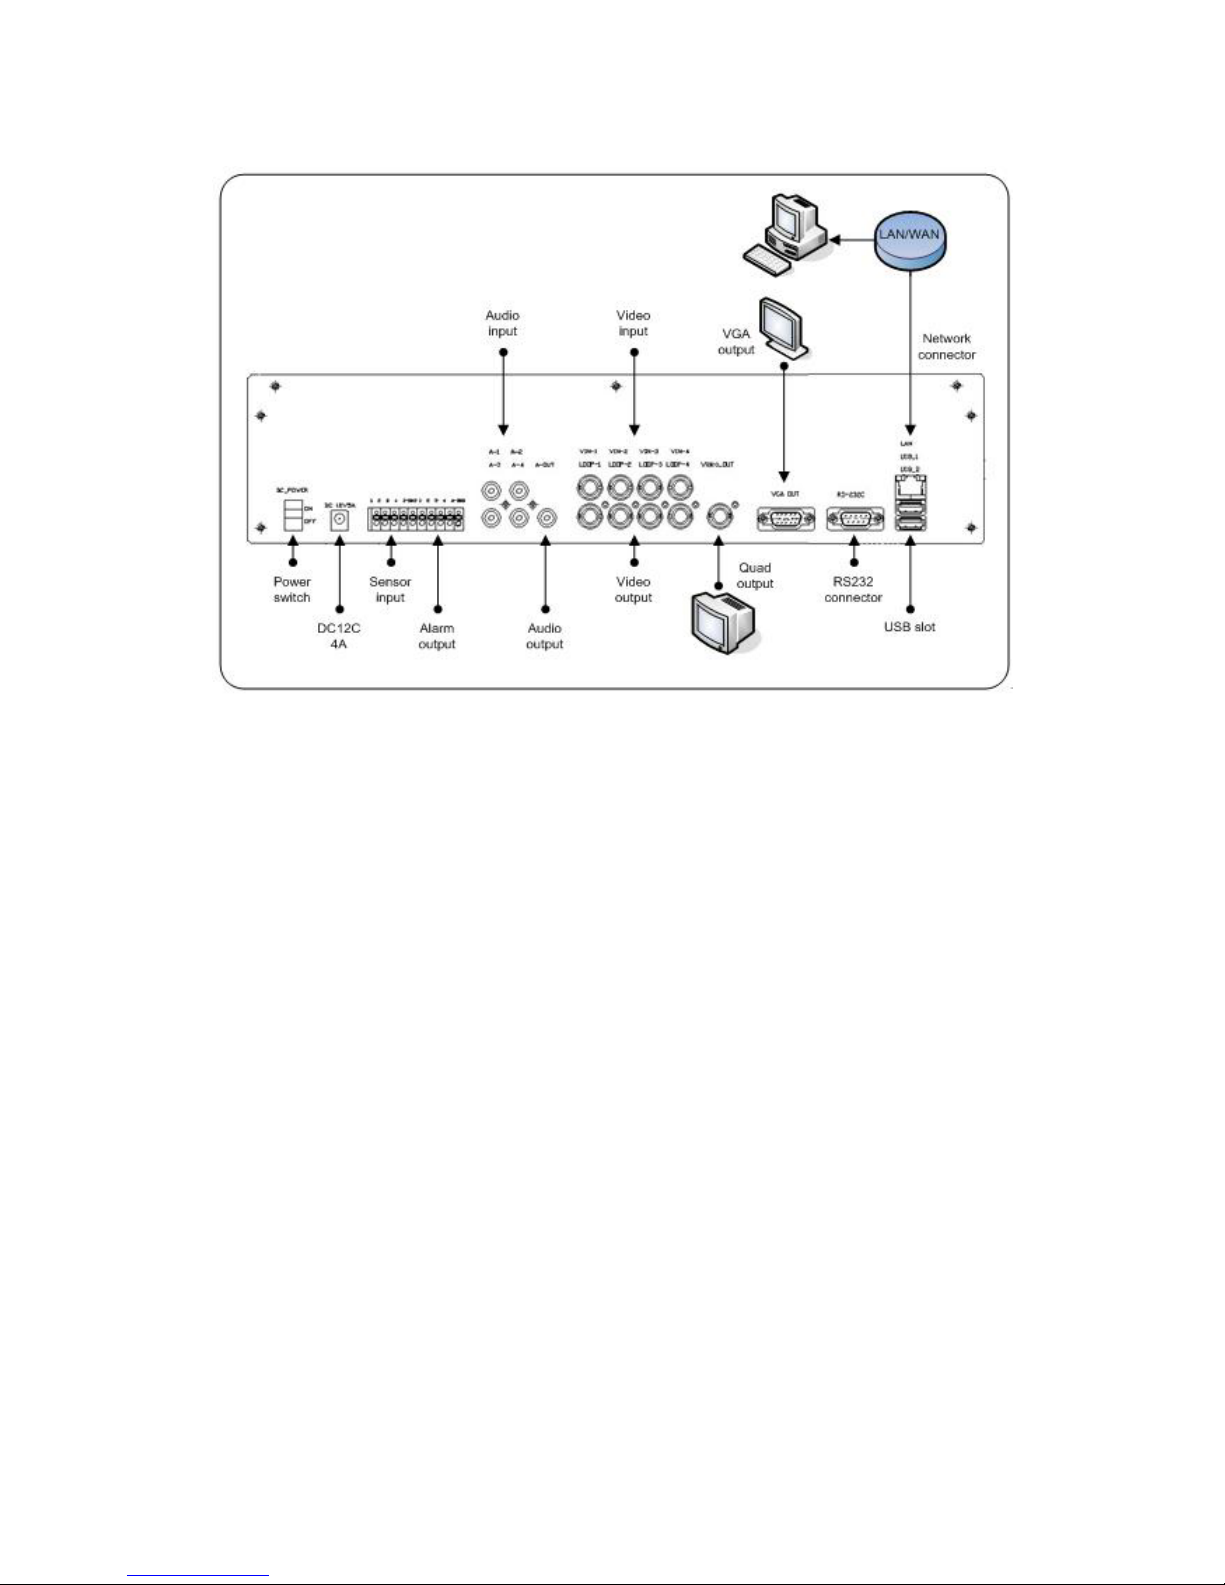
2.1. Connections
Primary connections
1. Connect the cameras to the BNC camera input connectors.
- The HVRM-S400E sets video signal’s impedance (75Ω) automatically
Impedance is set as 75Ω basically. If connecting a device to video output, impedance will be “Hi-z” status.
- The HVRM-S400E automatically configures itself as a PAL or NTSC unit by detecting the signal format of the first
connected
camera (lowest camera input number)
2. Connect a monitor to the BNC output MON Out.
- Connect the unit to the monitor using 75-ohm video coaxial cables with BNC connectors.
Optional connections
3. Connect up to four audio inputs via the RCA connectors.
4.
Connect an audio output device via the RCA connectors.
5. Connect up to four (alarm) inputs via the terminal connector.
7
- Each input line can be switched by a relay contact from devices such as pressure pads, passive infra-
red detectors, smoke detectors and similar device. You can configure the alarm inputs as N/O (Normal
Open)or N/C (Normal Close) in the menu system. The default is N/O.
6. Connect up to four alarm output relays via the terminal connector.
- Relay 1 responds to an input alarm, Relay 2 responds to a system failure and the other relays are
assigned to the remote software. Configure the alarm output as N/O or N/C in the menu system.
7. Connect to your network via the Ethernet port.
- The HVRM-S400E is delivered with the DHCP function switched on, so IP address are assigned
automatically if the network server uses DHCP. (Refer to the System settings/Connectivity/Network setup
menu)
Powering up
8. Switch on all connected equipment.
9. Connect the power cord to the unit and switch on.
<Note>
Be sure to use a DC adapter that is provided by HUNT ELECTRONIC USA INC.
Power (applied adaptor) :
12Vdc 5A (110V ~ 220V)
8
9

2.2. First-time use
To open the quick setup menu, press the MENU key on the front panel and select the Quick setup submenu. Fill
in the basic settings to get the unit operational. The unit begins recording automatically. Press the EXIT key to
close the menu.
Navigating
z Use the LEFT, RIGHT, UP and DOWN keys to move through a menu.
z The ENTER key selects a submenu or menu item, or saves selections made in menus.
z Use the EXIT key to go back or to exit the menu.
2.2.1. Quick Setup Menu
>> DATE.TIME
Quick Setup Recording
Dat e & Ti me
Re c o r d i n g
Camera
Ti m e Zo n e
GMT + 01:00 Amsterdam
Daylight Saving On
Dat e Fo r ma t YYY/ M M / DD
Ti m e Fo r m a t AM/ PM
Cur r e n t Ti m e 11:28 AM
Cur r e n t Da t e 2006/10/17
Apply
>>> TIME ZONE
• Select the correct time zone from a list. The default time zone is GMT 00:00.
DAY LIGHT SAVING
>>>
• Select if DST is used (On) or not (Off).
>>> DATE FORMAT
• Select from three date formats which show either the month (MM), the day (DD) or
10

the year (YYYY) first.
>>> TIME FORMAT
• Select between 24 Hour and 12 Hour (AM/PM) format.
>>> CURRENT TIME
• Fill in the current time.
>>> CURRENT DATE
• Fill in the current date.
>>> APPLY
• Select this item to save your current time and date settings.
Changing time settings
All recorded video is time stamped for authentication. A linear timescale, with no gaps or overlaps, is used for
searching and archiving. If you change the time, there is a mismatch between the time stamp and the linear
timescale. This offset is displayed during playback on the right of the time stamp.
To prevent mismatches, we recommend that you archive any important video and reformat the hard disk when
you change the time.
11
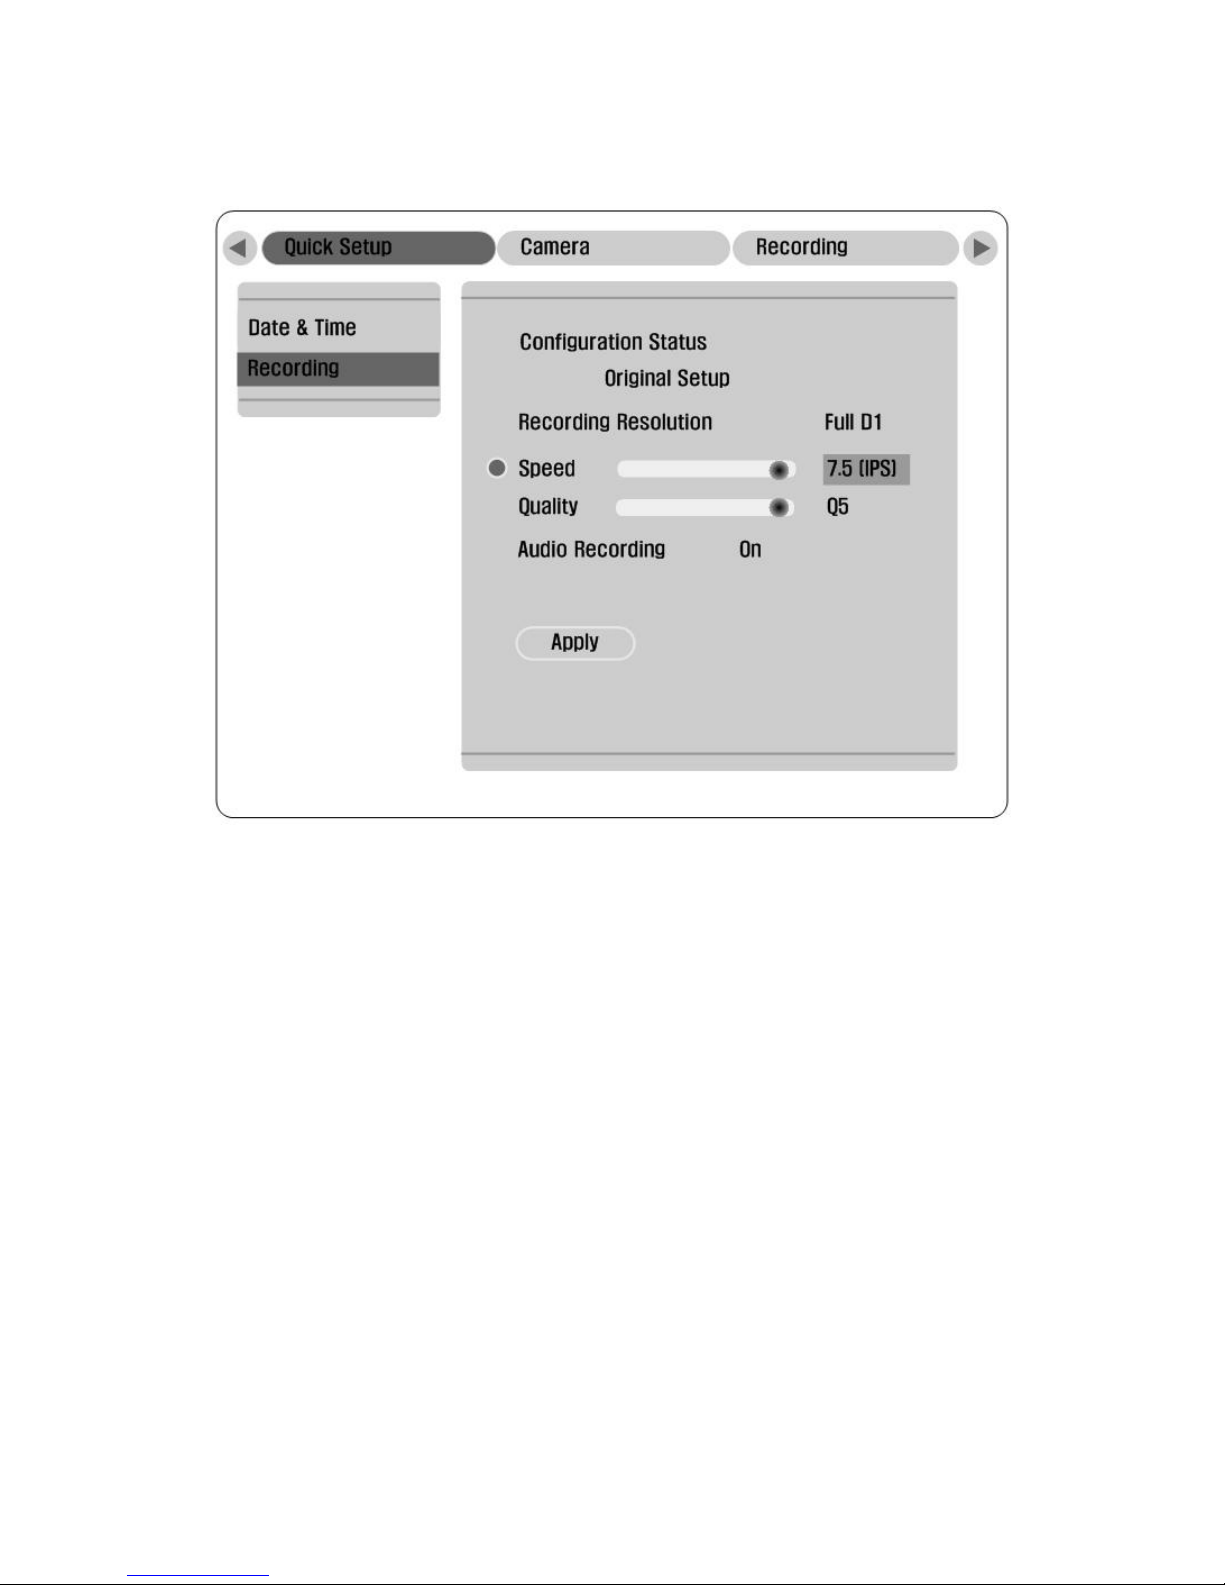
>>> RECORDING
>>> CONFIGURATION STATUS
• This shows the current setting of the HVRM-S400E. When the HVRM-S400E is still configured in the
same way as it was during the last quick setup, the configuration status displays Original setup.
Otherwise it shows Custom setup.
>>> RECORDING RESOLUTION
• Set recording resolution of all cameras [CIF /Half D1/ Full D1].
>>> SPEED (IPS)
• Select the recording speed to be used for all cameras.
• The Images Per Second (IPS) rates available for PAL range from 0, 0.75 (one image every 1.3 seconds),
up to 25 IPS.
• The IPS rates available for NTSC range from 0, 1(one image every second), up to 30 IPS.
>>> QUALITY
• Select either Q1 ~ Q5 for the image quality level.
>>> AUDIO RECORDING
• Select On or Off to record Audio or not to record Audio.
>>> APPLY
• Select this item to save your settings.
12
3. Operating instructions
The purpose of the front panel keys is explained here. The functions available can be limited by setting
passwords. An administrator has access to many more functions in the menu. Refer to Menu System for a full
list of available menu items.
3.1. Front panel controls
Keys 1 to 4: Press to select a camera for full screen display in live or playback mode. The indicators light in
green when a camera is selected in full screen mode or quad mode. They light in red when there is an alarm or
video loss for that input or camera.
HDD / CD-ROM Removable Rack:
Keys 1 to 4: Press to select a camera for full screen display in live or playback mode.
QUAD key: Press to display a quad screen in live or playback mode.
PWR: The power indicator lights to indicate that power is being supplied to the unit.
NET: The indicator lights when the unit is accessed via the network.
REC: The recording indicator lights when the unit is recording video.
PLAY: The playback indicator lights when playback is active.
COPY: In case of USB copy or CD backup, Copy LED turns on.
They light in green when there is an alarm or video loss for that input or camera.
SHUTTLE: In case of rotating Shuttle during Search & Playback mode, the speed of
Forward/Reverse Play increases by 2x, 4x, 8x, 16x, and 32x.
FF Key: By pressing FF key during Playback mode, the speed of Play increases toward Forward
direction.
PAUSE key: In playback mode press to pause playback.
STOP key: In playback mode, press to stop playback.
13

PLAY Key: By pressing PLAY key during Live mode, it back to Play mode and runs forward
play.
REW key: By pressing REW key during Playback mode, the speed of Play increases toward Reverse
direction. And by pressing REW key during Live mode, it back to Play mode and display 1 minute
previous video image.
HELP key: By default the On-Screen Display (OSD) shows all information during live and playback mode.
If a text device is connected, text data is shown only in the full screen mode. Event information is shown
only in live mode. Press the HELP button to show only the channel number, the time and the date. Press
twice to disable the OSD. In the menu mode, press to see an explanation of the selected item.
EXIT key: Escape from the current menu level. If in Edit mode, changes are not saved. In playback mode,
press to stop playback and to go back to live mode. In pause mode, press to go back to live mode. If the
beeper sounds, press EXIT to silence it.
RIGHT key: In menu mode, press to move the current selected position to the right.
In zoom mode, press to move the zoomed area to the right.
UP key: In menu mode, press to move the current selected position upwards.
In zoom mode, press to move the zoomed area upwards.
DOWN key: In menu mode, press to move the current selected position downwards.
In zoom mode, press to move the zoomed area downwards.
LEFT key:
MENU key: Press to active the setup menu for configuration of the HVRM-S400E on the local monitor (in
live mode only).
ENTER key: In menu mode, selects a submenu or menu item or saves selections made in menus.
RELAY key: In live mode, the relay can be on/off.
SEARCH key: Press to enter the search menu.
ZOOM key: Zooms in on the active camera display.
SELECT key: By pressing Select key during Playback Full screen mode and MENU key, it back to
Copy/Backup menu.
SEQ key: View cameras in sequence on full screen.
USB slot:
In menu mode, press to move the current selected position to the left.
In zoom mode, press to move the zoomed area to the left.
Insert a USB memory into this slot.
14

3.2. Viewing pictures
The unit has one monitor output. The monitor picture display depends on how the system has been set up. It
shows full screen or quad live or playback camera pictures. Alarms, motion, and video loss warnings are also
displayed on the monitor. When the menu system is activated, it is displayed on the monitor.
3.2.1. Quad screen
To view a Quad screen display on the monitor, press the QUAD key.
3.2.2. Full screen
To view a full screen shot of a camera, press a camera key.
3.2.3. Sequence
To view a sequence of live camera pictures in full screen, press the SEQ key. The sequence icon is
displayed on the monitor. A sequence of camera pictures appears, each for a pre-programmed dwell time.
Pressing the sequence key again or selecting a single camera stops sequencing.
3.2.4. Zoom
To zoom in on a camera picture:
1. Press the ZOOM key.
¾ The zoom icon is displayed on the monitor.
¾ The picture is enlarged by a factor of 2.
2. Use the Up, Down, Left and Right keys to select the area of the pictures you want to see.
3. Press the ZOOM key again to return to a full picture and leave the zoom mode.
¾ The zoom icon is displayed on the monitor.
3.3. Live, playback, copy/backup and search modes
3.3.1. Live mode
The live mode is the normal operating mode of the unit where you watch live pictures from the cameras. From
the live mode you can switch to the search mode, the playback mode or to the system menu. Access to system
menu, search and playback functions may require a password. Discuss this with your administrator. To switch
back to live viewing from another mode, close the activated mode by pressing the EXIT key.
15
3.3.2. Playback mode
To enter the playback mode, press the play key. Use the Reverse, Pause, Fast Forward and Stop keys to change
the direction and speed of the recording being played.
In case of display of Full D1 resolution recorded, it shakes when Pause during playback. (when connect video
out device operated in Interlace mode). In such case, press “Pause” one more to remove video shaking. And
press “Pause” again to return original mode. (Toggle type)
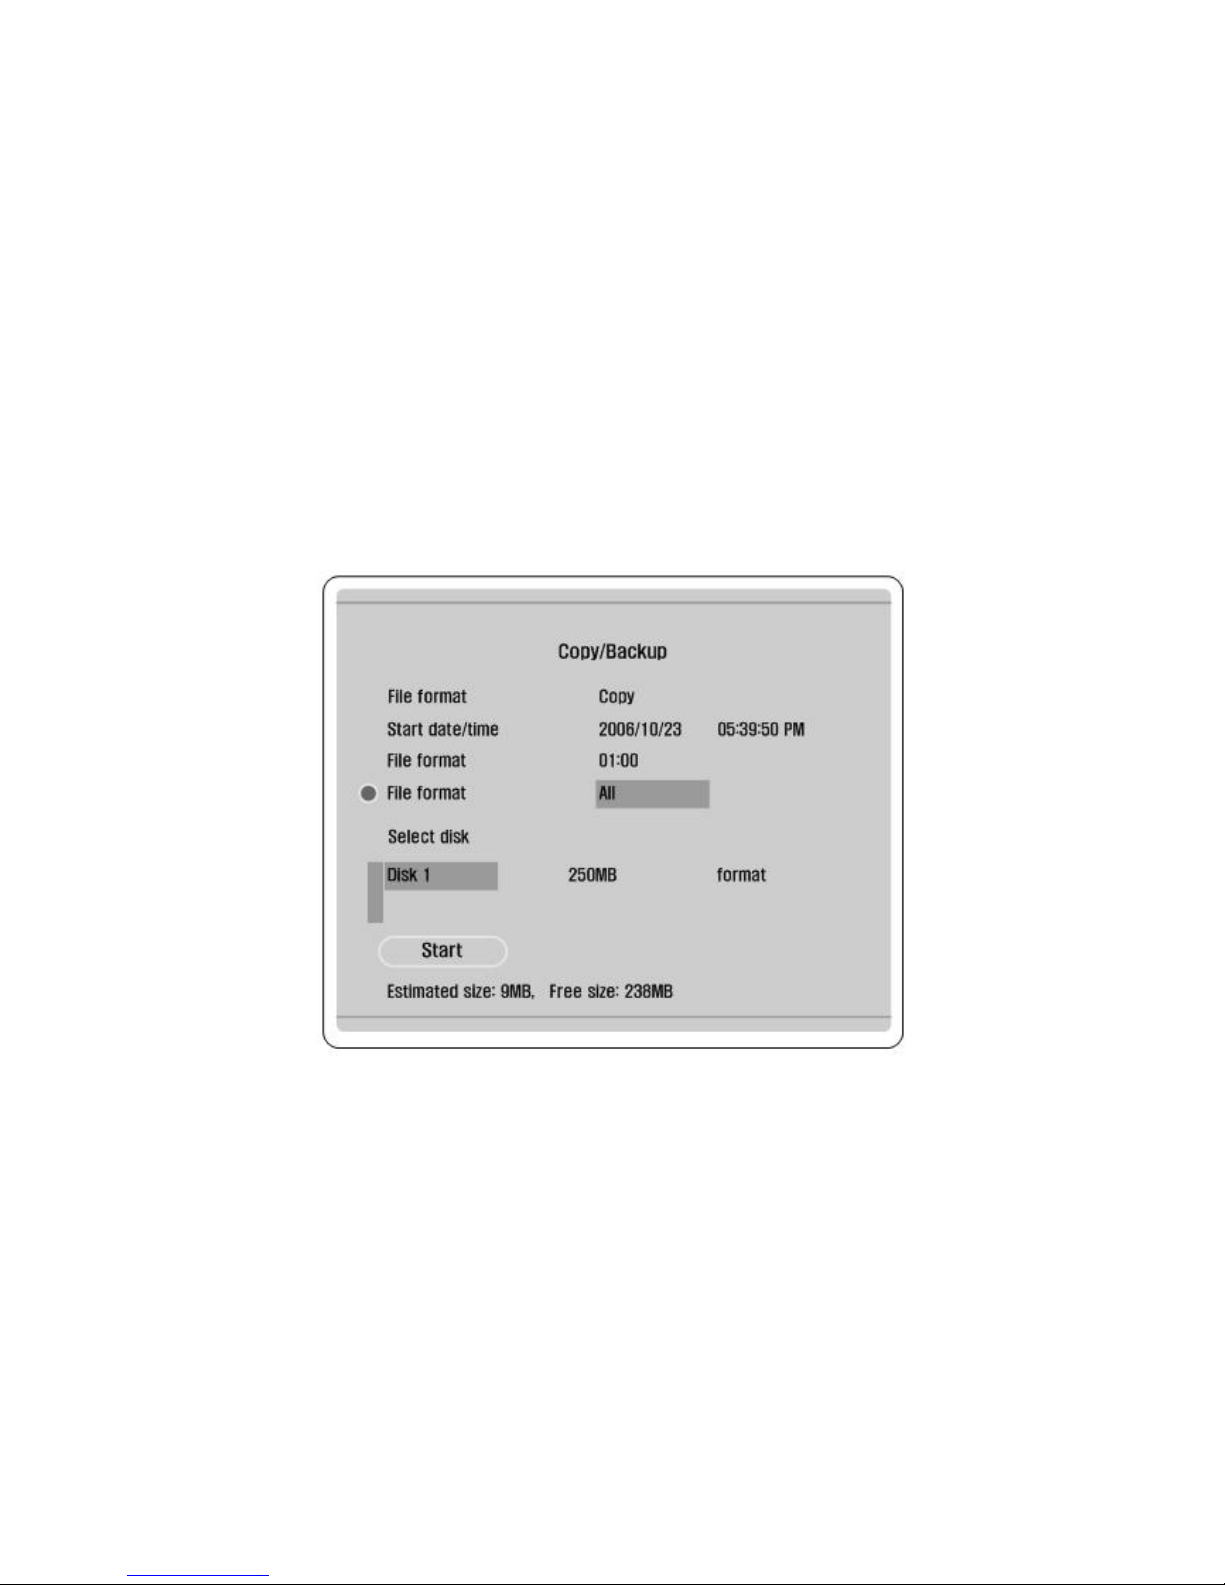
3.3.3. Copy / Backup mode
Press SELECT key during Playback mode and press MENU key, Copy/Backup menu will be shown.
Insert USB memory stick, USB status will be shown on “Select disk”.
In case of Backup, CD status will be shown on “Select disk”.
Copy
1. Select Copy from the “File format”.
- To play the HUNT ELECTRONIC USA INC. AVI format you can use a normal Windows
compatible MPEG-4
player such as Media Player but you must ensure that an XVID codec is installed. (Check the
Internet for this codec.)
2. Type starting time to copy from the “Start date/time”
3. Set a range to copy from the “Duration”.
4. Copy is available per each channel.
- Select a channel to copy from the Playback mode before shown Copy menu.
16

5. Select USB memory to copy from the “Select disk”.
6. Press Start button to start Copy.
7. Press EXIT button to back to previous menu after completing Copy.
Backup
1. Select Backup from the “File format”.
2. Type starting time to backup from the “Start date/time”.
3. Set a range to backup from the “Duration”.
4. Select a camera to backup from Camera.
- One or all cameras can backup simultaneously.
5. Select Disk to backup from the “Select disk”.
6. Press Start button to start Backup.
7. Press EXIT button to back to previous menu after completing Backup.
CD Backup
1. Select CD Backup from the “File format”.
2. Type starting time to backup from the “Start date/time”.
3. Set a range to backup from the “Duration”.
4. Select Disk to backup from the “Select disk”.
5. Press Start button to start Backup.
6. Press EXIT button to back to previous menu after completing Backup.
7. When CD backup, it has the limits in Encoding rate around 10 second base on Recording
resolution as follow.
A. 4 fps at CIF
B. 2 fps at Half D1
C. 1 fps at Full D1
3.3.4. Search mode
Press the SEARCH key to open the search menu. Use the search menu to search for stored video
recordings.
>> SEARCH CRITERIA
• Fill in a time and date from where to start the search
• Fill in the end time and date for the search
• To search for a specific type of event, select a filter option: Input Alarm, Motion, Text or All.
• Select Start Search to start the search.
• A full screen playback starts and the search results are displayed from the selected time and date.
17

• Press the EXIT key to exit the search mode and return to the playback mode.
>> EVENT LIST
• Use the up/down arrow keys to select an event in the list of search results.
• Press the play key for a full screen playback of selected event.
• Press the EXIT key to close the search menu and return to the playback mode at the
selected time and date or at the selected event
4. Menu system
You access all the parameters used to set up the unit via the menu system using the keys on the front of the unit
itself. The PC-based Control Center Lite application allows you to access the menu system from a remote
computer
4.1. Overview of the menu system
The main menu gives access to seven major menu groups. Each of these groups has a submenu tree where the
values and functions can be selected. The seven menu groups are:
Quick Setup. The Quick Setup is the easiest way to set-up the unit, activating all cameras to record
with the same settings and conditions.
Camera. The Camera menu is used to program the individual cameras.
Recording. The Recording menu is used to configure dynamic recording conditions such as image quality and
recording rate.
Event Source. The Event Setup menu is to configure the alarm inputs and motion detection.
System. The System Settings menu is used to configure various system parameters.
Profiles. The Profiles menu is for setting the time frame for the four available profiles.
Utility. This menu is used for the storage system including internal hard disk settings
4.1.1. Accessing the menu from the unit
To open the menu (in live mode only):
1. Press the MENU key.
2. The main menu appears on the monitor.
If the administrator password is enabled, the HVRM-S400E asks for a password when the main menu is
activated.
18
 Loading...