

Hunt Electronic HKB-300 Instruction Manual

Intelligent Keyboard Instruction Manual
1
INDEX
I. Keyboard Overview 2
II. Intelligent Keyboard Technical Parameters 2
III. Intelligent Keyboard Drawing 2
3.1 Intelligent Keyboard Connection 2
3.2 Keyboard Connection with Dome Camera 3
IV. Function Key 4
V. Keyboard Parameters Setting 5
5.1 Keyboard Parameters Set 5
VI. Intelligent Keyboard Operation 8
6.1 Keyboard Communication Address Set 8
6.2 Keyboard Control for Dome Camera 8
6.3 Auto Scanning (2 Points Scanning,360°Scanning) 8
6.4 Set Preset Position 9
6.5 View Preset Position 10
6.6
Preset Position Parameter Set for the Dome (PWT protocol has this function) 15 10
6.7 Guard Location Set 13
6.8 Guard Location Parameter Set 14
6.9 Intelligent Keyboard Menu Set for 14
6.10 Defense Set 15
VII. Auxiliary Function Set 15
7.1 Wash Brush Set
17
15
7.2 Heating Set
18
15
7.3Auxiliary Switch 1 Set 16
7.4Auxiliary Switch 2 Set 16
7.5 Setting Of The Menu Of Matrix 16
7.6 Proportion Joystick 16
7.7 Joystick ratio setting/adjustment 16
VIII. Lock Keyboard 18
IX. Exception Handles 18
X. Key-press Function 18
Clear preset position 19
Start up the perambulate group 19
Panel Scanning (Mode Scanning) 19
Panel Scanning (Mode Scanning) 19
XI. Keyboard Spare Parts List 19
XII. Keyboard Menu Frame 19
Intelligent Keyboard Instruction Manual
2
I. Keyboard Overview
The keyboard is used for controlling the intelligent dome. The keyboard is the main device between operator
and device in the monitoring system. It can be regarded as the main control keyboard and as the vice control
keyboard.
1. Liquid Crystal Display the LCD display board is regarded as interface between operator and device. It is
direct, convenient, easy to follow and conveys large amounts of information.
2. Proportion Joystick
1
(Options: PTZ control joystick and PT control joystick
Use this joystick to operate high-speed dome. It is easy to use with good handling and flexible
maneuvering.
3. The lock function of the keyboard can prevent unauthorized users to operate the keyboard.
4. Provide RS485 control output signal and also offer the standard RS232 control signal.
II. Intelligent Keyboard Technical Parameters
1. Communication baud rate: 1200 bps;2400 bps;4800 bps;9600 bps
2. Protocol: PWT protocol, PELCO_D, PELCO_P
3. Data Format: N,8,1
4. Power input: AC/DC 9V-12V
5. Max controlled dome camera: 1024
2
6. Power: 5W
III. Intelligent Keyboard Drawing
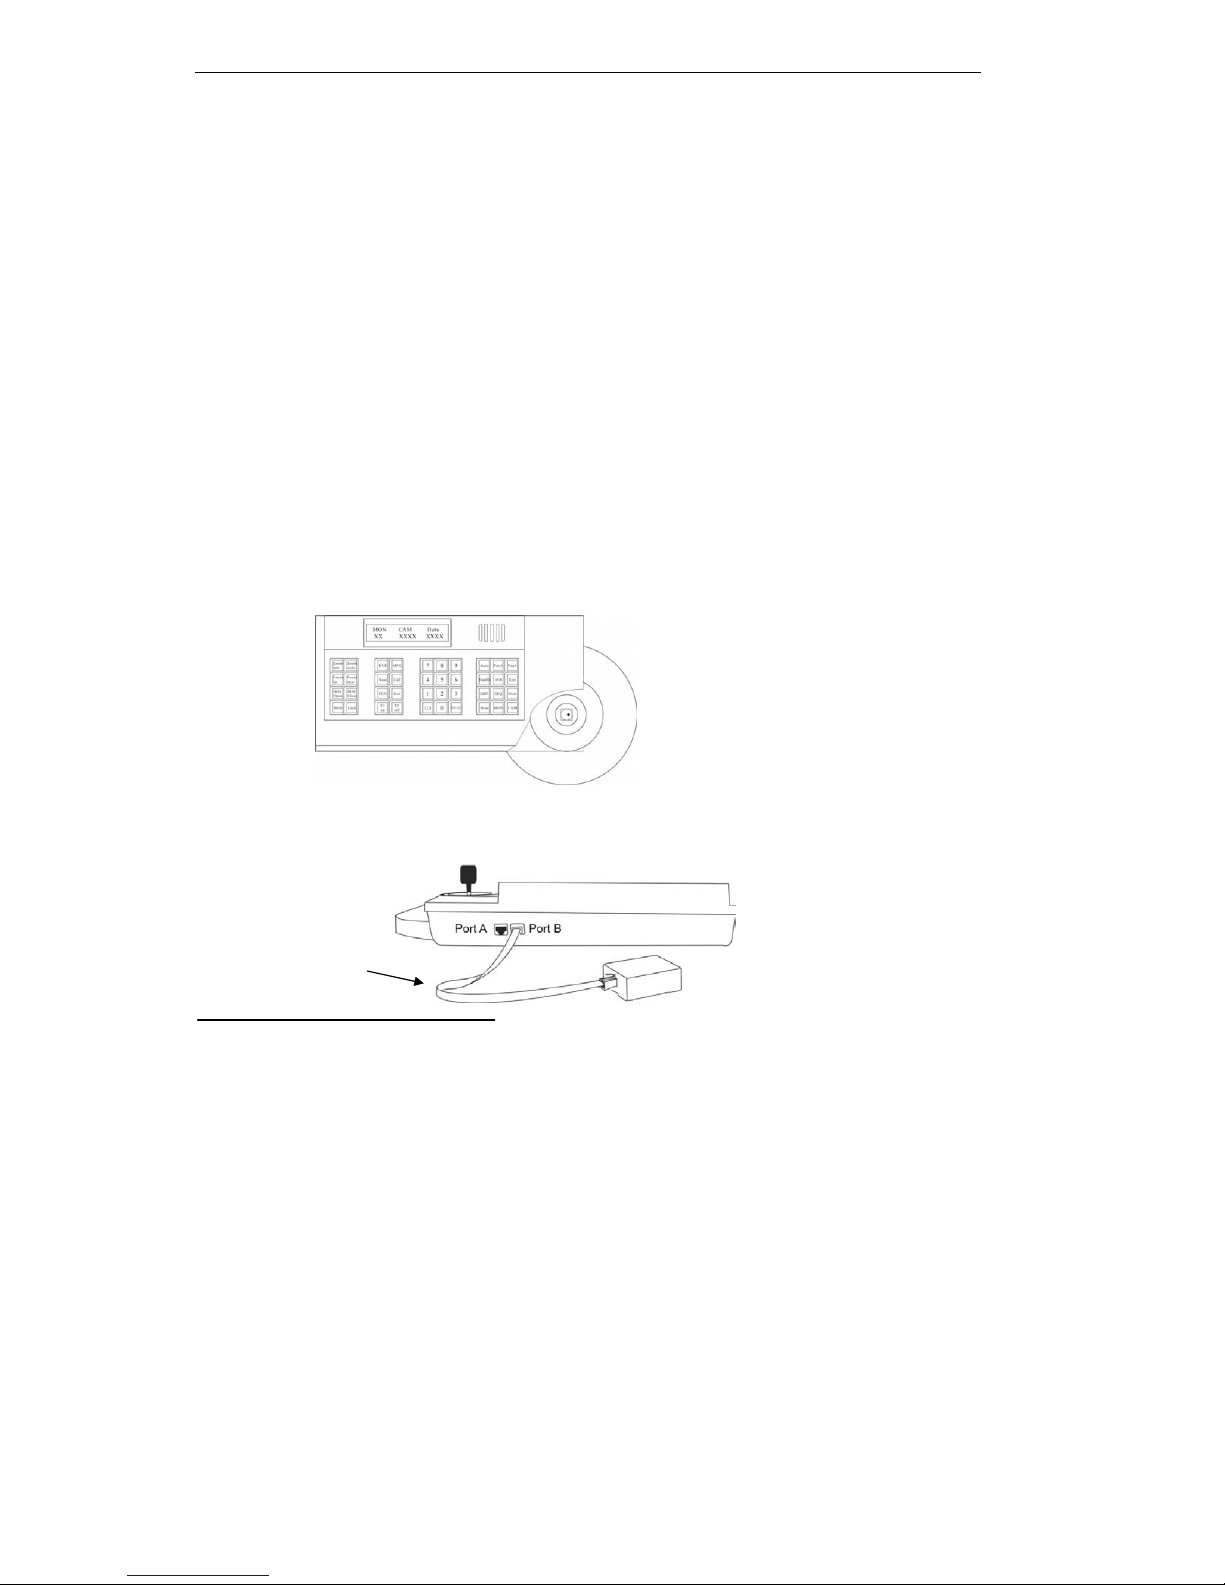
3.1 Intelligent Keyboard Connection
Insert one end of keyboard data line into keyboard port B on the right of its back panel. Insert the other end into
wire box. The picture is as below:
1
Proportion Joystick: The speed of the joystick is a direct ratio to the running speed of the dome camera.
2.
The keyboard can set up to 1024 sole addresses. However, it does not control 1024 dome cameras directly. The strength and
weakness of the RS485 control signal determines the speed dome quantity. It can control up to 1024 VPTZ dome cameras
through signal compensation devices. The RS485 can control 32 dome cameras at most if it has no signal compensation.
Keyboard Line
Intelligent Keyboard Instruction Manual
3
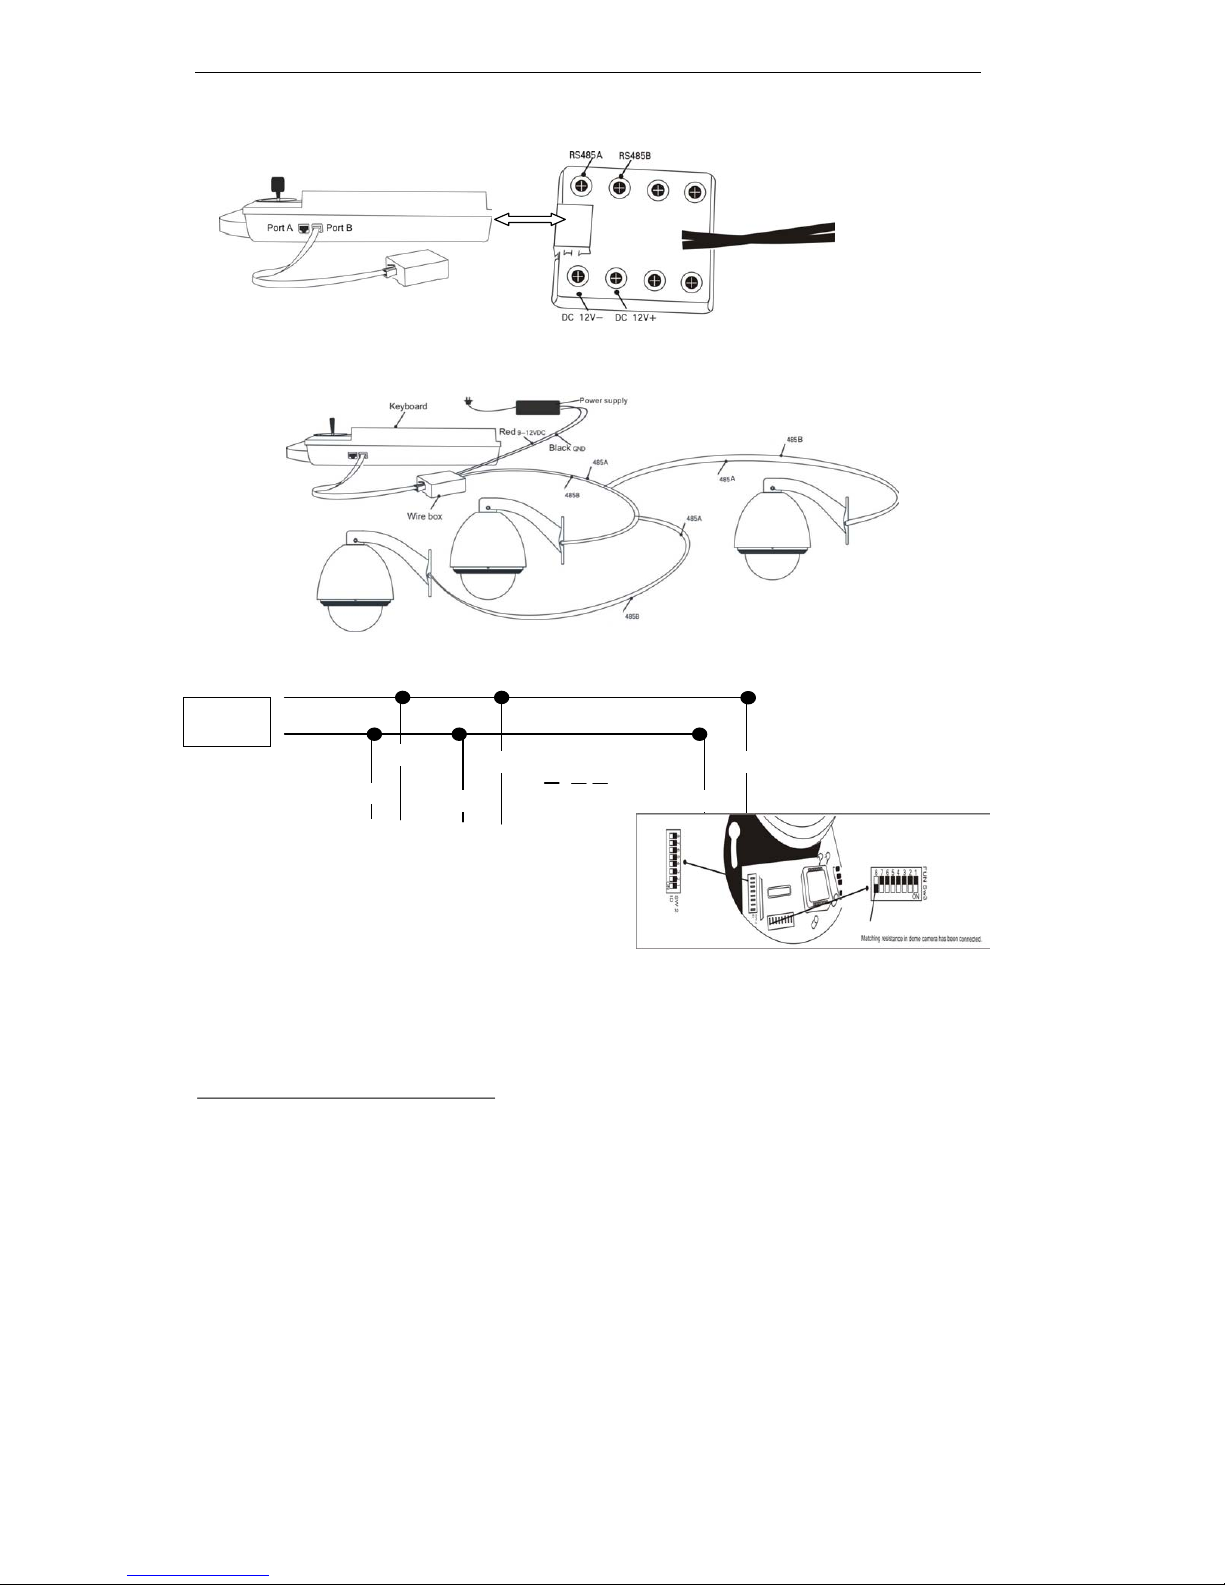
Wire Box Inner Function Picture
3.2 Keyboard Connection with Dome Camera
△
! When dome camera is furthest away from the control keyboard, Please set
switch of matching resistance as ON status.
3.
R is on behalf of matching resistance. The farthest dome from the control center should be set as its matching resistance in
order to minimize RS485 bus reflection and disturbance. The 8
th
bit of SW3 shows ON status which means the BUS matching
resistance has been connected.
dome camera
Wire box
control line
RS485
RS485
dome camera
dome camera
RS485A
RS485A
RS485A
RS485B
RS485B RS485B
dome camera R
3
Power Supply 12VDC
RS485 Signal
Intelligent Keyboard Instruction Manual
4
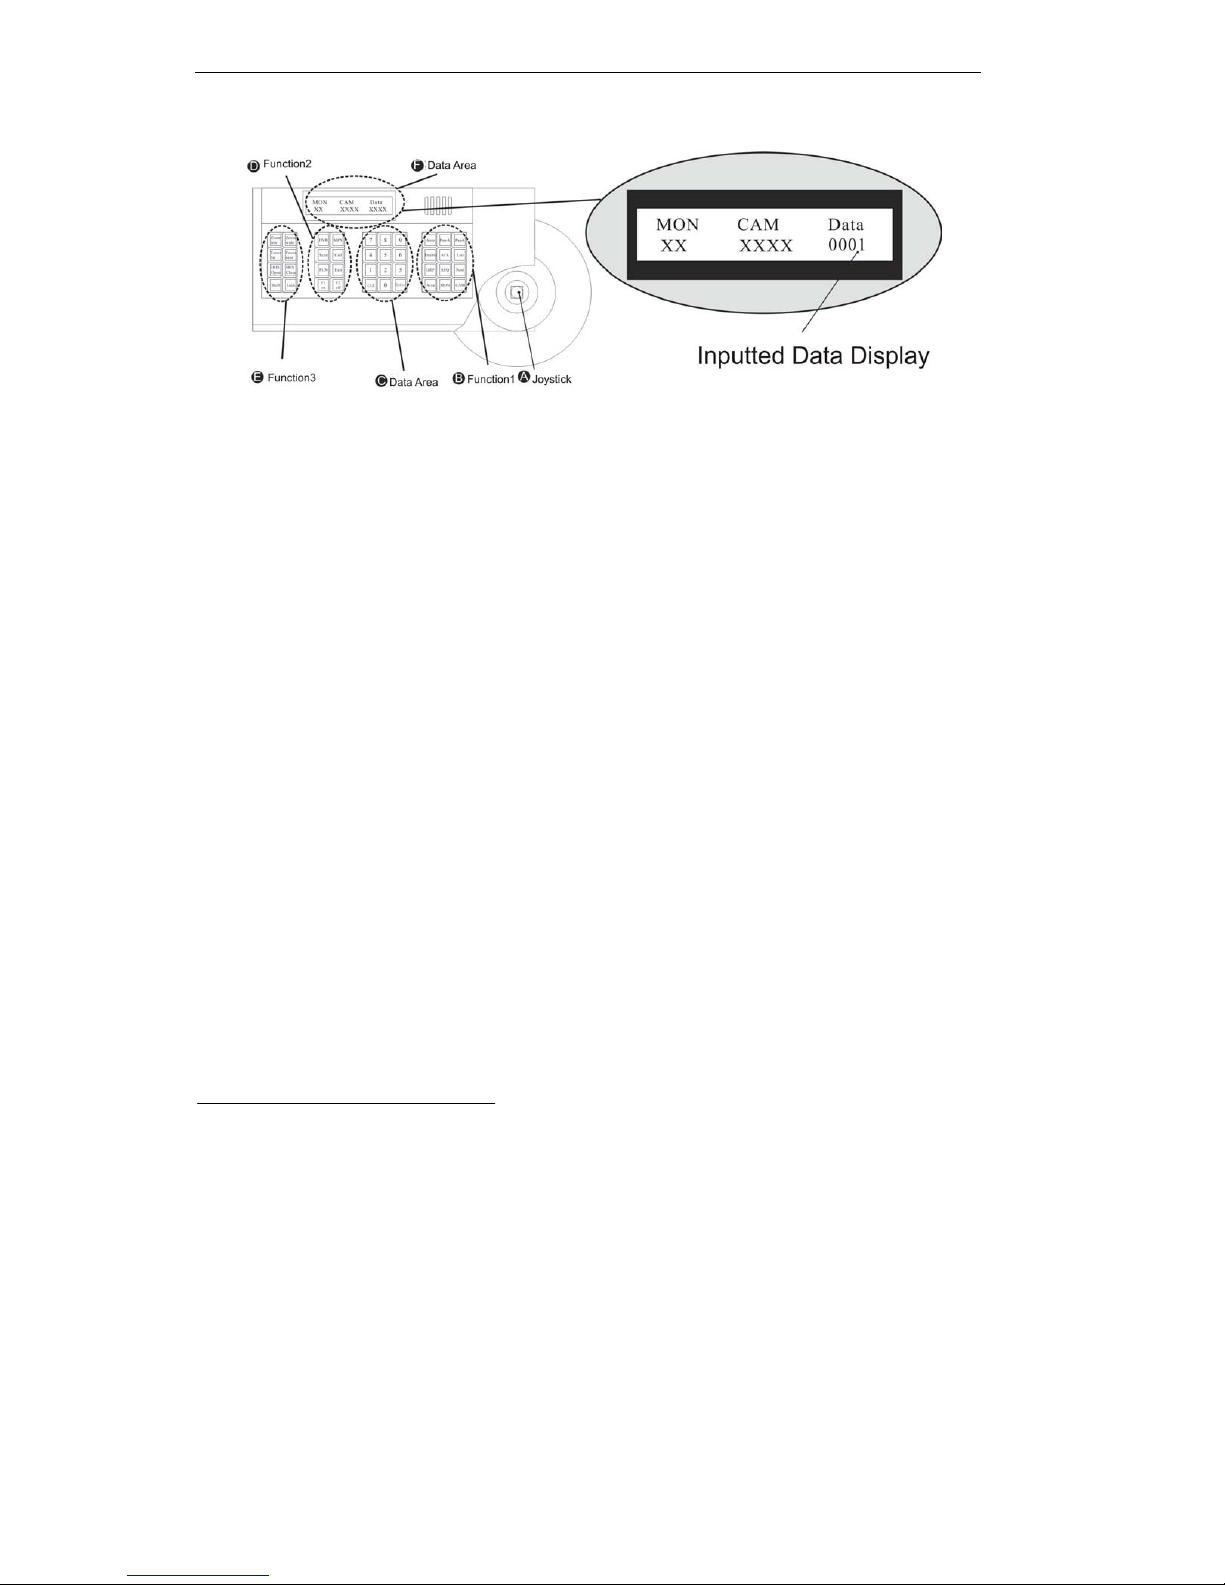
IV. Function Key
¾ Joystick: Control Dome Camera running: Up, down, Left, Right, Left-up, Left-down, Right-up, right-down,
camera lens zoom in and zoom out
Keyboard joystick can’t control Dome Camera lens zoom in and zoom out. Other
function same as
¾ Function Area 1: Dome Camera Selection and Auto scanning Control
¾ Number Area: Data Input, Clear and Confirmation
¾ Function Area 2: Menu Turning, Exit and Preset Position Set
¾ Function Area 3: Dome Camera Lens Control and Keyboard Lock and Unlock
¾ Data Display Area: Data Display
Function Key Explanation is As Below:
AUTO key: Finish Dome Camera auto action
Pan-A key: Set the starting point of dome camera auto scanning.
Pan-B key: Set the starting point of dome camera auto scanning.
Enable key: Alarm open set
4
ACK key: Dome Camera menu function confirmation
List key: Dome Camera menu function selection
CAM key: Dome Camera address selection
CLR key: Clear the inputted number on the DATA display area.
Press CLR to delete when inputted number is wrong or need to input it again
ENTER key: When you press the ENTER key, the inputted number in the Data area or selected function
is in operation immediately.
Scan key: Adjust Dome Camera pattern tour function
Call Key: Adjust Dome Camera preset position function
F1 Key: Keyboard menu cursor up. F2 key: Keyboard menu cursor down.
FUN key: Press the FUN key to select menu items circularly.
EXIT key: Exiting from Grade 2 menu to Grade 1 menu or from Grade 1 to normal operating mode.
4 This function is only for the high speed dome with alarm linkage, not for the Dome Camera.
Intelligent Keyboard Instruction Manual
5
LOCK key: After pressing this key; input the password 6688, the keyboard is under locked status.
Open the keyboard by inputting 6688
SHIFT key: Such as <SHIFT> + <AUTO> stands for pressing the SHIFT key and AUTO key.
SHIFT+AUTO key: Start up 360°scanning. SHIFT+ Scan key: Set preset position.
Other key such as GRP, SEQ, NEXT, AREA, DVR, MPX is designed for other VPROTECT terminal device.
Camera Lens control
Zoom in: Press <ZOOM in> key/ joystick make a veer rotation
Zoom out: Press <ZOOM out> key/ joystick make a retrorse rotation
Focusing Far: Press <FOCUS far> key
Focusing Near Press <FOCUS near> key
IRIS open: Press <IRIS open> key
IRIS close: press<iris close> key
V. Keyboard Parameters Setting
△
! The keyboard intelligent keyboard baud rate and communication protocol should
Be consistent with that of the dome camera.
5.1 Keyboard Parameters Set
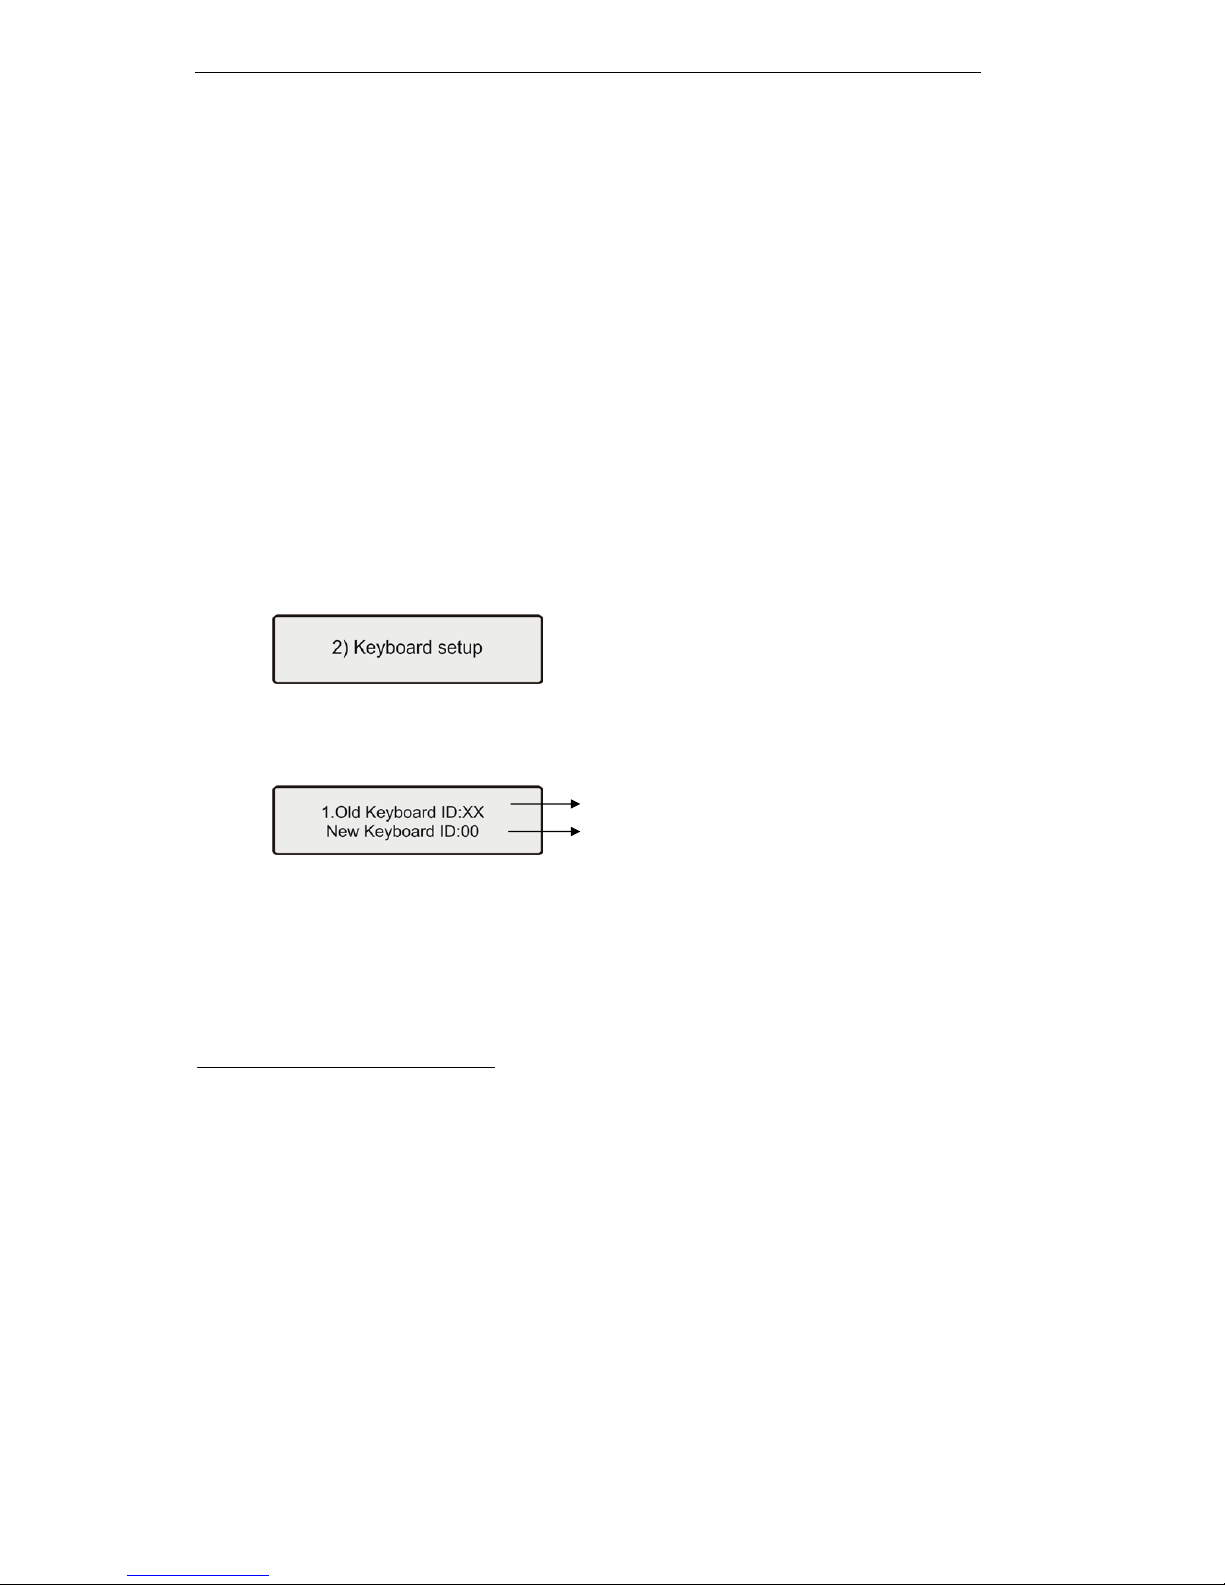
Press the FUN key two times until LCD displays:
Press the ENTER key into keyboard set up menu. Press the FUN key to enter the submenu. Press the
EXIT key to exit to the main menu.
5.1.1 Keyboard ID No Set
5
Press the ENTER key on keyboard screen “Keyboard setup” until LCD displays:
Input the number (0-16), press ENTER for confirmation. New ID will be in effect immediately. ID:00
Main Control Keyboard6, ID: 1-16 Vice Control Keyboard7.
△
! The default keyboard ID number is No. 00. This is also the ID number for the
Dome camera. Verify the keyboard ID, if the ID No, is not set correctly you will
Not be able to control the dome camera.
5. Keyboard ID is used to set multi controlling keyboards when a series of Cameras are required to be controlled. A group of speed
domes can be supported by one main control keyboard and 16 vice control keyboards.
6. Main control keyboard: Its ID is 00. It enjoys priority when several keyboards are in control. Only one of several keyboards can
be set as main control keyboard. ID must be sole, not repeated.
7. Vice control keyboard: ID is to be 01-16 keyboard
Current keyboard ID No.
Input New ID No.
Intelligent Keyboard Instruction Manual
6
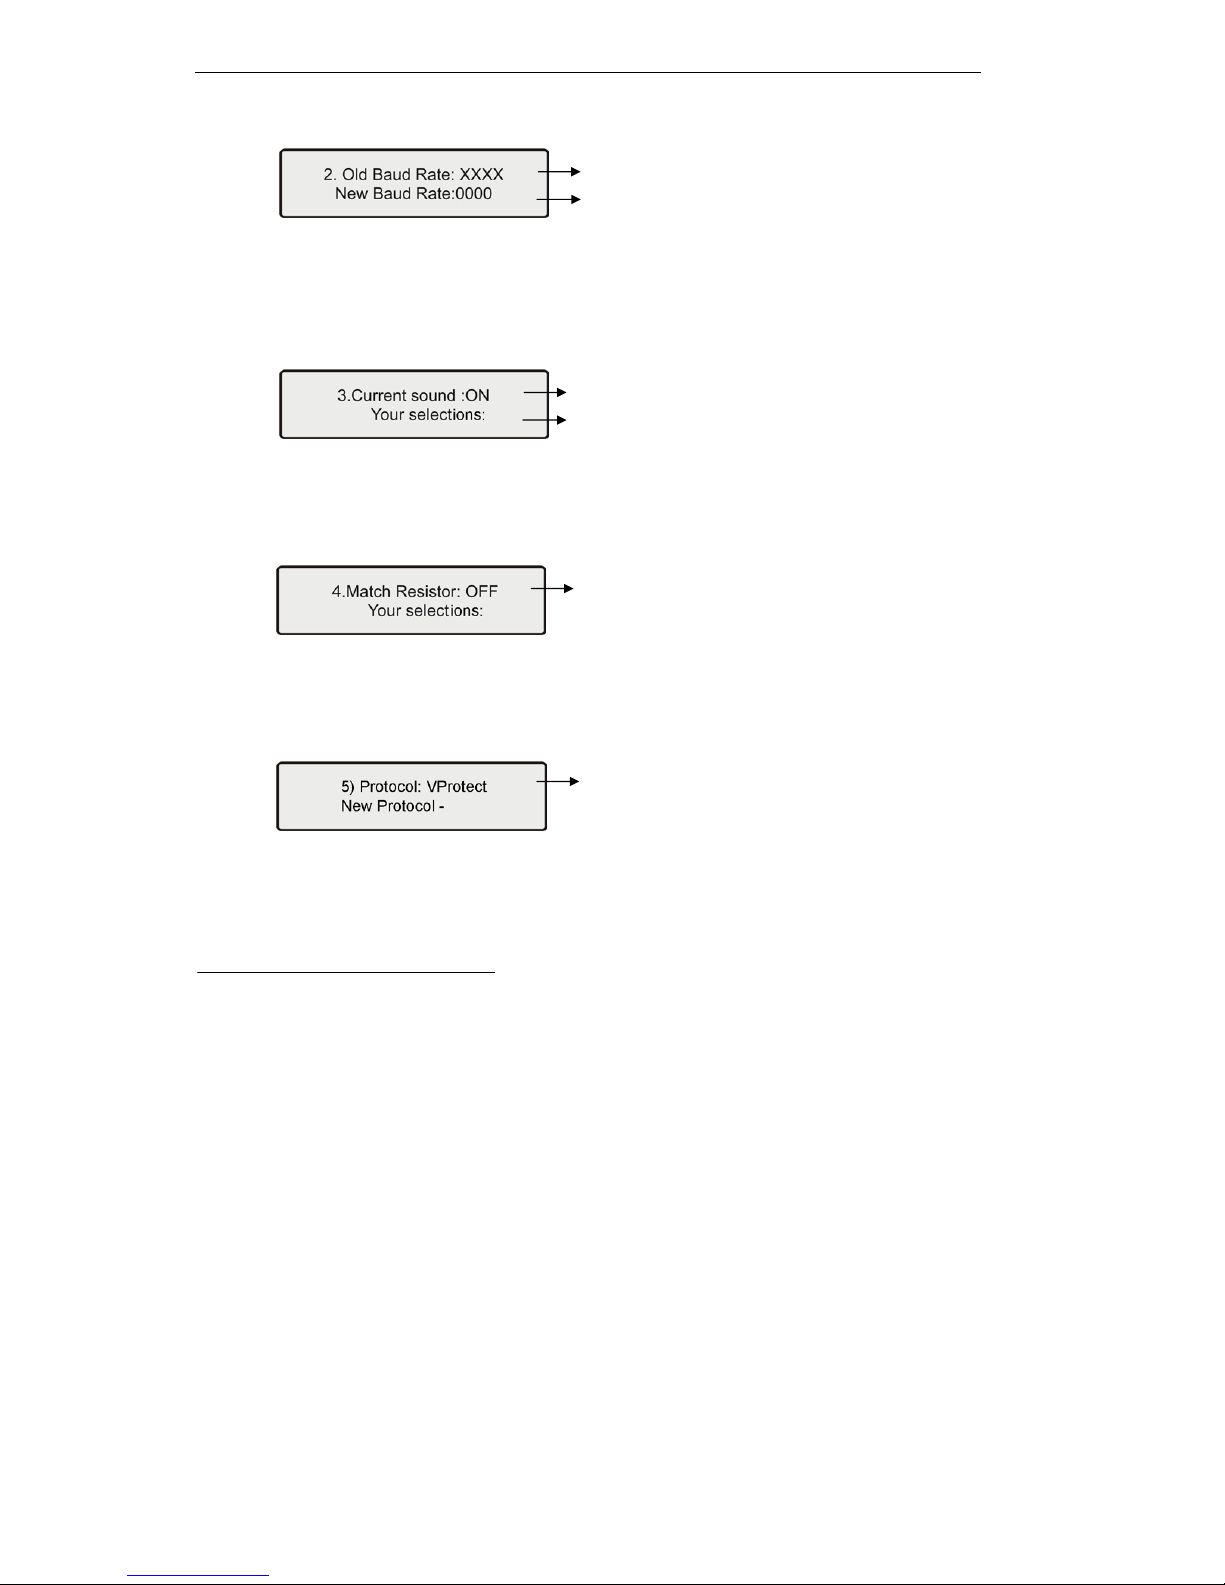
5.1.2 Keyboard Baud Rate Set
Press the FUN key until LCD displays:
Optional baud rate: 9600, 4800, 2400, and 1200
Default baud rate: 9600bps.
Input your required baud rate in DATA area, and press the ENTER key for confirmation.
New baud rate is in effect immediately.
5.1.3 Key-press Sound Set
Press the FUN key until LCD displays:
Press <F1/ON> key showing “ON”; turns on the sound function. Press the Enter key for confirmation.
Press<F2/OFF> key showing “OFF”; turns off the sound function. Press the Enter key for confirmation.
The normal sound status is open.
5.1.4.Matching Resistance (150Ω) Set
8
Press the FUN key three times until LCD displays:
Press<F1/ON> key showing “ON”, this will place suited resistance between RS485 D+ and D-,
Press<F2/OFF> key showing “OFF”, this will separate suited resistance from RS485 D+ and D-,
Press the ENTER key for confirmation. The normal status is open.
5.1.5.Keyboard Protocol Set
Press the FUN key four times until LCD displays:
Press “1” key showing “VPROTECT” protocol, press “ENTER” for confirmation.
Press “2” key showing “PEL-D”, PELCO-D
9
protocol, press “ENTER” for confirmation.
Press “3” key showing “PEL-P”, PELCO-P protocol, press “ENTER” for confirmation
default protocol is the our PWT Protocol.
8
Sometimes, matching resistance should be set at the control center in order to avoid reflection and disturbance from RS-485
communication signal and other signals.
9.
PELCO-P, PELCO-D protocol: The keyboard can be used together with other high speed domes. When using a Camera, please
adopt the PWT protocol.
Current baud rate.
Input new baud rate
Displays current set
Select Sound preference
Displays the current set
Displays the current set
 Loading...