

HUMMINGBIRD MEDICAL Oracle User Manual
USER GUIDE
62 68 RO -M 01 A1

1. Contents
Section Topic Page
1. Table of Contents
2. Introduction
3. Appearance and Key Functions of the meter
4. Alternate Site Testing
5. Safety Information
6. Quick Testing Instructions
Date/Time/Alarm/ Memory Deletion)
Preparing for Testing
7. Installing the Battery
8. Settings (
9. Running a Control Solution Test
Blood Testing
10.Running a Blood Glucose Test
11.Recalling the Memory and Viewing the Average
12.Expected Values
13.Transmitting Results
Maintenance
14.Maintenance of Your System
15.Troubleshooting
16.Customer Service
17.Limitations
Important Additional Information
18. Specifications
19. Ordering Supplies
20. Warranty Information
1
1
2-3
4
5-8
9
10
11
12-16
17-18
19-21
22-23
24
24
25
26-27
28
29
30
30
31
NOTE: For information about the name of the manufacturer of
the lancing device and the lancets, please refer to the package
inserts that came with your starter kits.

2
2. Introduction to the System
Intended Use / Indications for Use
The Oracle Blood Glucose Monitoring System is for use in the
quantitative measurement of glucose in fresh capillary whole
blood from the finger and the forearm. It is intended for use
by healthcare professionals and people with diabetes mellitus at
home and as an aid in monitoring the effectiveness of a diabetes
control program. The Oracle Blood Glucose Monitoring System
is not intended for the diagnosis of or screening for diabetes
mellitus, nor for use with neonates.
The alternative site testing (forearm) in this system can only be used
during steady-state blood glucose conditions.
Some models of this system contain a speaking function that an
audible message of test results for users with low vision.
Contents of the System
This User Guide has been prepared to describe the proper use
of the Oracle Blood Glucose Monitoring System.
Please read this User Guide and the package insert that comes
with the Oracle Glucose Test Strips before testing. The
system is available either as a meter alone or as a kit. If you
have a meter only, you can purchase the system supplies from
your system provider. Please provide your system provider
with the 3 digit system reference number marked on the
packaging box when you purchase supplies.

The starter kit for Oracle Blood Glucose Monitoring System
includes the following items:
1.Oracle Glucose Meter with 2 AAA batteries
2.User Guide
3.Log Book
4.Carrying Case
5.Oracle Glucose Test Strips
6.Oracle Control Solution (Medium)
7.Sterile Lancets
8.Lancing Device
9.Package Inserts for Test Strips, Control Solution,
and Lancets/Lancing Device
The Oracle Glucose Meter uses Oracle Glucose Test Strips. Neither
the meter nor the test strips will work when used with any other brand
of glucose products.
3
4
The principle of the method
When glucose reacts with the reagents on the test strips, an electrical current
is produced, which is proportional to the glucose concentration in the blood sample.
The glucose concentration is calculated by the meter and based on the current measured.
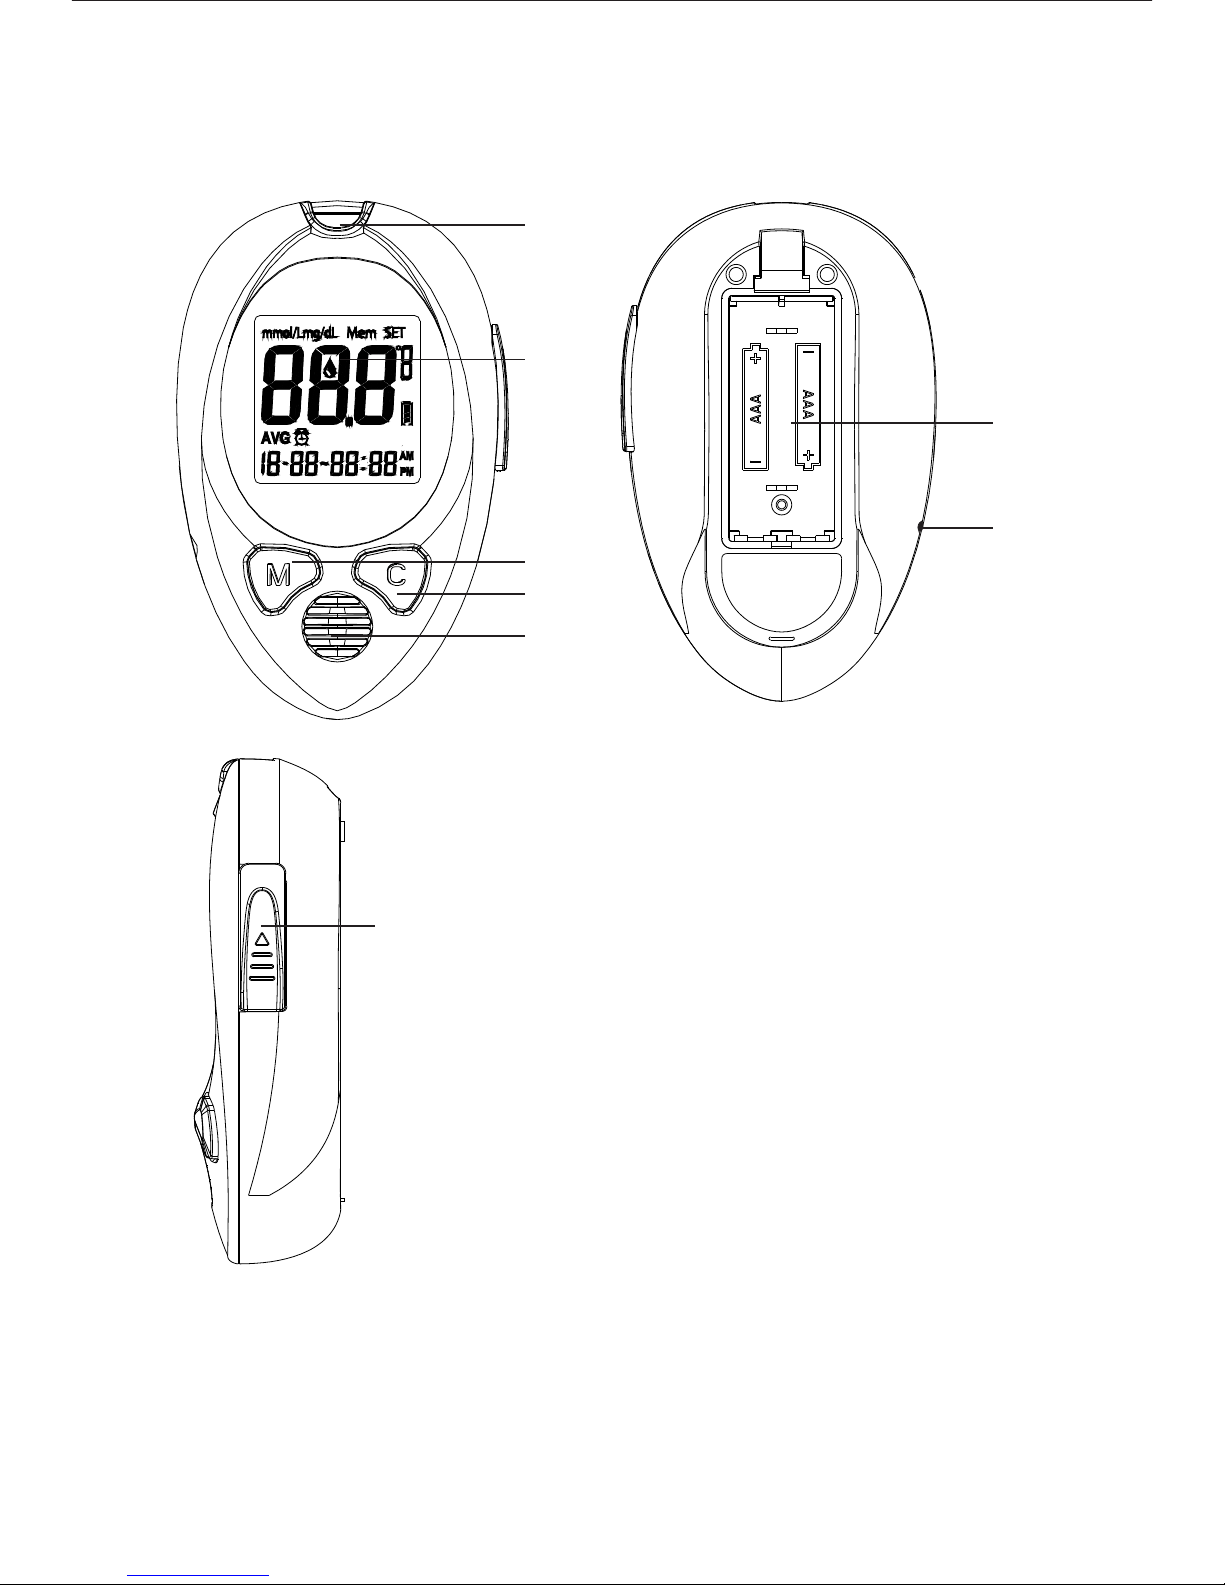
1.Test strip slot - When the strip is inserted into the
slot, the meter will automatically turn on.
2. LCD Display - Guides you through the test using
symbols and simple messages.
3. M Key - Power ON/OFF, also for memory recalling
mode, please refer to manual for detailed function
description.
4. C Key - Setting mode, please refer to manual for
detailed function description.
5. Speaker - For voice-enabled models only.
6. RS232 port - Cable connection and data transmitting.
7. Battery Compartment - Where batteries are
located.
8. Ejector - Remove used strip.
(1)
(2)
(3)
(4)
(5)
(6)
(7)
(8)
3. Appearance and key functions
of the meter

5
4. Alternate Site Testing (AST)
What is AST?
Sampling from anatomical sites (parts of the body) other than
the fingertip (i.e. forearm, upper arm, thigh, calf, palm) to check
the blood glucose levels. This system allows you to test on the
forearm with the equivalent results to fingertip testing.
There are important limitations to AST. Please consult your
healthcare professional before you use AST.
What is the advantage ?
It is more painful to take a blood sample from fingertips
because fingertips have more nerve endings. Other body sites
do not have as many nerve endings, so blood samples in
less pain.
When to use AST ?
Medication, stress, illness, food and exercise can affect blood
glucose levels. Capillary whole blood at the fingertip can reflect
test changes faster than capillary blood at other sites of body. If
you test your blood glucose level during or immediately after
a meal, physical exercise or stressful events, take the blood
sample from your fingertip instead of from other sites.
Use AST only:
1. 2 hours or more after taking insulin;
2. 2 hours or more after a meal;
3. 2 hours or more after exercise.
Do not use AST if you are pregnant, or if you are aware that
your glucose level is not as stable as usual, or if you think
you have hypoglycemia (low blood sugar) or hyperglycemia
(high blood sugar).
Do not use AST if you think your blood glucose is low and if
your AST results do not match the way you feel.
6
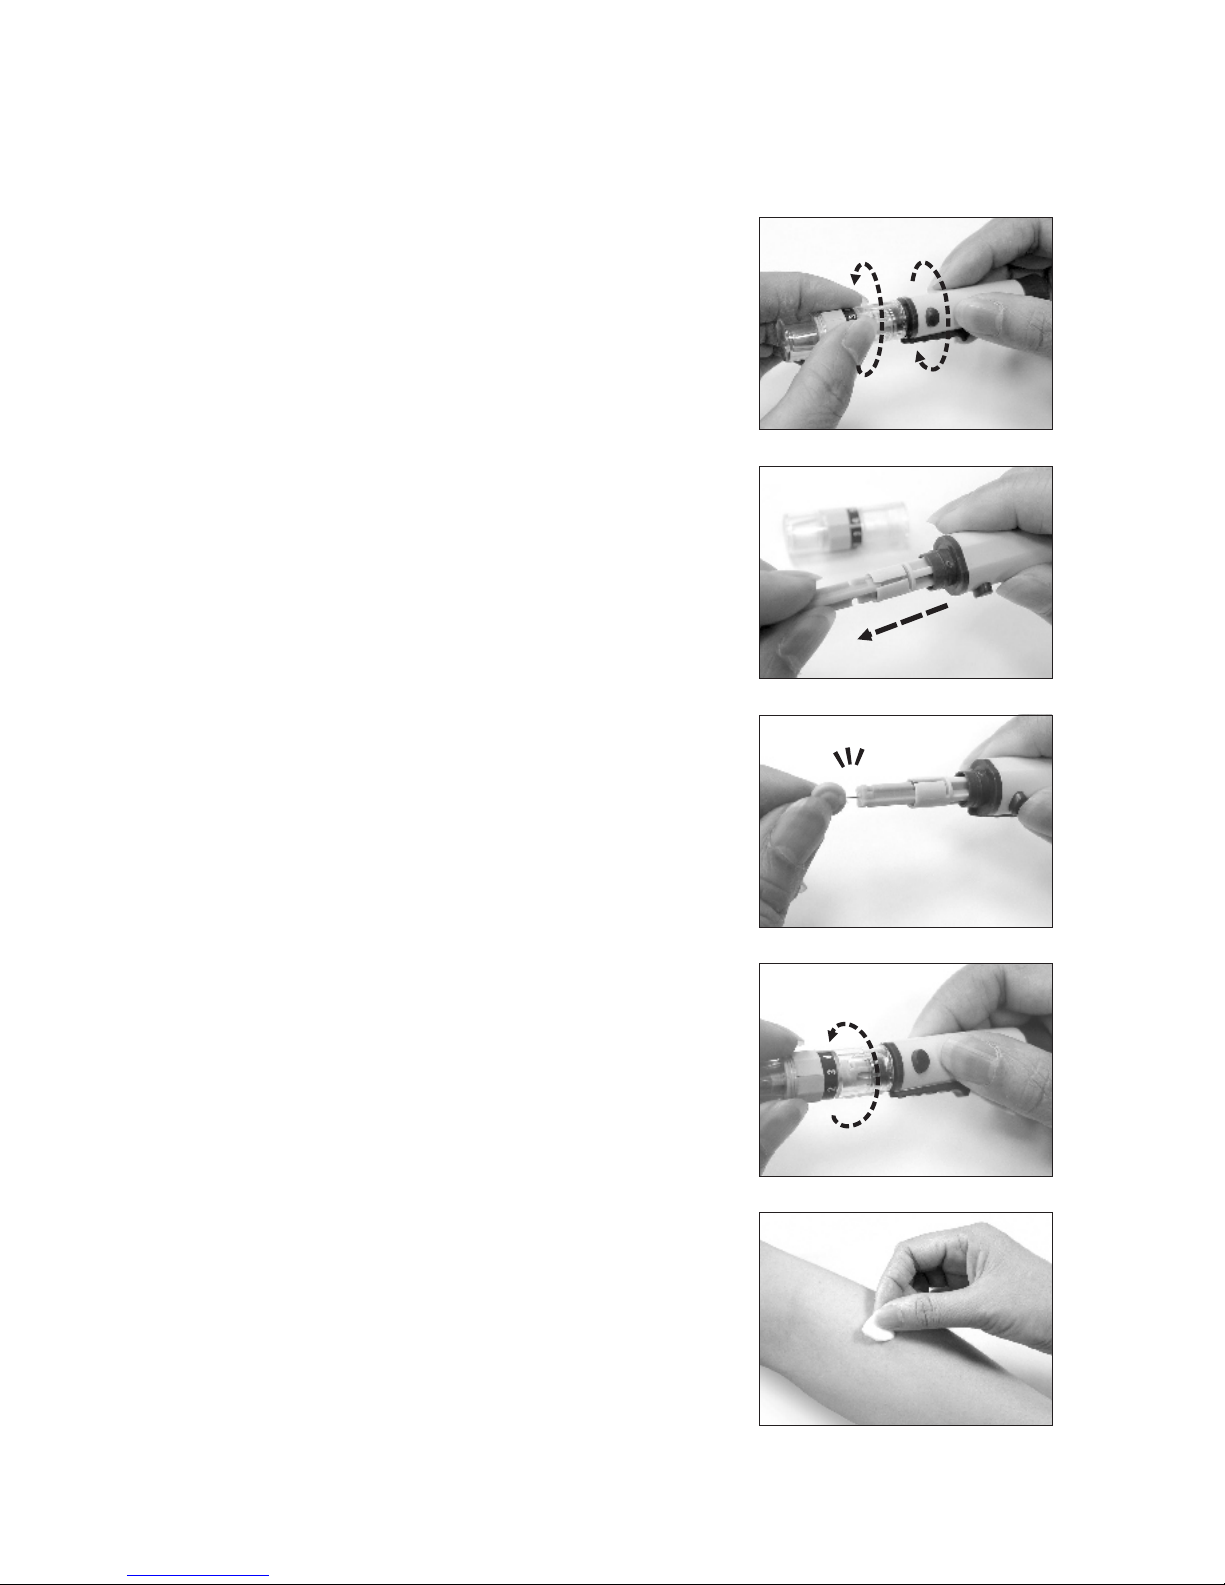
Testing Procedure for AST
1.Unscrew the lancing device by
turning the end cap counter
clockwise. A clear cap will come
with the package of a meter kit or
a lancing device. The clear cap on
the lancing device will make it easy
to get a drop of blood for AST.
2.Insert a new lancet firmly into the
lancet holder.
3.Twist off the protective top of the
lancet.
4.Close the end cap of the lancing
device and grasp the lancing device
as shown. Slide into locking position.
If necessary, please set the lancing
device for a deeper puncture.
5.Select a soft, fleshy area on your
forearm that is clean and dry, away
from bone and free of visible veins
and hair.
1
2
3
4
5
7
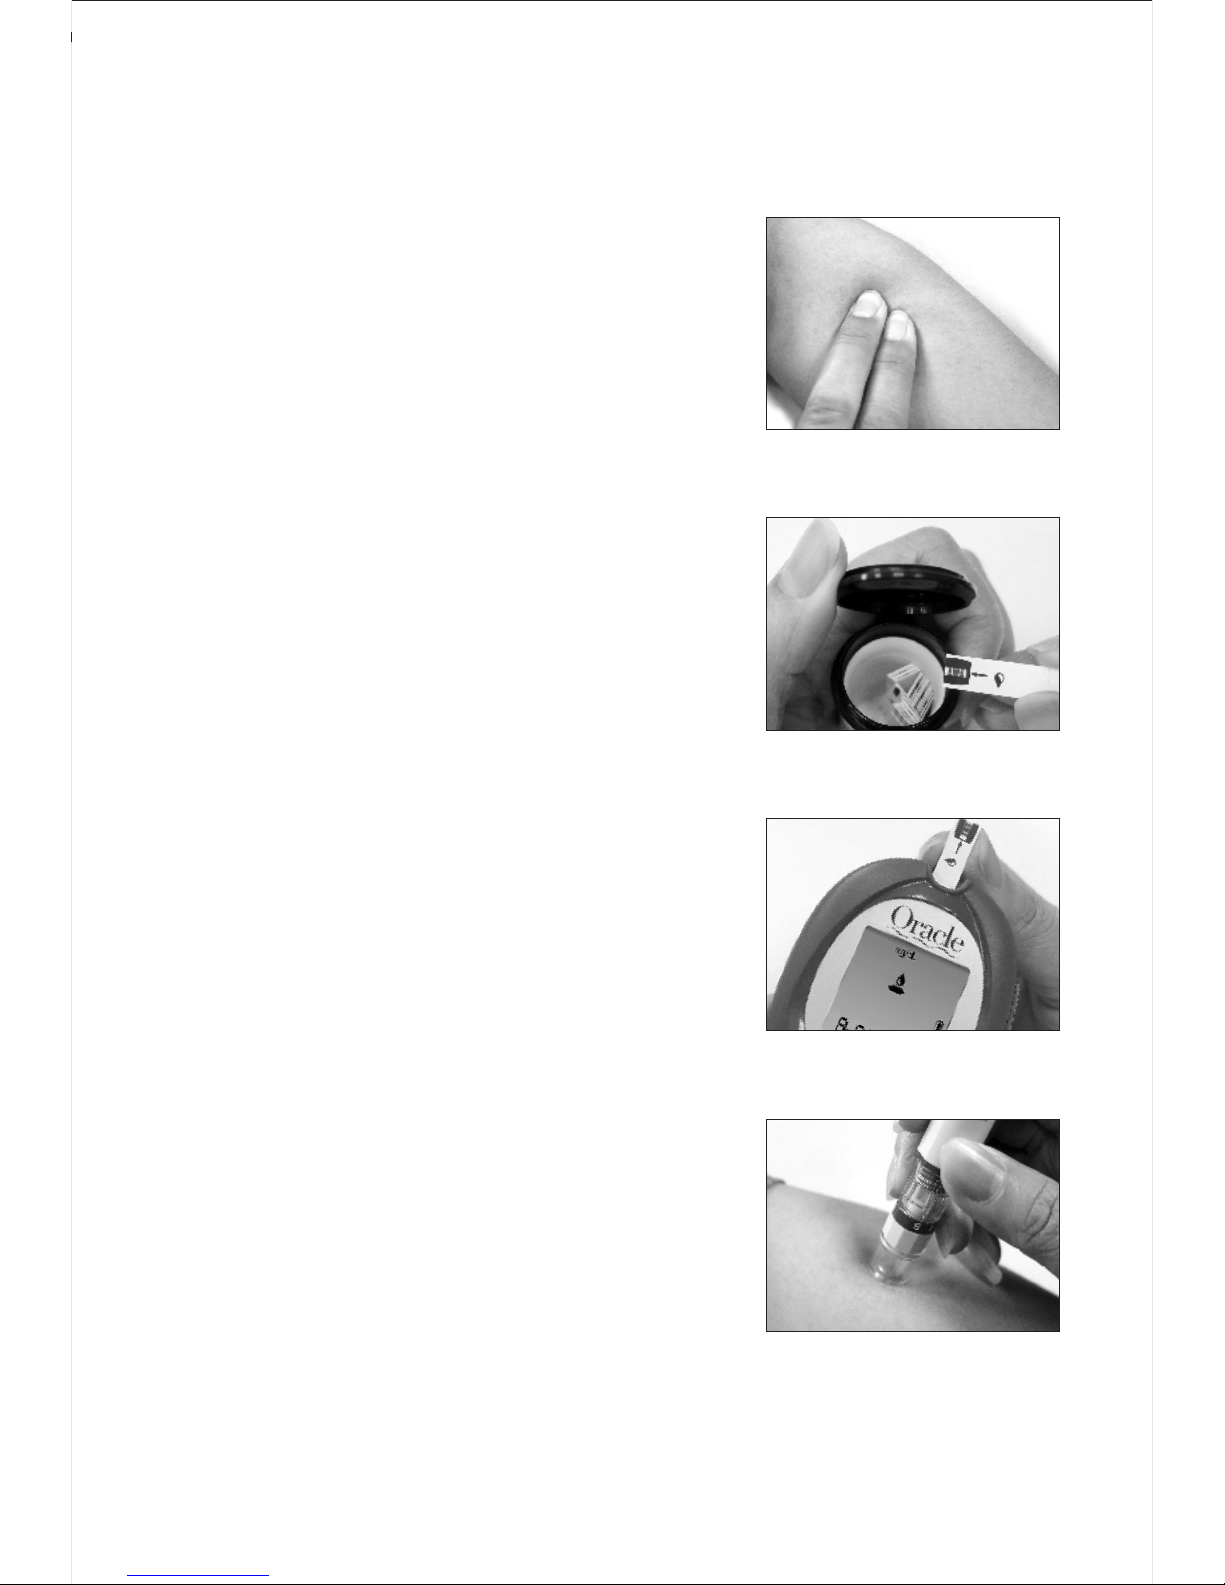
6.Massage the selected area gently
to increase blood flow to the
puncture site. Clean the test location
with an alcohol wipe or with soap
and water.
7.Open the test strip vial. Take one
test strip out of the vial and quickly
cover the vial to keep air out.
8.Insert a test strip into the meter
while the meter is off. The meter
will turn on and a blinking blood
drop icon appears on the LCD
screen.
9.Press and hold the loaded lancing
device against the forearm for a few
seconds, then press and release the
button.
6
7
8
9
8
10
11
12
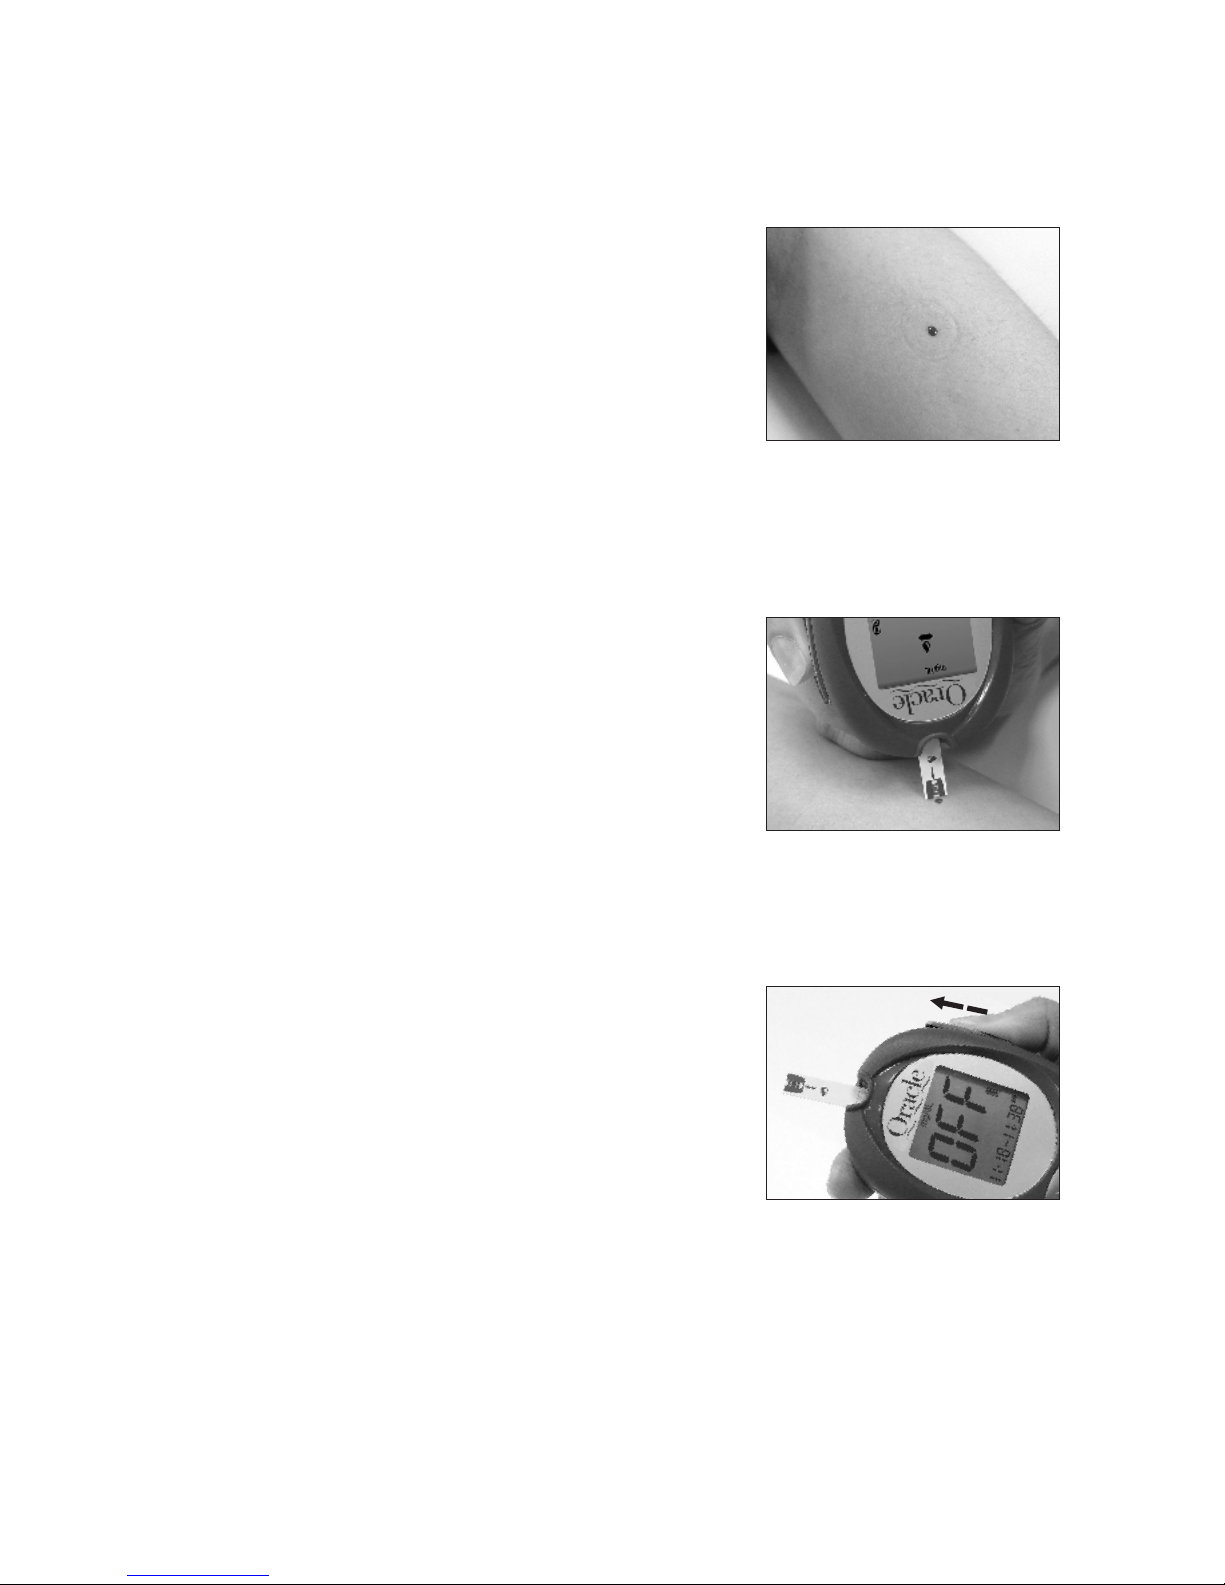
10. Wait for a few seconds until the
blood drop forms. Make sure you
have sufficient blood to fill the
small window of the test strip. For
individuals who experience
difficulty in getting sufficient blood
for a test, it may be helpful to rub the
puncture site a little longer before
using the lancing device.
11. Apply blood to the front edge
(the tip) of the test strip, and the
meter will start counting down
for 6 seconds then display the test
results on the screen.
12. Remove the used strip by hand
or by pushing the ejector button. The
meter will turn off automatically.

9
5. Safety Information
Please use this device only for the intended use described
in this user guide.
Before using this system to test your blood glucose
please read instructions thoroughly and practice the test
when you first use this system. Do a quality check on
the system by following the instructions and consult
with healthcare professionals for questions or problems.
Be aware of the safety of young children or handicapped
persons near you when you conduct a glucose test using
this system.
Use only Oracle test strips and control solutions with
the Oracle meter.
Keep the test strip vial away from children. The test
strips and vial cap can present a choking hazard.
Be cautious when removing the lancet. Take the lancet
out carefully. Always place the protective cap
back on the exposed tip or (if using a twist lancet)
place the cap on a hard surface and push the exposed tip
into the protective cap and discard properly.
Test your blood glucose using the meter and the test
strips with the same reference number as labeled on
the outer box of meter and the test strips.
 Loading...