

Hummer H-240AURA, H-120AURA User Manual

H-240AURA
H-120AURA

EN - Warning
Improper installation will result in damage to the processor. Never switch the computer system on until the cooler and the
fans are connected to the motherboard power connector.
Always use the included screws. Screw the radiator with care to avoid damaging it.
Electrostatic discharge (ESD) can damage system components. Use and ESD-controlled workstation. If a worksation is not
available, wear an antistatic wrist strap or touch an earthed surface before handling any PC components.
PT - Atenção
Uma instalação imprória poderá danicar o processador. Nunca ligue o computador sem vericar se o cooler e as ventoinhas
estão ligadas na motherboard.
Utilize sempre os parafusos fornecidos. Aparafuse o radiador com cuidado de forma a evitar possíveis danos.
Descargas eletroestáticas (ESD) poderão danicar componentes do PC. Use uma bancada com controle de ESD. Caso não
tenha uma bancada disponível, utilize uma pulseira anti-estática ou toque uma superfície aterrada antes de manusear
qualquer componente do PC.
ES - Advertencia
Una instalación inapropriada puede provocar daños al procesador. Nunca encienda el ordenador antes de que el cooler y los
ventiladores estén conectados al conector de corriente de la placa madre.
Utilice siempre los tornillos originales. Cuidado con no dañar el radiador al atornillar.
Descargas electrostáticas (ESD) pueden dañar componentes en el sistema. Use una estación de trabajo con control de ESD.
Si no tiene disponible dicho lugar de trabajo, colóquese una muñequera antiestática o toque una supercie conectada a tierra
antes de tocar cualquier componente en el PC.
FR - Advertissement
Une installation incorrecte endommagerait le processeur. N’allumez jamais l’ordinateur avant que le ventilateur e le
refroidisseur ne soit connecté au connecteur d’alimentation de la carte mère. Ne mettez jamais le système sous tension
jusqu’à ce que le refroidisseur et les ventilateurs soient connectés au connecteur d’alimentation de la carte mère.
Utilisez toujours les vis fournies. Vissez le radiateur avec précaution pour éviter de l’endommager.
Une décharge électrostatique (ESD) peut endommager les composants du systéme. Utilisez une station de travail protégée
contre l’ESD. Si vous ne disposez pas d’une telle station de travail, portez un bracelet antistatique ou touchez une surface
connectée à la masse avant de manipuler les composants du PC.
DE - Warnung
Fehler bei der Installation können zu Schäden am Prozessor führen. Schalten Sie das Computersystem niemals ein, bis der
Kühler und die Lüfter an den Netzanschluss angeschlossen sind.
Verwenden Sie immer die mitgelieferten Schrauben. Schrauben Sie den Kühler sorgfältig, um eine Beschädigung zu
vermeiden.
Die Systemkomponenten können durch elektrostatische Entladung beschãdigt werden. Benutzen Sie einen for ESD
schützenden Arbeitsplatz. Sollte ein solcher Arbeitspaltz nicht verfügbar sein, tragen Sie ein antistatisches Armband or
berühren Sie eine geerdete Oberãche vor dem hantieren mit PC Komponenten.
IT - Avvertimento
L’installazione non corretta si tradurrà in danni al processore. Non accendere il sistema informatico no al dispositivo di
raffreddamento ei ventilatori sono collegati al connettore di alimentazione della scheda madre.
Usare sempre le viti in dotazione. Avvitare il radiatore con cura per evitare di danneggiarla.
Le scariche elettrostatiche (ESD) possono danneggiare i componenti del sistema. Uso e workstation ESD-controllato. Se un
worksation non è disponibile, indossare un bracciale antistatico o toccare una supercie messa a terra prima di maneggiare
qualsiasi componente del PC.
H-240AURA
H-120AURA
1
5
9
13
2
6
10
14
3
7
11
15 16
4
8
12
Important announcement
Please read this user’s manual carefully before installation to get the water cooler’s best performance
by optimized installation. Nox Xtreme is not responsible for any damage to the product or injury caused
by incorrect installation or user’s carelessness. The water cooler may cause interference with some
motherboards. If you face an interference between Hummer cooler and your motherboard, please stop
installing it. Be careful not to hurt yourself by the radiator while installating & disassembling the water
cooler. Do not move the water cooler around after the installation to prevent CPU damage. Please, do not
use the water cooler for any other usage apart from the original purpose.
Warranty
For your warranty claims, please contact Nox Xtreme overseas distribution partners in your country.
Find the distribution partner list at www.nox-xtreme.com
Warranty: 2 years from purchasing date. (Depending on the laws of each country)
URL: www.nox-xtreme.com
E-mail: support@nox-xtreme.com
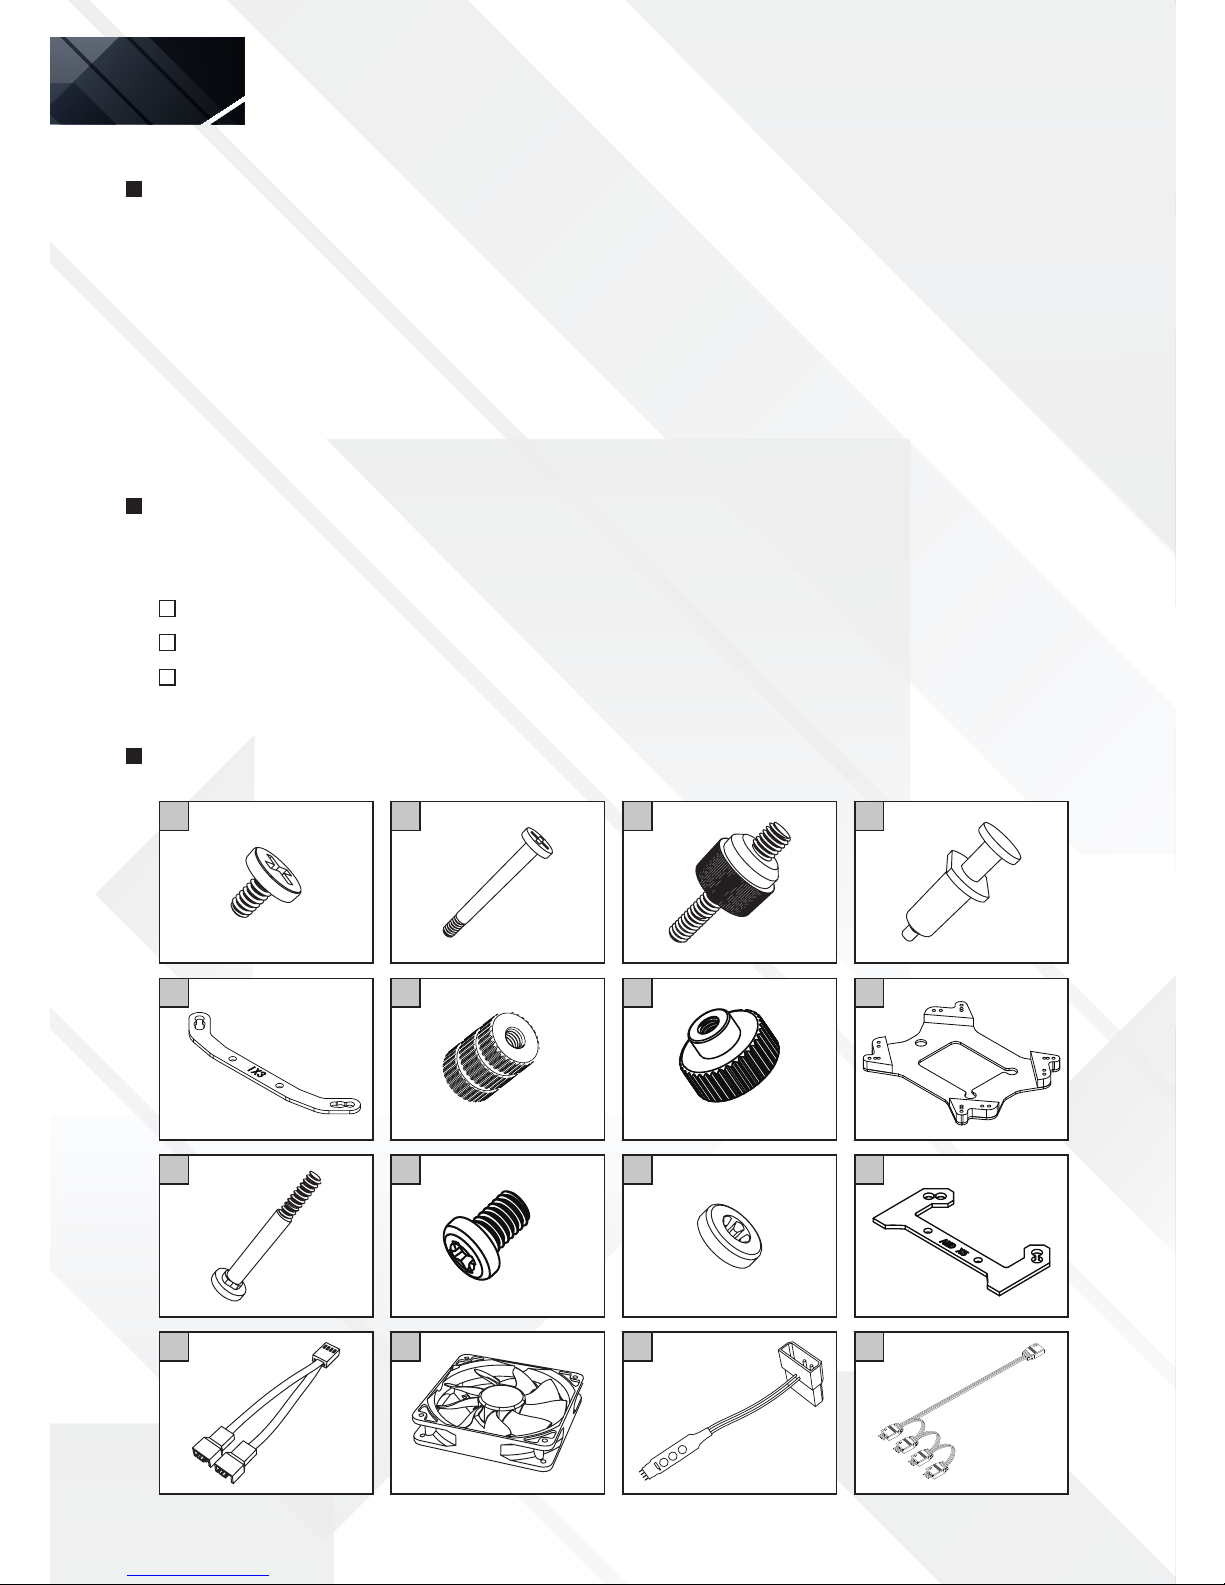
Components description
EN
LGA 2011 LGA 2011
LGA 775 / 115X / 1366 LGA 775 / 115X / 1366 LGA 775 / 115X / 1366
1366
115X
775
1
2
3
4
8
11
9
6
4
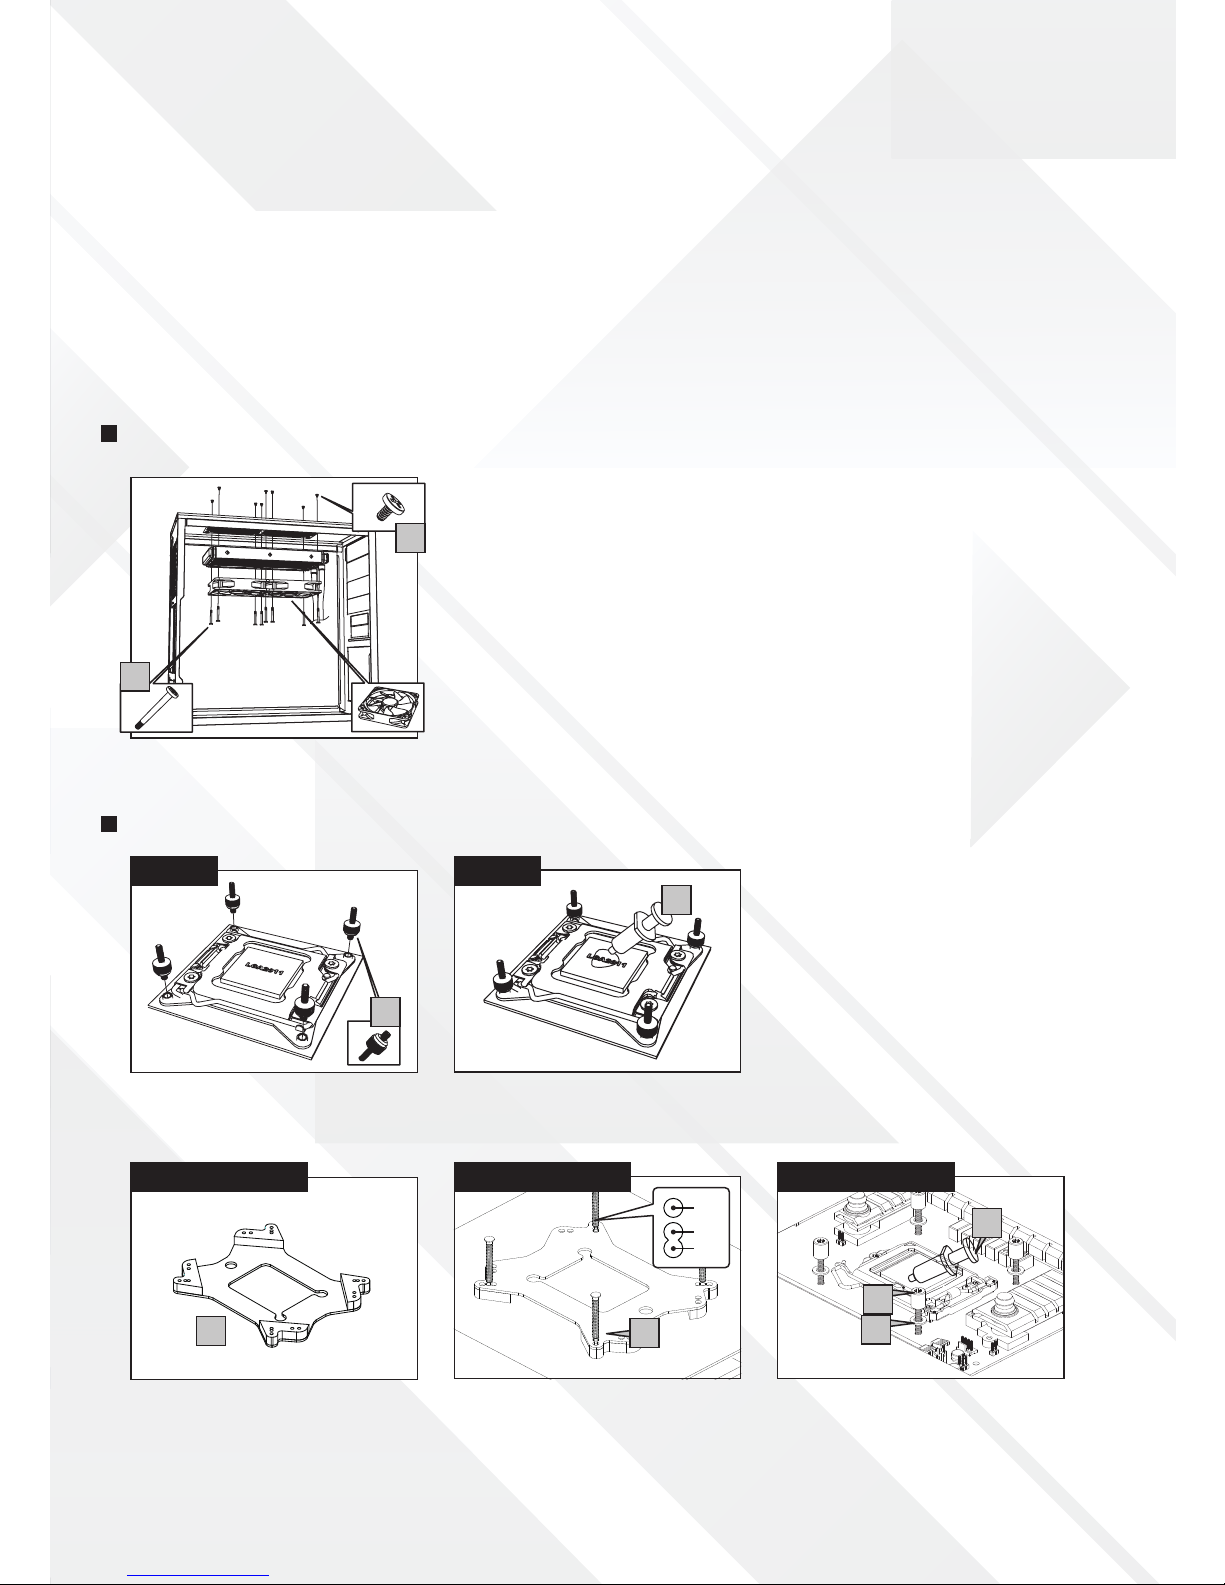
Radiator & fans installation
Intel installation LGA 2011 / 775 / 115X / 1366
1) 6mm radiator screws x8
2) 29.5mm fan screws x8
3) Intel LGA 2011 screws x4
4) Thermal compound x1
5) Intel bracket x2
A.1) Attach the LGA 2011 (3) screws on
the motherboard.
6) Knurled Threaded nuts x4
7) T-nuts x 4
8) Back plate x1
9) 28.5mm back plate screws x4
10) Brackets screws x4
11) Insulative rings x4
12) AMD bracket x2
13) Fan spliter cable x1
14) 12cm Hummer fan x2*
15) Internal RGB controller x1
16) RGB hub adapter x1
A) Attach the fans on the radiator using the 29.5mm fan screws (2).
Make sure that the fan’s airow will be moving towards the exterior of the
PC chassis.
B) Attach the radiator on the PC chassis using the 6mm radiator screws (1).
Note:
Optionally, you can also install the radiator at the PC chassis’ front and rear interior.
* The H-120AURA model only includes 1x 12 cm Hummer fan.
A.2) Apply thermal compound (4) on
the CPU.
A.2) Position and insert the screws (9)
on the back plate according with the
CPU socket.
A.3) Pass the back plate screws through
the motherboard, apply the insulative
rings rst (11) and then the knurled
nuts (6). Apply thermal compound (4)
on the CPU.
A.1) Use the back plate (8) with the
correct side for Intel mounting. This
side will face the motherboard.
 Loading...