

Page 1

H-120
Page 2
Notice
Please read this user´s manual carefully before installation to get the cooler´s best performance by optimized
installation. NOX xtreme is not responsible for any damage to the product or injury caused by incorrect installation or
user´s carelessness. The cooler may cause an interference with few motherboards and if you face an interference
between Hummer cooler and your motherboard, please stop installing the cooler. Be sure to be careful not to hurt
yourself by the sharp fins while installating & disassembling the cooler. Do not move the cooler around after the
installation to prevent CPU damage. Please, do not use the cooler for any other usage apart from the original purpose.
Warranty
For your warranty claims, please contact Nox Xtreme overseas distribution partners in your country. Find the
distribution partner list at where listed at www.nox-xtreme.com
Warranty: 2 years from purchasing date. (Depending on the laws of each country)
URL: www.nox-xtreme.com
E-mail: support@nox-xtreme.com
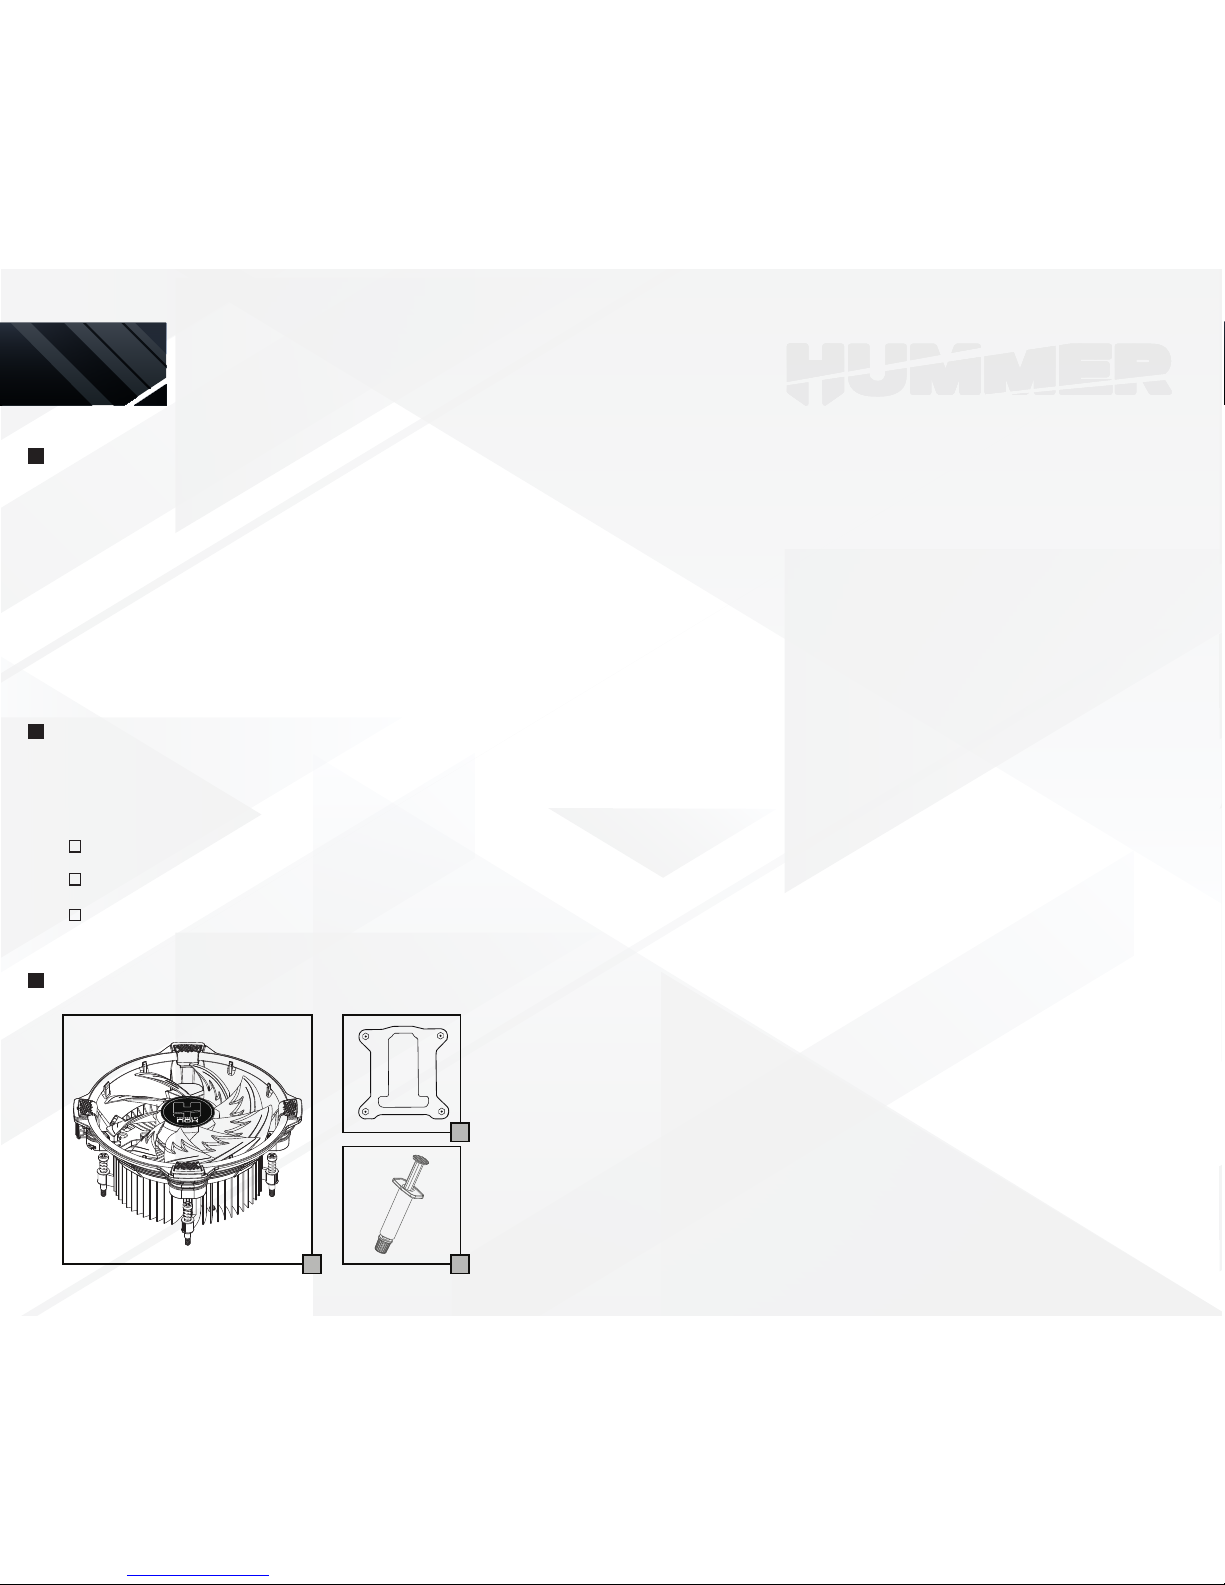
1) CPU cooler x 1
2) Back plate x 1
3) Thermal paste x 1
Components description
H-120
EN
3
2
1
Page 3

Put the back plate on the motherboard
backside.
Intel LGA 1150 / 1151 / 1155 / 1156 installation
Apply the thermal paste on the CPU surface.
Place the CPU cooler and screw it to the back
plate.
Complete the installation by connecting the fan
cable on the motherboard.
1 2
3 4
Page 4

Observaciones
Por favor, lea este manual del usuario detenidamente antes de la instalación para obtener el mejor rendimiento del
cooler y una instalación optimizada. Nox-xtreme no se hace responsable de los daños causados al producto o daños
causados por una instalación incorrecta o una negligencia del usuario. El cooler podría causar interferencias con
algunas placas base. En este caso, por favor, deje de instalar el disipador. Asegúrese de tener cuidado de no dañar las
aletas durante la instalación y desmontaje del cooler. No mueva ni fuerce el cooler despues de la instalación para evitar
dañar la CPU. Por favor, no utilice el cooler H-100 para cualquier otro uso del propósito original.
Garantía
Para cualquier reclamación de la garantía, por favor póngase en contacto con los distribuidores de Nox Xtreme en el
país en el que haya realizado la compra. Puede ver la red de distribuidores en nox-xtreme.com
Garantía: 2 años desde la fecha de compra. (Sujeto a las leyes de cada país)
URL: www.nox-xtreme.com
E-mail: support@nox-xtreme.com
Descripción de componentes
H-120
ES
1) Disipador para CPU x 1
2) Soporte x 1
3) Pasta térmica x 1
3
2
1
Page 5

Instalación Intel LGA 1150 / 1151 / 1155 / 1156
Coloca el soporte en la parte posterior de la
placa base.
Aplica la pasta térmica sobre la superficie de
la CPU.
Coloca el disipador para CPU y atorníllalo al
soporte.
Completa la instalación conectando el cable del
ventilador a la placa base.
1 2
3 4
Page 6

Note
Por favor leia este manual cuidadosamente antes de instalar o dissipador. A sua instalação correcta permite obter a
melhor performance. A NOX Xtreme não é responsável por quaisquer danos no produto, ou que este possa provocar em
produtos terceiros, causados pela instalação incorrecta ou falta de cuidado. É possível, apesar de improvável, que o
dissipador cause interferências na motherboard. Se experimentar interferências entre a sua motherboard e o Cooler
Hummer por favor pare a instalação. Tenha em atenção que as aletas do cooler podem causar cortes, manuseie com
cuidado, tanto na instalação como na remoção. Não mova o cooler após a sua instalação para prevenir eventuais danos
no CPU. Por favor não use este produto para outra finalidade para além da original.
Garantia
Para efeitos de garantia, por favor contacte a loja onde adquiriu o seu Cooler Hummer. Ela tratará de encaminhar o
seu processo para o distribuidor Nox em Portugal.
Garantia: 2 anos
website: www.nox-xtreme.com
E-mail: support@nox-xtreme.com
Descrição dos componentes:
H-120
PT
1) Dissipador x 1
2) Back plate x 1
3) Massa térmica x 1
3
2
1
Page 7

Instalação Intel LGA 1150 / 1151 / 1155 / 1156
Coloque a back plate na traseira da motherboard. Aplique a massa térmica na superfície do CPU.
Coloque o dissipador e aparafuse-o à back plate. Complete a instalação ligando o cabo da ventoinha
à motherboard.
1 2
3 4
Page 8

 Loading...