

Page 1
78,0 °F | 6,16 % | 456 kg/m3 | -27,3 td | 0,64 aw | 51,9 %r.H. | 14,8 % abs | 100,4 g/m2 | 09 m/s | 4,90 Ugl | 1
Operating Manual
Always read this operating manual before using the humimeter BMA-2!
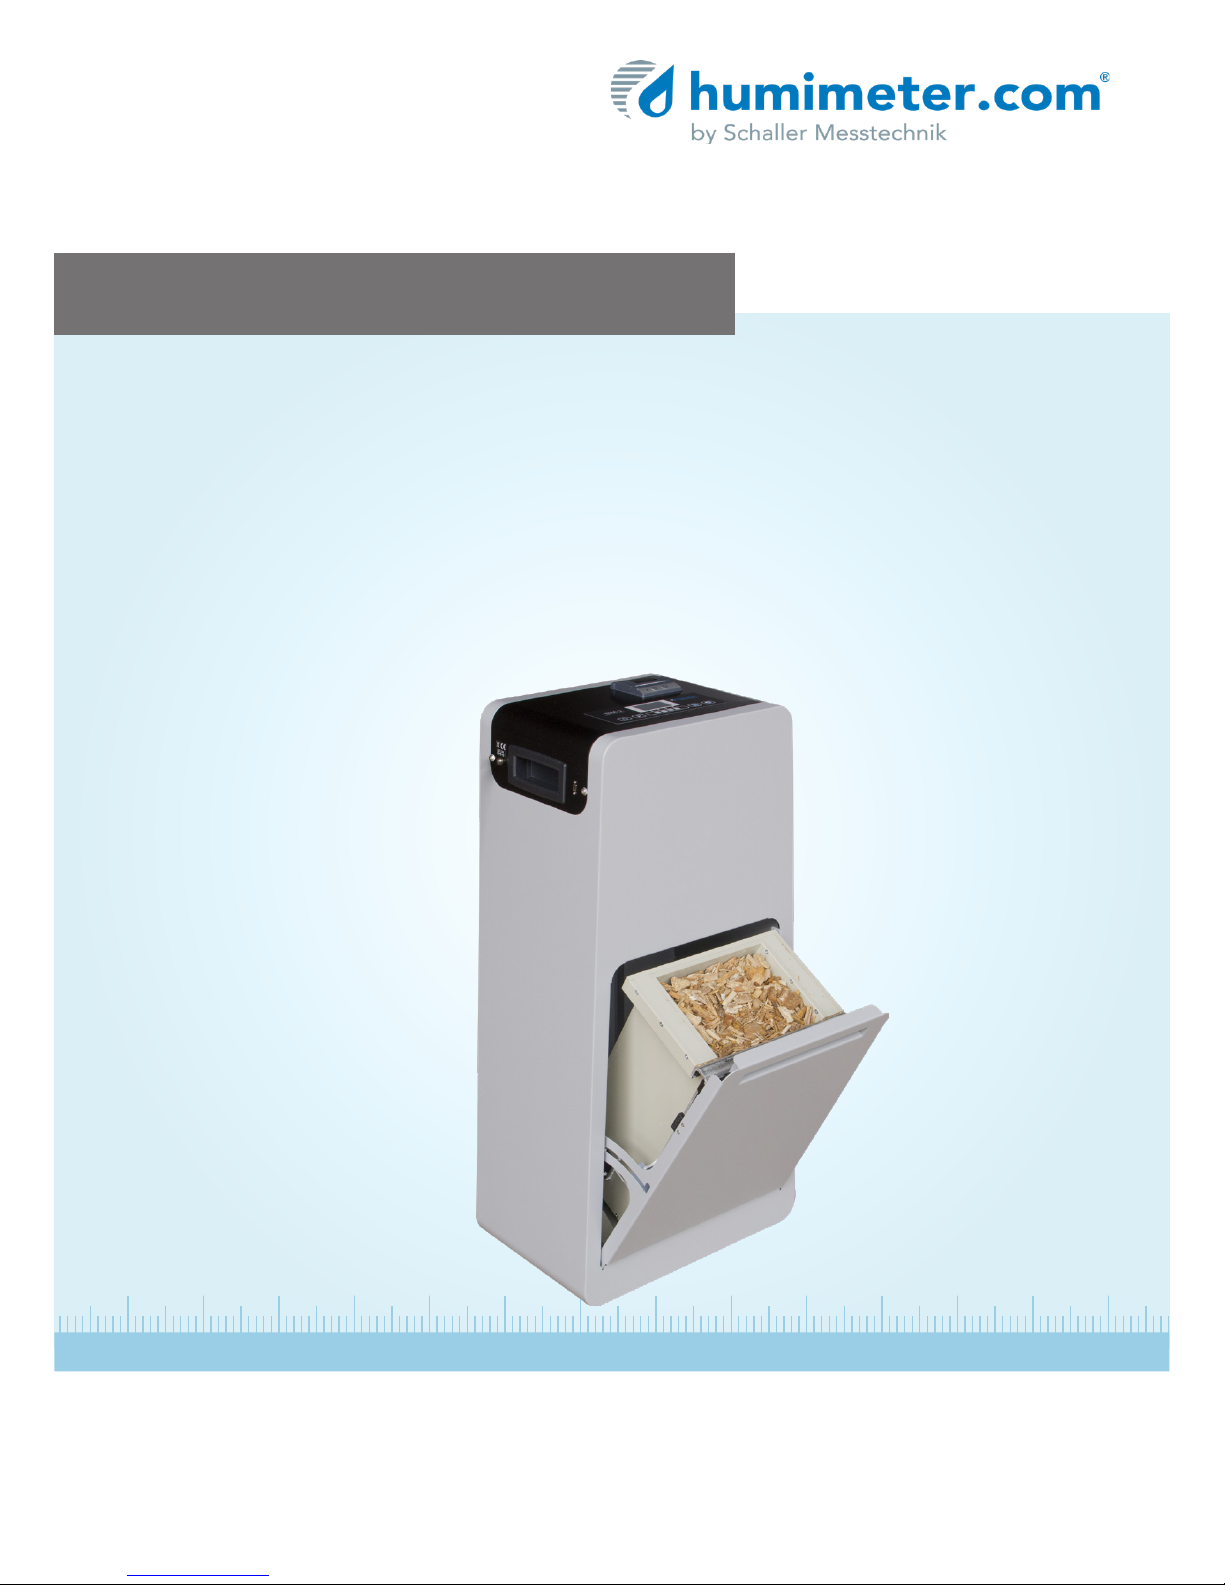
humimeter BMA-2
Moisture meter for measuring the moisture content of
biomass
Moisture meter
Version 3.0
Page 2

humimeter BMA-2 Operating Manual
Page 2
Your humimeter BMA-2 at a glance
The main unit
No. Name
1 Control panel and display
2 Measuring chamber
3 Drawer
4 USB port
5 Power supply
1
2
3
4
5
Page 3
Page 3
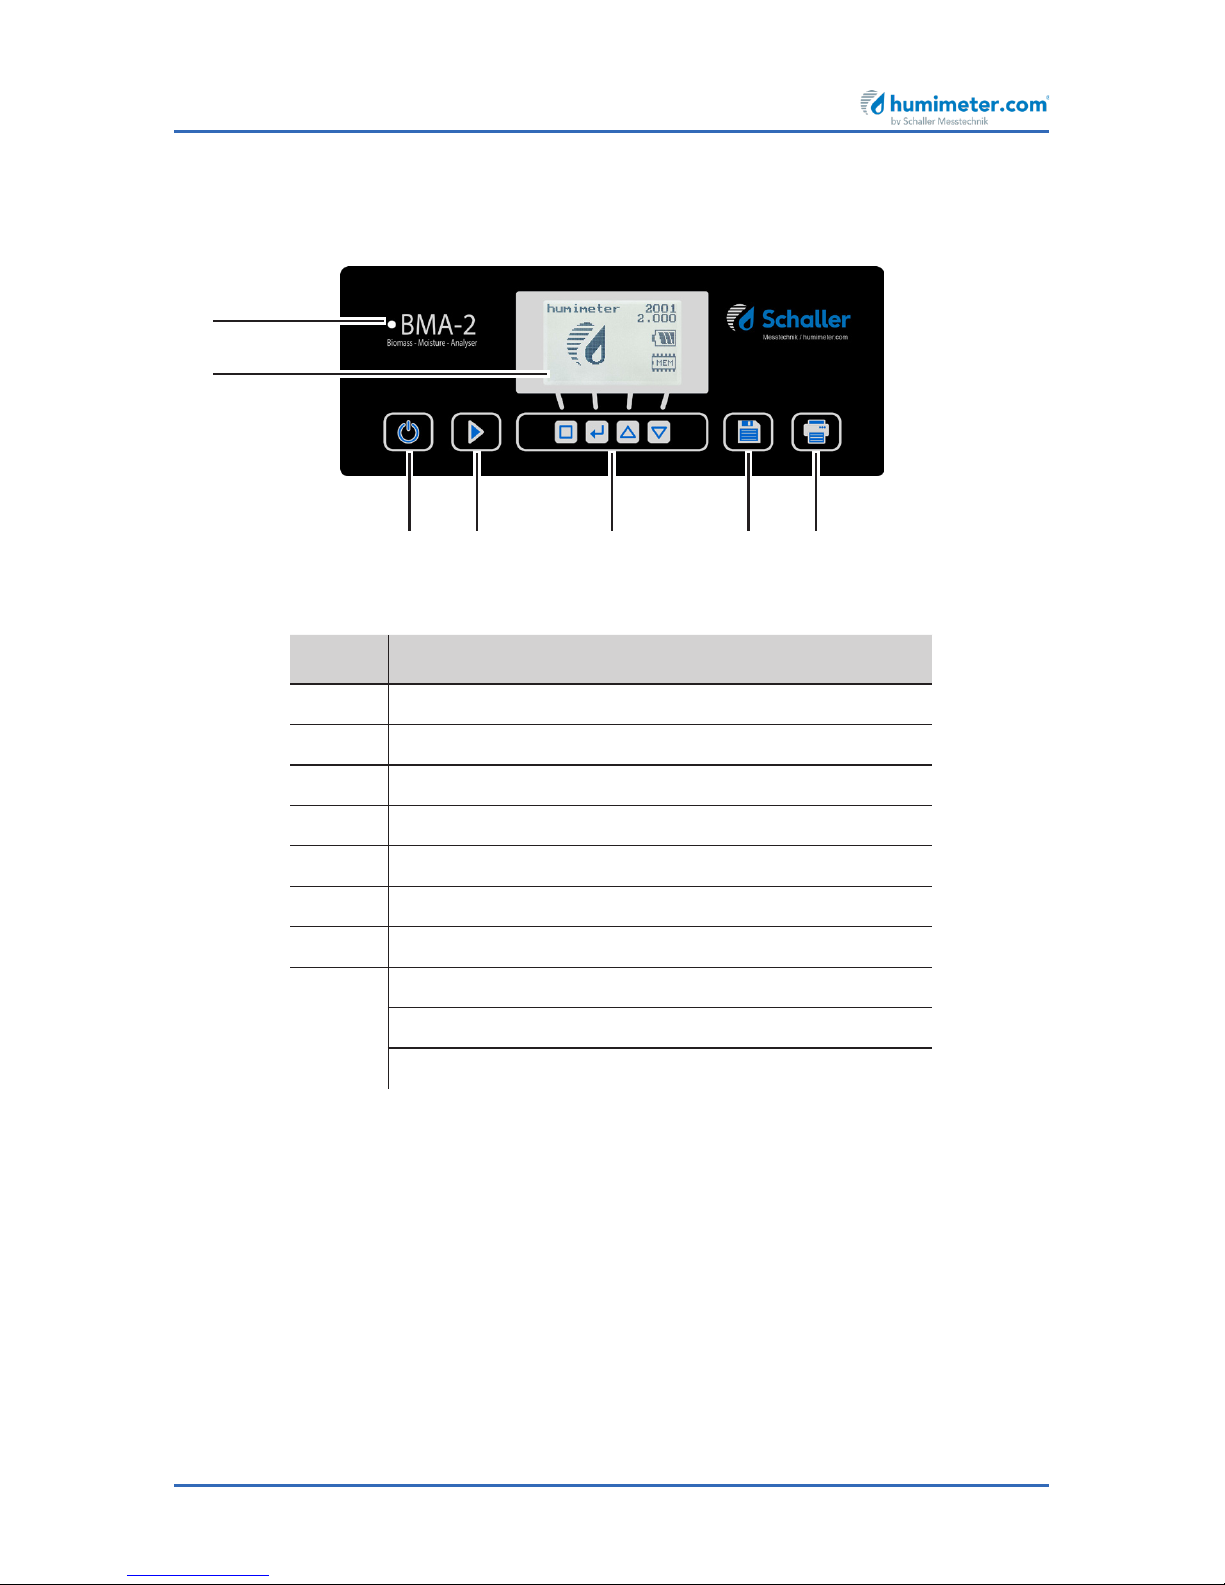
The control panel
No. Name
1 Print button
2 Save button
3 Control buttons for display
4 Start button
5 On/off button
6 Display
7 LED light
solid blue: ready for use
flashing blue: measurement in progress
flashing red: fault (see"11. Faults")
7
6
5 4 3 2 1
Page 4
humimeter BMA-2 Operating Manual
Page 4
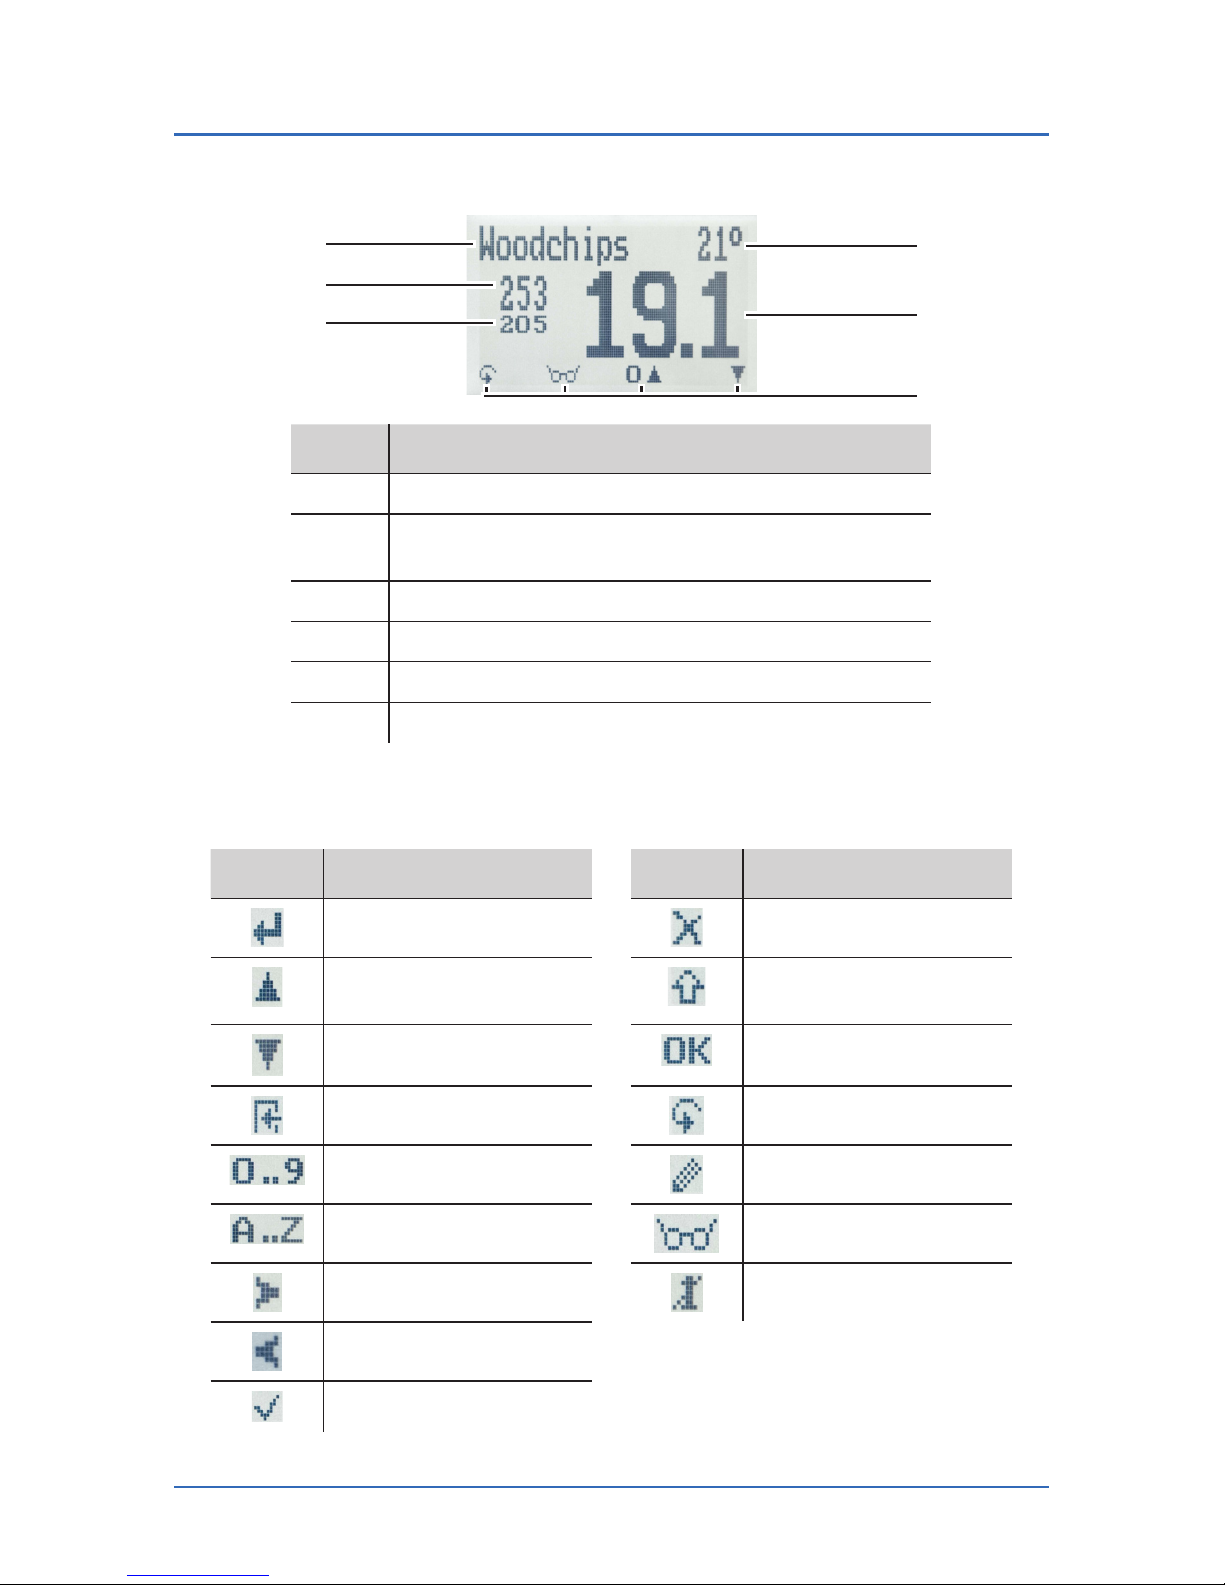
The display
No. Name
1 Temperature
2 Moisture content in % (see "6.1 How moisture
is defined")
3 Display symbols
4 Atro weight/m³ (optional)
5 Bulk density (optional)
6 Product type
The display symbols
Symbol Name Symbol Name
Enter No
Up Change input
level
Down OK
Back Change menu
Enter numbers Enter data
Enter letters View measurements
Continue / go right Delete measurements
Left
Yes
1
2
4
5
6
3
Page 5
Page 5
The menus
The device has two different menus: product selection menu and main menu:
Product selection menu
No. Name
1 Open main menu
2 Show the last recorded values
3 For changing the product type
Main menu
The main menu comprises the following menu items:
• Edit Logs:
Manual Logs, Clear Logs
• Print Logs:
Last Log, All Logs, Clear Logs
• Send Logs:
Manual Logs, Clear Logs
• Options:
Bluetooth, Date/Time, Language, Unlock, °C/°F, BL On Time, Auto Off Time,
Materialcalibration, Password, Reset
• Status
2
1
3
Page 6

humimeter BMA-2 Operating Manual
Page 6
Table of contents
Your humimeter BMA-2 at a glance �������������������������������������������� 2
The main unit ................................................................................................... 2
The control panel .............................................................................................. 3
The display ........................................................................................................ 4
The display symbols .......................................................................................... 4
The menus ........................................................................................................ 5
1� Introduction �������������������������������������������������������������������� 9
1.1 Information about this operating manual .......................................... 9
1.2 Limitation of liability ......................................................................... 9
1.3 Symbols used in this manual ........................................................... 10
1.4 Customer service ............................................................................ 10
2� For your safety �������������������������������������������������������������� 11
2.1 Proper use ...................................................................................... 11
2.2 Improper use .................................................................................. 11
2.3 User qualications .......................................................................... 11
2.4 Danger from electric current ...........................................................12
2.5 General safety information ............................................................. 12
3� On receipt of your device �������������������������������������������� 13
3.1 Taking the device out of its packaging ............................................ 13
3.2 Making sure that all of the components have been included ........... 13
3.3 Setting up the device ...................................................................... 14
4� Using the device - Basics ���������������������������������������������� 15
4.1 Inserting the measuring chamber .................................................... 15
4.2 Plugging in the device ..................................................................... 15
4.3 Switching the device on .................................................................. 15
4.4 Automatic drawer check ................................................................. 16
4.5 Automatic calibration ..................................................................... 16
Page 7

Page 7
4.6 Taking a measurement .................................................................... 16
4.7 Switching the device off ..................................................................16
5� The measuring process ������������������������������������������������� 17
5.1 Preparing a measurement ...............................................................17
5.2 Taking a measurement .................................................................... 17
5.3 Saving individual readings ............................................................... 19
5.4 Saving several readings (a measurement series) at the same time ....20
5.5 Printing measured values ................................................................ 21
5.6 Viewing individual readings .............................................................23
5.7 Viewing individual readings from a series of measurements ............23
5.8 Deleting all measured values (data log) ........................................... 24
5.9 Deleting individual measurement series ........................................... 24
6� Product types ���������������������������������������������������������������� 25
6.1 How moisture is dened ................................................................. 25
6.2 Denition of wood chips types (Norm EN ISO 17225-1) .................. 26
6.3 Selection of calibration curve for wood chips .................................. 26
6.4 Notes for the measurement of wood shavings ................................ 33
6.5 Notes for bulk density and dry weight (atro)/m³ .............................. 33
6.6 Notes for comparative measurement with oven-drying method ....... 33
7� Using the LogMemorizer program ������������������������������ 34
7.1 Installing/Opening the program .......................................................34
7.2 Exporting measuring values to a computer ...................................... 34
8� Checking the device's status ���������������������������������������� 37
9. Conguringthedevice ������������������������������������������������� 38
9.1 Turning on Bluetooth ...................................................................... 38
9.2 Adjust the date/time ...................................................................... 38
9.3 Selecting a language ....................................................................... 39
9.4 Activating options ........................................................................... 39
Page 8

humimeter BMA-2 Operating Manual
Page 8
9.5 Deactivating options ....................................................................... 40
9.6 Selecting °C/°F ................................................................................ 40
9.7 Reducing the device's power consumption ..................................... 41
9.8 Conguring the material calibration function .................................. 42
9.9 Changing the password .................................................................. 42
9.10 Resetting the device to its factory settings ....................................... 43
10� Cleaning and maintenance ������������������������������������������ 43
10.1 Care instructions .............................................................................43
10.2 Cleaning the device ........................................................................ 44
10.3 Replacing the printer paper roll ....................................................... 45
10.4 Checking the calibration ................................................................. 45
11� Faults ����������������������������������������������������������������������������� 46
12� Troubleshooting ������������������������������������������������������������ 48
12.1 Cleaning the contacts of the measuring chamber ........................... 48
13� Transportation, storage and disposal ������������������������� 49
13.1 Transporting the device ................................................................... 49
13.2 Storing the device ........................................................................... 49
13.3 Disposing of the device ................................................................... 49
14� Device information ������������������������������������������������������� 50
14.1 EC declaration of conformity .......................................................... 50
14.2 Equipment packages ....................................................................... 51
14.3 Technical data ................................................................................. 51
Page 9

Page 9
1. Introduction
1.1 Information about this operating manual
This operating manual is designed to enable you to use the humimeter BMA-2 safely
and effectively. It is part of the device, has to be stored nearby and must be easily accessible to users at all times.
All users are required to carefully read and make sure that they have understood this
operating manual before using the humimeter BMA-2. All of the safety and operating
instructions detailed in this manual have to be observed to ensure the safety of the
device.
1.2 Limitation of liability
All of the information and instructions provided in this operating manual have been
compiled on the basis of the current standards and regulations, the state of the art,
and the extensive expertise and experience of Schaller GmbH.
Schaller GmbH does not accept any liability for damage associated with the following,
which also voids the warranty:
• Non-observance of this operating manual
• Improper use
• Inadequately qualified users
• Unauthorised modifications
• Technical changes
• Use of unapproved spare parts
This fast measuring procedure can be affected by a range of different factors. For this
reason, we recommend periodically checking the device’s measurements with a standardised oven-drying method.
We, as the manufacturer, do not accept any liability for any incorrect measurements
and associated consequential damage.
Page 10
humimeter BMA-2 Operating Manual
Page 10
1.3 Symbols used in this manual
All of the safety information provided in this manual is shown with a corresponding
symbol.
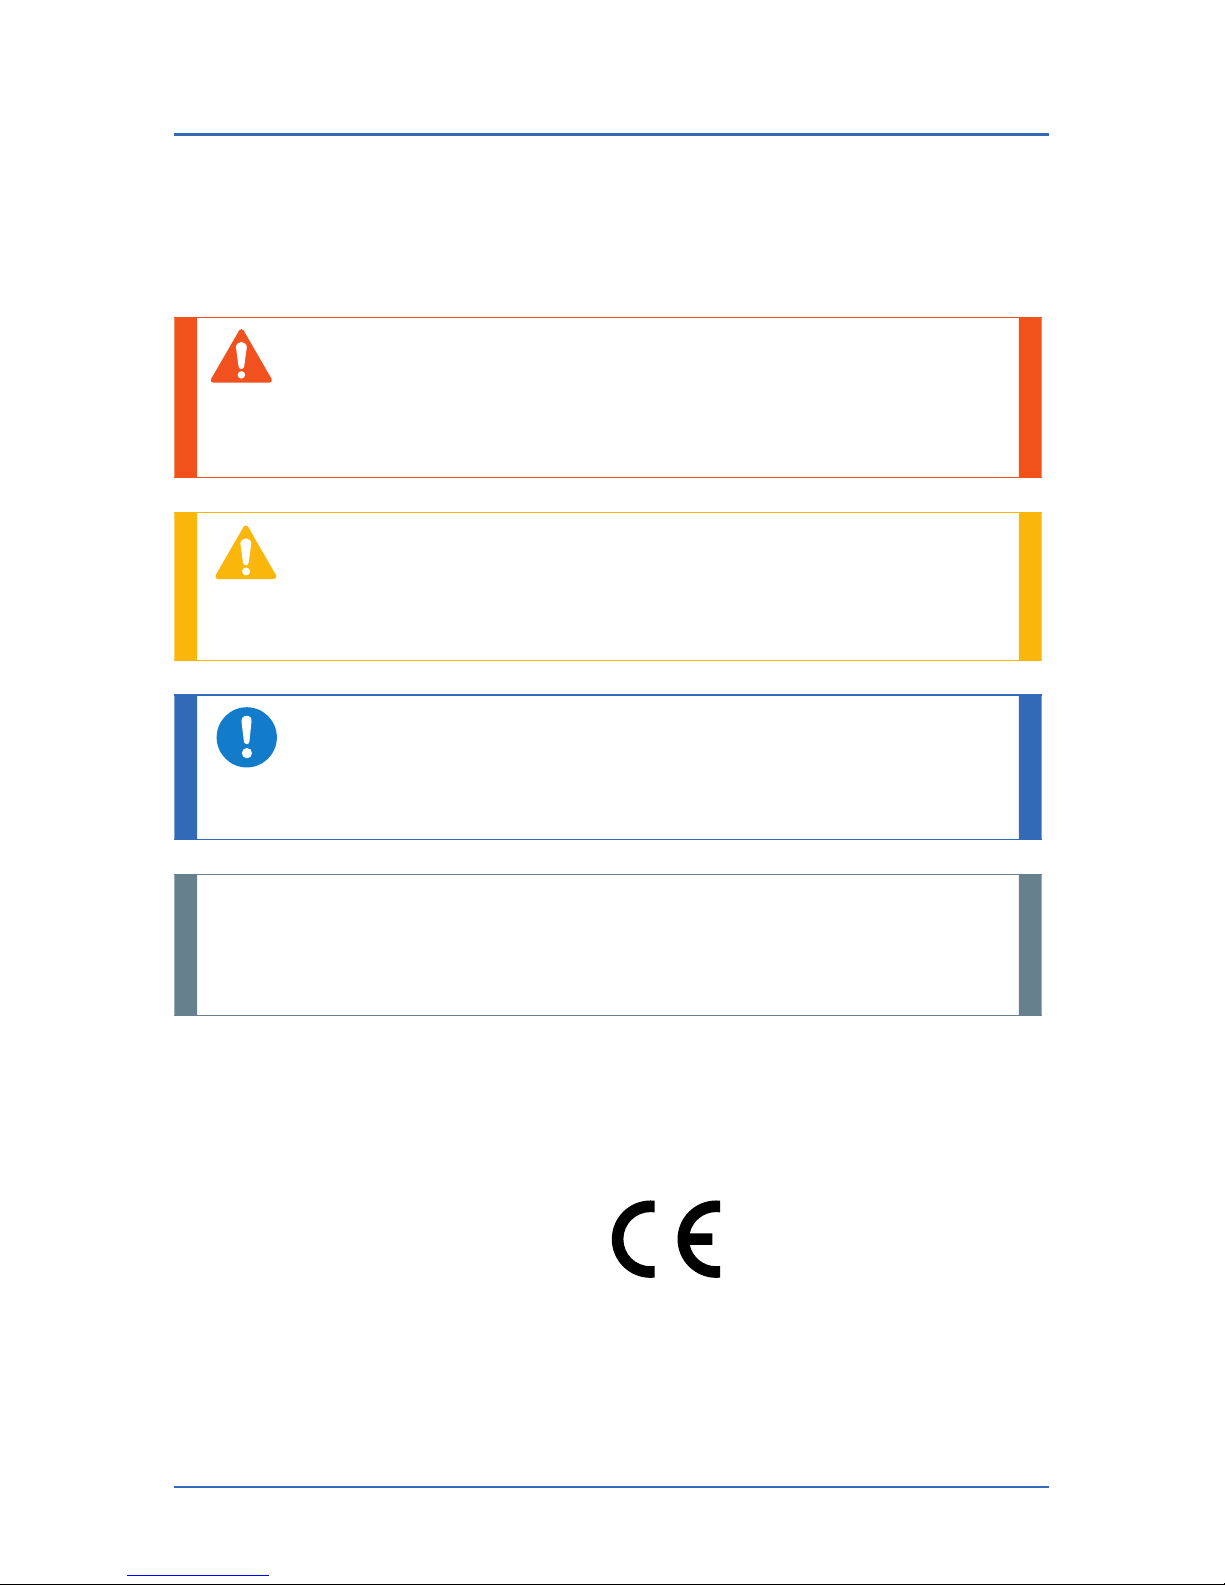
WARNING
It is essential to observe this warning. Non-compliance can lead to serious
irreversible or fatal injury.
CAUTION
It is essential to observe this warning. Non-compliance can lead to injury.
ATTENTION
It is essential to observe this warning. Non-compliance can lead to damage to
property or equipment.
i Information
This symbol indicates important information that enables users to use the device more efficiently and cost-effectively.
1.4 Customer service
For technical advice, please contact our customer service department at:
Schaller GmbH
Max-Schaller-Straße 99
A - 8181 St.Ruprecht an der Raab
Telephone: +43 (0)3178 28899
Fax: +43 (0)3178 28899 - 901
E-mail: [email protected]
Internet: www.humimeter.com
© Schaller GmbH 2018
Page 11

Page 11
2. For your safety
The device complies with the following European directives:
• Restriction of Hazardous Substances in Electrical and Electronic Equipment
(RoHS)
• Electrical equipment (Low Voltage Directive, LVD)
• Electromagnetic Compatibility Directive (EMC)
• Machinery
The device corresponds to state-of-the-art technology. However, it is still associated
with a number of residual hazards.
These hazards can be avoided through strict observance of our safety information.
2.1 Proper use
• Easy to use device for quickly measuring the moisture content of wood chips and
other biomass fuels
• The device must only be used for taking measurements on the products defined
in the following sections of this manual (see "6. Product types").
• Optionally, it is possible to determine the bulk density and absolute dry weight
(ATRO).
2.2 Improper use
• The device must not be used in ATEX.
• The device is not suitable for measuring frozen material or material with a temperature of more than +50 °C.
• The device is not waterproof and must be protected from water and fine dust
(IP40).
2.3 User qualifications
The device must only be operated by people who can be expected to reliably take the
measurements. The device must not be operated by people whose reaction times may
be slowed due to, e.g. the use of drugs, alcohol or medication.
All persons using this device must have read, understood and follow the instructions
provided in the operating manual.
Page 12

humimeter BMA-2 Operating Manual
Page 12
2.4 Danger from electric current
WARNING
Electric shock
Danger to life due to electric shock when operating with a defective mains
cable or defective device.
► Disconnect the device from the power supply and secure it against being
switched on again.
Observe the following safety instructions to avoid hazards from electric current:
• Do not use a damaged power cable.
• A damaged power cable may only be replaced by the manufacturer, customer
service or a similarly qualified person.
• Do not open any firmly screwed covers from the housing of the unit.
• Do not use the device if it shows any externally visible damage, e.g. to the
housing, controls or connection cables, or if it malfunctions.
• A defective device may only be replaced by the manufacturer, customer service
or a similarly qualified person. Do not repair the device yourself.
• Do not make any changes to the device, its components or accessories.
2.5 General safety information
The following safety information has to be observed at all times to avoid damage to
objects and injury to people:
• Do not reach into the interior of the device during operation.
• Keep the device and its power cable away from children under the age of 8.
• Disconnect the device from the power supply if it is to be left unattended for an
extended period of time.
• Attention: Danger of tipping! Ensure that the device stands on a stable and level
surface.
All of the device’s technical features have been inspected and tested before delivery.
Every device has a serial number. Do not remove the tag with the serial number.
Page 13

Page 13
3. On receipt of your device
3.1 Taking the device out of its packaging
• Take the device out of its packaging.
• Next, make sure that it is not damaged and that no parts are missing.
• Do not discard the packaging! In case of shipping the device, the original
packaging must be used.
» We refuse any liability for damages during transport using inadequate
packaging.
3.2 Making sure that all of the components have been included
Make sure that all of the components have been included by checking the package
contents against the following list:
• humimeter BMA-2
• Measuring chamber (12 liters)
• Power supply unit 24VDC 5A with Schuko plus (CEE 7/16)
• 2 pieces of plastic buckets (13 liters)
• Operating manual
Optional accessories:
• USB flash drive with LogMemorizer measuring data recording and analysing software and USB cable (Included in the equipment packages: USB package, Data
package, ATRO package) - Described in a separate operating manual
• Integrated printer with 2 pieces of paper rolls (Included in the equipment
packages: Data package, ATRO package)
• Determination of bulk density and ATRO dry weight (tons/m³) for humimeter
BMA-2 (Included in the ATRO equipment package)
• External rechargeable battery - Described in a separate operating manual
• Bluetooth module - Described in a separate operating manual
• Measuring device check test medium - Described in a separate operating
manual
• Wheels for transportation (2 pieces)
Page 14
humimeter BMA-2 Operating Manual
Page 14
3.3 Setting up the device
Note the following:
• Do not leave the device out in the rain. The device and measuring chamber are
not waterproof.
• Do not position the device in damp rooms..
• Place the device on a stable, level and dry surface.
• Do not expose the device to large quantities of dust.
• Do not expose the device to extreme temperatures.
• Protect the device from strong mechanical shocks and loads.
• Keep a sufficient distance of about 10 cm from the wall and other objects.
• Lay the power cable so that it cannot be damaged by edges or hot surfaces.
CAUTION
Danger of tipping
Risk of injury due to tipping device
► Place the device on a stable and level surface.
Page 15
Page 15
4. Using the device - Basics
4.1 Inserting the measuring chamber
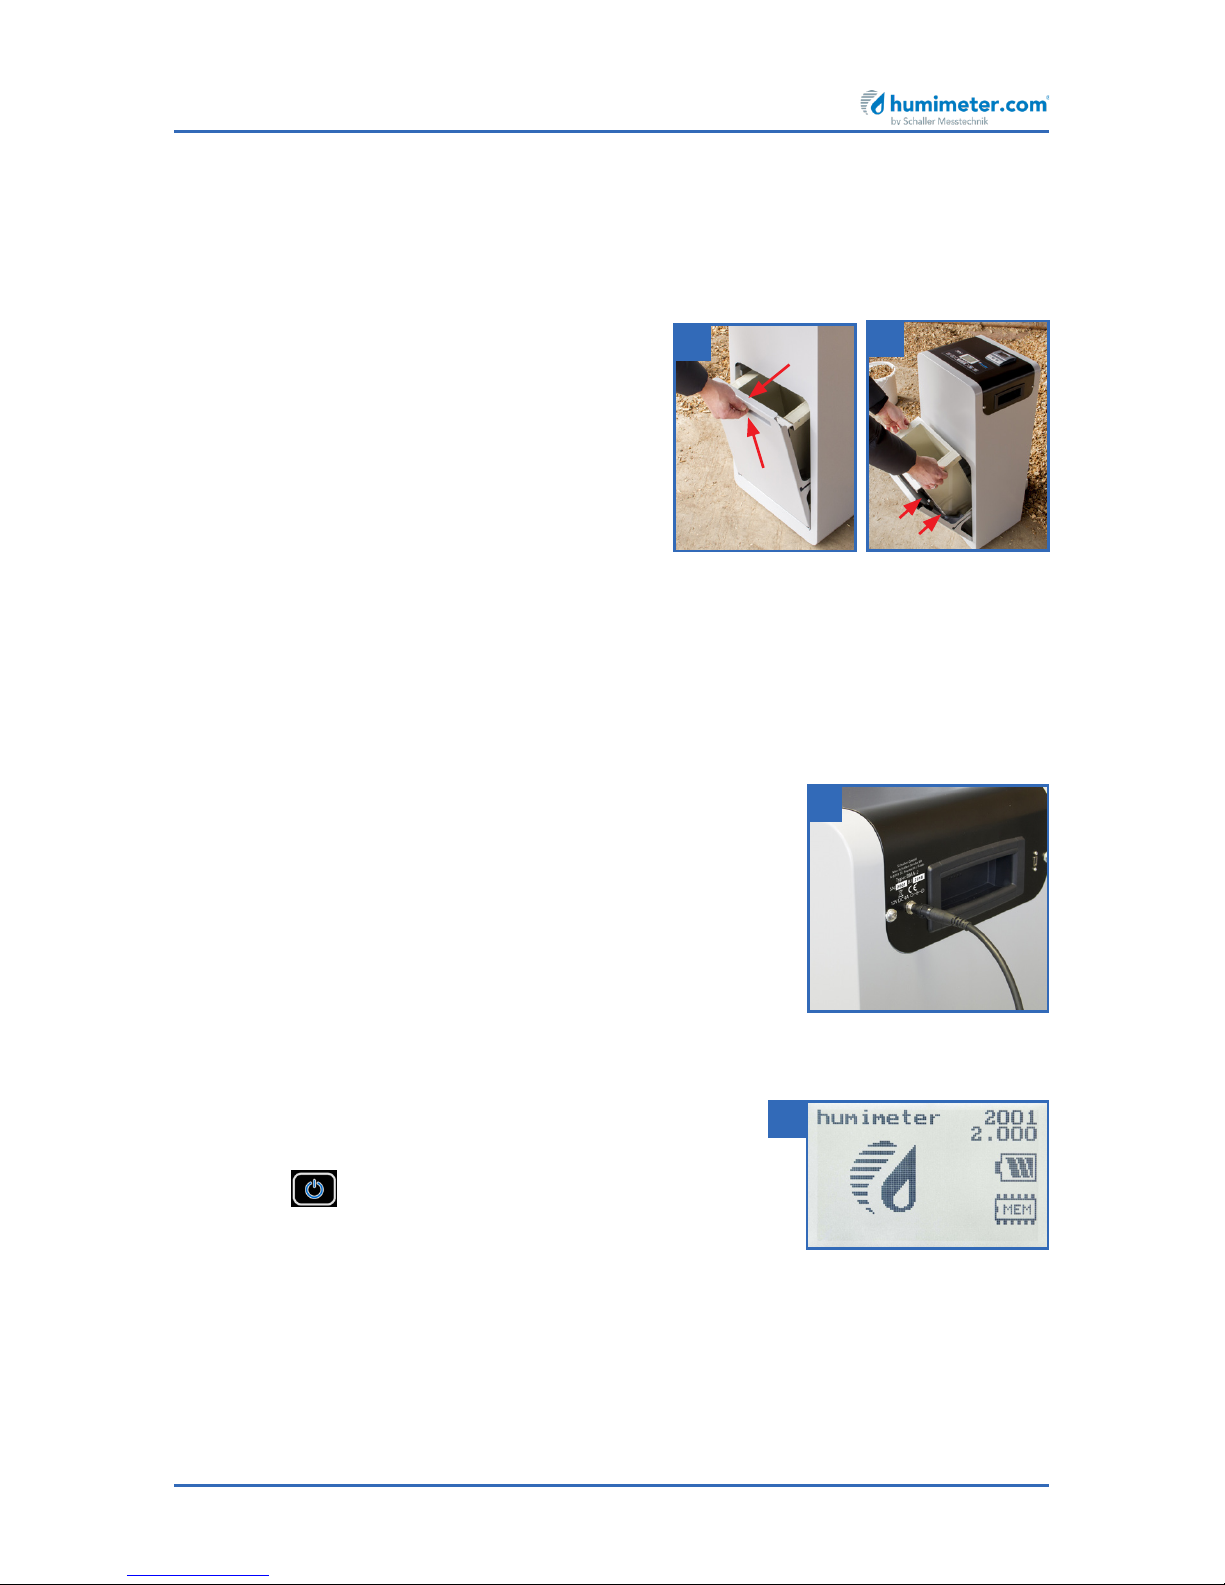
1. Open the drawer of the device by lifting and pulling the handle towards you
(figure1).
2. Hang the empty measuring chamber in
the drawer.
» The handle and the suspension of the
measuring chamber must hang in the
plastic brackets of the drawer (figure2).
3. Close the drawer. If necessary, push its handle downwards to fully close it.
4.2 Plugging in the device
1. Make sure that the socket you want to use has the
same electrical voltage as described on the name plate
of the power supply unit.
2. Plug the power cable into the device (figure3).
3. Plug the power cable into the power socket.
4.3 Switching the device on
» After plugging in the power cable, the device
switches on automatically Or
• Press for 3 seconds.
» The display will then show the status indicator
humimeter (figure4).
1
2
3
4
Page 16
humimeter BMA-2 Operating Manual
Page 16
4.4 Automatic drawer check
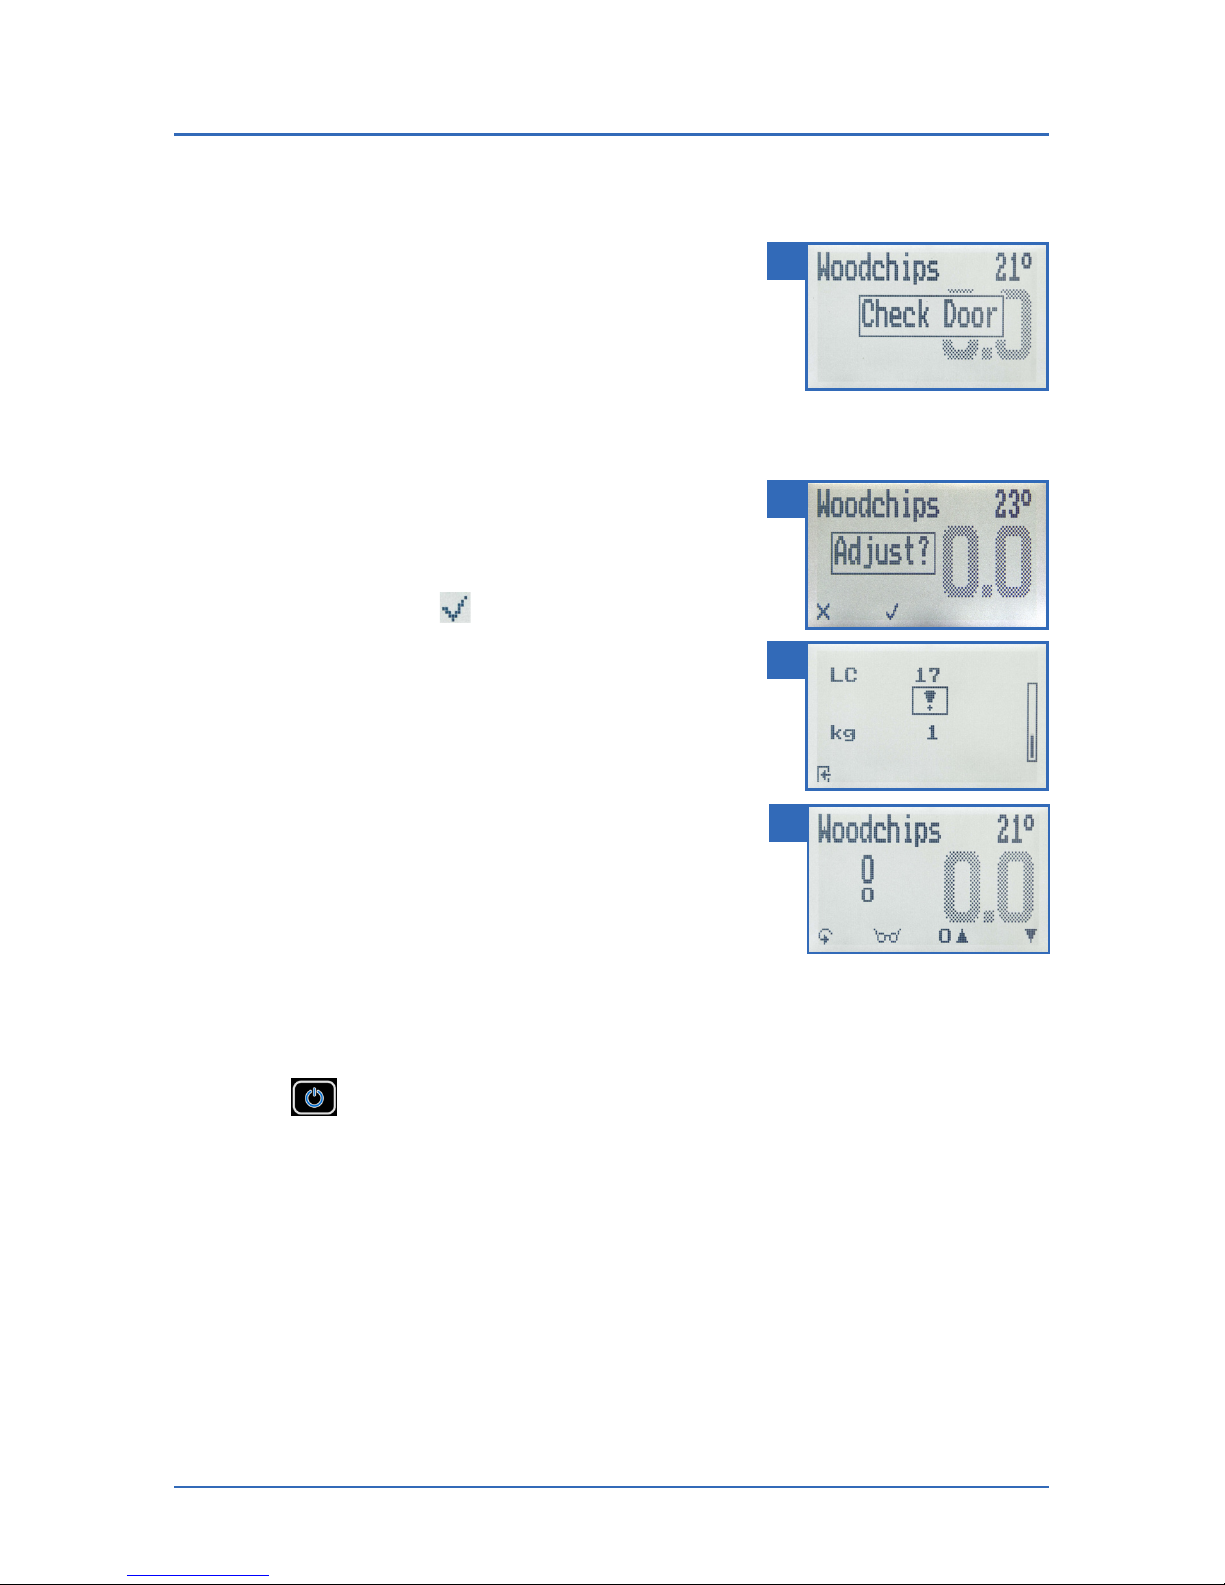
» After switching on, the device goes through a sen-
sor check of the drawer. The display will show the
message Check Door (figure5).
• Open and close the drawer.
4.5 Automatic calibration
» After switching on, the device goes through a
self-calibration. The display shows the message
Reinitialize? (figure6).
• Confirm by pressing .
» The calibration is effected. The display will appear
as shown in figure7.
» Once completed, the device will show the measu-
ring window (figure8).
4.6 Taking a measurement
• For information on how to take a measurement,
see section "5. The measuring process".
4.7 Switching the device off
• Press for 3 seconds.
5
6
7
8
Page 17
Page 17
5. The measuring process
5.1 Preparing a measurement
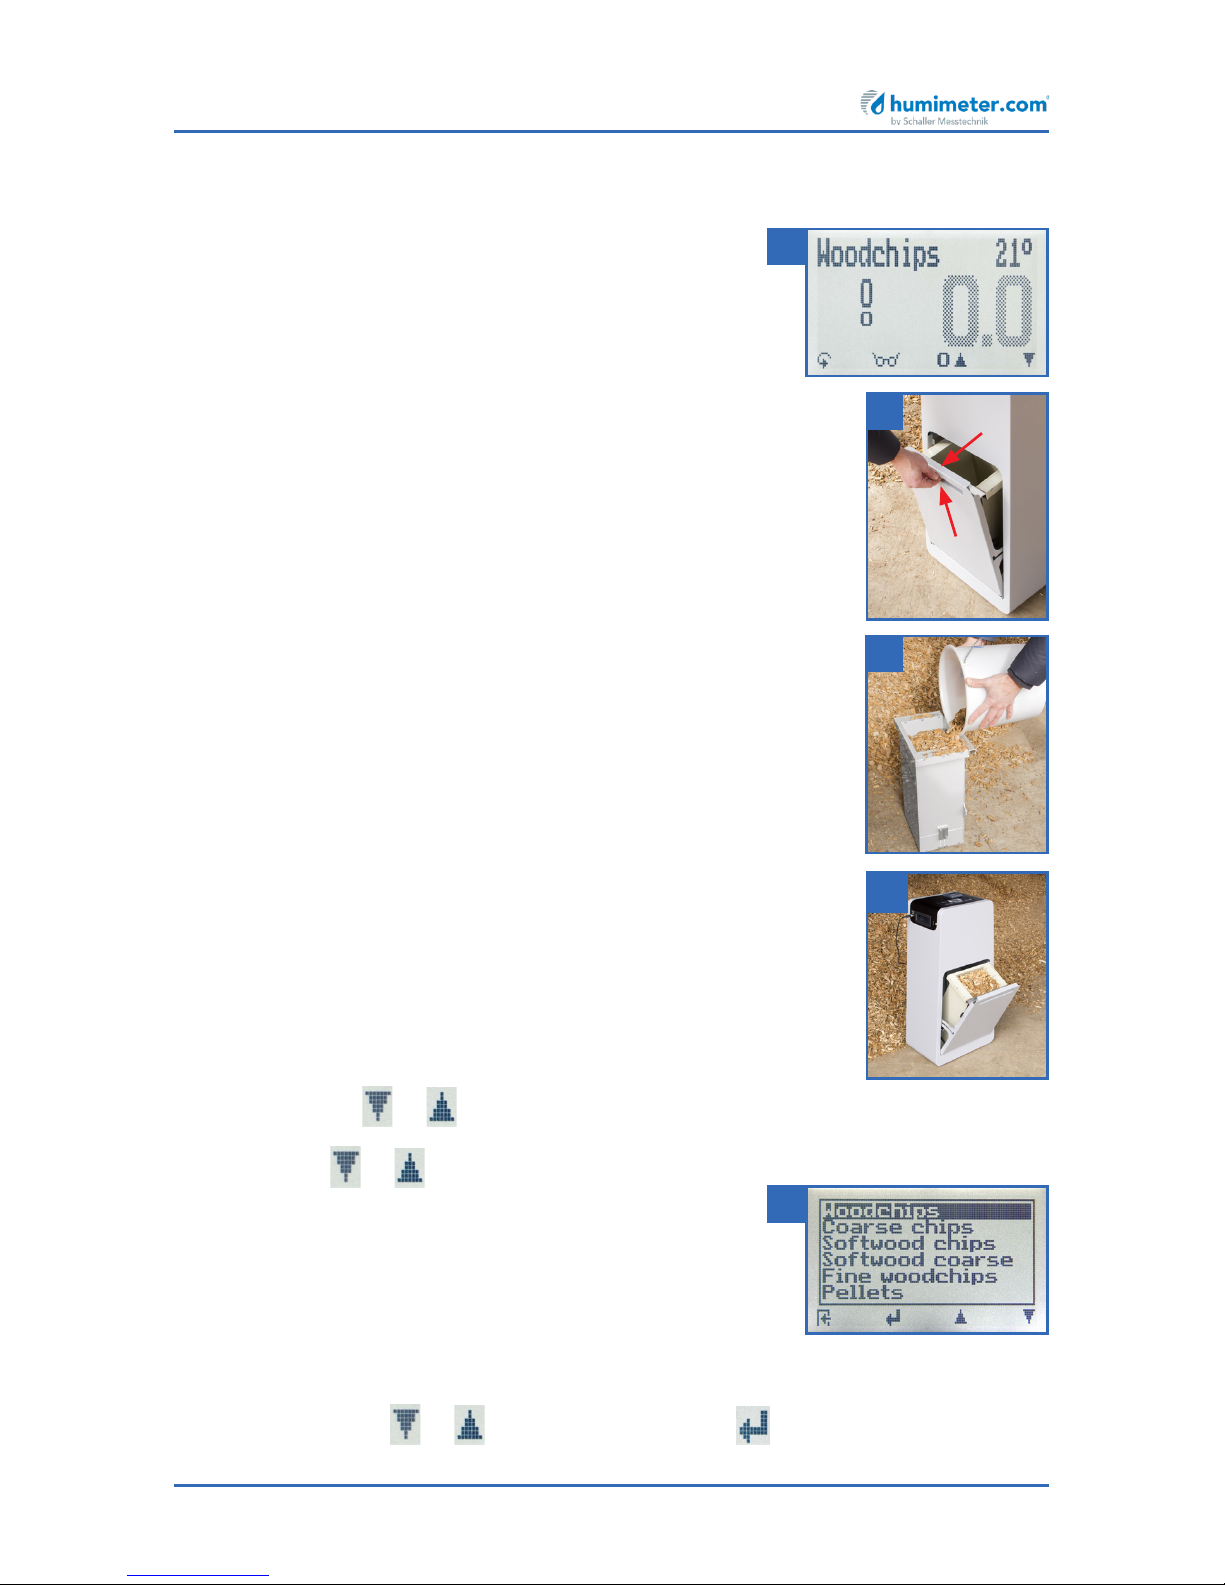
To do so: The display has to show the measuring window
(figure9).
1. Open the drawer of the device by lifting and pulling the
handle towards you (figure10).
2. Take out the measuring chamber.
3. Completely fill the measuring chamber with the material
being measured. Use the included plastic bucket and fill
the measuring chamber from the side with the metal plate
(figure11).
4. Wipe off the material at the upper edge of the measuring
chamber evenly.
5. Hang the filled measuring chamber in the drawer (figure12).
» The handle and the suspension of the measuring chamber
must hang in the plastic brackets of the drawer.
6. Close the drawer. If necessary, push its handle downwards to
fully close it.
5.2 Taking a measurement
1. Select the required product type (see "6. Product types") by
pressing the or button Or
2. Press the or button for 3 seconds.
» The display will now show the product type over-
view (figure13).
3. Select the required product type (Woodchips,
Coarse chips, Softwood chips, Softwood coarse, Fine
woodchips, Pellets, Miscanthus, Shavings Softwood,
Sawdust Softwood, Sawdust Hardwood, Corn cob, Empty 1).
To do so, press or and confirm by pressing Or
9
10
11
12
13
Page 18
humimeter BMA-2 Operating Manual
Page 18
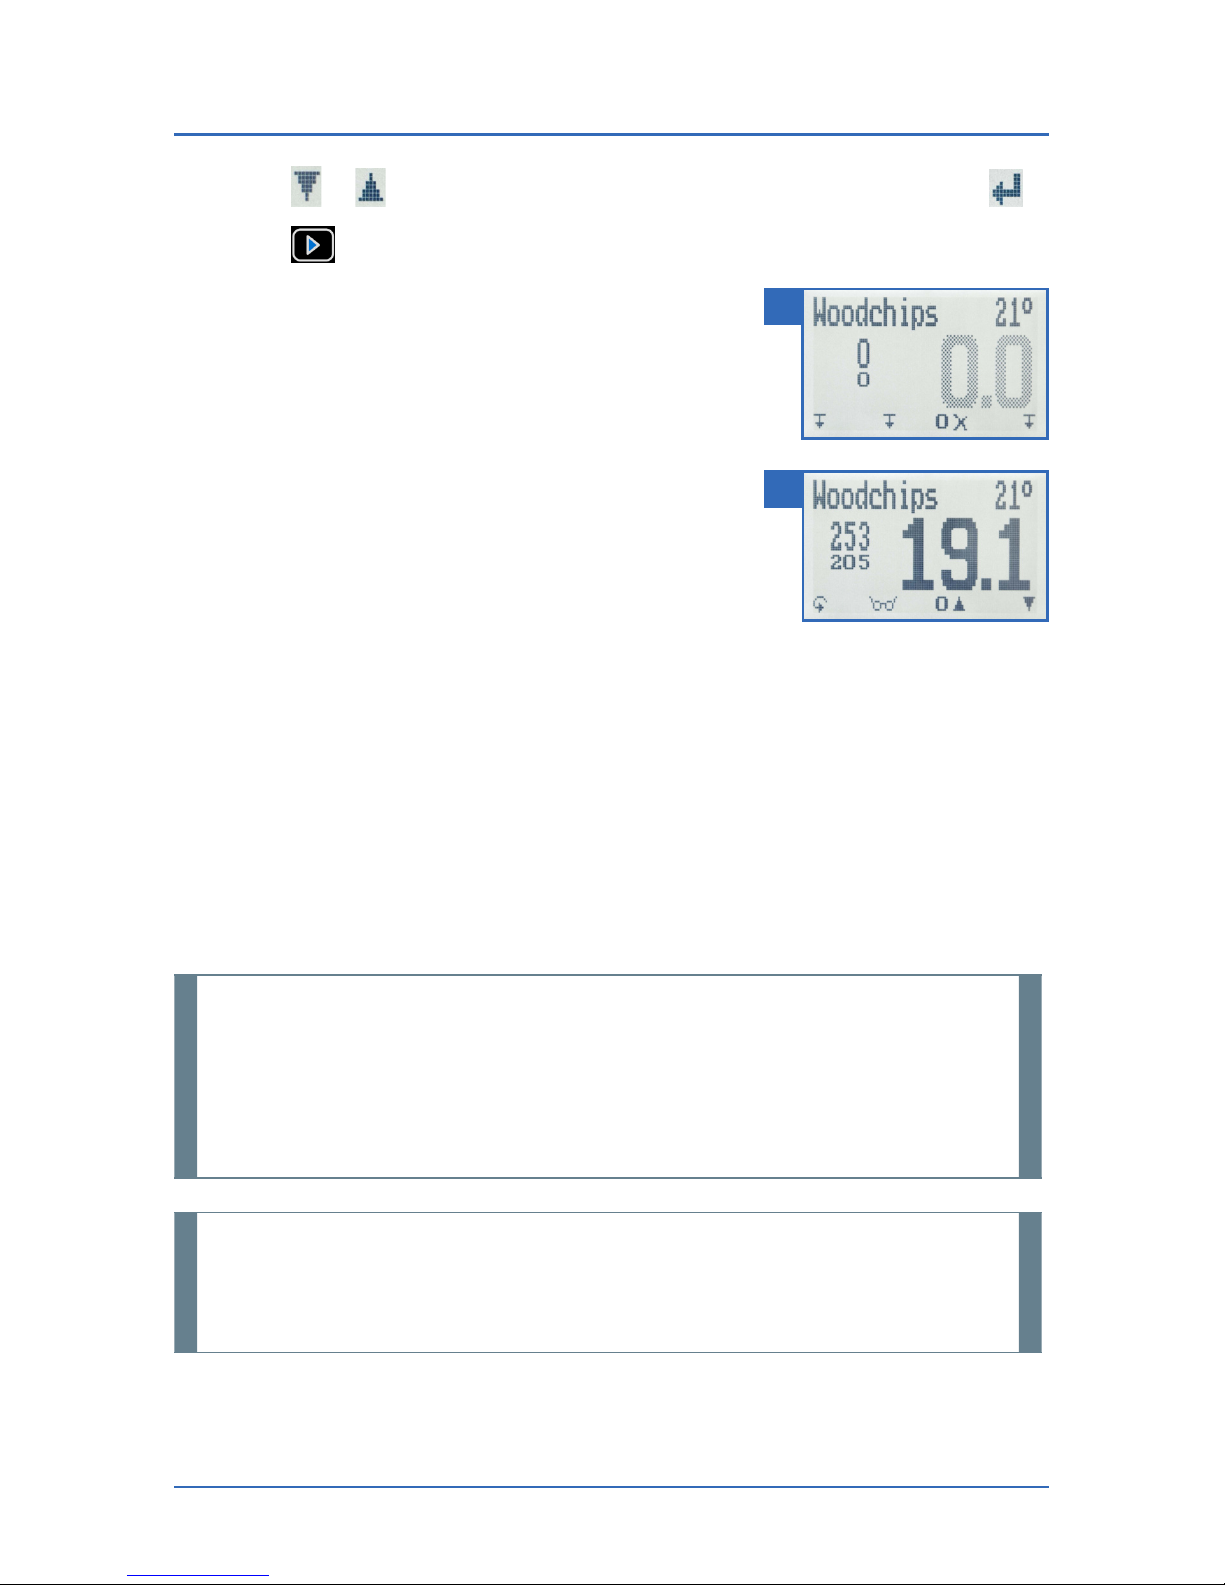
4. Keep or pressed to scroll through the types and confirm by pressing .
5. Press to start the measurement.
» The LED is blinking in blue during the entire mea-
surement.
» The display shows the active measurement process
(figure14).
» After completion of the measurement, the LED is
shining in blue.
» The display now shows the measured values
(figure15).
» The displayed value flashes when the moisture
content exceeds the measuring range of the selected product type. A flashing value signals lowered accuracy of the measurement.
The measuring range limit of the wood chip calibration curves is 60 % moisture
content.
6. Once the reading has been taken, it can be saved on the device (see "5.3 Saving
individual readings" or "5.4 Saving several readings (a measurement series) at the
same time").
7. Open the drawer and carefully remove the measuring chamber.
8. Empty the measuring chamber completely.
i Information - Measuring accuracy
To increase the measuring accuracy, take three measurements of the same
material. When saving the individual readings, the device will automatically calculate the readings’ average (see "5.4 Saving several readings (a measurement
series) at the same time").
i Information - Incorrect readings
Always make sure to select the correct product type for the material you are
measuring. This prevents taking incorrect readings (see "11. Faults").
14
15
Page 19
Page 19
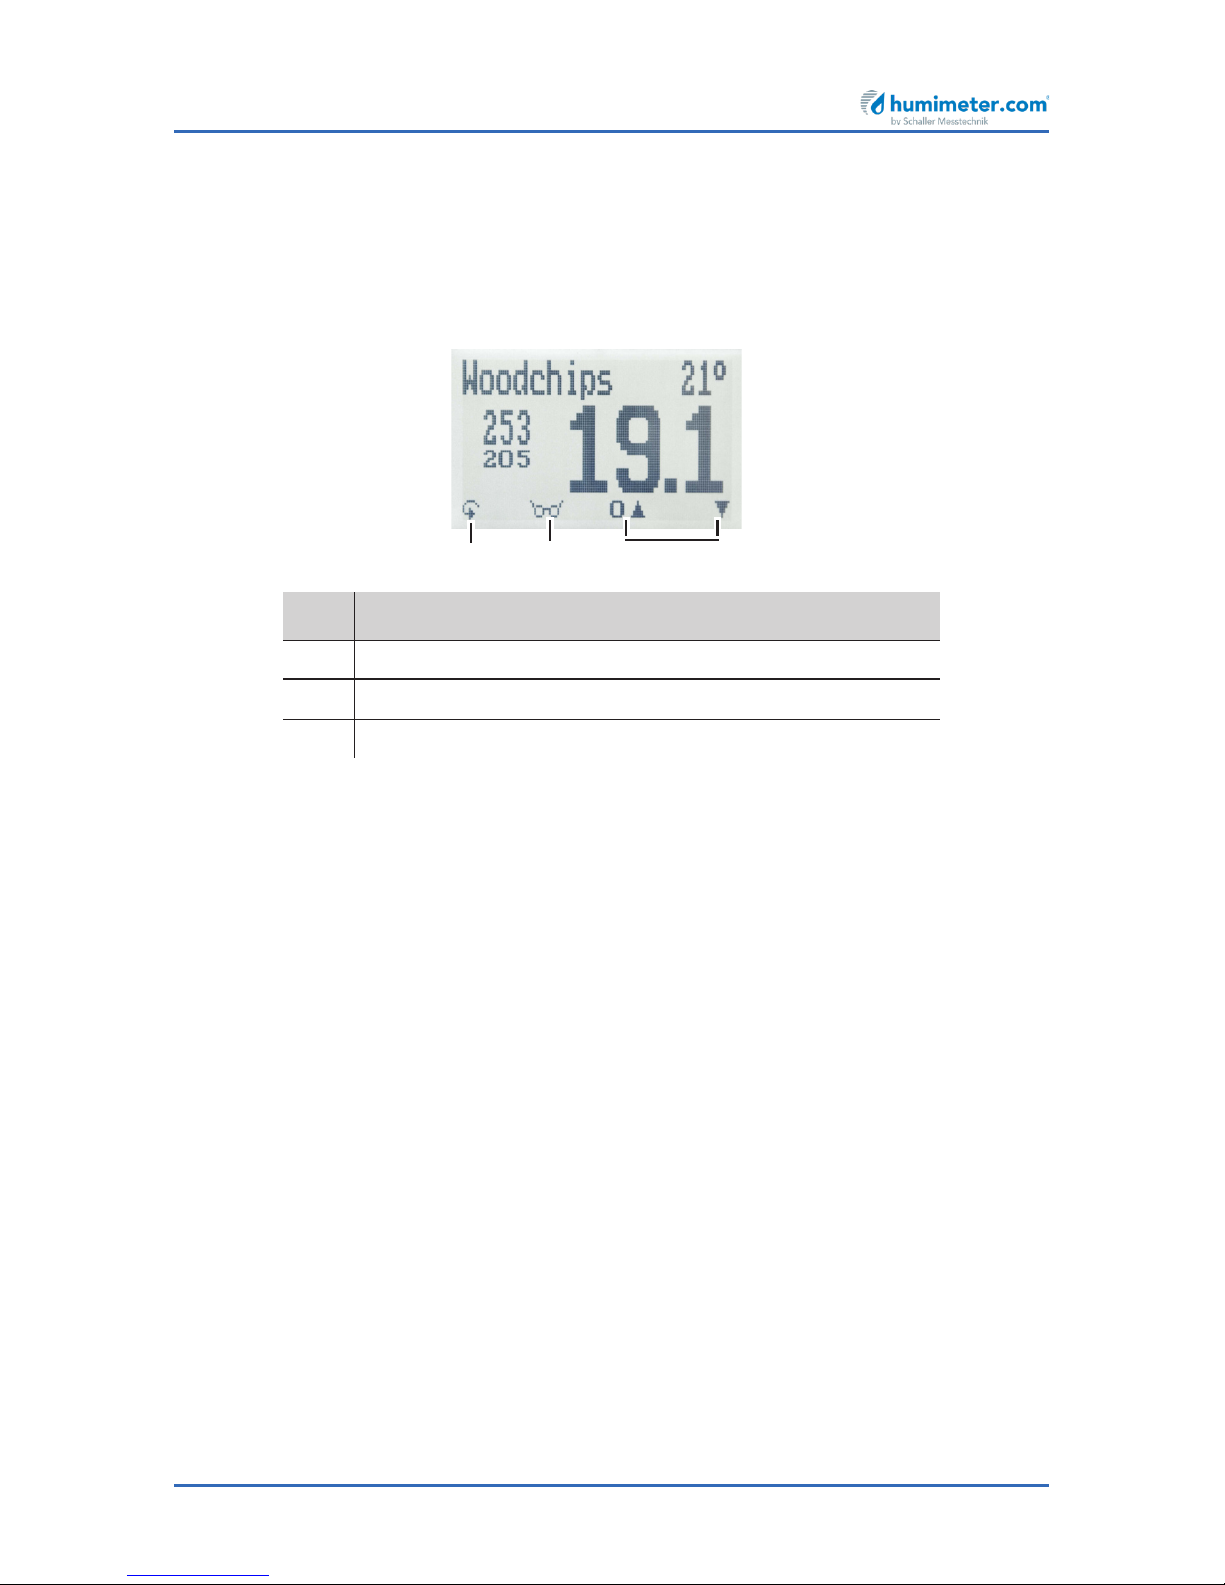
5.3 Saving individual readings
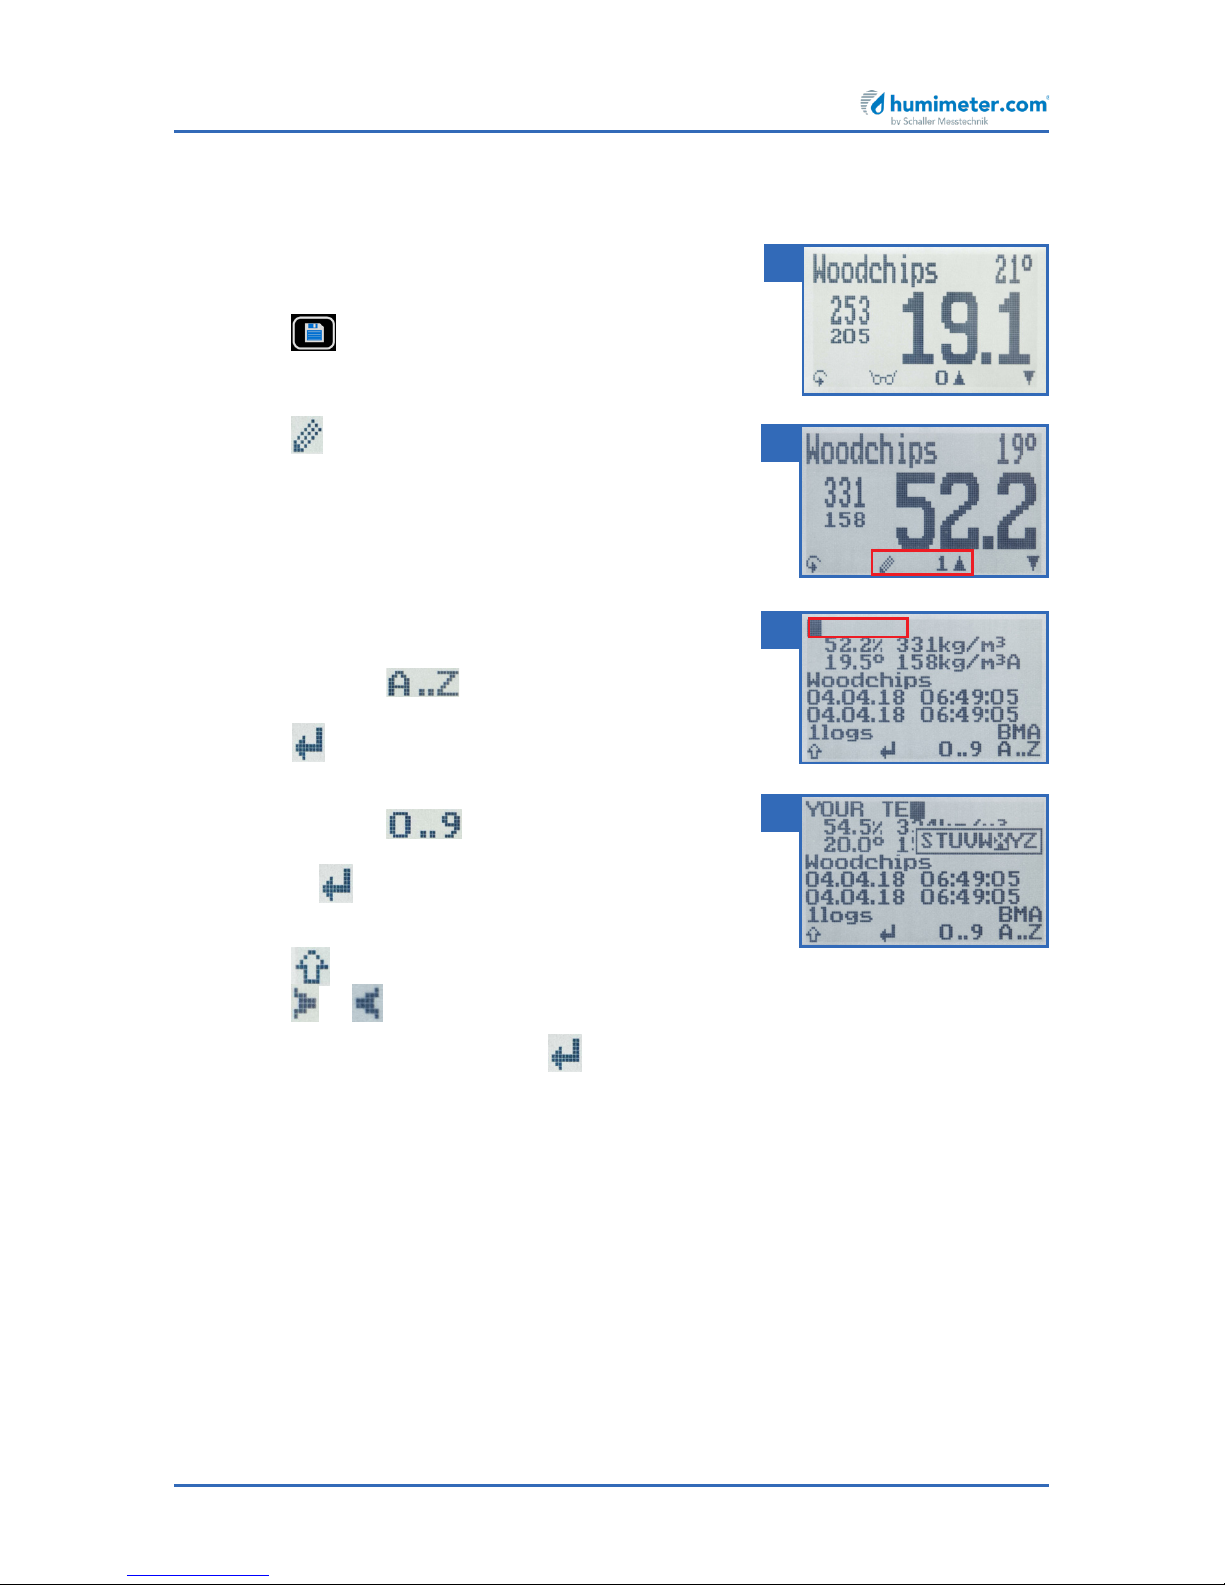
To do so: A measurement has been taken. The display
will now appear as shown in figure16.
1. Press .
» The display will now appear as shown in figure 17.
2. Press to enter a name for the saved reading
and to finish the measuring process.
» The display will now appear as shown in figure 18.
3. The data you have inputted can be overwritten at
any time.
4. Inputting letters:
Press and hold to quickly scroll to the
required letter and either press it for 3 seconds or
press to confirm the selected letter (figure 19).
5. Inputting numbers:
Press and hold to quickly scroll to the
required number and either press it for 3 seconds
or press to confirm the selected number.
6. Moving forward/back:
Press to switch to another input level.
Press or to move forward or back.
7. Confirm your entry by pressing .
» The data you entered has been saved.
16
17
18
19
Page 20
humimeter BMA-2 Operating Manual
Page 20
5.4 Saving several readings (a measurement series) at the same time
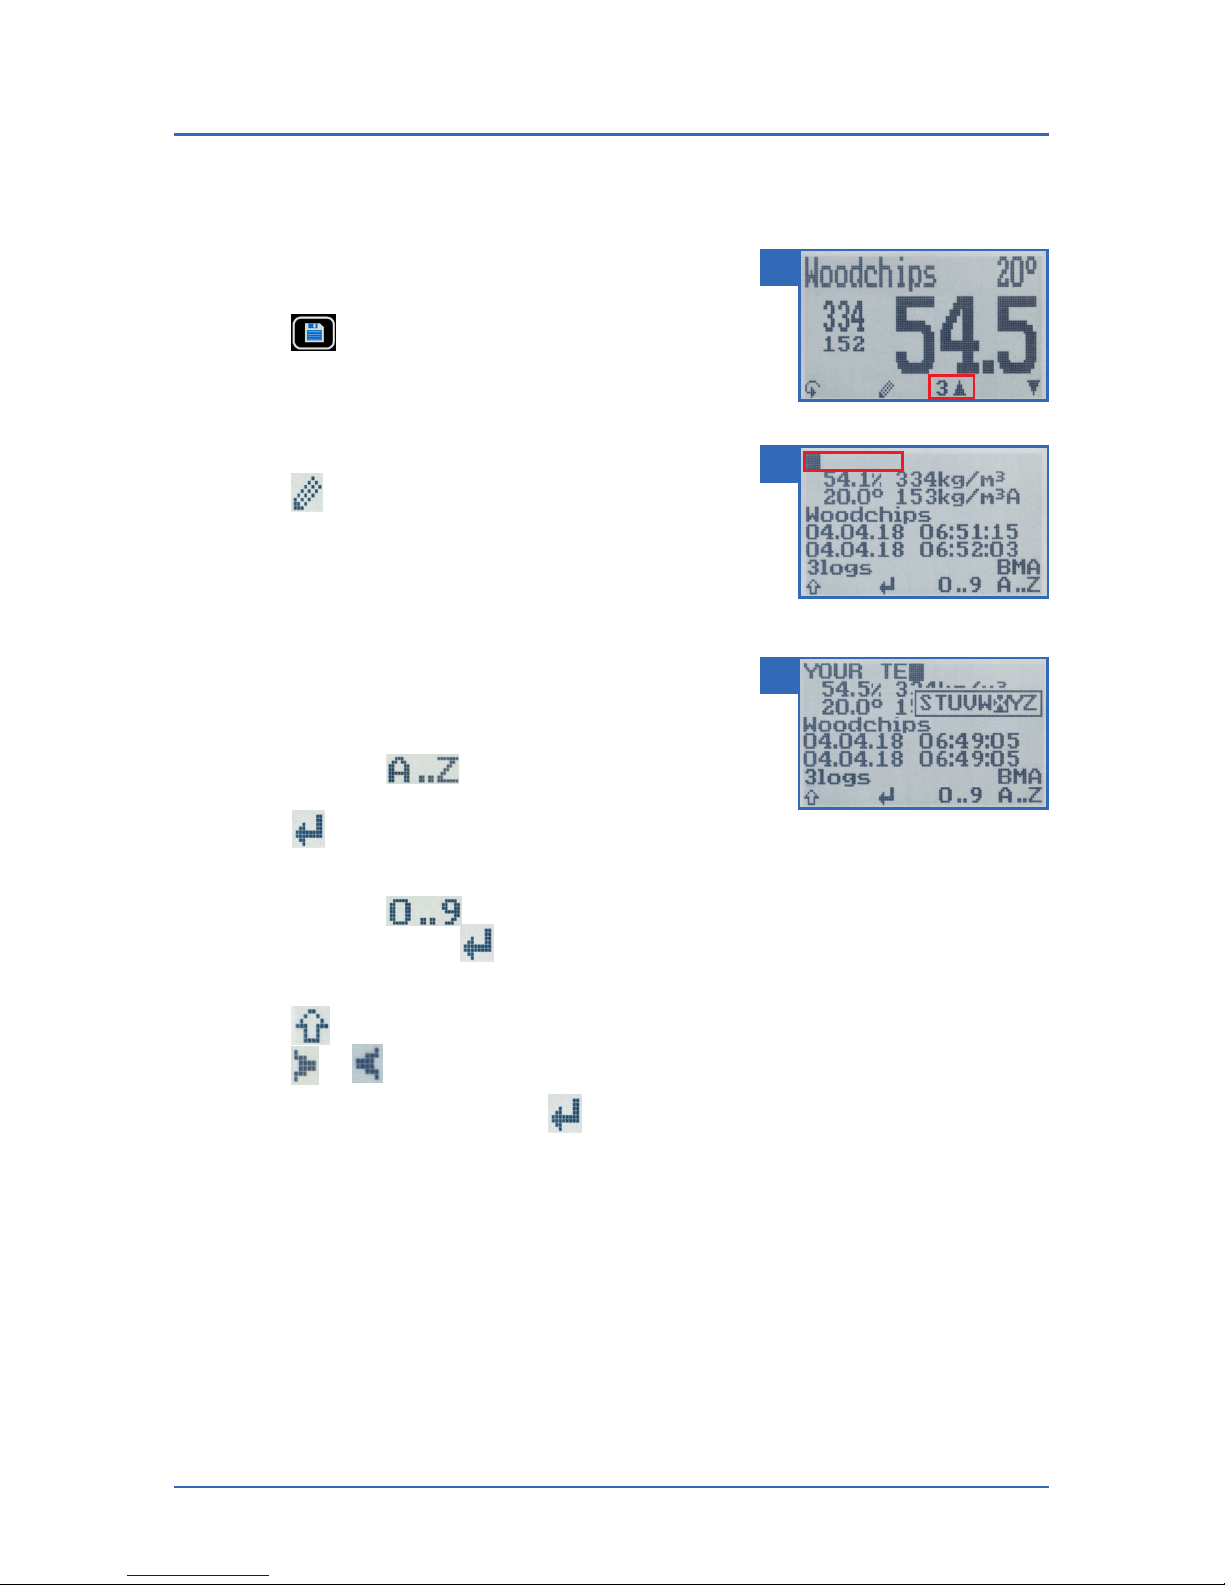
1. Take several readings of the same material (see "5.
The measuring process").
2. Press after each measurement.
» The display will now appear as shown in figure
20. The marked number shows the number of
readings that have already been saved.
3. Press to enter a name for the saved series
of measurements and to finish the measuring
process.
» The display will now appear as shown in figure 21.
4. The data you have inputted can be overwritten at
any time.
5. Inputting letters:
Press and hold to quickly scroll to the
required letter and either press it for 3 seconds or
press to confirm the selected letter (figure 22).
6. Inputting numbers:
Press and hold to quickly scroll to the required number and either press it
for 3 seconds or press to confirm the selected number.
7. Moving forward/back:
Press to switch to another input level.
Press or to move forward or back.
8. Confirm your entry by pressing .
» The data you entered has been saved.
» The device automatically determines the average moisture content of the saved
measuring values.
20
21
22
Page 21
Page 21
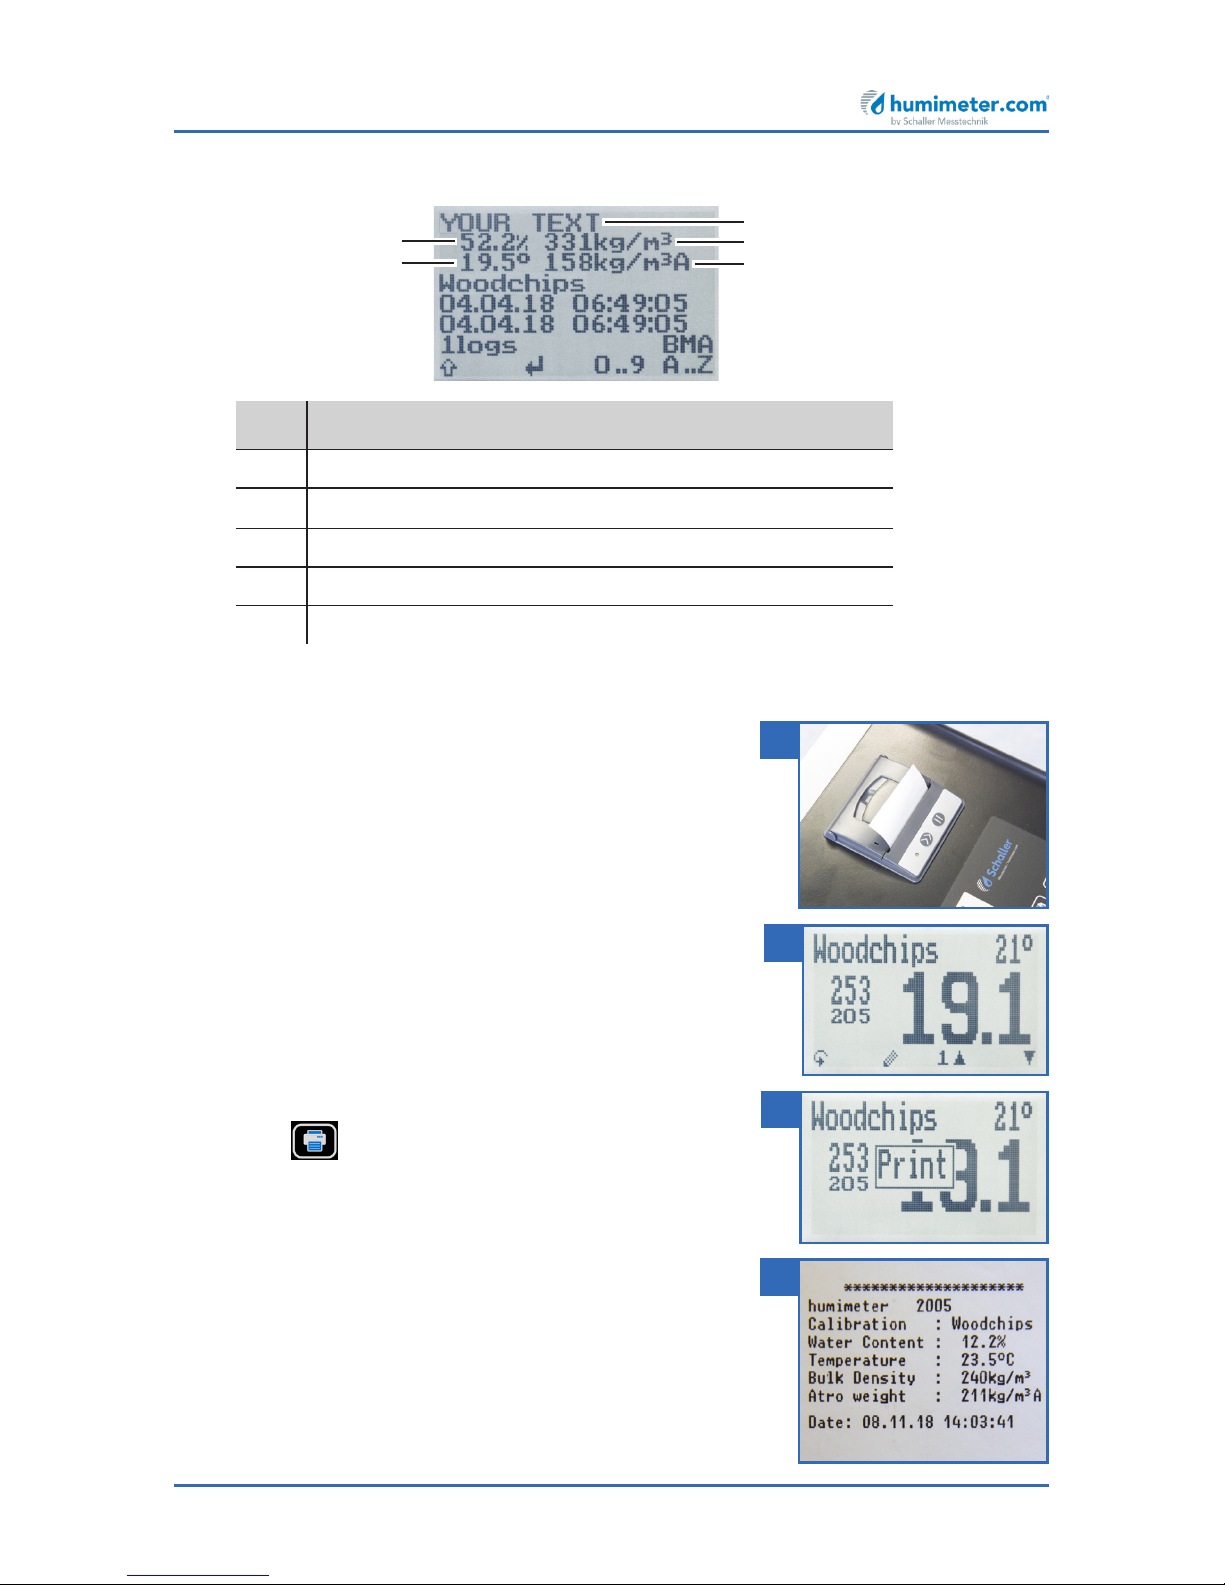
» The display will show the following information:
No. Name
1 Name of the measurement series (editable)
2 Bulk density [kg/m³] (average) (optional)
3 Dry weight (atro)/m³ [kg/m³] (average) (optional)
4 Temperature (average)
5 Moisture content (average)
5.5 Printing measured values
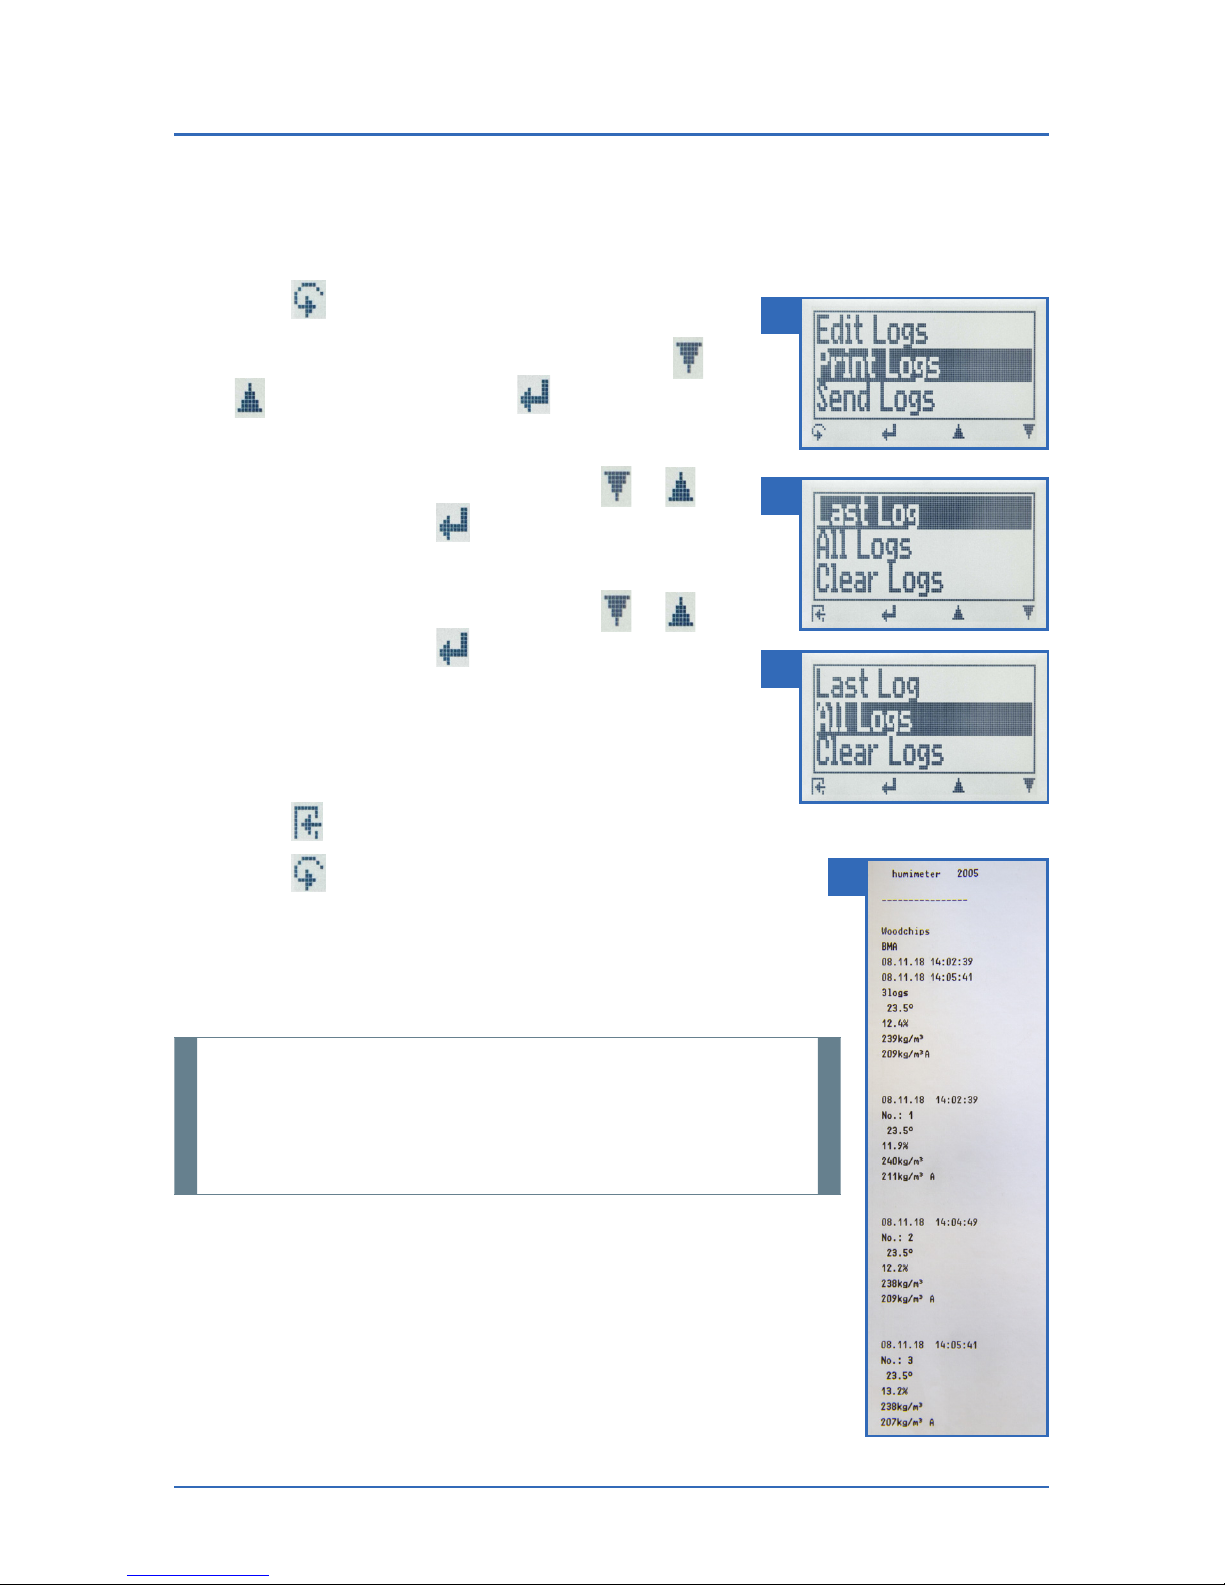
To do so: The integrated printer and a paper roll is
required (figure 23). Both are included in the equipment
packages: Data package and ATRO package.
Options: The current measurement or already saved
readings can be printed.
5.5.1 Printing the current measurement
To do so: A measurement has been taken. The display
appears as shown in figure 24.
1. Press .
» The display will show the message Print (figure 25).
» The current measurement will be printed (Printout
figure 26).
1
2
4
5
3
23
24
25
26
Page 22
humimeter BMA-2 Operating Manual
Page 22
5.5.2 Printing already saved readings
To do so: You must have taken and saved one or several readings.
1. Press .
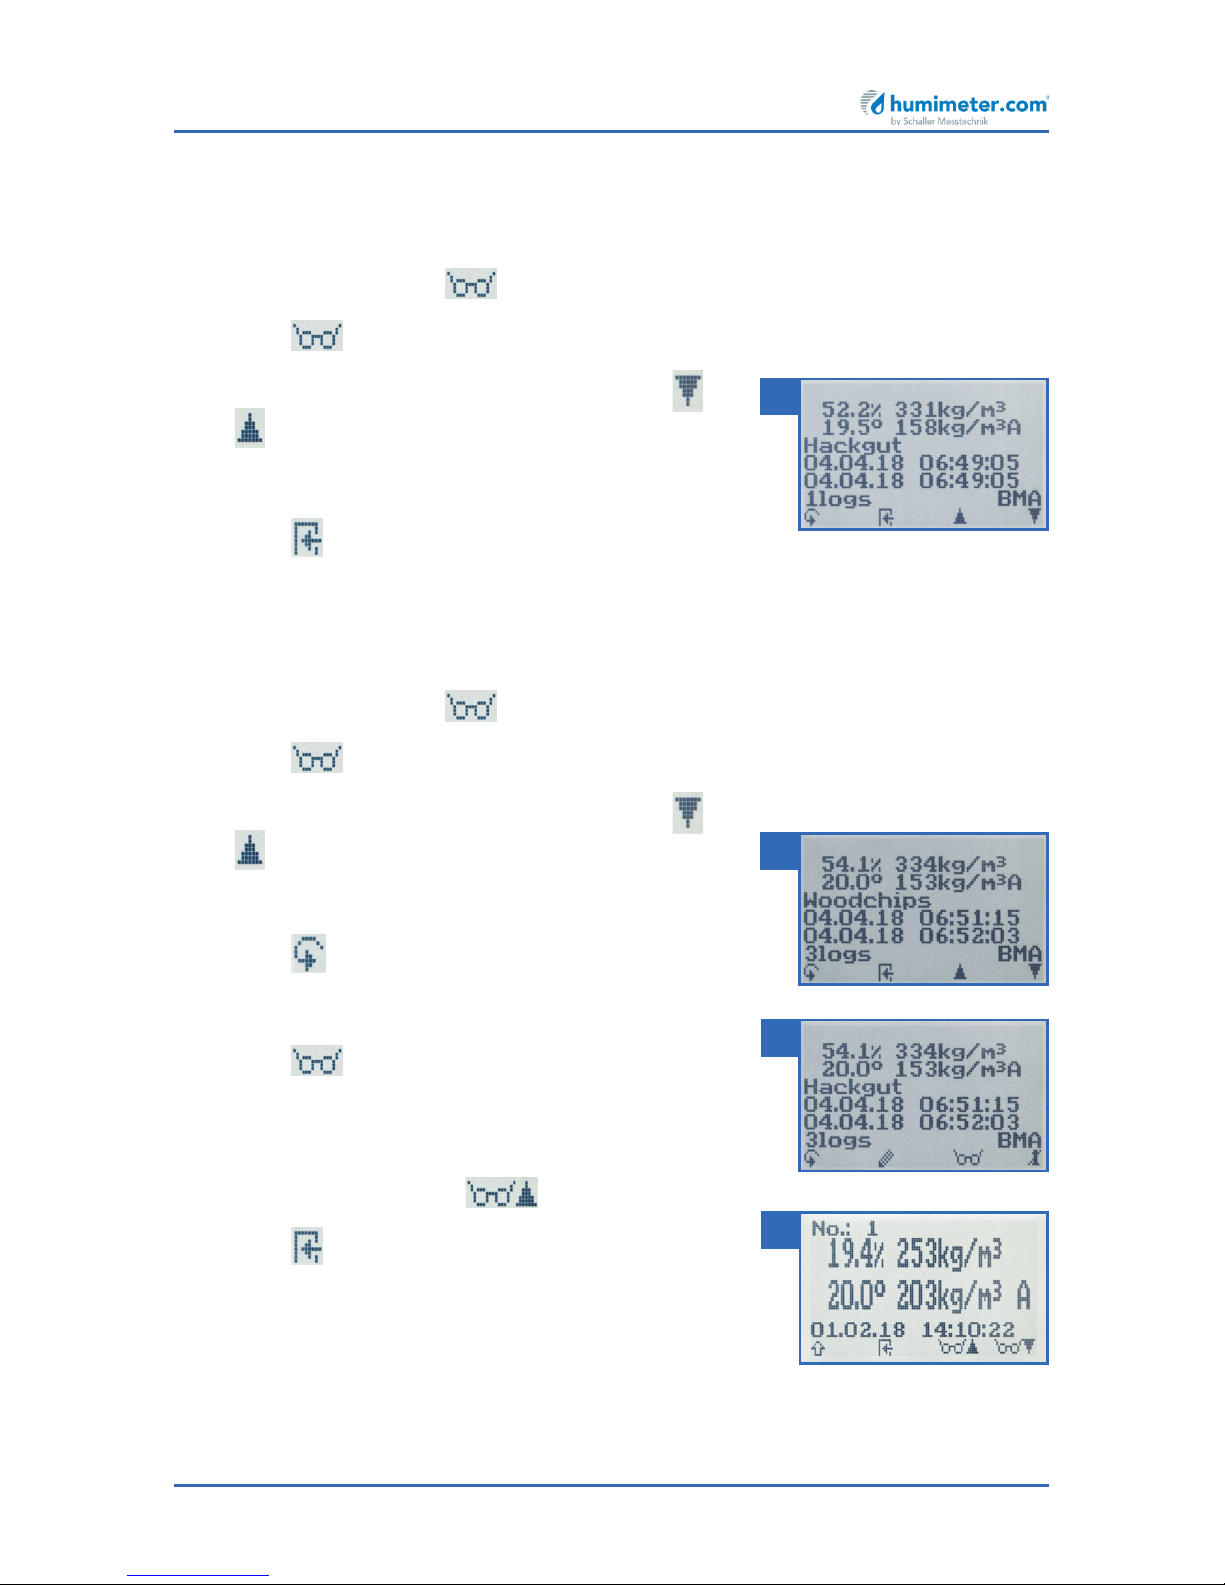
2. Select Print Logs (figure 27). To do so, press or
and confirm by pressing .
3. Select Last Log (figure 28) to print the last recorded
measurement series. To do so, press or and
confirm by pressing Or
4. Select All Logs (figure 29) to print all recorded
measurement series. To do so, press or and
confirm by pressing .
» The display will show the message Print.
» The selected measurement series will be printed
(Printout figure 30).
5. Press to leave the Print Logs menu.
6. Press to leave the main menu.
i Information
Make sure to regularly clear the data memory (see "5.8
Deleting all measured values (data log)"). This helps to save
printing paper.
27
28
29
30
Page 23
Page 23
5.6 Viewing individual readings
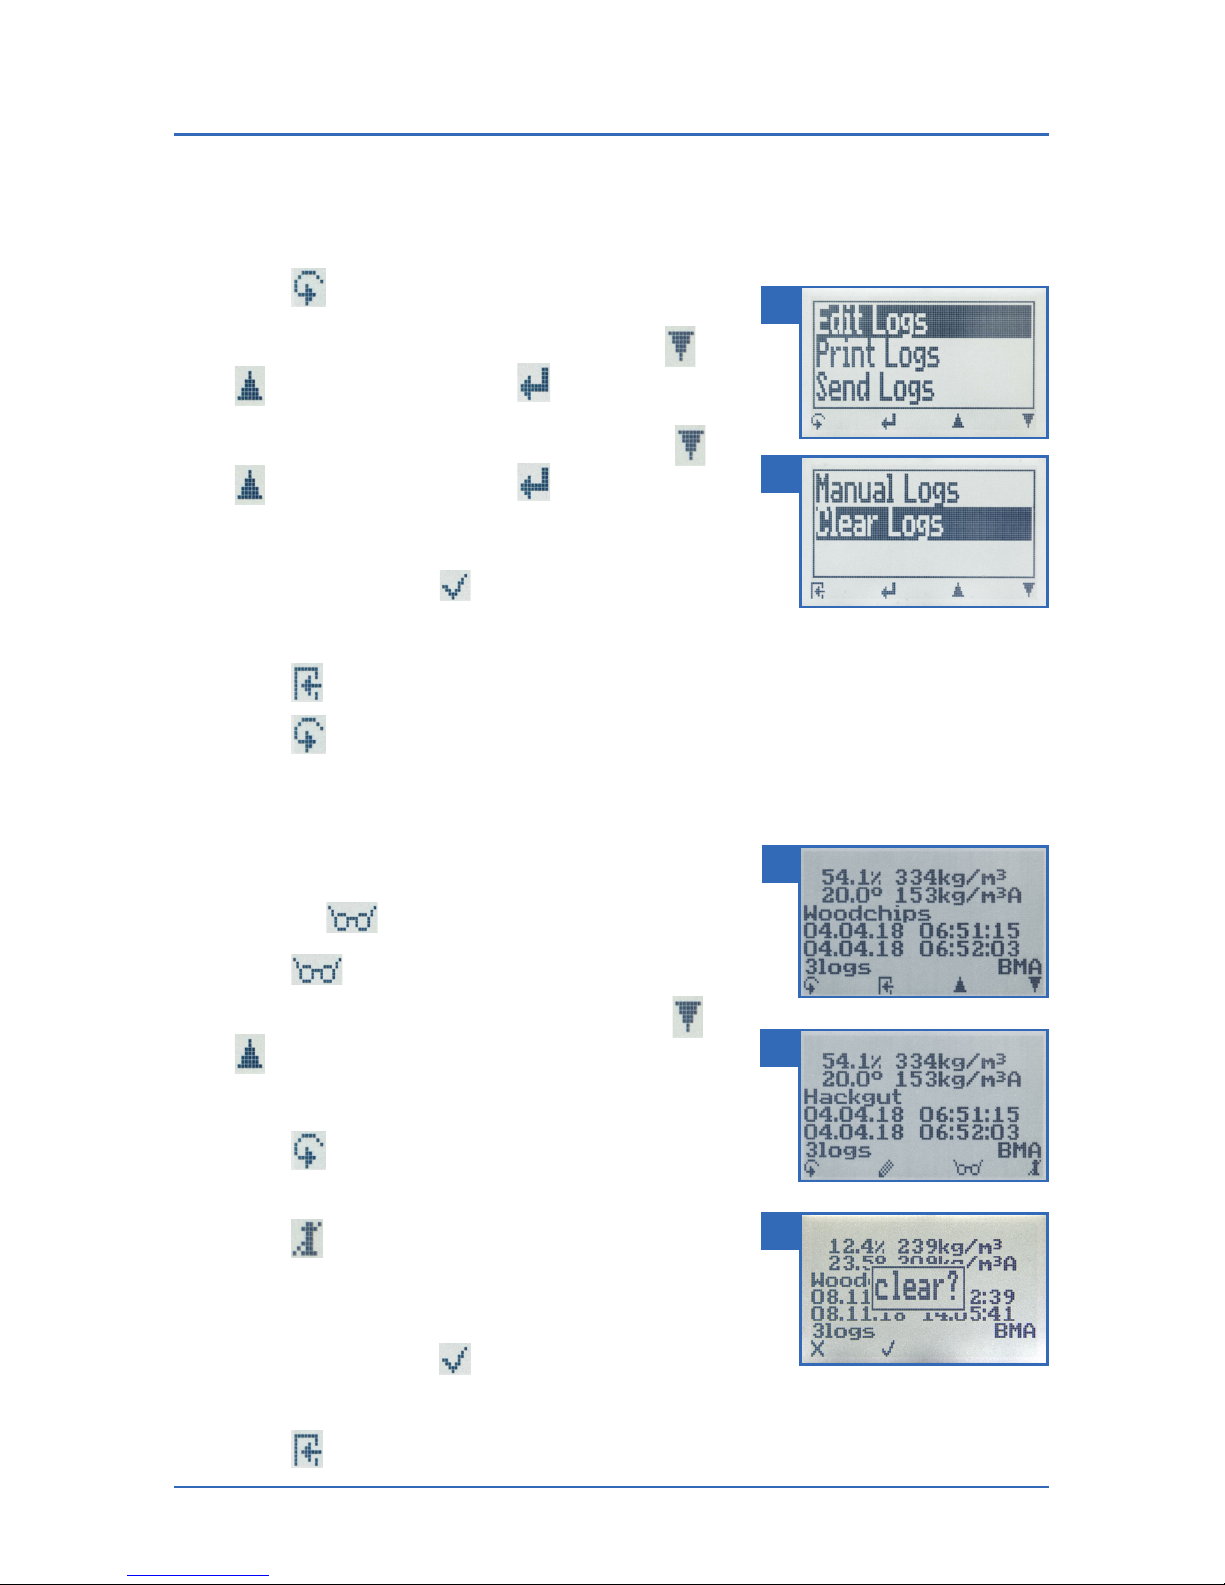
To do so: You must have saved a reading (e.g. 1 log).
The display will now show .
1. Press .
2. Select the required reading. To do so, press or
.
» The display will now appear as shown in figure 31.
3. Press to leave this screen.
5.7 Viewing individual readings from a series of measurements
To do so: You must have saved a reading (e.g. 3 log).
The display will now show .
1. Press .
2. Select the required reading. To do so, press or
.
» The display will now appear as shown in figure 32.
3. Press to switch to another input level.
» The display will now appear as shown in figure 33.
4. Press again.
» The display will now appear as shown in figure 34.
5. Navigate to the required reading (No.: 1, No.: 2,
No.: 3). To do so, press .
6. Press to leave this screen.
31
32
33
34
Page 24
humimeter BMA-2 Operating Manual
Page 24
5.8 Deleting all measured values (data log)
To do so: You must have taken and saved one or several readings.
1. Press .
2. Select Edit Logs (figure 35). To do so, press or
and confirm by pressing .
3. Select Clear Logs (figure 36). To do so, press or
and confirm by pressing .
» The display will show the message clear?
4. Confirm by pressing .
» The data log has been deleted.
5. Press to leave the Edit Logs menu.
6. Press to leave the main menu.
5.9 Deleting individual measurement series
To do so: You must have saved a measured value (e.g. 1
log) or a series of measurements (e.g. 3 logs). The display
will now show .
1. Press .
2. Select the required reading. To do so, press or
.
» The display will now appear as shown in figure 37.
3. Press to switch to another input level.
» The display will now appear as shown in figure 38.
4. Press .
» The display will show the message clear?
(figure 39).
5. Confirm by pressing .
» The measurement has been deleted.
6. Press to leave this screen.
35
36
37
38
39
Page 25
Page 25
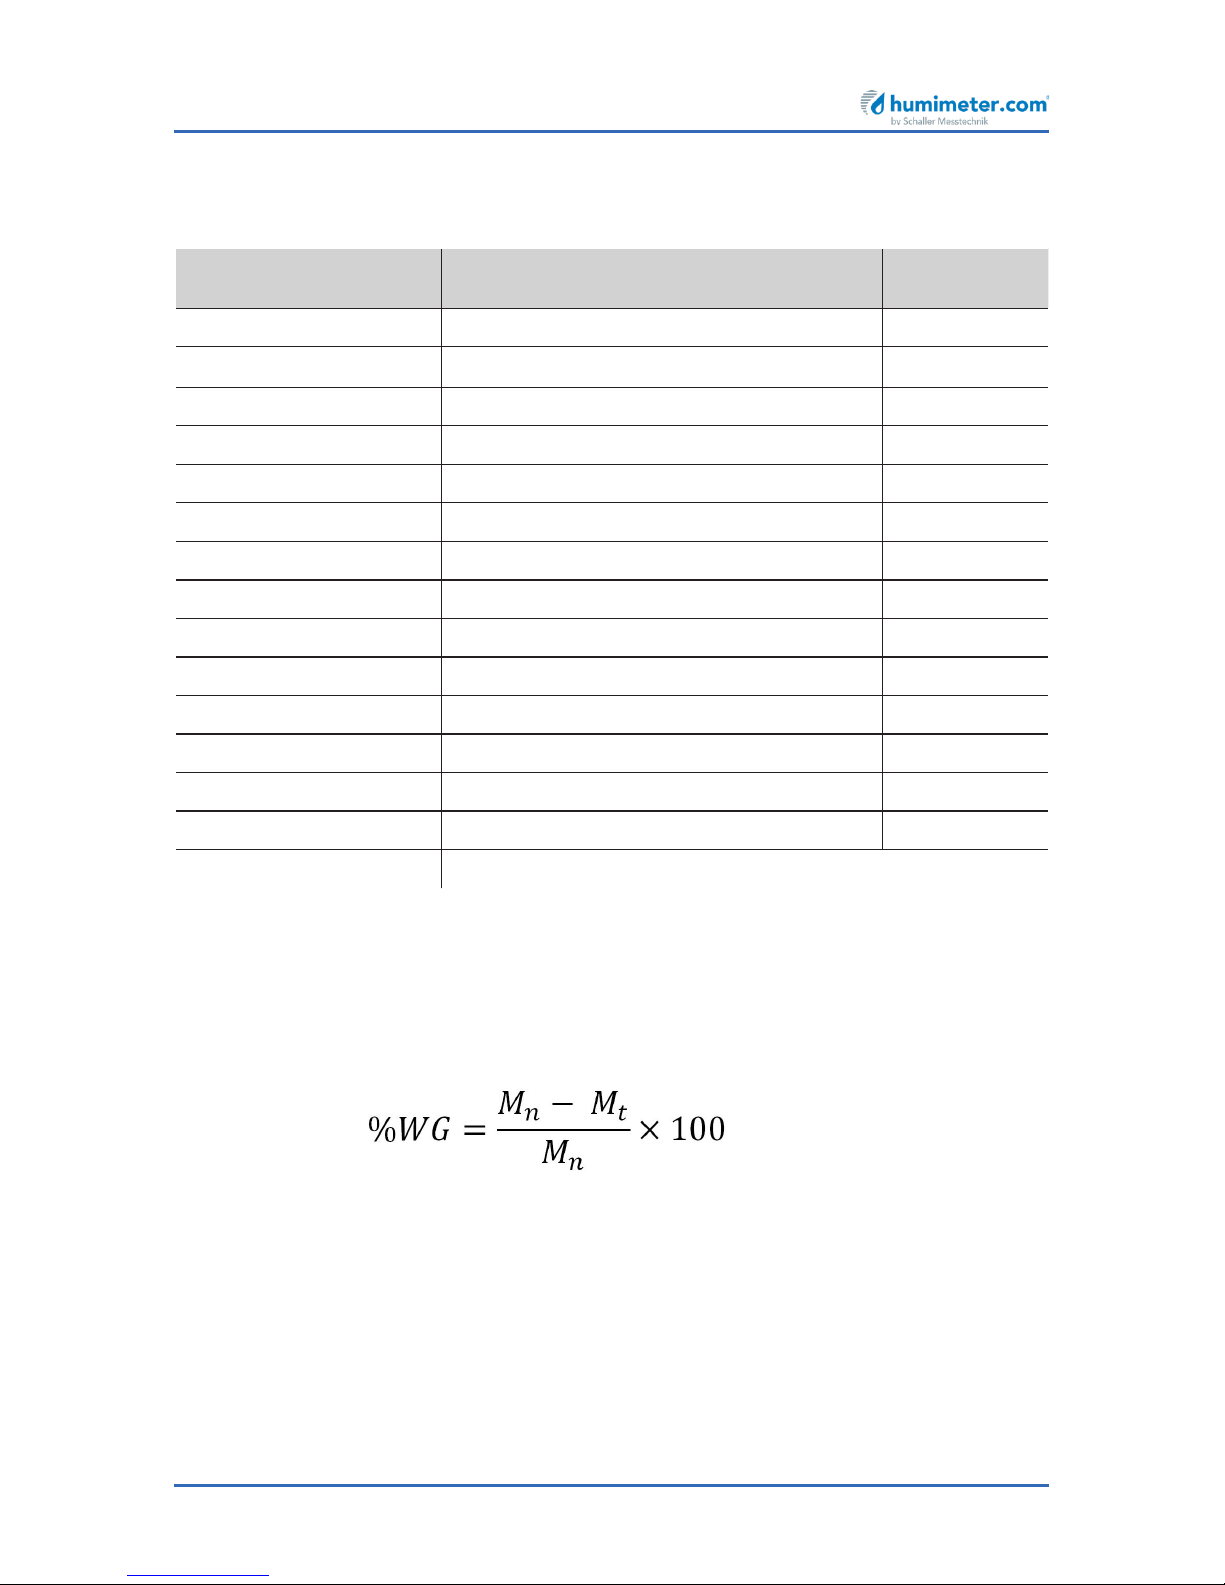
6. Product types
Product name Product type
Measuring
range
Woodchips See "6.3.1 Wood chips" 5 % - 70 %
Coarse chips See "6.3.2 Coarse wood chips" 5 % - 70 %
Softwood chips See "6.3.3 Softwood chips" 5 % - 70 %
Softwood coarse chips See "6.3.4 Softwood coarse chips" 5 % - 70 %
Fine woodchips See "6.3.5 Fine wood chips" 5 % - 70 %
Pellets Wood pellets Ø 6 mm 5 % - 14 %
Miscanthus Chopped miscanthus (P16) 5 % - 35 %
Shaving Softwood Shavings from softwood 5 % - 45 %
Sawdust Softwood Sawdust from softwood 10 % - 60 %
Sawdust Hardwood Sawdust from hardwood 10 % - 60 %
Corn cob Corn cobs (chopped or whole cobs) 10 % - 40 %
Empty 1 Free curve for special products
Empty 2 Free curve for special products
Empty 3 Free curve for special products
Reference ! Only for testing the moisture meter !
6.1 How moisture is defined
The device measures and shows a material’s moisture content. The moisture content
readings it displays are calculated in relation to the material’s overall mass:
Mn: Mass of the sample with average moisture content
Mt: Mass of the sample with zero moisture content
%WG: Moisture content (in accordance with EN ISO 18134-2)
Page 26

humimeter BMA-2 Operating Manual
Page 26
6.2 Definition of wood chips types (Norm EN ISO 17225-1)
The given numbers, in accordance with EN ISO 17225-1, refer to the particle sizes that
fit through the round screen openings.
• P16 at least 75% of the mass between 3.15 and 16mm
• P31 at least 75% of the mass between 8 and 31.5mm
• P45 at least 75% of the mass between 8 and 45mm
• P63 at least 75% of the mass between 8 and 63mm
6.3 Selection of calibration curve for wood chips
The calibration curves for wood chips depend on the wood type (hardwood, softwood), the size of the chips (size classes according to norm EN ISO 17225-1) as well as
on the content of fine fraction.
If you are not sure which calibration curve is the best suited for your material, it is
recommended to carry out a reference measurement by kiln-drying (according to EN
ISO 18134-2).
Schaller GmbH will be happy to advise you on the selection of the right calibration
curve. Please send a picture of your wood chips, placing a measuring tape to the
material, to [email protected]. You will receive a recommendation from us
immediately.
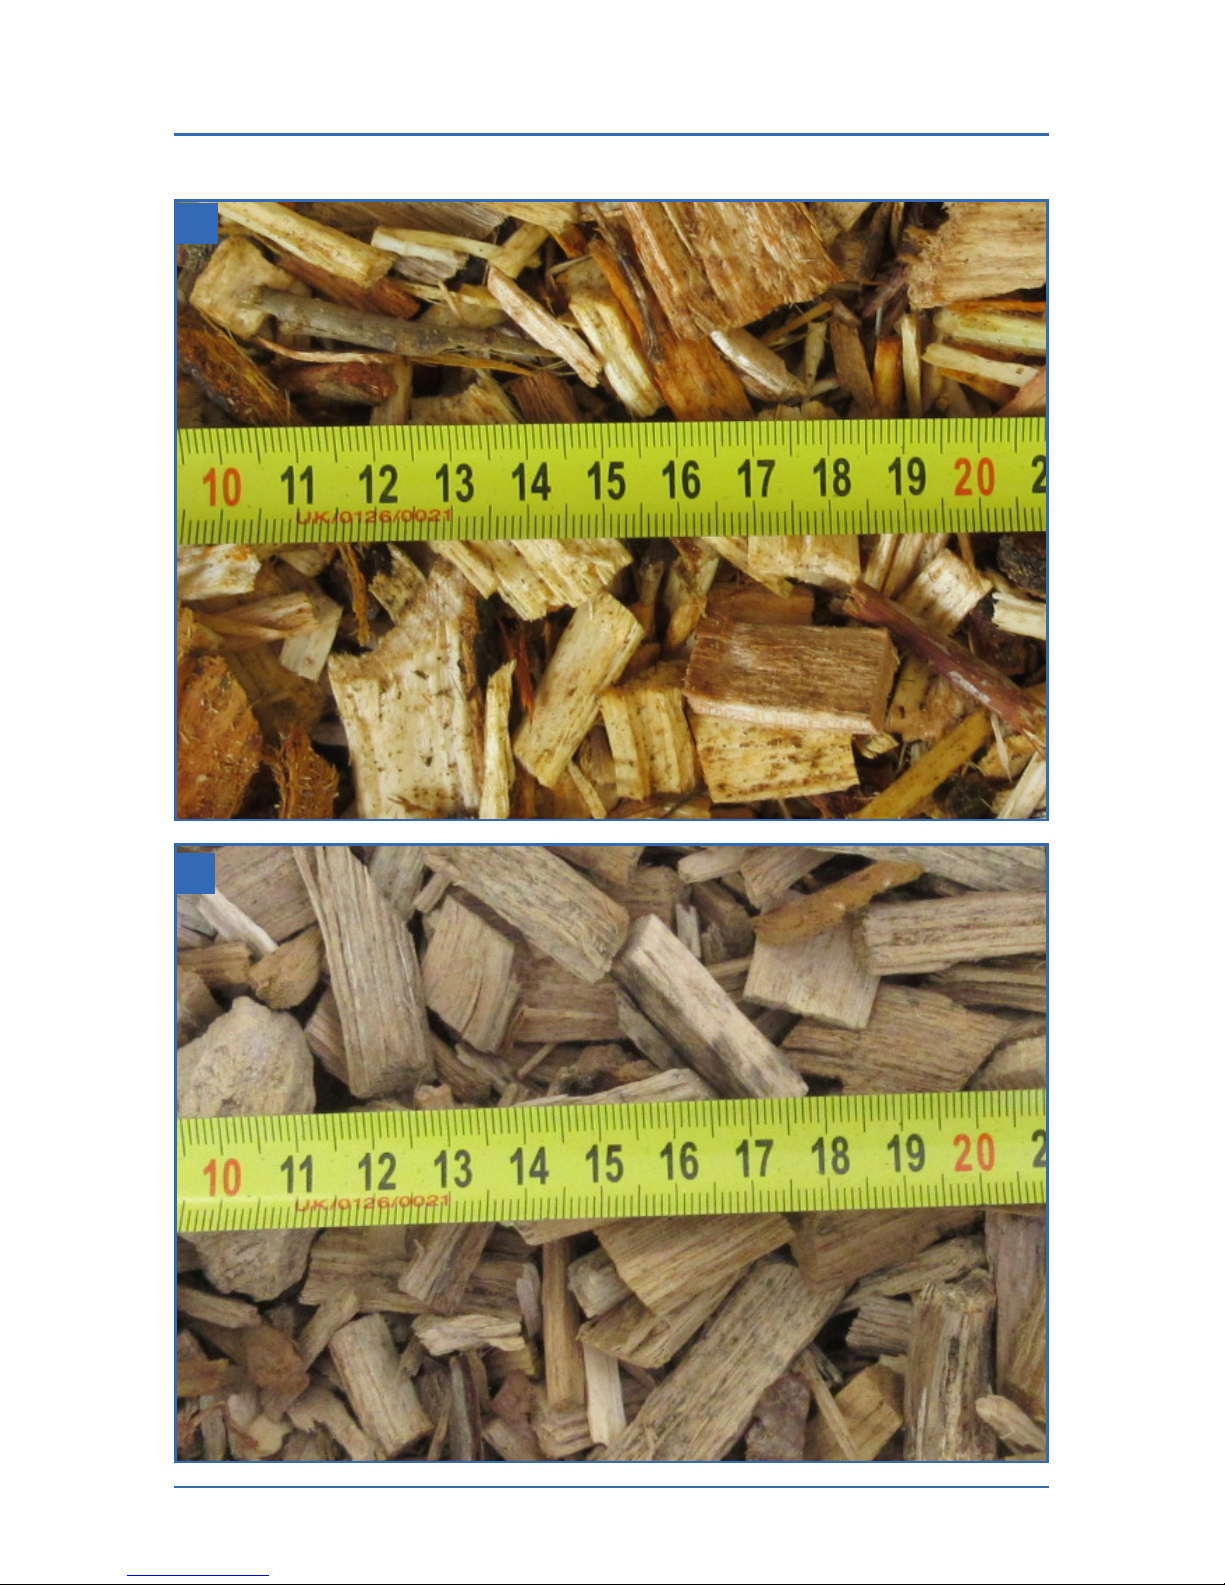
6.3.1 Wood chips
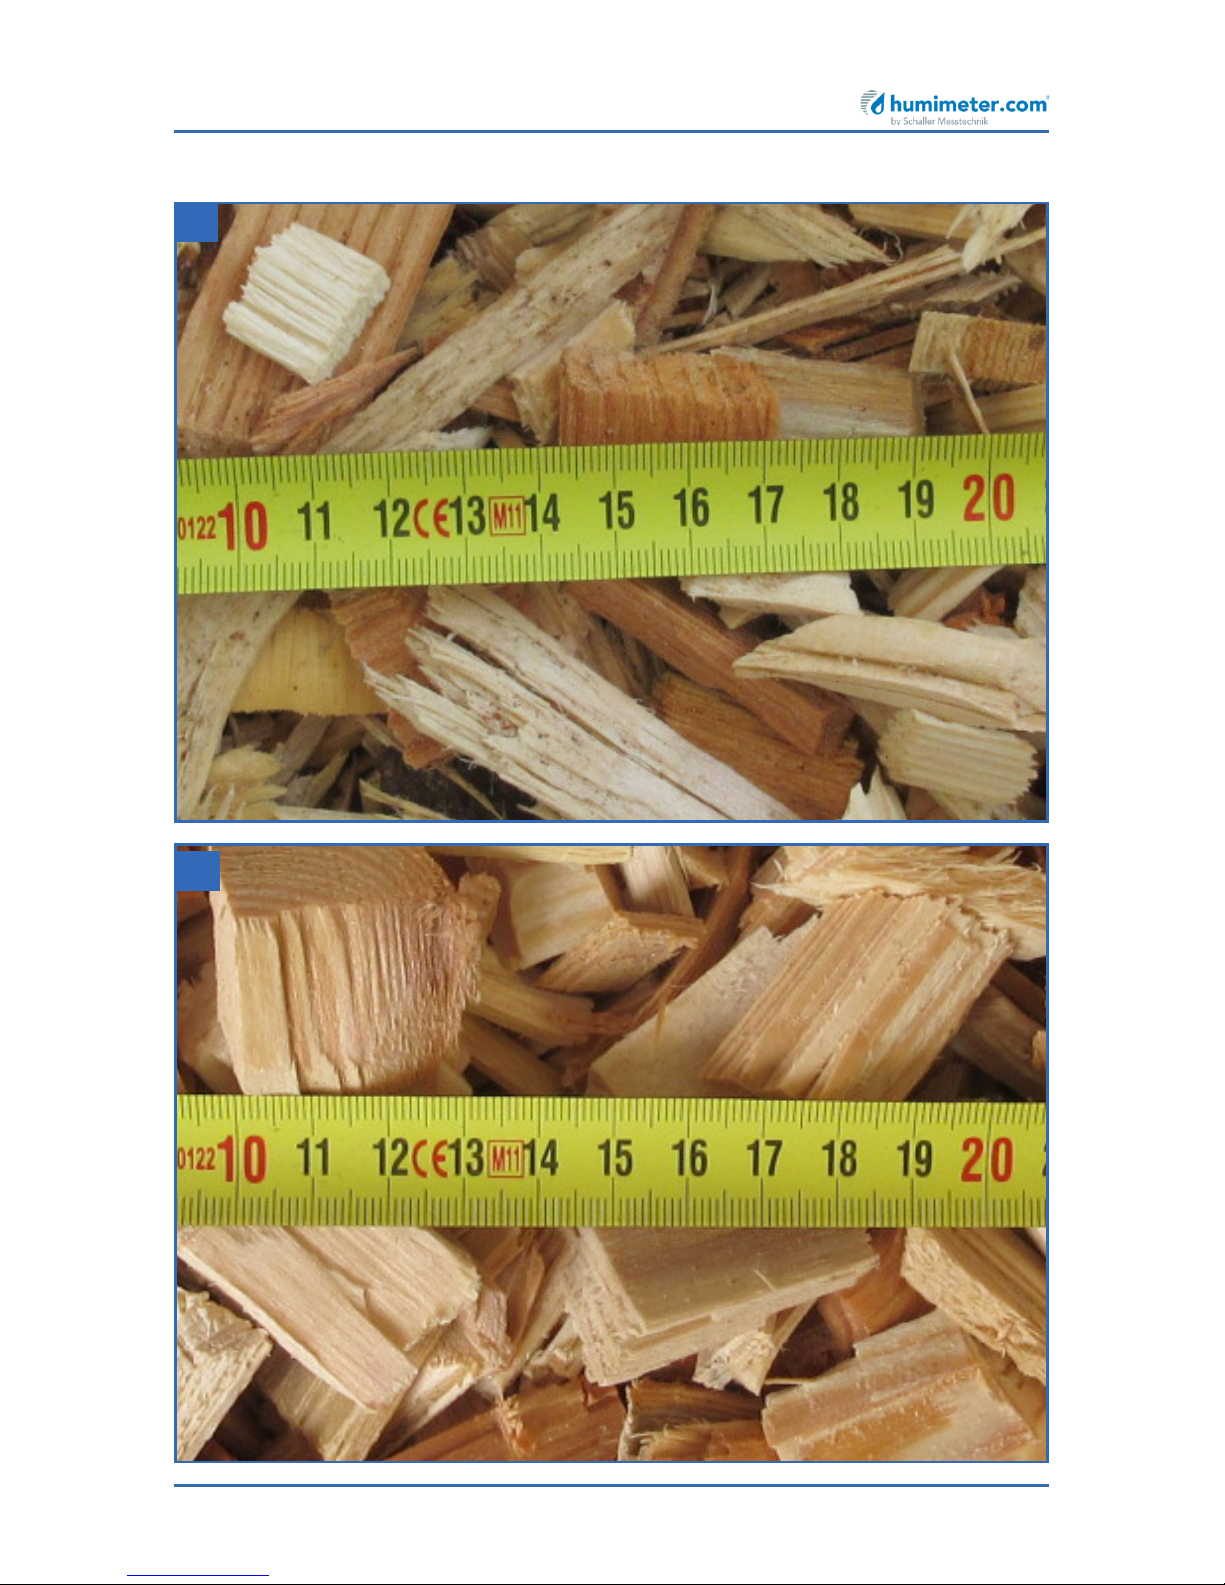
For wood chips with fine fraction, consisting of at least one third hardwood. The fine
fraction mainly derives from barks, small branches and bushes. For wood chips sizes
from P31 to P45. See example pictures 40 and 41.
If your wood chips contain few fine fraction or no fine fraction or if the wood chips
contain a higher proportion of softwood, use one of the following calibration curves.
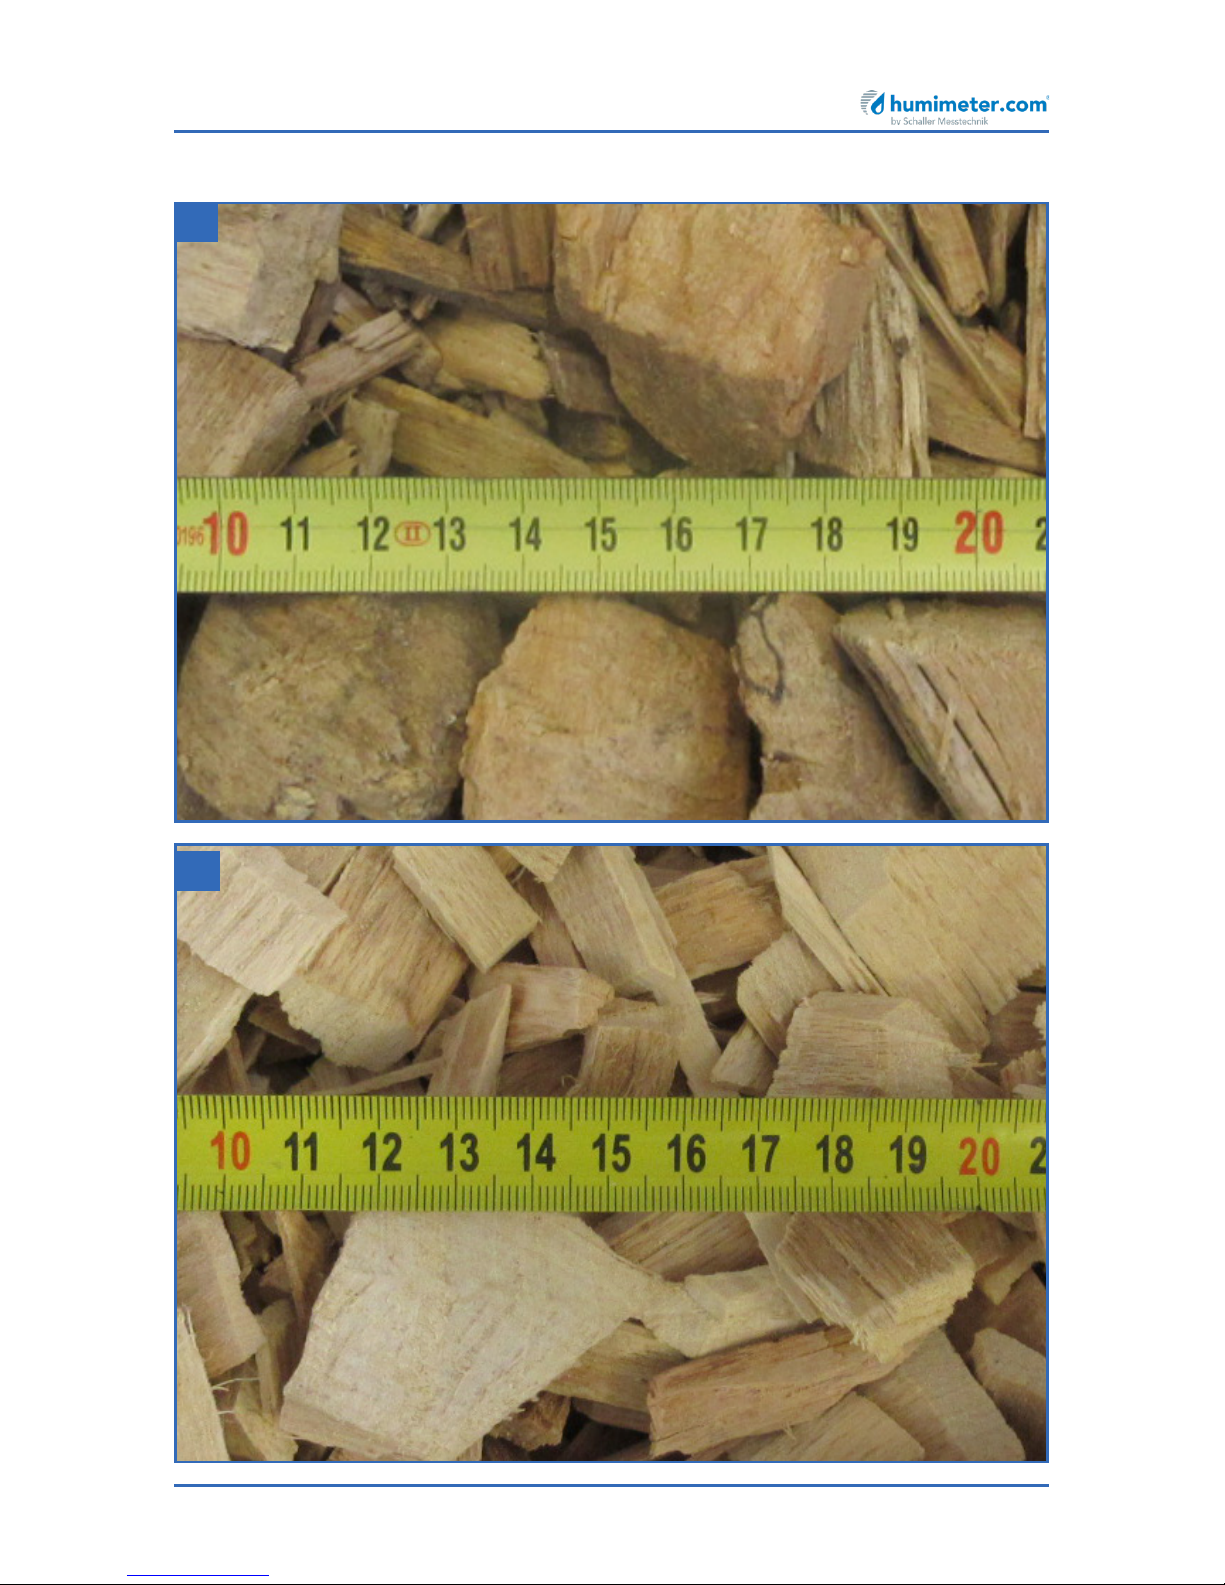
6.3.2 Coarse wood chips
For coarse wood chips without fine fraction, consisting of at least one third hardwood.
This curve is predominantly suited for measuring wood chips deriving from logs and full
trees. For wood chips sizes from P45 to P63. See example pictures 42 und 43.
If your wood chips contain a higher proportion of softwood, use one of the following
calibration curves.
Page 27

Page 27
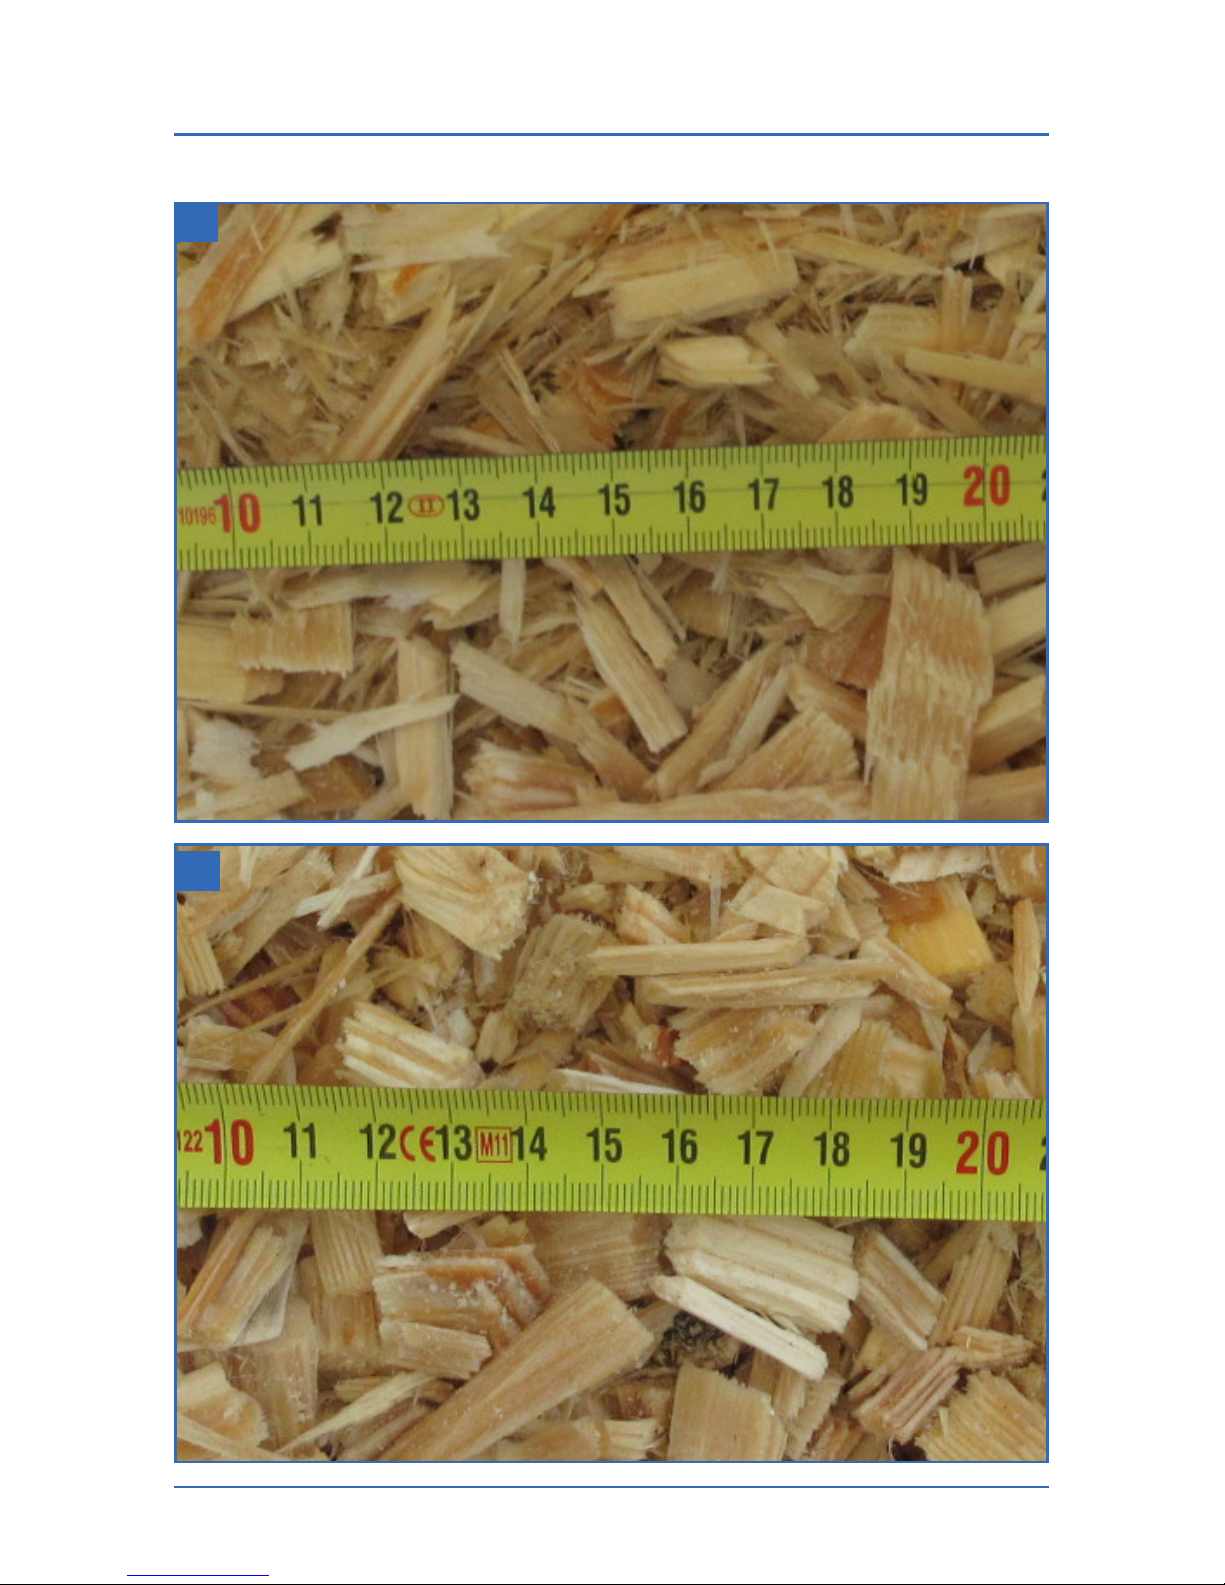
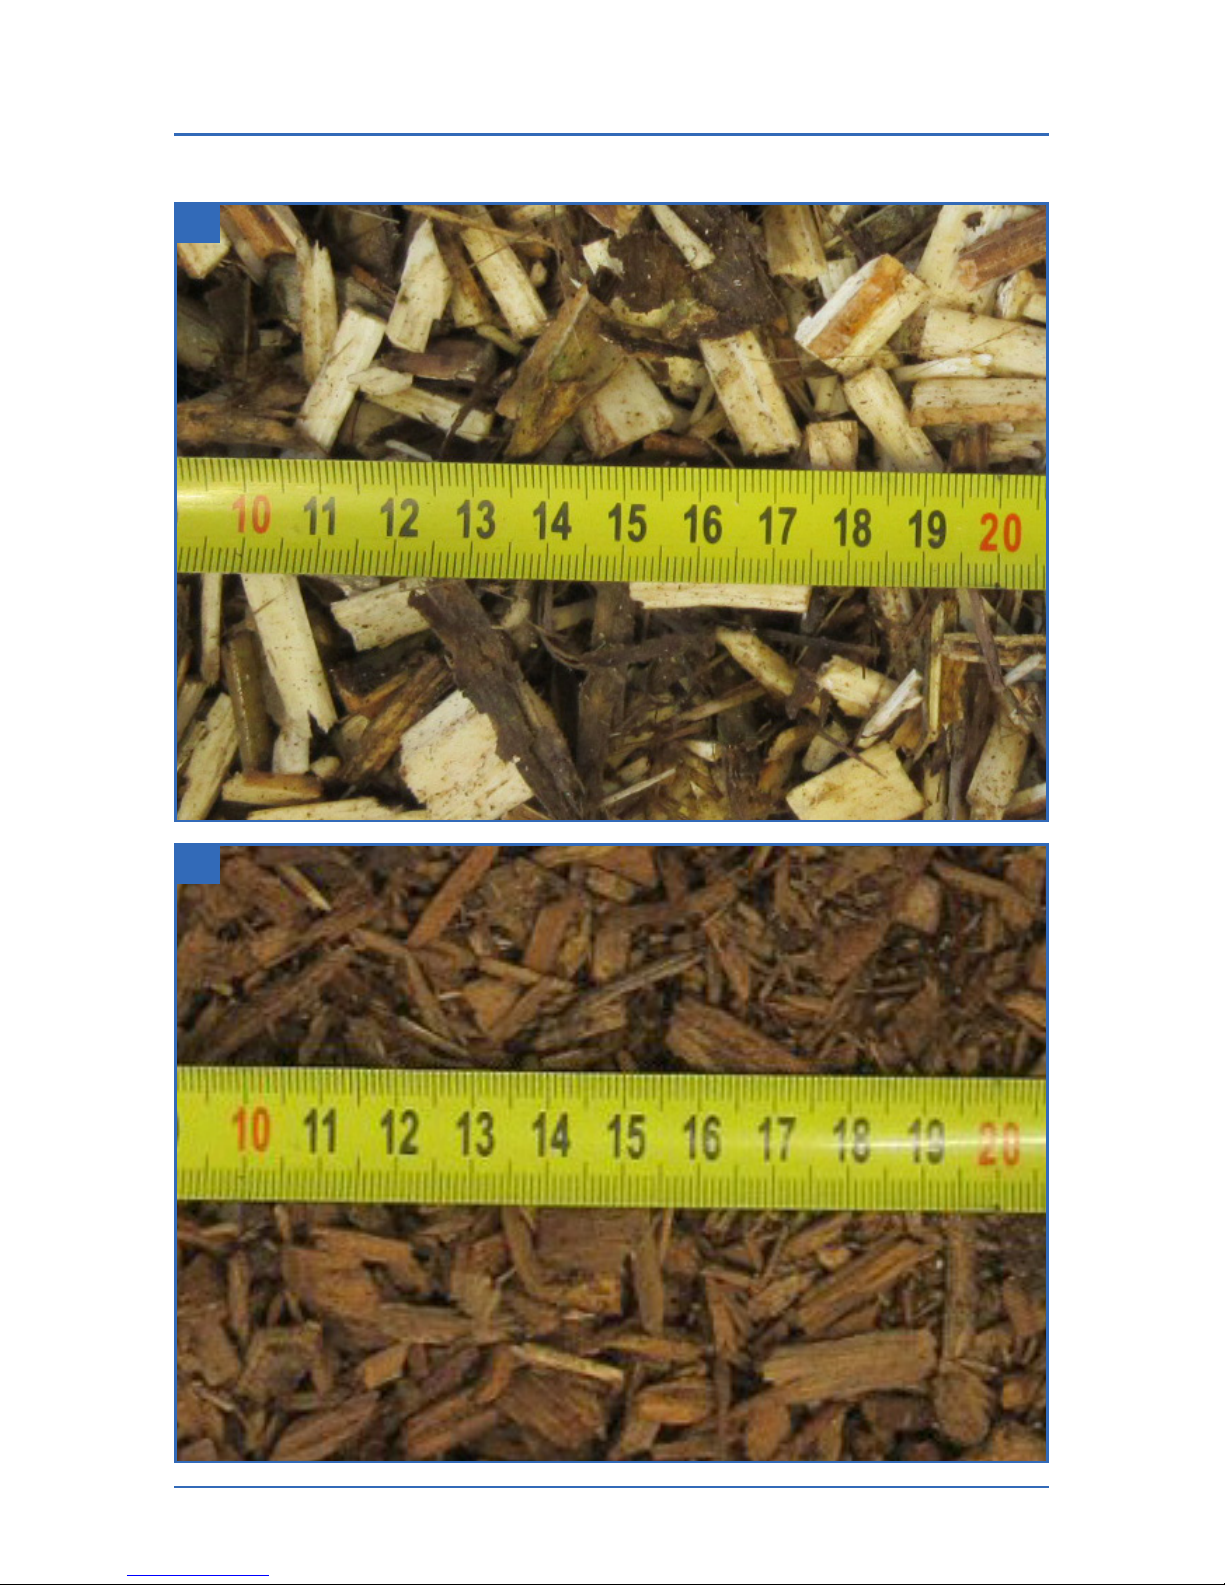
6.3.3 Softwood chips
For wood chips with fine fraction, mainly (more than two thirds) consisting of softwood (spruce, fir, pine, larch). The fine fraction mainly derives from barks, small
branches and bushes. For softwood chips sizes from P16 to P45. See example pictures
44 and 45.
If your wood chips contain few fine fraction or no fine fraction, use one of the following calibration curves.
6.3.4 Softwood coarse chips
For coarse wood chips without fine fraction, mainly (more than two thirds) consisting
of softwood (spruce, fir, pine, larch) of 70% and more. This curve is predominantly
suited for measuring wood chips deriving from logs and full trees as well as sawmill
residues. For wood chips sizes from P45 to P63. See example pictures 46 and 47.
6.3.5 Fine wood chips
For fine wood chips with a high proportion of fine fraction, consisting of at least
one third hardwood. The fine fraction mainly derives from barks, small branches and
bushes. For wood chips size P16. See example picture 48 and 49.
For wood chips purely from ash trees, wood chips sizes from P31 to P45, also choose
this calibration curve.
Page 28
humimeter BMA-2 Operating Manual
Page 28
Example pictures wood chips
40
41
Page 29
Page 29
Example pictures coarse wood chips
42
43
Page 30
humimeter BMA-2 Operating Manual
Page 30
Example pictures softwood chips
44
45
Page 31
Page 31
Example pictures softwood coarse chips
46
47
Page 32
humimeter BMA-2 Operating Manual
Page 32
Example pictures fine wood chips
49
48
Page 33

Page 33
6.4 Notes for the measurement of wood shavings
The weight of the measured shavings must be at least 380 g. Otherwise the shavings
in the chamber have to be compressed to 380 g.
6.5 Notes for bulk density and dry weight (atro)/m³
For determining the bulk density according to norm EN 14961 a round bucket is used.
As the humimeter BMA-2 device uses a rectangular measuring chamber, a compensation factor is stored in the device. This compensation factor has been optimised for
wood chips and therefore can differ when measuring other material types. The bulk
density of biomass material during transport can change considerably (compacting),
when measuring the volume a material cone has to be considered.
An eventual discrepancy of the bulk density directly influences the displayed dry weight
(atro)/m³.
6.6 Notes for comparative measurement with oven-drying method
The device uses a much higher sample quantity than the drying oven (12-fold to
20-fold quantity of kiln-drying method). Furthermore, to determine a more accurate
average moisture value in case of inhomogeneous material, there can be effected several measurements within a short time.
Considering a sampling error due to the considerably smaller sample quantity as well as
the content of volatile matters, resin etc. (that are not water), the kiln-drying method
will practically reach an accuracy of approx. +/- 3 %. Therefore, if the measuring values
of these two very different methods of determining the water content are compared,
differences of +/- 3 % can be considered to be normal.
In the standard EN ISO 18134-2 is declared that the drying oven method provides no
absolute values, but only comparable values.
Page 34
humimeter BMA-2 Operating Manual
Page 34
7. Using the LogMemorizer program
To do so: The device is provided with USB interface, and the USB stick with LogMemo-
rizer software and USB cable are available (Included in the equipment packages: USB
package, Data package or ATRO package).
7.1 Installing/Opening the program
1. Insert the USB stick with the LogMemorizer program into the USB port on your
computer.
2. Open the setup application.
3. Follow the installation instructions.
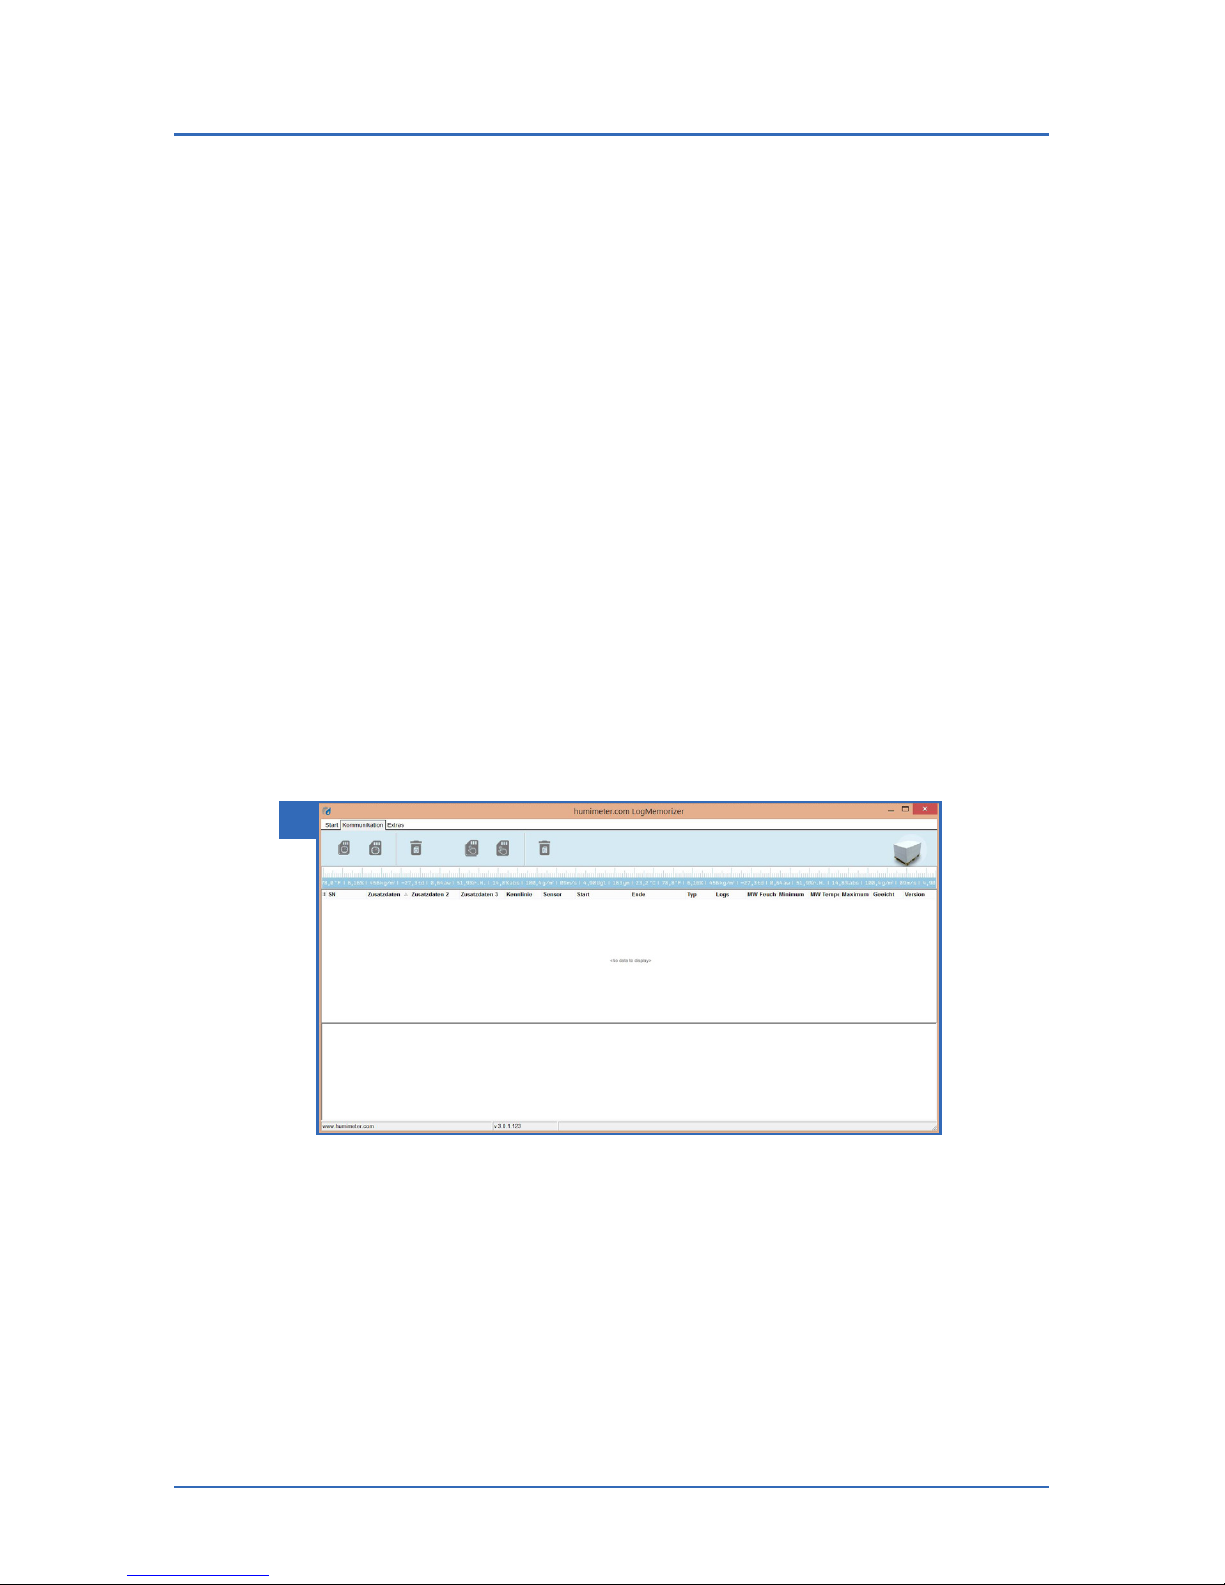
1. Open LogMemorizer.
» The screen will now display the LogMemorizer’s interface (figure 50).
» Before using LogMemorizer, please refer to the the separate LogMemorizer
opation manual for the correct configuration of the USB COM Port.
For more information on LogMemorizer, please refer to the separate LogMemorizer
operating manual supplied with the device.
7.2 Exporting measuring values to a computer
To do so: LogMemorizer must be installed. And you must have taken and saved one or
several moisture readings.
Options: You can export moisture readings from the humimeter BMA-2 and initiate the
export at your computer.
50
Page 35
Page 35
Exporting moisture readings from the humimeter BMA-2
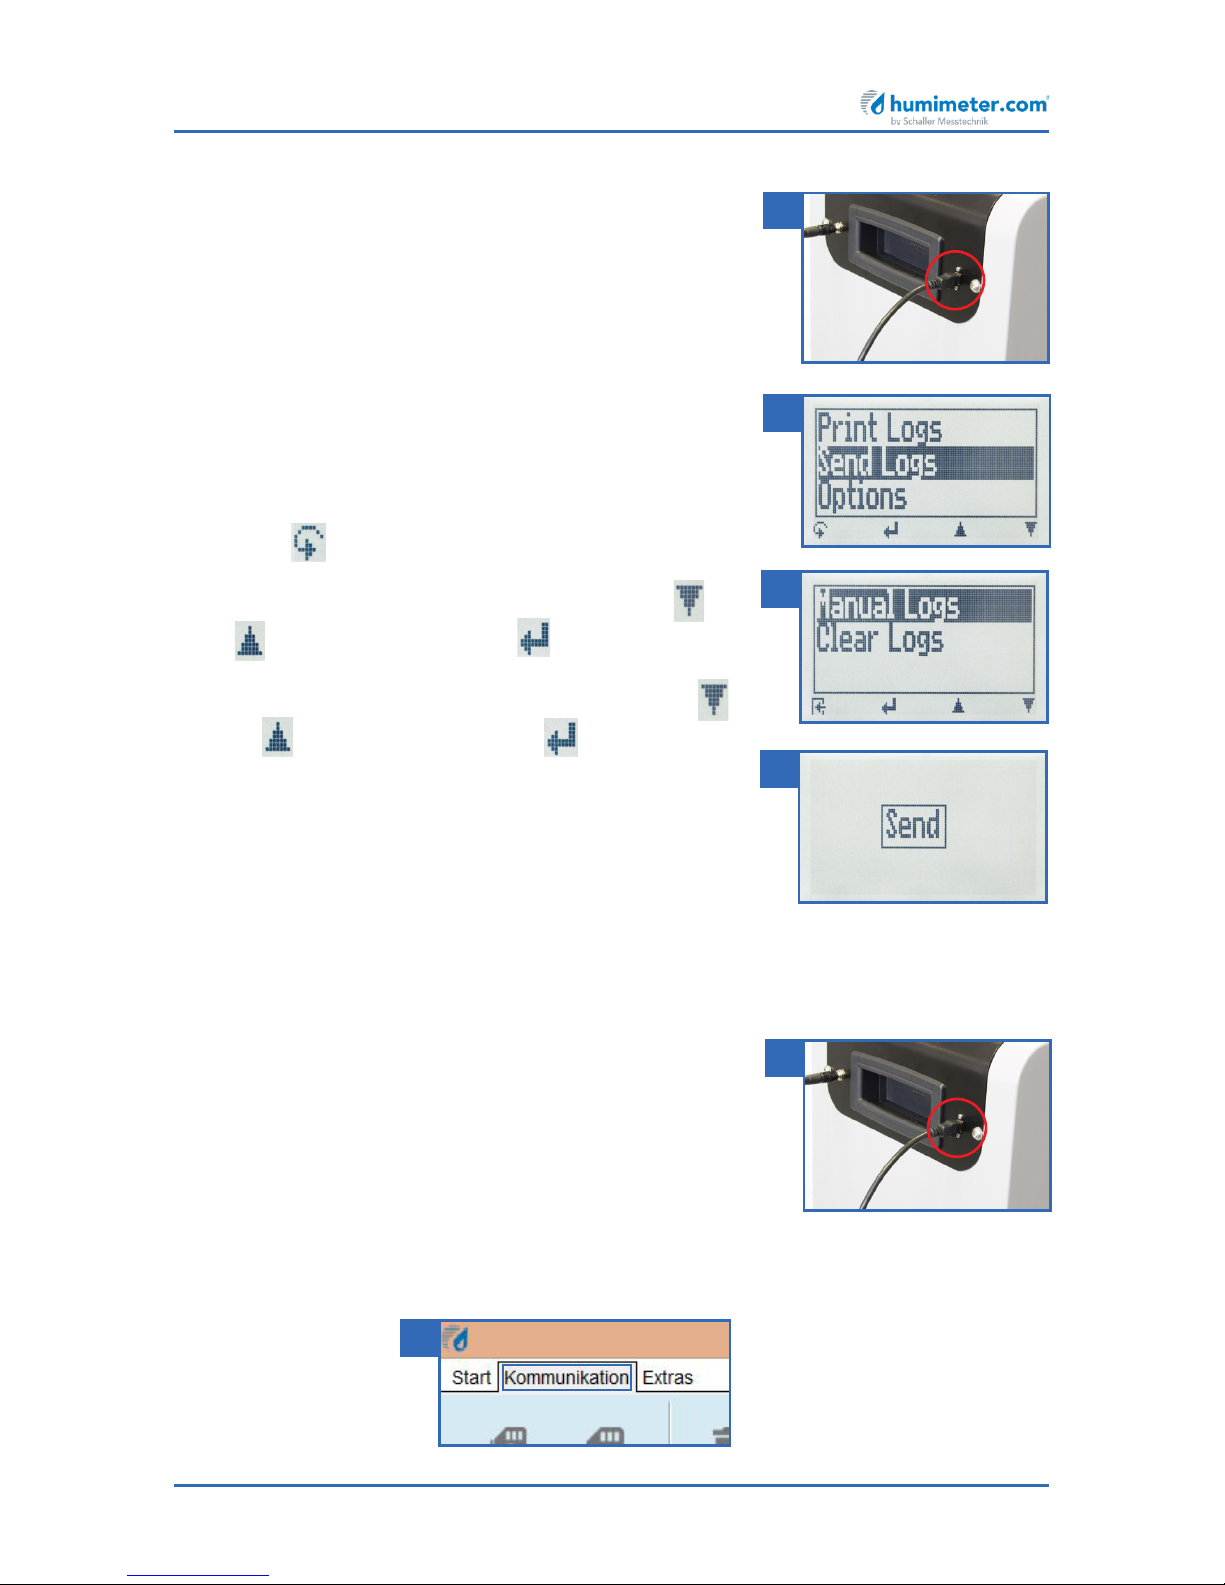
Connect the humimeter BMA-2 to your computer using
the supplied USB cable.
1. Insert the USB Mini B connector into the humimeter BMA-2 (figure 51).
2. Insert the USB connector into the computer.
3. Open LogMemorizer on your computer.
4. Switch on the humimeter BMA-2.
5. Press .
6. Select Send Logs (figure 52). To do so, press or
and confirm by pressing .
7. Select Manual Logs (figure 53). To do so, press
or and confirm by pressing .
» The display will then show the message Send
(figure54).
» All of the measuring values saved on the humime-
ter BMA-2 will now be sent to your computer.
Initiating the data export at your computer
Connect the humimeter BMA-2 to your computer using the supplied USB cable:
1. Insert the USB Mini B connector into the humimeter BMA-2 (figure 55).
2. Insert the USB connector into the computer.
3. Open LogMemorizer on your computer.
4. Switch on the humimeter BMA-2.
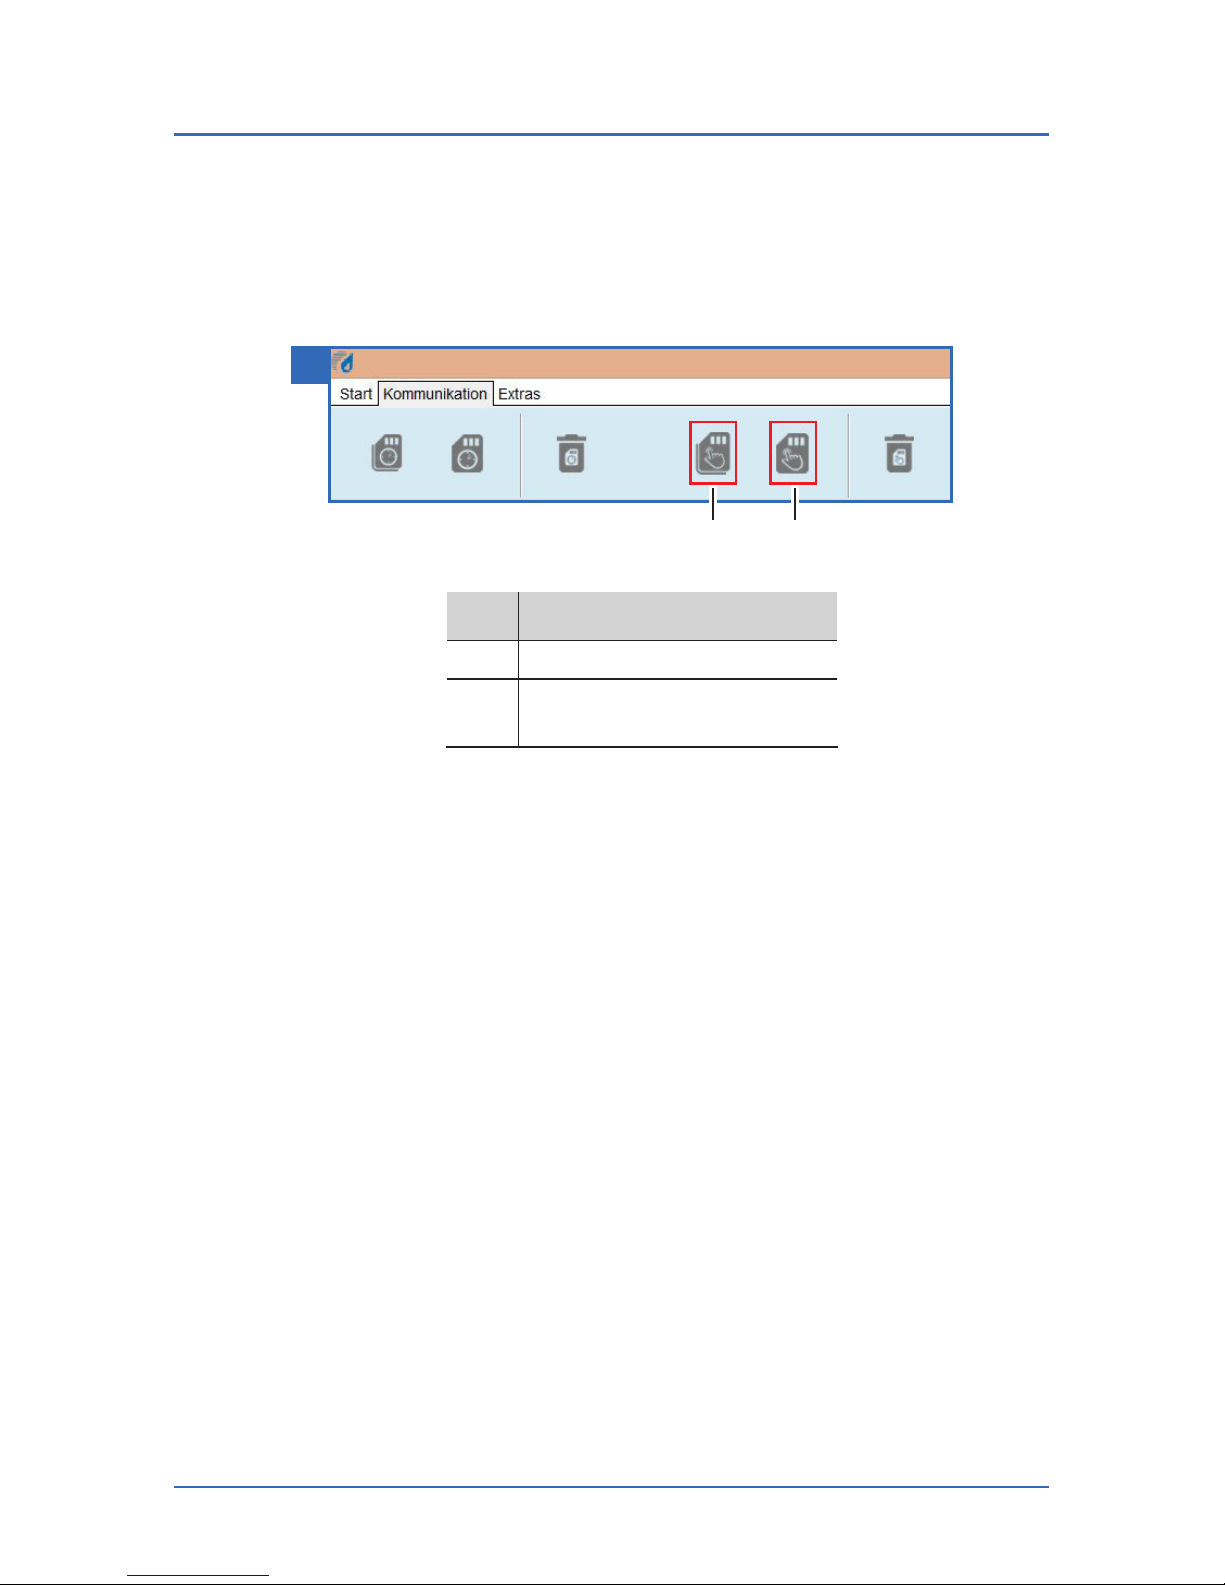
5. Open the Communication tab in LogMemorizer (figure 56).
51
52
53
54
55
56
Page 36
humimeter BMA-2 Operating Manual
Page 36
6. Select and click on one of the buttons shown in figure 57:
» Import all manual logs (for importing all manually saved readings) or
» Import most recent manual log (for importing the most recent manually saved
logs).
No. Name
1 Import all manual logs
2 Import most recent manual
log
» The measuring values saved on the humimeter BMA-2 will now be sent to your
computer.
57
1 2
Page 37
Page 37
8. Checking the device's status
1. Press .
2. Select Status. To do so, press or and confirm by pressing .
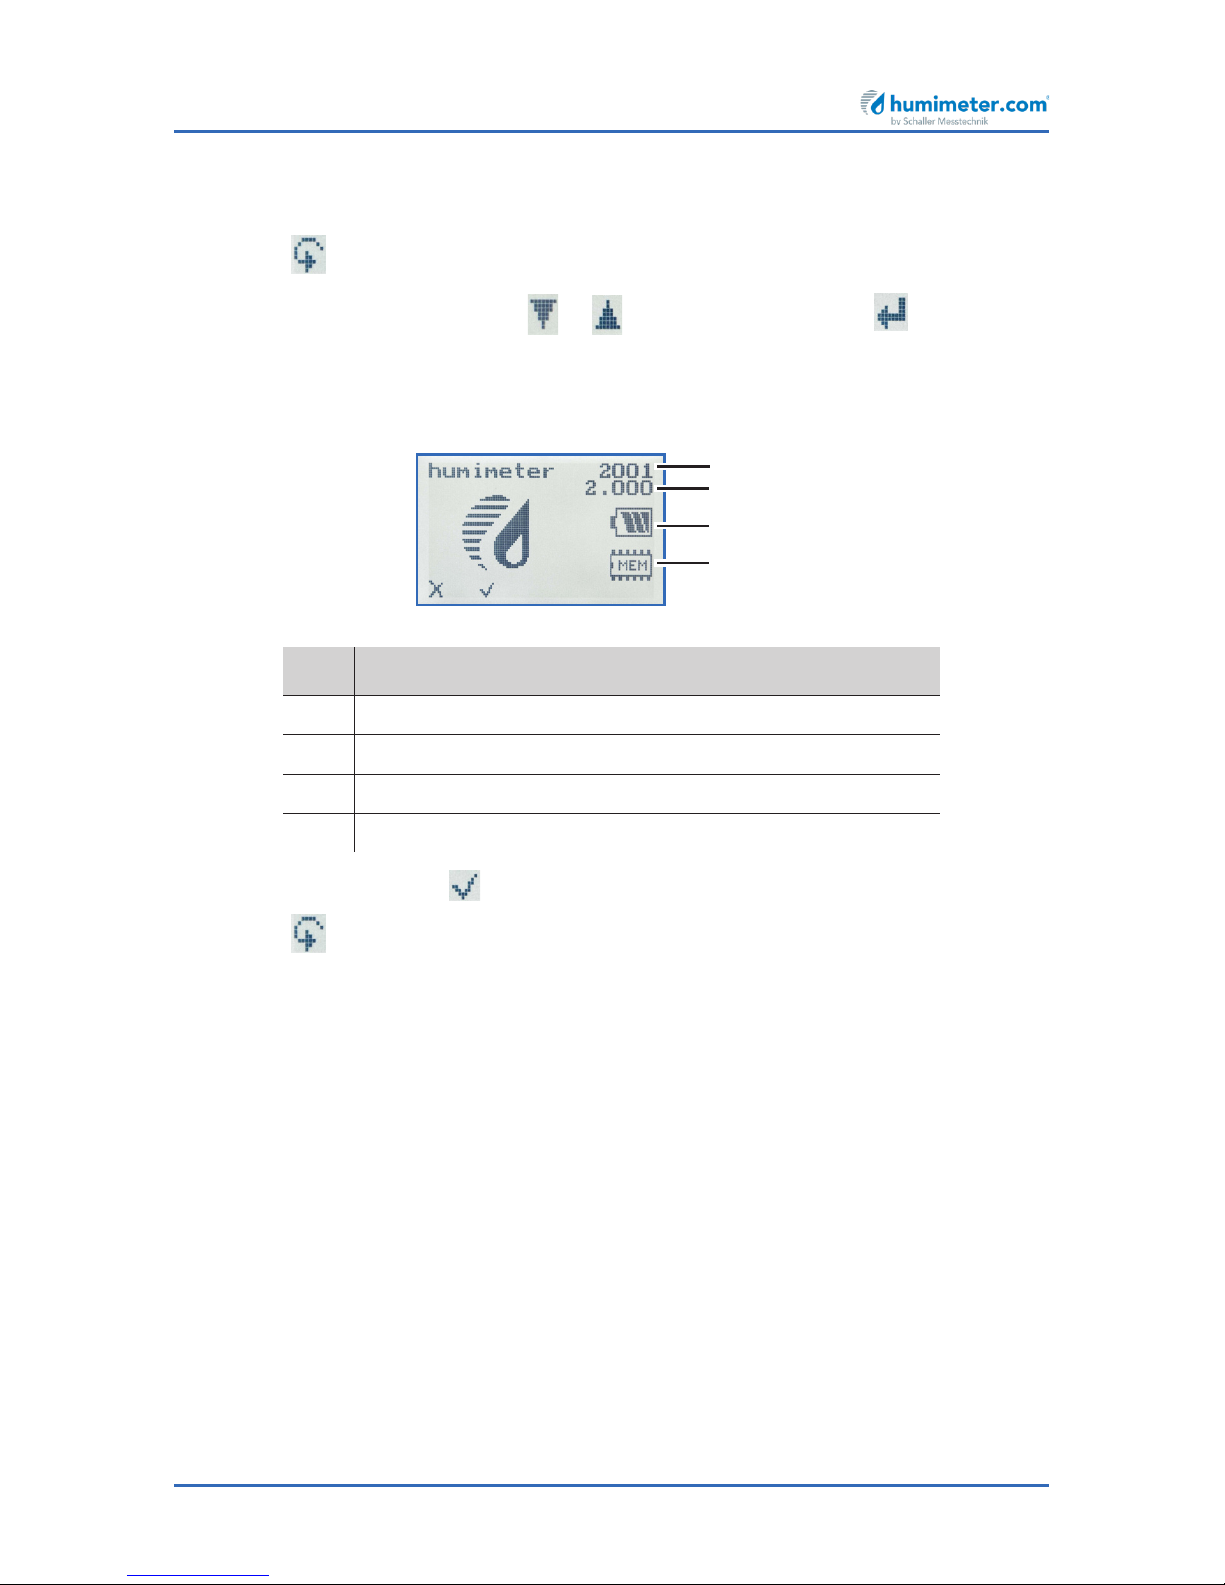
» The display will then show the status indicator humimeter.
» The display will show the following information:
No. Name
1 Serial number
2 Software version
3 Battery status
4 Memory status
3. Confirm by presssing .
4. Press to leave the main menu.
1
2
3
4
Page 38
humimeter BMA-2 Operating Manual
Page 38
9. Configuring the device
9.1 Turning on Bluetooth
The information on Bluetooth is provided in a separate operating manual.
9.2 Adjust the date/time
1. Press .
2. Select Options. To do so, press or and confirm by pressing .
3. Select Date/Time. To do so, press or and confirm by pressing .
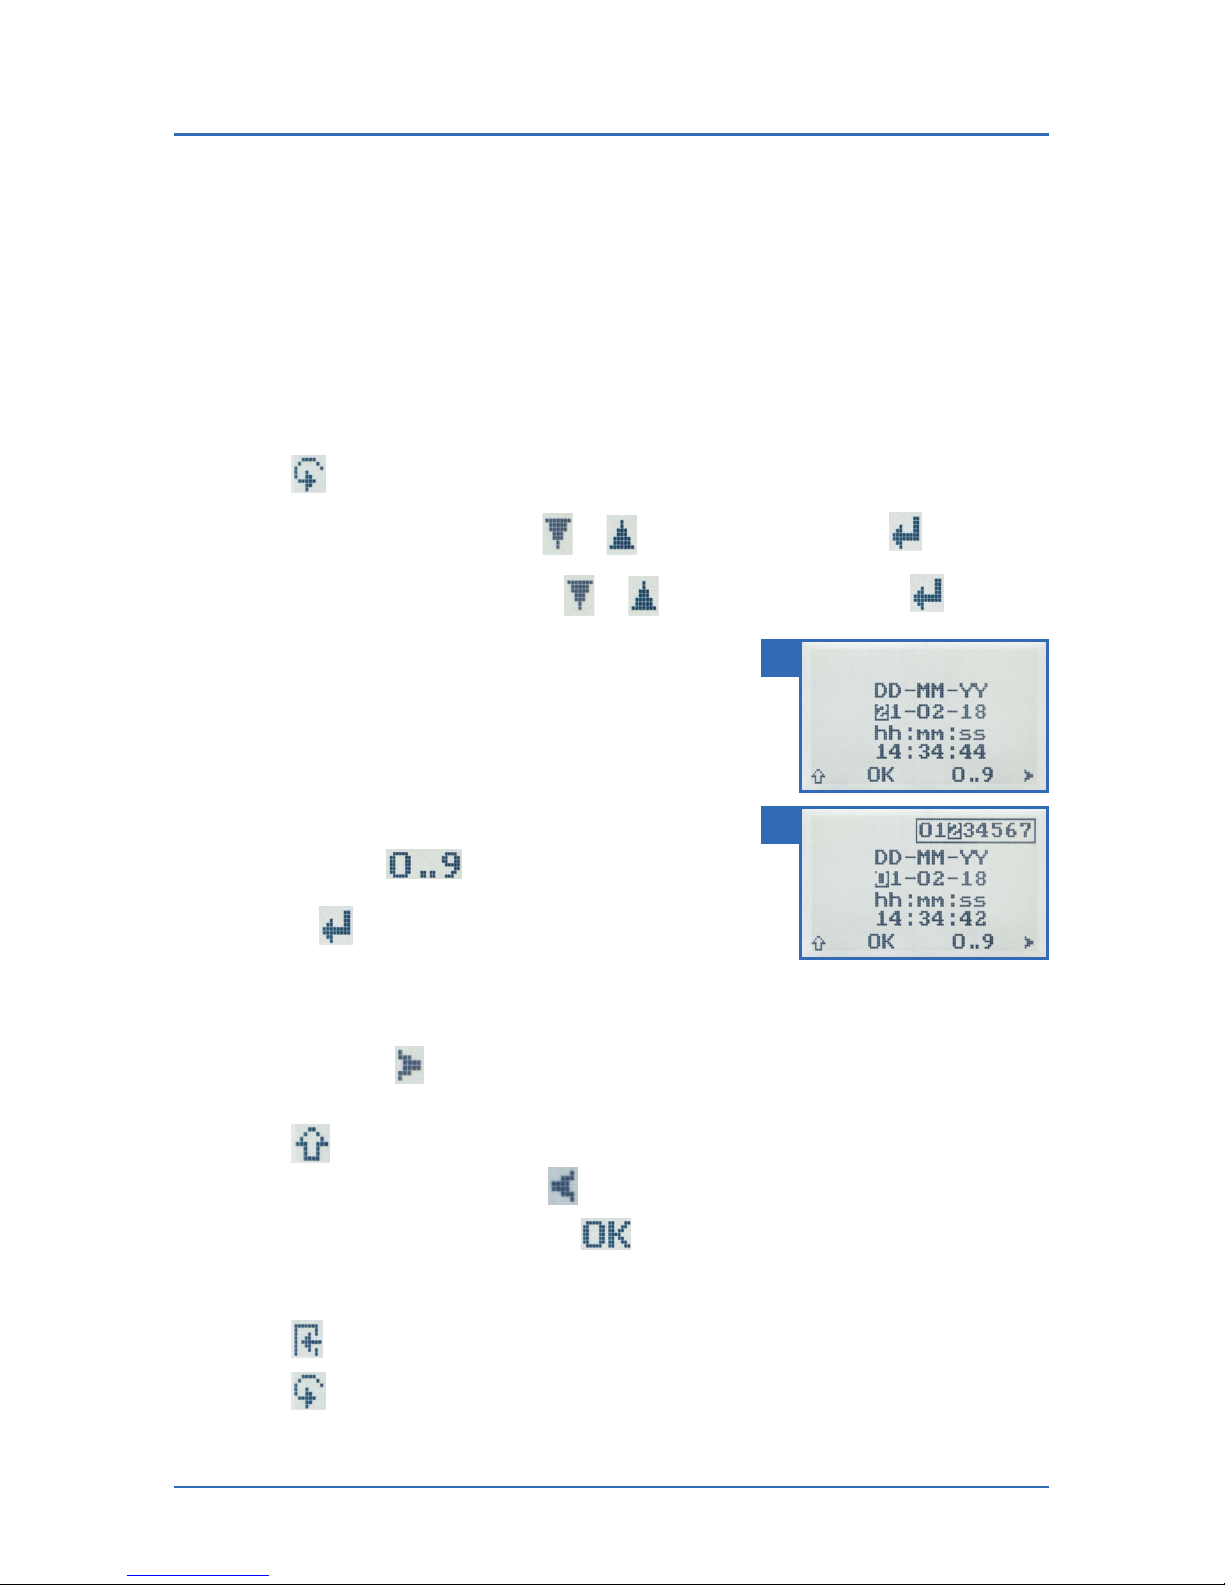
» The display will now appear as shown in figure 58.
» The format for the date is DD-MM-YY (Day-Month-
Year).
» The format for the time is hh:mm:ss
(Hour:Minutes:Seconds).
4. Inputting numbers:
Press and hold to quickly scroll to the
required number and either press it for 3 seconds
or press to confirm the selected number (figure
59).
5. Moving forward:
To move forward between DD-MM-YY and
hh:mm:ss, press .
6. Moving back:
Press to switch to another input level. To move backward between
DD-MM-YY and hh:mm:ss, press .
7. Confirm the date/time by pressing .
» The settings have been saved.
8. Press to leave the Options menu.
9. Press to leave the main menu.
58
59
Page 39
Page 39
9.3 Selecting a language
1. Press .
2. Select Options. To do so, press or and confirm by pressing .
3. Select Language. To do so, press or and confirm by pressing .
4. Navigate to the required language. To do so, press or and confirm by
pressing .
» The settings have been saved.
5. Press to leave the Options menu.
6. Press to leave the main menu.
9.4 Activating options
To do so: Some of the options are deactivated.
1. Press .
2. Select Options. To do so, press or and confirm by pressing .
3. Select Unlock. To do so, press or and confirm by pressing .
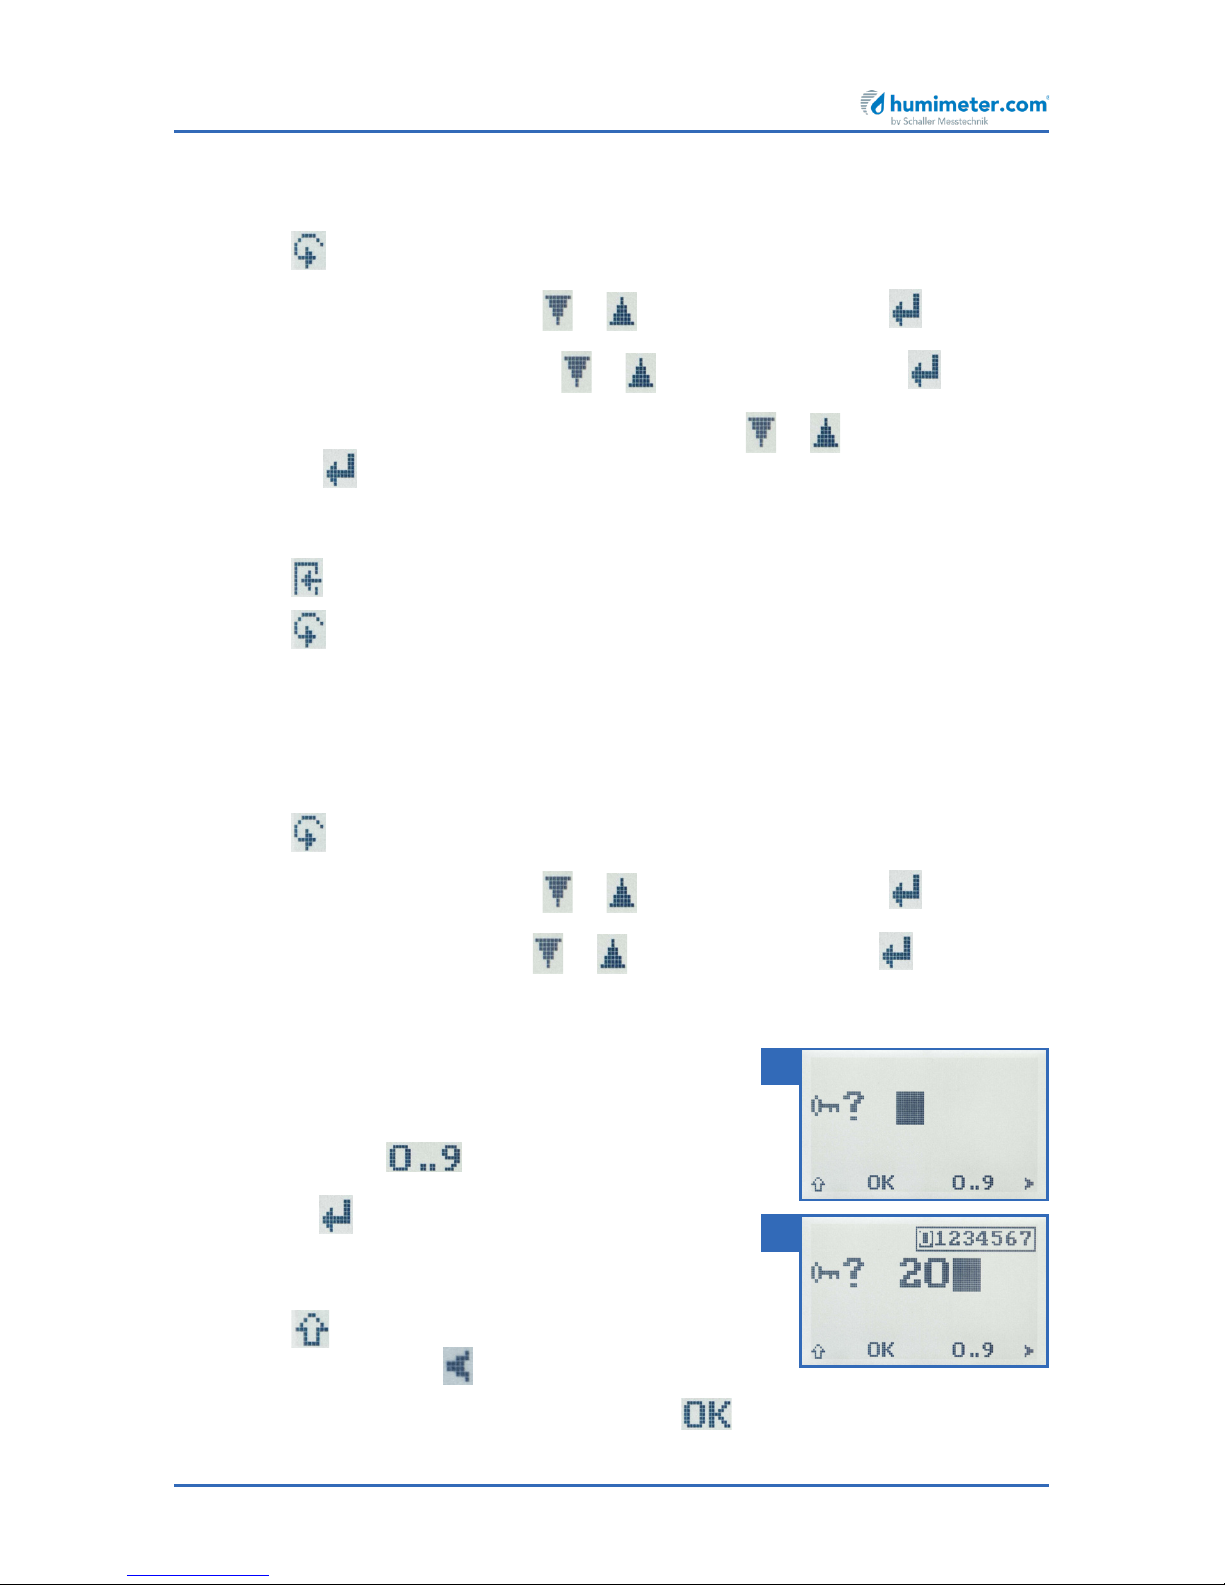
» The display will now appear as shown in figure 60.
» On delivery, the four-digit password is the device’s
serial number.
4. Inputting numbers:
Press and hold to quickly scroll to the
required number and either press it for 3 seconds
or press to confirm the selected number
(figure 61).
5. Moving back:
Press to switch to another input level.
To move back, press .
6. Confirm the four-digit password by pressing .
60
61
Page 40
humimeter BMA-2 Operating Manual
Page 40
» The settings have been saved.
» The °C/°F, BL On Time, Auto Off Time, Materialcalib., Password, Reset options are
now activated.
7. Press to leave the Options menu.
8. Press to leave the main menu.
9.5 Deactivating options
Once the device has been switched restarted, the °C/°F, BL On Time, Auto Off Time,
Materialcalib., Password, Reset options will be deactivated again.
9.6 Selecting °C/°F
To do so: All of the options must be activated (see "9.4 Activating options").
1. Press .
2. Select Options. To do so, press or and confirm by pressing .
3. Select °C/°F. To do so, press or and confirm by pressing .
4. Navigate to the required temperature scale, i.e. Celsius(°C) or Fahrenheit (°F). To
do so, press or and confirm by pressing .
» The settings have been saved.
5. Press to leave the Options menu.
6. Press to leave the main menu.
Page 41
Page 41
9.7 Reducing the device's power consumption
9.7.1 Configuring the display illumination time
To do so: All of the options must be activated (see "9.4 Activating options").
1. Press .
2. Select Options. To do so, press or and confirm by pressing .
3. Select BL On Time. To do so, press or and confirm by pressing .
4. Select the required display illumination period (30seconds/2 minutes/5 minu-
tes/10 minutes). To do so, press or and confirm by pressing .
» The settings have been saved.
5. Press to leave the Options menu.
6. Press to leave the main menu.
9.7.2 Configuring automatic switch-off
To do so: All of the options must be activated (see "9.4 Activating options").
1. Press .
2. Select Options. To do so, press or and confirm by pressing .
3. Select Auto Off Time. To do so, press or and confirm by pressing .
4. Select the period of time you want the device to stay switched on (4minutes,
6minutes, 10minutes, 30minutes). To do so, press or and confirm by
pressing .
» The settings have been saved.
5. Press to leave the Options menu.
6. Press to leave the main menu.
Page 42
humimeter BMA-2 Operating Manual
Page 42
9.8 Configuring the material calibration function
The type calibration function is described in a separate operating manual.
9.9 Changing the password
To do so: All of the options must be activated (see "9.4 Activating options").
1. Press .
2. Select Options. To do so, press or and confirm by pressing .
3. Select Password. To do so, press or and confirm by pressing .
» The display will show the current password.
4. Overwrite the current password. To do so, press and hold to quickly
scroll to the required number and either press it for 3 seconds or press to
confirm the selected number.
Moving back:
Press to switch to another input level.
To move back, press .
5. Confirm the new four-digit password by pressing .
» The settings have been saved.
6. Press to leave the Options menu.
7. Press to leave the main menu.
Page 43
Page 43
9.10 Resetting the device to its factory settings
To do so: All of the options must be activated (see "9.4 Activating options").
1. Press .
2. Select Options. To do so, press or and confirm by pressing .
3. Select Reset. To do so, press or and confirm by pressing .
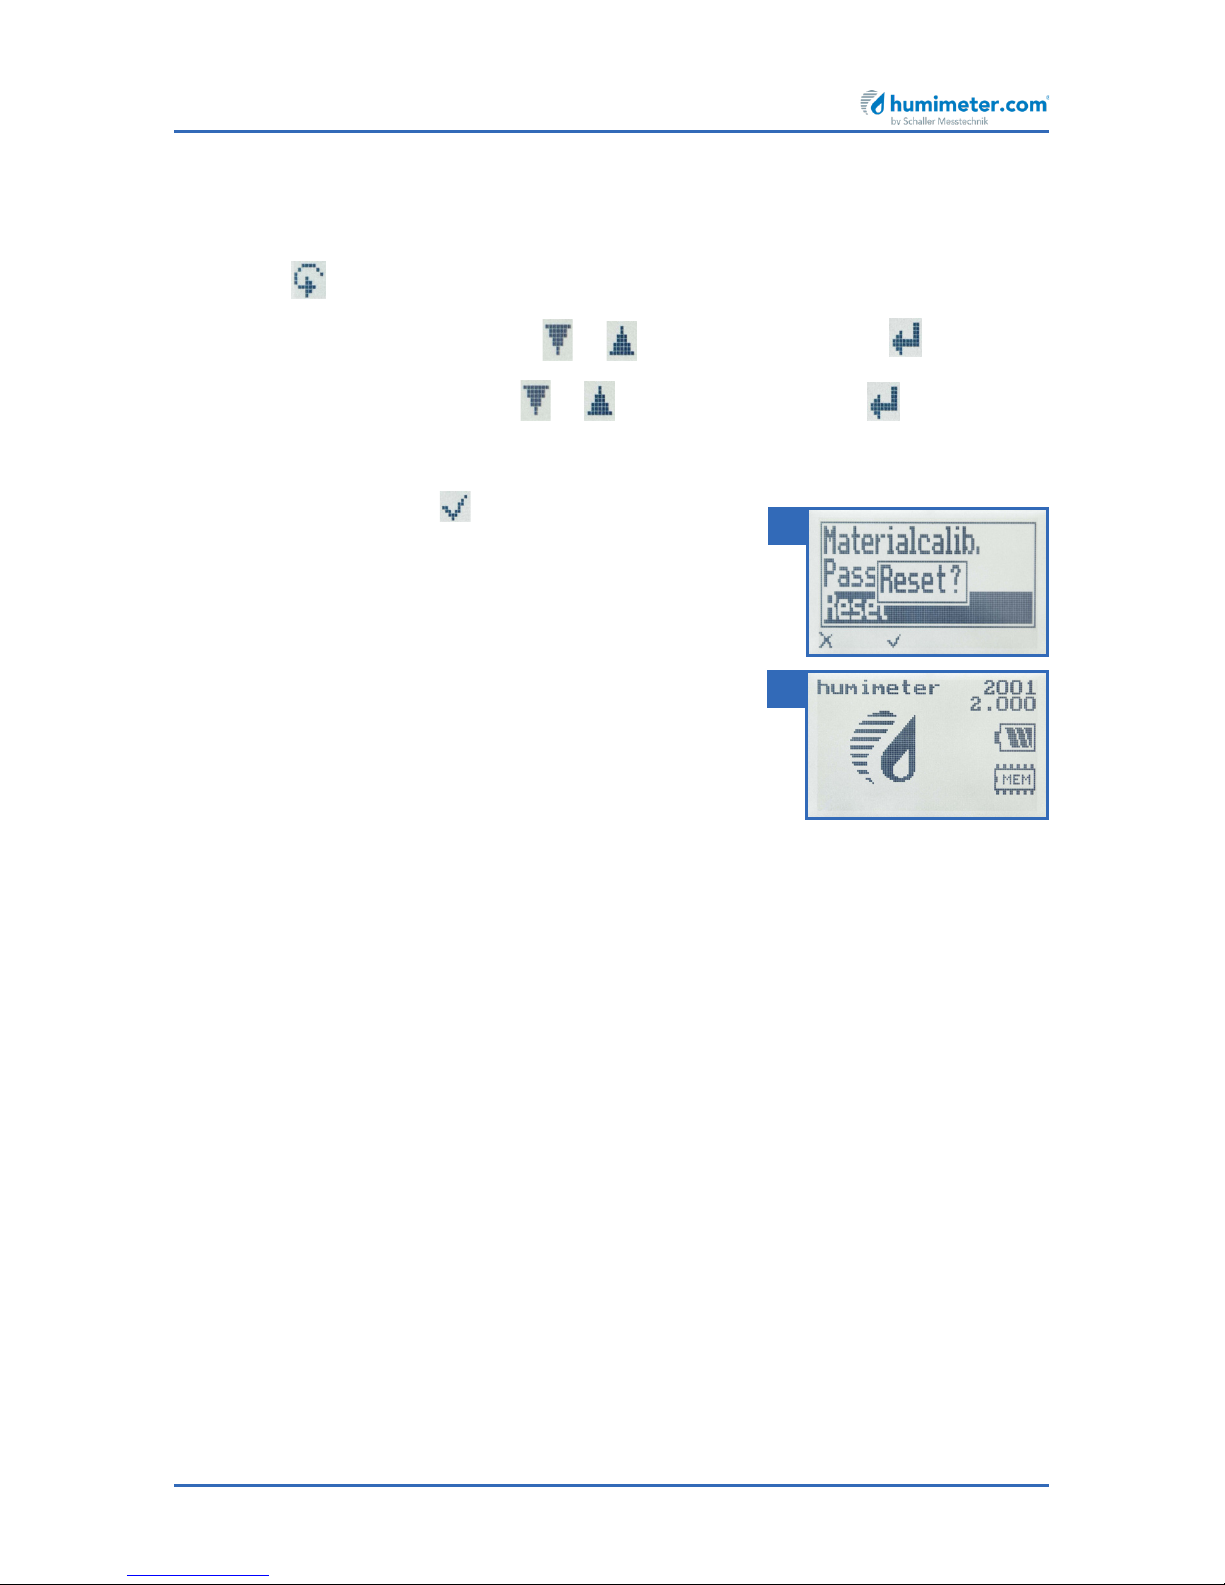
» The display will then show the message Reset? (figure 62).
4. Confirm by pressing .
» The device will now be reset to its factory settings.
All of your personal settings will be lost.
» The display will show the status indicator humi-
meter (figure 63).
» Resetting the device will not affect the saved
measuring values.
10. Cleaning and maintenance
Regularly cleaning and maintaining the device will ensure that it will have a long service
life and stay in good condition.
10.1 Care instructions
• Do not leave the device out in the rain. The device and measuring chamber are
not waterproof.
• Do not position the device in damp rooms.
• Place the device on a stable, level and dry surface.
• Do not expose the device to large quantities of dust.
• Do not expose the device to extreme temperatures.
• Protect the device from strong mechanical shocks and loads.
• Keep a sufficient distance of about 10 cm from the wall and other objects.
• Lay the power cable so that it cannot be damaged by edges or hot surfaces.
62
63
Page 44
humimeter BMA-2 Operating Manual
Page 44
10.2 Cleaning the device
ATTENTION
Do not clean with fluids
Water or cleaning fluid getting inside the device can destroy the device.
► Only clean with dry materials.
ATTENTION
Damage due to improper cleaning
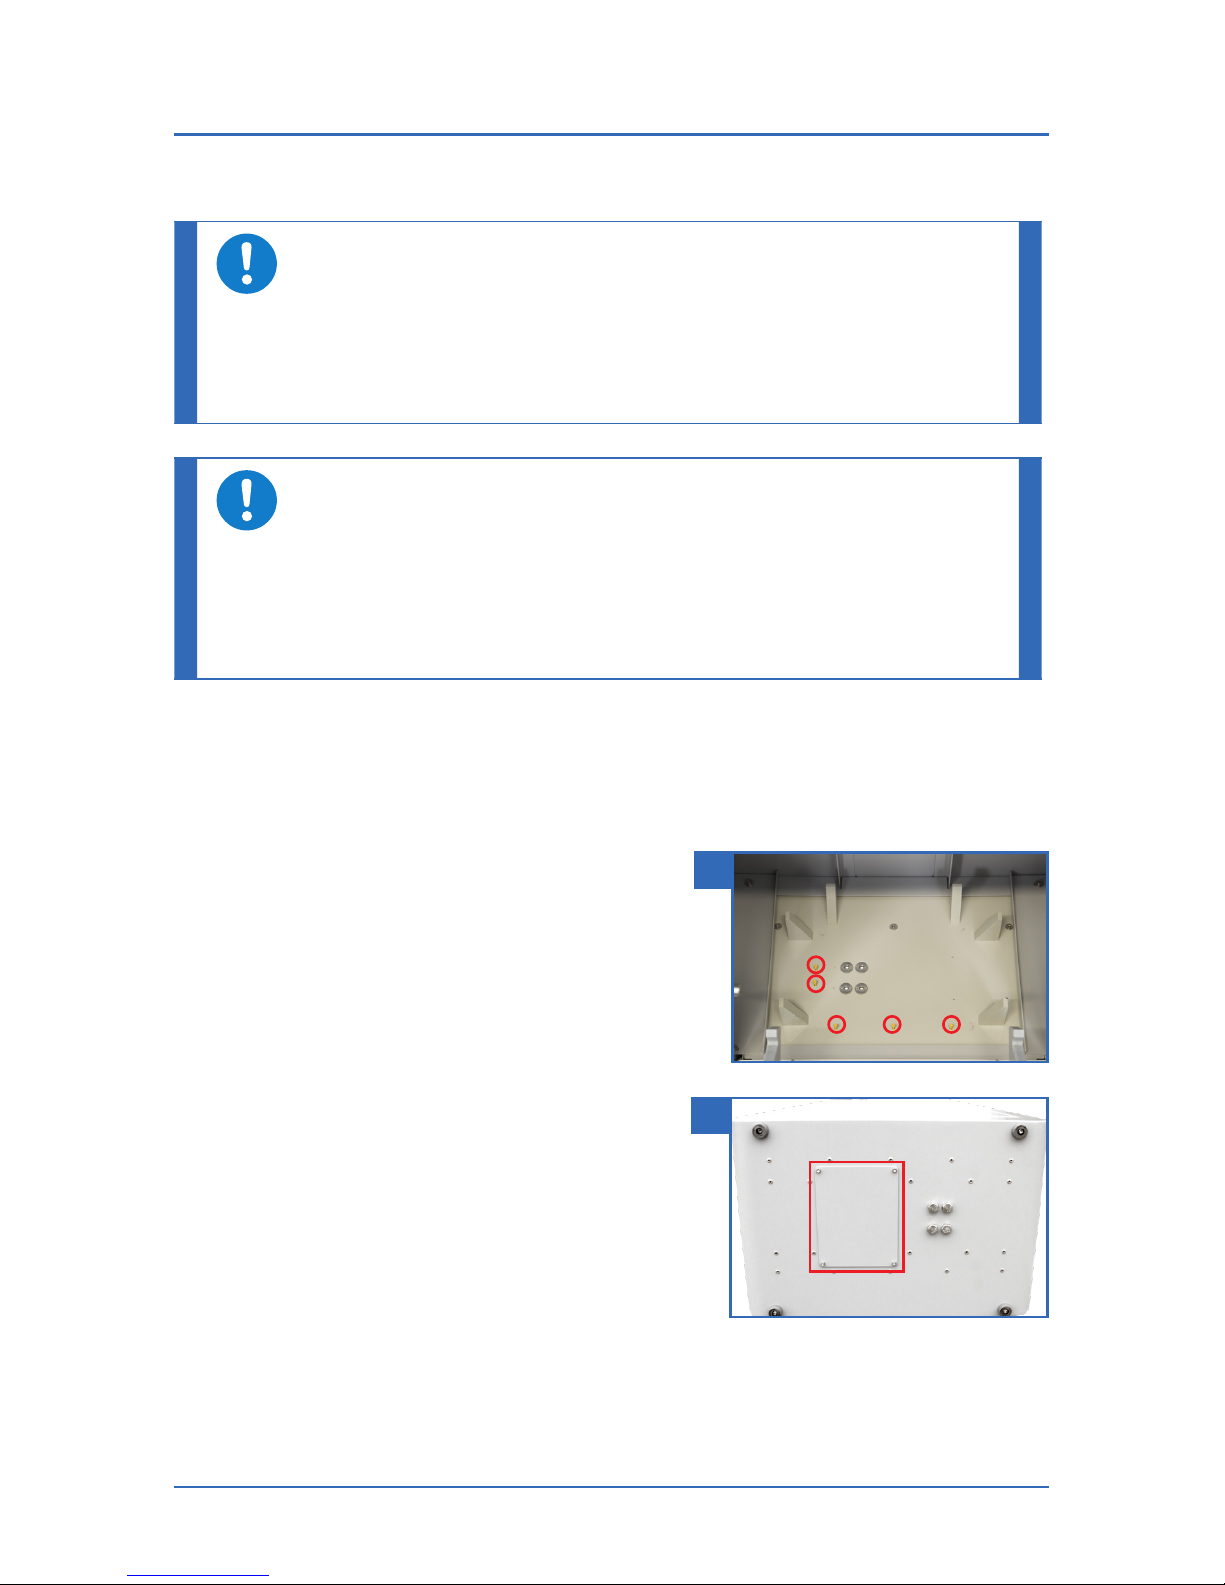
Damage to the golden contacts on the weighing plate (figure 64) can destroy
the device.
► Do not touch the golden contacts during cleaning.
Measuring chamber
• Clean the measuring chamber with a cloth or a soft brush.
Interior
» The weighing plate (figure 64) must always
be free of wood chips or dirt.
• Remove wood chips or dirt with the vacuum
cleaner.
Weighing cell
» At the bottom of the device there is a cover
(figure 65).
• Unscrew the cover after approx. 200 measurements.
• Remove wood chips or dirt with the
vacuum cleaner.
64
65
Page 45
Page 45
10.3 Replacing the printer paper roll
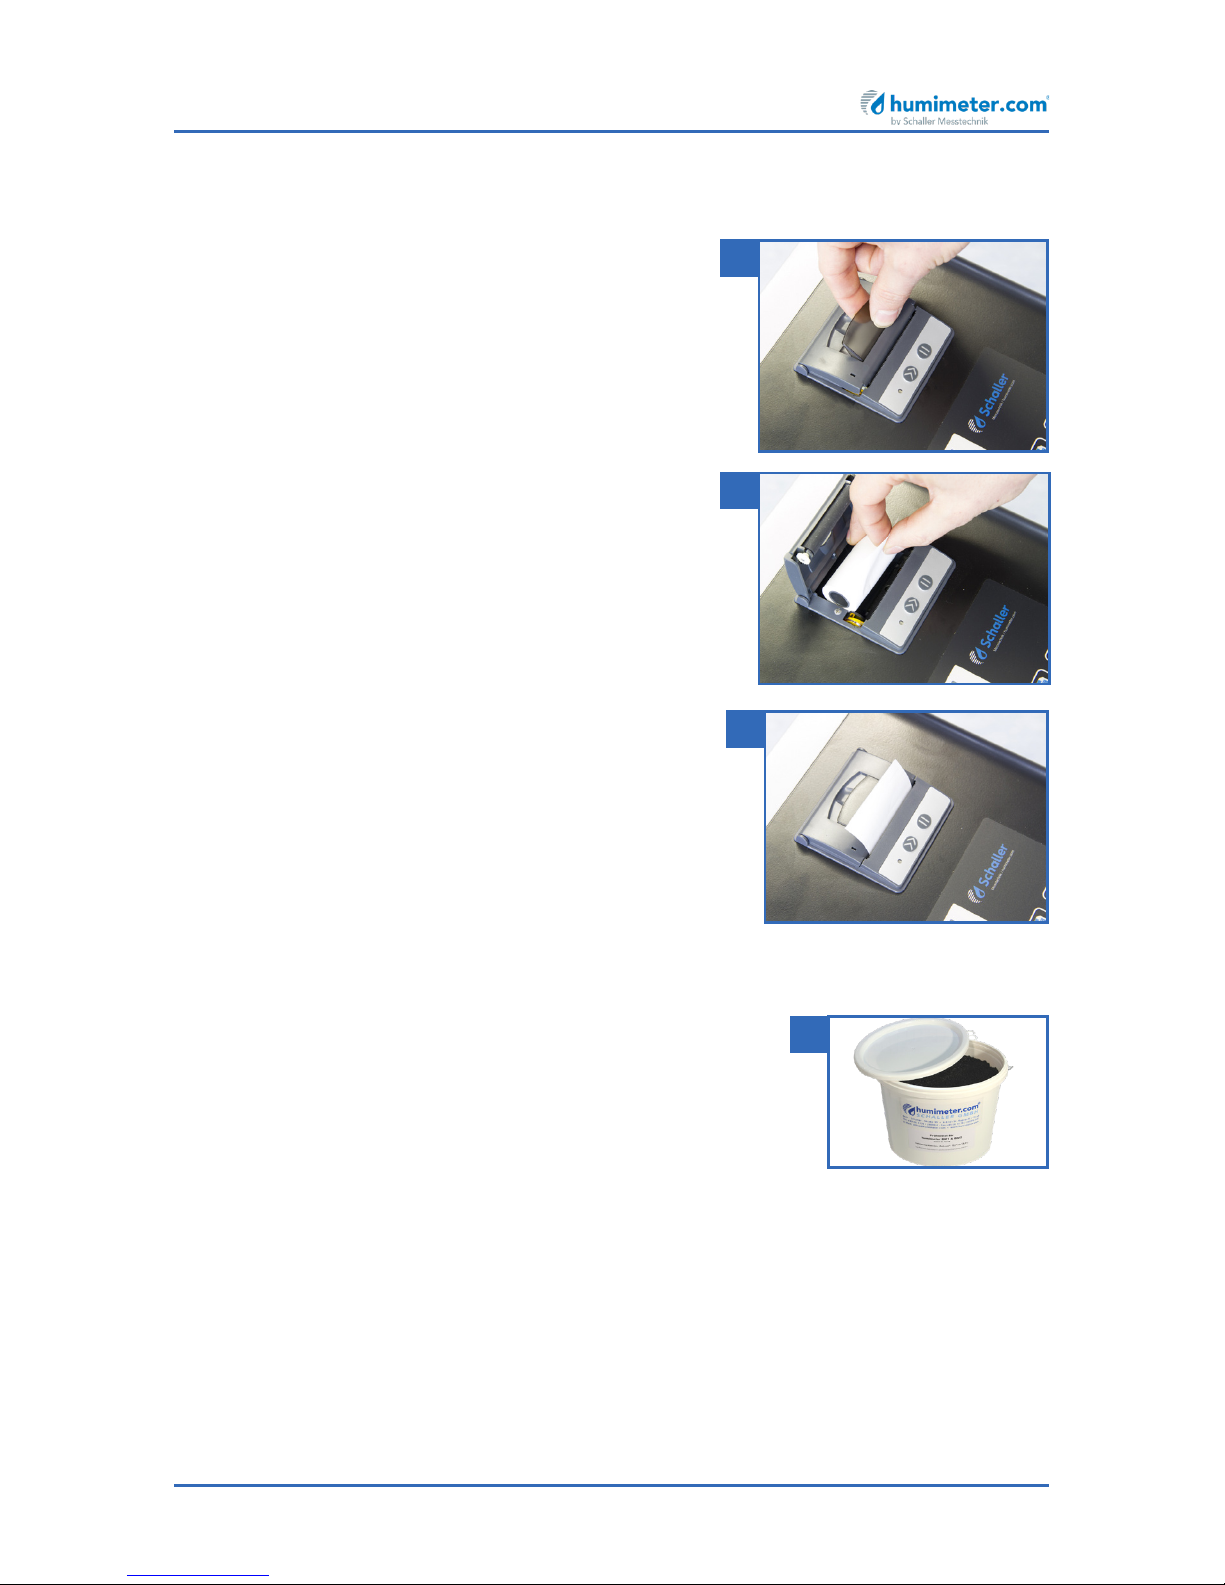
To do so: The integrated printer and a paper roll is
required. Both are included in the equipment packages: Data package or ATRO package.
1. Lift the tab of the printer all the way up
(figure 66).
» The printer cover pops open.
2. Remove the empty paper roll.
3. Place a new, opened paper roll into the printer
(figure 67).
4. Keep hold of the beginning of the paper roll
and close the printer cover.
» The printer is now ready to use again
(figure 68).
10.4 Checking the calibration
The device’s calibration should be checked regularly.
To do so: The test medium (figure 69) for checking the
measuring device is required. The device's calibration check
is described in a separate operating manual.
66
67
68
69
Page 46

humimeter BMA-2 Operating Manual
Page 46
11. Faults
If the measures listed below fail to remedy any faults or if the device has faults not
listed here, please contact Schaller GmbH.
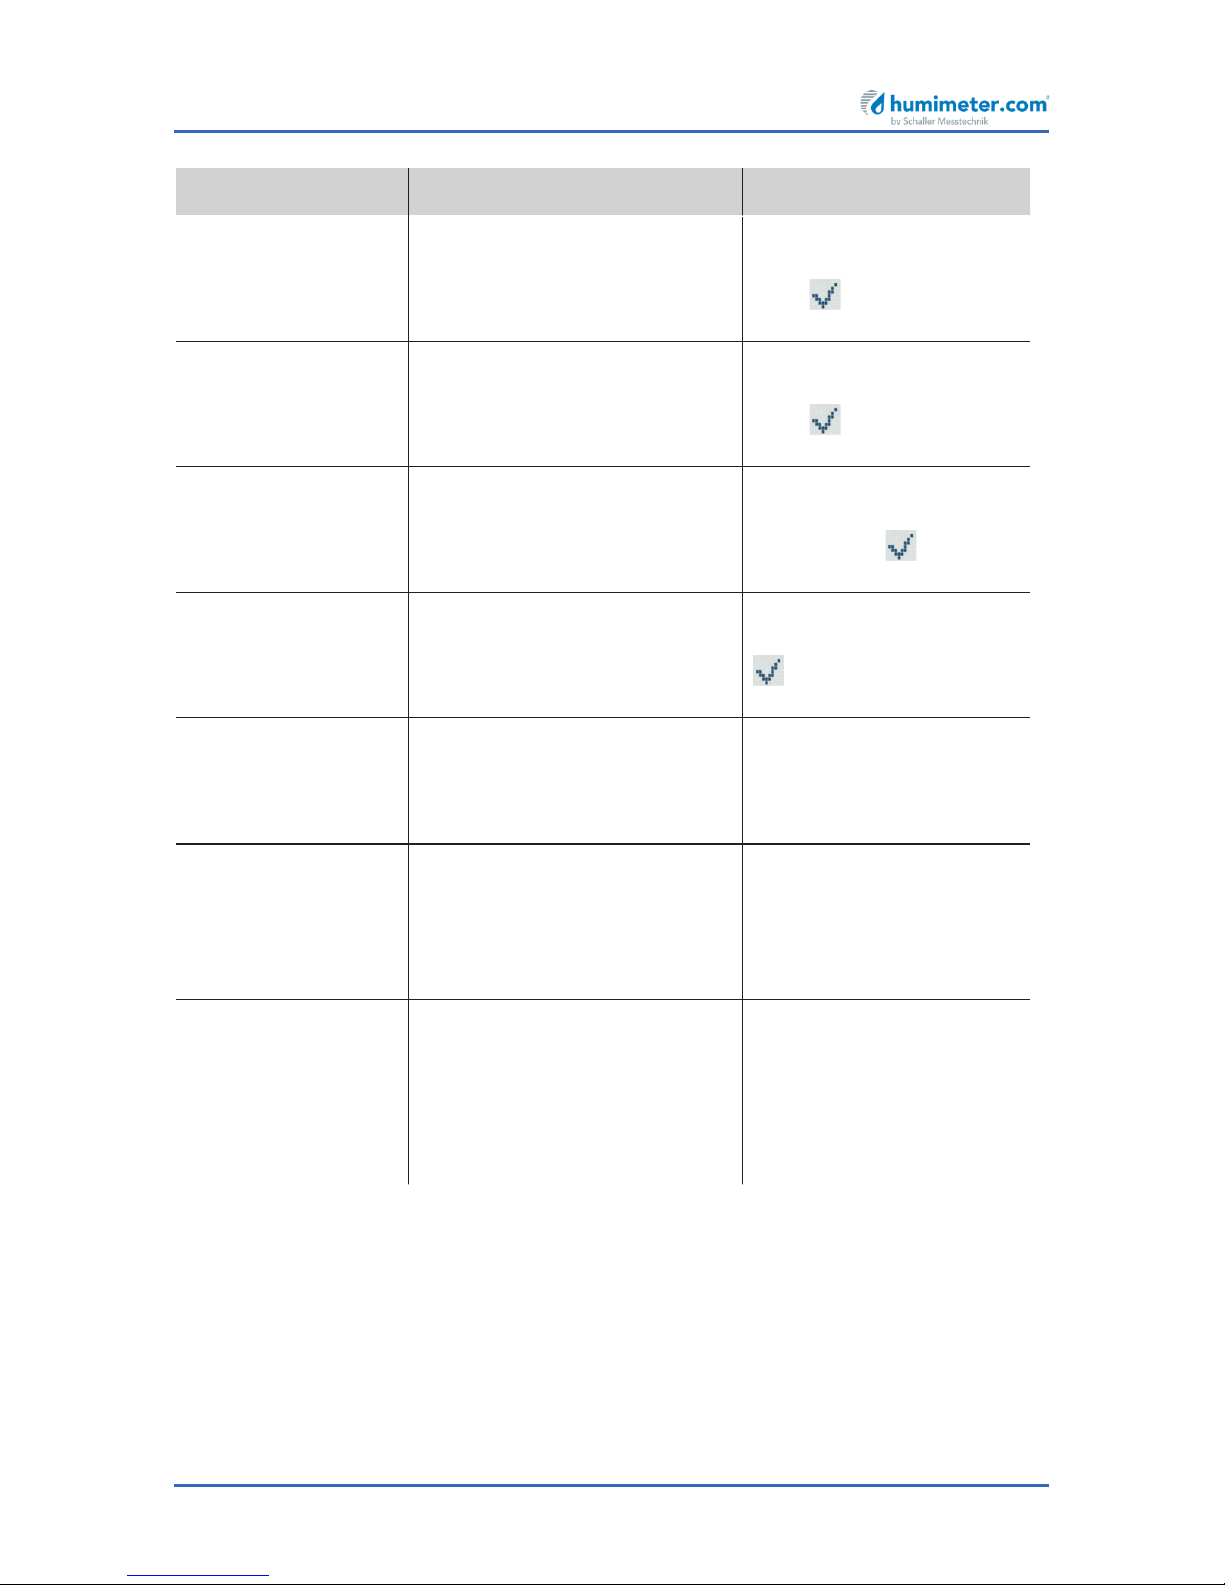
Fault Cause Remedy
Measuring error The temperature of the ma-
terial being measured is too
low or high. I.e. the material’s
temperature is lower than 0 °C
or higher than +50 °C.
The temperature of the
material being measured
has to be between 0 °C
and +50 °C.
Frozen material or material
mixed with snow
Accuracy decreases significantly
The material must not
be frozen or mixed with
snow.
Wrong product type Check whether you have
selected the right product
type (product) before
taking a reading (see "5.2
Taking a measurement").
Mouldy or rain wet material
Accuracy decreases significantly
Only measure dry, not
mouldy material.
Insuffient material in the
measuring chamber
Ensure that the measuring chamber is completely filled with material;
there must not be less nor
more material in it.
Wrong filling procedure The measuring cham-
ber has to stand on the
ground when filling it.
Always use the included
bucket for the filling.
Wrong filling direction Always fill the measuring
chamber from the side
with the metal plate.
LED flashing red Drawer not closed correctly Close the drawer comple-
tely. Press to confirm
the error message.
Page 47
Page 47
Fault Cause Remedy
Measuring chamber is not
in the device while taking a
measurement
Put the filled measuring
chamber into the device.
Press to confirm the
error message.
Measuring chamber empty
while taking a measurement
Put the filled measuring
chamber into the device.
Press to confirm the
error message.
Measuring chamber wrongly
positioned while taking a
measurement
Put the filled measuring
chamber correctly into the
device. Press to confirm the error message.
Motor overloaded while compressing the material
Check the content of the
measuring chamber. Press
to confirm the error
message.
Incorrect calibration
(the exclamation
mark on the display
does not go away)
Material in the measuring
chamber during calibration
Empty the measuring
chamber completely.
Pollution of contacts of the
measuring chamber
Clean the contacts of
the measuring chamber
according to "12.1 Clean-
ing the contacts of the
measuring chamber".
Data transfer to Log
Memorizer failed
Interface has not been configurated
The interface only has to
be configurated once. To
do so, press the F1 key on
your computer and read
the Help file of the Log
Memorizer program.
Page 48
humimeter BMA-2 Operating Manual
Page 48
12. Troubleshooting
12.1 Cleaning the contacts of the measuring chamber
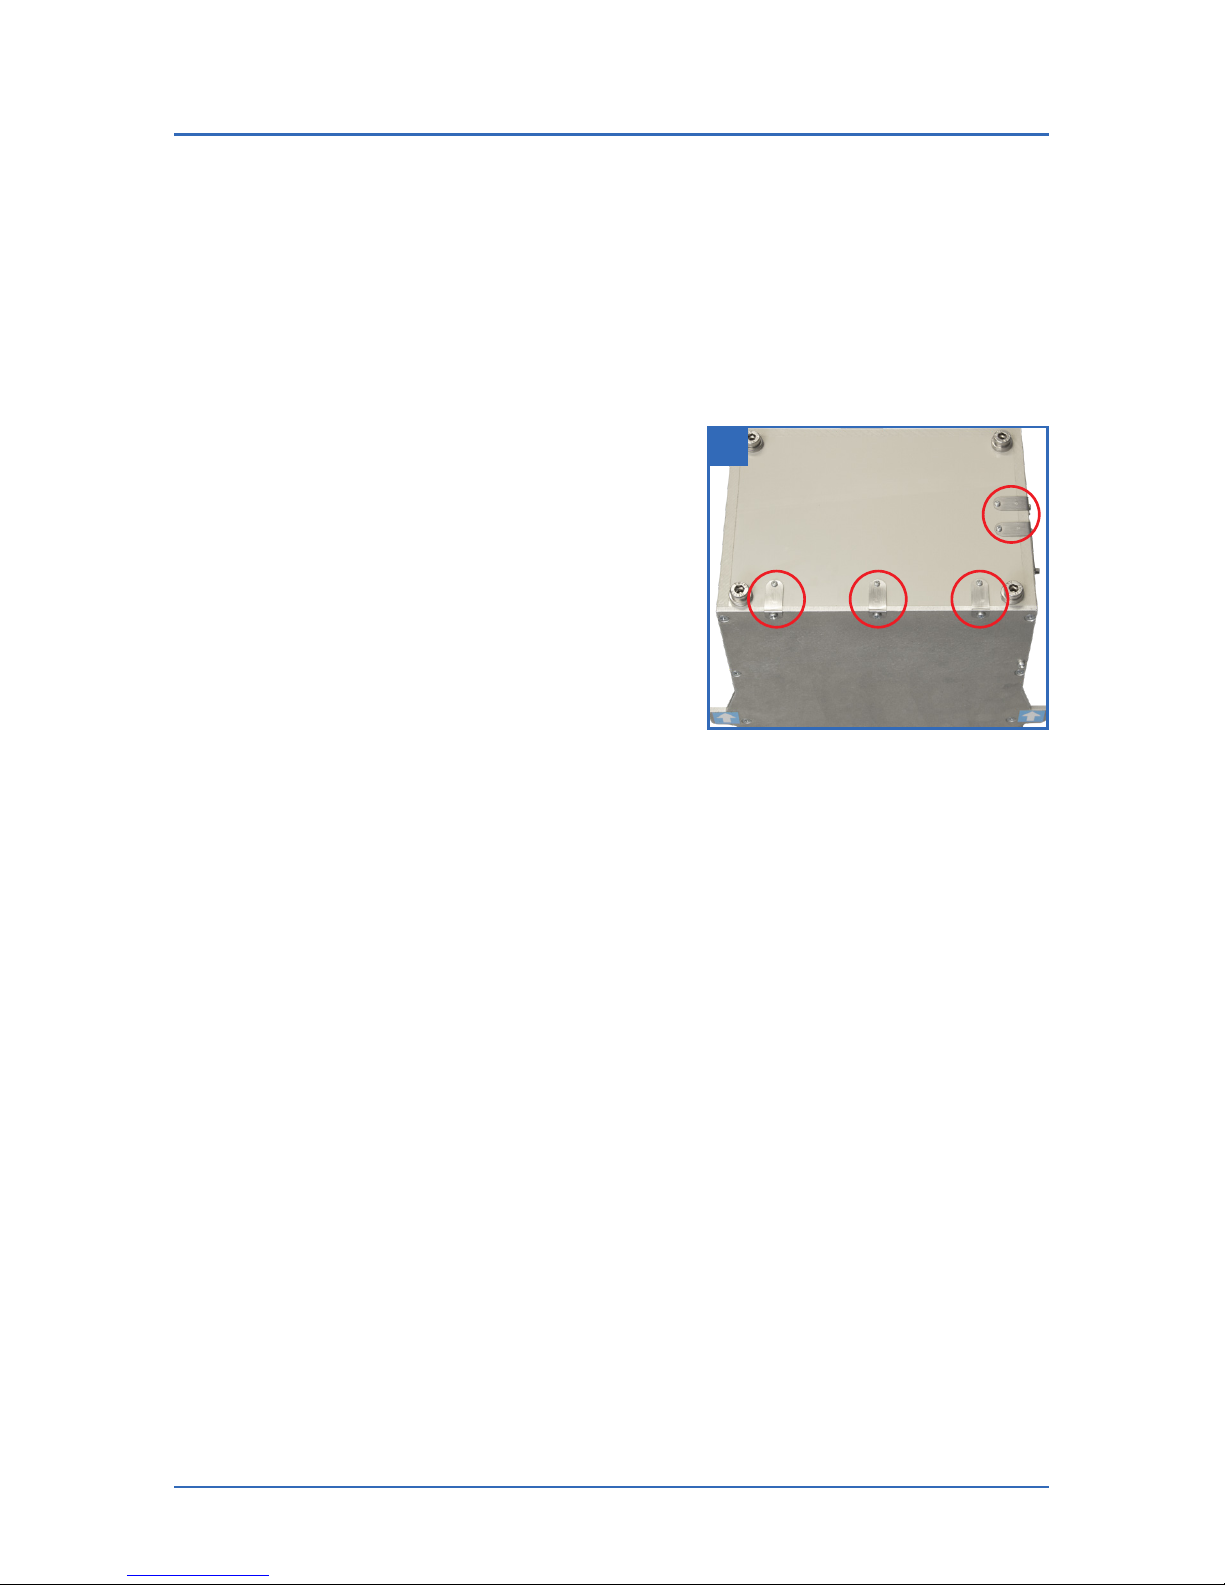
To do so: The automatic calibration is not successful and the exclamation mark on the
display does not go away. The contacts of the measuring chamber are polluted.
1. Lightly sand the contacts (figure 70) with
a fine sandpaper (K400). The contacts are
made of stainless steel.
2. Clean the contacts with a cloth and cleaning
alcohol.
If this measure does not remedy the fault, please
contact Schaller GmbH.
70
Page 49
Page 49
13. Transportation, storage and disposal
13.1 Transporting the device
ATTENTION
Damage due to improper transport
The device can be damaged or ruined by a dispatch with various parcel services
or by post.
► Only ship the device in its original packaging.
► Only ship the device by a freight forwarder.
Before you transport the device, carry out the following activities:
1. Remove the measuring chamber. It must not be inside the instrument during
transport or shipment.
2. Disconnect the power cable from the device and the power socket.
3. Only pack the device in its original packaging.
13.2 Storing the device
The device must be stored as follows:
• Do not store outdoors.
• Store in a dry and dust-free place.
• Protect the device from sunlight.
• Avoid mechanical shocks/loads.
• Storage temperature: -20 °C to +60 °C
13.3 Disposing of the device
Devices marked with this symbol are subject to Directive 2012/19/
EU of the European Parliament and of the Council of 4 July 2012 on
waste electrical and electronic equipment (WEEE).
If the device is being operated outside the European Union, the
national regulations on the disposal of such devices that apply in the
country of use must be observed.
Electronic devices must not be disposed of as domestic waste.
The device must be disposed of appropriately using appropriate collection systems.
Page 50
humimeter BMA-2 Operating Manual
Page 50
14. Device information
14.1 EC declaration of conformity
DECLARATION OF CONFORMITY
______
in accordance with the following Directives:
Low Voltage Directive 2014/35/EU,
EC Machinery Directive 2006/42/EC,
Electromagnetic Compatibility (EMC) Directive 2014/30/EC,
We Schaller GmbH
Max-Schaller-Straße 99
A – 8181 St. Ruprecht
hereby declare that the following product type
:
Product: humimeter BMA ; BMA-2
is in conformity
with
the applicable essential requirements of the above mentioned directives.
Among others, the following harmonised standards were correspondingly applied:
• EN ISO 12100-2010 Safety of machinery -- General principles for design -- Risk assessment and risk reduction
• EN ISO 13857 Safety of machinery – safety distances to prevent hazard zones being reached by upper limbs
• EN 349 Safety of machinery – minimum gaps to avoid crushing of parts of the human body
• EN ISO 13849-1 Safety of machinery – Safety-related parts of control system – Part 1: General principles for design
For the above mentioned product a complete documentation with manual of instruction in original
version is available.
In case of any changes not agreed upon with the manufacturer, this declaration of conformity loses its
validity.
This declaration is subject to the responsibility of:
St. Ruprecht, 06.08.2018 .......................................................
Schaller GmbH
Maximilian Schaller
General Manager
Page 51
Page 51
14.2 Equipment packages
In addition to the standard version without any accessories, the device is available in
three further, different equipment variants:
USB package
• USB flash drive with LogMemorizer measuring data recording and analysing
software and USB cable
Data package
• USB flash drive with LogMemorizer measuring data recording and analysing
software and USB cable
• Integrated printer
ATRO package
• USB flash drive with LogMemorizer measuring data recording and analysing
software and USB cable
• Integrated printer
• Determination of bulk density and dry weight (atro) in tons/m³ (only for wood
chip products)
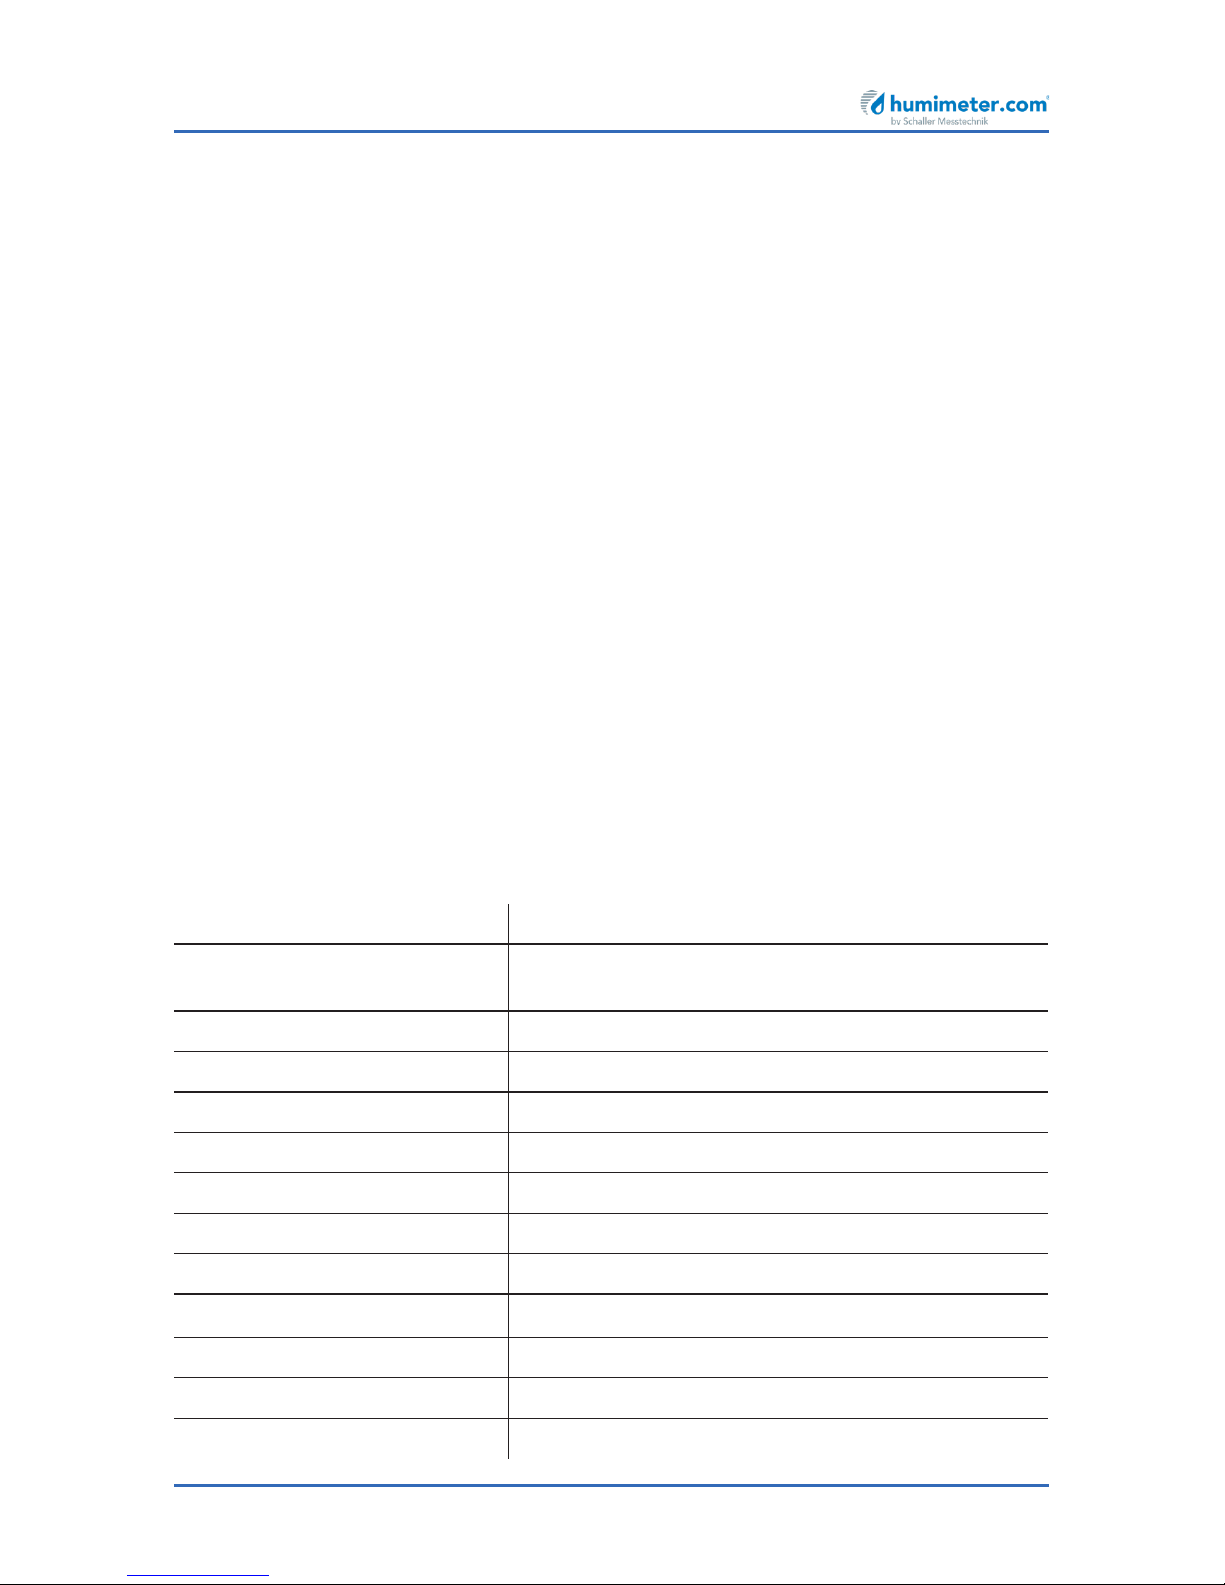
14.3 Technical data
Display resolution 0.1% moisture content
Measuring range 5 to 70% moisture content (dependent on
product type)
Operating temperature 0 °C to +50 °C
Storage temperature -20 °C to +60 °C
Temperature sensor Infrared (non-contact)
Temperature compensation Automatic
Probenmenge 12 liters
Power supply 100-240VAC 1.2A 50-60 Hz
Plug Schuko plug, CEE 7/16
Display 128 x 64 illuminated matrix display
Dimensions (WxDxH) 432 x 282 x 862 mm
Weight 29 kg (including measuring chamber)
IP rating IP 40
Page 52

Schaller GmbH
Max-Schaller-Straße 99, A - 8181 St. Ruprecht an der Raab
Tel +43 (0)3178 - 28899 , Fax +43 (0)3178 - 28899 - 901
[email protected], www.humimeter.com
Climate
Environment
Food
Bioenergy
Materials
Buildings
Paper / Board
Schaller Messtechnik develops, produces and sells professional
moisture meters and turnkey solutions.
 Loading...