

Page 1
Resource
Guide
Page 2

Page 3

Welcome orientation and
mobility trainers.
You’re there to help,
so we’re here to help you.
Trekker is a powerful and efficient tool that has
been developed from the ground up with
extensive input from our customers. Trekker
users continuously tell us they would rather not
be without it because it greatly increases their
self-confidence, orientation and independence.
This resource guide will help you to empower
your students with the skills they need to get the
most out of their Trekker.
What is GPS
Trekker uses state-of-the-art GPS and digital
map technology to help blind persons find their
way in urban and rural areas. Users can pinpoint
exactly where they are, learn about area
attractions, and find out how to get to specific
destinations. Trekker provides information to
help users get to where they want to go without
having to count steps or continually ask for
directions. It therefore allows users to
concentrate more on their own mobility and not
worry about getting lost or disoriented.
The Global Positioning System (GPS) is a
worldwide navigation system formed from a
constellation of 24 satellites orbiting the earth.
The idea behind GPS is to use satellites in space
as reference points for locations here on earth.
By measuring our distance from at least three
satellites, we can obtain our position anywhere
on earth.
Trekker has a GPS receiver that communicates
with the satellites through wireless connection
(Bluetooth) to the PDA (handheld computer).
The PDA has a map of the user’s area installed in
its memory card and is therefore able to tell
users where they are and what is around them.
How will this guide help me?
This guide is meant as a reference guide to help
you rapidly train users to get started with their
Trekker. To make it easier for you to access the
fundamental information you need, this
document contains easy-to-follow instructions
for basic Trekker functions and operations.
This guide covers the following
topics:
• Trekker components
• Key description
• Description of functions
• Getting started
• Application menu
• Menu structure
• Top features
• Searching Points of
Interest
• Working with
routes
• Data input
• Getting help
• Glossary
• Braille table
Page 4
Trekker components
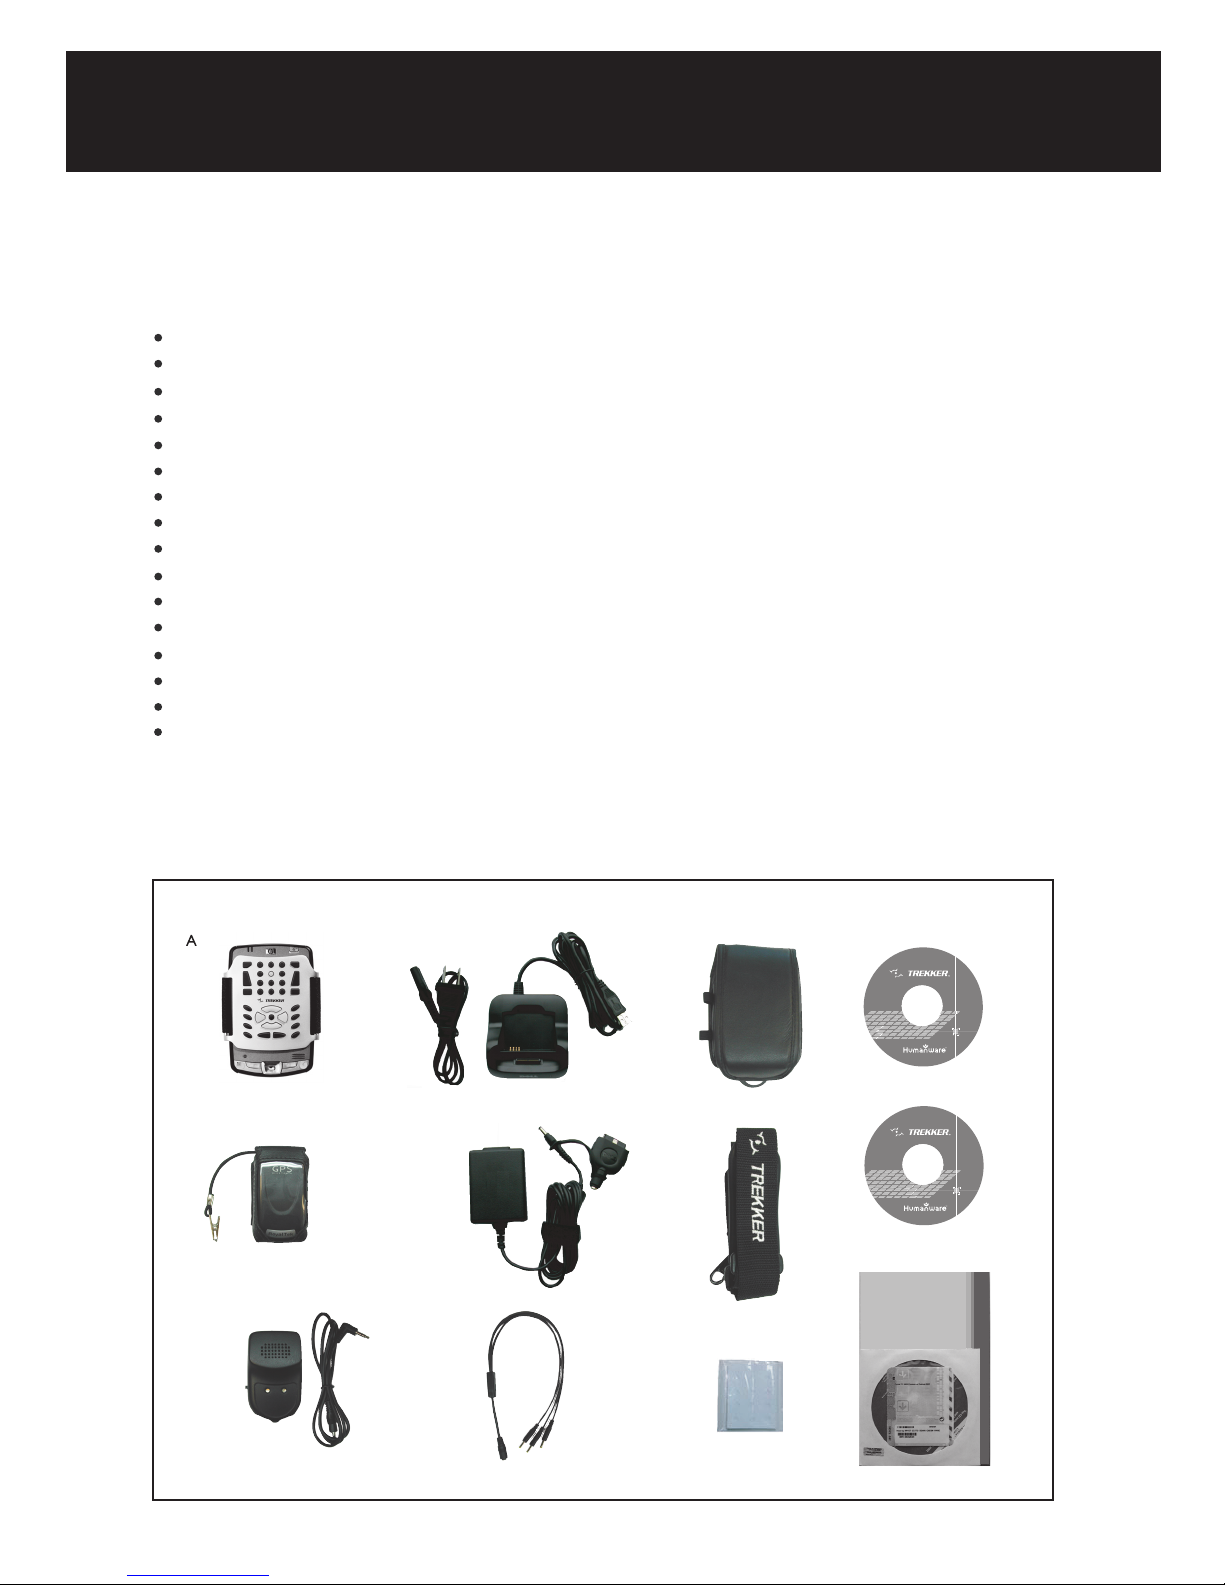
The package includes the following items:
HP iPAQ hx2490b PDA with tactile keyboard (A)
GPS receiver RoyalTek RBT 2100 and clip-on case (B)
External speaker with audio cable (C)
Desktop cradle and USB connector cable (D)
Power supply adapter (E)
Power splitter (to charge the GPS receiver, external speaker or PDA at the same time) (F)
Carrying case (G)
Strap (H)
Travel bag (not shown on the picture)
Keyboard stencil (for sighted users) (I)
Trekker Companion CD (J)
An electronic map on CD and a storage card (K)
Trekker getting started guide (print and Braille) (not shown on the picture)
Tactile description of the PDA (not shown on the picture)
Replacement tactile pads (not shown in picture)
Standard PDA software and documentation package containing print documents and Companion CD (L)
D
B
C
E
F
G
H
I
J
K
L
Page 5
PDA description
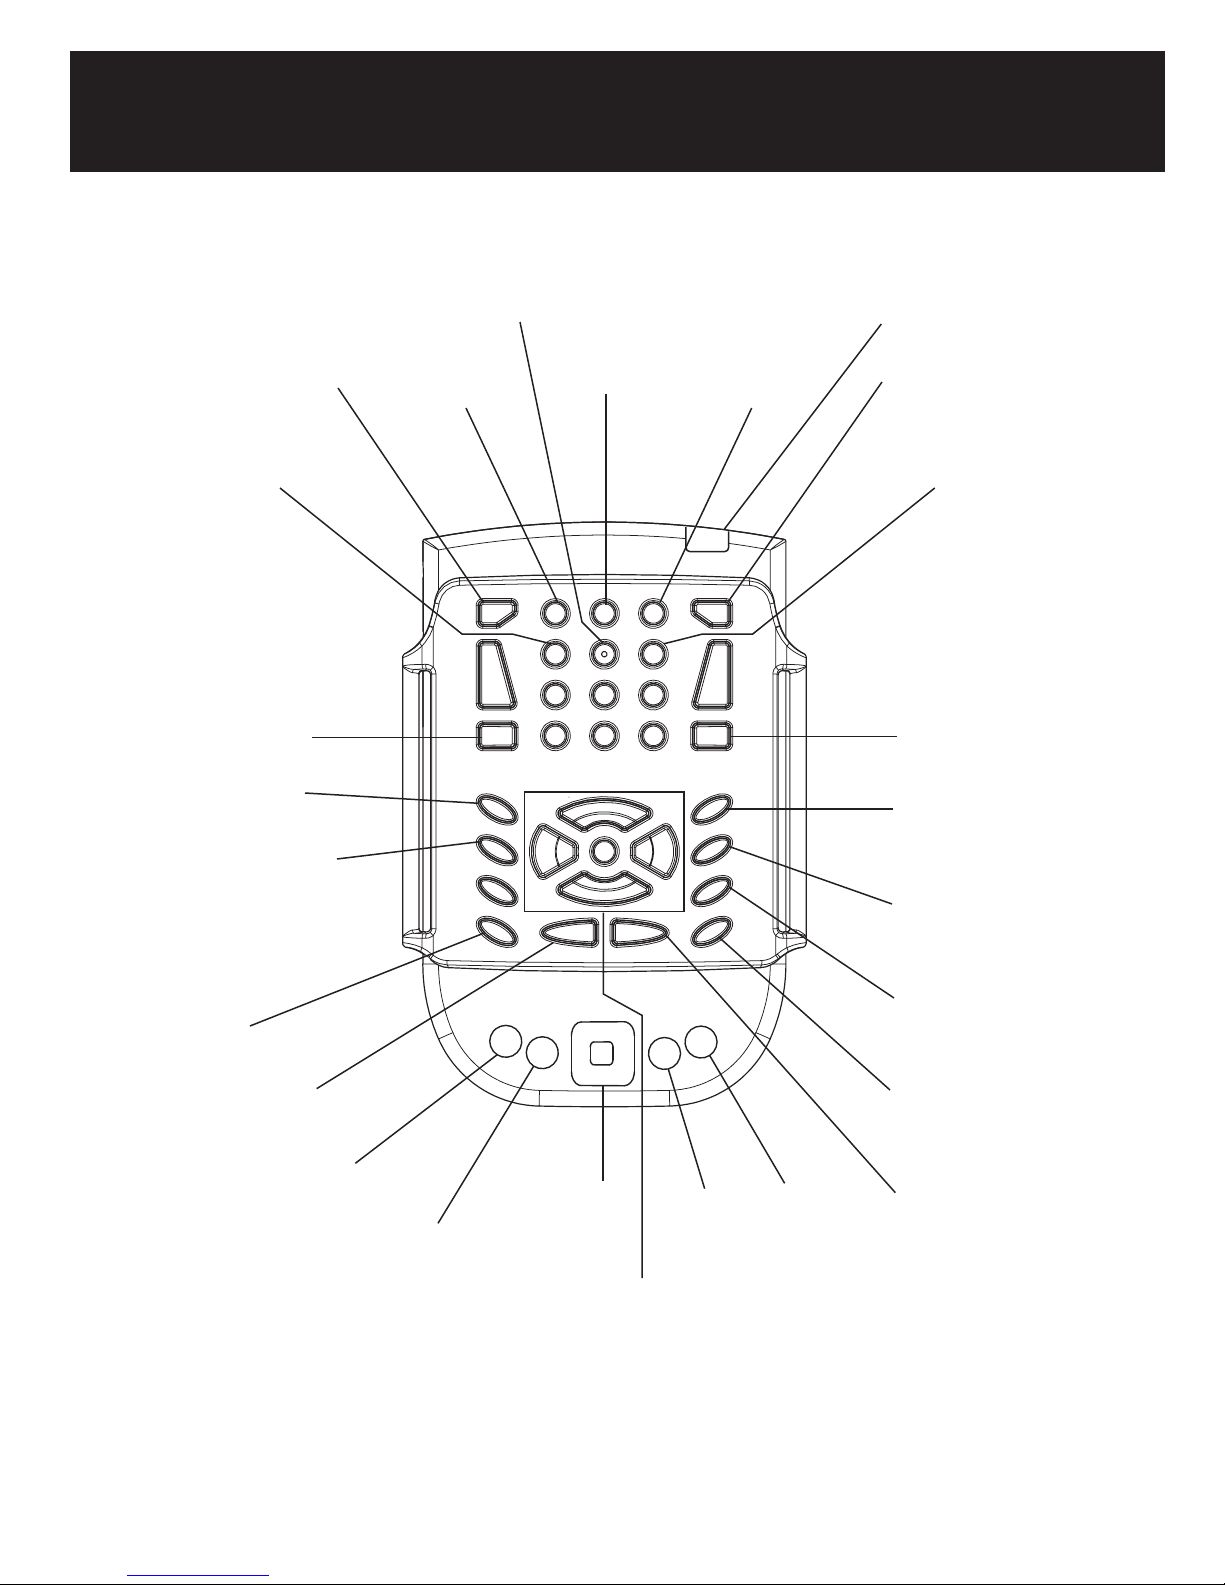
Key description
Backspace
Altitude
Spell
Where am I / Key describer
GPS status and name of active
route, GPS connection
Latitude and longitude
Speed
Heading
Current city
ON
Delete
Number of satellites in view
Repeat last message
Geographical Where am I /
Pedestrian and motorized
mode toggle
Page up: Route information /
Free mode toggle
Application menu /
Keyboard mode toggle
Shift Tab
Escape
Control
Note: Grey functions are activated by pressing and holding the key.
Record POI
Shift
4-way navigation
arrows and Enter
key.
System bar
Page Down: Route activation /
Route creation
End: Points of interests on
segment / browsing toggle
Tab
Page 6

Description of functions
Explore your environment
With Trekker, you can explore your outdoor environment and let the system announce the information as
you pass by. You can use Trekker in any environment where you travel on foot or by vehicle. After powering
ON and establishing GPS coverage, Trekker will automatically find your position in the street and tell you
where you are. As you walk by, the system announces and describes upcoming intersections and Points of
Interest.
Where Am I?
When online with satellites, you can access information on your current position. Trekker will announce the
following information:
Route Status informs you whether you are currently on route (if one is activated)
The direction you are heading (North, South, East, West, South West etc.)
The current estimated address number and street name
The name of the nearest Point of interest (POI) with direction, and associated text note (if any).
The nearest intersection, in front of you.
The next instruction, if a route is activated.
Points of Interest
Trekker provides information about POI that have been marked in the map area. The system provides
powerful features to find and view commercially available information such as restaurants, hospitals, schools
and train stations. Users can also create their own landmarks by means of the POI recording feature.
POI can be used as the origin or destination of a route or as a starting point to browse an area prior to
visiting.
Create and follow a route
Trekker allows you to create a precise travel route by entering a starting point and a destination point. You
can then travel the route in real-time or explore it virtually with the browsing feature. As you travel, Trekker
will announce streets and intersections you come across and will provide turn-by-turn instructions to reach
your destination. The system can create route for pedestrian or motorized use.
Preview before going somewhere
Browsing allows you to virtually explore an area on the map using the Navigation buttons. You can also
browse a route previously created. This features allows you to learn a route or explore a remote area
without having to be there.
Page 7
Getting started
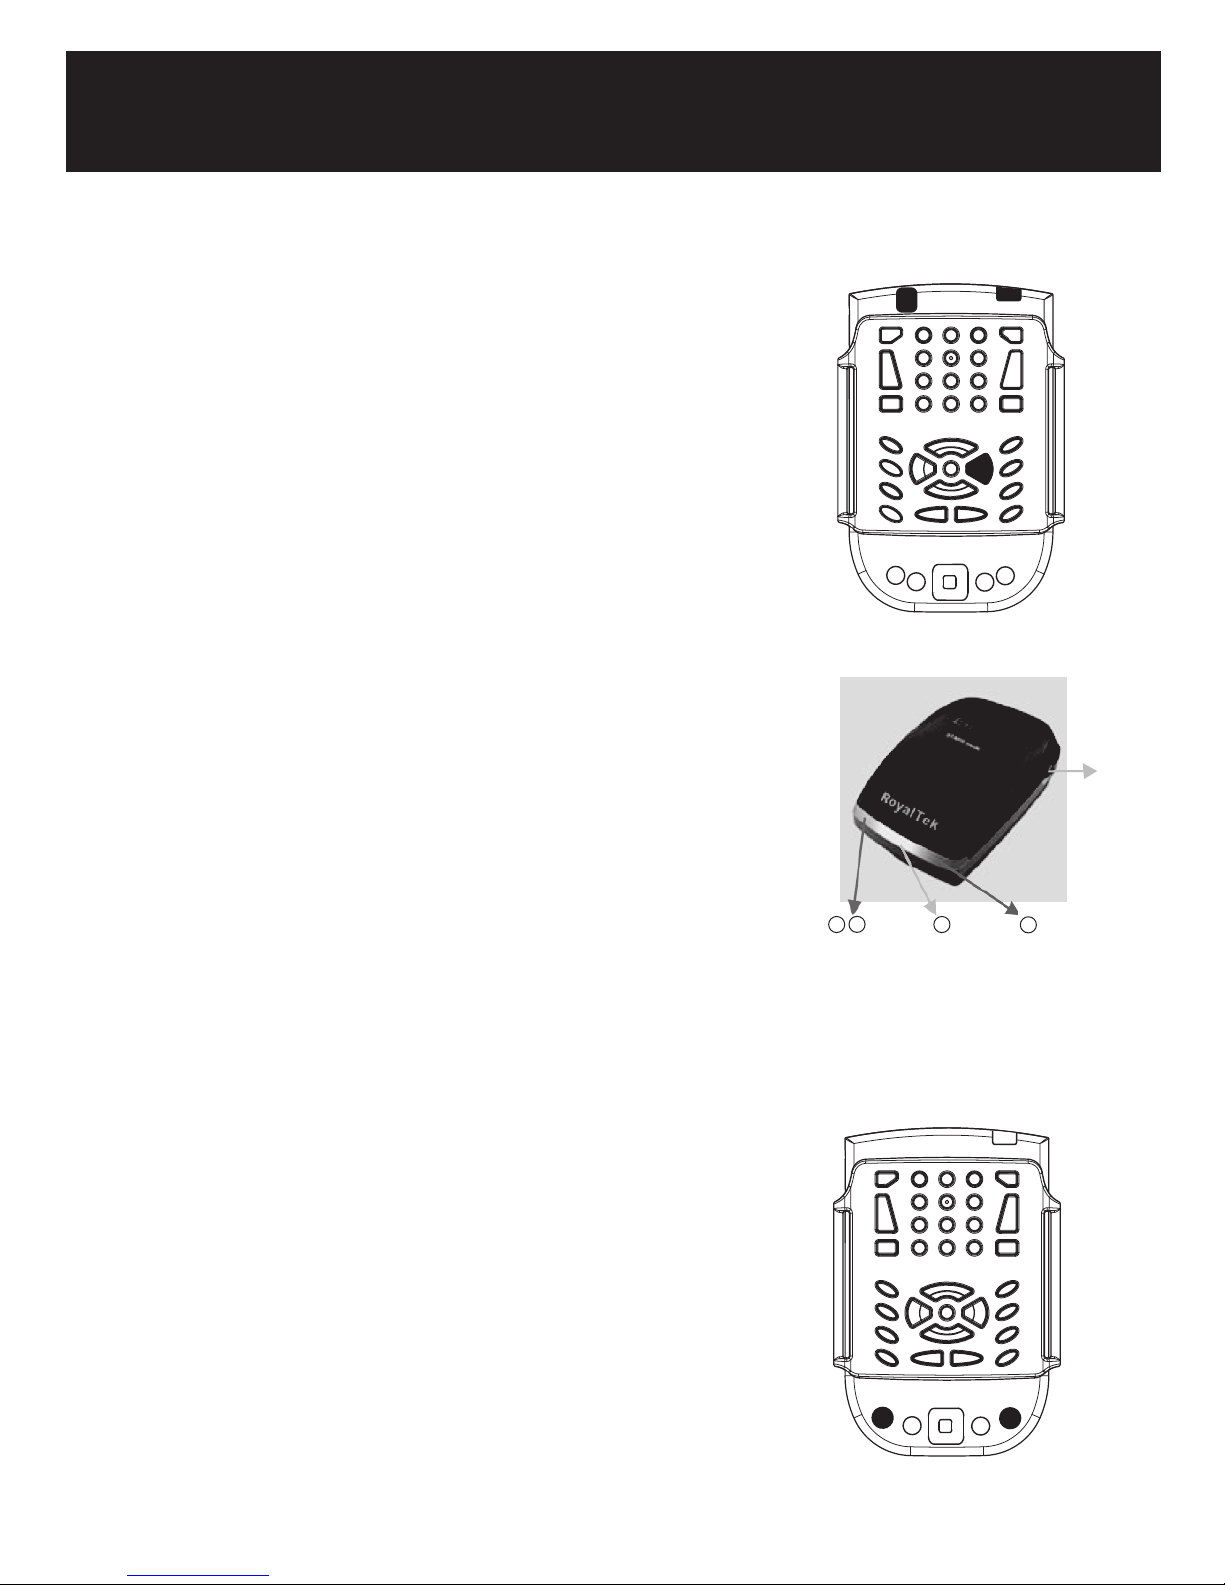
1. Power ON the PDA
Press the Power button of the PDA (1). A single beep will sound.
Trekker announces you are in the System Bar.
2. Verify the Bluetooth radio is ON
a. Bluetooth LED should be blinking (2a).
b. Alternatively, access the System bar Bluetooth status. From the System
Bar, scroll using the Right Arrow (2b) till you hear the Bluetooth status.
If the Bluetooth radio is OFF, please refer to the Turn Bluetooth ON
procedure described below.
3. Turn the GPS receiver ON
On Royaltek receivers, the Power switch is located on the right side
panel, near the back. Slide the Power switch towards the front to power
up the unit. The led (2) should be solid orange.
On the Globalsat BT-338, the Power button is located on the bottom
portion of the face panel. To turn ON the receiver, press the Power
button for one second. The status LED should be solid orange.
4. Launch the Trekker application
a. From the System menu, arrow down to select Trekker, then press
Enter to confirm your choice.
b. When launching the Trekker application, the Bluetooth connection with
the GPS receiver will be established automatically. Wait for the USB
sound indicating the connection with the receiver is done.
c. Verify the GPS connection is ON. Both, the PDA Bluetooth LED (2a)
and the GPS receiver Bluetooth status LED (4) should be blinking.
2
1
Battery Status
2a
GPS Status
1
2b
On/Off
switch
3
4
Bluetooth Status
5. Establish a GPS connection
a. Outdoors and in contact with the satellites, Trekker will automatically
search for satellite connection. The system will start beeping.
b. When connection is done, Trekker announces the location where you
are. The green led of GPS receiver status (3) then blinks.
6-Powering OFF Trekker
a. To exit the Trekker application, press Escape (6a), or select Exit Trekker
from the Application menu or.
b. Now turn off the PDA, by pressing and holding the System Bar button
(6b). A double beep will be heard.
Note: When exiting Trekker, the current connection between the GPS
and Trekker will be disabled. But remember, your GPS receiver is still
powered ON. Do not forget to power it OFF.
6a
6b
Page 8
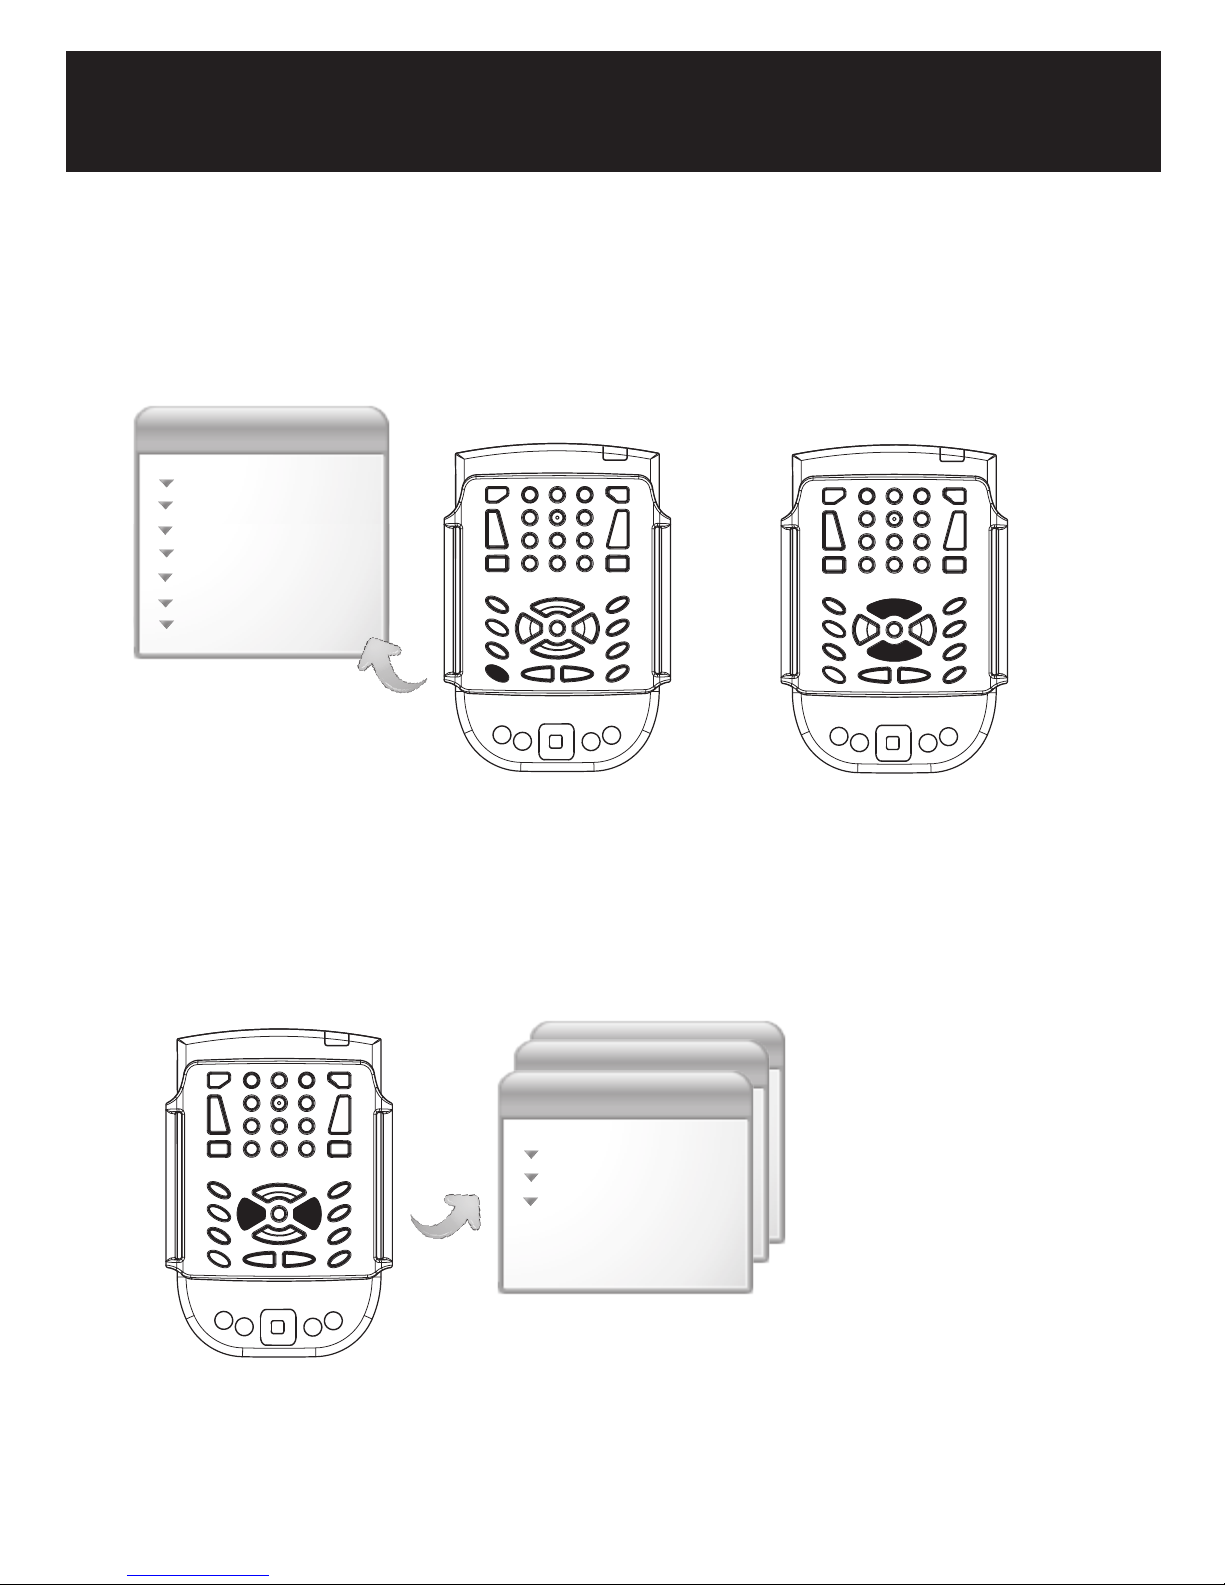
Trekker application menu
Trekker menu
Point of Interest
Info
Navigation modes
Route
Setting
Help
Exit
Use the Application
menu to access Trekker
functions.
Use the Up or Down
Arrow keys to select an
item within the list, then
confirm with Enter.
Navigating submenus
Use the Right or Left
Arrow keys to navigate
submenus
Navigation modes
submenu
Browsing offline
Motorized mode
Free mode
Page 9

Menu structure
Point of Interest
• Search by distance
o
• Search by address
• Create
• Edit
• Delete
Info
• Route
• GPS
• System
• Where am I?
Navigation modes
• Browsing offline
• Motorized mode
• Free mode
Setting
• Set GPS, Speaker On
• Verbosity
o
Where am I
o
POI Pedestrian
o
POI Motorized
o
Browsing offline
o
Route browsing
• General
o
Distance unit
o
POI creation
o
Position format
o
Reset default format
• Trekker volume
• Trekker speech rate
• Map activation
• Dictionary
Help
• Quick reference
• General help
Route
• Activate
o
Pedestrian
o
Motorized
• Create
o
Pedestrian
o
Motorized
• Browse
o
Pedestrian
o
Motorized
• Delete
o
Pedestrian
o
Motorized
• Edit
o
Pedestrian
o
Motorized
• Deactivate
• Reroute
• Reverse
Exit
Page 10
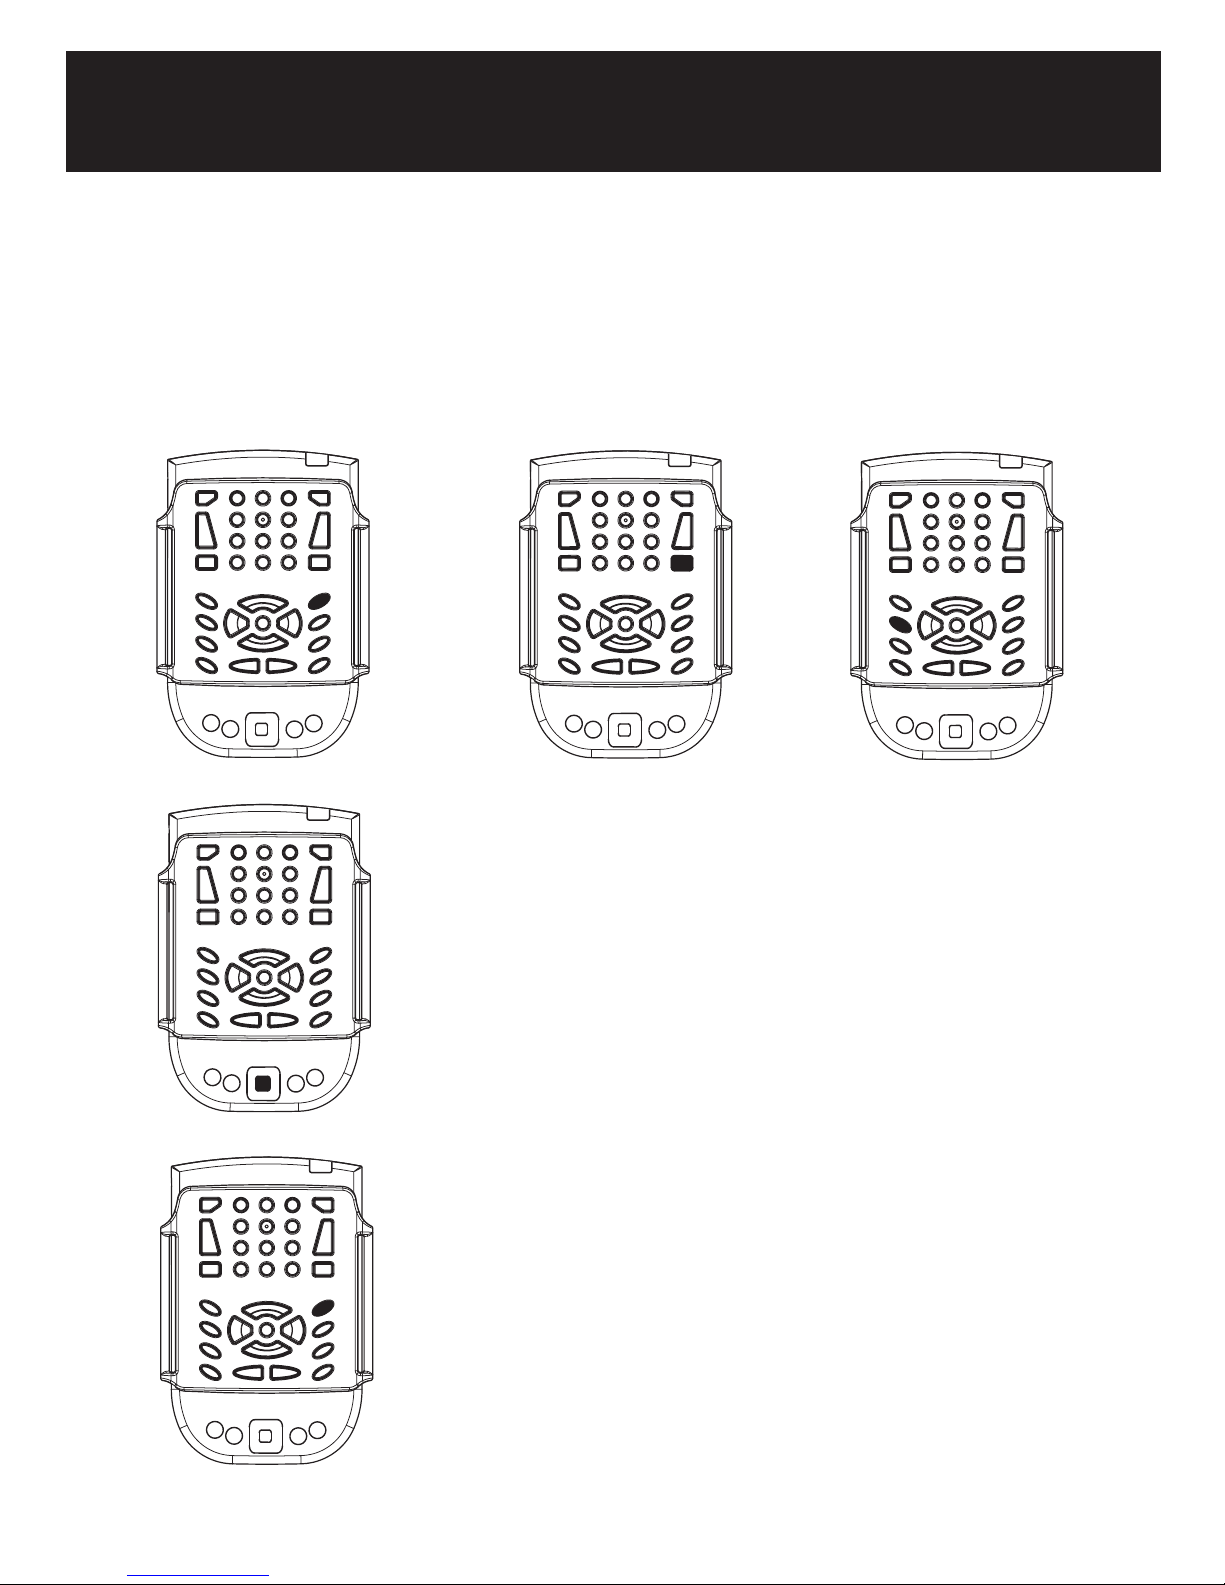
Top features
Geographical Where
am I: Provides informa-
tion on your current
location.
Repeat message
Repeats the last
geographical message.
Record a Point of Interest (POI)
Trekker allows you to mark any location as a personal point of interest.
To create a personal POI, you need to be in an open-air area and
online.
1. Press the Record button.
2. After the beep, dictate a short audio message. The recording option
will stop automatically after 4 seconds. After 2 beeps, you should hear
the messages, "Recording stopped", and "POI created".
Get GPS information
Press F2 to learn the
number of satellites in view,
quality of GPS reception,
speed and altitude.
Switching navigation modes
Trekker automatically provides the available information in Pedestrian
mode.
If you walk into an area such as a park where no streets are available,
the system will automatically switch to Free mode.
To use Trekker in a vehicle, toggle between the Pedestrian Mode and
Motorized mode by Pressing and Holding the Home button.
To navigate virtually a map, switch to Browsing mode by pressing and
holding the End button to toggle ON or OFF.
Navigation modes are also available from the Trekker Application
menu. To learn your current Navigation mode, press Shift+F3.
Page 11
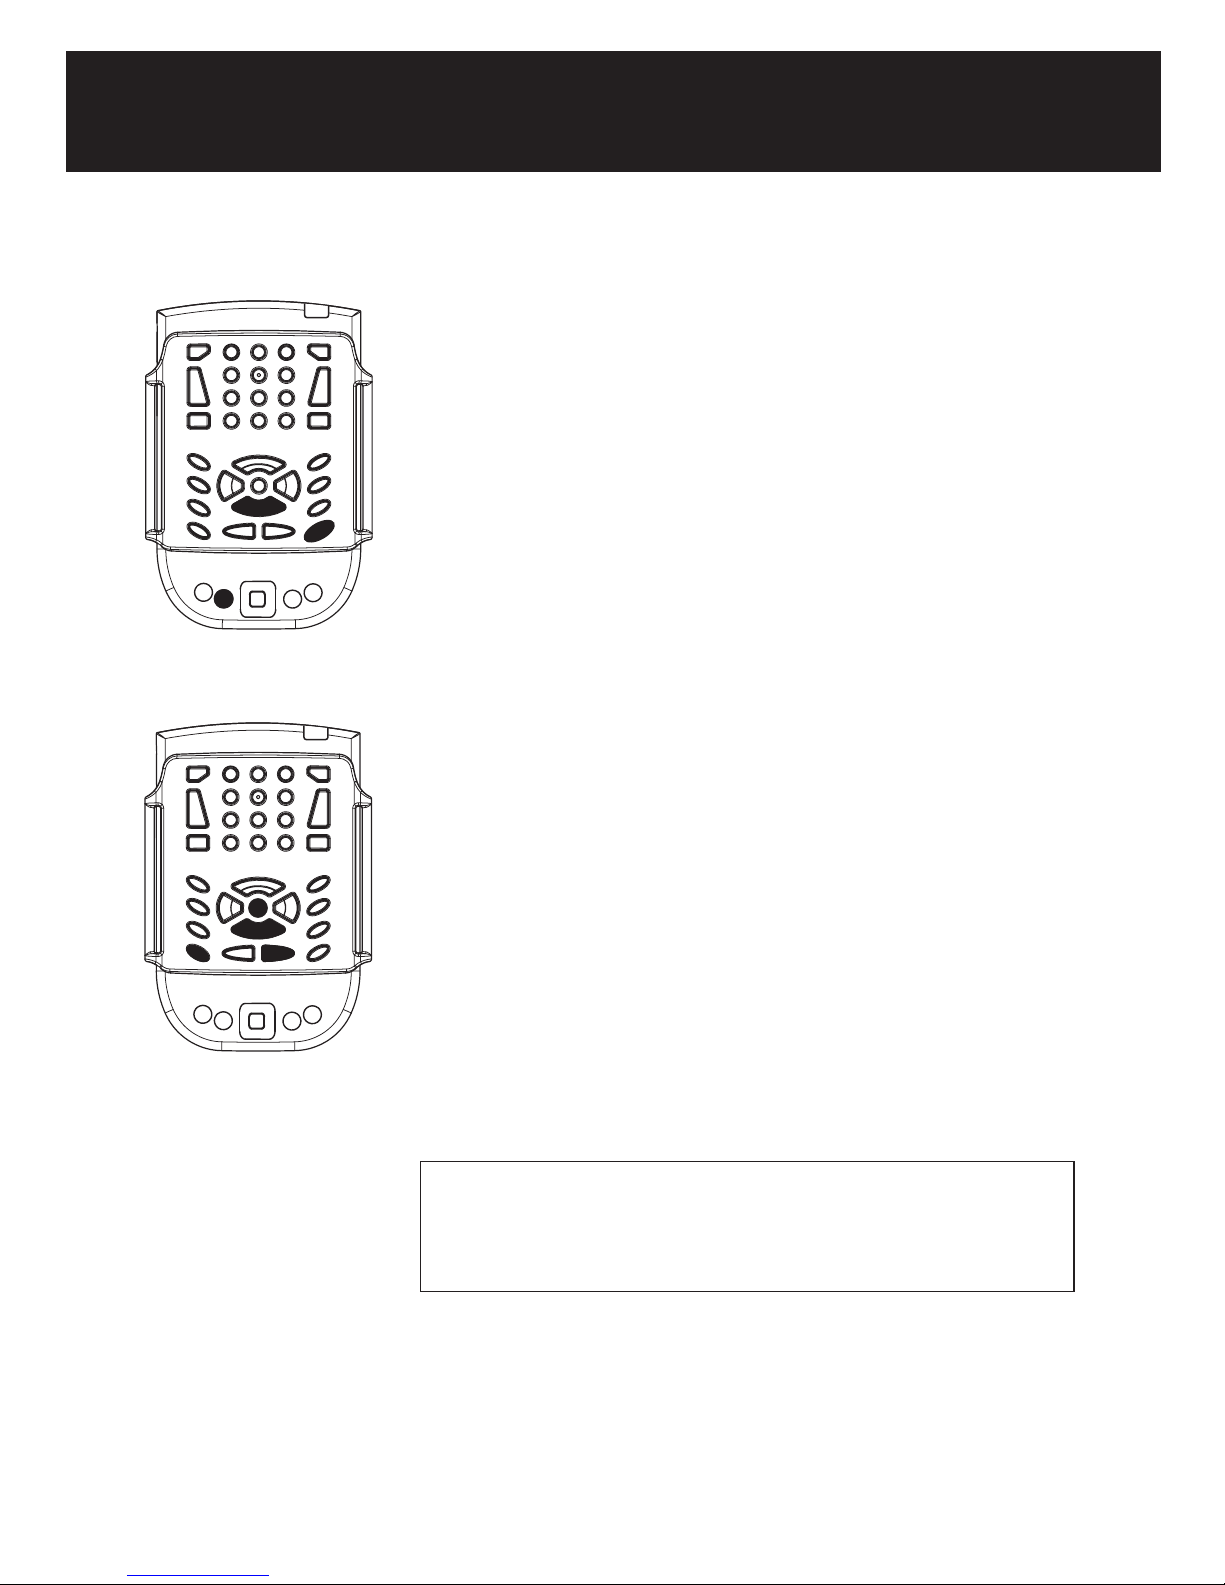
Searching Points of Interest
Search Points of Interest information on a segment
1. Press the End button (1a) to display a list of Points of Interest on your
current street segment.
2. Arrow down (2a) to select a point of interest.
3. Press Control+Right Arrow (3a) to hear associated information
2a
1a
3a
3
2
1
4
In Free mode, Select a POI , then press Enter to be directed to it.
Search Points of Interest by distance
To use this function, you must be online with GPS.
1. From the Trekker Application menu (1), select Point of Interest, and
then Search by distance.
2. Arrow down (2) to select the desired distance.
3. Select Search button or press Enter (3) to search for your POI
You can refine your search by entering criteria such as the name of the
desired POI, the source database or a category (restaurant, ATM,
hospital). Use Tab to navigate to each criteria (4).
TIP: If there are words with special characters or if you are not sure
about the spelling, enter only a few characters, Trekker will search
the database to provide selection lists containing the string entered.
Page 12
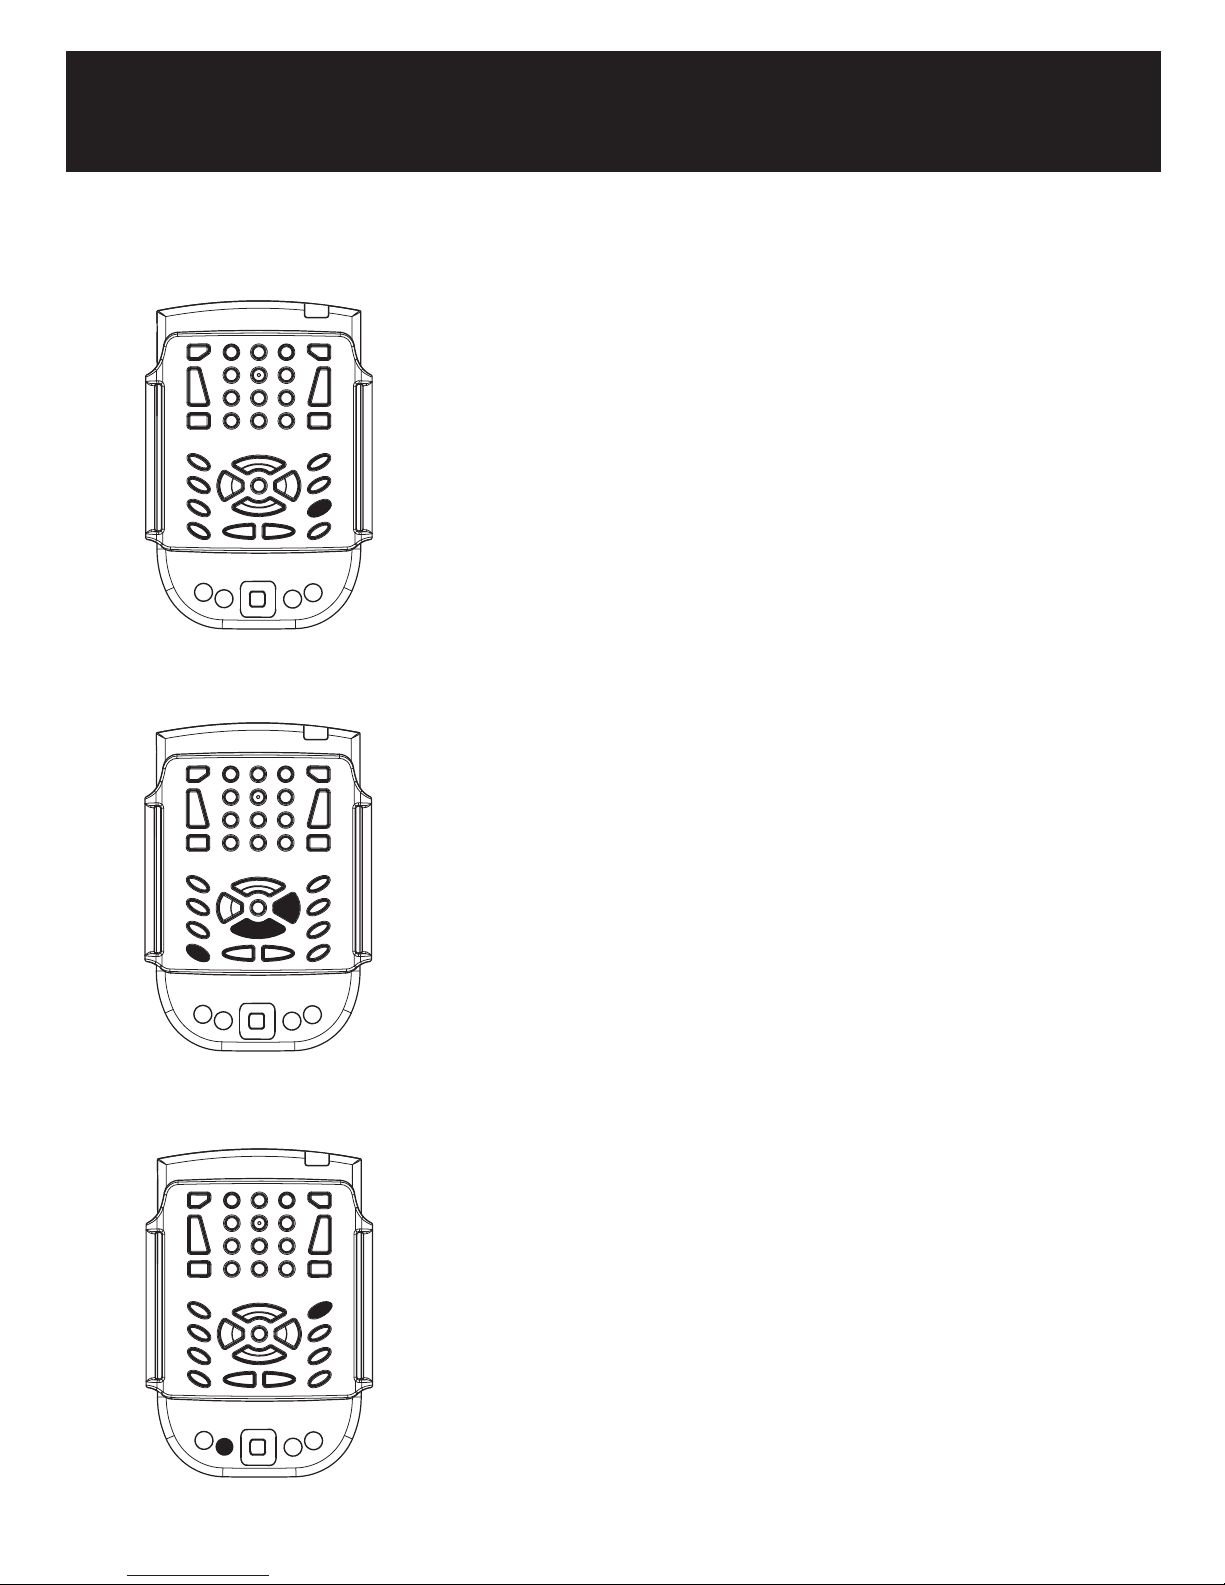
Working with routes
Create a quick route
A Quick Route starts at your current position, and you must select your
destination. Trekker will create either a pedestrian or motorized route
depending on the current mode.
1. Press and hold the Page Down button.
2. Trekker asks to select a type of destination. Arrow down to select
between:
• Searching a Point of Interest by criteria, for example search a
restaurant’s name in Chicago
• Searching a Points of Interest by distance, for example search for the
nearest restaurant
• Selecting a favourite Point of Interest
• Enter the address of the destination point
Preview a route
1. From the Trekker Application menu (1), select Route.
2. Arrow right (2) to select the Browse submenu. Select
Pedestrian or motorized.
3. The list of routes will appear. Use the Down arrow (3) to select a route,
2
3
1
then Enter to activate the route.
4. Use the Up Arrow and Down Arrow keys to scroll forward and back
ward through the route instructions. Press Escape to turn off Route
Browsing.
Next instruction
When a route is active, you can ask for the next instruction and its
distance with the CTRL-Where am I command.
Page 13
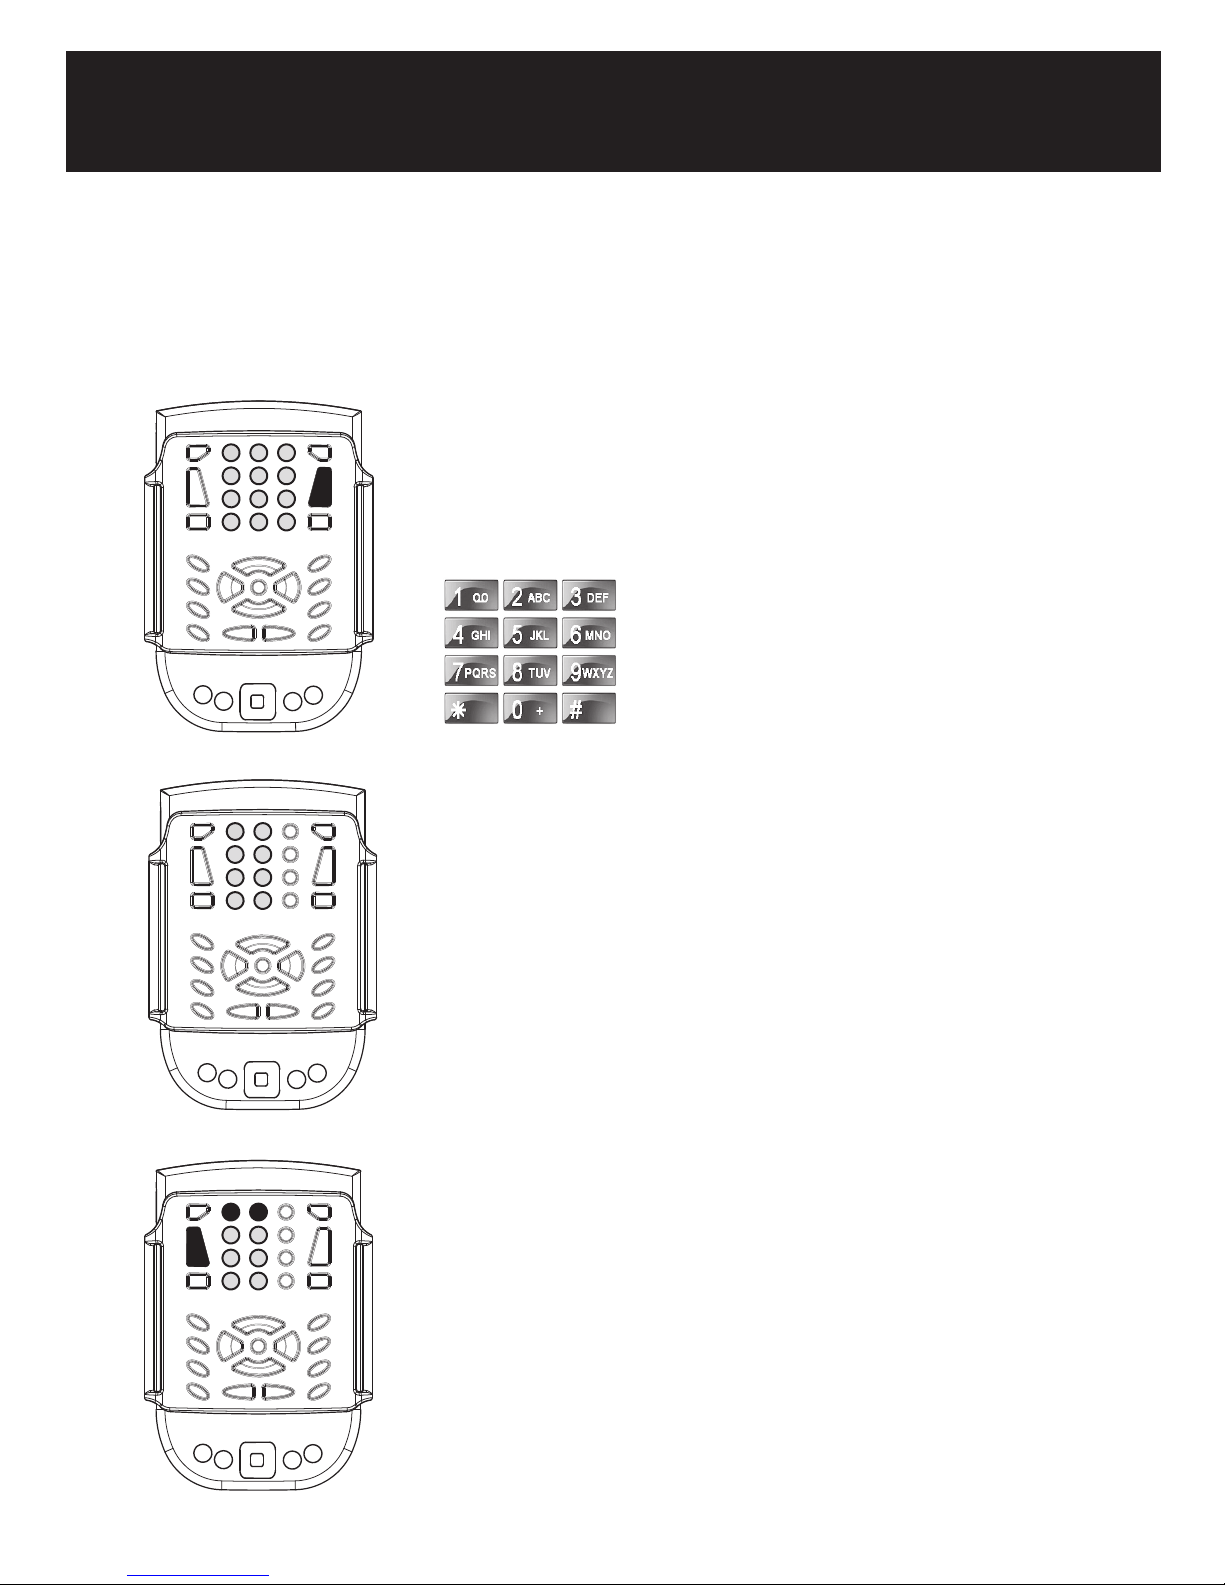
Data input
To enter text, the keypad can be used either as a Braille or a telephone keyboard. Press and hold F4 to
toggle between the Braille and telephone keyboard.
Telephone keyboard
1
2 3
4
5
6
7
8
0
*
b
9
#
Keys are used like those on a cellular telephone.
a. Select a key and press repeatedly till you hear the desired value.
b. Press Validate.
For example to input b, press #2 three times, then Validate.
To enter a capital letter, select the value,
then press Shift + Validate
Press key #1 and # 0 for special
characters.
1
2
3
7 8
1
1
2
3
7 8
4
5
6
Braille keyboard
When used as a Braille keyboard, the 6 dots of a Braille cell are mapped
in the first 2 columns. Dots 7 and 8 for computer Braille are mapped in
the last row.
Pressing only Validate will enter a space. When using computer Braille, dot 7
is required for capital letters.
4
4
5
6
Type each Braille dot one at a time, then accept the character using one
of the Validate keys. For example, to input the letter c, press Braille dot
1, Braille dot 4, then Validate.
Page 14
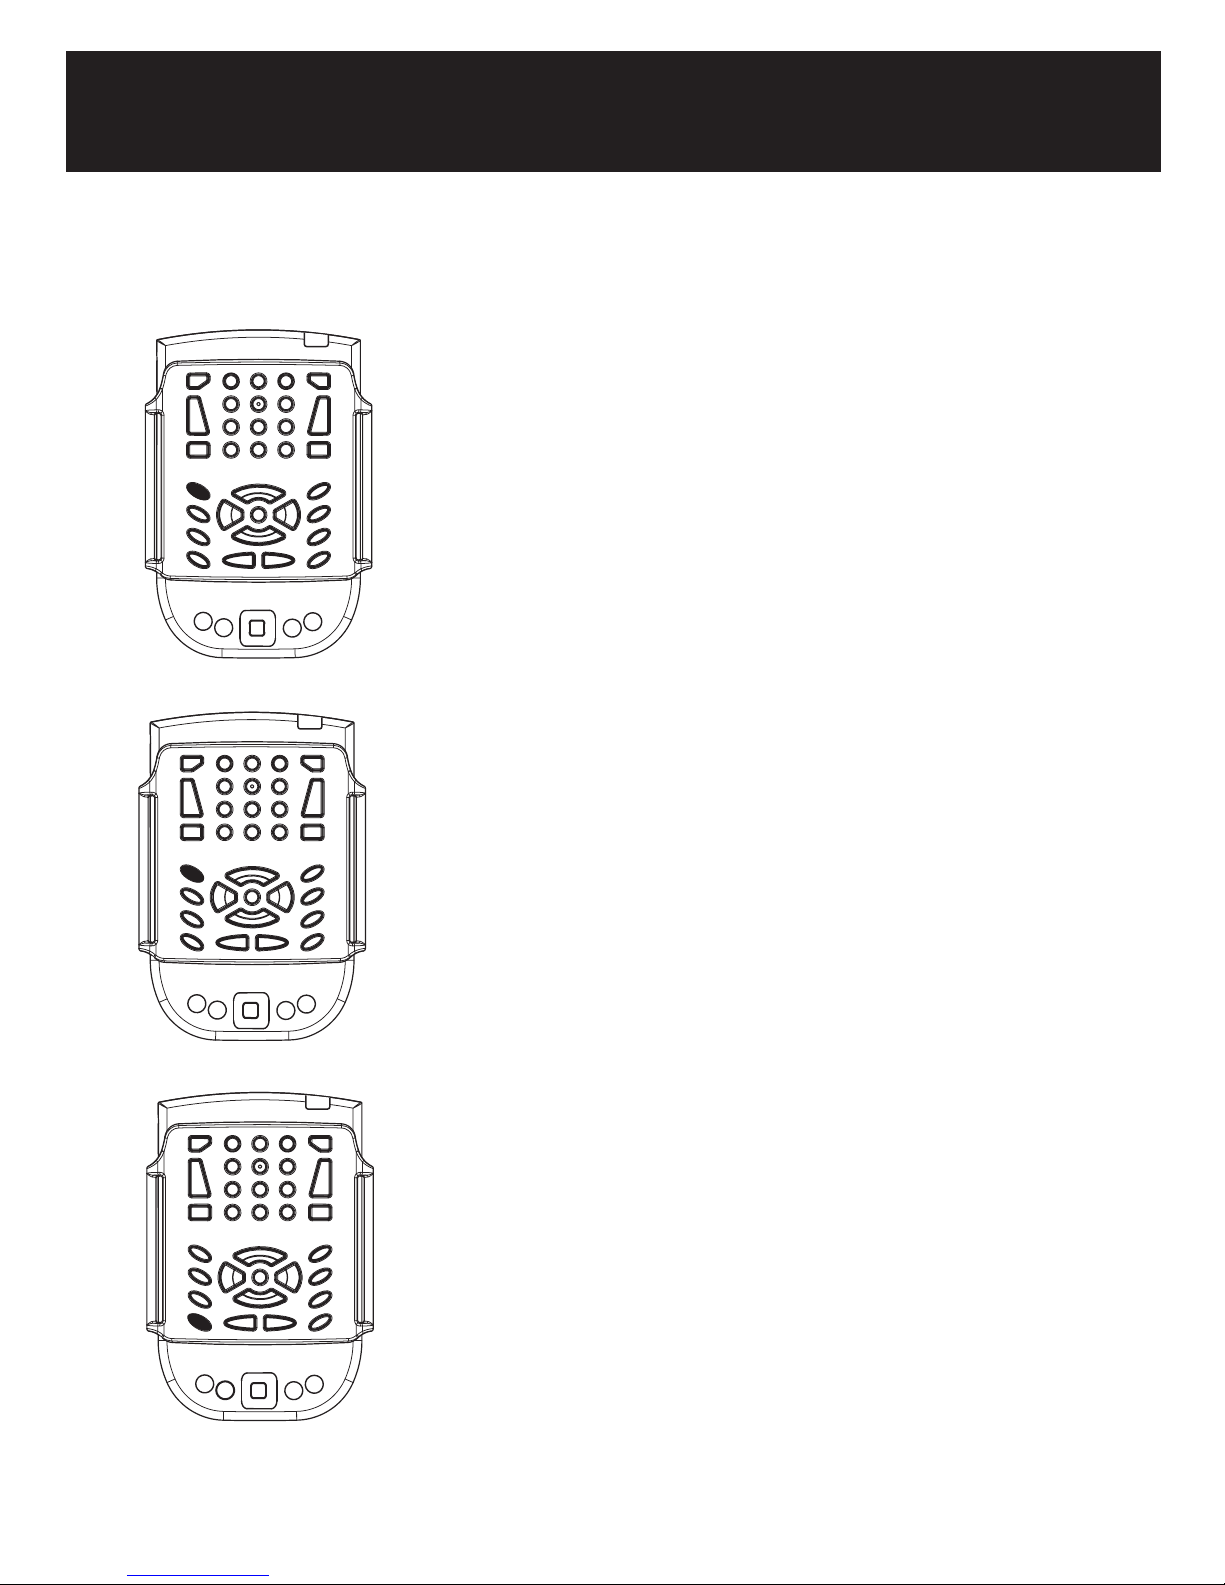
Getting help
Key Describer mode
Provides voice descriptions for any key pressed. This is a great way to learn
about the application interface.
Press and hold the F1 key to toggle Key Describer mode ON or OFF.
System Where am I?
Tells you where you are in the application. Press the F1 key. The
application will announce the title of the active window within an
application.
General Help
From the Trekker Application menu, open the Help submenu, then
select General Help. Arrow down to choose a topic, then Tab to read
specific information related to your selection.
Page 15

Basic settings
Turn the Bluetooth Radio ON
a. From the System Bar, arrow to the left to choose the Bluetooth option, then press Enter.
b. Press Enter after hearing Turn Bluetooth On and to allow the procedures.
c. To check the Bluetooth Radio status, go to the System Bar - Bluetooth.
Activate a map
If more than one map is present in the storage card, you will need to activate one.
a. From the Trekker Settings submenu, Arrow down to select Map activation.
b. Arrow down to hear the list of maps.
c. Select one or more maps (up to four) using the Validate key and press Enter when done.
ActiveSync
This authentic Microsoft software is provided on the Companion CD. It allows a computer to
communicate or synchronize with the PDA through the USB cradle. Once a guest partnership is
established, you can perform operations such as installing maps, exchanging POIs or updating your
Trekker version.
Trekker Map Manager
This software handles all map operations related to Trekker. A partnership with Active Sync is
required. There are many useful functions: Map installation, POI backup and exchange, route backup,
External database management, and more.
Page 16

Glossary
Navigation modes
Trekker distinguishes three different situations coresponding to three navigation modes: Pedestrian, Free
and Motorized modes.
Pedestrian mode
Walking in areas where streets are available in the map is called Pedestrian mode. This is the default Trekker
navigation mode, providing GPS coverage and mapping functions associated with the installed regional map.
Free mode
Use Free mode to travel in unmapped areas such as parking lots, parks, campuses, or bodies of water.
Motorized mode
Use Motorized mode while traveling by car, bus or train. The main difference between Motorized and
Pedestrian modes is a reduction in the information verbosity level. The speed of motorized travel does not
allow the extent of spoken detail possible in Pedestrian Mode. So verbosity information is shorter to reduce
the length of the spoken message.
Points of Interest (POI)
POIs are landmarks that you may encounter in your travels. The system handles three different types of
Points of Interest:
Navteq POIs: commercially available information such as restaurants, hospitals, schools, train stations
included in the Navteq Maps. This information is included in the Navteq Maps.
Personal POIs: landmarks created by the user by means of the recording POI feature. Personal POIs can
be transferred to the main computer for backup purposes or shared with other users. Personal POIs are
organized in CSV (Comma-Separated Values) format.
External POIs: Trekker can handle POI information coming from third party sources. The system supports
any database in CSV format, provided they contain at least the GPS coordinates (longitude, latitude) and a
name, with a specific organization. Any database different from the Navteq or your Personal database is
considered as external and should be managed using the Map Manager tool in the External database page.
Page 17
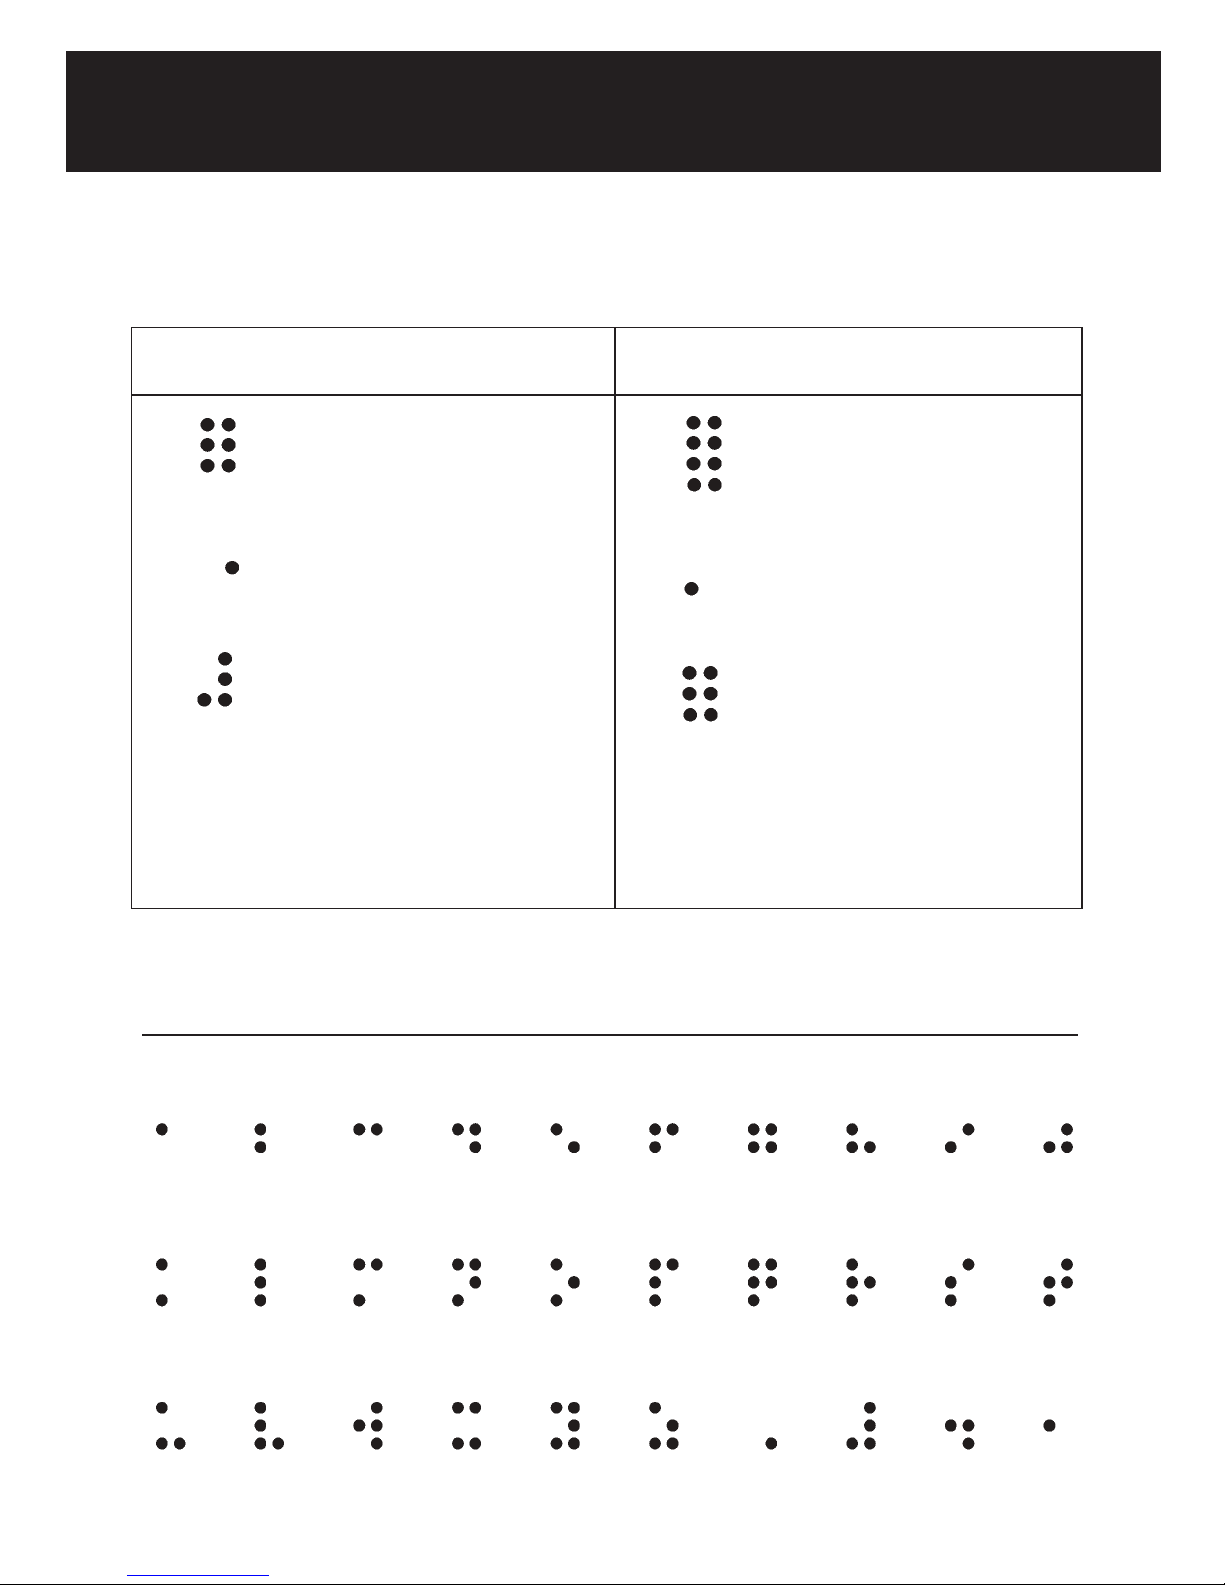
Braille table
Braille grade 1 and 2
1
2
3
1
2
3
4
1
5
2
3
6
The six dots of the Braille cell
4
5
are arranged and numbered:
6
4
The capital sign, dot 6,
5
placed before a letter,
6
makes a capital letter.
The number sign, dots 3,
4, 5, 6, placed before the
characters a through j, makes
the numbers 1 through 0. For
example: a preceded by the
number sign is 1, b is 2, etc.
Computer Braille
1
2
3
7
4
1
2
5
3
6
7
8
4
1
2
5
3
6
7
8
In computer Braille, dots 7
4
5
and 8 are added.
6
8
The capital sign, dot 7,
placed before a letter,
makes a capital letter
In computer Braille, dots 7
and 8 are added.
Dots 2,3,5,6,7,8 are used for
numbers. Dot combinations
for letters a to j, one row
lower, make the numbers 1
through 0. For example,
number 2 is obtained by
pressing dot 2 and 3
Braille alphabet
a b c d e f g h i j
k l m n o p q r s t
u v w x y z
capital
sign
number
sign
period comma
Page 18

Page 19

Page 20

Warning: Avoid exposure to moisture,
rain, sand and extreme temperatures
Contact:
For customer support please contact
the HumanWare Office nearest you.
Australia/Asia
+61 2 9686 2600
Canada
1 888 723-7273 or +1 450 463 1717
UK/Europe
+44 1933 415 800
USA
1 800 722-3393 or 925 680-7100
www.humanware.com
REV01
 Loading...