


CONTENTS
Contents ....................................................... 1
Chapter 1: Introduction ................................. 3
Chapter 2: Getting to know your Prodigi ...... 5
Box Contents ............................................. 5
Prodigi Connect at a glance ...................... 6
Setting up ................................................ 13
Chapter 3: Using Prodigi ............................ 18
The Button Banner .................................. 18
Magnifying ............................................... 19
Capturing ................................................. 23
Full page capture ................................. 24
Multi-Capture ....................................... 25
Reading ................................................... 27
Using the Carousel menu ........................ 33
Viewing saved documents ...................... 35
The Action Menu .................................. 36
Using the Distance Camera .................... 41
Viewing Distance Camera Images ....... 47
Reading with the Distance camera ...... 49

Removing Distance Camera from Stick 49
Viewing text files in Prodigi ..................... 50
Chapter 4: Choosing your contrast ............. 52
Chapter 5: Changing your Settings ............ 55
Visual ...................................................... 58
Audio ....................................................... 59
Gestures and Controls ............................ 60
General ................................................... 61
About ....................................................... 61
Chapter 6: Accessing Android .................... 62
Chapter 7: Recharging your Tablet ............ 63
Chapter 8: Recharging your distance camera
................................................................... 65
Chapter 9: Software update ....................... 66
Setting up your Wi-Fi ............................... 66
Automatic update .................................... 67
Manual update ........................................ 67
Chapter 10: Troubleshooting ...................... 69

Page 3
CHAPTER 1: INTRODUCTION
Thank you for purchasing
Prodigi™ Connect 12, the touch-controlled
personal vision assistant system from
HumanWare, global leader in assistive
technologies for people who have low vision.
Prodigi is a simple, intelligent, portable, and
adaptable line of products aimed at restoring
and maintaining independence for people
living with vision loss.
Prodigi Connect is a complete magnification
system that will allow you to magnify, read
documents, and capture images anywhere
you are.
Carefully read the operating and safety
instructions described in this user guide prior
to using your Prodigi. If you have any
questions about your system, please contact
HumanWare Customer Service by consulting
the contact information in the back of this user
guide.
Copyright 2016 by Technologies HumanWare
Inc., all rights reserved. No part of this
publication may be reproduced or distributed

Page 4
in any form or by any means, or stored in a
database or retrieval system, without the prior
written permission of Technologies
HumanWare Inc.

Page 5
CHAPTER 2: GETTING TO KNOW
YOUR PRODIGI
BOX CONTENTS
Protective Carrying Case
Prodigi Tablet 12.2
Power Supply
USB Recharge Cable
Folding Stand
5 replaceable stylus tips
Distance Viewing (Optional)
o Distance Camera
o Smartphone attachment
o Camera Stick
o Wrist strap
o Micro USB cable
o Camera Quickstart Guide
o Camera Reference Guide
Prodigi Box
Getting Started Guide
User Guide
Warranty Sheet

Page 6
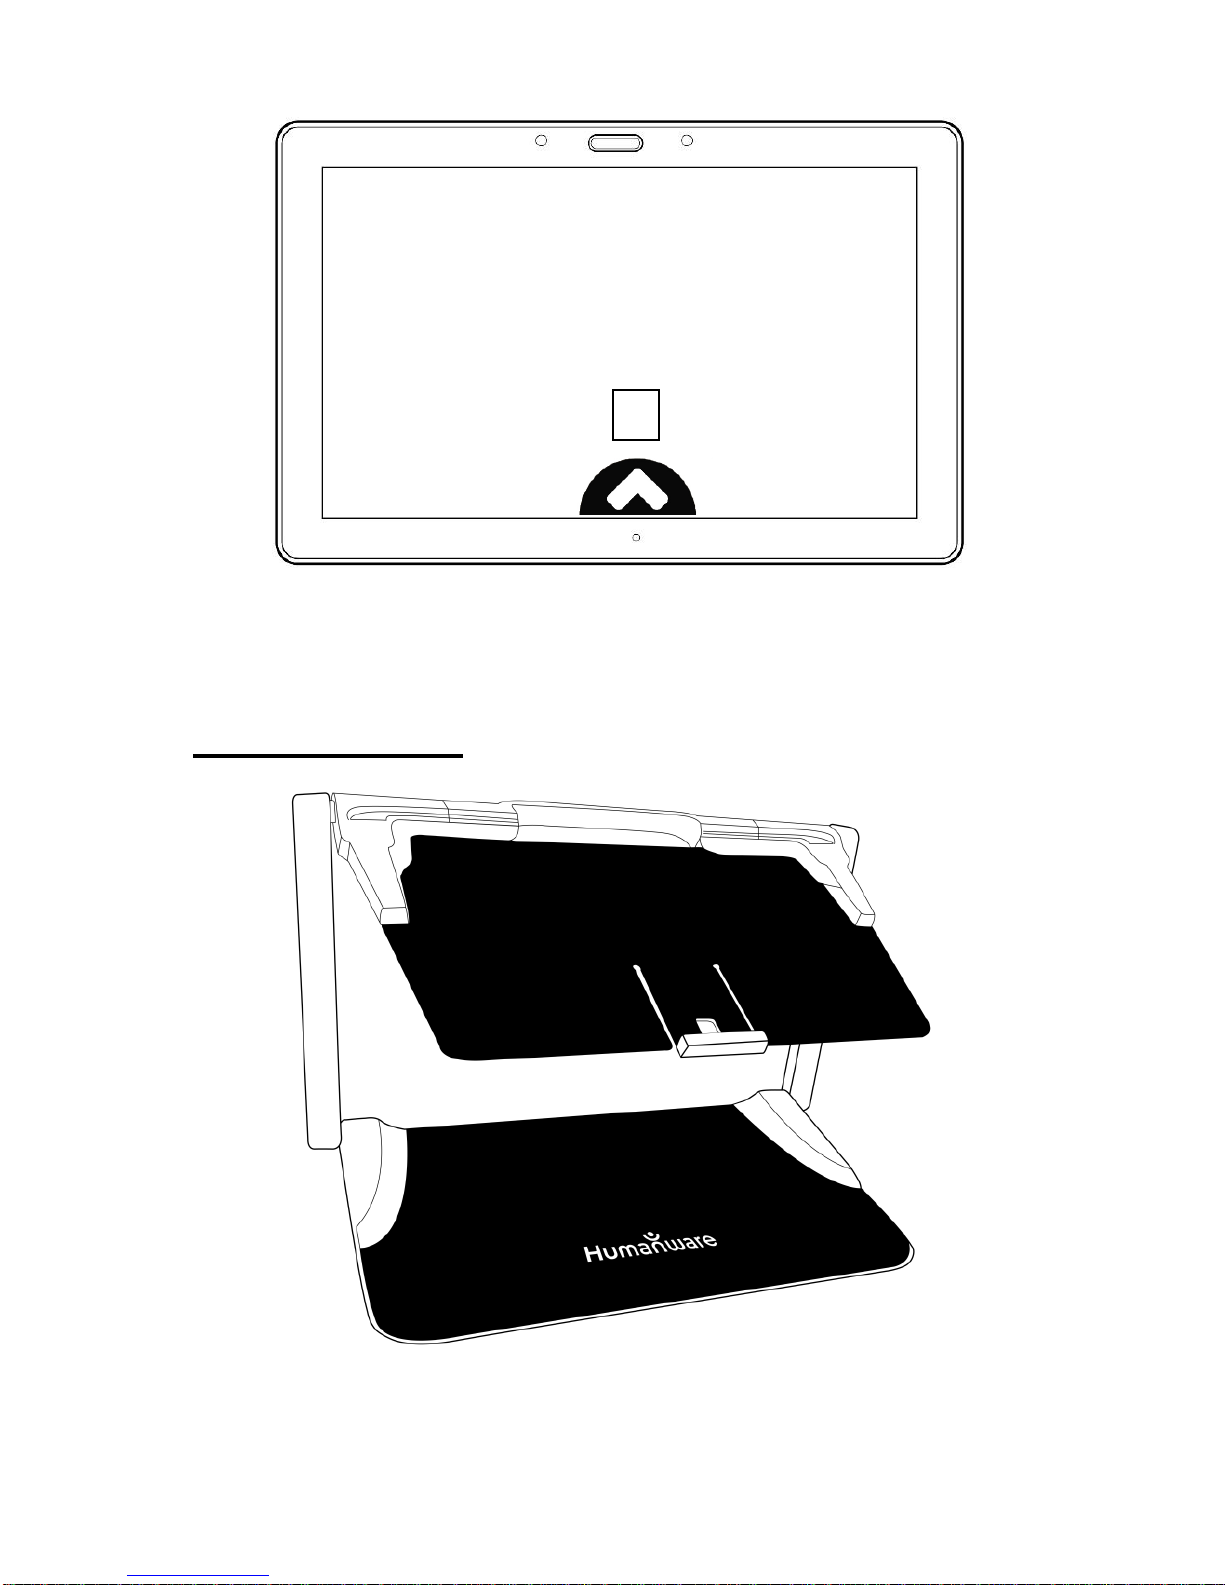
PRODIGI CONNECT AT A GLANCE
Front Face
1. Back Button (not a physical button)
2. Home Button
3. History Button (not a physical button)
4. MicroSD slot
5. USB slot
6. Speaker
7. Stylus
8. Headphone slot
Note: Tablet is inserted in stand upside down
intentionally, for better camera usage.
3
4
5
6
6
8
7

Page 7
Bottom Edge
1. Volume Down-Up
2. Power Button
Back Side
1. Camera
2. LED
2
1
1
2

Page 8
Button Banner
1. Back button
2. Settings button
3. Light Button
4. Capture/Read Button
5. Zoom Out Button
6. Zoom In Button
1
2
3
4
5
6
Page 9
1. Open Banner Button
Folding stand
1

Page 10
Distance camera
1. Distance camera
2. Distance camera stick
1
2

Page 11
Front view
Back view (with battery cover removed)

Page 12
Top view
1. Power button
2. Microphone
3. Power/Charge/Movie light
Left view
1. Zoom lever
2. Shutter button
1
2 3 1
2

Page 13
IMPORTANT: It is essential to keep the Quick
Start guide provided with your Sony distance
camera as it contains your camera’s pairing
information.
SETTING UP
1. On a flat and stable surface, hold your
Prodigi stand in an upright position making
sure the panel with the word “PULL” is
facing you. While holding the handle with
one hand, unfold the “PULL” panel with
your other hand until it is flat on the table.

Page 14
2. Next, unfold the top panel until it is roughly
parallel with the lower panel.

Page 15
3. Hold your tablet with the screen side facing
you, making sure the Samsung logo is
upside down. Carefully insert your tablet
into the slot and slide it forward until you
reach the back end of the slot. Lock the
front bracket to fasten your tablet onto the
folding stand.

Page 16
4. Connect the USB Recharge Cable to the
Power Supply.
5. Carefully connect the cable to the
recharge port and plug it to an outlet. The
recharge port is located on the left side of
the tablet.
IMPORTANT: Use caution while inserting
the cable into the Recharge Port.

Page 17
IMPORTANT: Do not close your folding
stand with your tablet in it when the
recharge cable is plugged in. You could
damage the recharge cable or tablet.
6. Allow the tablet to charge until the battery is
full (initial charge is 8 hours).
7. Press and hold the Power button to power
on your tablet. Your tablet will take about
30 seconds to initialize. The Samsung logo
will appear on the screen (possibly upside
down for booting, as the tablet is inserted
upside down).

Page 18
CHAPTER 3: USING PRODIGI
THE BUTTON BANNER
Most of Prodigi Connect’s actions are
performed through the Virtual Button banner
located at the bottom of your screen.
If you wish to hide this banner to better see
your screen, do a downward swipe on your
screen (move your hand downwards while
touching the screen with a finger). The banner
will be replaced by the Open Banner button at
the bottom of your screen.

Page 19
Tap this button or swipe upward to display
the Button Banner.
MAGNIFYING
Power on the tablet.
Properly align the tablet above the
document or object you wish to view.
It is recommended to use the Folding
stand to stabilize your tablet above the
document you wish to view.
Move the object or document under your
tablet to find the information you are
looking for.

Page 20
Tap the Light button to turn on the tablet’s
light if the display is too dark.
Tap the Zoom In-Out buttons to adjust
the zoom level. To increase character
size, tap the Zoom In button (+). To
decrease character size, tap the Zoom
Out button (-). You can also tap and hold
the Zoom In-Out buttons to progressively
adjust the zoom level, and release once
you reach your desired zoom level.
In addition to the Zoom In-Out buttons,
you can use the pinch and zoom
gesture to adjust the zoom level

Page 21
Decrease the distance between 2 fingers
to zoom out, and increase the distance to
zoom in:
To toggle between color, positive, and
negative contrasts, simply swipe
vertically on the right side of the tablet’s
screen (see Chapter 4: Choosing your
contrast for more details).
Note: Prodigi Connect allows you to
decide whether to lock or unlock the

Page 22
camera’s autofocus. This is useful when
the right focus is displayed for the
document and you want to lock its
position, or when you are performing a
manual task like writing on a piece of
paper, and want to prevent your tablet
from refocusing on your hand or pencil,
for example. To lock autofocus, simply
perform a double tap gesture (tap twice
quickly) anywhere on your screen.
Double tap again anywhere on the
screen to unlock autofocus. The following
icon appears in the top right your screen
when autofocus is turned off.

Page 23
CAPTURING
Using the folding stand, properly align the
tablet above the document or object you
wish to capture.
Tap the Capture button to capture your
document or tap and hold your finger on
the screen for 2 seconds.
You will hear a picture sound, followed by
a clicking sound; indicating that the
document has been captured.
Once you make a capture, the Light
button will disappear and be replaced by
a save to disk button. This button allows
saving of capture in Gallery.
Tap the Save button to save your
document in the Gallery for future use.

Page 24
Tap the Back button if you want to return
to Magnifier Live mode.
FULL PAGE CAPTURE
To capture a full page:
Make sure the angle of your folding
stand is approximately 90° (you may
need to adjust this later).
Instead of laying your sheet vertically,
place your sheet sideways (landscape
position) so that the top of your text is
located under the left edge of your
Prodigi, and the bottom of your text is
located under the right edge of your
Prodigi.
From Magnifier mode, tap the Zoom
Out button once. This will activate full
page view, turn on LED and reduce the
button banner.
Align your page visually under the
stand so that all of the text is displayed
on-screen.
Long press to capture.

Page 25
Tip: to capture more text, you can raise the
tablet further from the document, allowing
more view angle.
MULTI-CAPTURE
To capture a multipage document, toggle
to Multi-Capture mode by swiping
vertically on the left side of the tablet’s
screen:
Note: You can also toggle to Multi-Capture
mode in the Settings. Tap the Settings button,
select Mode and set it to Multi-Capture. Exit
the Settings.

Page 26
You can now capture a multipage
document. Align the tablet above the first
page of the document you wish to
capture and press the Capture button.
Proceed in the same way for each page
you wish to capture. Your multipage
document will be saved in the Gallery for
future use.
To end Multi-Capture and view your
document, tap the top left Multi-Capture
button.
Tap the Back button to return to Magnifier
mode.

Page 27
READING
Once you make a capture, the Capture button
will change from a camera image to a play
symbol. This is now the Read button.
Tap Read or long press anywhere on the
screen for 2 seconds to scroll and read
aloud the text according to your reading
preferences.
Note: When you press read, the Button
Banner will collapse to provide a better view of
your image. It can be re-opened by pressing
the Open Banner Button or by doing an
upward swipe.
To adjust the volume, use the Volume
Down-Up buttons.
To pause, tap Read again or long press
anywhere on the screen.

Page 28
While paused, tap Back to exit reading
view, and Back again to return to the
camera view.
To resume, tap Read again or long press.
When in magnifier mode, reading mode allows
you to zoom in and out of your captured
document.
To zoom in a captured document:
Use the Zoom In-Out buttons to adjust
the zoom level. To increase character
size, tap the Zoom In button (+). To
decrease character size, tap the Zoom
Out button (-). You can also tap and hold
the Zoom In-Out buttons to progressively
adjust the zoom level, and release once
you reach your desired zoom level.
In addition to the Zoom In-Out buttons,
you can use the pinch and zoom gesture
to adjust the zoom level.

Page 29
To instantly zoom to an area of interest,
perform a single tap on the area you wish
to view and the image will zoom at that
location at your preferred zoom level.
If you are in a zoomed level over 1X, you can
move around your zoomed document by doing
a Pan Gesture (slowly move your finger on
the screen without lifting it).
Pan to reach other parts of the enlarged
image.
To toggle between the different
contrasts, swipe on the right edge of the
touchscreen or access the Settings (see
Chapter 4: Choosing your contrast for
more details).

Page 30
Note: Text can be presented in 3 different
formats (Reading Modes): it can be changed
in the settings to a single line in the Line mode,
a column in the Column mode (default), or you
can read text without losing its configuration in
the Page mode. Two “greater than” signs will
identify the end of a paragraph in the Line and
Column modes (˃˃).
Prodigi will beep and announce “End of
document” when you reach the end of your
document; tap Read to start reading from the
beginning again.

Page 31
To set a different Reading Mode, tap the
Settings button to access the Settings
menu and select Reading Mode.
Swipe up to change your Reading Mode.
Tap Back to exit the Settings menu.
You can increase the speech rate by
swiping to the left (sliding and releasing
your finger to the left) on the
touchscreen, and decrease the speech
rate by swiping to the right.
Note that changing the speech rate will
change the reading speed (text scrolling
speed) accordingly.

Page 32
Note: You can also increase or decrease the
speech rate from the Settings. Tap the
Settings button, select Speech Rate, and
swipe up to change the value. Tap Back to exit
Settings.
To deactivate Speech, simply double tap
on the screen. Alternatively, tap the
Settings button, select Speech, swipe up
to select Documents only or off.
Note: You will be able to change the reading
speed (text scrolling speed) by swiping left or
right, or from the Settings (in the Visual menu
and Text submenu) even when speech is
deactivated.
Prodigi has 2 different voices that can be
used to read aloud text documents. To
select a different voice, tap the Settings
button, select Voice, and tap to toggle
between the 2 reading voices.
Tap Back to return to your document.
Make sure that the language of the
selected voice is the same as in the
document you want to read.

Page 33
Tap Back to stop reading and return to
camera view.
USING THE CAROUSEL MENU
Prodigi has 4 main applications – Distance
camera (only available if distance camera
option is purchased), Magnifier, Gallery, and
Settings. They are presented one by one in the
carousel menu:
To access the carousel menu from the
Magnifier:
Tap Back to close the Magnifier and
access the carousel menu.
Prodigi will announce “Main Carousel”
followed by the currently selected
application.

Page 34
The currently selected application is
positioned in the center of the screen:
Swipe left or right in the carousel menu to
select an application.
To launch a selected application, simply
tap.
To cancel and return to the carousel
menu, tap Back.
Note: You can access the Carousel menu
from anywhere in Prodigi by double tapping
with two fingers anywhere on the screen.

Page 35
VIEWING SAVED DOCUMENTS
The Gallery contains all the documents you
have saved.
Select and tap on the Gallery icon in the
carousel menu:
Swipe left or right in the Gallery to flip
through your saved documents.
The currently selected document is in the
center of the screen. Prodigi will
announce and indicate the first word
contained in the currently selected
document. If the document contains no
words, Prodigi will tag it as an image. A
notebook icon will indicate a multipage
document.
To open a selected document, simply
tap.
Tap somewhere on the document to see
that section at your preferred zoom level.

Page 36
You can toggle between color, positive,
negative, and Diamond Edge™ (if the
image contains text) contrasts, and
adjust the brightness in the same way as
with the Magnifier (see section
Magnifying for more information).
Once you are in a zoomed level over 1X,
you can move around your zoomed
document by doing a Pan Gesture.
Pan to reach other parts of the enlarged
image.
Tap or tap Back to return to the full image
view.
When in full image view, tap Back to
close a document and return to the
Gallery.
THE ACTION MENU
The Gallery features an “Action Menu” that
includes many useful functions for your saved
documents.
In the Action menu, you can:
Create a new category

Page 37
Rename a document or category
Delete a document, category, or the
content of a category
Move a document to a category
Export the text from document to a text
file in Android file system
Move an image captured with the
distance camera to the Gallery for
Diamond Edge processing
Delete, replace, insert, or append pages
in a multipage document.
To access the Action menu, simply long press
on a document or category icon in the Gallery.
You will be directed to a menu listing available
actions for your selected file.
To delete a document, a category, or the
content of a category
Long press on the document or category
you want to delete.
Tap Delete, Delete category or Delete
category content.
Tap Yes to confirm deletion.

Page 38
To rename a document or category
Long press on the document or category
you wish to rename.
Tap Rename or Rename category.
Type in the new name of your document
or category.
Tap DONE (Enter key on keyboard).
To create a new Category
Long press on any document.
Tap Create new category.
Type in the name of your new category.
Tap DONE. Categories will be sorted
alphabetically in Gallery.
To move a document to a category
Long press on the document you want to
move.
Tap Move.
Tap the category where you wish to
move your image.

Page 39
Export the text from a document to a text
file in Android file system
Long press on the document whose text
you wish to export.
Tap Export OCR text.
The OCR (optical character recognition)
text will be saved as a text file in the Root
of your tablet.
Move an image captured with the distance
camera to the Gallery
In the Distance category, hold your finger
on the image you wish to move.
Tap Move to Gallery.
The image will be treated to find text and
display Diamond Edge if text was found.
The file will be renamed to first found
word in document, if text is found.
The file can be then moved into a
Category if required.

Page 40
To delete, replace, insert, or append a page
in a multipage document
Open the multipage document you wish
to modify.
To delete a page, long press on the page
you wish to delete and tap Yes to confirm
deletion.
To replace a page, long press on the
page you wish to replace. Tap replace,
tap yes and capture a new page.
To insert a page, long press on the page
where you want to insert a new page.
Tap insert and capture a new page.
To append a page, long press on any
page in a multipage document and tap
append. Capture your document. It will
be added at the end of the multipage
document.

Page 41
USING THE DISTANCE CAMERA
Prodigi™ Connect 12 features a distance
camera that can be extremely useful when you
need a better view of something at a distance,
such as a presentation or the teacher’s slides
during a lecture. Your distance camera
connects wirelessly, has a battery duration of
4 hours, and can be set up to 30 feet (10
meters) from Prodigi. The camera comes
already paired with your tablet out of the box.
Note: The distance camera is only available if
you bought the Distance Viewing Option with
your Prodigi Connect.
To use the distance camera, first align
your camera with the object you wish to
view.
Turn camera On.
IMPORTANT: Always attach the camera stick
to a solid object before using your distance
camera. If you simply place the camera stick
upright on a flat surface, there is a high risk
that the camera will tip over and break.

Page 42
You can attach your camera to a desk

Page 43
You can attach your camera to the side
of the folding stand’s frame

Page 44
You can attach your camera to the top
of the folding stand’s frame

Page 45
DO NOT use the distance camera
unless it is attached to a solid object.

Page 46
Enter the Carousel menu by tapping the
Back button in the magnifier mode.
Select the Distance Camera icon, then
tap.
PlayMemories Mobile, Sony’s camera
capture software, will open.
Note: PlayMemories offers many features
and functionalities that are not specified in
this guide. For additional information on
how to use PlayMemories Mobile, please
refer to the Sony camera user guide
provided in your Prodigi box or visit
http://www.sony.net/pmm/.
You are now in your camera’s live view.
To take a picture, Tap the camera icon
located on the right side of your screen.
Alternatively, you can take a picture by
tapping on the Shutter button located
next to the Zoom lever on the left side of
your camera.

Page 47
You should hear a confirmation sound
and briefly see the picture you just took,
then return to the camera’s live view.
You can zoom in or out in PlayMemories
by tapping or tapping and holding the
virtual “W” and “T” buttons on the right
side of your screen. Alternatively, you
can use the Zoom lever located next to
the capture button on the left side of your
camera.
To exit PlayMemories and return to
Prodigi, tap the home button at the top of
your tablet then double tap on the Prodigi
icon.
VIEWING DISTANCE CAMERA IMAGES
Pictures taken in PlayMemories can be
viewed in the Prodigi gallery similarly to the
pictures taken with the Prodigi magnifier.

Page 48
To view pictures taken with the distance
camera:
Select and tap on the Gallery icon in the
carousel menu.
Swipe right until you have selected the
Distance camera picture icon (a spyglass
in front of a folder), then tap once.
The currently selected document is in the
center of the screen. Prodigi will
announce and indicate the date the
picture was taken.
Swipe left or right to scroll through the
available pictures.
To open a selected document, simply
tap.

Page 49
READING WITH THE DISTANCE
CAMERA
To read a picture taken with the distance
camera, you will need to transfer the picture
from the Distance category to the root of the
Gallery.
In the Distance category of your Gallery
(a folder with a spyglass), hold your
finger on the image you wish to move.
Tap Move to Gallery.
Your image should now be in the root of
your Gallery where it can be read just like
any other document.
REMOVING DISTANCE CAMERA FROM
STICK
Your Distance camera comes already
attached to the camera stick. If you wish to
remove it from the stick, do the following:
Make sure your camera is turned off.
With one hand, firmly hold the camera.

Page 50
With your other hand, locate the square
bracket located underneath the camera,
and slide the top section it to the left
(while looking at the back of your
camera) until the camera is detached
from the stick.
Warning: The camera is very fragile, so make
sure you are holding it properly before
removing it from the stick.
VIEWING TEXT FILES IN PRODIGI
Prodigi Connect allows you to paste text files
into the gallery and then open them using the
Prodigi interface.
To paste a text file in Prodigi:
Copy to your tablet’s clipboard the text
you wish to add to Prodigi. This can be
done outside Prodigi in Android
applications that allow you to copy text
(e.g. your internet browser, Dropbox or
your emails.).
Tap Back to open the Carousel menu.

Page 51
Select and tap on the Gallery icon in the
carousel menu.
Swipe until the Text icon is selected,
then Tap to open the text section of the
Gallery.
Swipe until the Paste icon is selected,
then Tap to paste the text you copied
earlier.
Your text will appear in Diamond Edge™
in column reading mode (original layout
and images are not available).
Tap back to return to the Text section of
the Gallery.

Page 52
The text you pasted will now be saved in
the Text section of the Gallery and will
be named with the first word of your text.
CHAPTER 4: CHOOSING YOUR
CONTRAST
Prodigi allows you to view documents,
pictures and objects in 3 types of contrast:
color, positive or negative. For documents
containing text, a 4th type of contrast can be
used: Diamond Edge™. Positive, negative,
and Diamond Edge™ contrasts are enhanced;
they are meant to enhance the original color of
a document or object to facilitate your visual
experience.
To toggle between the different contrasts, tap
the Settings button to access the Settings,
select Contrast, and swipe down to choose a
contrast. Tap Back to return to your document
or object.

Page 53
Prodigi also allows you to toggle between the
different contrasts by swiping on the right edge
of the touchscreen:
Color contrast is useful if you want to view
documents, objects, and photographs in their
original color.
Positive contrast shows text and images in
2 colors according to your selected color
combination, the default combination being
Black on White. This is a practical way to view
text in the best color combination for your
vision.
Negative contrast shows text and images in
reversed contrast as compared to your
selected color combination. For example, if

Page 54
your combination is Black on White, negative
contrast will show text and images in White on
Black. This is useful if you wish to reverse the
contrast of a text that contains different
contrasts.
Diamond Edge™ contrast combines the best
of both worlds; it shows Diamond Edge Text™
in your selected color combination and images
in their original color. This allows you to
magnify text indefinitely without compromising
its quality in the best color combination for
your vision, while viewing images in their
original color on the same page.
Note: The contrast cannot be changed while
in Line or Column mode, or while viewing an
image at 1x (Gallery).

Page 55
CHAPTER 5: CHANGING YOUR
SETTINGS
(Note: The values marked with a star (*) are
default settings.)
To quickly configure your system while
viewing a document, you can tap the Settings
button to access the Settings menu. The
currently selected item is announced and
highlighted by a rectangular frame. Scroll up
or down to move the rectangle and select an
item. The items will be read one at a time (by
default). Tap to toggle the value or swipe up
when in a list of values. Tap Back (top left
corner) to return to your document.
Note: Your navigation mode will be different if
your Speech setting is set to “Off” or
“Documents only”. There will no longer be a
rectangular frame, and each menu item will
have a shadow below it. In this navigation
mode, you can simply touch an item to select
it instead of highlighting it with the rectangular
frame.

Page 56
The Settings menu lists the battery charge
level and the most frequently used settings:
Brightness (Change the brightness of a
live or captured image): 0 to 100%
(50%*)
Note: To change brightness, select the
brightness option and tap the screen.
Prodigi will take you to magnifier view
where you can adjust your brightness by
tapping the Zoom In-Out buttons.
Contrast: Diamond Edge (if captured
image contains text), Color*, Positive,
Negative
Colors: Black on White* (see list of 16
color pairs in main Settings below)
Mode: Live*, Multi-Capture
Reading Mode: Page, Column*, Line
Speech: On*, Documents only, Off
Reading speed: Very slow, Slow,
Normal*, Fast, Very fast
Voice: Voice 1*, Voice 2
Autofocus: Unlocked*, Locked

Page 57
You can further customize your system by
selecting All Settings at the end of the Settings
menu. You can also access these Settings by
selecting and opening the Settings application
in the carousel menu:
The Settings contain 5 main menus: Visual,
Audio, Gestures and Controls, General, and
About. Scroll up or down in the Settings to
select a menu. Prodigi will announce
“submenu” if a selected menu contains
submenus and display an arrow on the right
edge of the screen. To open a menu or
submenu, simply select it and tap. Once you
have reached the setting you want to modify,
tap or swipe up in a list of values. Tap Back to
return to a previous screen. Tap and hold the
back button to exit the Settings from anywhere
in the Settings menu.

Page 58
VISUAL
The Visual menu contains 2 submenus:
1. Display contains the following settings:
Screen Brightness (Change the
screen’s brightness level): 1 to 100%
(60%*)
Mode: Live*, Multi-Capture
Contrast: Diamond Edge (if captured
image contains text), Color*, Positive,
Negative (see chapter 4)
Diamond Edge: Always*, On Request
(See chapter 4)
Colors (Select from 20 color pairs):
Black on white*, White on black, Black
on gray, Gray on black, Black on yellow,
Yellow on black, Black on orange,
Orange on black, Black on cyan, Cyan
on black, Black on purple, Purple on
black, Black on green, Green on black,
Blue on yellow, Yellow on blue, White on
blue, Blue on white, Beige on black,
Black on beige
Locator color: Red, Orange, Yellow,
Purple, Cyan, Green, Blue
Preferred Zoom (Default zoom level):
2x to 35x, 4x*

Page 59
Button Banner: Auto*, Hidden, Always
2. Text contains the following settings:
Reading Mode: Page, Column*, Line
Reading Speed: Very slow, Slow,
Normal*, Fast, Very fast
Highlight (Column and Line modes
only. Highlight on spoken words):
Display*, Hide
Font Size: Minimum, Small, Medium,
Standard*, Large, Very large, Extra
large, Maximum
Font Type: Regular, Bold*
AUDIO
The Audio menu contains the following
settings:
Tablet Volume: 0 to 15 (9*)
Headphone Volume (when
headphones are plugged in): 0 to 15 (3*)
Sounds: On*, Off
Tablet Vibrations: On*, Off
Speech: On*, Documents only, Off
Speech Rate: Very slow, Slow,
Normal*, Fast, Very fast
Voice: Voice 1*, Voice 2
OCR Sound: On, Off*

Page 60
GESTURES AND CONTROLS
The Gestures and Controls menu allows you
to enable and disable the following gestures.
They are activated by default:
Swipe on left edge / Mode: Toggle
between Live and Multi-Capture modes.
Swipe on right edge / Contrast: Toggle
between Color, Positive, Negative, and
Diamond Edge™ contrasts (Note: The
last selection will be saved in Prodigi’s
memory).
Pinch and zoom: Adjust the zoom level
by decreasing or increasing the distance
between 2 fingers.
Double tap: Access the carousel menu
or toggle between Speech On and Off
while reading by tapping twice quickly
with 1 finger.
Tap / Zoom: Press your finger down
quickly on the touchscreen (tap) to zoom
at your preferred zoom level.

Page 61
GENERAL
The General menu contains the following
items:
System Language: Language 1*,
Language 2, Other (will connect to the
Internet to find downloadable language
packs)
WI-FI Setup (Help of a sighted person is
required to configure wireless network)
Tablet Auto Shutoff: 3 min*, 5 min,
10 min
Software Update (see chapter 9)
Delete Gallery content: Permanently
delete all files in Gallery.
Restore to Factory Defaults
Exit to Android: Exits Prodigi. You can
return to Prodigi by pressing the Home
button and double tapping the Prodigi
icon.
ABOUT
The About menu contains the following items:
Software (Version)
Voices (Version)
OCR (Version)

Page 62
Serial Number
Model
Android (Version)
CHAPTER 6: ACCESSING ANDROID
The Prodigi Connect Tablet allows you to
access Android applications. Please note that
HumanWare provides limited support for
Android and Android applications.
To access Android from anywhere in Prodigi,
simply press the Home button, and you will be
directed to the Android desktop icon choices.
Alternatively, you can tap the History button
and then tap on any previously opened
application to leave Prodigi and access this
application.
Note: Pressing Always would remove access
to Android from the home button (not
recommended).

Page 63
CHAPTER 7: RECHARGING YOUR
TABLET
Maximizing operating efficiency:
In a working situation where you need the
Tablet intermittently, you can enter
Standby mode when you are not using
the Tablet by pressing Power. The
screen will power off.
Wake Tablet by pressing the Power
button.
If you will not be using the Tablet for the
next few days, it is recommended that
you power it off by pressing and holding
the Power button and selecting Power
off.
Recharging the battery:
Tap the Settings button to enter the Settings
menu and to display the Tablet’s battery
charge level. Swiping upwards in the Settings
menu from the first item will announce the
charge level (if Speech is set to On in the
Settings).

Page 64
IMPORTANT: The tablet becomes warm
during recharging. Do not recharge the
tablet near a heat source.
IMPORTANT: Do not close your folding
stand while recharging. Doing so could
damage your cable or the tablet.
To recharge the battery:
Connect the USB Recharge Cable to the
Tablet Power Supply. Then, carefully
connect the USB Recharge Cable to the
Tablet and plug the Power Supply to an
outlet.
A full charge requires 4 hours.
To recharge the battery with a computer:
Plug the USB recharge cable to a
computer USB port.
Note: Please note that recharging the
battery via PC will take longer than by
plugging it to an outlet.
Battery safety precautions:
Do not disassemble or modify the
battery.

Page 65
There is a risk of overheating, fire or
explosion if the battery is put in a fire,
heated, subjected to impact, put in
contact with water, or if its terminals are
shorted.
CHAPTER 8: RECHARGING YOUR
DISTANCE CAMERA
Your Sony camera has a battery life of 4 hours
and will eventually need to be recharged.
Note: Help of a sighted person may be
required to charge your camera.
To charge your camera:
Carefully plug in the micro-USB
connector into the slot located under the
cap.
Carefully connect the USB connector
using the Tablet’s charging block.
The charge indicator will be orange when
your camera is charging and turn green
once the battery is fully charged.

Page 66
CHAPTER 9: SOFTWARE UPDATE
SETTING UP YOUR WI-FI
Before initiating a software update, the WI-FI
network needs to be configured.
Tap the Settings button to access the
Settings, and select All Settings. Tap to
open. Select General and tap. Select
WI-FI Setup and tap.
Slide the switch located on the top edge
of the screen to the ON position.
Tap on the network you wish to
configure.
To enter your password, tap in the text
field. A keyboard will appear on the
screen. Enter the password and tap on
Done. Then, tap on Connect.
Tap the small Back button at the top of
your tablet to return to General in
Prodigi’s Settings.

Page 67
AUTOMATIC UPDATE
When WI-FI is configured, Prodigi will
automatically check every week for updates.
If there is an update available, Prodigi will
notify you and ask you if you wish to update
your tablet. When this occurs:
Tap Install to install the latest update.
Your tablet will ask for your permission to
install the update. When prompted, tap
the install button to proceed.
A new pop-up will appear telling you that
the update was successfully installed.
Tap Open to go back to Prodigi.
MANUAL UPDATE
At times, you may want to manually update
your Prodigi tablet.
Access the settings then select All
Settings.
To initiate a software update, select
Software Update and tap.

Page 68
Prodigi will verify if your software is up to
date or if an update is available.
If an update is available and you wish to
install it, tap Install. If you wish to cancel,
tap Cancel.
If you chose to install the update, Prodigi
will download the update and show the
download progress.
Your tablet will ask for your permission to
install the update. When prompted, tap
the install button to proceed.
A new window will appear indicating that
the update was successfully installed.
Tap Open to launch Prodigi.

Page 69
CHAPTER 10 : TROUBLESHOOTING
If the screen is blank:
Zoom out of the image for minimum
magnification.
The Tablet could be powered off or in
Standby Mode. Tap Power to power it on
or to exit Standby Mode.
If colors are difficult to detect:
Check if you have sufficient ambient light.
Choose a different contrast or color
combination in the Settings.
Adjust the brightness level in the
Settings.
If there is a lot of glare:
Tilt object in a different direction to
reduce glare.
Reduce the brightness level in the
Settings.
Reduce external lighting effects.
If your captured image is too bright or
uneven, turn off the light on the button
banner and capture a new image.

Page 70
If the image/text is out of focus or blurry:
Use the Zoom In-Out buttons to zoom in
and then out of the image so as to trigger
the camera’s focus. If needed, capture a
new image of your document.
Make sure you hold the camera still while
capturing an image.
Make sure your Tablet is powered off,
and wipe the LED lights and camera
surface on the back side with a cleaning
tissue.
If the audio reading does not make sense:
Make sure the voice setting is the same
as your document’s language. Change it
in the Settings if necessary.
If the Tablet is not responding:
Make sure the battery is not empty.
Recharge it if necessary.
Other problems:
Restore factory defaults in the Settings.
Contact your dealer or technical support.
[End of document VER-04-2016-05-31]


ACCD-0131
REV 03
 Loading...