

Human Touch PC-000-400-010 Use & Care Manual

Perfect Chair
®
Laptop Desk
ENG FRC ESN
use & care manual
mode d’emploi et d’entretien
manual de uso y cuidado
©2012 Human Touch®, LLC. Patents pending and intellectual property rights enforced.
No medical claims are warranted or implied by the use of this product.
Human Touch is a trademark of Human Touch®, LLC.
PC-LD-B0
humantouch.com
800.355.2762
use & care manual
Register your product ONLINE Today
www.humantouch.com/register
Register your product ONLINE Today
www.humantouch.com/register

ENGLISH
humantouch.com
The Perfect Chair Laptop Desk adds a whole new dimension to your already Perfect
Chair. Now you can rest your laptop, notebook, netbook computer, iPad, book,
papers, or handcraft on your convenient Laptop Desk, and work comfortably for
hours in either an upright or partially reclined position.
Your Perfect Chair Laptop Desk was designed with every aspect of your comfort and
convenience in mind. It installs quickly, using provided tools, and is easily adjustable
to different heights. It swings easily out of the way for chair entry/exit or for optimal
camera angle during video conferencing, yet stays in place when in use. It also
enables precise horizontal leveling and tilts and swivels to the perfect position, while
flexible edge stops hold your device in place and convenient clips keep cables out of
the way.
Having a party and want it out of the way? Simply flip the laptop desk over to the
side of the chair.
To ensure that you don’t overlook any of your Laptop Desk features, and that you use
it safely, read this manual carefully. Then sit back, relax, and enjoy!
welcome to human touch
®
humantouch.com
Perfect Chair
®
Laptop Desk
keep it safe
WARNING:
• Do not place any food or drink on your Laptop Desk, as it may spill and cause injury or damage.
• Do not place any object that weighs more than 25 Lbs. on your Laptop Desk, as it will
permanently damage the unit.
Register your product at www.humantouch.com to ensure your product is
in our system to simplify the warranty process should you ever need it.
3
ENGLISH
humantouch.com
2
Laptop Desk
mounting plate
Silver armrest plate
get ready
Installing your Perfect Chair Laptop Desk is easy! Simply
remove the armrest, install the mounting bracket, reinstall the
armrest, then quickly assemble the mounting post. Place your
Laptop Desk on top of the mounting post, and you’re done!
Remove the right-hand armrest and accessory table (if any)
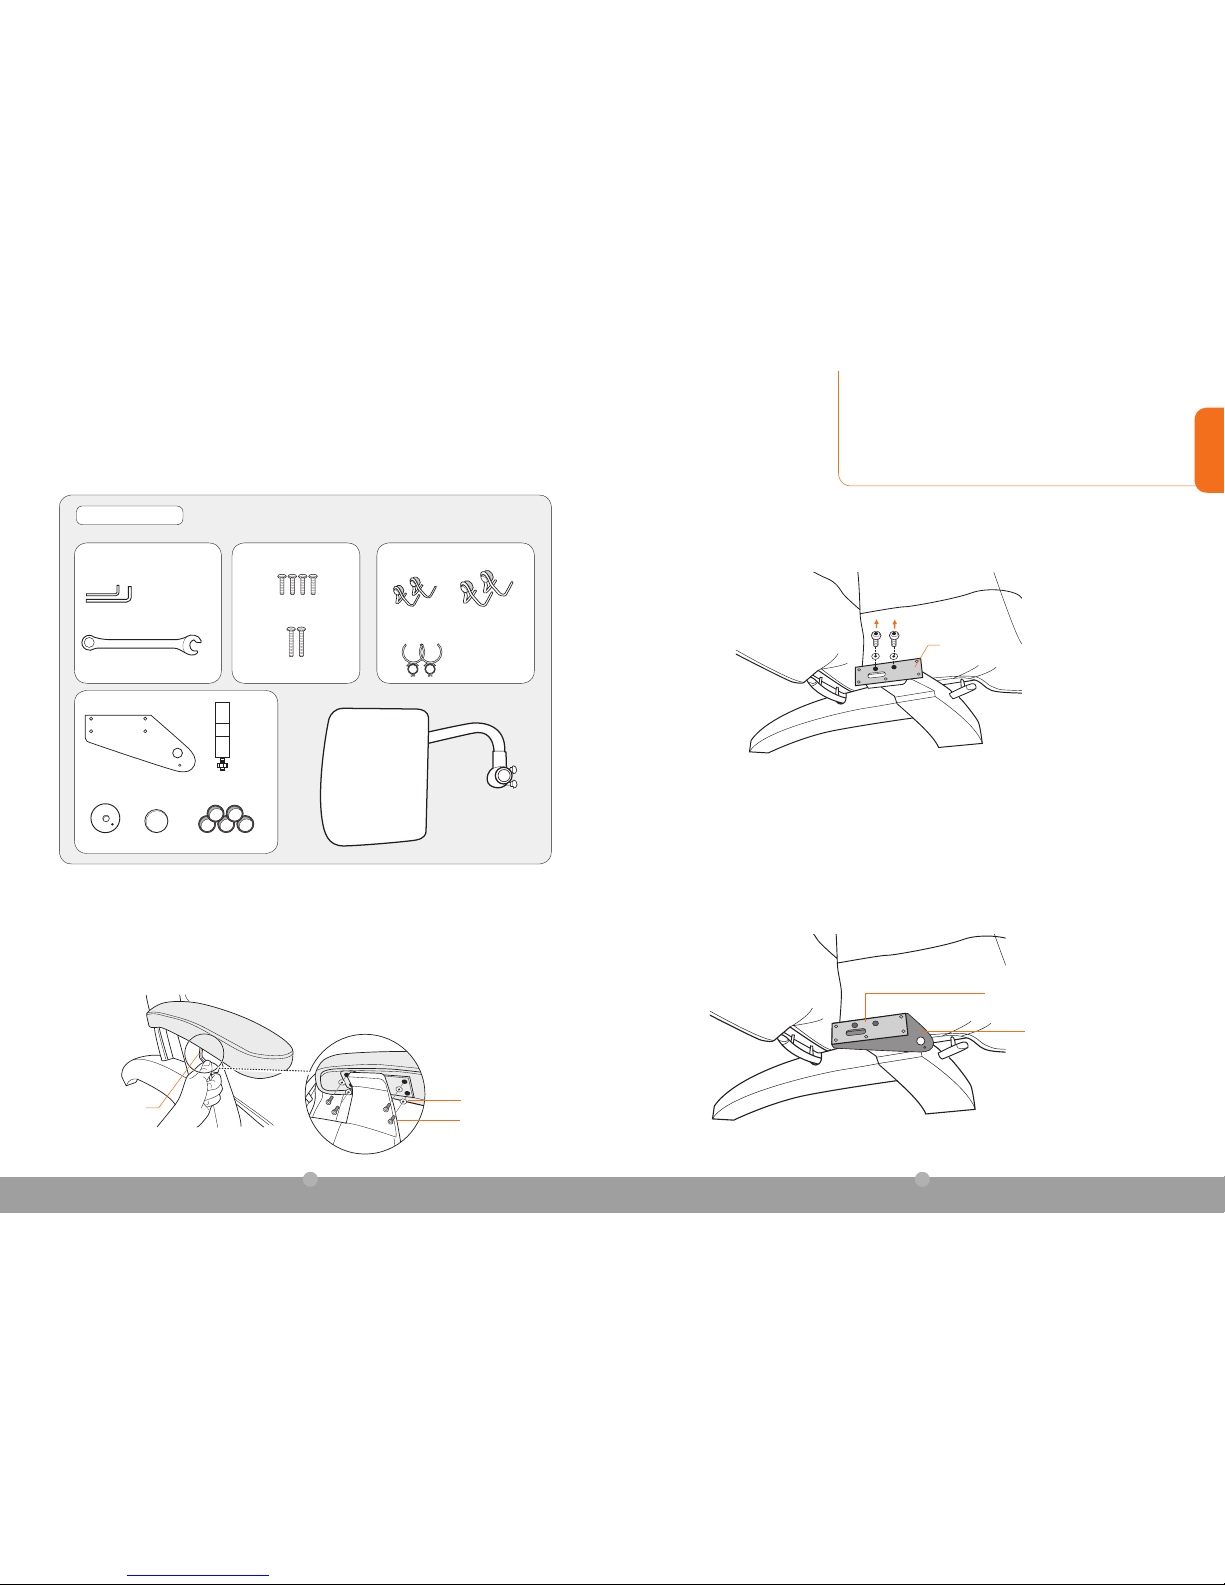
1. Using the larger Allen wrench (provided), remove the four Allen screws from the underside of the right-hand
armrest (Fig.1).
2. Discard the screws; retain the washers.
3. Remove the armrest from the chair.
4. If you have a Perfect Chair accessory table attached to your chair, set it aside for later installation.
1. Using the larger Allen wrench (provided), remove the two screws that secure the silver armrest plate to the top of the
armrest support (Fig.2)
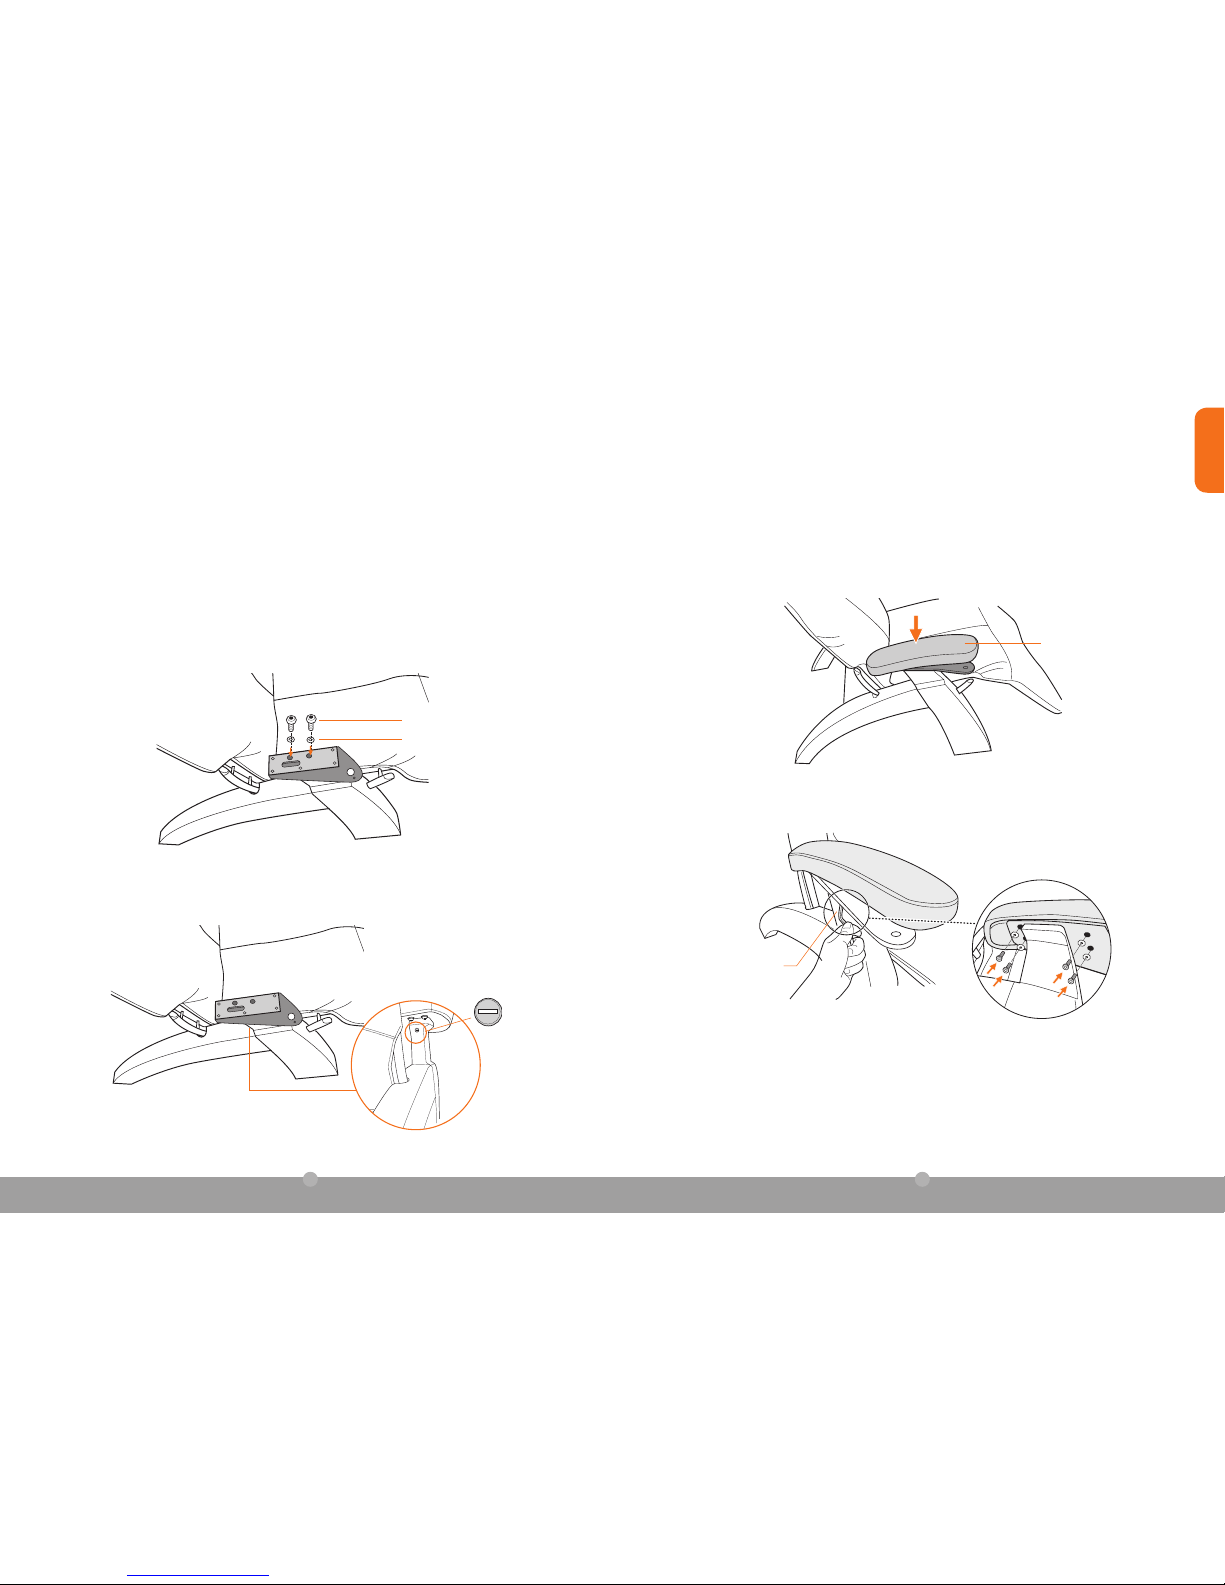
Install the mounting bracket
Larger Allen wrench
(Fig.1)
2. Discard the screws; retain the washers.
3. Place the Laptop Desk mounting plate on top of the armrest support as shown, then place the silver armrest plate on
top of the bracket, aligning the holes (Fig.3).
(Fig.2)
(Fig.3)
Silver armrest plate
Allen screw
Washer
Unpack the box, including the inner box containing small parts. Make sure you
have each of the following items:
TOOLS
Allen wrench
Wrench
HARDWARE
Short screw (4)
Long screw (2)
ACCESSORIES
Edge stop (short)
(2)
Edge stop (tall)
(2)
Cable clip (2)
COMPONENTS
Mounting plate
Mounting post
Spacer plate
Post cap
Spacer (5)
Laptop desk
Unpack the box
5
ENGLISH
humantouch.com
4
4. Place one of the washers you removed earlier onto each of the two longer screws (provided), insert the screws into
the two center bracket holes, then hand-tighten (Fig.4).
5. If you cannot fully insert the screws into the holes, do the following:
a. Using a flat-head screwdriver, turn the barrel nut located on the back of the armrest so that the slot is
horizontal (Fig.5).
b. Standing above the armrest, visually inspect the screw holes to determine whether the screw holes are aligned with
the holes in the barrel nut; if they are not, use a Phillips-head screwdriver or a pen to align the bolt holes with the
screw holes.
c. Repeat step 4.
6. Insert a short screw into one corner bracket hole and another short screw into the hole diagonally opposite the first
hole, to ensure all holes are well aligned.
7. Use the larger Allen wrench to firmly tighten the two center screws, then remove the two short screws from the corners
of the bracket.
Install the armrest cap
1. Place one of the washers removed earlier onto each of the four short screws (provided).
2. Place the armrest cap into position (Fig.6).
3. Replace and partially tighten the two rear armrest screws.
4. If you have an accessory table, place it into position.
5. Replace and hand-tighten the two front armrest screws.
6. Use the larger Allen wrench to moderately tighten the four screws (Fig.6).
(Fig.6)
Armrest cap
Allen screw
Washer
(Fig.4)
Larger Allen wrench
Barrel nut
(Fig.5)
Slot is horizontal

7
ENGLISH
humantouch.com
6
Install the desk
1. Install the desired number of spacers onto the post, to position the desk at the desired height.
2. Place the Laptop Desk collar onto the post.
3. Place any unused spacers on top of the post for storage.
4. Place the post cap on top of the post.
Add spacer to increase the
height (maximum height with
5 spacers)
Cap
Install the mounting post
1. Hold the spacer plate with the pin facing down, align the pin with the corresponding hole on the mounting
plate, then insert the pin into the hole to secure the plate (Fig.7).
(Fig.7)
2. Hold the mounting post with the threads facing down,
align the pin on the bottom of the post with the outside
hole on the top of the spacer plate (Fig.8).
3. Install the nut (provided) onto the bottom of the post and use
the provided open wrench to tighten. Do not over-tighten (Fig.9).
Spacer plate
Mounting post
Spacer plate
(Fig.8)
Nut
Pin
Outside hole
of spacer plate
(Fig.10)
Complete desk installation
(Fig.9)
Place unused spacers on top for storage
Collar
(Fig.11)

9
ENGLISH
humantouch.com
8
take a seat
1. Pull the desk out and to the side, out of the way (Fig.12).
2. Take a seat.
3. Pull the table back toward you to the desired location (Fig.12).
4. Recline or incline your chair to the desired location. NOTE: You can recline approximately two-thirds of the full recline
range (depending on the height at which you installed the desk) while using your Laptop Desk (Fig.13).
SAFETY NOTE: Should you inadvertently recline to a full recline position, the Laptop Desk will automatically rise to
avoid trapping your legs between the chair and the desk.
(Fig.12)
Adjust the desk level
You can adjust your desk level up to two inches, to accommodate objects up to the maximum allowable 10 Lbs. at
a perfect level. For your safety, do not place any food or drink on the Laptop Desk.
1. While sitting in the chair, place the object you intend to use (laptop/iPad/book) on the desk. CAUTION: Do not place
any object that weighs more than 10 Lbs. on the desk, as permanent damage to the desk may occur.
2. Observe whether the desk needs to be raised or lowered to be level.
3. Lift the desk up slightly with one hand to relieve pressure on the leveling screw, then use your other hand to turn the
screw slightly clockwise to raise the desk or counterclockwise to lower it (Fig.14).
CAUTION: You must raise the desk before adjusting the leveling screw to avoid permanently damaging the desk.
NOTE: Do not remove the screw, as it is difficult to reinstall.
4. Repeat step 1-3 until the desk is level.
(Fig.14)
Lift the desk up slightly to relieve
pressure on the leveling screw
Leveling screw
(Fig.13)
Tension screw
11
ENGLISH
humantouch.com
10
Install the edge stops
Your Laptop Desk comes with two tall edge stops, for use with laptops, and two short edge stops, for use with iPads and
netbooks. These stops, combined with the holes along the inside edge of the desk, enable you to hold virtually any device
securely on the desk when the desk is tilted.
1. With the object you intend to use in place on the desk, determine whether the taller or shorter stops are best suited to
hold the object. Do not use more than two stops at one time.
2. Choose the desired location in which to install the first stop.
3. While squeezing the stop sides firmly toward each other, insert the ends into the corresponding desk holes and push the
stop inward halfway before releasing the stop sides (Fig.15).
NOTE: Repeated installation of the edge stops without squeezing the sides together will eventually enlarge the holes and
they will no longer hold the stops in place.
4. Push the stop the rest of the way into the holes, as far as you can.
5. Repeat steps 2 – 4 to install the other stop.
6. Once all desired stops are installed, slide the rubber bumpers up or down to the location that best protects the edges
of your device from becoming scratched.
7. Store the unused edge stops in a convenient place, so you can locate them when using a different device.
(Fig.15)
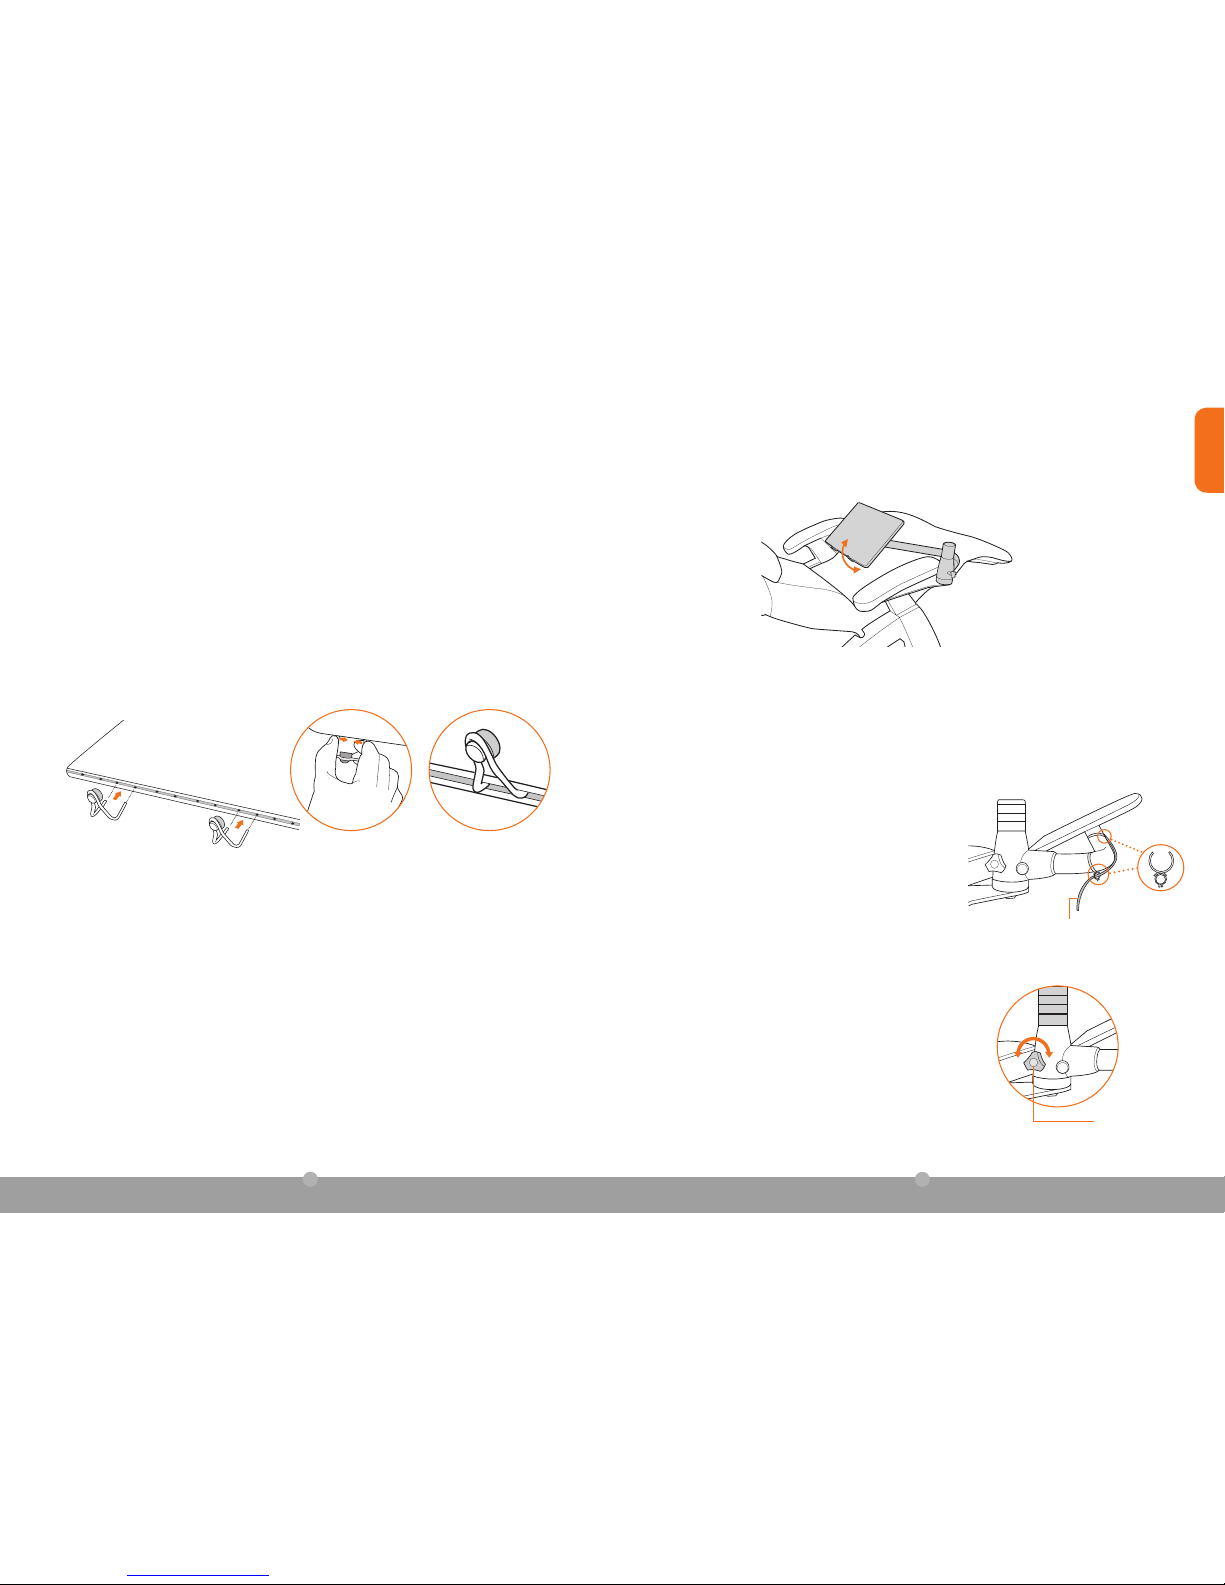
Adjust the desk tilt
Grasp the Laptop Desk with your hands on both sides, then tilt it forward, for optimal viewing angle.
Install the cable clips
If you are using an outlet-powered device, you can use the provided
cable clips to secure the device cables to the Laptop Desk arm,
conveniently out of the way.
1. Attach the first clip to the desk arm, underneath the desk.
2. Attach the second clip to the arm, near the bend.
3. Snap the cable into the cable guides on each clip.
Adjusting the desk arm tension
You can increase or decrease the desk arm tension, to make it easier
or more difficult to swivel the desk arm forward and backward.
1. While sitting in the chair, locate the tension screw on the desk post.
2. Turn the screw clockwise to increase the arm tension or
counterclockwise to decrease the tension.
Tension screw
Cable clip
Device cable
Edge stop installedSqueeze the stop sides
IMPORTANT: When removing the edge stops, be sure to squeeze the sides firmly toward each other before pulling the
stops out of the holes.
13
ENGLISH
humantouch.com
12
Specifications*
Laptop Desk Size: 18”L x 12”W
Laptop Desk Weight: 9 Lbs.
Maximum Load Weight: 25 Lbs.
*Specifications are subject to change without prior notice.
maintenance
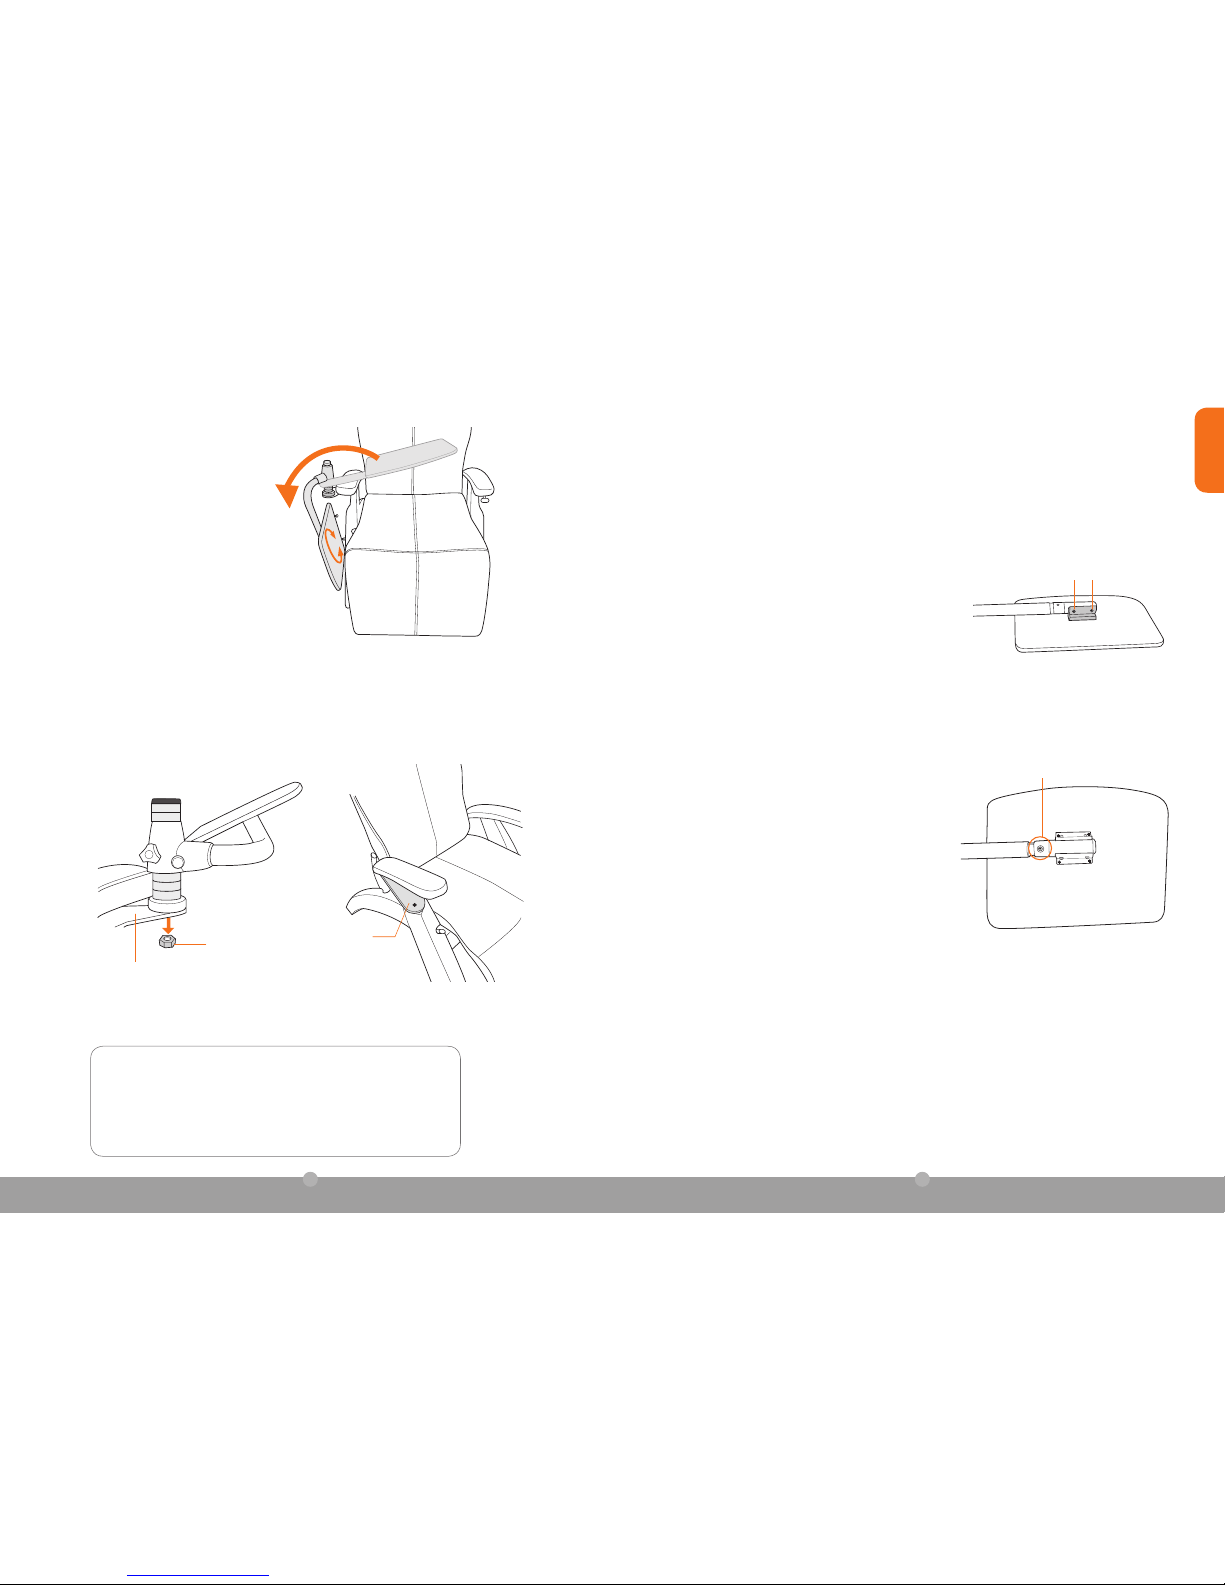
Adjusting the table tilt tension
1. Lift the Laptop Desk off the post, then turn it upside down.
2. Remove the Allen wrench from the storage slot on the bottom
of the Laptop Desk, then use it to slightly tighten the tilt screws.
IMPORTANT: Do not over-tighten the screws or the desk
may break. Be sure to tighten the two screws equally.
3. Test the tension to ensure that is appropriately tight, and that
the table tilts smoothly. If the table does not tilt smoothly, you
likely did not tighten the screws equally.
Tension screws
Desk upside down
Adjusting the table swivel tension
1. Lift the desk off the post, then turn it upside down.
2. Remove the Allen wrench from the storage slot on the
bottom of the Laptop Desk, then use it to slightly tighten
the swivel screw.
Desk upside down
Swivel screw
After years of use, the table tilt and swivel tension screws may become loose and require tightening. Follow the steps in
this section carefully to perform this maintenance.
You can also quickly remove the laptop desk (minus the bracket) without completely uninstalling it.
1. Use the provided open wrench to remove the nut on the bottom of the mounting post.
2. Pull up on the Laptop Desk arm and mounting post to remove the unit from the chair.
The mounting bracket remains, for easy reinstallation.
Stowing the laptop desk
To stow the Laptop Desk, out of the way,
simply flip it over to the side of the chair.
Nut
Mounting bracket
Mounting bracket
Rotate the Laptop Desk to avoid interference
with the floor.
 Loading...