

HumanStar 300 User manual
HumaStar 300
| User Manual
|
Cat.No. 17901s/1


Revision List of the Manual
No. Rev / Date REVISION DESCRIPTION
1 01/2008-07 First edition for modified HumaStar 300 from S/N A520331
2 02/2010-08 Correction of typing errors
i

ii

1 INTRODUCTION
This manual is considered as a part of the instrument; it has to be at the operator’s hand as well as at the
maintenance operator’s availability. For accurate installation, use and maintenance, please read the following
instructions carefully. In order to avoid instrument or personal damages, carefully read the ”GENERAL SAFETY
WARNINGS”, describing the suitable operating procedures. In case of breakdowns or any troubles with the
instrument, apply to the local Technical Service.
2 USER WARRANTY
HUMAN warrants that instruments sold by one of its authorised representatives shall be free of any defect in
material or workmanship, provided that this warranty shall apply only to defects which become apparent within
one year from the date of delivery of the new instrument to the purchaser.
The HUMAN representative shall replace or repair any defective item at no charge, except for transportation
expenses to the point of repair.
This warranty excludes the HUMAN representative from liability to replace any item considered as expendable in
the course of normal usage, e.g.: lamps, valves, syringes, glassware, fuses, diskettes, tubing etc.
The HUMAN representative shall be relieved of any liability under this warranty if the product is not used in
accordance with the manufacturer's instructions, altered in any way not specified by HUMAN, not regularly
maintained, used with equipment not approved by HUMAN or used for purposes for which it was not designed.
HUMAN shall be relieved of any obligation under this warranty, unless a completed installation / warranty
registration form is received by HUMAN within 15 days of installation of this product.
This warranty does not apply to damages incurred in shipment of goods. Any damage so incurred shall be re-ported
to the freight carrier for settlement or claim.
3 INTENDED USE OF THE INSTRUMENT
[IVD]
The instrument has to be used for the expected purposes and in perfect technical conditions, by qualified
personnel, in working conditions and maintenance operations as described in this manual, according to the
GENERAL SAFETY WARNINGS. This manual contains instructions for professional qualified operators.
4 GENERAL SAFETY WARNINGS
Use only chemical reagents and accessories specified and supplied by HUMAN and/or mentioned in this manual.
Place the product so that it has proper ventilation.
The instrument should be installed on a stationary flat working surface, free from vibrations.
Do not operate in area with excessive dust.
Work at room temperature and humidity, according to the specifications listed in this manual.
Do not operate this instrument with covers and panels removed.
Only use the power cord specified for this product, with the grounding conductor of the power cord connected to
earth ground.
Use only the fuse type and rating specified by the manufacturer for this instrument, use of fuses with improper
ratings may pose electrical and fire hazards.
To avoid fire or shock hazard, observe all ratings and markings on the instrument.
Do not power the instrument in potentially explosive environment or at risk of fire.
Prior to cleaning and/or maintaining the instrument, switch off the instrument and remove the power cord.
For cleaning use only materials specified in this manual, otherwise parts may become damaged.
It is recommended always to wear protective apparel and eye protection while using this instrument.
Respective warning symbols, if appearing in this manual, should be carefully considered.
I

5 DISPOSAL MANAGEMENT CONCEPT
The currently valid local regulations governing disposal must be observed. It is in the responsibility of the user to
arrange proper disposal of the individual components.
All parts which may comprise potentially infectious materials have to be disinfected by suitable validated
procedures (autoclaving, chemical treatment) prior to disposal. Applicable local regulations for disposal have to be
carefully observed.
The Instruments and electronic accessories (without batteries, power packs etc.) must be disposed of according to
the regulations for the disposal of electronic components.
Batteries, power packs and similar power source have to be dismounted from electric/electronic parts and disposed
off in accordance with applicable local regulations.
6 INSTRUMENT DISINFECTION
Analytical instruments for in vitro diagnostic involve the handling of human samples and controls which should be
considered at least potentially infectious. Therefore every part and accessory of the respective instrument which
may have come into contact with such samples must equally be considered as potentially infectious.
Before doing any servicing on the instrument it is very important to thoroughly disinfect all possibly contaminated
parts. Before the instrument is removed from the laboratory for disposal or servicing, it must be
decontaminated/disinfected. Decontamination/disinfection should be performed by a authorised well-trained
personnel, observing all necessary safety precautions. Instruments to be returned have to be accompanied by a
disinfection certificate completed by the responsible laboratory manager. If a disinfection certificate is not
supplied, the returning laboratory will be responsible for charges resulting from non-acceptance of the instrument
by the servicing centre, or from authority’s interventions.
7 NOTICE
Every effort has been made to avoid errors in text and diagrams, however, HUMAN GmbH assumes no
responsibility for any errors which may appear in this publication. It is the policy of HUMAN GmbH to improve
products as new techniques and components become available. HUMAN GmbH therefore has to reserve the right
to change specifications if necessary in the course of such improvements.
II

NOTICE
Analytical instruments for in vitro diagnostic application involve the handling of human samples and controls
which should be considered at least potentially infectious. Therefore every part and accessory of the respective
instrument which may have come into contact with such samples must equally be considered as potentially
infectious.
BIOHAZARD
The „BIOHAZARD“ warning label must be affixed to instrument prior to first use with biological material !
Servicing Note:
Before doing any servicing on the instrument it is very important to thoroughly disinfect all possibly contaminated
parts. Before the instrument is removed from the laboratory for disposal or servicing, it must be decontaminated.
Decontamination should be performed by authorised well-trained personnel only, observing all necessary safety
precautions. Instruments to be returned have to be accompanied by a decontamination certificate completed by
the responsible laboratory manager. If a decontamination certificate is not supplied, the returning laboratory will
be responsible for charges resulting from non-acceptance of the instrument by the servicing centre, or from
authority’s interventions.
HUMAN
Gesellschaft für Biochemica und Diagnostica mbH
| Max-Planck-Ring 21 · 65205 Wiesbaden · Germany
| Tel.: +49 61 22/99 88-0 · Fax: +49 61 22/99 88-100
| e-Mail: tech-support@human.de · www.human.de
a

b

Contents
1 General Description .................................................................................................................................................................................... 1
1.1 Main Characteristics............................................................................................................................................................................. 2
1.2 Warranty ................................................................................................................................................................................................... 3
1.3 Installation ............................................................................................................................................................................................... 4
1.3.1 Unpacking ...................................................................................................................................................................................... 4
1.3.2 Installation ..................................................................................................................................................................................... 4
1.3.3 Environmental Requirements ................................................................................................................................................. 4
1.3.4 Operating Temperature Limits ............................................................................................................................................... 4
1.3.5 Power Requirements .................................................................................................................................................................. 4
1.4 Assembly ................................................................................................................................................................................................... 5
1.4.1 Hydraulic Connections............................................................................................................................................................... 6
1.5 Description of the Analyzer ............................................................................................................................................................... 7
1.5.1 Layout ............................................................................................................................................................................................... 7
1.5.2 Analytical Plate and its incubation thermostatic bath. ................................................................................................ 8
1.5.3 Cuvette Washing System ......................................................................................................................................................... 9
1.5.4 Cuvette Washing Probe ............................................................................................................................................................. 9
1.5.5 Sampling Arm ............................................................................................................................................................................ 10
1.5.6 Reagent compartment ........................................................................................................................................................... 11
1.5.7 Sample Tray ................................................................................................................................................................................ 12
1.5.8 Probe Washing Station ........................................................................................................................................................... 12
1.5.9 Diluter ........................................................................................................................................................................................... 13
1.5.10 Peristaltic pumps ................................................................................................................................................................ 14
1.5.11 Photometer ........................................................................................................................................................................... 15
2 Start Up ......................................................................................................................................................................................................... 17
2.1 Start-Up .................................................................................................................................................................................................. 17
2.2 Main Menu Display ............................................................................................................................................................................ 17
2.3 File ............................................................................................................................................................................................................ 18
2.4 Registers ................................................................................................................................................................................................. 20
2.5 Tools ........................................................................................................................................................................................................ 20
2.6 EDIT .......................................................................................................................................................................................................... 23
2.7 Navigation ............................................................................................................................................................................................. 24
2.8 Help ? ....................................................................................................................................................................................................... 25
2.9 Analyzer Status .................................................................................................................................................................................... 25
2.10 Sub-Programs – F2 a F9 ................................................................................................................................................................ 25
2.11 User Personalized Programs ....................................................................................................................................................... 26
2.12 Important functions:..................................................................................................................................................................... 27
3 Software ....................................................................................................................................................................................................... 29
3.1 Software ................................................................................................................................................................................................. 29
3.2 F3 – Archive ........................................................................................................................................................................................... 30
3.3 F4 - Methods ......................................................................................................................................................................................... 30
3.3.1 To Introduce or Delete a Method ........................................................................................................................................ 35
3.3.2 Examples of how to Program the Methods: .................................................................................................................. 35
3.3.3 Calculated Methods - F4 ........................................................................................................................................................ 40
3.4 F5 - Profiles ............................................................................................................................................................................................ 41
3.4.1 To program a new Profile ...................................................................................................................................................... 41

3.4.2 To Delete a Profile..................................................................................................................................................................... 41
3.5 F6 - Standards ...................................................................................................................................................................................... 42
3.5.1 To Program a New Standard ................................................................................................................................................ 42
3.5.2 To Delete or modify a Standard Value .............................................................................................................................. 42
3.6 F7 - Controls .......................................................................................................................................................................................... 43
3.6.1 To Program a New Control .................................................................................................................................................... 43
3.6.2 To Delete or Change a Control Value ................................................................................................................................ 43
3.6.3 Quality Control Program ........................................................................................................................................................ 44
3.7 Options ................................................................................................................................................................................................... 44
3.7.1 Standard Options - can be activated by the operator when needed: ................................................................... 44
3.7.2 Special Options (upon request) ........................................................................................................................................... 45
4 Analyzer Operation .................................................................................................................................................................................. 47
4.1 Analyzer Operation ............................................................................................................................................................................ 47
4.2 Reagents ................................................................................................................................................................................................ 47
4.2.1 Check Reagent Volumes for the Daily Run ...................................................................................................................... 48
4.2.2 Prepper–the Auto- Pre-dilution system ........................................................................................................................... 50
4.3 Calibration ............................................................................................................................................................................................. 50
4.3.1 The Calibration page ............................................................................................................................................................... 51
4.3.2 To program a Serum Control for Calibration ................................................................................................................. 51
4.3.3 Multi-Standard Calibration ................................................................................................................................................... 51
4.3.4 ISE Module Calibration ........................................................................................................................................................... 51
4.3.5 Reag. BIAS Subt. ......................................................................................................................................................................... 51
4.3.6 Start Calibration ........................................................................................................................................................................ 51
4.3.7 Check Calibration ...................................................................................................................................................................... 51
4.3.8 To Repeat a Standard or Calibrator .................................................................................................................................... 52
4.3.9 To Repeat a Serum Control ................................................................................................................................................... 52
4.3.10 To Display the graph of a Calibration or a Kinetic Control .................................................................................. 52
4.4 Patient Entry ......................................................................................................................................................................................... 53
4.4.1 To Program Patients using Profiles .................................................................................................................................... 53
4.5 To Program a Stat ............................................................................................................................................................................... 54
4.6 To Run Patient Samples ................................................................................................................................................................... 55
4.6.1 To Add Samples During Operation .................................................................................................................................... 55
4.6.2 To Repeat a Test, a Sample or All Tests ............................................................................................................................ 55
4.6.3 To Recalculate a Test against a New Factor ................................................................................................................... 56
4.7 Print of a Patient Report ................................................................................................................................................................... 56
4.8 Special Notes ........................................................................................................................................................................................ 57
4.8.1 Flags and/or Errors displayed On Line: ............................................................................................................................. 57
4.8.2 Sample Pre-dilution ................................................................................................................................................................. 57
5 Bar Code Reader, Ise Module, Data Exchange ................................................................................................................................ 59
5.1 Bar Code Reader for Samples and Reagent............................................................................................................................... 59
5.1.1 The Bar Code can read the following codes: .................................................................................................................. 59
5.1.2 To identify the samples with the Bar Code: ................................................................................................................... 59
5.2 Reagent Identification ...................................................................................................................................................................... 61
5.3 Ise Module ............................................................................................................................................................................................. 62
5.3.1 Some Characteristics ............................................................................................................................................................... 62
ii/iii Human HumaStar 300 User Manual

5.3.2 Technical Specifications ......................................................................................................................................................... 63
5.3.3 Important Notes ....................................................................................................................................................................... 63
5.3.4 Testing Procedure ..................................................................................................................................................................... 64
5.3.5 Urine Tests................................................................................................................................................................................... 64
5.3.6 Trouble Shooting the ISE Module ....................................................................................................................................... 64
5.4 Data Exchange with Host Computer .......................................................................................................................................... 66
5.4.1 Host Computer Setup ............................................................................................................................................................. 66
5.4.2 Connection from Host Computer To HumaStar 300 .................................................................................................. 66
5.4.3 Protocol......................................................................................................................................................................................... 66
5.4.4 To Transfer a Worklist (Downloading from HOST or from a diskette) ................................................................. 67
5.4.5 Transfer Results (Transmission to HOST or Diskette) ................................................................................................. 68
6 Maintenance Program ............................................................................................................................................................................ 71
6.1 Reagent System ................................................................................................................................................................................... 71
6.2 Sample System .................................................................................................................................................................................... 72
6.3 Measurement System ....................................................................................................................................................................... 73
6.4 Daily Checks .......................................................................................................................................................................................... 73
6.5 Maintenance every TWO weeks ................................................................................................................................................... 74
6.6 Operation to be done every 2 months ........................................................................................................................................ 74
6.7 Analyzer Maintenance ...................................................................................................................................................................... 75
6.7.1 Change Photometer Lamp (See 6.7.1-1) .......................................................................................................................... 75
6.7.2 Drain and Fill the Incubation bath (see 6.7.2-1) ............................................................................................................ 76
6.7.3 Check Incubation Temperature ........................................................................................................................................... 76
6.7.4 Change the Sampling Probe (See 6.7.4-1) ....................................................................................................................... 77
6.7.5 Change Tubing on Peristaltic Pump .................................................................................................................................. 78
6.7.6 Replace the Syringe .................................................................................................................................................................. 79
7 Trouble Shooting, Spare Parts .............................................................................................................................................................. 81
7.1 Trouble Shooting Guide ................................................................................................................................................................... 81
7.2 Spare parts and accessories ............................................................................................................................................................ 84
7.3 Suggestions and Warnings ............................................................................................................................................................. 85
7.4 HumaStar 300 – Maintenance Program .................................................................................................................................... 86
8 Appendix – Reaction details ................................................................................................................................................................. 99
iii/iii

iv/iv Human HumaStar 300 User Manual
1 General Description
HumaStar 300 is an automatic random access Chemistry Analyzer to run your daily workload, a single test, a
profile, an organ panel or STAT with the same speed and efficiency.
HumaStar 300 incorporates the latest in the art of smart technology and a sophisticated software that simplifies
the work of the operator and offers maximum versatility and reliability of operation. The analyzer offers many new
and desirable features, including a throughput of 300 chemistry test single reagent plus over 180 electrolytes per
hour ±5% at the same time, making it ideal in any size laboratory.
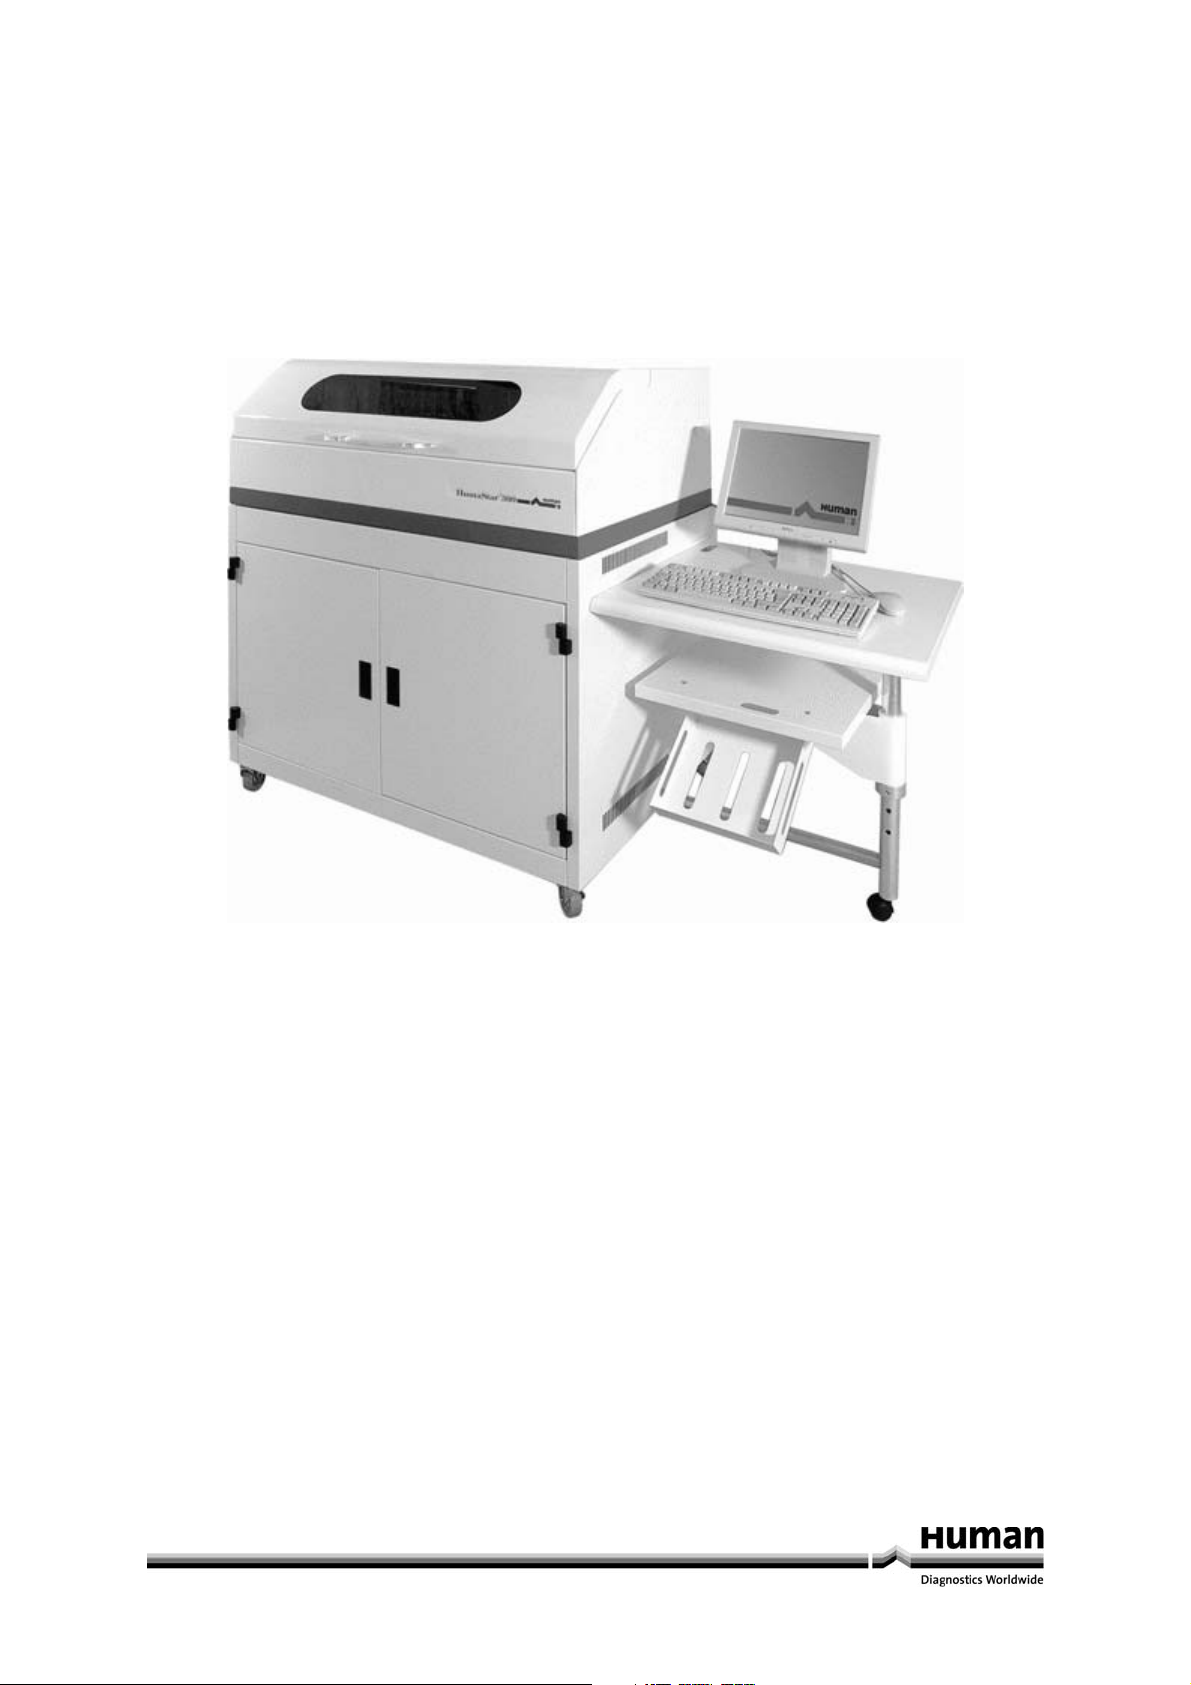
Fig 1-1
1

1.1 Main Characteristics
HumaStar 300 - is fully controlled by a built-in Pentium computer and performs the tests in a true random access
mode; where all tests for sample ONE are processed before starting on sample number TWO. Each sample is
treated like a STAT and a Patient Report is automatically printed.
THROUGHPUT - 300 Chemistry test per hour independent of method used, plus 180 electrolytes at the same time
by a built-in ISE module for Na, K and Cl. (Optional).
SAMPLE CAPACITY - The analyzer is conceived to process up to 240 Patients at a time, with automatic loading and
programming while the analyzer is in operation. 40 On-Line primary tubes or small sample cups, on 4 independent
sector, plus 20 positions for Standards, Calibrators, Controls and Stats. Each sample has a corresponding place for a
cup for automatic pre-dilution if necessary.
REAGENT CAPACITY - 30 On-Line reagents - each reagent can be cooled or left at room temperature.
METHODS - an unlimited number of user programmable methods can be programmed with a single or two
reagents. Up to 30 different single-reagent methods or 15 two-reagent methods can be processed at a time, or a
combination of the two.
REAGENT VOLUME – is automatically monitored with an On-Line inventory. The number of tests available in each
reagent bottle is displayed and its stability checked. A missing reagent is automatically flagged.
AUTOMATIC SAMPLE PRE-DILUTION - on request prior to start operation.
SAMPLING PROBE - with its built-in mixer and liquid level sensor transfers both reagent and sample and
automatically mixes to start reaction.
BAR CODE READER - to identify for samples and reagents (Optional).
WALK-AWAY OPERATION - Once the patients are programmed, all operations are fully automatic including
automatic wash of the reaction cuvettes to assure a non stop operation.
DIRECT READING - a built-in multi-filter photometer measures each sample every 12 seconds at 8 different
wavelengths. There is a reagent-cuvette blank for every sample to eliminate the possibility of errors.
I.S.E. MODULE - is built-in for the determination of Na, K and Cl together with the routine chemistries. (Optional)
AUTOMATIC REPETITION OF RESULTS - results, that are outside of linearity range or suspect of substrate depletion,
are automatically repeated with half its sample size.
REAGENT VOLUME - only 300 μl of reagent is sufficient to run any test.
KEYBOARD – a full keyboard for easy programming and patient data input.
USER FRIENDLY SOFTWARE – with graphic presentation, makes the analyzer easy and simple to operate. The
operator is guided step by step through all operations, including an On-Line HELP program.
ON-LINE HELP – a program to help the operator during operation and programming.
OPEN SYSTEM – an unlimited number of Chemistries and Immunoassay methods, Profiles, Standards, Calibrators
and Controls are all user programmable, including automatic calculations of Ratio methods.
ON-LINE QUALITY CONTROL – checks the precision during standardisation and presents graphically a 60 day
Quality Control program with calculated MEAN, Standard Deviation, %CV and theor CV%.
STATS - are processed within 6 minutes without interfering with the routine testing.
PATIENT REPORT – are user personalised, printed and automatically saved on a hard disk.
BI-DIRECTIONAL INTERFACE – via built-in a RS 232/C connection to EDP systems.
2 Human HumaStar 300 User Manual

1.2 Warranty
HUMAN warrants that instruments, sold by it or by one of its authorised dealers, shall be free of defects in material
or workmanship, provided that this warranty shall apply only to defects which become apparent within one year
from the date of delivery of the new instrument to the purchaser.
HUMAN shall replace or repair any defective item at no charge, except for transportation expenses to the point of
repair.
This warranty excludes HUMAN from liability to replace any item considered as expendable in the course of normal
usage, e.g.: lamps, valves, syringes, glassware, fuses, diskettes, tubing etc.
HUMAN shall be relieved of any liability under this warranty if the product is not used in accordance with the
manufacturer's instructions, not regularly maintained, used with equipment not approved by HUMAN or used for
purposes for which it was not designed.
HUMAN shall be relieved of any obligation under this warranty, unless:
1. A completed installation/warranty registration form is received by HUMAN within 15 days of installation of this
product.
2. The Buyer, within the applicable period of time, returns the defective product or part thereof, freight pre-paid at
Buyer's expense, to HUMAN.
This warranty does not apply to damages incurred in shipment of goods. Any damage so incurred shall be reported
to the freight carrier for settlement or claim.
3
1.3 Installation
1.3.1 Unpacking
Shipping and packing materials have been selected to provide maximum protection during transportation under
normal handling conditions.
NOTICE: once the carrier has taken possession of the system for transportation from the factory, the carrier
assumes all liability until delivery. All claims for damage due to transportation must be filed with the carrier as
soon as possible.
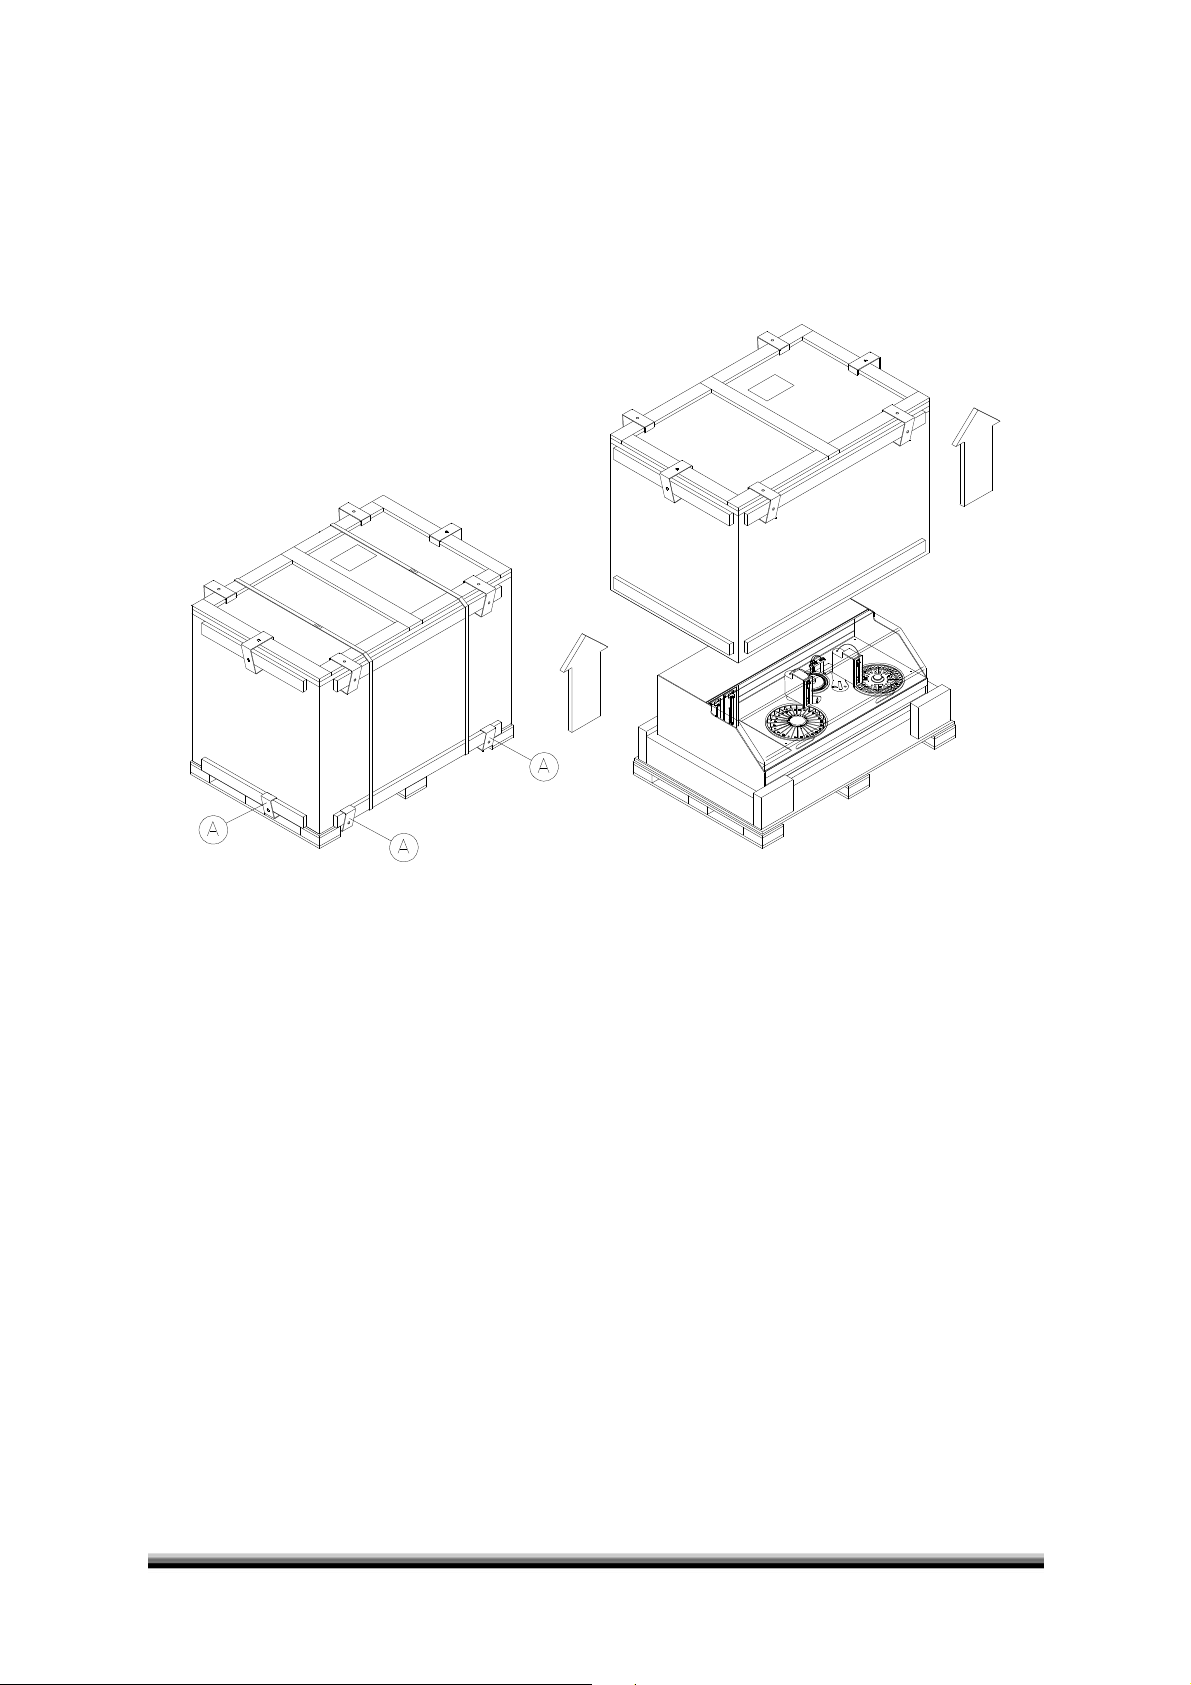
1.3.1-1
Examine the shipping crate and cartons for indications of damage, e.g. crushed or indented walls, holes or gouges,
water damage, etc. Have the carrier note any such damage on the delivery receipt; this will simplify formulating a
claim if any of the instruments or parts are damaged.
NOTICE: the system serial number is identified as the serial number of the Analyzer.
Open the carton from the top and remove the instrument with care as shown on the graph above. It is
recommended that two people help with the removal of the instrument from its crate and its plastic bag. Save the
crate and packing material until you are sure you have received everything and all is in good working condition.
1.3.2 Installation
The Analyzer system must be installed in the laboratory by specialised personnel. At the time of installation the
system will be checked to ensure proper operations. During installation, at least one person in the laboratory will
be trained in operation and maintenance of the Analyzer.
The HumaStar 300 is a highly sophisticated, high precision, sensitive instrument. Proper installation will ensure
optimum performance.
1.3.3 Environmental Requirements
The system should be mounted on a table or workbench in an area free from vibration, draughts, dust, strong
magnetic fields or direct sunlight.
1.3.4 Operating Temperature Limits
Ambient room temperature from 15° C to 32°C max. humidity 65% (non-condensing)
1.3.5 Power Requirements
A standard 115/230 V - 50/60 Hz - 500 VA power is required, as indicated on the back of the instrument. A 2-wire
outlet is used to assure proper electrical grounding.
If the laboratory power supply varies by more than 10%. It is recommended to install an external stabiliser an OnLine UPS with a minimum rating is 600 VA.
4 Human HumaStar 300 User Manual
1.4 Assembly
The Analyzer is supplied assembled and ready to use. However, it is important that the installation be done by
authorised personnel only. The instrument should be internally examined to check that no damage has occurred to
any of the electronic boards or mechanical parts during shipment.
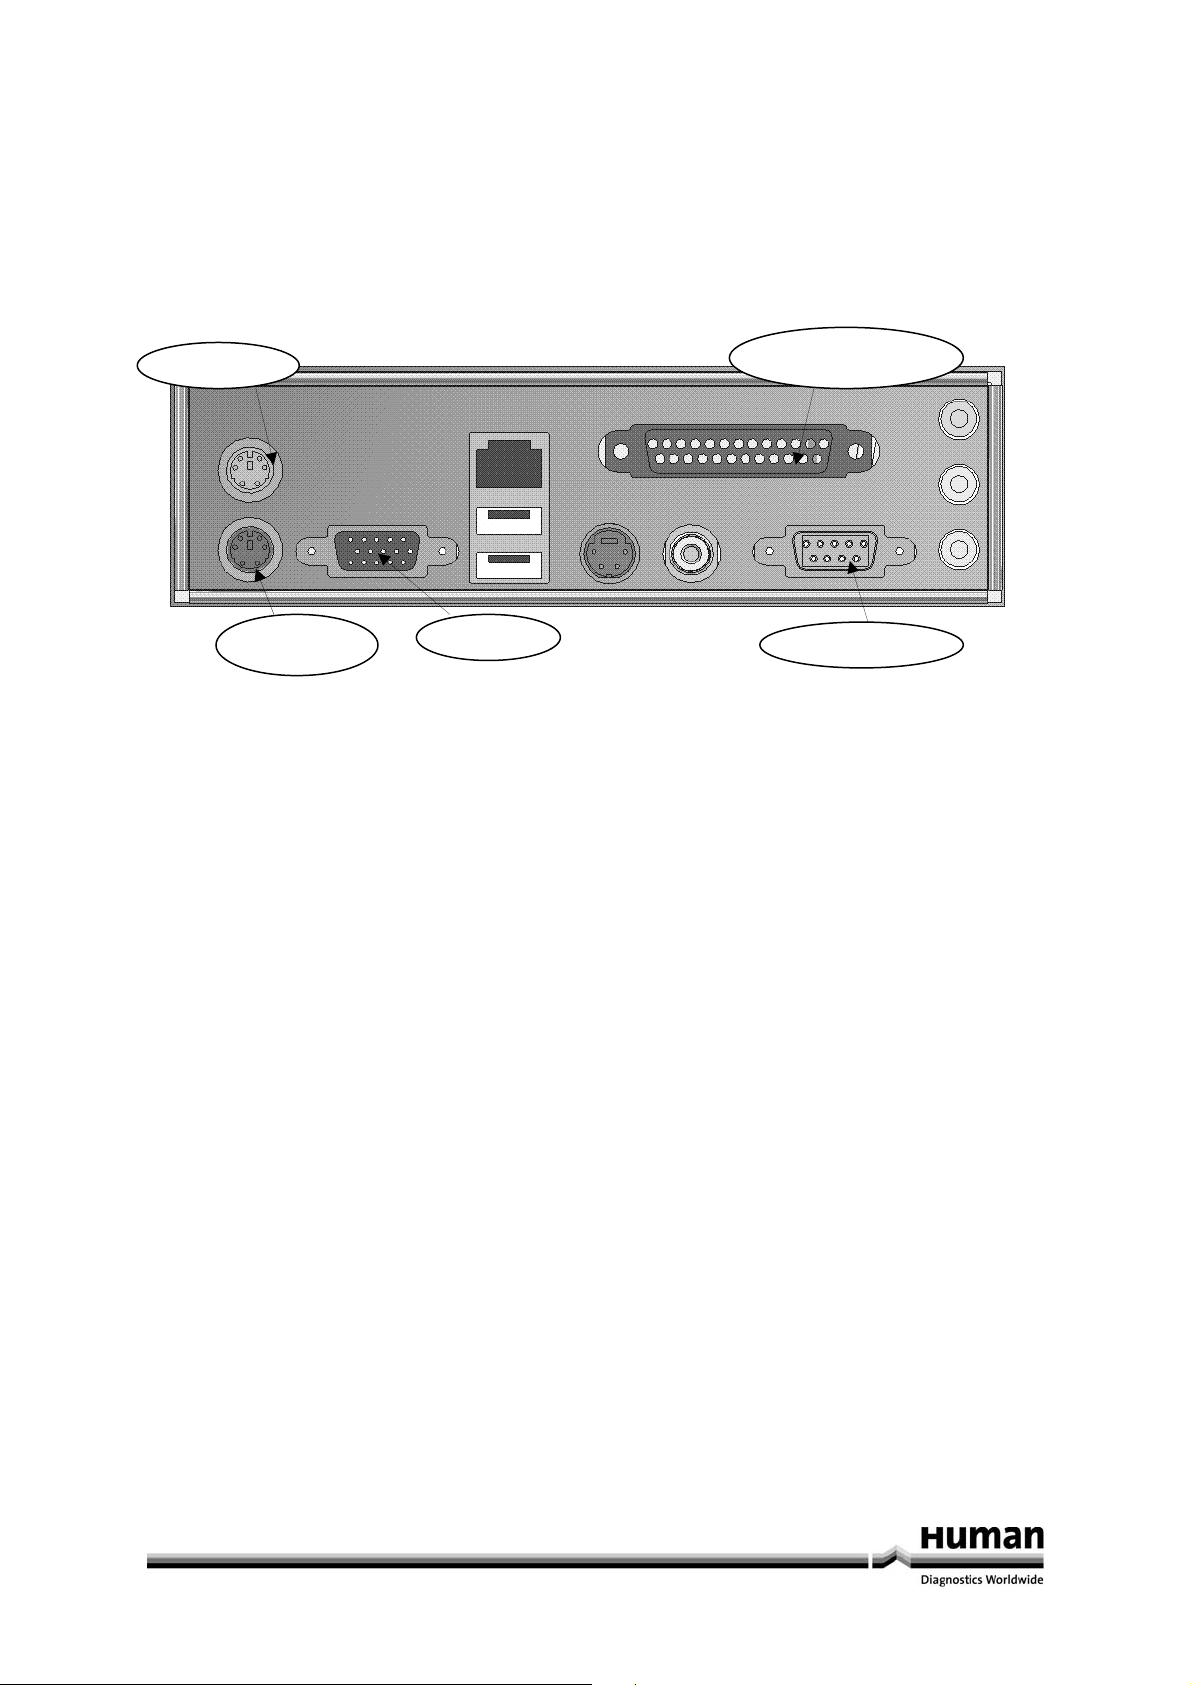
Then proceed to install the external parts as follows: Monitor, Printer, Mouse, Keyboard, Waste Container, Wash
Solution Container, Container of liquid for the Incubation Bath. See Figure 1.4-1.
The Monitor and the printer can be connected to the outlets AUX located in the back of the analyzer.
MOUSE
PARALLEL PORT
MONITOR
COM 1 (HOST)
1.4-1
5
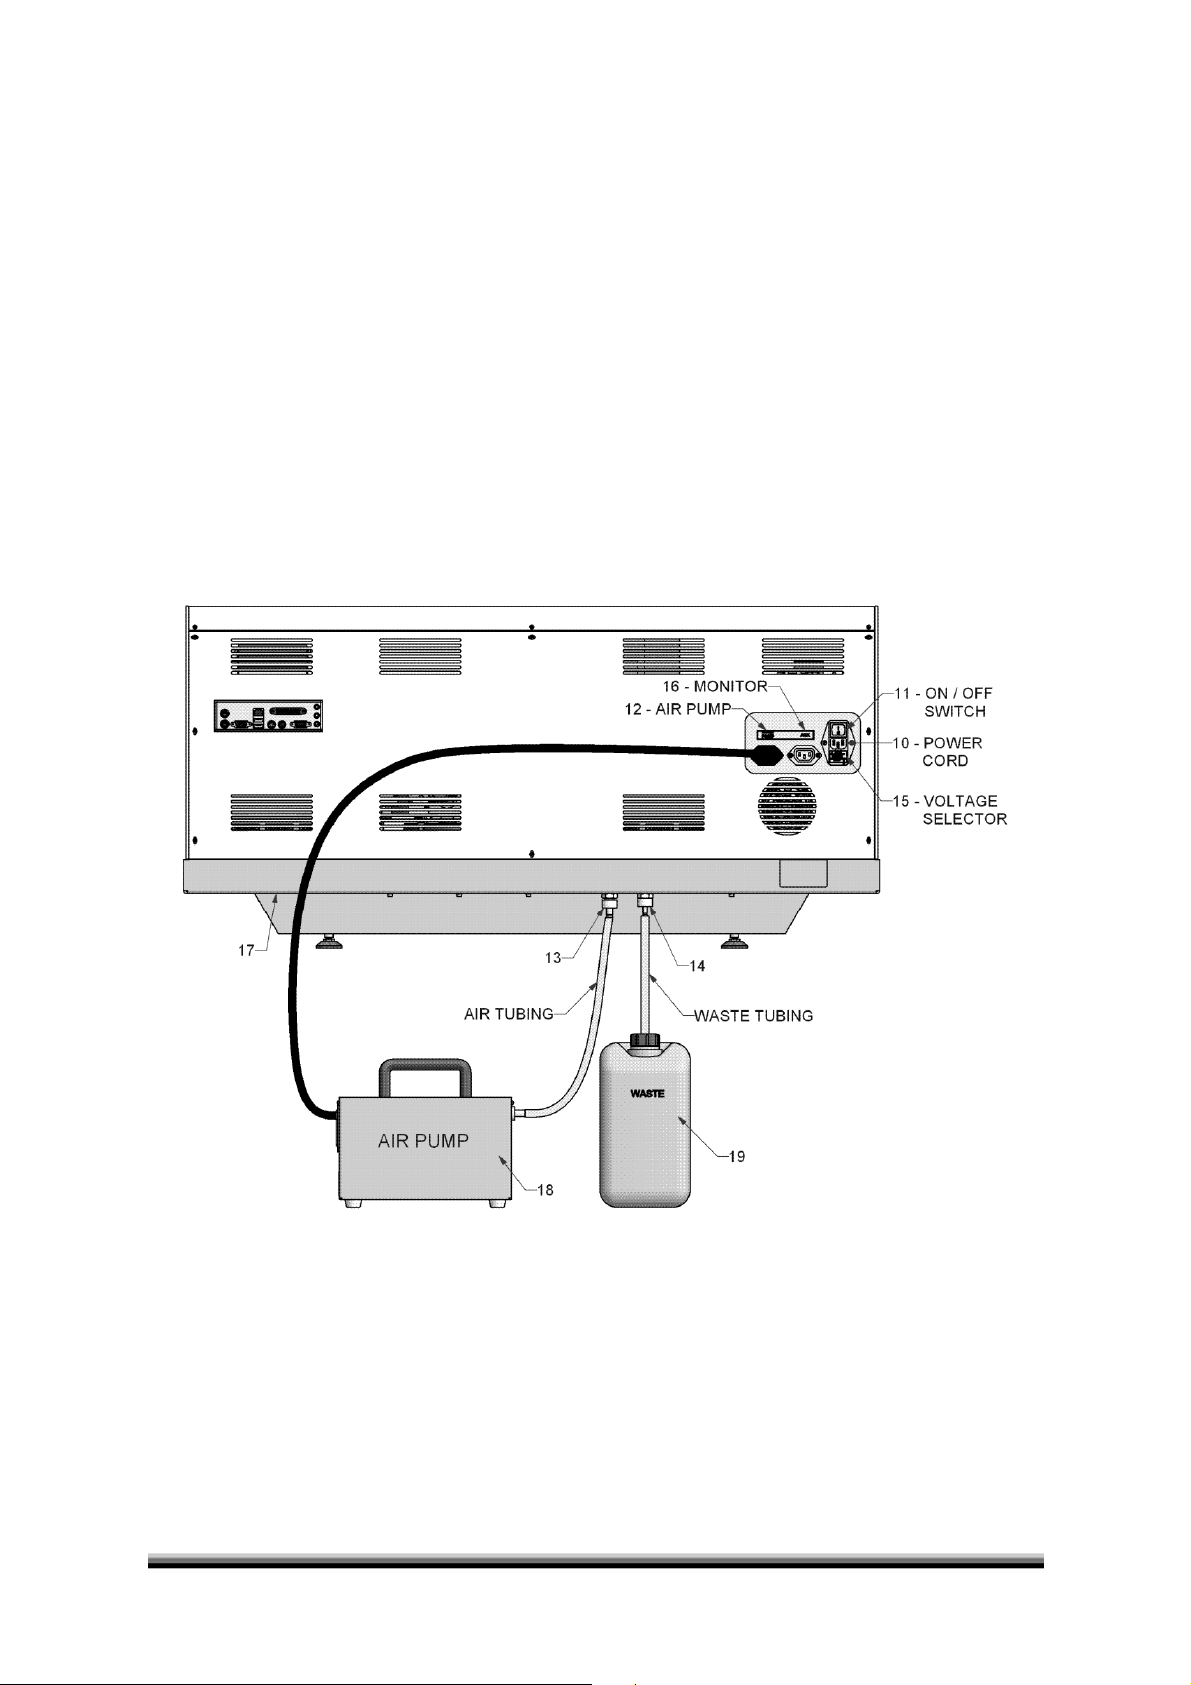
1.4.1 Hydraulic Connections
Follow example in Figure 1.4.1-1
1) WASH SOLUTION - Fill container with 5 liters of dist. water and add 1.500μl of Wash Additive cat.-no.
18971. Mix slowly to avoid foaming. Close the container with its screw cap containing the level sensor.
a) It will be flagged when the solution level in the container gets low, however, there will be enough solution
to finish the programmed workload.
b) It is suggested to prepare the Wash Solution fresh every day and add to the container as necessary.
c) Once a week it is suggested to rinse thoroughly the Wash Container with distilled water before adding
the freshly prepared Wash Solution.
2) INCUBATION BATH - Fill the container with bi-distilled water and close it with its screw cap and its level
sensor.
a) When the Analyzer is turned ON, the incubation bath will be automatically filled including its thermostat.
Both the temperature and the level of liquid in the incubation bath are continuously monitored.
b) Missing bi-distilled water in the bath is automatically signaled and flagged.
c) To avoid formation of bacteria or other undesirable matter inside the water bath, it is important that
every two weeks this bi-distilled water be drained and fresh one introduced. This operation is done
automatically through the Maintenance program. Simply press first Drain Bath and then Fill Bath.
NOTE: USE ONLY BI-DISTILLED WATER FOR THE INCUBATION BATH
1.4.1-1
3) ISE – CALIBRATOR “A” - Place the "Calibrator A" bottle close to the ISE module and close it with its level
sensor cap. When using the ISE module, the reagent will automatically fill the system. For details see ISE
Calibration.
4) WASTE – It is suggested to empty the Waste Container daily and rinse it with a detergent to avoid bacteria
formation.
6 Human HumaStar 300 User Manual

1.5 Description of the Analyzer
1.5.1 Layout
The analyzer consists in three main parts which are assembled on a single support.
REAGENTS - SAMPLES - REACTION/MEASUREMENT including cuvette washing system. See Figure 1.4.3-1 each of
these parts will be described in detail below.
with 39 cuvettes and Built Photometer
REACTION PLATE
Reagent Dispensing Arm
24
3
2
4
1
5
0
3
9
2
8
2
7
2
6
2
5
2
4
2
3
2
2
2
1
2
6
7
8
9
1
0
1
1
1
2
1
3
14
1
5
1
0
6
2
1
9
7
1
8
1
Washing well
30 ON-LINE REAGENT
1.5.1-1: Layout
23
6
3
5
3
4
3
3
3
2
3
1
3
0
3
9
2
8
2
7
2
6
2
5
2
4
1
2
9
3
8
3
4
7
3
2
5
6
1
6
1
7
1
8
3
2
1
9
2
2
2
1
0
2
I.S.E.
Primary tube
Pre-dilution cup
Cuvettes washing station
7
8
9
1
0
1
1
1
2
1
3
1
4
1
5
7
5
4
3
1
Sample Dispensing Arm
1
1
9
0
1
8
6
A
B
A
A
B
.
l
a
C
2
.
S
.
n
a
e
l
C
0
4
9
8
3
3
7
3
SAMPLE TRAY
4 STAT
1
D
C
T
A
T
S
E
S
I
4
1
6
3
5
3
16 Place for
Standard and Controls
3
1
1
5
1
4
2
2
1
3
1
2
1
D
D
4
3
3
1
1
6
B
B
3
4
5
S
T
A
6
N
D
A
R
D
7
a
n
d
8
C
O
N
T
R
9
O
L
S
1
0
1
1
3
2
3
1
3
25
7
1
1
8
9
2
0
2
1
2
2
2
3
2
4
C
C
2
5
2
6
2
7
2
8
3
0
2
9
7
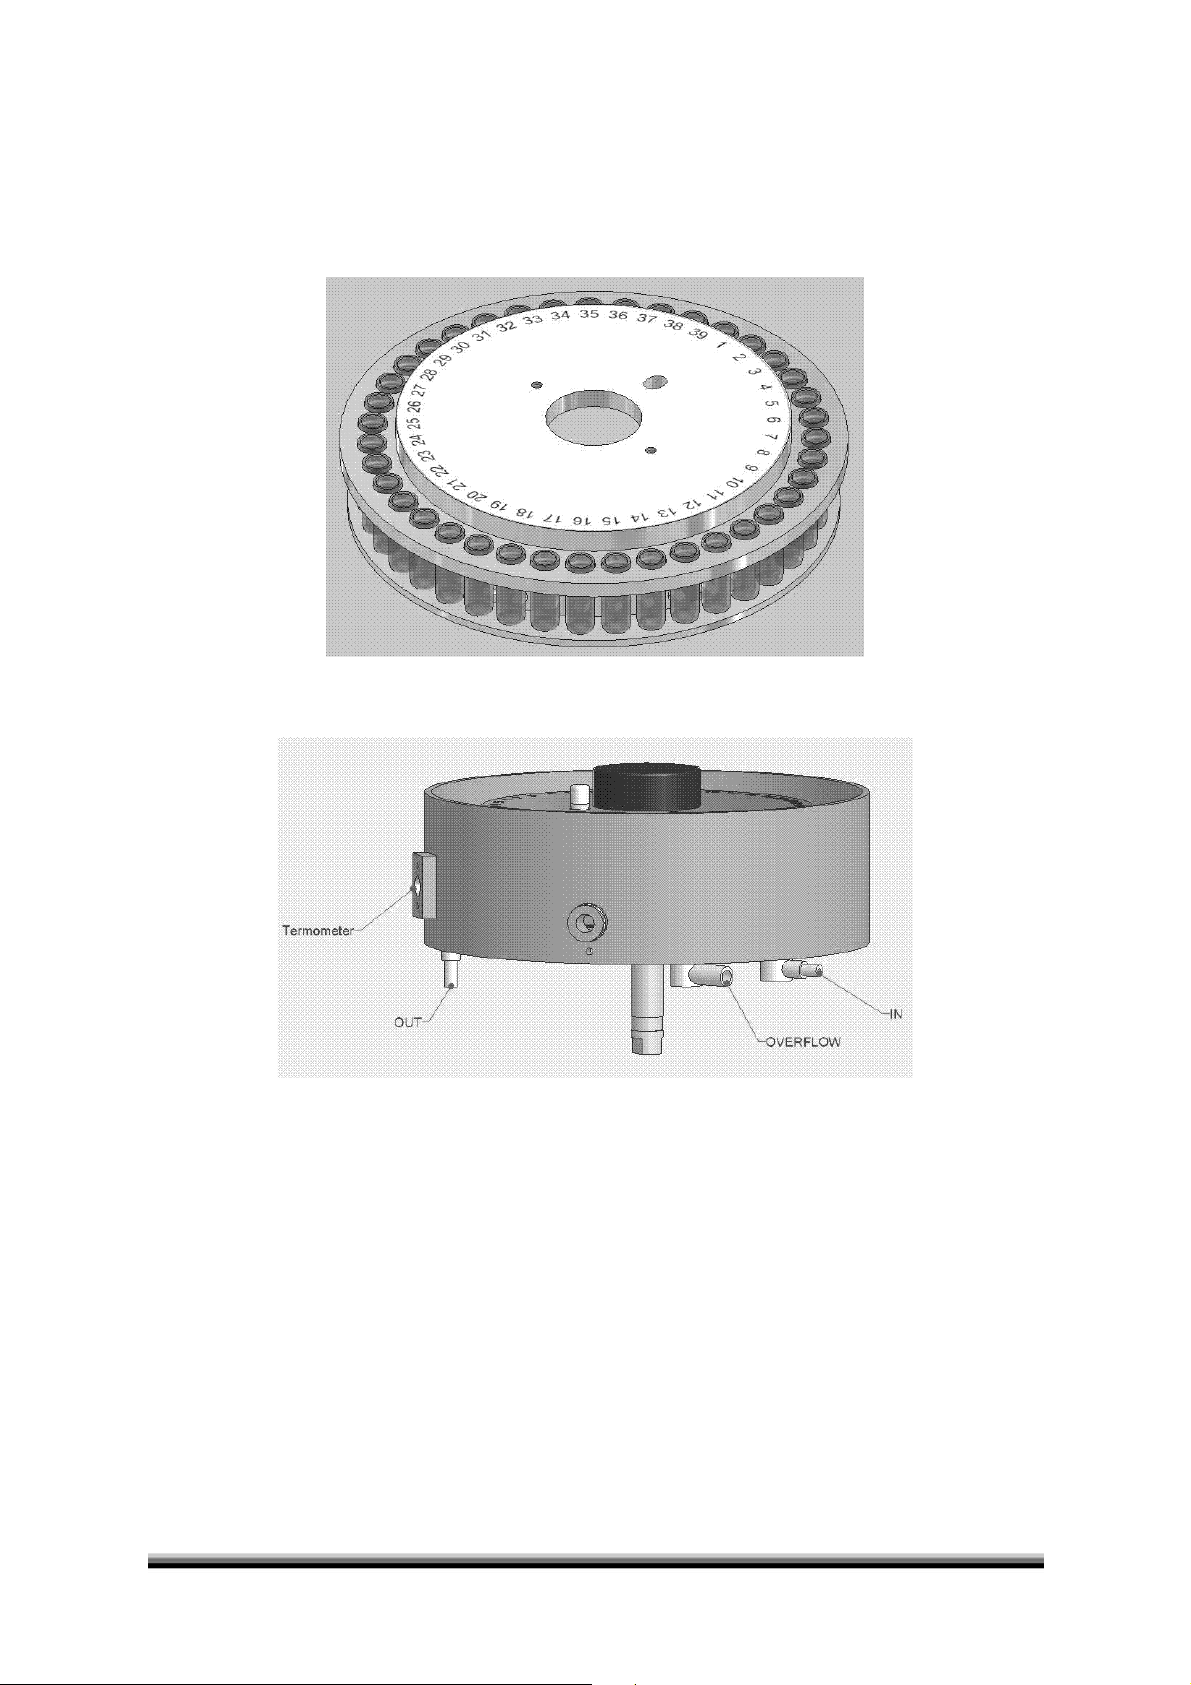
1.5.2 Analytical Plate and its incubation thermostatic bath.
The reaction takes place in an analytical place containing 39 quartz cuvettes. The plate is incubated in a water bath
at 37°C +/-0.2°C. The temperature in the bath is maintained constant by a thermostat that continuously circulates
the water by means of the pump P6. The measurement of the reaction is made directly inside the cuvettes through
two quartz windows mounted on the circumference of the Incubation chamber, that enables the photometric light
to go though to a detector.
1.5.2-1: Analytical Plate
1.5.2-2: Incubation Chamber
8 Human HumaStar 300 User Manual
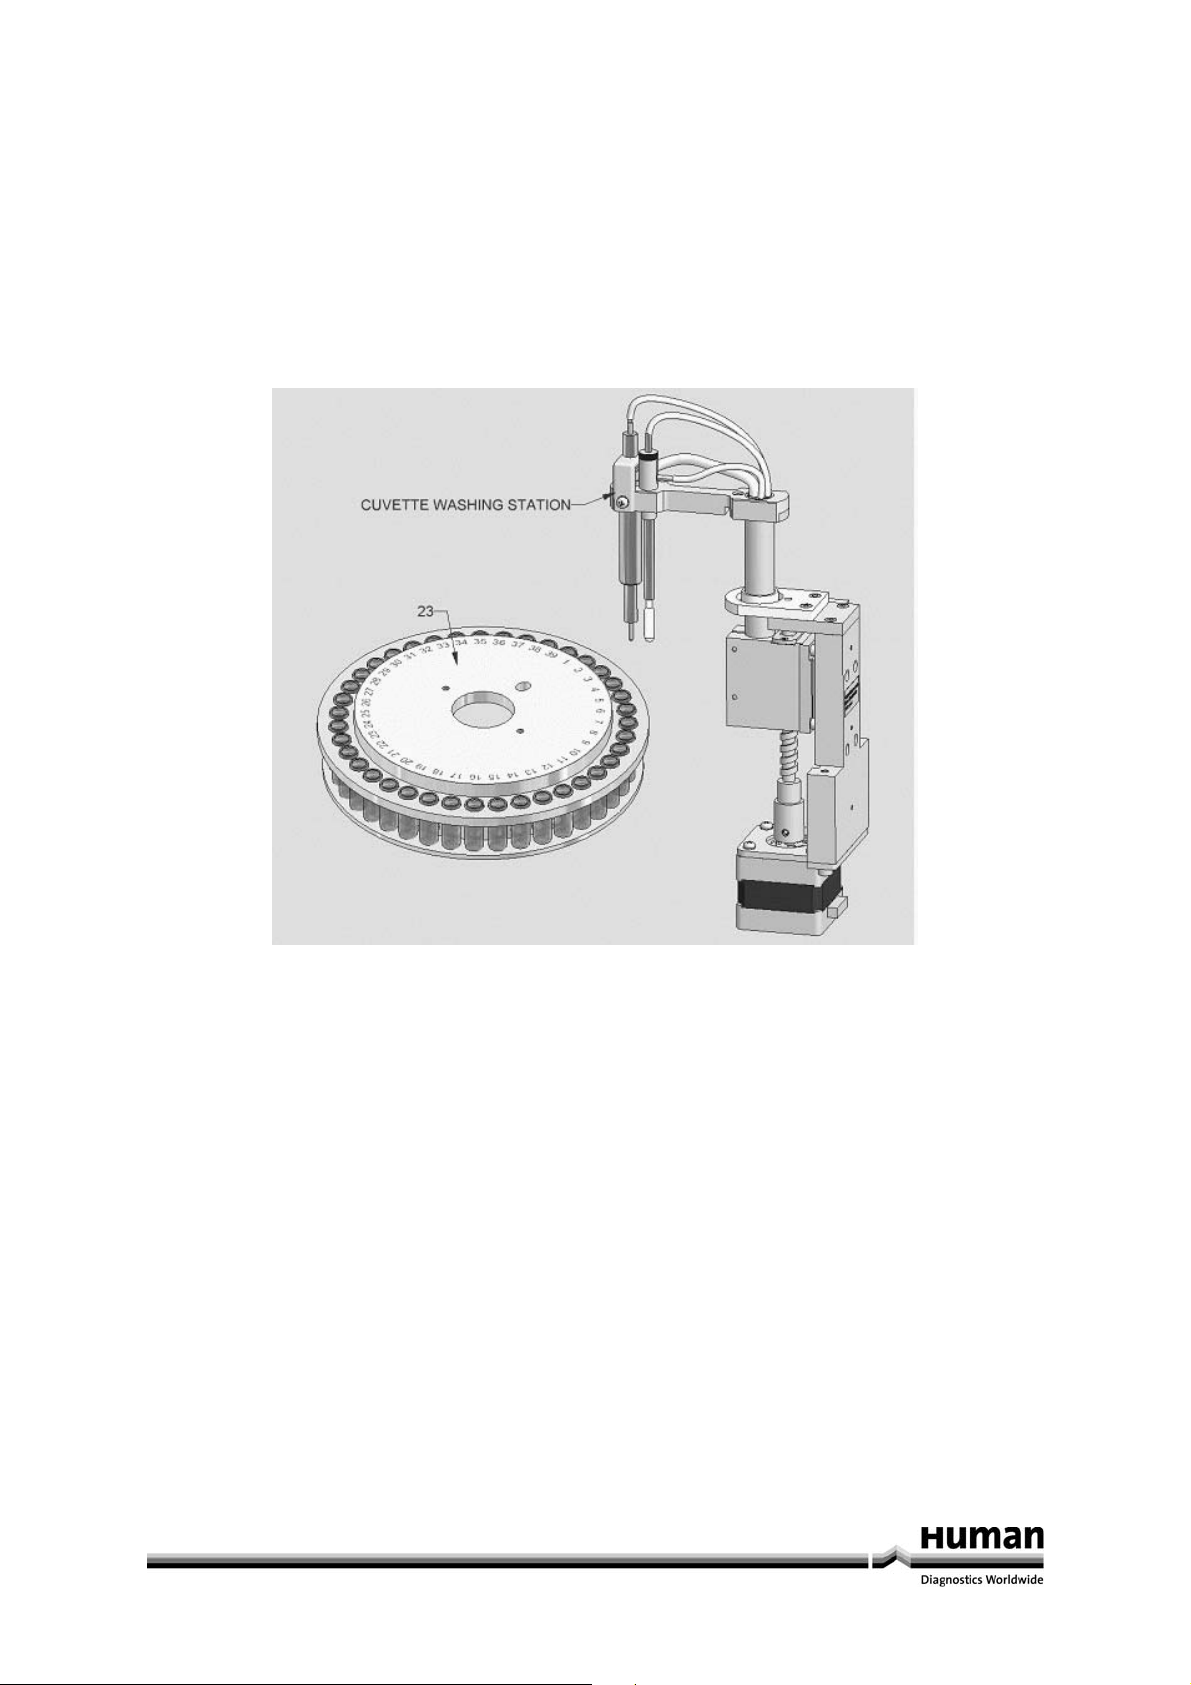
1.5.3 Cuvette Washing System
It is of utmost importance that each cuvette is properly washed and dried to assure reliable results, since both the
reaction and the measurement take place inside that cuvette. To assure perfect cleaning, the cuvette has a circular
design with a spherical closure at the bottom to avoid right-angles which are the difficult ones to clean.
1.5.4 Cuvette Washing Probe
It’s a four way system: the first one empties the cuvette, the second purges with wash solution several times and
the third to blows air to eliminate any residue from the inside wall of the cuvette.
The Probe as it goes down into the cuvette activates the aspirating pump P3 and P8, while wash solution is forced
inside the cuvette several times and re-aspirated. Finally forced air is blown into the cuvette to eliminate the
residues of the wash solution.
1.5.4-1: Cuvette Washing System
9
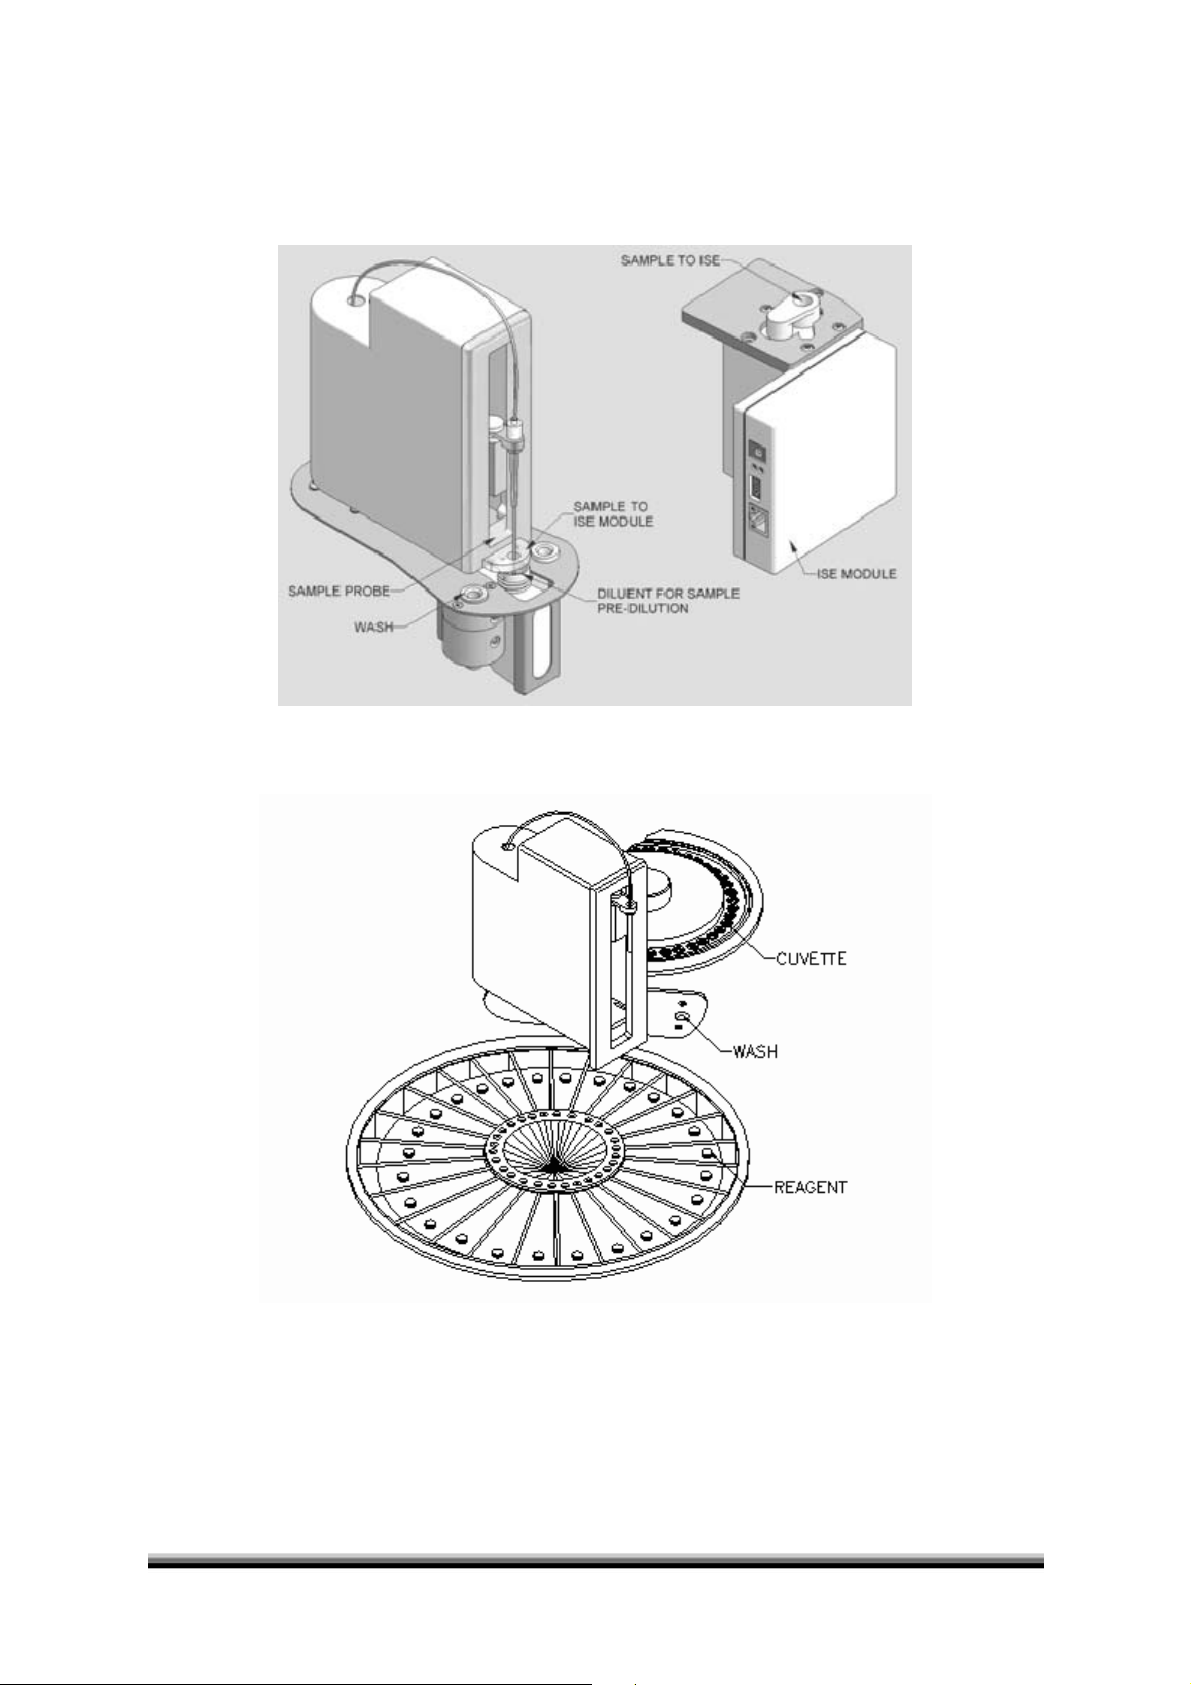
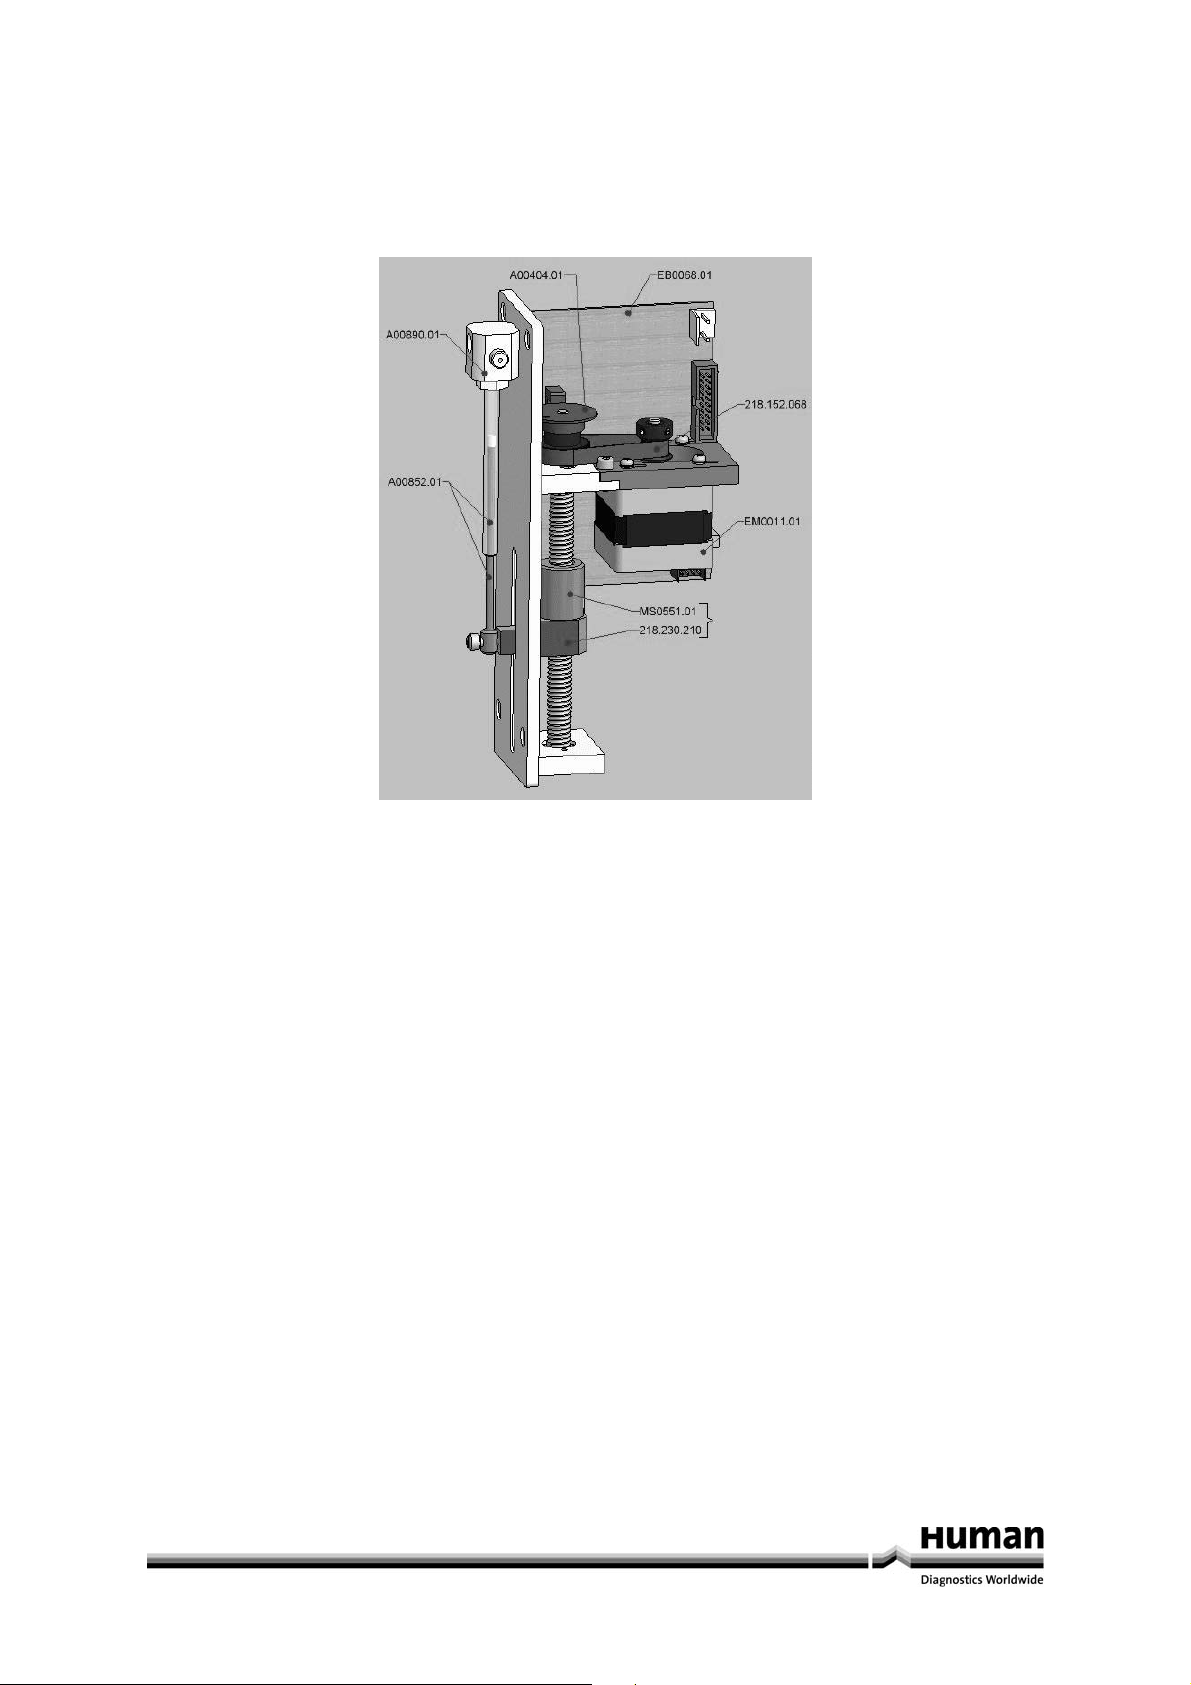
1.5.5 Sampling Arm
The Sampling arm holds the probe that is connected to the diluter, which aspirates and transfers both the sample
and the reagent into the reaction cuvette and mixes at the same time. During its operating cycle the probe can
move to its various positions - Samples, Reaction cuvette, Washing Position, Sample Pre-dilution Container and
into the ISE Module.
1.5.5-1: Sampling Arm
10 Human HumaStar 300 User Manual
1.5.5-2: Reagent Arm
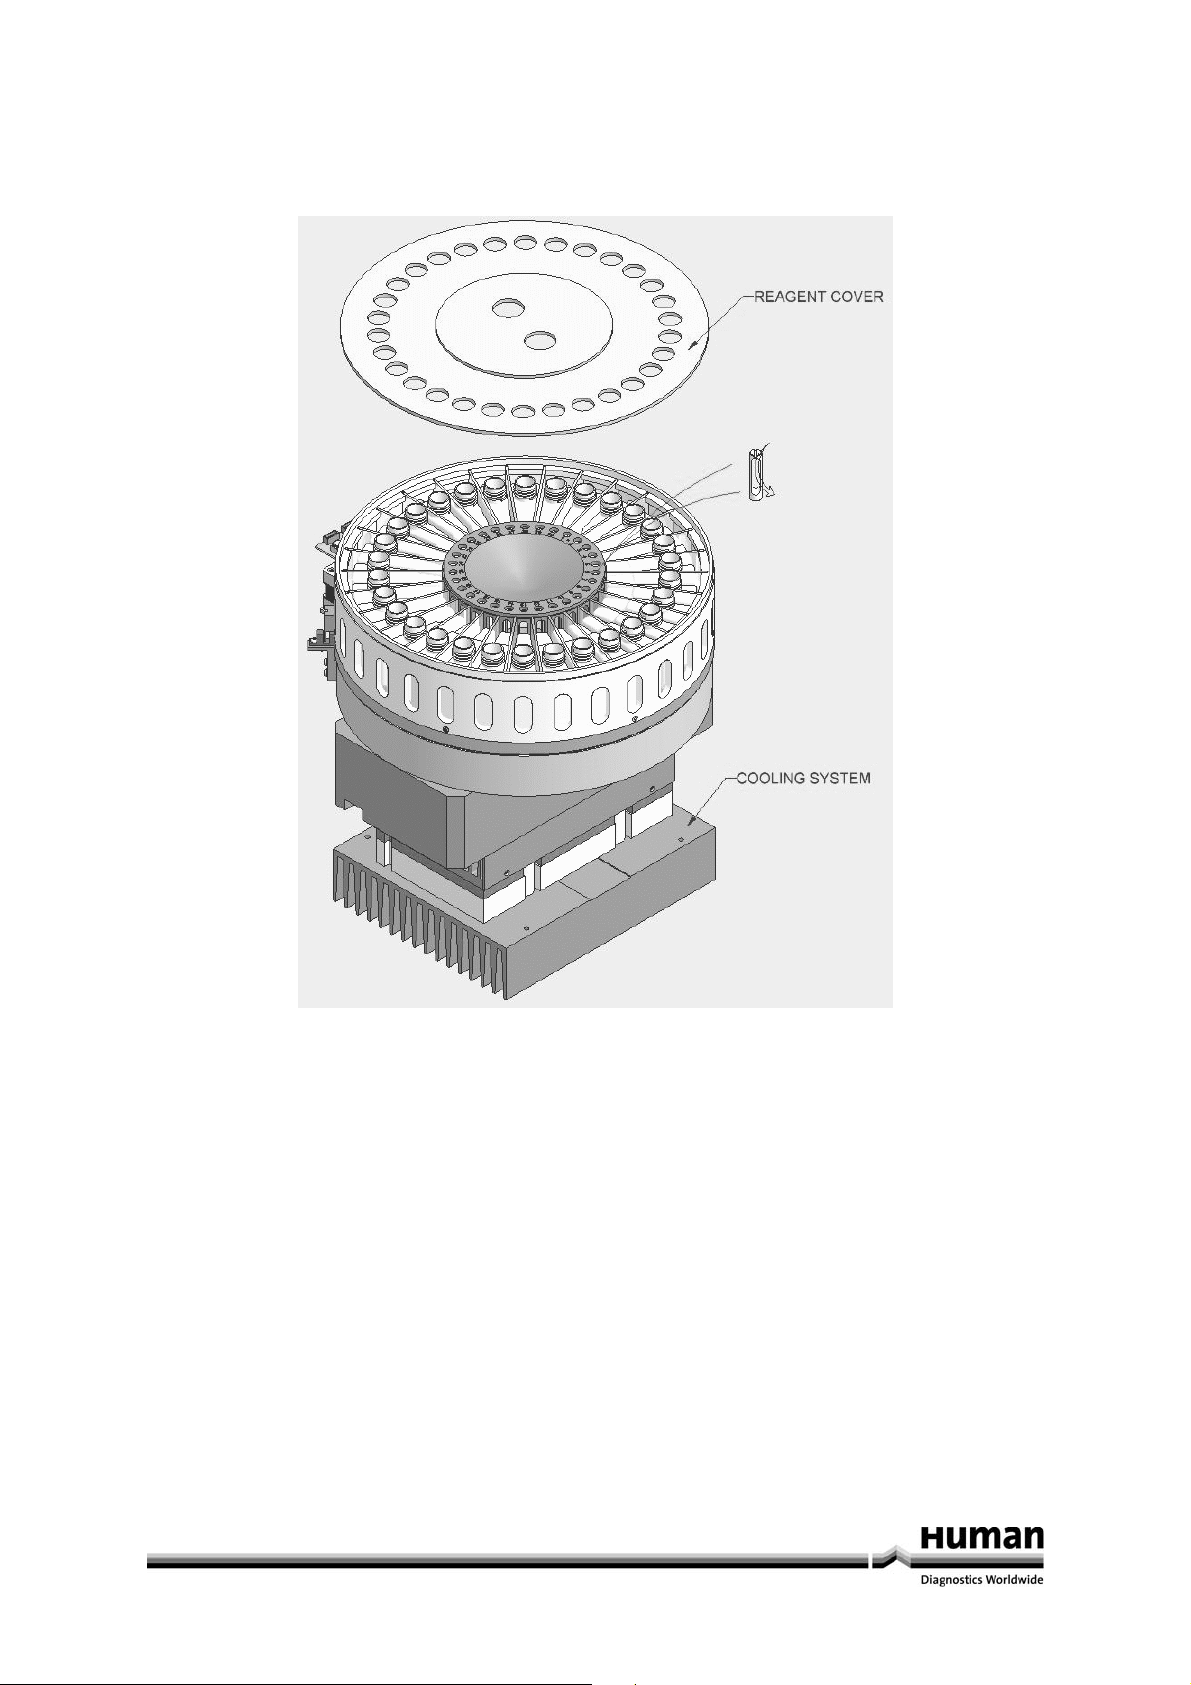
1.5.6 Reagent compartment
REAGENT CAPACITY - 30 On-Line reagents - each reagent can be cooled or left at room temperature.
The large reagent bottles hold 50 ml and the smaller reagent bottles hold 5 ml.
1.5.6-1: Reagent Tray
11
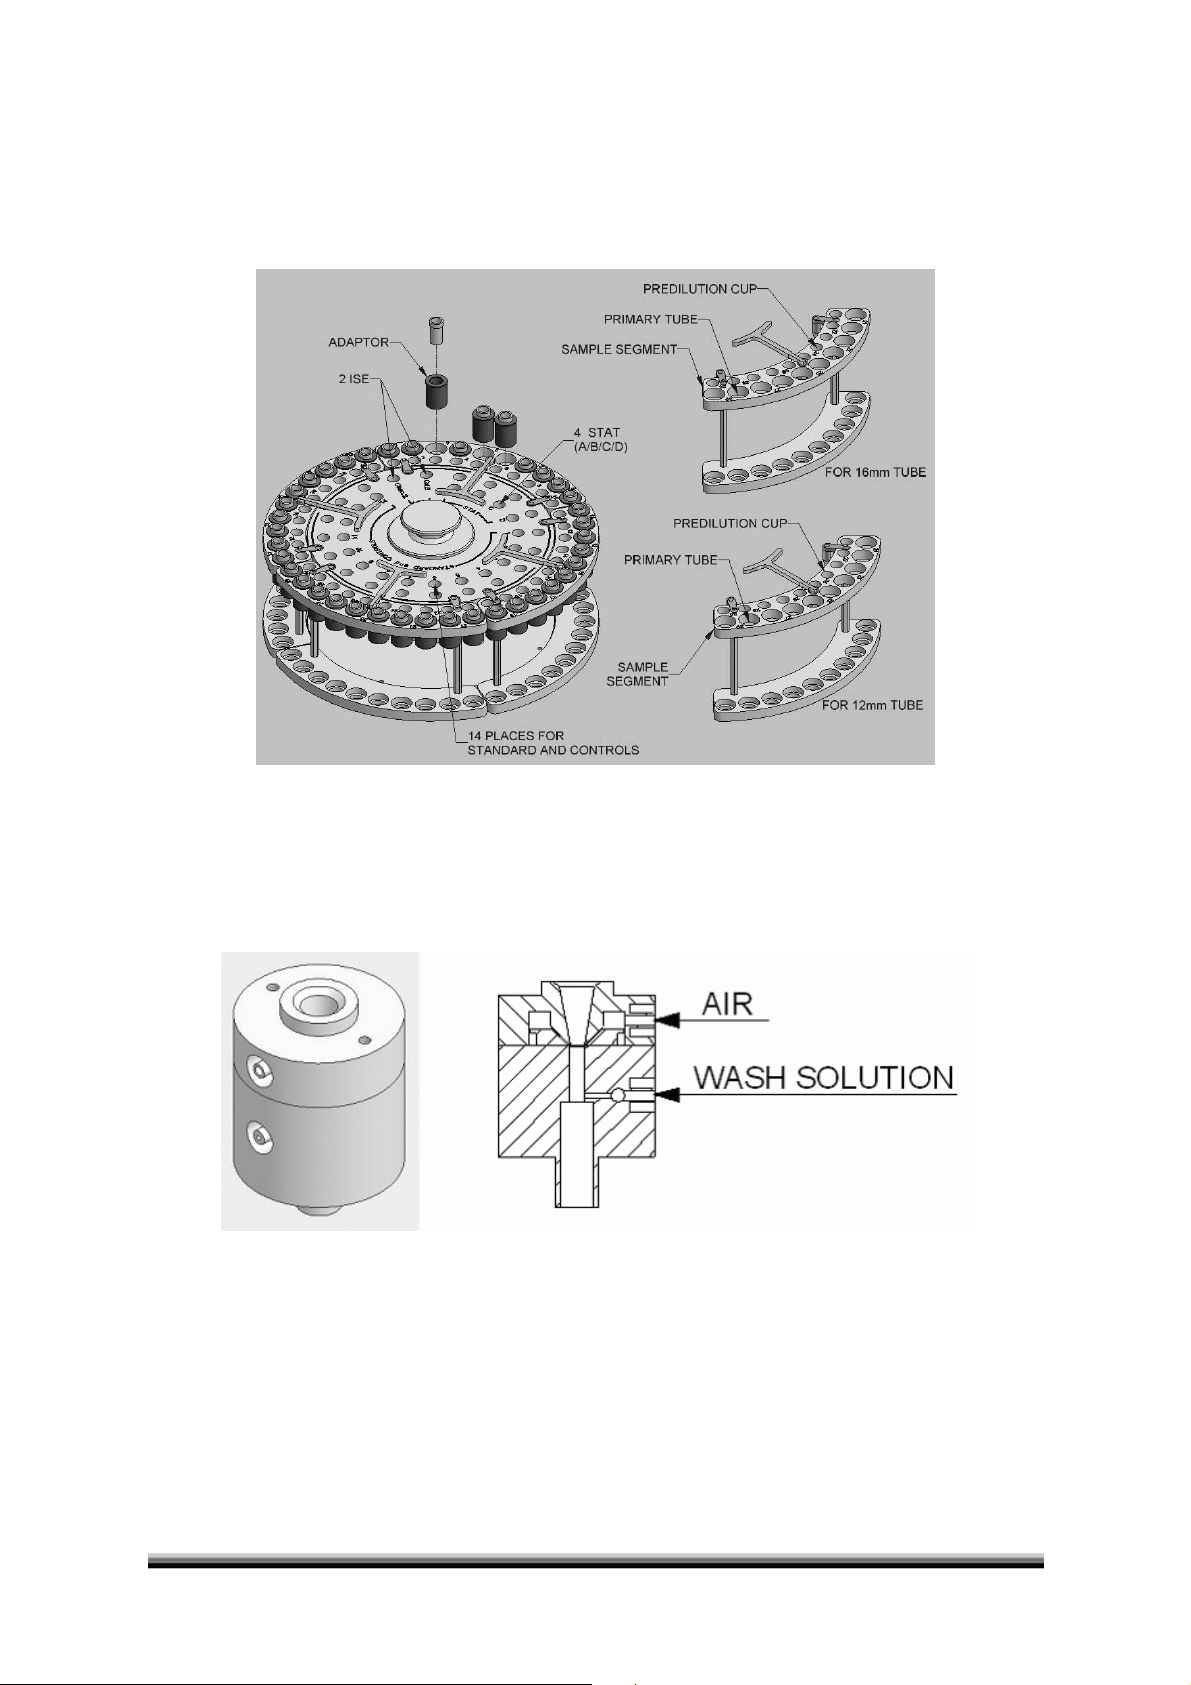
1.5.7 Sample Tray
SAMPLE CAPACITY - 40 On-Line primary tubes or small sample cups, on 4 independent sector (See Fig. 1.4.9-1), plus
20 positions for Standards, Calibrators, Controls and STATs. Each sample has a corresponding place for a cup for
automatic pre-dilution if necessary.
For details see Chapter 6.
1.5.7-1: Sample Tray
1.5.8 Probe Washing Station
It is of utmost importance that the Probe is properly cleaned after each operation to avoid both carry over and
contamination. This washing station has been especially conceived to wash the probe both internally (P1 and P2)
and externally by pump P4 and, a final air jet cleans and dries the tip of the probe from any residue of wash
solution.
1.5.8-1: Washing Station
12 Human HumaStar 300 User Manual
1.5.9 Diluter
A high precision Diluter connected to the Probe transfers both the sample and reagent. User programmable
volumes are possible from 3 μl to 70 μl for sample and 3 μl to 600 μl for reagent, with 1μl increments.
The peristaltic pumps P1 and P2 mounted in series with the Diluter, washes both the Probe and its connecting
tubing after each operation. The volume of wash has been optimised to assure a perfectly clean operation.
1.5.9-1
13
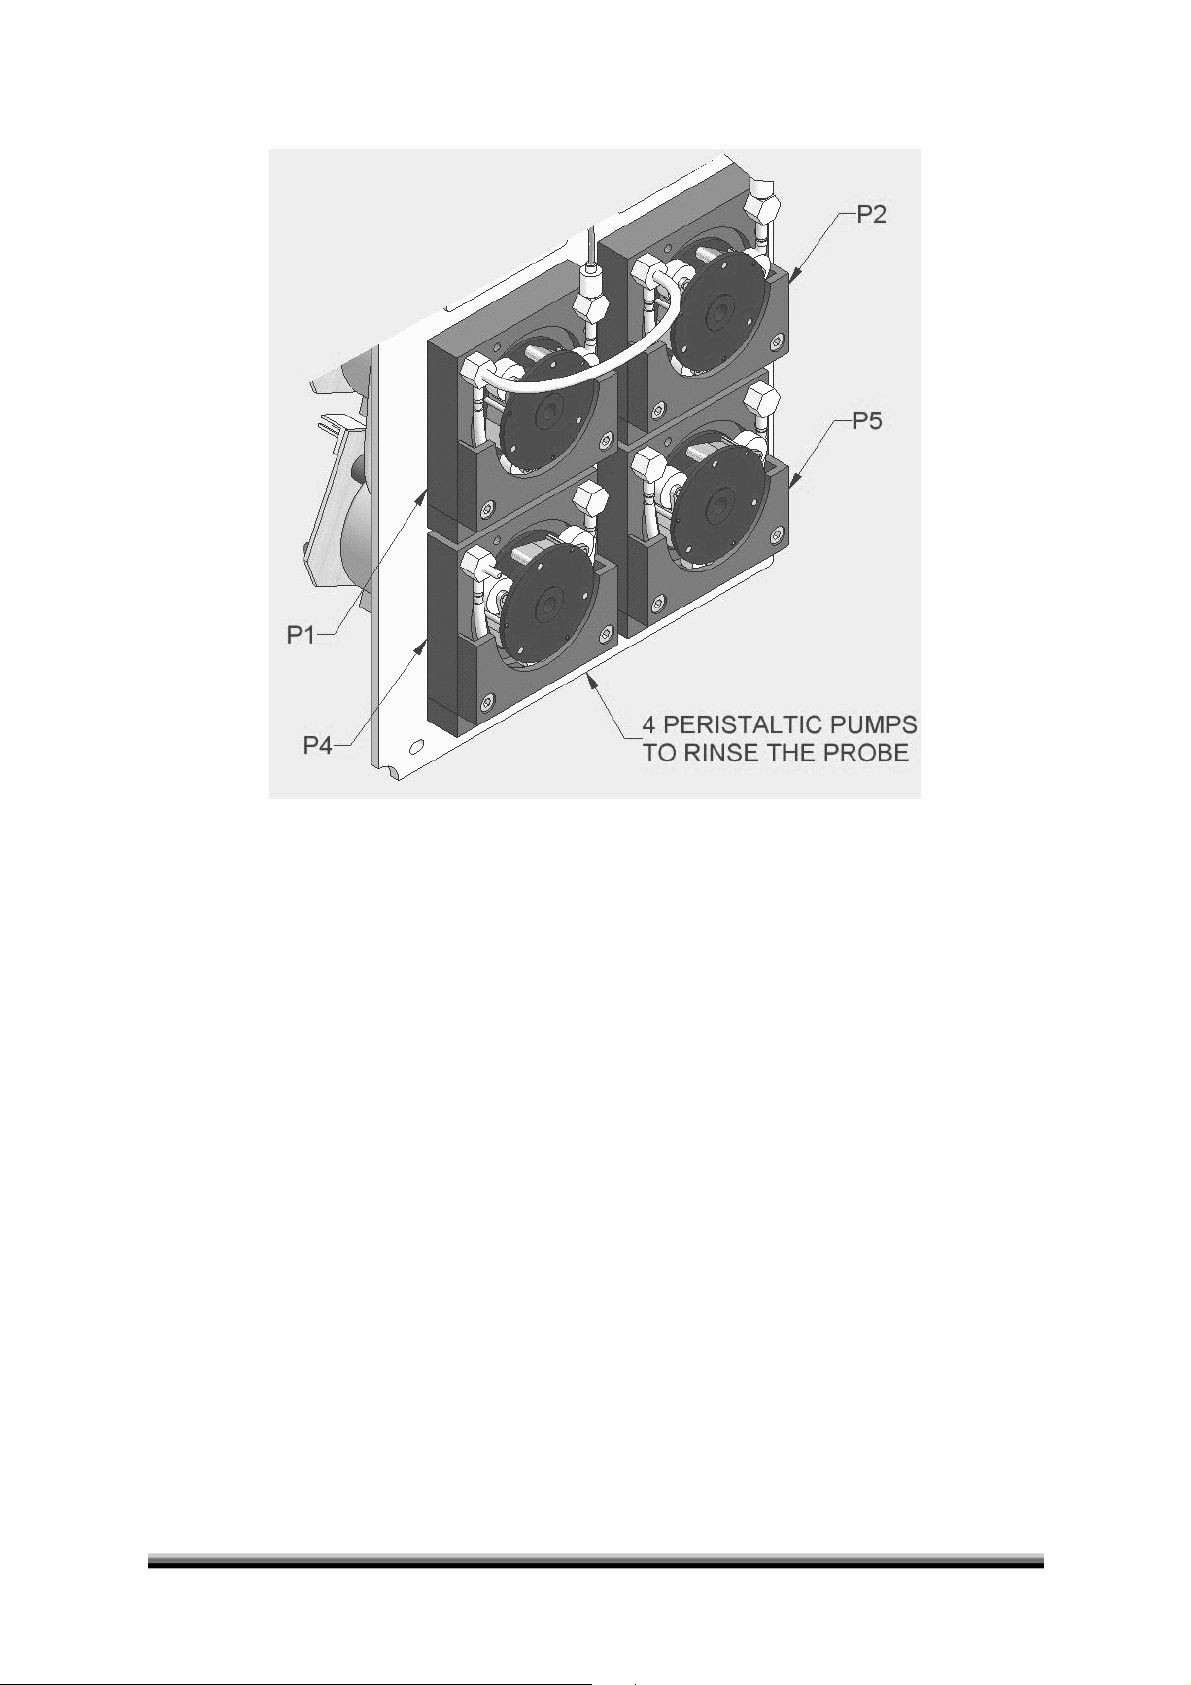
1.5.10 Peristaltic pumps
The four peristaltic pumps below serve as follows:
P1 - Washes the sample tubing and its Probe inside
P2 - Washes the reagent tubing and its Probe inside
P4 - Washes both probes externally
P5 - Solution to wash the cuvettes
1.5.10-1
14 Human HumaStar 300 User Manual
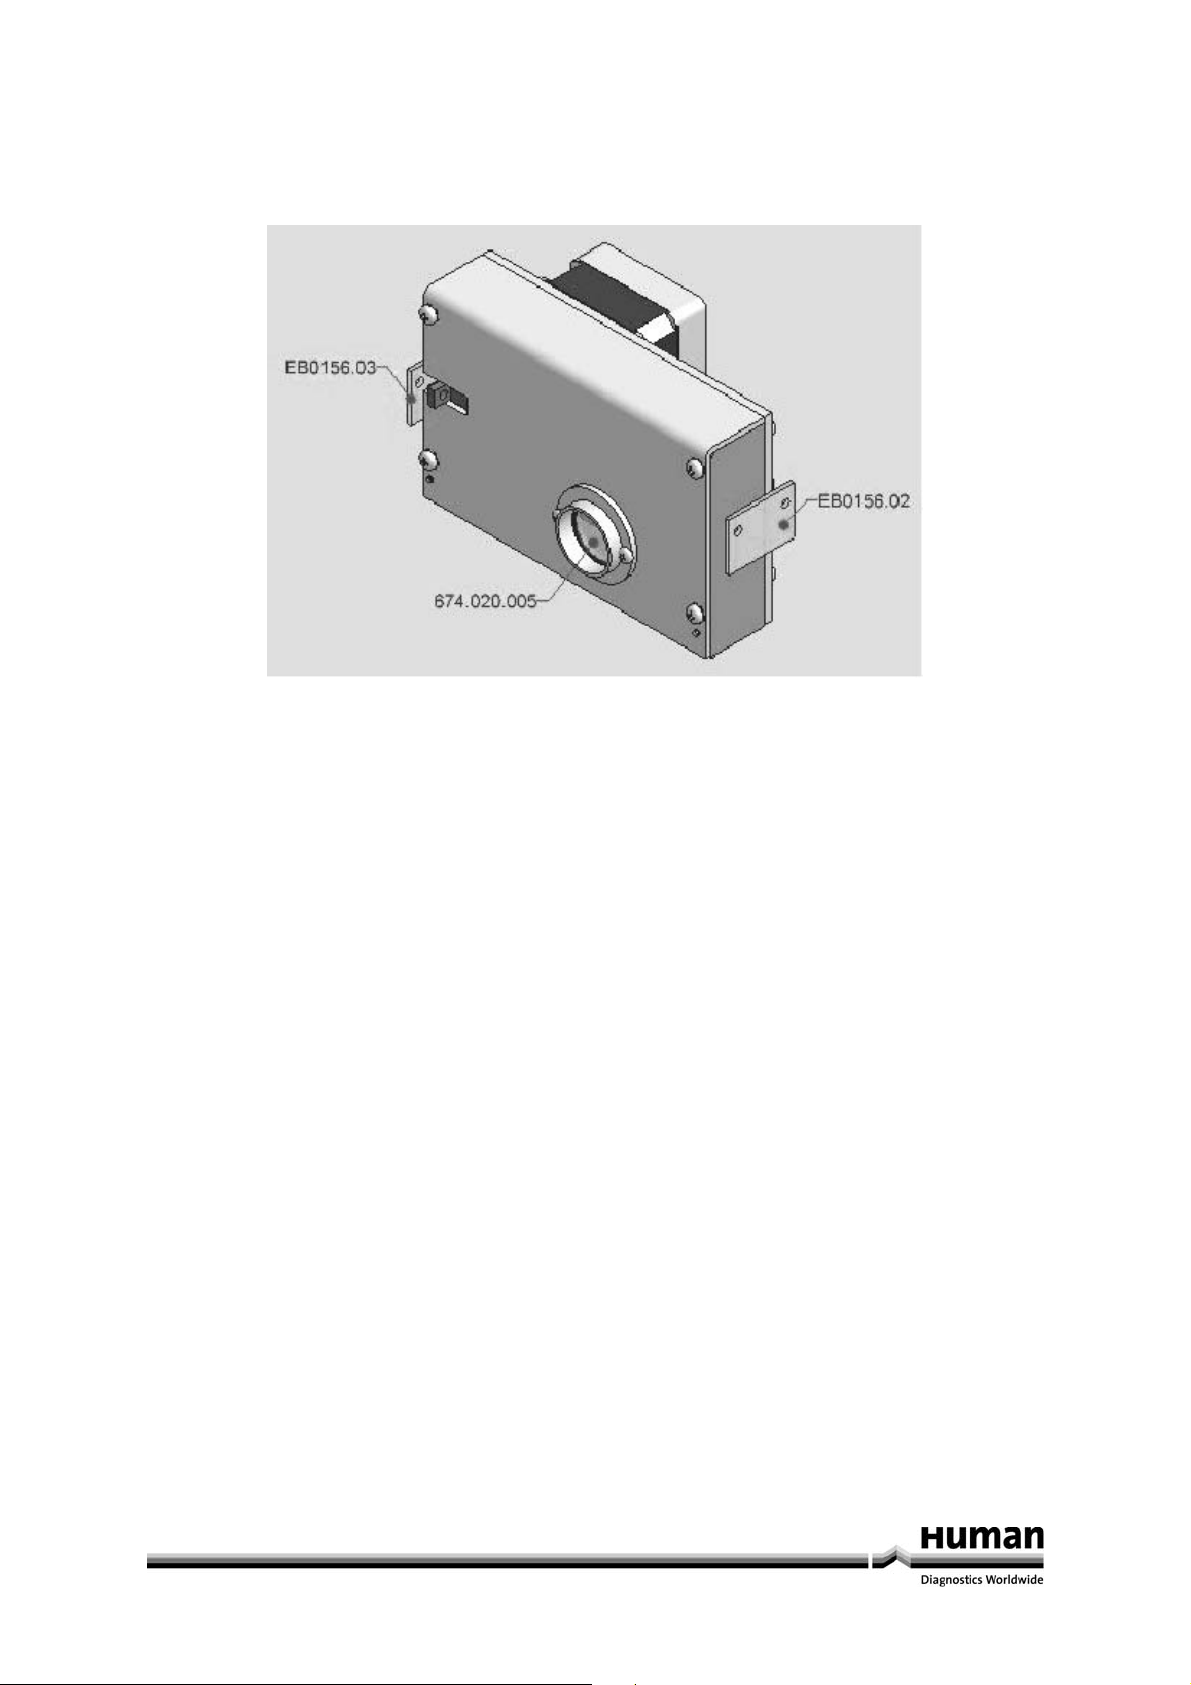
1.5.11 Photometer
A multi-filter photometer using 8 narrow band interference filters has been conceived to offer maximum
sensitivity, accuracy and stability of measurement.
The following 8 standard interference filters have been built-in: 340, 380, 405, 510, 546, 578, 620 and 700 nm.
1.5.11-1: Photometer
15

16 Human HumaStar 300 User Manual
2 Start Up
2.1 Start-Up
Turn ON the Analyzer. The analyzer goes through an Auto-check program and any anomaly will be automatically
flagged.
When ready, the green triangle START will be lit.
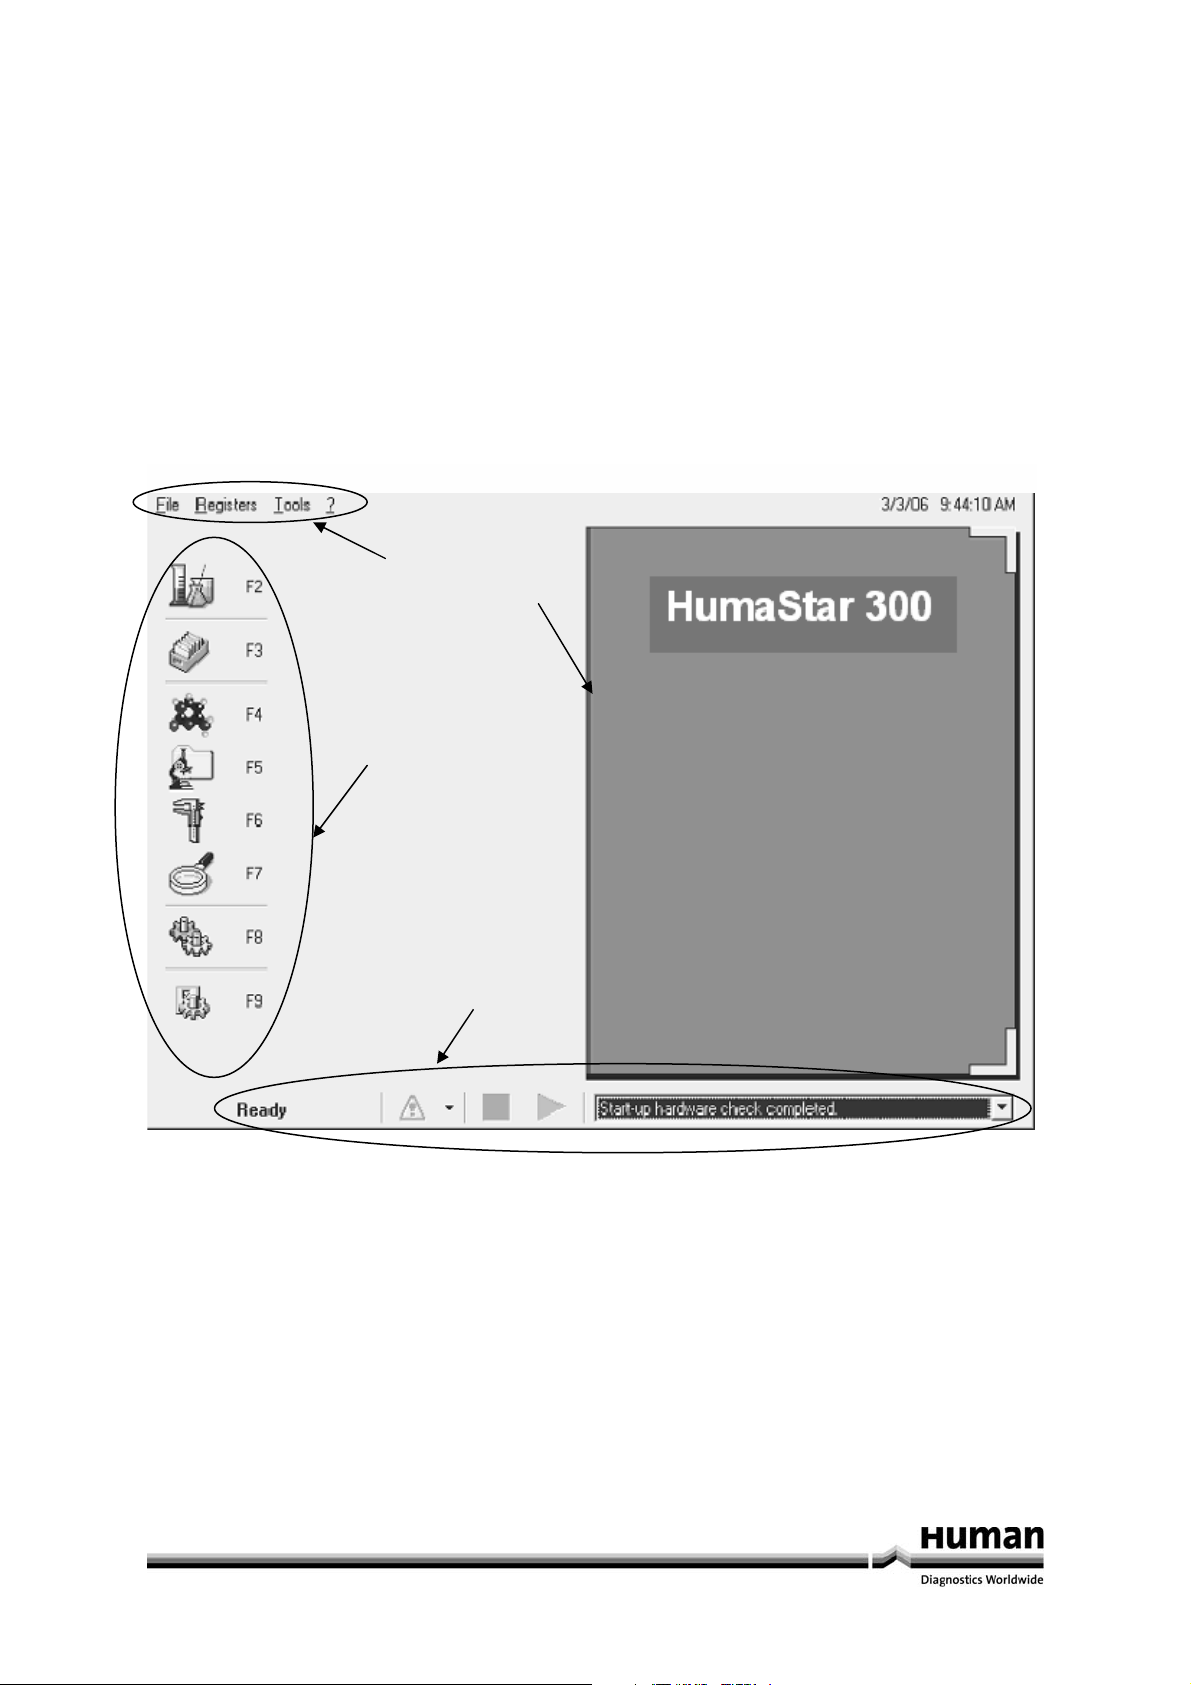
2.2 Main Menu Display
The Main Display is divided into 4 parts:
Part 1 – contains all the commands for operation.
Part 2 – contains all the icons of the 8 sub-programs or Registers.
Part 3 – indicates the Status of the analyzer.
Part 4 – is the book – OPERATION.
1
4
2
3
2.2-1
17
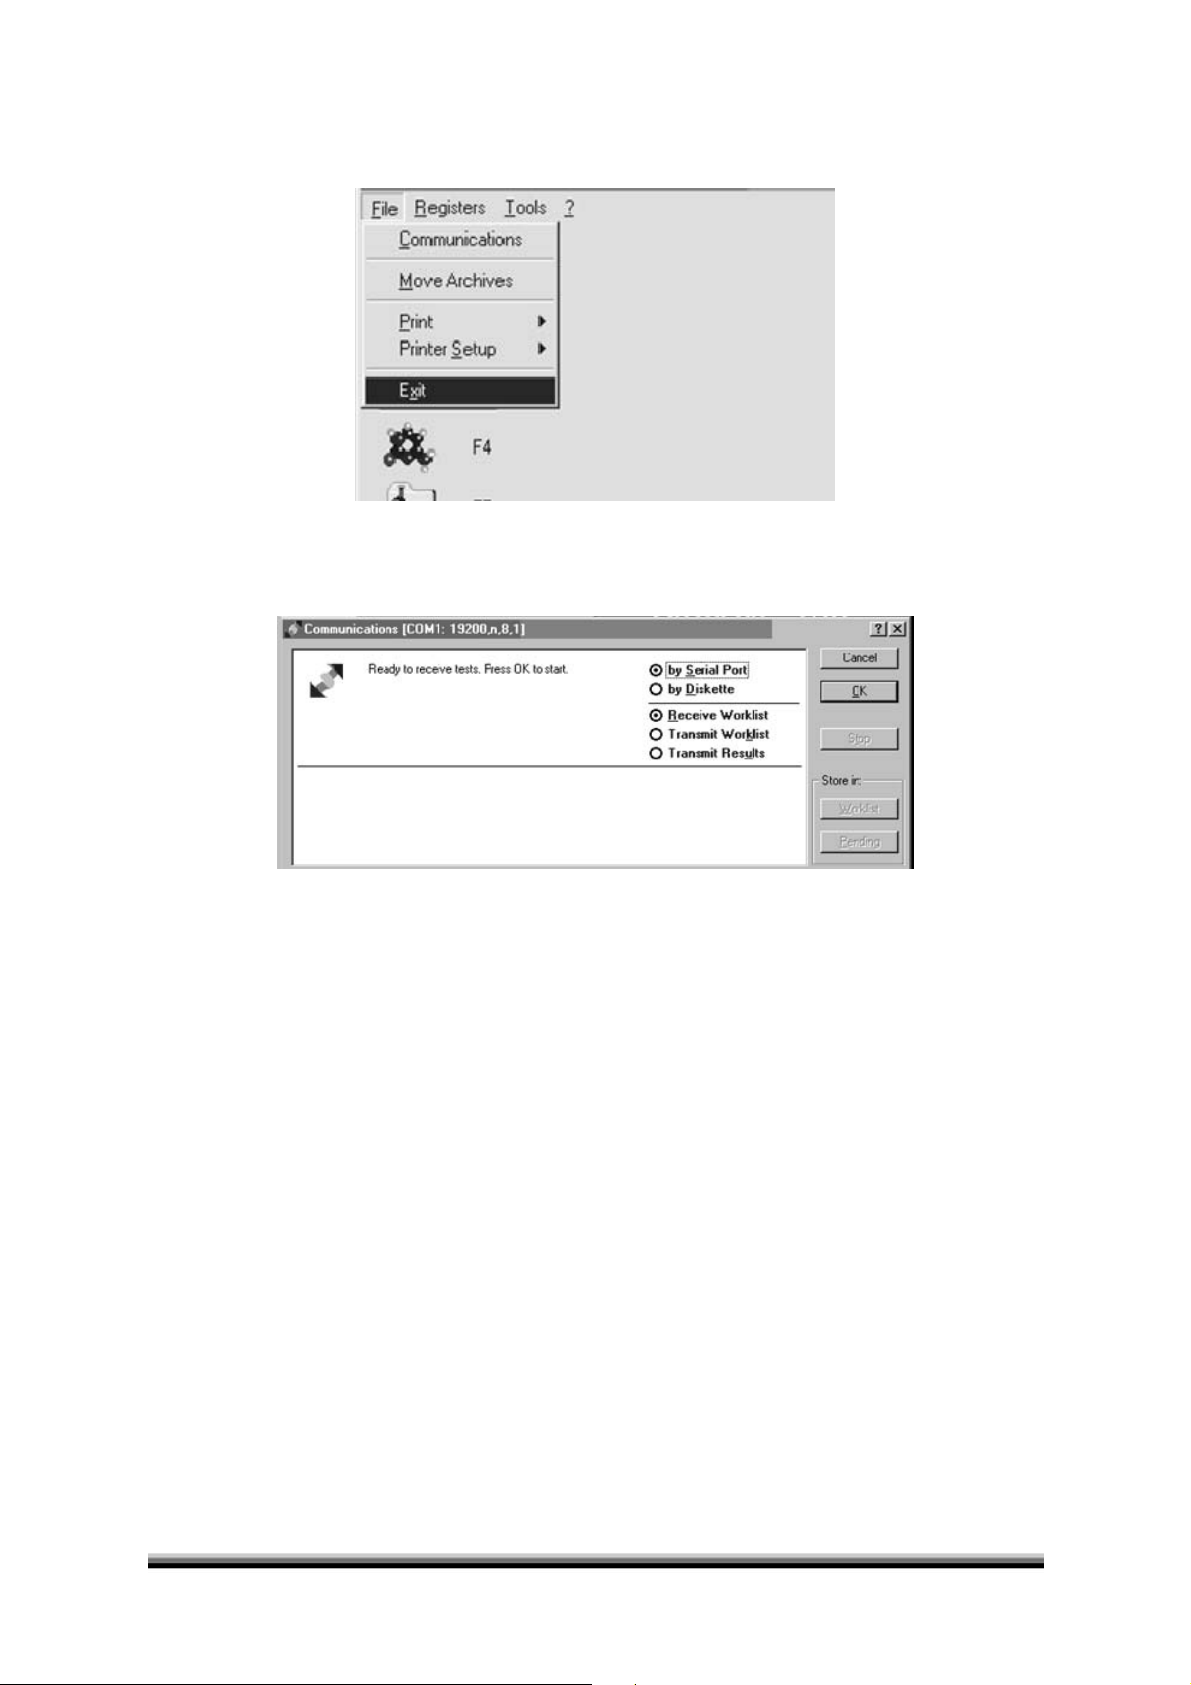
2.3 File
Click - to obtain a number of options as shown below:
2.3-1
1. Communications
Enables to send and receive data. Click to open the window that offers the below displayed options:
2.3-2
The data can be transferred two ways, via the Serial Port or via a floppy diskette. Choose the way and proceed to:
a) Receive a Work list
b) Transfer a Work list
c) Transfer Results
The description above on the left (1) will indicate how it will be done when pressed OK. The lower part in the
window (2) will indicate what is being transferred or received.
ATTENTION – The system will transmit all the data that it holds in memory. It is suggested to cancel all the old
results before transferring new data. To cancel results after having transferred them, go to F2 “Work List”. Choose
Modify and then click on “Save and delete all Samples or clear all samples”.
18 Human HumaStar 300 User Manual
 Loading...