

Page 1

Underwater Case
Page 2
VUZE-UWC Manual V6
INTRODUCTION . . . . . . . . . . . . . . . . . . . . . . . . . . . . . . . . . . . . . . . . . . . . . . . . . . . . . . . . . . . . . . . . . . 1
PACKAGE CONTENTS . . . . . . . . . . . . . . . . . . . . . . . . . . . . . . . . . . . . . . . . . . . . . . . . . . . . . . . . . . . . 2
ASSEMBLY . . . . . . . . . . . . . . . . . . . . . . . . . . . . . . . . . . . . . . . . . . . . . . . . . . . . . . . . . . . . . . . . . . . . . 3
BEFORE EACH USE CHECKLIST . . . . . . . . . . . . . . . . . . . . . . . . . . . . . . . . . . . . . . . . . . . . . . . . . . . 5
DURING OPERATION . . . . . . . . . . . . . . . . . . . . . . . . . . . . . . . . . . . . . . . . . . . . . . . . . . . . . . . . . . . . . 6
MAINTENANCE . . . . . . . . . . . . . . . . . . . . . . . . . . . . . . . . . . . . . . . . . . . . . . . . . . . . . . . . . . . . . . . . . . 7
STORAGE AND TRANSPORT . . . . . . . . . . . . . . . . . . . . . . . . . . . . . . . . . . . . . . . . . . . . . . . . . . . . . . 9
O-RING GREASE AND LUBRICANT . . . . . . . . . . . . . . . . . . . . . . . . . . . . . . . . . . . . . . . . . . . . . . . . . 9
SPARE PARTS & TOOL KIT . . . . . . . . . . . . . . . . . . . . . . . . . . . . . . . . . . . . . . . . . . . . . . . . . . . . . . . . 11
PROFESSIONAL SERVICING . . . . . . . . . . . . . . . . . . . . . . . . . . . . . . . . . . . . . . . . . . . . . . . . . . . . . . . 11
LIMITED WARRANTY . . . . . . . . . . . . . . . . . . . . . . . . . . . . . . . . . . . . . . . . . . . . . . . . . . . . . . . . . . . . . 11
VUZE UNDERWATER CASE SPECIFICATIONS . . . . . . . . . . . . . . . . . . . . . . . . . . . . . . . . . . . . . . . . 12
CONTACT US . . . . . . . . . . . . . . . . . . . . . . . . . . . . . . . . . . . . . . . . . . . . . . . . . . . . . . . . . . . . . . . . . . . . 12
ASSEMBLY DRAWING . . . . . . . . . . . . . . . . . . . . . . . . . . . . . . . . . . . . . . . . . . . . . . . . . . . . . . . . . . . . 13
INTRODUCTION
Congratulations on purchasing this HumanEyes VUZE Underwater Case for VUZE and VUZE+ 360 degree
stereo vision cameras. The case will protect and allow your camera to film in the underwater environment and
should last for many years of service with proper care and maintenance.
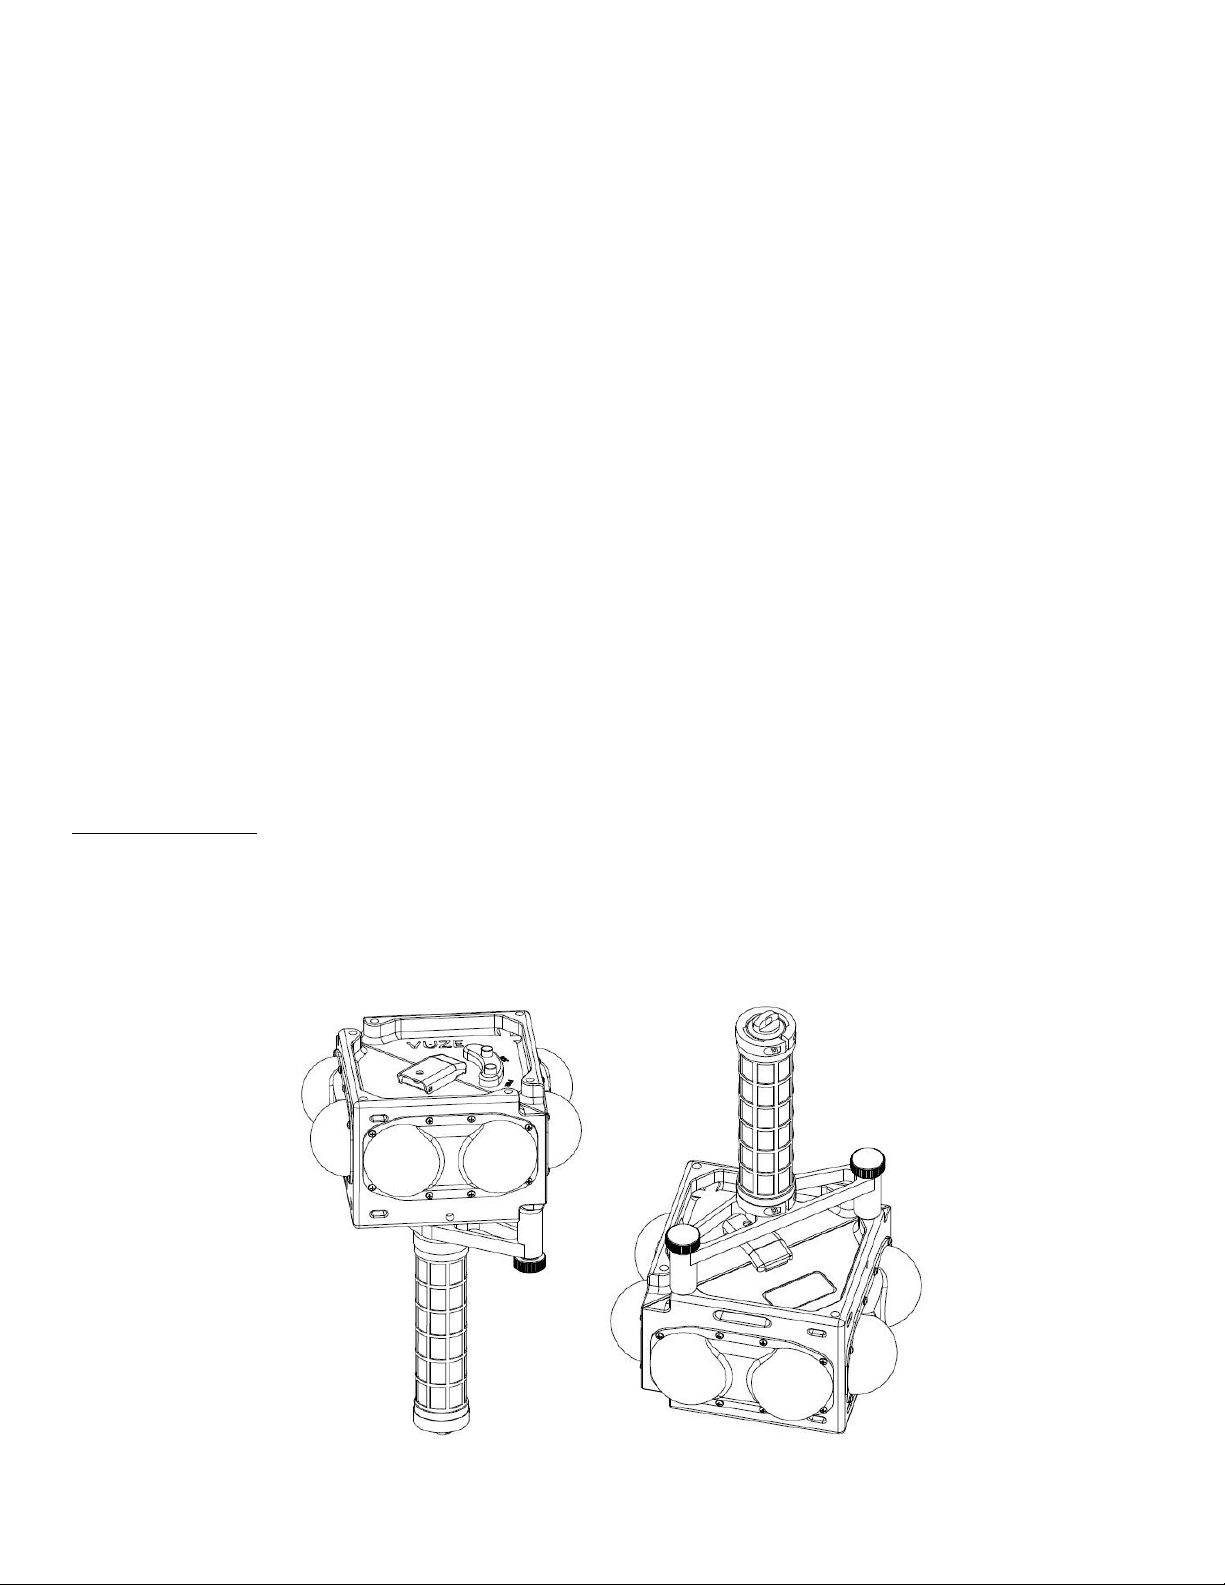
Figure 1: Views of VUZE Underwater Case with handle installed (Wrist Lanyard not shown)
1
Page 3

VUZE-UWC Manual V6
PACKAGE CONTENTS
● VUZE Housing Assemblies (Latch Side, Button Side)
● Camera Mount Plate Assembly
● Handle Bridge Assembly (2x)
● Handle Assembly
● Desiccant Packet (with double sided adhesive mounting square)
● Microfiber Storage Pouch
● Manual
● Pelican Storage Case & Foam
● Spare Parts & Tools Kit
Figure 2: Parts needed for assembling the VUZE Underwater Case and
mounting the VUZE and VUZE+ camera
2
Page 4
VUZE-UWC Manual V6
ASSEMBLY
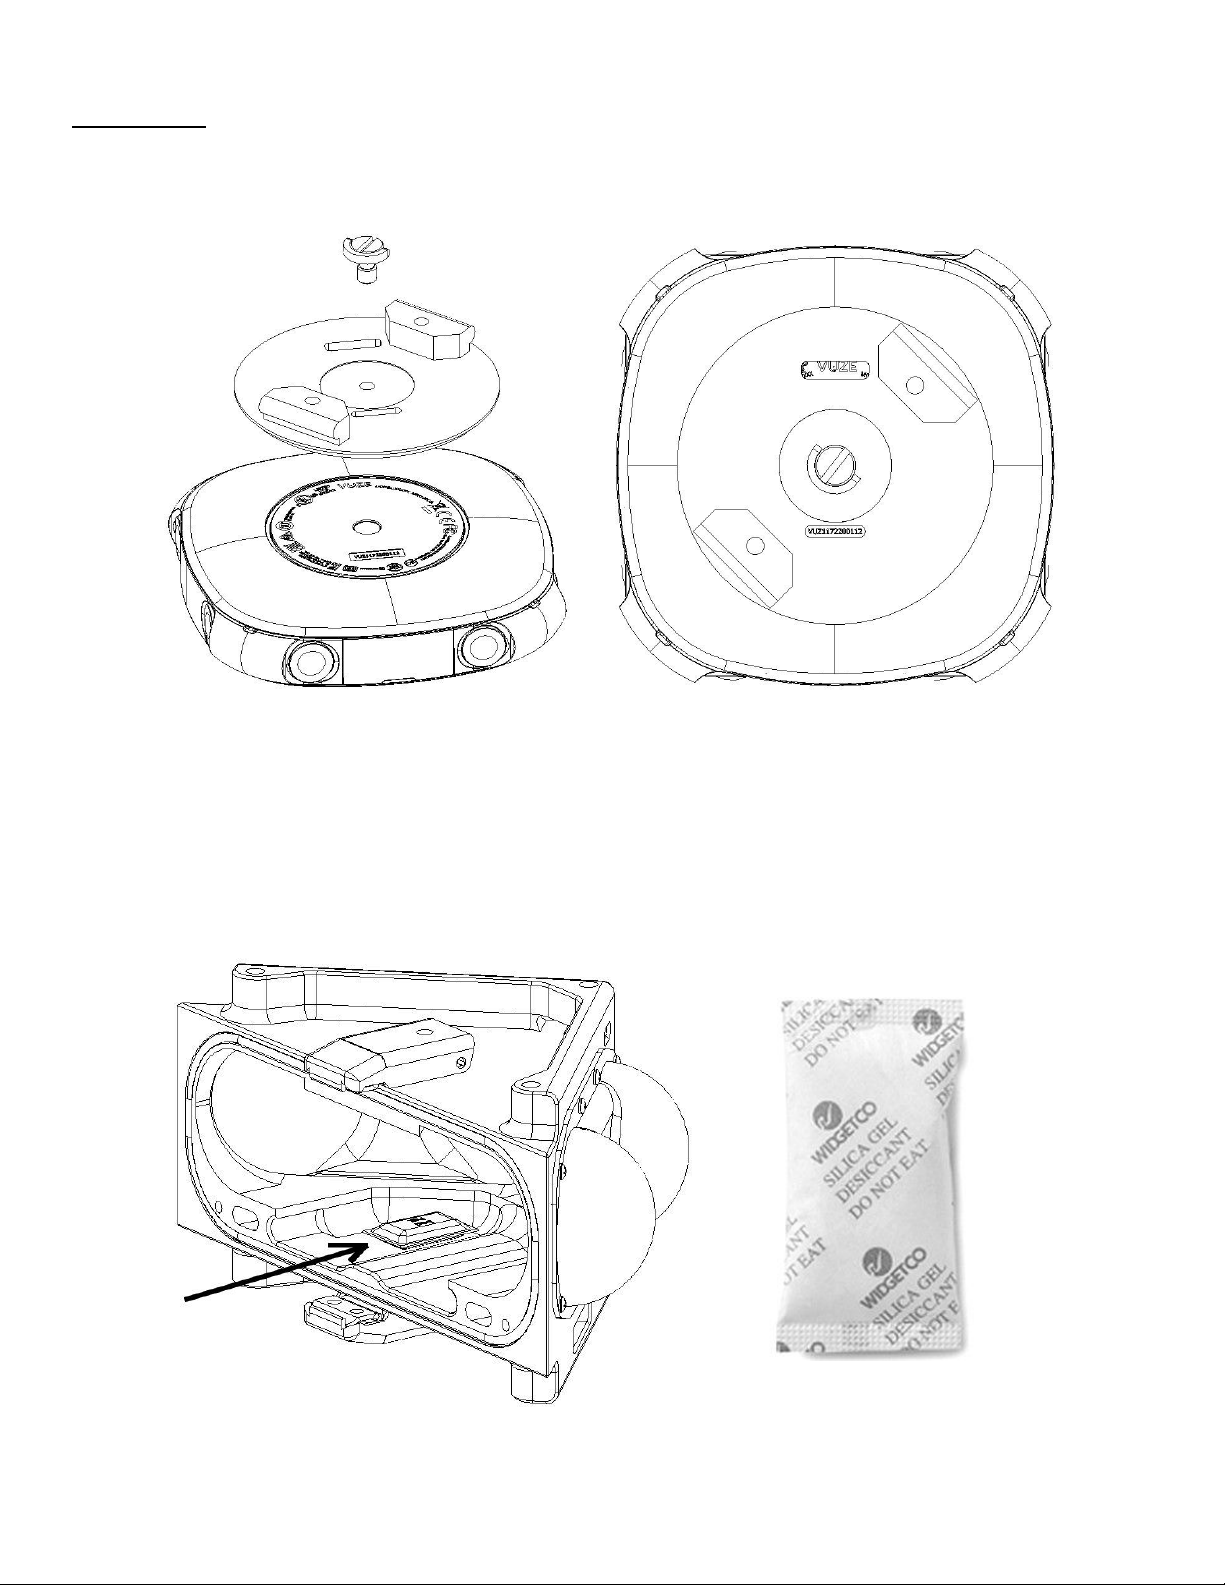
STEP 1: Attach the Camera Mount Plate to the bottom of your VUZE or VUZE+ camera. Ensure that the
serial number is fully visible and aligned with the Camera Mount Plate.
Figure 3: Assembly of VUZE camera to Camera Mount Plate
STEP 2: Secure one desiccant packet into the underwater housing
with double sided adhesive mount square
Figure 4: Location recommendation for desiccant placement inside case.
3
Page 5
VUZE-UWC Manual V6
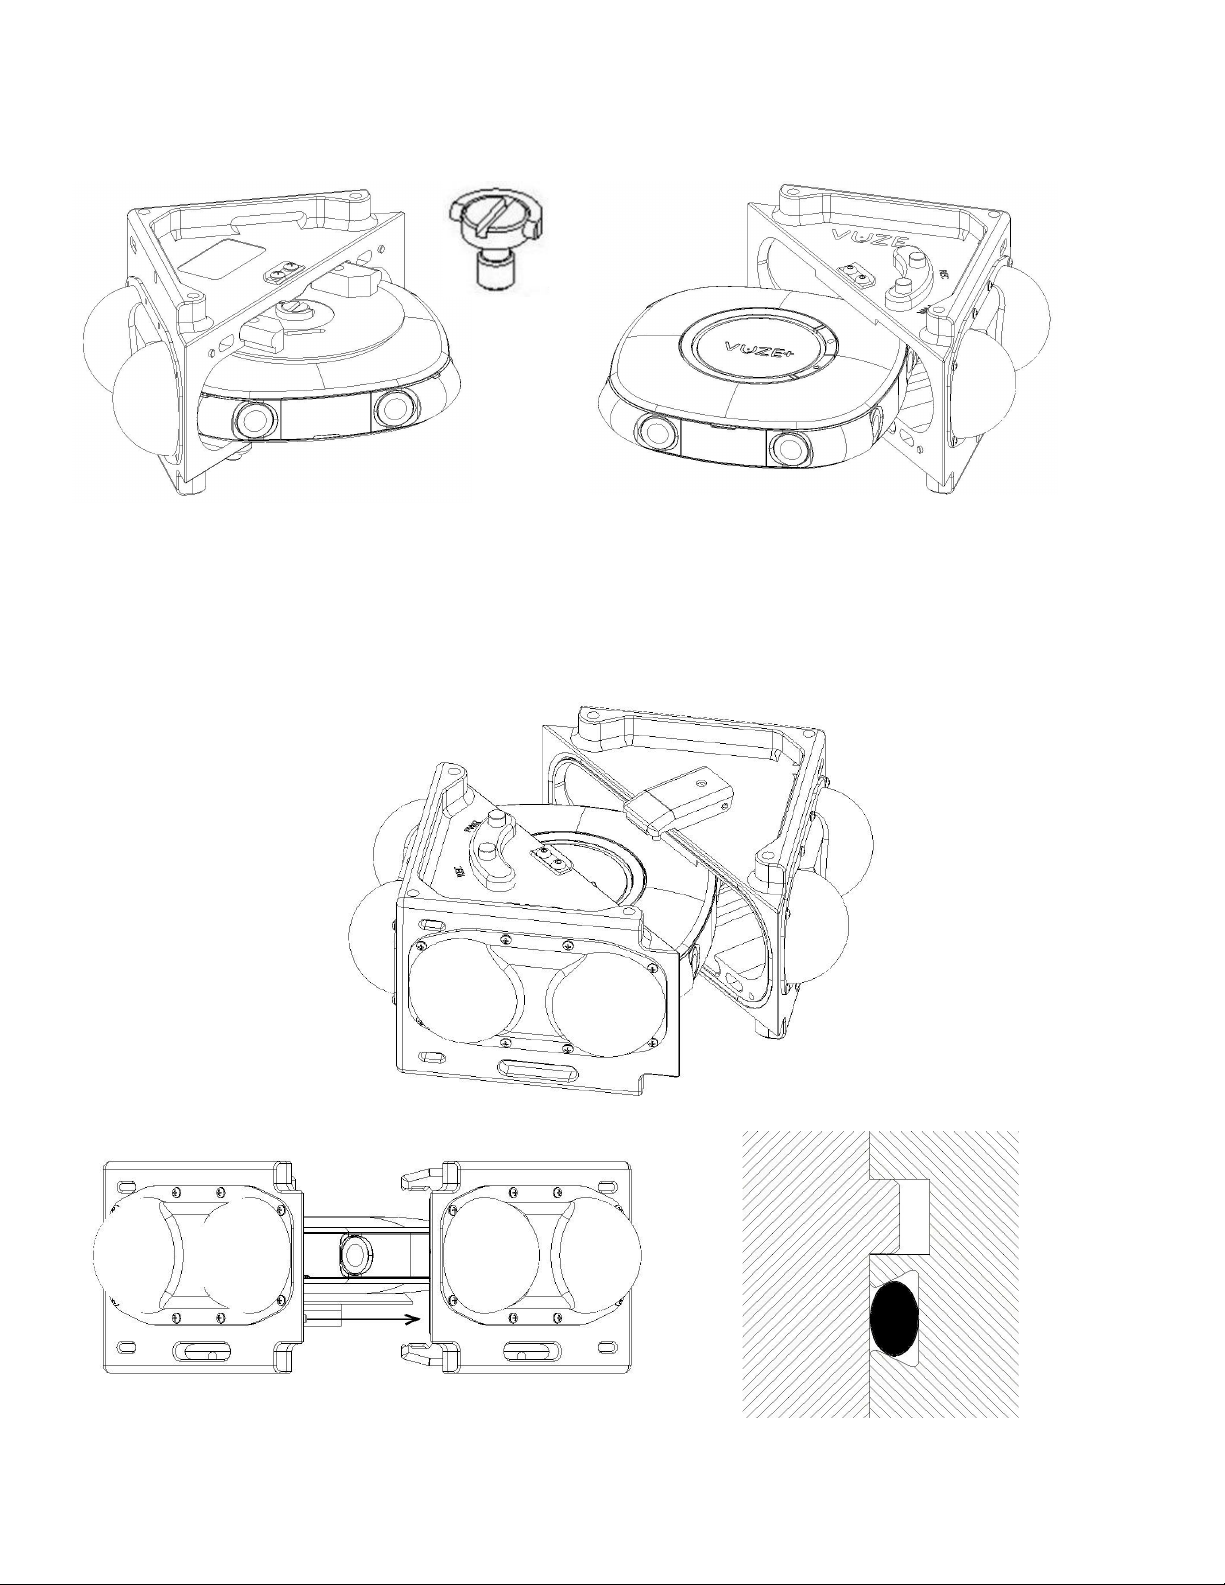
STEP 3: Ensure that the “D-ring” on the Camera Fixing Screw lays flat. Slide the Camera Mount Plate
and camera into one half of the underwater housing with the camera buttons aligned to the underwater
housing buttons.
Figure 5: Orientation and loading of camera into underwater case.
STEP 4: Connect the two halves of the underwater housing and verify full closure of the two housing
latches.
Figure 6: On a flat surface, slide housings together such that buttons and holes engage.
Ensure O-ring is lubricated and fully seated.
4
Page 6

VUZE-UWC Manual V6
STEP 5: Remove the protective plastic films from the lenses and store for later reuse.
STEP 6: Perform submersion test in shallow water to confirm a waterproof seal.
NOTE: During a dive if you detect any leaks or flooding, immediately stop diving and return the underwater
housing to the surface. Any impacts with rocks, coral, or hard obstacle may cause leaks. If an impact occurs,
immediately inspect for leaks.
BEFORE EACH USE CHECKLIST
Several tasks must be performed every time the underwater housing is used to minimize the risk of leaks and
ensure the camera performs as expected:
1. Visually inspect the housing face seal O-ring for damage (knicks, cuts, etc.), contamination (dirt, sand,
hair, etc.), and sufficient O-ring grease. Replace, clean, or re-grease the O-ring as necessary.
2. Visually inspect all screws used to attach the domes to the underwater housing. Tighten loose screws
as necessary.
3. Visually inspect domes for external and internal scratches, cracks, and other damage. Replace lenses
as needed. Lenses can be cleaned with a lint-free microfiber cloth.
4. Verify the Camera Mount Plate is securely attached to the VUZE or VUZE+ camera mount. Verify the
VUZE or VUZE+ camera serial number is fully visible and aligned within the Camera Mount Plate serial
number cut-out. Press the underwater housing camera buttons to verify proper functionality and proper
alignment of the camera with the housing.
5. Insert a fresh desiccant packet into the underwater housing.
6. Verify both latches are fully engaged.
7. Verify no air bubbles or leaks are present by immersing in shallow water such as a small bucket of
fresh water. Check the underwater housing buttons and verify no leaks are present.
8. Upon completion of underwater activities, place the underwater housing in a bucket of fresh water for at
least five minutes before opening the underwater housing. Press all of the underwater housing buttons
while submerged in fresh water. Clean off any debris to prevent contamination of the housing face seal
O-ring and mating surface.
9. Fully dry the underwater housing before opening.
5
Page 7
VUZE-UWC Manual V6
DURING OPERATION
While diving, stay alert for leaks or flooding of the underwater housing. Look through the domes periodically to
inspect for leaks. Any impacts with rock, coral, or hard obstacles (including impacts with lead weights) may
compromise the watertight seal and flood the underwater housing. Immediately inspect for leaks if an impact
occurs. If a leak is detected, immediately return the underwater housing to the surface.
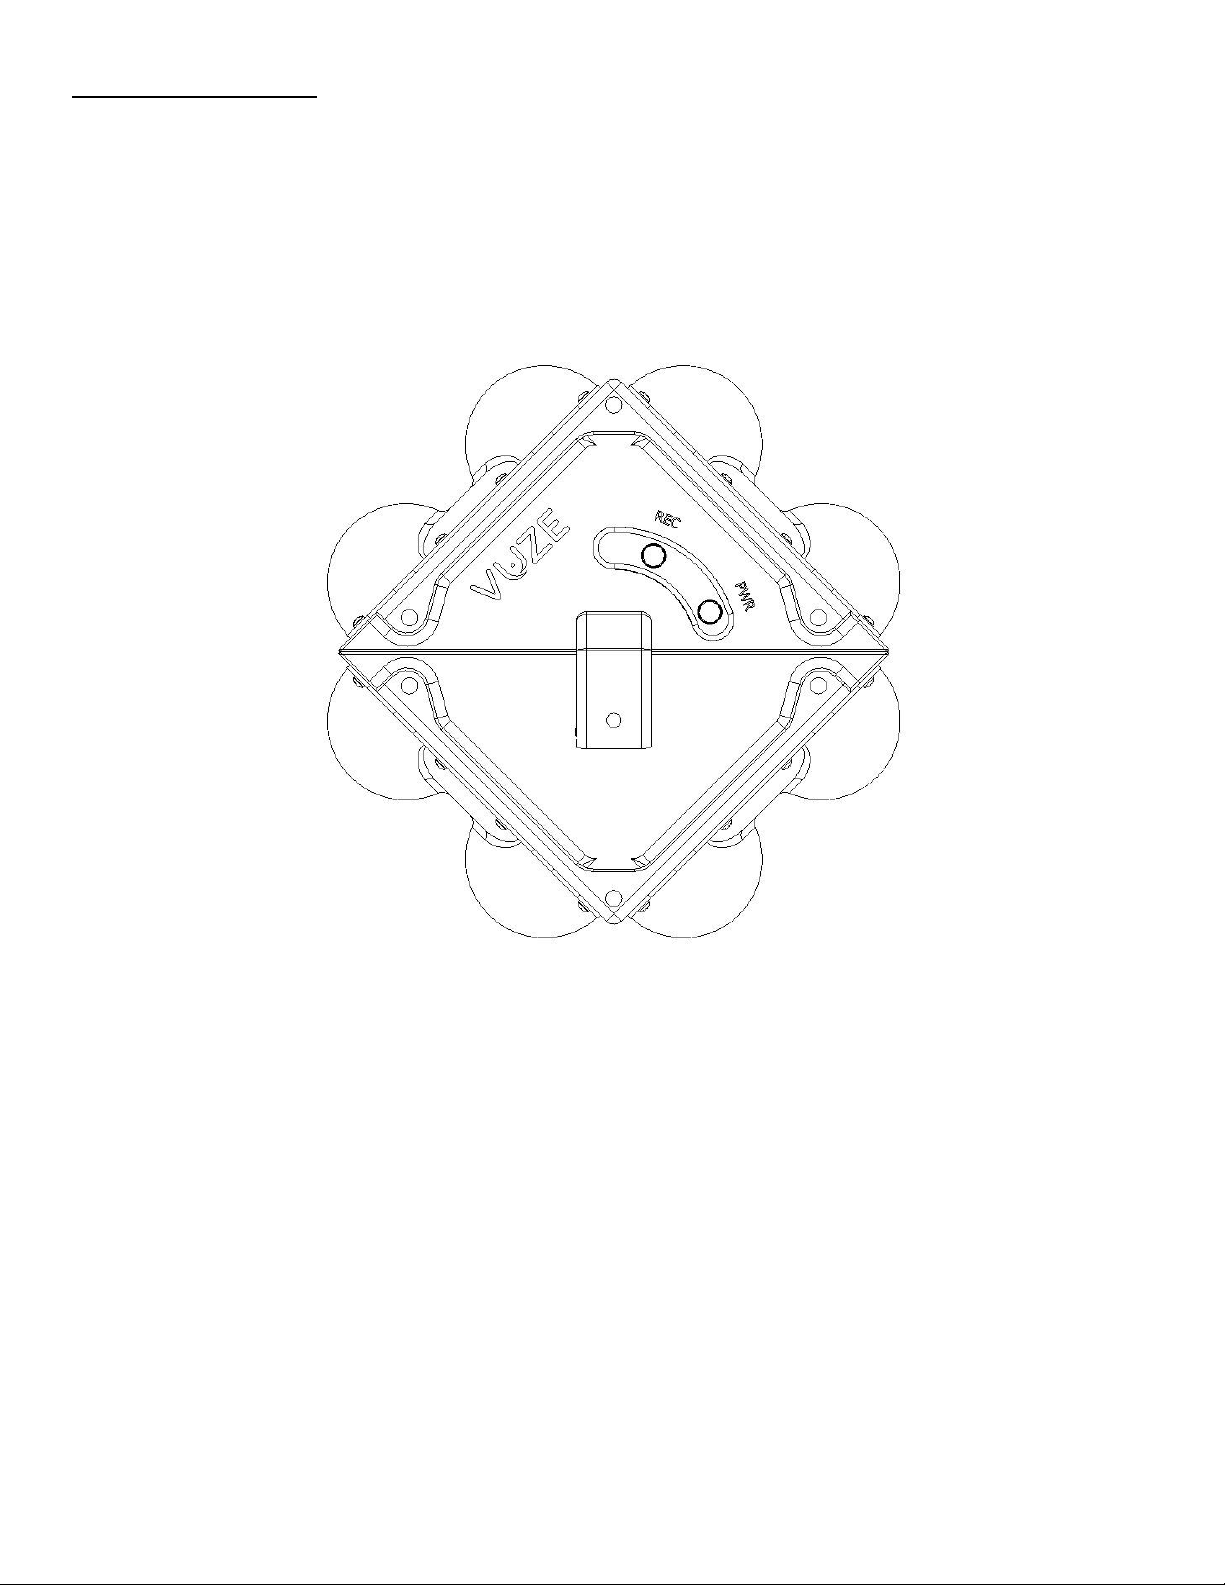
The buttons on the top of the underwater housing are used to actuate the record (REC) and power (PWR)
buttons. Look through the clear plastic Curved Button Assembly to verify status lights on the camera.
Figure 7: Top view of HumanEyes VUZE Underwater Case
Note that the camera microphones are extremely sensitive to noises while underwater. Bumping of the
underwater housing, SCUBA regulator operation, boat noises, fish and reef noises may be loud and distorted
on the recording.
During your dive, small bubbles may accumulate on the outside of the polycarbonate lenses and show up in
your images. To remove, create a current by waving your hand in front of the affected lens or gently wipe the
bubbles away with your fingers.
6
Page 8

VUZE-UWC Manual V6
MAINTENANCE
DOME REPLACEMENT
If the domes become dirty or smudged, use a microfiber cloth to gently clean. Avoid using harsh chemicals or
abrasive cloths to prevent scratching, pitting, or other damage of the domes.
The domes may become scratched through the normal course of use. Two replacement domes are included
in this kit and are field-replaceable. Follow the steps below to replace domes:
Figure 8: Dome Screw Installation Figure 9: Anti-seize lubricant (example)
REPLACING THE DOMES
1. On a clean, dry, and level surface, place the half of the underwater housing with the lens that is to be
replaced on a clean towel. (a small container to hold screws will be helpful)
2. Use the included phillips screwdriver (#1 Phillips head) to carefully remove all eight screws around the
domes.
3. Remove the scratched lens. This may require pushing on the lens from the inside of the underwater
housing.
4. Inspect/replace the dome O-ring and install the new lens, aligning the lens holes with the housing’s
tapped screw holes.
5. Using the O-ring pick (supplied), (or a toothpick) apply a small amount of TEF-GEL (or similar
anti-seize lubricant) to each screw hole and install the eight screws. Torque each screw to 2
pound-inch (0.22 newton-meters). This is roughly equivalent to the screws being hand-tight. Be careful
not to over-tighten the screws as this may cause cracking of the lens, strip the threads in the
underwater housing, or damage the screw. Ensure the screw is sufficiently tightened to fully seal the
lens to the underwater housing.
6. Verify the underwater housing does not leak before using the underwater housing with the VUZE or
VUZE+ camera.
7
Page 9

VUZE-UWC Manual V6
O-RINGS
The HOUSING FACE SEAL O-RING (Buna-N O-ring 2-157-70) may become damaged (nicked, cut, flattened,
etc.) through normal use. To replace the Housing Face Seal O-ring, follow the steps below:
1. Remove the existing O-ring using an O-ring pick (supplied) or tooth pick.
NOTE: Do not use a metal tool for this operation.
2. Thoroughly clean the O-ring groove using an alcohol swab, gauze, or other delicate cloth to remove
any contaminants (old lubricant, sand, dirt, hair, etc.).
3. Apply a thin coat of approved lubricant to the new O-ring.
4. Install the new O-ring into the O-ring groove using a gentle touch.
5. Thoroughly clean the O-ring mating surface on the other half of the underwater housing.
6. Test the underwater housing to verify that it is waterproof prior to use.
Figure 10: Verify the lubricated O-ring is fully seated into the dovetail groove.
The Dome Face Seal O-ring may need to be serviced or replaced during the dome replacement procedure.
The procedure is similar to that of replacing the main housing seal with the exception that the Dome O-ring
needs to be stretched during installation and dome installation has to be quick enough to prevent the O-ring
from shrinking and popping out of the groove.
Note that the O-ring groove is a dovetail groove that is designed to retain the O-ring through repeated opening
and closing cycles of the underwater housing. The O-ring is intentionally difficult to remove from the dovetail
groove as a feature to help ensure proper retention of the O-ring.
PREVENTATIVE MAINTENANCE AND CARE
Always thoroughly rinse the VUZE Underwater Case. Upon completion of underwater activities, place the
underwater housing in a bucket of fresh water for at least five minutes prior to drying and opening the
underwater housing.
8
Page 10
VUZE-UWC Manual V6
ADVANCED MAINTENANCE AND REPAIR
Advanced maintenance tasks for this underwater housing include adjusting or replacing the underwater
housing latches, and replacing the buttons. While these tasks can be performed by a competent SCUBA
equipment technician in an emergency, it is recommended that the unit be sent back to the manufacturer for
professional servicing.
If the underwater housing has been dropped or otherwise damaged and is no longer holding a watertight seal,
contact the manufacturer to discuss options for repair or replacement.
STORAGE AND TRANSPORT
While the VUZE Underwater Case is designed for underwater environments, care must be taken during
transport and storage to reduce the likelihood of leaks:
● Always keep the lenses covered with the plastic film that originally came with the lenses. Cellophane or
similar plastic cling wrap may be substituted if the original plastic film is lost or damaged.
● Keep the underwater housing latched and closed. The underwater housing is safe to transport in this
manner on airplanes.
● Ensure the underwater housing is fully dry and clean.
● Place the underwater housing in the included microfiber storage pouch.
● Keep the underwater housing and accessories in the Pelican case.
● Ensure that the Pelican case is free of water and debris (sand, dirt, hair, dust, etc.).
● Do not leave the underwater housing in direct sunlight or a hot environment for prolonged periods as
UV light and heat may damage the lenses and O-rings.
● Do not transport the camera in the underwater housing.
O-RING GREASE AND LUBRICANT
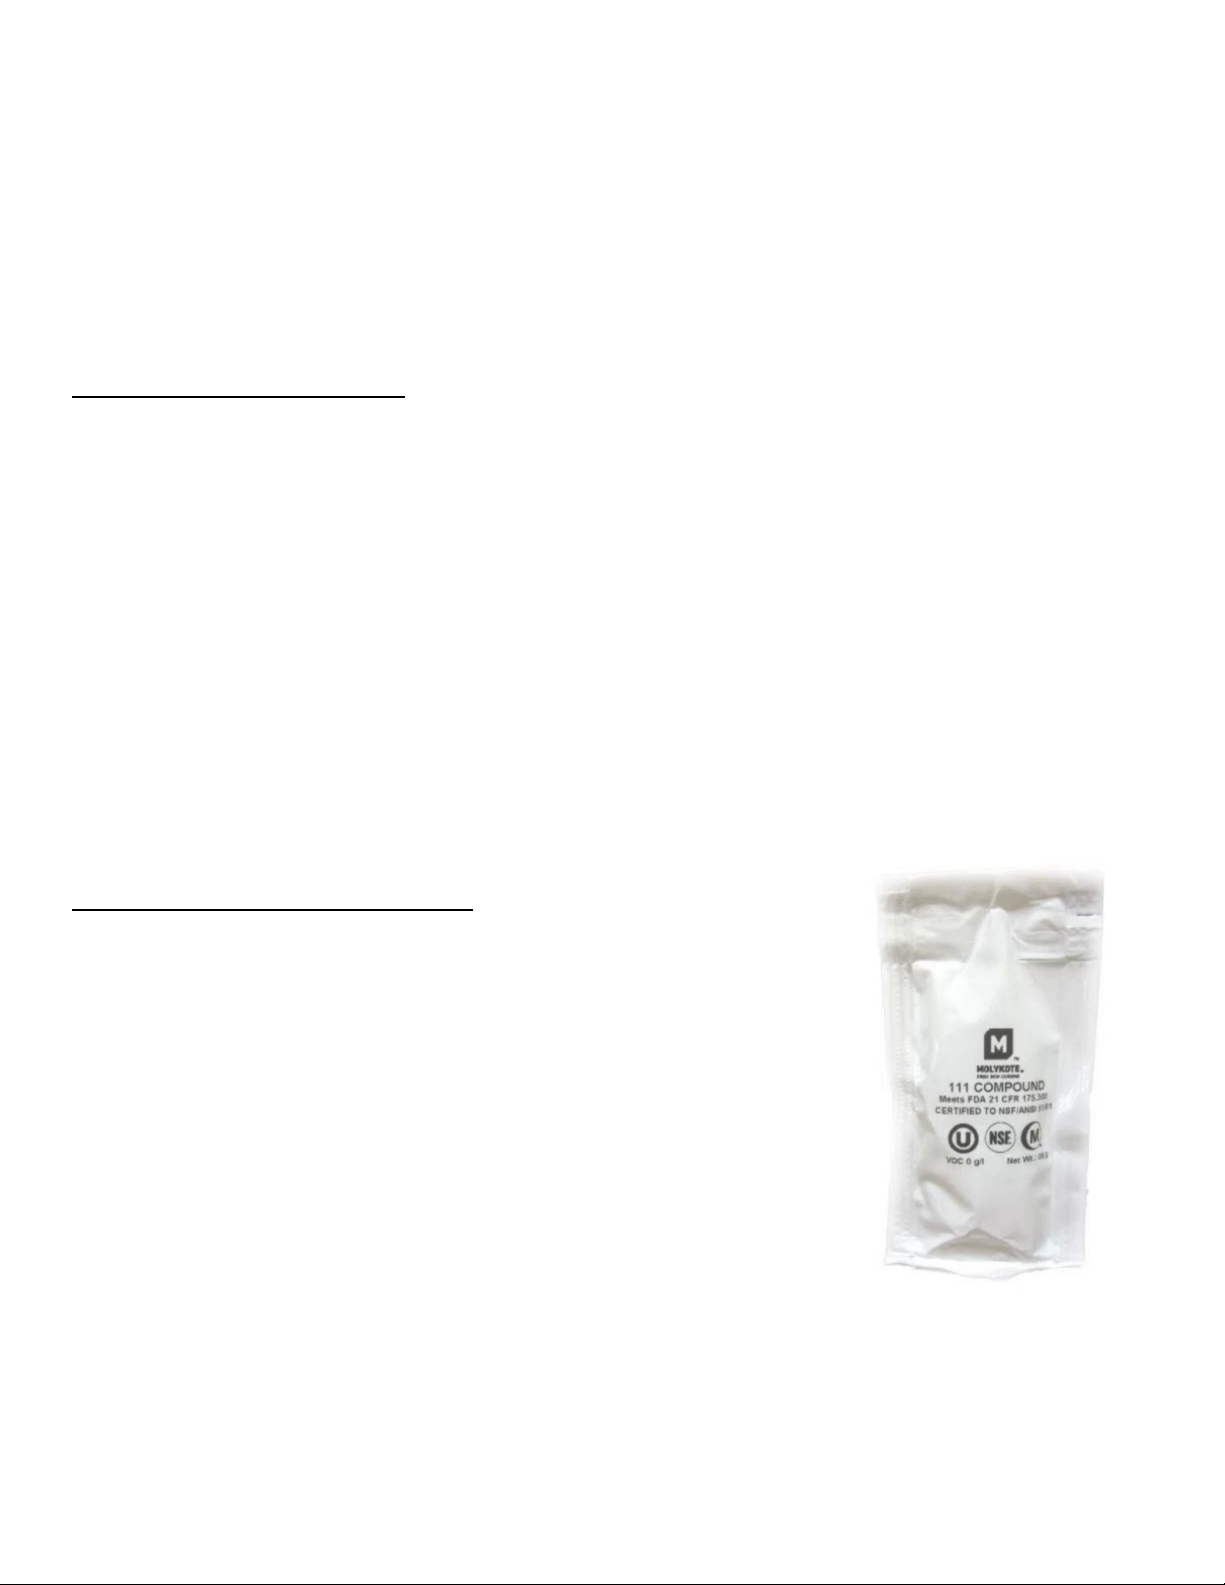
Use ONLY MOLYKOTE 111 lubricant to grease the O-rings. Other types of
lubricant may cause swelling of the O-rings, cracked lenses and other plastic
parts, and other potential problems.
Ensure that only a sufficient amount of grease to give the O-rings a slippery
and shiny look is used. Too much grease can lead to underwater housing
damage and flooding.
Regularly inspect the grease on the underwater housing to verify it is free of
debris (sand, dirt, hair, etc.) that may compromise the underwater housing
seal.
Figure 11: Molykote 111 O-ring Grease
9
Page 11
VUZE-UWC Manual V6
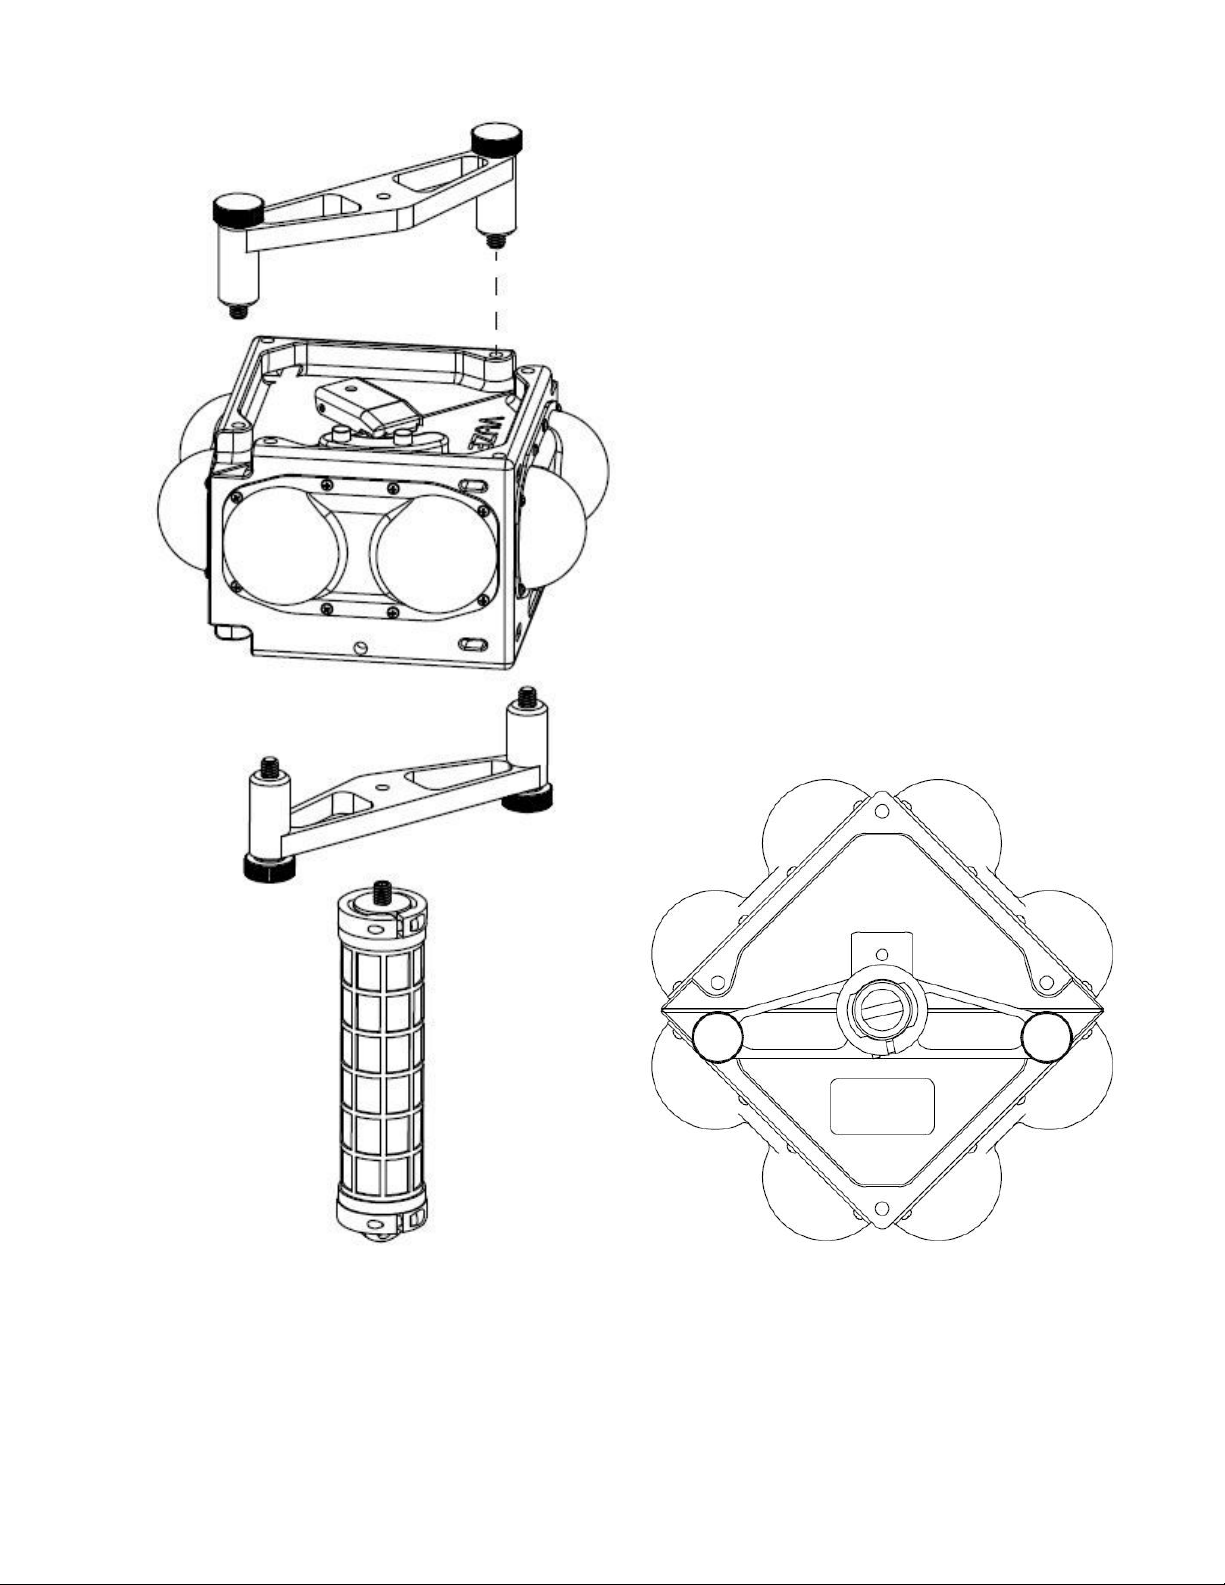
Figure 12: Exploded view of Handle Bridge
installation (top and bottom) and removable handle.
Figure 13: (Bottom View) The Handle Bridge allows
rigging and accessory attachment along central
vertical axis of the underwater case to increase
stability
10
Page 12

VUZE-UWC Manual V6
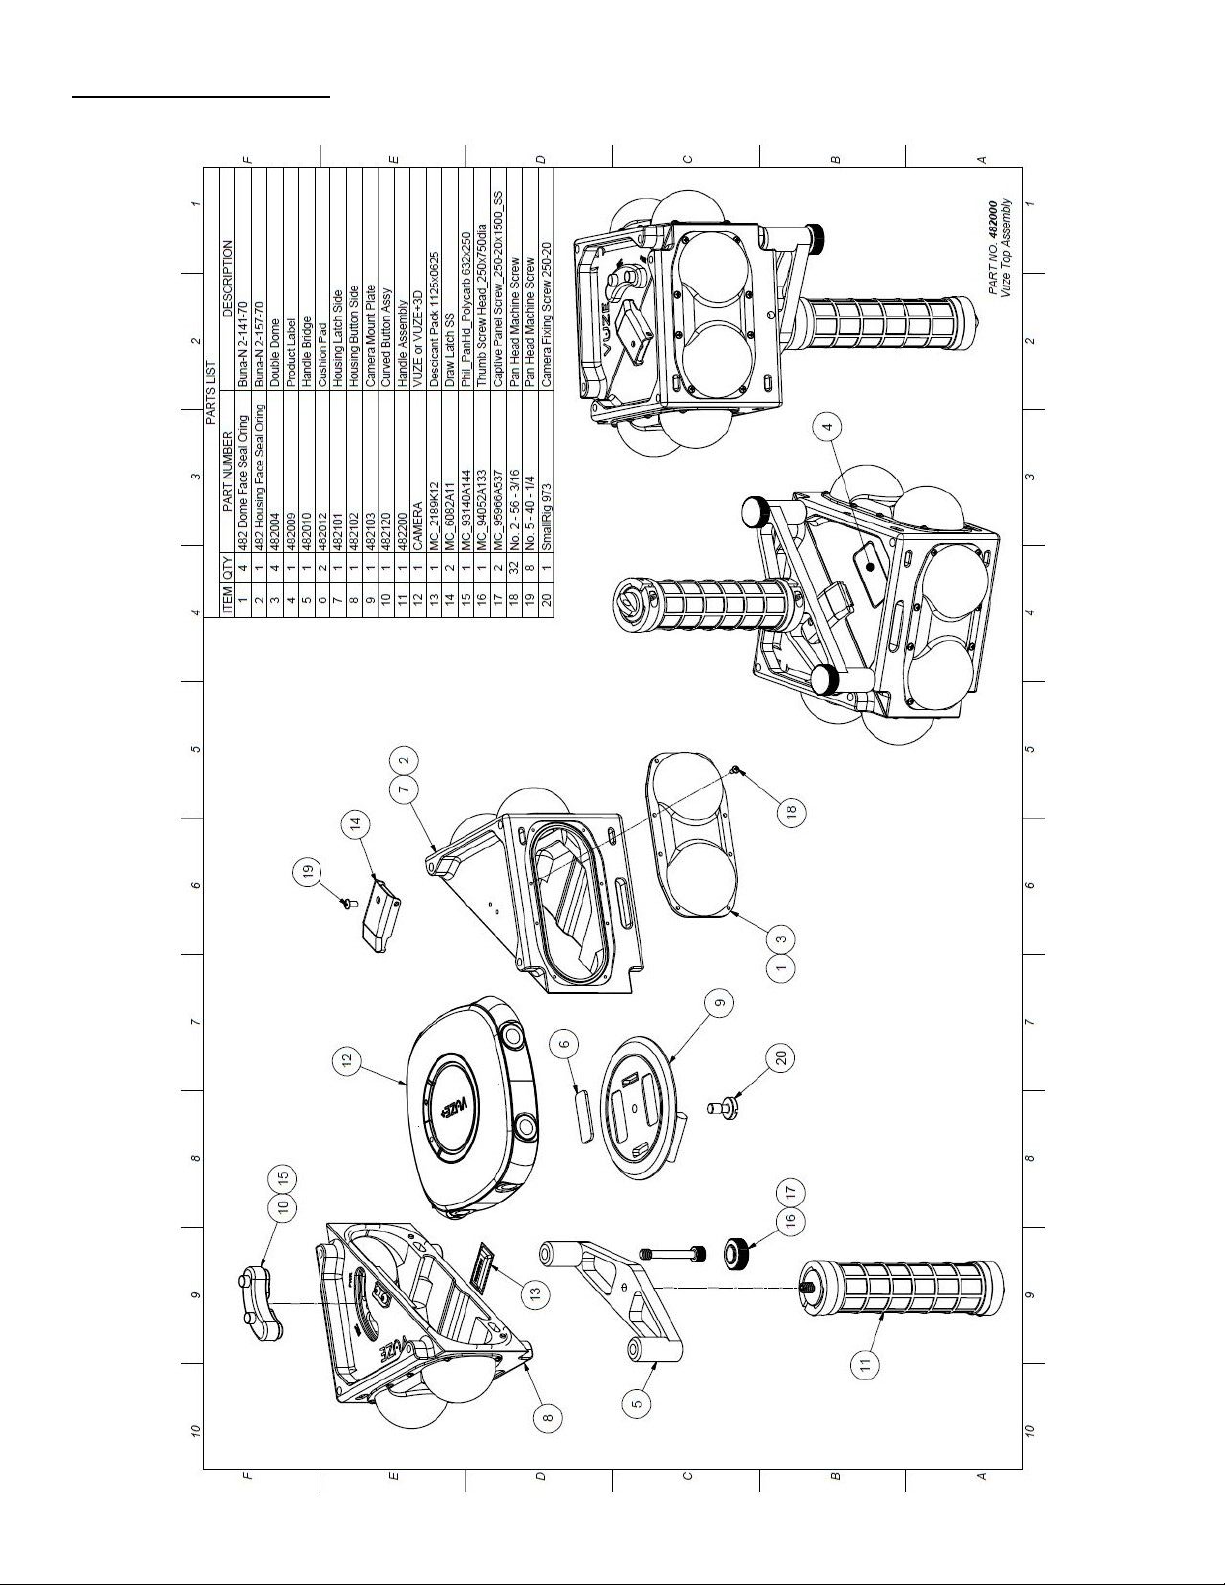
SPARE PARTS & TOOL KIT (see assembly drawing)
Contact Vuze at https://vuze.camera/support/ to purchase spare parts as needed.
Item
Qty
VUZE-UWC Double Dome (p/n 482004)
2
O-ring 2-157-70 (Housing Face Seal)
2
O-ring 2-041-70 (Dome Face Seal)
4
O-ring Pick
1
Molykote 111
1
Desiccant Packets (with double sided adhesive mount squares)
4
Philips #1 Screwdriver
1
#2-56 x 3/16, Phillips Head, 316SS
8
#5-40 x ¼, Phillips Head, 316SS
4
¼-20 x 1.5, Plastic Head Thumb Screw, Black, 18-8 SS
1
¼-20 Camera Fixing Screw, D-ring
1
PROFESSIONAL SERVICING
Contact Vuze at https://vuze.camera/support/ to arrange for professional servicing, inspection, and repair of the
underwater housing.
LIMITED WARRANTY
This HumanEyes VUZE Underwater Case is warranted against any manufacturer defects for a period of one
(1) year from the original date of purchase. Defective products should be returned to HumanEyes postage
paid. HumanEyes will, at its sole discretion, repair or replace such products, and will return to customer
postage paid. All other claims of any nature including but not limited to flooding of the underwater housing,
damage to the camera, damage to the housing due to dropping or other impact events, etc., are not covered.
Normal wear and tear including but not limited to scratched lenses, scratched anodization, and minor hardware
corrosion is not covered. Except as mentioned above, no other warranty expressed or implied applies to this
product.
11
Page 13
VUZE-UWC Manual V6
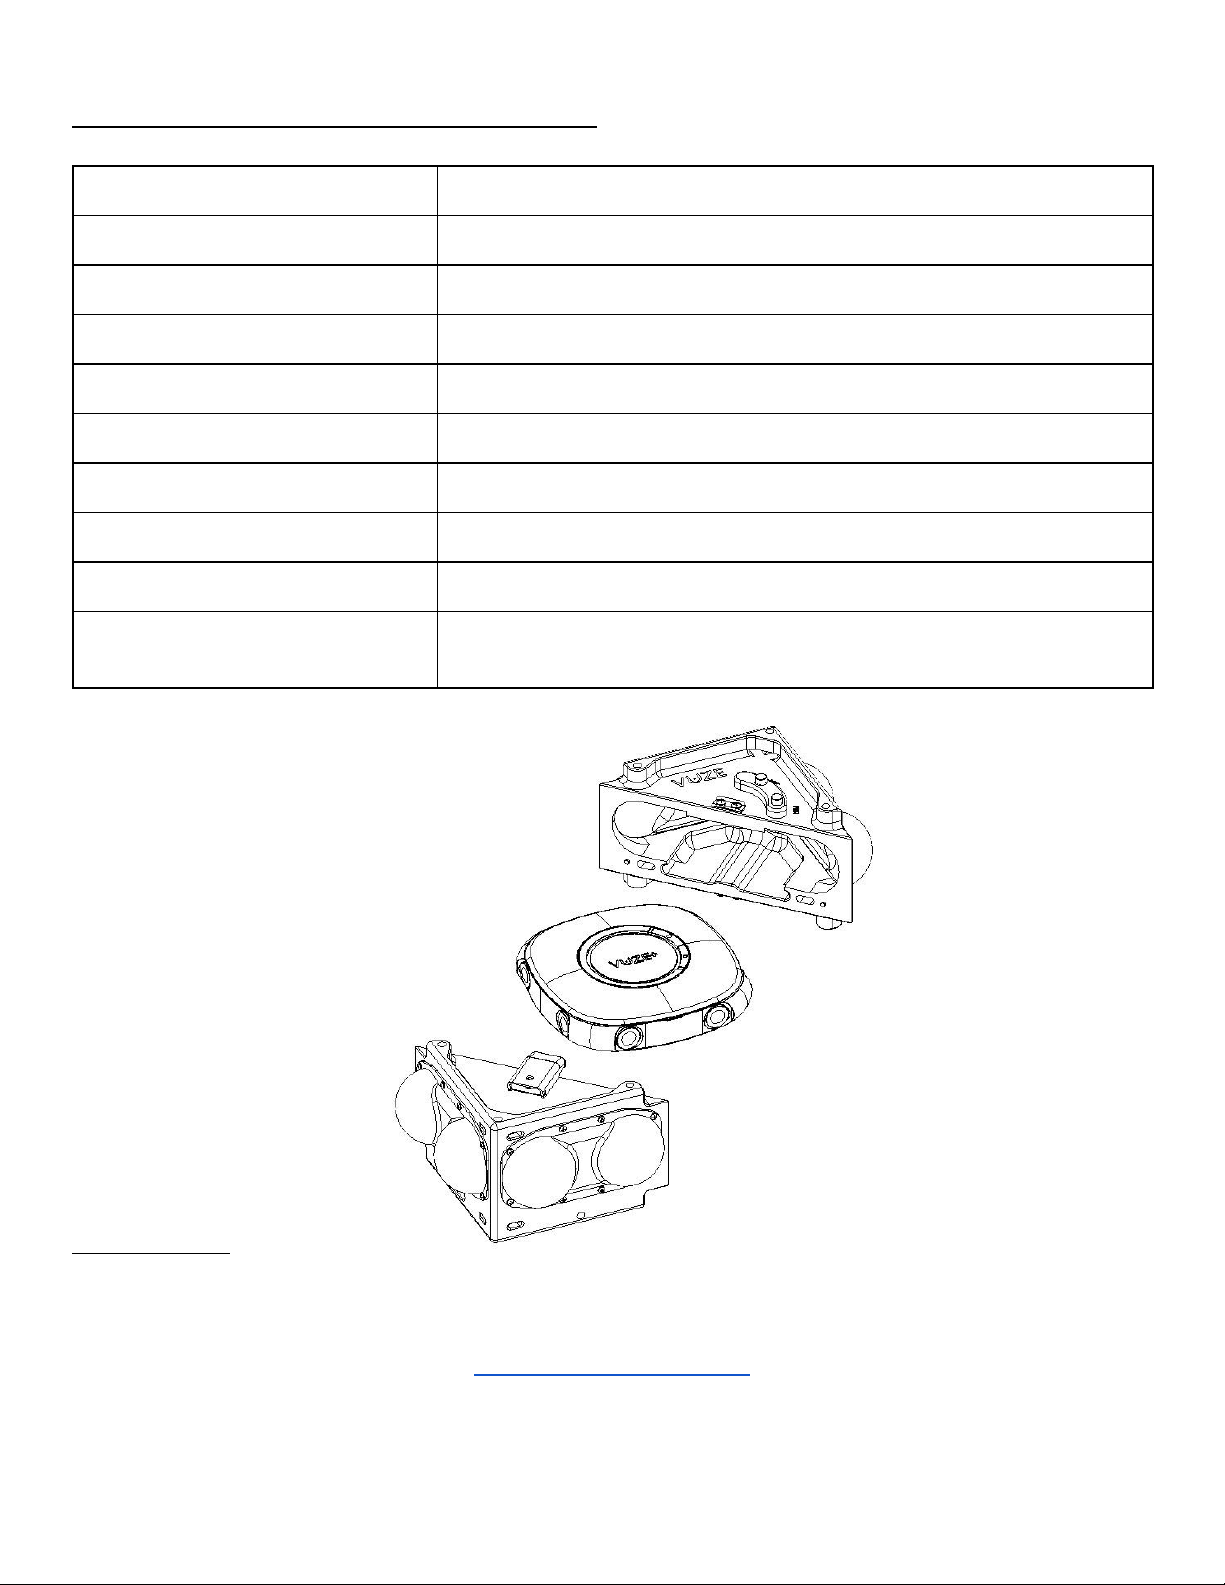
VUZE UNDERWATER CASE SPECIFICATIONS
Compatible Cameras
VUZE and VUZE+
Maximum Rated Depth
135 ft (41 meters)
Weight in Air
Approximately 3.8 lbs (1.72 kg)
Buoyancy (seawater)
Negative 0.90 lb (-0.41 kg)
Buoyancy (freshwater)
Negative 0.97 lb (-0.44 kg)
Dome Screw Torque
2 pound-inches (0.22 newton-meters)
Lens Material
Polycarbonate
Housing Material
6061-T6 Aluminum (Type II Hard Anodize)
O-ring Material
Buna-N Rubber
Drop Rating
NONE - If underwater case is dropped, bumped, or otherwise
impacted, verify water tightness prior to use.
CONTACT US
If you have any questions about your product or need advice on setup and use, please contact us and we will
do everything that we can to help you film the underwater world in 3D 360 degrees.
https://vuze.camera/contact/
512-615-7522
9:00 to 5:00 (GMT-5), Mon to Fri
12
Page 14
VUZE-UWC Manual V6
ASSEMBLY DRAWING
13
Page 15

VUZE-UWC Manual V6
NOTES
________________________________________________________________________________________
________________________________________________________________________________________
________________________________________________________________________________________
________________________________________________________________________________________
________________________________________________________________________________________
________________________________________________________________________________________
________________________________________________________________________________________
________________________________________________________________________________________
________________________________________________________________________________________
________________________________________________________________________________________
________________________________________________________________________________________
________________________________________________________________________________________
________________________________________________________________________________________
________________________________________________________________________________________
________________________________________________________________________________________
________________________________________________________________________________________
________________________________________________________________________________________
________________________________________________________________________________________
________________________________________________________________________________________
________________________________________________________________________________________
________________________________________________________________________________________
________________________________________________________________________________________
________________________________________________________________________________________
14
Page 16

Humaneyes Technologies Inc.
www.humaneyes.com
 Loading...