

Page 1

CAR RADIO
NEW JERSEY 220 BT
1 011 303 335 001
Enjoy it.
Bedienungs- und Einbauanleitung
Operating and installation instructions
Notice d'utilisation et de montage
Instrucciones de manejo e instalación
Instruções de serviço e de montagem
Petunjuk Pengoperasian dan Pemasangan
01_NewJersey220BT_World_de.indd 101_NewJersey220BT_World_de.indd 1 17.02.14 10:1317.02.14 10:13
Page 2
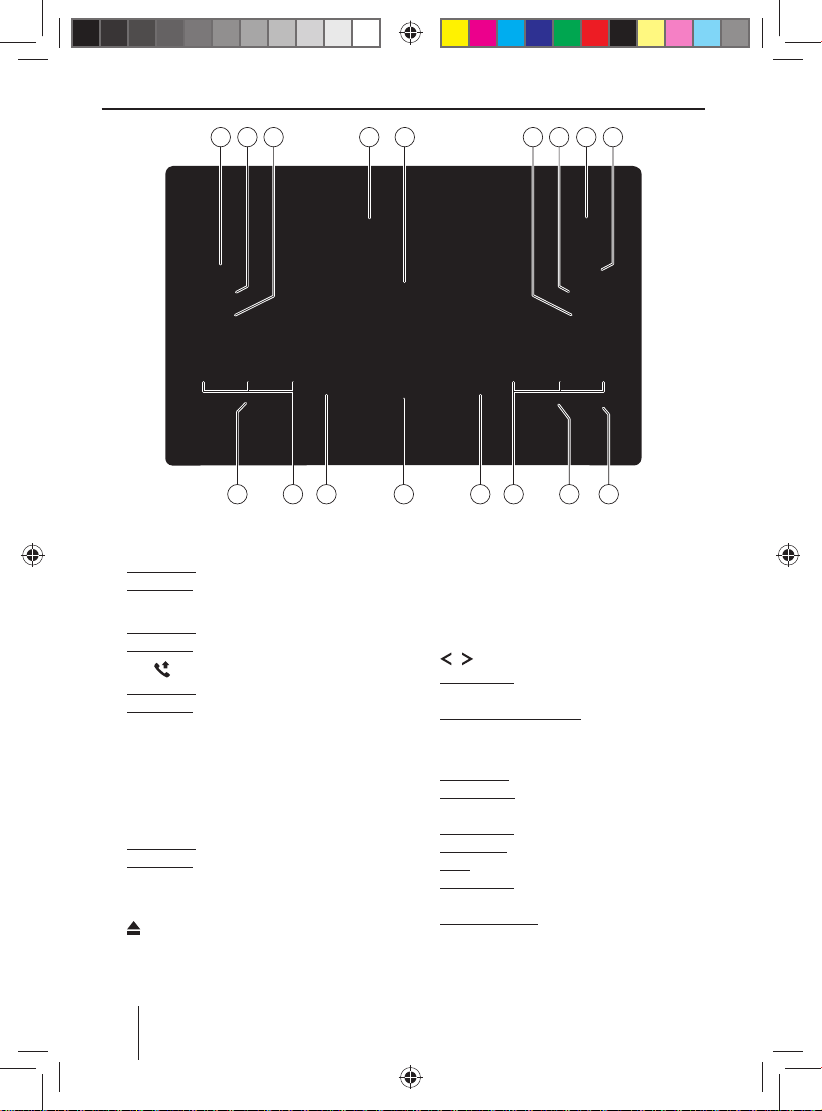
Controls
4 52 931 7 86
1313 14 1212 11 1015
MENU button
1
Short press: Call up/close user menu
Long press: Scan station (scan function)
DISPLAY button
2
Short press: Switch display
Long press: Set time
3
SRC button
Short press: Selecting an audio source
Long press: Call up the Bluetooth® menu
4
CD tray
5
Display
AUDIO button
6
Call up/close the "AUDIO" menu
BAND/TS button
7
Short press: Select memory bank
Long press: Store stations automatically
(Travelstore)
Microphone
8
button (Eject)
9
Eject a CD
Reset button
:
Restoring the original factory settings of the
car sound system.
USB port
;
<
Keys 1 - 6
=
/ button
Radio mode: Set station manually
(short press), start seek tuning (long press)
Other operating modes: Track selection
(short press), fast searching (long press)
>
Rotary/pushbutton
Short press: Switch on car sound system
In operation: Mute car sound system (Mute);
interrupt playback (Pause)
In the menu: Call up menu items
Long press: Switch o car sound system
Turn: Adjust volume
In the menu: Select menu item, change
settings
In Browse mode: Category (iPod only), select
folder and track
?
Front AUX-IN socket
20
02_NewJersey220BT_World_gb.indd 2002_NewJersey220BT_World_gb.indd 20 17.02.14 10:1417.02.14 10:14
Page 3
Contents
Safety notes .................................................... 22
Symbols used ............................................................22
Road safety ................................................................22
General safety notes ...............................................22
Declaration of conformity ....................................23
Cleaning notes ................................................ 23
Disposal notes................................................. 23
Scope of delivery ............................................ 23
Optional equipment
(not part of the scope of delivery) .....................23
Placing the device in operation .....................23
Important note for radio reception
in America and Europe ..........................................23
Switching on/o ......................................................23
Volume ........................................................................24
Setting the time .......................................................24
Tra c information .......................................... 24
Radio mode .....................................................24
RDS................................................................................24
Changing to radio mode.......................................25
Select memory bank ..............................................25
Tuning into a station ..............................................25
Storing stations or calling stored station ........25
Scanning stations ....................................................25
Storing stations automatically
(Travelstore) ...............................................................25
PTY ................................................................................26
Switching the display .............................................26
CD/MP3/WMA/iPod mode .............................. 26
Basic information ..................................................... 26
Changing to CD/MP3/WMA/iPod mode .........27
Inserting/ejecting a CD .........................................27
Connecting/removing a USB data carrier .......28
Selecting tracks ........................................................28
Selecting a folder
(in MP3/WMA mode only) ....................................28
Fast searching ...........................................................28
Interrupting playback ............................................28
Scanning all tracks (not in iPod mode) ............28
Playing tracks in random order ..........................28
Repeatedly playing individual tracks or
directories ..................................................................29
Switching the display .............................................29
Browse mode ............................................................29
Bluetooth® mode ............................................ 30
Pairing and connecting a Bluetooth®
device ...........................................................................31
Telephone functions...............................................31
Bluetooth® streaming mode................................32
External audio sources ................................... 32
Front AUX-IN socket ................................................32
Sound settings ................................................ 32
Calling and exiting the "AUDIO" menu ............32
Making settings in the "AUDIO" menu .............33
Adjusting the equalizer .........................................33
User settings ................................................... 34
Calling the user menu and selecting
a menu .........................................................................34
Making settings in the "TUNER" menu ............34
Making settings in the "VOLUME" menu ........35
Making settings in the "DISPLAY" menu .........36
Making settings in the "VARIOUS" menu ........36
Useful information ......................................... 37
Warranty .....................................................................37
Service .........................................................................37
Technical data ................................................. 37
Installation instructions ............................... 110
ENGLISH
21
02_NewJersey220BT_World_gb.indd 2102_NewJersey220BT_World_gb.indd 21 17.02.14 10:1417.02.14 10:14
Page 4
Safety notes
Safety notes
The car sound system was manufactured according to the state of the art and established safety
guidelines. Even so, dangers may occur if you do
not observe the safety notes in these instructions.
These instructions contain important information to easily and safely install and operate the car
sound system.
• Read these instructions carefully and completely before using the car sound system.
• Keep the instructions at a location so that they
are always accessible to all users.
• Always pass on the car sound system to third
parties together with these instructions.
In addition, observe the instructions of the devices
used in conjunction with this car sound system.
Symbols used
These instructions employ the following symbols:
DANGER!
Warns about injuries
CAUTION!
Warns about damaging the CD drive
DANGER!
Warns about high volume
The CE mark con rms the compliance
with EU directives.
쏅 Identi es a sequencing step
• Identi es a listing
Road safety
Observe the following notes about road safety:
• Use your device in such a way that you can
always safely control your vehicle. In case of
doubt, stop at a suitable location and operate
your device while the vehicle is standing.
• Always listen at a moderate volume to pro-
tect your hearing and to be able to hear acoustic warning signals (e.g. police sirens). During
mute phases (e.g. when changing the audio
source), changing the volume is not audible.
Do not increase the volume during this mute
phase.
General safety notes
Observe the following notes to protect yourself
against injuries:
• Do not modify or open the device. The device
contains a Class 1 laser that can cause injuries
to your eyes.
• Do not increase the volume during mute
phases, e.g. when changing the audio source.
Changing the volume is not audible during a
mute phase.
Use as directed
This car sound system is intended for installation
and operation in a vehicle with 12 V vehicle system voltage and must be installed in a 2-DIN slot.
Observe the performance limits in the technical
data. Repairs and installation, if necessary, should
be performed by a specialist.
Installation instructions
You may only install the car sound system yourself if you are experienced in installing car sound
systems and are very familiar with the electrical
system of the vehicle. For this purpose, observe
the installation instructions at the end of these
instructions.
22
02_NewJersey220BT_World_gb.indd 2202_NewJersey220BT_World_gb.indd 22 17.02.14 10:1417.02.14 10:14
Page 5
Safety notes | Cleaning notes | Disposal notes | Scope of delivery | Placing the device in operation
Declaration of conformity
The Blaupunkt Europe GmbH declares that the car
sound system New Jersey 220 BT complies with
the basic requirements and the other relevant
regulations of the directives 2004/108/EC and
1999/5/EC.
The declaration of conformity can be found on the
Internet under www.blaupunkt.com.
Cleaning notes
Solvents, cleaning and scouring agents as well as
dashboard spray and plastics care product may
contain ingredients that will damage the surface
of the car sound system.
• Use only a dry or slightly moistened cloth for
cleaning the car sound system.
• If necessary, clean the contacts of the control
panel regularly using a soft cloth moistened
with cleaning alcohol.
Disposal notes
Do not dispose of your old unit in the household trash!
Use the return and collection systems available to
dispose of the old device.
Scope of delivery
The scope of delivery includes:
1 Car sound system
1 Operating/installation instructions
1 Support frame
1 Handheld remote control (incl. battery)
1 Connecting cable chamber A
1 Connecting cable chamber B
Optional equipment
(not part of the scope of delivery)
Use only optional equipment by Blaupunkt.
Information is available from your Blaupunkt
specialised dealer or on the Internet under
www.blaupunkt.com.
Placing the device in operation
Caution!
Transport securing screws
Ensure that the transport securing screws at the
top side of the device are removed before the
startup of the car sound system.
Important note for radio reception in
America and Europe
This car sound system is designed for operation in
di erent regions with di erent frequency ranges
and station technologies. The factory default of
the reception area is "ASIA". If you operate the car
sound system outside of Asia, e.g. in America or
Europe, you rst have to set a suitable reception
area in the menu. Available reception areas are
"EUROPE", "ASIA", and "AMERICA".
The reception area for the radio reception is set
in the user menu (see the chapter "User settings",
section "Making settings in the "TUNER" menu",
menu item "REGION").
Switching on/o
Switching on/o with the rotary/pushbutton
쏅 For switch-on, press the rotary/pushbut-
ton
.
>
The car sound system switches on.
쏅 For switch-o , hold the rotary/pushbut-
ton
pressed for more than 2 seconds.
>
The car sound system switches o .
Switching on/o via vehicle ignition
If the car sound system is connected with the vehicle ignition and it was switched o with the rotary/
pushbutton
ignition.
, it is switched on or o with the
>
ENGLISH
23
02_NewJersey220BT_World_gb.indd 2302_NewJersey220BT_World_gb.indd 23 17.02.14 10:1417.02.14 10:14
Page 6

Placing the device in operation | Tra c information | Radio mode
Volume
Adjusting the volume
You can adjust the volume in steps from 0 (o ) to
50 (maximum).
쏅 Turn the rotary/pushbutton
volume.
Muting the car sound system (Mute)
쏅 Brie y press the rotary/pushbutton > to
mute the device or to reactivate the previous
volume.
While it is muted, "MUTE" is ashing on the
display.
>
to change the
Setting the time
쏅 Press the DISPLAY button 2 for approx.
2 seconds to set the time.
쏅 Press the
between hours and minutes.
The hour or minute display ashes if it is
selected.
쏅 Turn the rotary/pushbutton
hours or minutes.
쏅 Press the rotary/pushbutton
the time set.
/ button = to change
>
to set the
to con rm
>
Tra c information
In the reception area "EUROPE", an FM station can
identify tra c reports by means of an RDS signal.
If priority for tra c reports is switched on, a traf c report is automatically switched through, even
if the car sound system is currently not in radio
mode.
If priority is switched on, the display shows the
symbol. "TRAFFIC" is displayed during a
switched-through tra c announcement.
The priority is activated and deactivated in the
user menu (see the chapter "User settings", section "Making settings in the "TUNER" menu", menu
item "TA").
Note:
The volume is increased for the duration of
the switched-through tra c announcement.
You can adjust the minimum volume for
tra c announcements (see the chapter "User
settings", section "Making settings in the
"VOLUME" menu", menu item "TA VOL").
Radio mode
RDS
Many FM stations broadcast an RDS (Radio Data
System) signal in addition to their programme
in the reception area "EUROPE" that allows the
following additional functions:
• The station name is shown on the display.
• The car sound system recognises tra c announcements and news broadcasts and can
automatically switch them through in other
operating modes (e.g. in USB mode).
• Alternative frequency: If the AF function is
switched on, the car sound system automatically tunes into the best receivable frequency
for the station that is currently set.
• Regional: At certain times, some radio stations divide their programme into regional
programmes providing di erent content. If
the REGIONAL function is activated, the car
sound system changes only to those alternate
frequencies on which the same regional programme is being broadcast.
The functions RDS, AF and REGIONAL are activated and deactivated in the user menu (see the
chapter "User settings", section "Making settings
in the "TUNER" menu", menu items "RDS", "AF" and
"REG").
24
02_NewJersey220BT_World_gb.indd 2402_NewJersey220BT_World_gb.indd 24 17.02.14 10:1417.02.14 10:14
Page 7

Radio mode
Changing to radio mode
쏅 Press the SRC button 3 repeatedly until
"TUNER" is displayed:
Playback starts with the station that was
played most recently.
Select memory bank
쏅 Press the BAND/TS button 7 repeatedly
until the desired memory bank is displayed:
FM1 씮 FM2 씮 FM3 씮 AM1 씮 AM2
Note:
Up to 6 stations can be stored in each memory bank.
Tuning into a station
There are various ways of tuning into a station:
Tuning into stations manually
쏅 Brie y press the / button = once or
several times to incrementally change the
frequency.
Starting station seek tuning
쏅 Press the
onds to start station seek tuning.
The radio tunes into the next receivable
station.
Notes:
• For the reception area "EUROPE": In the FM
• The sensitivity of seek tuning can be ad-
/ button = for approx. 2 sec-
waveband, only tra c information stations
are tuned into if the priority for tra c information is switched on.
justed (see the chapter "User settings",
section "Making settings in the "TUNER"
menu", menu item "DX/LO").
Storing stations or calling stored
station
쏅 Select the desired memory bank.
쏅 If necessary, set the desired station.
쏅 Press the station button 1-6
2 seconds to store the current station under
the button.
- or -
쏅 Brie y press the station button 1 - 6
call up the stored station.
for approx.
<
<
to
Scanning stations
The scan function enables scanning the stored
stations of the current waveband.
쏅 Press the MENU button
onds to start scanning.
During the scan, the display shows the mem-
ory location and the current frequency or
station name.
쏅 Brie y press the MENU button
tinue listening to the station that is currently
being scanned.
for approx. 2 sec-
1
1
to con-
Storing stations automatically
(Travelstore)
With Travelstore, you can automatically search for
and store all receivable the stations in the FM and
AM wavebands. Any stations that were previously
stored are deleted in the process.
쏅 Select the desired waveband, e.g. FM1 or
AM1.
쏅 Press the BAND/TS button
2 seconds.
The tuner starts the automatic station seek
tuning; the display shows "TS". After storing is
completed, the stored stations are scanned in
the order of the storage locations. Afterwards,
the station in memory location 1 of the FM1 or
AM1 level is played back.
for approx.
7
ENGLISH
25
02_NewJersey220BT_World_gb.indd 2502_NewJersey220BT_World_gb.indd 25 17.02.14 10:1417.02.14 10:14
Page 8

Radio mode | CD/MP3/WMA/iPod mode
PTY
In the reception areas "EUROPE" and "AMERICA",
an FM station can transmit its current programme
type, e.g. CULTURE, POP, JAZZ, ROCK, SPORT or
SCIENCE. Hence, the PTY function allows a targeted search for broadcasts of a certain programme
type, e.g. for rock or sports broadcasts. Note that
PTY is not supported by all stations.
Selecting the programme type and starting
PTY seek tuning
To select a programme type, read the section
"Making settings in the "TUNER" menu", menu
item "PTY" in the chapter "User settings".
쏅 Select the desired programme type and press
the rotary/pushbutton
seek tuning.
As soon as a station with the desired programme type is found, it remains being tuned
into.
Note:
If no station with the selected programme
type is found, "PTY NONE" is brie y displayed
and 2 beeps can be heard. The radio will then
retune to the station that it played last.
to start the PTY
>
Switching the display
쏅 Press the DISPLAY button 2 to toggle
between these two displays:
Display Meaning
ABCDEF Station name
FM1 102.90 Memory bank/frequency
POP M
CLK 18:30 Time
Programme type, only if
available
CD/MP3/WMA/iPod mode
Basic information
CD/MP3/WMA mode
This car sound system can be used to play audio
CDs (CDDA) and CD-R/RWs with audio, MP3 or
WMA les as well as MP3 or WMA les on USB data
carriers.
Notes:
• To ensure proper functioning, use only CDs
with the Compact-Disc logo.
• Blaupunkt cannot guarantee the awless
function of copy-protected CDs and all CD
blanks and USB data carriers available on
the market.
Note the following information when preparing
an MP3/WMA data carrier:
• Naming of tracks and directories:
– Max. 32 characters without the le exten-
sion ".mp3" or ".wma" (the use of more
characters reduces the number of tracks
and folders that the car sound system can
recognise)
– No umlauts or special characters
• CD formats: CD-R/RW, Ø: 12 cm
• CD data formats: ISO 9669 Level 1 and 2, Joliet
• CD burn speed: Max. 16x (recommended)
• USB format/ le system: Mass storage device/
FAT16/32
• File extension of audio les:
– .MP3 for MP3 les
– .WMA for WMA les
•WMA les only without Digital Rights Manage-
ment (DRM) and created with Windows Media
Player version 8 or later
• MP3 ID3 tags: Version 1 and 2
• Bitrate for creating audio les:
– MP3: 32 to 320 kbps
– WMA: 32 to 192 kbps
• Depending on the data structure on the USB
medium, up to 3,000 entries can be managed.
26
02_NewJersey220BT_World_gb.indd 2602_NewJersey220BT_World_gb.indd 26 17.02.14 10:1417.02.14 10:14
Page 9

CD/MP3/WMA/iPod mode
iPod mode
You can connect numerous iPod and iPhone models to the car sound system via the USB port and
control the audio playback from the car sound
system.
Note:
A list of compatible iPod and iPhone models
is located at the end of these instructions.
Blaupunkt cannot guarantee the awless
function of other iPod and iPhone models.
Use a suitable adapter cable to connect your iPod
or iPhone with the USB port of the car sound
system.
Changing to CD/MP3/WMA/iPod
mode
쏅 Press the SRC button 3 repeatedly until
the desired audio source is displayed:
• "CD": Inserted CD
• "USB": Connected USB data carrier
• "IPOD": Connected iPod/iPhone
• "AUX": Connected external audio source
Notes:
• The respective audio source can be selected only if a corresponding CD is inserted or
a corresponding device is connected.
• A connected iPod is initially selected under "USB" and, as soon as the iPod is recognised, under "IPOD".
• If the car sound system rst has to read
the data of a connected device or data carrier before the playback, the display shows
"READING". The duration of the reading
depends on the data volume and design
of the device or data carrier. If the device
or data carrier is defective or the transferred data cannot be played back, a corresponding message appears on the display
(e.g. "ERROR").
Inserting/ejecting a CD
Inserting a CD
Risk of severe damage to the CD
drive!
and CDs with a diameter of 8 cm (mini CDs) must
not be used.
We accept no responsibility for any damage to the
CD drive that may occur as a result of the use of
unsuitable CDs.
Ejecting a CD
Noncircular contoured CDs (shape CDs)
Note:
You must not hinder or assist the drive as it
automatically draws in the CD.
쏅 Insert the CD with its printed side up into the
CD tray
4
until you feel a slight resistance.
The drive automatically draws in the CD and
checks its data. Afterwards, the playback
starts in CD or MP3 mode.
Note:
If the inserted CD cannot be played back,
"ERROR" is brie y displayed and the radio
changes to radio mode.
Note:
You must not hinder or assist the drive as it
ejects the CD.
쏅 Press the
Notes:
• If a CD is ejected and not removed, the
• You can also eject CDs while the car sound
button 9 to eject an inserted CD.
drive will automatically draw it back in
again after approx. 15 seconds.
system is switched o or whilst another
audio source is activated.
ENGLISH
27
02_NewJersey220BT_World_gb.indd 2702_NewJersey220BT_World_gb.indd 27 17.02.14 10:1417.02.14 10:14
Page 10

CD/MP3/WMA/iPod mode
Connecting/removing a USB data
carrier
Connecting a USB data carrier
쏅 Switch o the car sound system so that the
data carrier will be correctly registered.
쏅 Insert the USB data carrier in the USB socket
.
;
쏅 Turn on the car sound system.
If the USB data carrier is selected as audio
source, the data are read rst.
Notes:
• If the connected USB data carrier cannot
be seen, "ERROR" is brie y displayed.
• The time required for reading in the data
depends on the design and size of the USB
data carrier.
Removing a USB data carrier
쏅 Switch o the car sound system so that the
data carrier will be correctly unregistered.
쏅 Disconnect the USB data carrier.
Selecting tracks
쏅 Brie y press the / button = to change
to the previous/next track.
Note:
If the current track plays longer than 3 seconds, pressing
= once restarts the track.
Selecting a folder
(in MP3/WMA mode only)
쏅 Press the DISPLAY button 2 repeatedly
until the symbol is displayed.
쏅 Brie y press the
to the previous/next folder.
/ button = to change
Fast searching
쏅 Press and hold down the / button =
until the desired position has been reached.
Interrupting playback
쏅 Brie y press the rotary/pushbutton > to
interrupt ("PAUSE") or continue playback.
Scanning all tracks
(not in iPod mode)
The scan function scans all available tracks.
쏅 Brie y press the
scanning.
"SCAN" and the scan time are shown on the
display during scanning.
쏅 Brie y press the 2 SCN button
continue listening to the track that is currently
being scanned.
button < to start
2 SCN
again to
<
Playing tracks in random order
쏅 Press the 4 RDM button < to change among
the playback modes:
Opera-
Display Meaning
tion
CD RDM ON Mixing tracks
RDM DIR
MP3/
WMA
RDM ALL
ALBUM
iPod
SONG
Gen. RDM OFF Regular playback
If the RANDOM function is active, the
symbol appears on the display.
Mixing tracks of
the current folder
Mixing tracks of
the data carrier
Mixing tracks of
the current album
Mixing tracks of
the current selection
28
02_NewJersey220BT_World_gb.indd 2802_NewJersey220BT_World_gb.indd 28 17.02.14 10:1417.02.14 10:14
Page 11

CD/MP3/WMA/iPod mode
Repeatedly playing individual tracks
or directories
쏅 Press the 3 RPT button < to change among
the playback modes:
Opera-
Display Meaning
tion
CD RPT ON Repeating tracks
RPT TRK Repeating tracks
MP3/
WMA
RPT DIR Repeating folders
iPod RPT ON
Gen. RPT OFF Regular playback
If the REPEAT function is active, the
symbol appears on the display.
Repeat current
selection
Switching the display
쏅 Press the DISPLAY button 2 once or several
times to toggle between these two displays:
Opera-
Display Meaning
tion
T01– 00:15
CD
CLK 18:30 Time
FILE File name ²
FOLDER Folder name ²
TITLE Track name¹
ARTIST Artist¹
MP3/
ALBUM Album name¹
WMA/
PLAY00:15 Playing time
iPod
TT 03:37 Track duration
ALL INFO
CLK 18:30 Time
¹ Track name, artist and album name must be
stored as ID3 tag to be able to display them.
² The le and folder name is displayed only in
MP3/WMA mode.
Track number and
playing time
All the information
in succession
Browse mode
In Browse mode, you can directly search for and
select a certain track on the MP3/WMA data carrier
or iPod without interrupting the current playback.
Browse mode in MP3/WMA mode
In MP3/WMA mode, you can select and play a
track from a directory of the data carrier.
쏅 Press the 1
browse mode in the MP3/WMA mode.
The
Notes:
• The browse mode remains switched on for
approx. 10 seconds if no selection is made.
• You can exit the browse mode at any time
by pressing the 1 button <.
쏅 Press the
of the data carrier.
The current folder is shown on the display.
쏅 Turn the rotary/pushbutton
di erent folder.
쏅 Press the rotary/pushbutton
available tracks of the folder.
The rst track of the folder is shown on the
display.
Note:
Pressing the button = returns you to the
list of folders.
쏅 Turn the rotary/pushbutton
di erent track.
쏅 Press the rotary/pushbutton
the track.
The playback starts. You are exiting the
browse mode.
button < to call up the
icon ashes on the display.
button = to display the folders
>
to select a
>
to display the
to select a
>
>
to play back
ENGLISH
29
02_NewJersey220BT_World_gb.indd 2902_NewJersey220BT_World_gb.indd 29 17.02.14 10:1417.02.14 10:14
Page 12

CD/MP3/WMA/iPod mode | Bluetooth® mode
Browse mode in iPod mode
In iPod mode, you can select and play back the
tracks via the categories "ARTISTS", "ALBUMS",
"SONGS", "GENRES", "COMPOSERS" or "PLAY
LISTS".
In addition, you can select and play back videos via the categories "MOVIES", "MUSIC VIDEOS",
"TV SHOWS" or "VIDEO PODCASTS".
쏅 Press the 1
button < to call up the browse
mode in iPod mode.
The
icon ashes on the display. In addition, "MUSIC" is displayed for music playback
or "VIDEO" for video playback.
Notes:
• The playback selection is displayed only if
the browse mode is initially being called
up after connecting the iPod. Afterwards,
the current selection is displayed whenever the browse mode is called.
• In browse mode, you can press the button = in each case to return to the higher
level.
• The browse mode remains switched on for
approx. 10 seconds if no selection is made.
• You can exit the browse mode at any time
by pressing the 1
쏅 Turn the rotary/pushbutton
button <.
>
to change
between "MUSIC" and "VIDEO".
쏅 Press the rotary/pushbutton
to con rm
>
the selection.
The rst category of the selection is displayed.
쏅 Turn the rotary/pushbutton
to select a dif-
>
ferent category.
쏅 Press the rotary/pushbutton
>
to display the
available folders of the category.
The rst folder of the selected category is
shown on the display (e.g. "JAZZ" in the
"GENRES" category).
Note:
Pressing the
button = returns you to the
list of categories.
쏅 Turn the rotary/pushbutton
to select a
>
di erent folder.
쏅 Press the rotary/pushbutton
to display the
>
available tracks of the folder.
The rst track of the folder is shown on the
display.
Note:
Pressing the button = returns you to the
list of folders.
쏅 Turn the rotary/pushbutton
to select a
>
di erent track.
쏅 Press the rotary/pushbutton
>
to play back
the track.
The playback starts. You are exiting the
browse mode.
Bluetooth® mode
You can connect the car sound system via
Bluetooth® with other Bluetooth®-ready devices,
such as cell phones or MP3 players. This allows
you to use the car sound system with its integrated microphone as hands-free system for connected cell phones or control the music playback
of Bluetooth® audio devices and play them back
via the loudspeakers of the car sound system
( Bluetooth® streaming).
To establish a Bluetooth® connection, you must
rst pair the car sound system and the Bluetooth®
device. When you pair the devices, a Bluetooth®
connection is subsequently established automatically.
Only one Bluetooth® device can be connected
with the car sound system. If you connect a new
device with the car sound system, the connection
to a currently connected device is automatically
interrupted.
30
02_NewJersey220BT_World_gb.indd 3002_NewJersey220BT_World_gb.indd 30 17.02.14 10:1417.02.14 10:14
Page 13

Bluetooth® mode
Pairing and connecting a Bluetooth®
device
쏅 Activate the Bluetooth® function of your
Bluetooth® device and start the search for
new devices.
The car sound system appears as "NJ 220" in
the list of devices found.
쏅 Establish the connection; you may have to
enter the PIN code "1234".
The connection is being established.
Telephone functions
Answering/rejecting an incoming phone call
With an incoming call, the number of the caller is
shown on the display. The current audio source is
muted and a ring tone is played via the loudspeakers of the car sound system.
Note:
If the number of the caller is not being transmitted, the display shows "IN CALL" (incoming
call) instead of the number.
쏅 Press the 6
The running talk time is shown on the display.
쏅 Press the 5
to end the current call.
Note:
During the call, you can change the volume
by turning the rotary/pushbutton
the car sound system by brie y pressing it.
Making a call by entering the phone number
쏅 Press the SRC button 3 for approx. 2sec-
onds to open the Bluetooth® menu.
쏅 Turn the rotary/pushbutton
"DIAL NO" (dial number) menu item.
쏅 Press the rotary/pushbutton
entry menu.
You can now enter a phone number.
button < to answer the call.
button < to reject the call or
or mute
>
>
to select the
to open the
>
쏅 Turn the rotary/pushbutton
>
to select a
digit for the respective position.
쏅 Press the rotary/pushbutton
to go to the
>
next position.
Note:
By pressing the
button =, you return to
the previous position in each case.
쏅 Press the 6
button < to call the number
entered.
The display shows "DIALLING".
As soon as the party you are calling accepts
the call, the display shows the running talk
time.
Making a call via the phone book
You can call up the phone book of the connected
cell phone and use it to place a call.
쏅 Press the SRC
button 3 for approx. 2sec-
onds to open the Bluetooth® menu.
쏅 Turn the rotary/pushbutton
to select the
>
"P-BOOK" (phone book) menu item.
쏅 Press the rotary/pushbutton
>
to open the
phone book.
쏅 Turn the rotary/pushbutton
>
to select a
contact.
쏅 Press the 6
button < to call the number
of the contact.
The display shows "DIALLING".
As soon as the party you are calling accepts
the call, the display shows the running talk
time.
Making a call via the call lists
You can call up the call lists of the connected cell
phone and use them to place a call.
쏅 Press the SRC
button 3 for approx. 2sec-
onds to open the Bluetooth® menu.
쏅 Turn the rotary/pushbutton
>
to select
the menu item "RECEIVED", "DIALLED" or
"MISSED".
ENGLISH
31
02_NewJersey220BT_World_gb.indd 3102_NewJersey220BT_World_gb.indd 31 17.02.14 10:1417.02.14 10:14
Page 14

Bluetooth® mode | External audio sources | Sound settings
쏅 Press the rotary/pushbutton > to open the
selected call list.
쏅 Turn the rotary/pushbutton
number.
쏅 Press the 6
displayed.
The display shows "DIALLING".
As soon as the party you are calling accepts
the call, the display shows the running talk
time.
Transferring a call
You can transfer a call from the car sound system
to the cell phone.
쏅 Press the 6
Note:
Depending on the cell phone, the connection
may be disconnected if you transfer the call
to the cell phone.
button < to call the number
button < to transfer a call.
to select a
>
Bluetooth® streaming mode
Starting the Bluetooth® streaming mode
쏅 Press the SRC
"BTSTREAM" (Bluetooth® streaming) is displayed.
쏅 Press the rotary/pushbutton
to start the music playback.
Notes:
• The Bluetooth® streaming mode can be selected only if a suitable streaming device
is connected.
• The volume set for a phone call is adopted
for the playback. The playback can be undesirably high if you adjusted the volume
to be high during the last phone call.
Selecting tracks
쏅 Brie y press the / button = to change
to the previous/next track.
Interrupting playback
쏅 Brie y press the rotary/pushbutton
interrupt ("PAUSE") or continue playback.
button 3 repeatedly until
, if necessary,
>
to
>
External audio sources
Front AUX-IN socket
Danger!
Increased risk of injury from
connector.
In case of an accident, the protruding connector in
the front AUX-IN socket may cause injuries. The use
of straight plugs or adapters leads to an increased
risk of injury.
For this reason, it is recommended to use angled
jack plugs.
As soon as an external audio source, such as a
portable MP3 player, is connected to the front
AUX-IN socket
SRC button 3. "AUX" then appears on the
display.
, it can be selected with the
?
Sound settings
The following sound settings can be changed in
the "AUDIO" menu:
• Setting the left/right volume distribution
(Balance) or front/rear (Fader)
• Adjusting the increase of bass at low volume
(Loudness)
• Adjusting the equalizer
Calling and exiting the "AUDIO"
menu
쏅 Press the AUDIO button 6 to open the
"AUDIO" menu.
쏅 Turn the rotary/pushbutton
desired menu item is selected.
쏅 Perform the setting (see the next section).
쏅 Press the AUDIO button
Notes:
• The menu is automatically exited approx.
20 seconds after the last button activation
and you are returned to the display of the
current audio source.
>
until the
to exit the menu.
6
32
02_NewJersey220BT_World_gb.indd 3202_NewJersey220BT_World_gb.indd 32 17.02.14 10:1417.02.14 10:14
Page 15

Sound settings
• In the menu, you can press the button
=
in each case to return to the higher
menu level.
• The menu does not allow changing the
volume or muting (Mute) the car sound
system.
Making settings in the "AUDIO"
menu
BALANCE
Left/right volume distribution. Settings: LEFT 7 to
RIGHT 7.
쏅 Press the rotary/pushbutton
to change
>
the setting.
쏅 Turn the rotary/pushbutton
until the
>
desired volume distribution is set.
FADER
Front/rear volume distribution. Settings: REAR 7
to FRONT 7.
쏅 Press the rotary/pushbutton
to change
>
the setting.
쏅 Turn the rotary/pushbutton
until the
>
desired volume distribution is set.
LOUDNESS
Adjustable increase of bass at low volume.
Settings: 400/800/2400 Hz and OFF (no increase).
쏅 Press the rotary/pushbutton
to change
>
the setting.
쏅 Turn the rotary/pushbutton
>
to change
between the settings.
Adjusting the equalizer
The radio features a 3-band equalizer. For each of
the three treble, middle and bass bands, you can
select a frequency as well as adjust the level. In addition, you can adjust the quality factor for bass
and middle.
In addition, the equalizer o ers sound presettings
for di erent types of music.
Setting the 3-band equalizer
쏅 In the "AUDIO" menu, select the "EQ" menu
item.
쏅 Press the rotary/pushbutton
to open the
>
"EQUALIZER" menu.
쏅 In the "EQUALIZER" menu, select the "USER"
menu item.
쏅 Press the rotary/pushbutton
to open the
>
menu.
쏅 Turn the rotary/pushbutton
to change
>
between the following menu items:
– BASS-G (level)
(settings: –7 to +7)
– BASS-F (frequency)
(settings: 60/80/100/200 Hz)
– BASS-Q (Q-factor)
(settings: 1.0/1.25/1.5/2.0)
– MIDDLE-G (level)
(settings: –7 to +7)
– MIDDLE-F (frequency)
(settings: 0.5/1.0/1.5/2.5 kHz)
– MIDDLE-Q (Q-factor)
(settings: 0.5/0.75/1.0/1.25)
– TREBLE-G (level)
(settings: –7 to +7)
– TREBLE-F (frequency)
(settings: 10.0/12.5/15.0/17.5 kHz)
쏅 Press the rotary/pushbutton
to change
>
the setting for the selected menu item.
쏅 Turn the rotary/pushbutton
to set the
>
level, frequency or Q-factor.
Selecting equalizer presettings
Settings: OFF (no presetting), ROCK, POP, JAZZ,
FLAT (linear).
쏅 In the "AUDIO" menu, select the "EQ" menu
item.
쏅 Press the rotary/pushbutton
to open the
>
"EQUALIZER" menu.
쏅 Turn the rotary/pushbutton
>
to change
between the settings.
ENGLISH
33
02_NewJersey220BT_World_gb.indd 3302_NewJersey220BT_World_gb.indd 33 17.02.14 10:1417.02.14 10:14
Page 16

User settings
User settings
Calling the user menu and selecting
a menu
쏅 Brie y press the MENU button 1 to open
the user menu.
In the user menu, the user settings can be found in
the following menus:
• TUNER
• VOLUME
• DISPLAY
• VARIOUS
쏅 Turn the rotary/pushbutton
desired menu is selected.
쏅 Press the rotary/pushbutton
selected menu.
쏅 Turn the rotary/pushbutton
desired menu item is selected.
쏅 Perform the setting (see the following
sections).
쏅 Brie y press the MENU button
menu.
Notes:
• The menu is automatically exited approx.
20 seconds after the last button activation
and you are returned to the display of the
current audio source.
• In the menu, you can press the button
=
in each case to return to the higher
menu level.
• The menu does not allow changing the
volume or muting (Mute) the car sound
system.
>
until the
to open the
>
>
until the
to exit the
1
Making settings in the "TUNER"
menu
RDS
Switching the RDS function on or o . Settings: ON,
OFF.
쏅 Press the rotary/pushbutton
the setting.
쏅 Turn the rotary/pushbutton
between the settings.
Note:
If the reception area "ASIA" or "AMERICA" is
selected, RDS is automatically switched o .
AF (alternative frequency)
(only for reception area EUROPE)
Only possible in FM radio mode and with RDS
function switched on: Switching AF function on or
o . Settings: ON, OFF.
쏅 Press the rotary/pushbutton > to change
the setting.
쏅 Turn the rotary/pushbutton
between the settings.
If the AF function is active, the
appears on the display.
REG (Regional)
(only for reception area EUROPE)
Only possible in FM radio mode and with RDS and
AF function switched on: Switching REGIONAL
function on or o . Settings: ON, OFF.
쏅 Press the rotary/pushbutton
the setting.
쏅 Turn the rotary/pushbutton
between the settings.
to change
>
to change
>
to change
>
symbol
to change
>
>
to change
34
02_NewJersey220BT_World_gb.indd 3402_NewJersey220BT_World_gb.indd 34 17.02.14 10:1417.02.14 10:14
Page 17

User settings
TA (tra c information)
(only for reception area EUROPE)
Only possible in FM radio mode and with RDS
function switched on: Switching priority for tra c
announcements on or o . Settings: ON, OFF.
쏅 Press the rotary/pushbutton
to change
>
the setting.
쏅 Turn the rotary/pushbutton
to change
>
between the settings.
If priority is switched on for tra c information, the
display shows the
symbol.
PTY (programme type)
(only for reception areas EUROPE and
AMERICA)
Only possible with activated RDS function: Select
a programme type.
쏅 Press the rotary/pushbutton
>
to show the
programme types.
쏅 Turn the rotary/pushbutton
>
to select a
programme type.
DX/LO (sensitivity)
Setting the sensitivity of station seek tuning. Settings: DX (stations with strong and weaker signals
are found), LO (only stations with a strong signal
are found).
쏅 Press the rotary/pushbutton
to change
>
the setting.
쏅 Turn the rotary/pushbutton
>
to change
between the settings.
REGION (reception area)
Select the reception area for the radio reception.
Settings: EUROPE, ASIA, AMERICA.
쏅 Press the rotary/pushbutton
>
to change
the setting.
쏅 Turn the rotary/pushbutton
to change
>
between the reception areas.
Making settings in the "VOLUME"
menu
LAST VOL
If you enable LAST VOL, the volume which was
set the last time you switched o the device is reenabled at switch-on. Settings: ON, OFF (the value
10 is automatically set at switch-on).
Danger!
High volume
The power-on volume can be unexpectedly high
if the LAST VOL setting is selected and a high volume was set the last time the radio was switched
o .
Always set the device to a moderate volume.
쏅 Press the rotary/pushbutton
the setting.
쏅 Turn the rotary/pushbutton
between the settings.
BEEP (button beep)
Switching the con rmation beep on or o . Settings: ON, OFF.
쏅 Press the rotary/pushbutton
the setting.
쏅 Turn the rotary/pushbutton
between the settings.
TA VOL (tra c information volume)
(only for reception area EUROPE)
Only possible with activated RDS function: Setting
the minimum volume for tra c announcements.
Settings: 15 – 40.
쏅 Press the rotary/pushbutton
the setting.
쏅 Turn the rotary/pushbutton
volume.
to change
>
to change
>
>
to change
>
to change
to change
>
>
to set the
ENGLISH
35
02_NewJersey220BT_World_gb.indd 3502_NewJersey220BT_World_gb.indd 35 17.02.14 10:1417.02.14 10:14
Page 18

User settings
Making settings in the "DISPLAY"
menu
LCD CTRL (display brightness)
Switching the display brightness between daytime and nighttime mode. Settings: BRIGHT, DARK.
쏅 Press the rotary/pushbutton
the setting.
쏅 Turn the rotary/pushbutton
between the settings.
SCROLL
Select the display of scrolling text (e.g. when displaying MP3 le names with more than 8characters) either as single display or continued display.
Settings: ON (continued scrolling), OFF (single
display).
쏅 Press the rotary/pushbutton
the setting.
쏅 Turn the rotary/pushbutton
between the settings.
12/24H
Selecting the 12 or 24-hour time. Settings: 12, 24.
쏅 Press the rotary/pushbutton
the setting.
쏅 Turn the rotary/pushbutton
between the settings.
Note:
When you set the time in 12-hour mode
(12 HOUR), an "AM" is displayed in front of the
time for the time before noon or a "PM" for the
time after noon.
to change
>
to change
>
>
to change
>
to change
to change
>
>
to change
Making settings in the "VARIOUS"
menu
AUTO CON (automatically connecting)
Switching the automatic connection of the car
sound system with a registered Bluetooth® device
on or o . Settings: ON, OFF.
쏅 Press the rotary/pushbutton
the setting.
쏅 Turn the rotary/pushbutton
between the settings.
REAR/SUB (preampli er output)
It allows you to select whether the rear preampli er outputs at the rear side are connected to the
loudspeakers or a subwoofer via an external ampli er. Settings: REAR (loudspeakers), S-WOOFER
(subwoofer).
쏅 Press the rotary/pushbutton
the setting.
쏅 Turn the rotary/pushbutton
between the settings.
RESET
Restoring the original factory settings of the car
sound system.
쏅 Press the rotary/pushbutton
The car sound system switches o and is reset
to the factory settings.
MCU VER, MPEG VER and BT VER (software
versions)
Display the software version of the radio, drive or
Bluetooth® module.
쏅 Press the rotary/pushbutton
current software version.
to change
>
to change
>
>
to change
>
to change
.
>
>
to display the
36
02_NewJersey220BT_World_gb.indd 3602_NewJersey220BT_World_gb.indd 36 17.02.14 10:1417.02.14 10:14
Page 19

Useful information | Technical data
Useful information
Warranty
We provide a manufacturer's warranty for products bought within the European Union. For devices purchased outside the European Union, the
warranty terms issued by our respective responsible domestic agency are valid. The warranty terms
can be called up from www.blaupunkt.com.
Service
In some countries, Blaupunkt o ers a repair and
pick-up service.
Information about the availability of this
service in your country can be found at
www.blaupunkt.com.
If you want to take advantage of this service, you
may request a pick-up service for your car sound
system via the Internet.
Technical data
Voltage supply
Operating voltage: 10.5 – 14.4 V
Current consumption
In operation: 15 A
10 sec. after switch-o : < 3.5 mA
Ampli er
Output power: 4 x 22 watts sine at
14.4 V at 4ohms.
4 x 50 watts max. power
Tuner
Wavebands Europe:
FM: 87.5 – 108 MHz
AM (MW): 522 – 1,620 kHz
Wavebands Asia:
FM: 87.5 – 108 MHz
AM (MW): 522 – 1,629 kHz
Wavebands in America:
FM: 87.5 – 107.9 MHz
AM (MW): 530 – 1,710 kHz
FM frequency response: 30 – 15,000 Hz
CD
Frequency response: 20 – 20,000 Hz
Pre-amp out
4 channels: 2 V
Input sensitivity
Front AUX-IN: 300 mV / 10 kΩ
Dimensions and weight
W x H x D: 178 x 100 x 170 mm
Weight: approx. 1.60 kg
ENGLISH
Subject to changes
37
02_NewJersey220BT_World_gb.indd 3702_NewJersey220BT_World_gb.indd 37 17.02.14 10:1417.02.14 10:14
Page 20

Einbauanleitung | Installation instructions
DE Einbauanleitung
Sicherheitshinweise
Für die Dauer der Montage und des Anschlusses beachten Sie bitte folgende Sicherheitshinweise.
• Minuspol der Batterie abklemmen! Dabei die
Sicherheitshinweise des Kfz-Herstellers beachten.
•
Beim Bohren von Löchern darauf achten, dass
keine Fahrzeugteile beschädigt werden.
Der Querschnitt des Plus- und Minuskabels
•
darf 1,5 mm² nicht unterschreiten.
• Fahrzeugseitige Stecker nicht an das Radio
anschließen!
Die für Ihren Fahrzeugtyp erforderlichen
Adapterkabel erhalten Sie im BLAUPUNKTFachhandel.
•
Je nach Bauart kann Ihr Fahrzeug von dieser
Beschreibung abweichen. Für Schäden durch
Einbau- oder Anschlussfehler und für Folgeschäden übernehmen wir keine Haftung.
Sollten die hier aufgeführten Hinweise für
Ihren Einbau nicht passen, so wenden Sie
sich bitte an Ihren Blaupunkt-Fachhändler,
Ihren Fahrzeughersteller oder unsere TelefonHotline.
Bei Einbau eines Ampli er müssen unbedingt erst
die Gerätemassen angeschlossen werden, bevor
die Stecker für die Line-Out-Buchse kontaktiert
werden.
Fremdgerätemassen dürfen nicht an der Autoradiomasse (Gehäuse) angeschlossen werden.
EN Installation instructions
Safety instructions
When carrying out installation work and
making connections please observe the following
safety instructions:
• Disconnect the negative terminal of the bat-
tery! When doing so, please observe the vehicle manufacturer’s safety instructions.
•
Make sure you do not damage vehicle components when drilling any holes.
The cross sections of the positive and negative
•
cables must not be less than 1.5 mm².
• Do not connect the vehicle’s plug connec-
tors to the radio!
You can obtain the adapter cable required
for your vehicle type from any BLAUPUNKT
dealer.
•
Depending on the model, your vehicle may
di er from the description provided here. We
accept no responsibility for any damages due
to incorrect installation or connection or for
any consequential damages.
If the information provided here is not suitable for your speci c installation requirements,
please contact your Blaupunkt dealer, your vehicle manufacturer or our telephone hotline.
When installing an ampli er, you must rst connect the device earth connections before connecting the plugs for the line-out jacks.
Earth connection of external devices may not
be connected to earth of car sound system
(housing).
110
07_EA_NewJersey220BT.indd 11007_EA_NewJersey220BT.indd 110 17.02.14 10:1917.02.14 10:19
Page 21

Notice de montage | Instrucciones de instalación
FR Notice de montage
Consignes de sécurité
Respecter les consignes de sécurité suivantes pendant la durée du montage et du branchement.
• Débrancher le pôle (-) de la batterie ! Respec-
ter les consignes de sécurité du constructeur
automobile !
•
Veiller à n’endommager aucune pièce du véhicule en perçant des trous.
La section du câble (+) et (-) ne doit pas dépas-
•
ser 1,5 mm².
• Ne pas brancher les connecteurs du véhi-
cule sur la radio !
Les câbles d’adaptation nécessai res pour le
type de véhicule sont disponibles auprès des
revendeurs BLAUPUNKT.
•
En fonction du modèle, votre véhicule peut
di érer de cette description. Nous déclinerons
toute responsabilité en cas de dommages
causés par des erreurs de montage ou de
connexion et en cas de dommages consécutifs.
Si les indications décrites ici ne s’appliquent
au montage que vous voulez e ectuer, adressez-vous à votre revendeur Blaupunkt, votre
constructeur automobile ou notre service
d’assistance téléphonique.
Pour le montage d’un ampli cateur, les masses
d’appareil doivent être d’abord connectées avant
de connecter les ches pour les connecteurs Line
Out.
Les masses des appareils externes ne doivent
pas être raccordées à la masse de l’autoradio
(boîtier).
ES Instrucciones de
instalación
Normas de seguridad
Durante el montaje y la conexión es imprescindible observar las siguientes normas de
seguridad.
• Desemborne el polo negativo de la batería.
Observe las normas de seguridad dadas por el
fabricante del vehículo.
•
Al perforar agujeros, asegúrese de no dañar
ninguna pieza del vehículo.
La sección transversal del cable positivo y del
•
cable negativo no debe ser menor de 1,5 mm².
• ¡No conecte a la radio los conectores ubica-
dos en el vehículo!
Los cables adaptadores necesarios para su
vehículo los encontrará en el comercio especializado en artículos de la marca BLAUPUNKT.
•
Dependiendo del modelo, es posible que su
vehículo varíe un poco con respecto a la descripción aquí dada. Tenga en cuenta que no
asumimos ninguna responsabilidad por los
daños debidos a un montaje o conexión incorrectos ni por los daños resultantes.
Si las instrucciones aquí dadas no son aptas para el montaje en su vehículo, póngase
en contacto con su proveedor de artículos
Blaupunkt o con el fabricante del vehículo, o
llame a nuestro teléfono de atención al cliente.
En caso de montar un ampli cador, es necesario
conectar la puesta a tierra de las unidades antes
de establecer el contacto de los conectores para
las hembrillas Line-Out.
No deben conectarse masas de otros equipos a
la masa de la radio (carcasa).
111
07_EA_NewJersey220BT.indd 11107_EA_NewJersey220BT.indd 111 17.02.14 10:1917.02.14 10:19
Page 22

Instruções de montagem | Petunjuk Pemasangan
PT Instruções de montagem
Instruções de segurança
Durante a montagem e a ligação do aparelho, queira respeitar as seguintes instruções de
segurança.
• Separar o pólo negativo da bateria! Respeitar
ao mesmo tempo as instruções de segurança
do fabricante do automóvel.
•
Quando se procede à furagem de buracos,
prestar atenção para não serem dani cadas
quaisquer partes do veículo.
As secções transversais dos cabos positivo e
•
negativo não devem ser inferiores a 1,5 mm².
• Não ligar as chas existentes do lado do au-
tomóvel ao auto-rádio
Os cabos adaptadores necessários para o seu
automóvel podem ser adquiridos nos revendedores da BLAUPUNKT.
•
O seu veículo pode divergir desta descrição
em função do modelo. Não assumimos qualquer responsabilidade por erros de montagem ou de ligação nem por danos daí decorrentes.
Caso as presentes instruções não sejam adequadas para a montagem no seu veículo,
dirija-se ao revendedor da Blaupunkt, ao fabricante do seu veículo ou à nossa linha verde.
No caso de montagem de um ampli cador, é imprescindível ligar primeiro os aparelhos à terra
antes de se conectar as chas às tomadas Line Out.
A massa de aparelhos externos não deve ser
ligada à massa do auto-rádio (caixa).
ID Petunjuk Pemasangan
Petunjuk keselamatan
Ketika memasang dan menyambungkan
perangkat, perhatikan petunjuk keselamatan
berikut.
• Putuskan koneksi kutub negatif baterai! Untuk
itu, perhatikan petunjuk keselamatan yang
diberikan oleh pabrikan kendaraan Anda.
•
Ketika melakukan pengeboran, pastikan Anda
tidak merusak komponen kendaraan.
Penampang lintang kabel positif dan negatif
•
tidak boleh kurang dari 1,5 mm².
• Jangan sambungkan konektor steker
kendaraan ke radio!
Anda dapat memperoleh kabel adaptor yang
diperlukan untuk jenis kendaraan Anda dari
dealer BLAUPUNKT.
•
Tergantung modelnya, kendaraan Anda
mungkin bisa berbeda dengan penjelasan
ini. Kami tidak bertanggung jawab atas
kerugian yang terjadi pada kesalahan proses
pemasangan atau penyambungan atau untuk
kerugian-kerugian lainnya.
Jika petunjuk yang dijelaskan di sini tidak
bisa diterapkan pada proses pemasangan
radio mobil Anda, sebaiknya proses tersebut
dilakukan oleh teknisi di dealer khusus
Blaupunkt atau hubungi nomor telepon kami.
Pada saat pemasangan ampli er, Anda harus
menghubungkan perangkat ke ground terlebih
dahulu sebelum menghubungkan steker ke soket
line-out.
Ground perangkat eksternal tidak boleh
dihubungkan ke ground.
112
07_EA_NewJersey220BT.indd 11207_EA_NewJersey220BT.indd 112 17.02.14 10:1917.02.14 10:19
Page 23

Änderungen vorbehalten!
Subject to changes!
Sous réserve de modi cations !
¡Modi caciones reservadas!
Sob reserva de alterações!
Informasi dapat berubah sewaktu-waktu!
113
07_EA_NewJersey220BT.indd 11307_EA_NewJersey220BT.indd 113 17.02.14 10:1917.02.14 10:19
Page 24

Supported iPod/ iPhone devices
Our product can support below listed iPod / iPhone generations:
iPod touch (5th generation)
•
•
iPod touch (4th generation)
•
iPod nano (7th generation)
iPod nano (6th generation)
•
•
iPhone 5
• iPhone 4S
iPhone 4
•
"Made for iPod" and "Made for iPhone" mean that an electronic accessory has been designed to
connect speci cally to iPod, iPhone respectively, and has been certi ed by the developer to meet Apple
performance standards.
Apple is not responsible for the operation of this device or its compliance with safety and regulatory
standards.
Please note that the use of this accessory with iPod, iPhone may a ect wireless performance.
iPhone, iPod are trademarks of Apple Inc., registered in the U.S. and other countries.
This product is protected by certain intellectual property rights of Microsoft. Use or distribution of such
technology outside of this product is prohibited without a license from Microsoft.
The Bluetooth® word mark and logos are registered trademarks owned by Bluetooth SIG, Inc.
FCC Statement
1. This device complies with Part 15 of the FCC Rules. Operation is subject to the following two conditions:
(1) This device may not cause harmful interference.
(2) This device must accept any interference received, including interference that may cause undesired
operation.
2. Changes or modi cations not expressly approved by the party responsible for compliance could void
the user’s authority to operate the equipment.
NOTE: This equipment has been tested and found to comply with the limits for a Class B digital device,
pursuant to Part15 of the FCC Rules. These limits are designed to provide reasonable protection against
harmful interference in a residential installation.
This equipment generates uses and can radiate radio frequency energy and, if not installed and used in
accordance with the instructions, may cause harmful interference to radio communications. However,
there is no guarantee that interference will not occur in a particular installation. If this equipment does
cause harmful interference to radio or television reception, which can be determined by turning the
equipment o and on, the user is encouraged to try to correct the interference by one or more of the
following measures:
• Reorient or relocate the receiving antenna.
Increase the separation between the equipment and receiver.
•
Connect the equipment into an outlet on a circuit di erent from that to which the receiver is connected.
•
Consult the dealer or an experienced radio/TV technician for help.
•
07_EA_NewJersey220BT.indd 11407_EA_NewJersey220BT.indd 114 23.05.14 10:1023.05.14 10:10
Page 25

Bitte den ausgefüllten Gerätepass sicher aufbewahren!
Please keep the lled-in radio pass in a safe place!
Prière de conserver soigneusement la carte d’autoradio remplie !
¡Favor guardar el documento del aparato debidamente llenado en un lugar
seguro!
Por favor, guardar o cartão preenchido do aparelho num lugar seguro!
Simpan dengan baik dokumen perangkat Anda yang sudah terisi!
©
2014 All rights reserved by Blaupunkt. This material may be reproduced, copied or distributed for
personal use only.
07_EA_NewJersey220BT.indd 11507_EA_NewJersey220BT.indd 115 23.05.14 10:1023.05.14 10:10
Page 26

Passport
Name: ......................................................................................................................
Type: ......................................................................................................................
Serial no.: BP ...............................................................................................................
02/14 450 285 – de, gb, fr, es, pt, id
07_EA_NewJersey220BT.indd 11607_EA_NewJersey220BT.indd 116 17.02.14 10:1917.02.14 10:19
New Jersey 220 BT
1 011 303 335 001
Blaupunkt Europe GmbH
Robert-Bosch-Straße 200
D-31139 Hildesheim
http://www.blaupunkt.com
5 101 030 015
 Loading...