

Page 1
CAR MULTIMEDIA
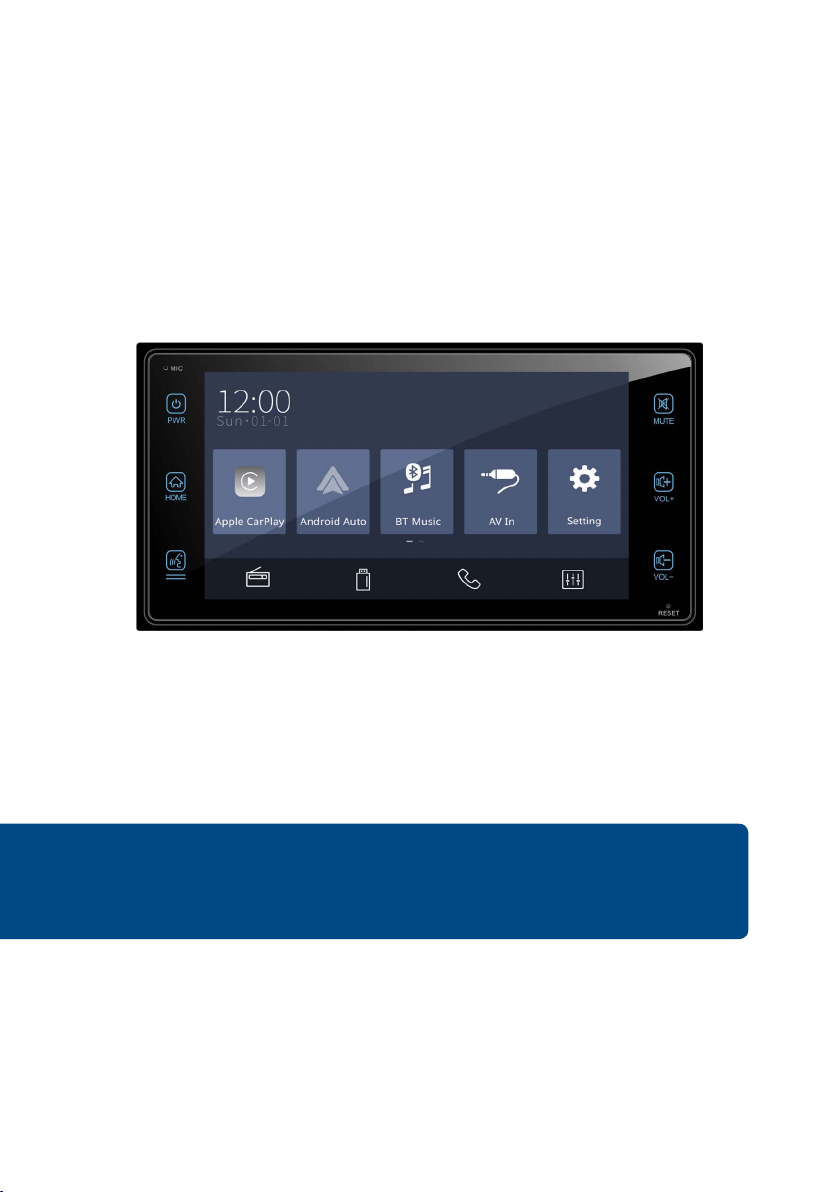
Adayo HM4Z05A
Operating instructions
Manual de instrucciones
Enjoy it.
Page 2
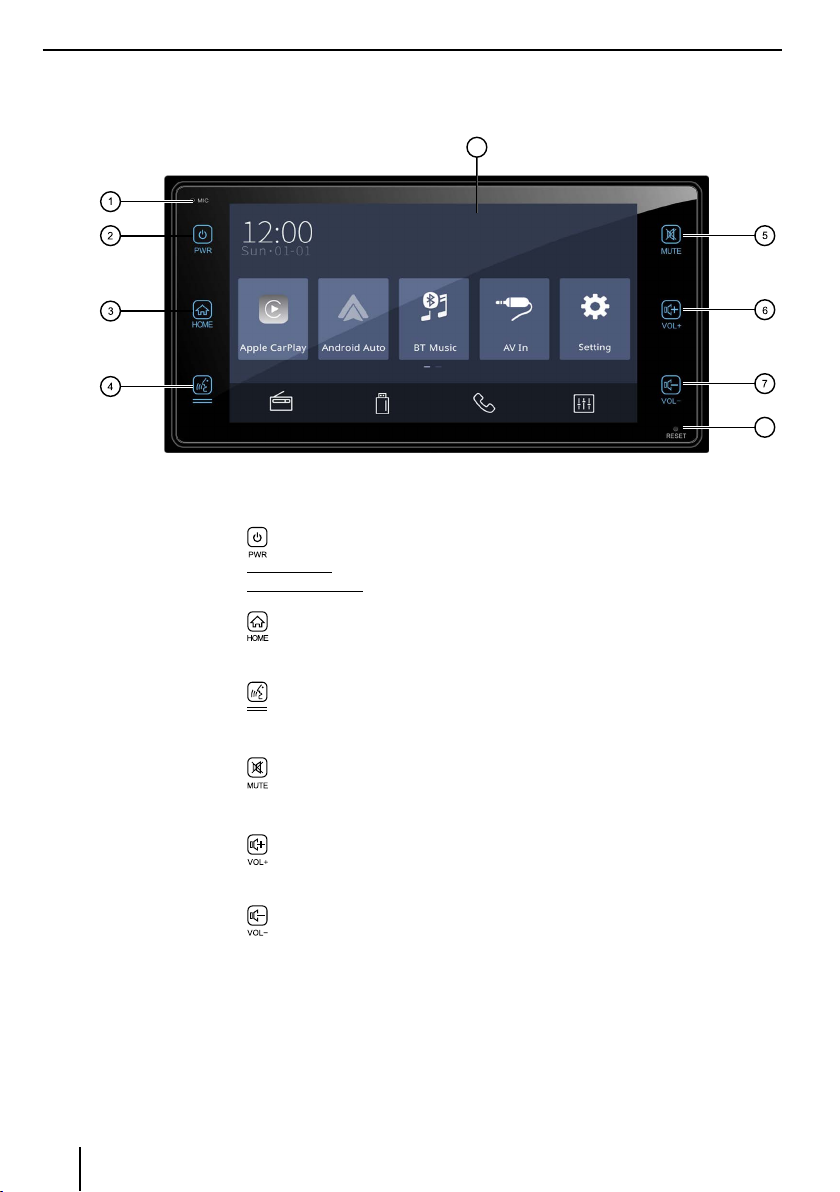
Controls – Device
9
1
Microphone
2 button
In operation: Long press to enter standby mode
In standby mode: Press to wake up the unit
8
3 button
Call up main menu
4
button
Activate Siri voice control
5 button
Mute audio source
6. button
Increase the volume level
7 button
Decrease the volume level
8
Reset button
Press to reset system settings to factory default (except
password and parental lock settings).
9
Touchscreen user interface
2
Page 3

Contents
Safety notes ................................................................ 4
Symbols used ...........................................................................4
Road safety ................................................................................4
General safety notes ..............................................................4
Declaration of conformity ....................................................4
Cleaning notes ............................................................ 4
Disposal notes............................................................. 4
Software update ......................................................... 4
Placing the device in operation ................................. 5
Switching on/o ......................................................................5
Volume ........................................................................................5
Main menu ................................................................................ 5
Setting the reception area ...................................................5
Radio mode ................................................................. 6
Start radio mode ..................................................................... 6
Select memory band ............................................................. 6
Tuning into a station ..............................................................6
Storing stations manually ....................................................6
Storing stations automatically ..........................................6
Adjusting the seek tuning sensitivity ..............................6
RDS setting ................................................................................6
USB media playback ................................................... 7
Basic information ....................................................................7
USB data carrier ....................................................................... 7
Audio playback from USB ...................................................7
Video playback from USB ....................................................8
Image playback from USB ...................................................8
Bluetooth mode .......................................................... 9
Starting Bluetooth mode ..................................................... 9
Registering Bluetooth devices ...........................................9
Telephone mode .....................................................................9
Alphabetic search ..................................................................9
Audio playback via Bluetooth streaming .................... 10
Bluetooth settings ............................................................... 10
Apple CarPlay ............................................................ 10
Android Auto ............................................................ 11
External audio/video sources .................................. 11
AV inputs ................................................................................. 11
Sound settings .......................................................... 11
Volume distribution (fader/balance) ............................ 11
Equalizer .................................................................................. 11
Steering Wheel Control ............................................ 12
Basic settings ............................................................ 13
Useful information ................................................... 13
Warranty .................................................................................. 13
Service ...................................................................................... 13
Technical data ........................................................... 13
DEUTSCHENGLISH
3
Page 4
Safety notes | Cleaning notes | Disposal notes
Safety notes
The car sound system was manufactured according
to the state of the art and established safety
guidelines. Even so, dangers may occur if you do
not observe the safety notes in these instructions.
These instructions are intended to familiarise
you with the most important functions. Detailed
information can be found on the Internet under
www.blaupunkt.com.
• Read these instructions carefully and
completely
before using the car sound system.
• Keep the instructions at a location so that they
are always accessible to all users.
• Always pass on the car sound system to third
parties together with these instructions.
In addition, observe the instructions of the devices
used in conjunction with this car sound system.
Symbols used
These instructions employ the following symbols:
Identies a sequencing step
• Identies a listing
Road safety
Observe the following notes about road safety:
• Use your device in such a way that you can
always safely control your vehicle. In case of
doubt, stop at a suitable location and operate
your device while the vehicle is standing. As the
driver, you may not use the applications that
will distract you from trac (depending on the
scope of functions of the device, e.g. viewing
videos, entering a destination).
• Follow the driving recommendations during
the route guidance only if you are not
violating any trac regulations! Trac signs
and trac regulations have always priority over
driving recommendations.
DANGER!
Warns about injuries
DANGER!
Warns about high volume
The CE mark conrms the compliance
with EU directives.
• Always listen at a moderate volume to protect
your hearing and to be able to hear acoustic
warning signals (e.g. police sirens). During mute
phases (e.g. when changing the audio source),
changing the volume is not audible. Do not
increase the volume during this mute phase.
General safety notes
Observe the following note to protect yourself
against injuries:
Do not modify or open the device.
Use as directed
This car sound system is intended for installation
and operation in a vehicle with 12 V vehicle system
voltage. Observe the output limits of the device.
Repairs and installation, if necessary, should be
performed by a specialist.
Declaration of conformity
The Blaupunkt Technology GmbH declares that
the device complies with the basic requirements
and the other relevant regulations of the directive
1999/5/EC.
The declaration of conformity can be found on the
Internet under www.blaupunkt.com.
Cleaning notes
Solvents, cleaning and scouring agents as well as
dashboard spray and plastics care product may
contain ingredients that will damage the surface of
the car sound system.
Use only a dry or slightly moistened cloth for
cleaning the car sound system.
Disposal notes
Do not dispose of your old unit in the
household trash!
Use the return and collection systems
available to dispose of the old device, the
remote control and exhausted batteries.
Software update
Under www.blaupunkt.com, you will nd the latest
software for your device, including instructions for
the software update.
Software updates are located at:
http://www.blaupunkt.com/en/servicesupport/car-
audio/downloads/updates/
4
Page 5
Startup
Placing the device in operation
Switching on/o
Switching on/o with the button
For switch-on, press the button.
For switch-o, hold the button pressed for more
than 2 seconds.
Switching on/o via vehicle ignition
If the car sound system is connected with the vehicle
ignition and it was switched o with the button, it is
switched on or o with the ignition.
Volume
Adjusting the volume
You can adjust the volume in steps from 0 (o) to 39
(maximum).
Press the / button and drag left/right on the
volume bar to change the volume.
Muting the car sound system (Mute)
Briey press the button to mute the device or to
reactivate the previous volume.
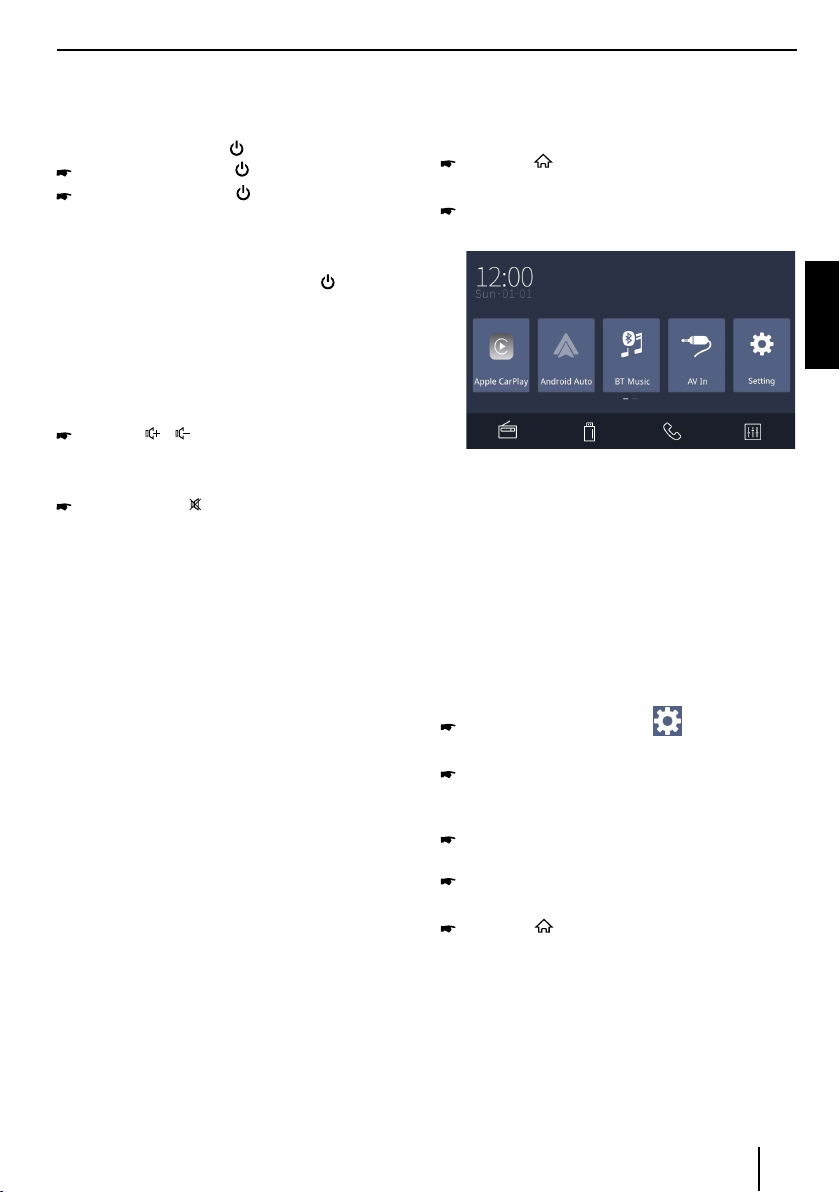
Main menu
In the main menu, you press the buttons on the touchscreen to call up the dierent sources and operating
modes.
Press the [ ] button.
- Or -
In the current source, press the top left corner.
The main menu is displayed.
DEUTSCHENGLISH
As long as you do not select a new audio source, the
last active audio source is played back.
Note:
The gures used in these instructions are intended
to facilitate the explanations and details may deviate
from your device.
Setting the reception area
This car sound system is designed for operation in
dierent regions with dierent frequency ranges and
station technologies. The factory default of the reception
area is "USA1 (FM/AM)". You can set a dierent reception
area.
In the main menu, press the button.
The Setting menu is displayed.
In the left area of the Setting menu, press the
General button.
The current setting is displayed behind "Radio Area".
Tap on the Radio Area button to display the list of
available reception areas.
Select the desired reception area.
The list is hidden, the selected reception area is set.
Press the button.
The main menu is displayed again.
5
Page 6
Radio mode
Radio mode
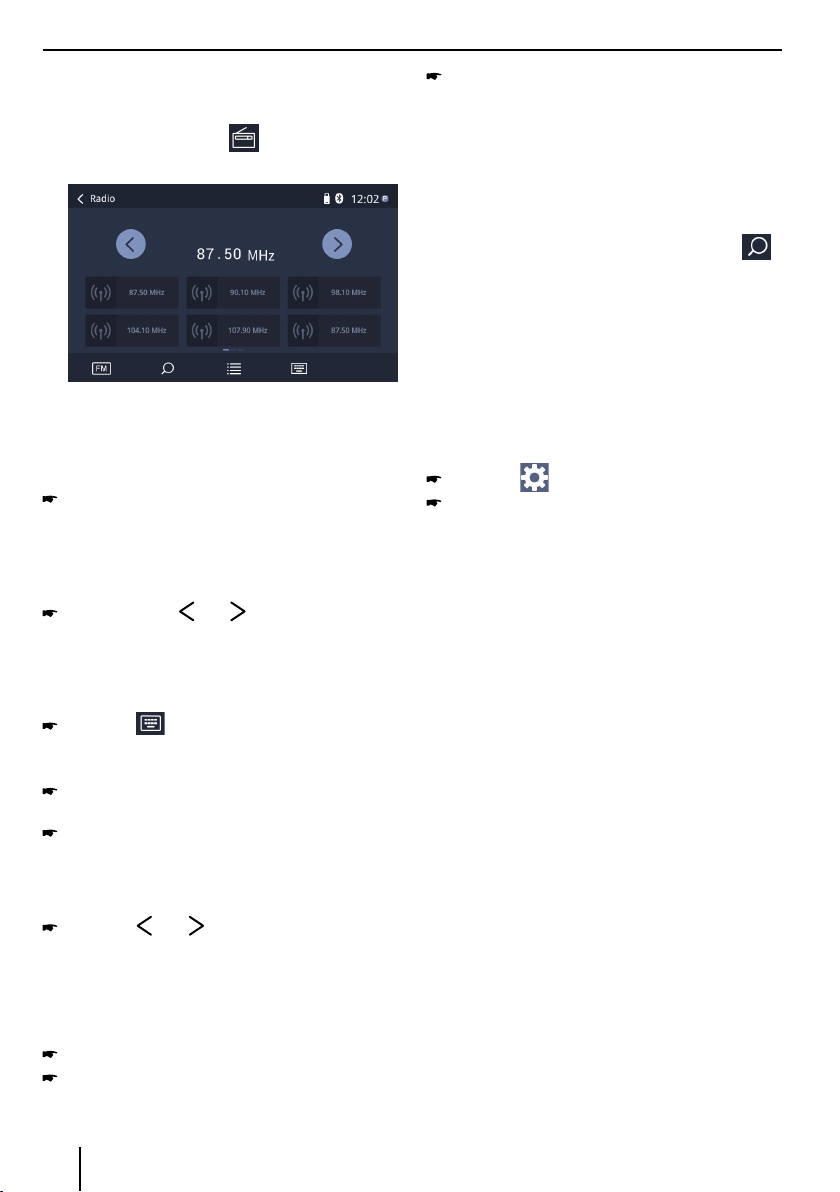
Start radio mode
In the main menu, press the button.
The radio playback menu is displayed.
Select memory band
Dierent memory bands and wavebands are available.
Up to 18 FM and 12 AM stations can be stored in each
memory bank.
Press the FM / AM button to switch band.
Tuning into a station
Tuning into stations manually
Briey press the or button once or several
times to change the frequency in increments.
Enter broadcast frequency directly
If the frequency of the desired stations is known, it can
be entered directly via the touchscreen.
Press the button.
A numeric keypad is displayed for the frequency
input.
Enter the frequency of the desired station with the
numeric keypad.
Press the OK button.
The radio playback menu is displayed, the station of
the frequency entered is played back.
Starting station seek tuning
Press the or button for approx. 2 seconds
to start station seek tuning.
The radio tunes into the next receivable station.
Storing stations manually
Select the desired memory band.
Set the desired station.
Press one of the memory buttons on center of the
screen for approx. 2 seconds to store the current
station at the button.
The station is stored.
Storing stations automatically
Only stations with sucient signal strength will be
detected and stored in the memory.
To start automatic station search, touch the [
button on the operation bar.
Note:
After auto store, the previous stored stations will be
overwritten.
Adjusting the seek tuning sensitivity
The seek tuning sensitivity decides whether the
automatic station seek tuning nds only strong stations
or also weaker stations that may be noisy.
Press the button in main menu.
Press the button right to LOC to adjust the
sensitivity of station seek tuning.
If LOC is on, only stations with a strong signal are
found during seek tuning.
If LOC is o, stations with a strong and weak signal
are found during seek tuning.
RDS setting
Many FM stations broadcast an RDS (Radio Data
System) signal in addition to their programme in
the reception area Europe that allows additional
functions, such as the display of the station name.
RDS Alternative Frequency : Switches RDS AF
on/o.
If RDS AF is activated, the device automatically
changes to the strongest frequency of the set
station.
Switching priority for traffic announcements
on/off : In the reception region Europe, an FM
station can identify trac announcements via an
RDS signal. If priority for trac reports is switched
on, a traffi c report is automatically switched
through, even if the car sound system is currently
not in radio mode.
RDS Time : Switches RDS time on/o. With RDS CT
activated, the time of the device is automatically
set via the received RDS signal.
PTY List : Opens a list of programme types.
Tap on the desired programme type to restrict
reception to the corresponding stations.
]
6
Page 7
USB media playback
USB media playback
Basic information
Playable data carriers and media
USB data carriers
MP3 or WMA les, movies and images
Notes:
The playback of movies and images on the
device display is allowed only while the
vehicle is stand-ing and the hand brake
is applied. The “PARKING” cable must be
connected with the hand brake connection
of the vehicle. The movie playback on an
external monitor (Rear Seat Enter-tainment)
is also possible while driving.
Note the following information when preparing
an MP3/WMA data carrier:
USB format/le system: FAT/FAT16/FAT32/NTFS
File extension of audio les:
– .MP3 for MP3 les
– .WMA for WMA les
WMA files only without Digital Rights
Management (DRM) and created with
Windows Media® Player version 8 or later
MP3 ID3 tags: Version 1 and 2
Bitrate for creating audio les:
– MP3: 32 to 320 kbps
– WMA: 32 to 192 kbps
Maximum number of les and directories:
– Up to 40,000 les (dep. on the le/directory
struc-ture)
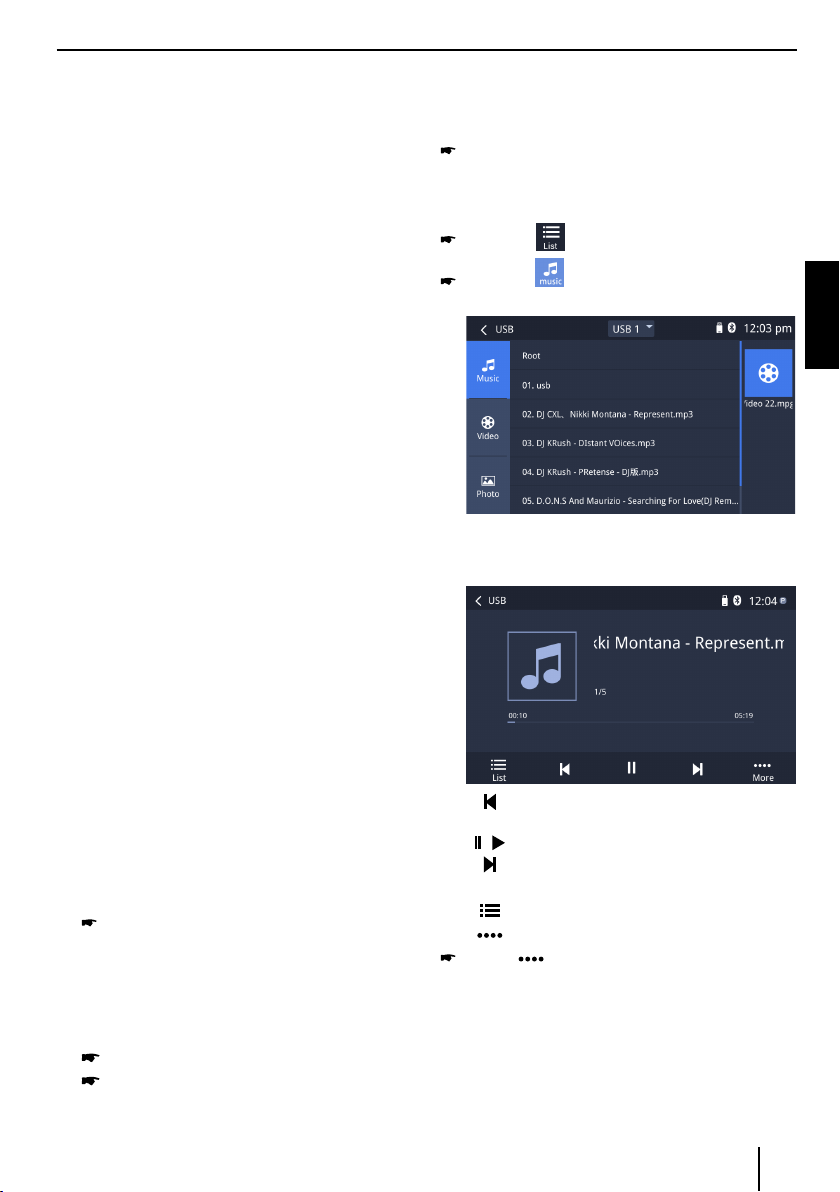
Audio playback from USB
The principles of the audio playback (MP3/WMA)
from data carriers are identical for all sources.
Select the desired source via the main menu.
The device changes to the desired source and the
playback starts.
If the playback does not start with the audio playback,
press the button to change to the folder/file
list.
Press the button to display all the audio les
of the data carrier.
DEUTSCHENGLISH
Briey tap on the name of the folder/track. The folder
is opened/the track is started.
After starting a title, the playback menu is displayed.
USB data carrier
This device features two USB ports at the rear of
the device.
USB 1 port for USB carriers with media files
and mobile phone.
USB2 port for USB carriers with media les.
Connecting a USB data carrier
Insert the USB data carrier in the USB socket.
The device automatically switches to USB
mode. The data are read, the playback starts
with the first media file recognized by the
device.
Removing a USB data carrier
Turn o the car sound system.
Disconnect the USB data carrier.
[ ] Short press: Title selection.
Long press: Fast searching.
[
/ ] Interrupt playback and continue playback.
[
] Short press: Title selection.
Long press: Fast searching.
[
] Display the folder/le list.
[
] Show additional operating options.
Tap on to display additional operating options
of the playback menu.
7
Page 8
USB media playback
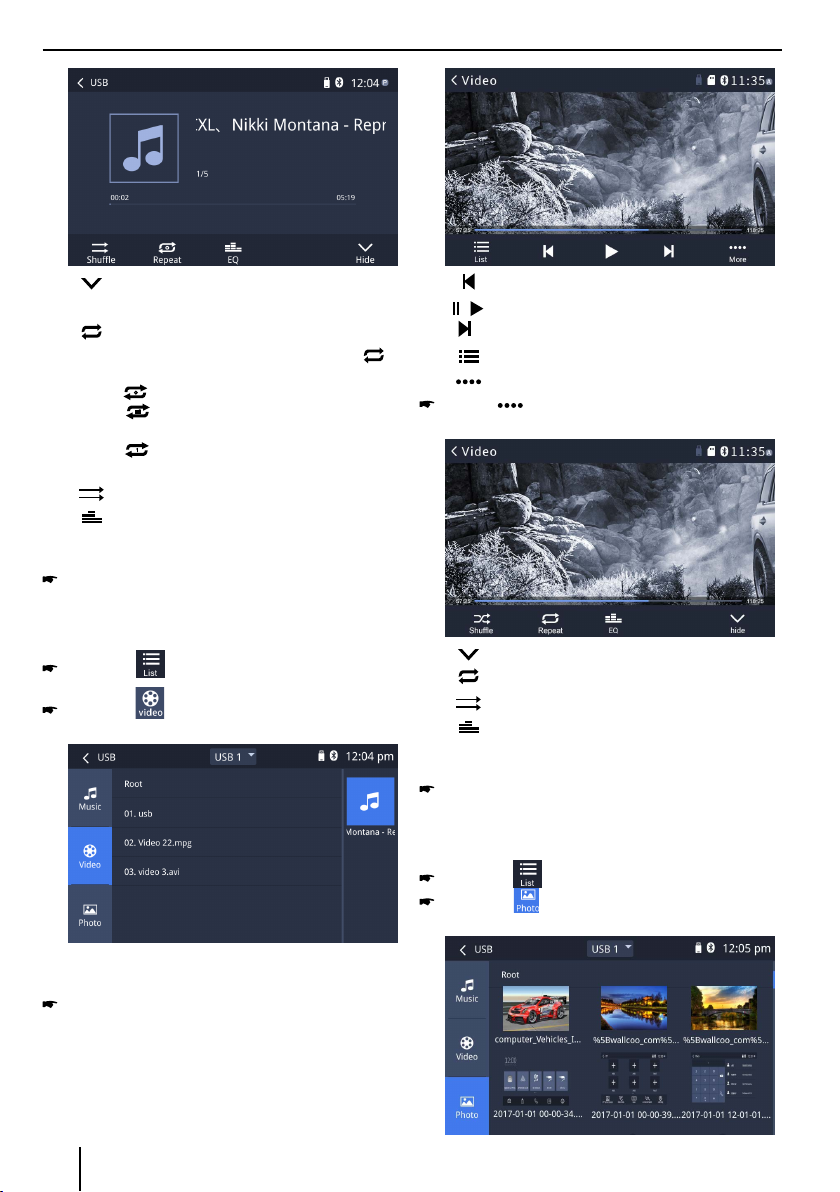
[ ] Hide additional operating options.
Audio playback from USB :
[
] Start and end REPEAT function.
The REPEAT mode changes each time the [
button is pressed.
[ ] Repeat folder: Play all in the
[ ] Repeat single: Play the current
[ ] Repeat off: Cancel repeat play.
current folder.
single repeatedly.
[ ] Shue play .
[
] Display equalizer.
Video playback from USB
Select the desired source via the main menu.
The device changes to the desired source and the
playback starts.
If the playback does not start with the video playback,
press the button to change to the folder/file
list.
Press the button to display all the video les
of the data carrier.
[ ] Select previous movie.
[
/ ] Interrupt playback and continue playback.
[
] Select next movie.
]
[
] Display the folder/le list.
[
] Show additional operating options.
Tap on to display additional operating options of
the playback menu.
[ ] Hide additional operating options.
[
] Start and end REPEAT function.
[
] Shue play .
[
] Display equalizer.
Image playback from USB
Select the desired source via the main menu.
The device changes to the desired source and the
playback starts.
If the playback does not start with the image playback,
press the button to change to the folder/file list.
Press the button to display all the images of the
data carrier.
If you selected a movie, the playback is started. During
the movie playback, the playback menu is hidden.
Briey touch the touchscreen once to display the
playback menu again.
The playback menu is shown.
8
Page 9
Bluetooth mode
Bluetooth mode
The Bluetooth® function allows registering cell phones
and media playback devices with the car sound system.
When you register a cell phone with the car sound system,
you can make phone calls with the built-in hands-free
function. You can access the lists of dialled numbers and
the phone book of the registered cell phone.
If the connected Bluetooth® device supports the
functions A2DP and AVRCP, you can play the music via
the car sound system and control the playback. During
a call, the music playback is interrupted and continued
again after the call.
If a cell phone is registered via Bluetooth® and a call is
received during the playback of another source, the
source playback is interrupted and the call menu is
displayed.
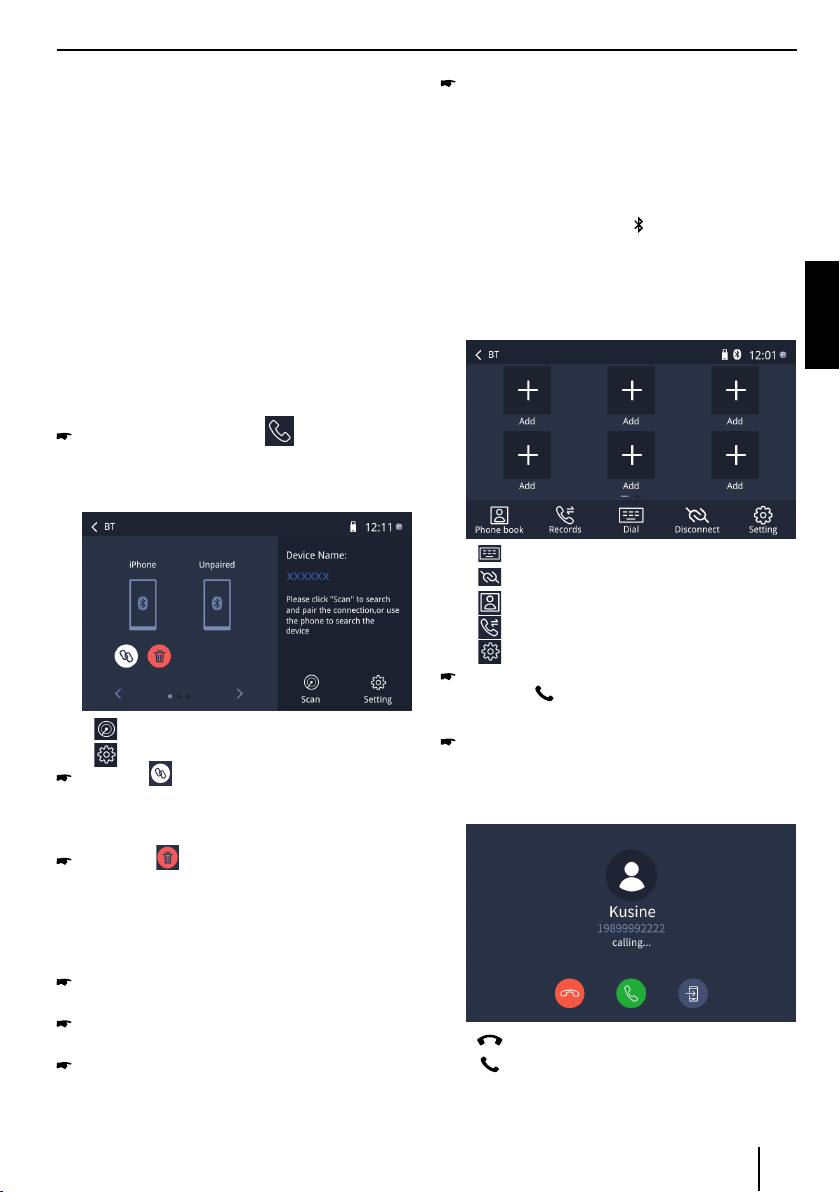
Starting Bluetooth mode
In the main menu, press on .
The Bluetooth® menu is displayed. It contains the list
of known Bluetooth® devices. Other audio sources
are switched o.
[ ] Add new Bluetooth® device.
[
] Display options menu.
Press the button of the Bluetooth® device with
which you want to establish a connection.
When the device is in range, the connection is estab
lished and the menu for the device is displayed.
Press the button if you want to delete the
Bluetooth® device from the list.
-
Establish the connection; you may have to enter the
pairing code that was previously entered on the car
sound system.
The connection is being established and the menu
for the registered device is displayed.
Note:
If a telephone is connected with the car sound system, the Bluetooth® icon is displayed at the top
right edge of the display in all audio/video sources.
Telephone mode
If you connected a phone with the car sound system via
Bluetooth®, the following menu appears.
[ ] Display the dial keypad menu.
[
] Disconnect connection with current device.
[
] Call up the phone book.
[
] Call up records lists.
[
] Display options menu.
Enter a phone number with the dial keypad and
press the button.
- Or -
Select a contact/number via the records lists or
phone book.
The connection is being established.
If a call is coming in, the call menu is displayed.
DEUTSCHENGLISH
Registering Bluetooth devices
If you want to register a device with the car sound system
for the rst time, proceed as follows:
Ensure that Bluetooth® is activated at the car sound
system and at your Bluetooth® device.
Search for new devices/connections on your
Bluetooth® device.
The car sound system appears as "HM4Z05A" in the
list of Bluetooth® devices.
[ ](Hang up): Reject a call.
[
](Answer): Answer a call.
9
Page 10

Bluetooth mode | Apple CarPlay
Alphabetic search
Press [ ] on the left bottom of the screen to access
Phonebook. If you want to search a contact, press [ ]
and enter the characters via the keypad.
Audio playback via Bluetooth streaming
If an audio streaming device is connected with the car
sound system via Bluetooth®, you can play back the music via the car sound system and control the playback.
Press the BT Music button on main menu to
change to the audio playback.
[ ] Short press: Title selection.
Long press: Fast searching.
[
] Interrupt playback and continue playback.
[
] Short press: Title selection.
Long press: Fast searching.
Bluetooth settings
In the options menu for Bluetooth®, you can make the
basic settings for the Bluetooth® mode.
Press the button.
The options menu is displayed.
Apple CarPlay
Available on select cars, CarPlay is a smarter, safer way to
use your iPhone in the car. CarPlay takes the things you
want to do with your iPhone while driving and puts them
right on your car's built-in display. You can get directions,
make calls, send and receive messages, and listen to
audiobooks and music, all in a way that allows you to stay
focused on the road.
How to enter CarPlay mode
1. Connect your iPhone to the CarPlay connector of the
unit via the Apple Digital Cable. The unit will enter
CarPlay mode automatically.
2. To exit CarPlay mode, touch [ ] button on the front
panel.
If you want to return to CarPlay mode, touch [CarPlay]
on the main menu.
How to use CarPlay
CarPlay features and Siri voice control is specially
designed for driving scenarios. It also works with your
car’s controls. And the apps you want to use in the car
have been reimagined, so you can use them while your
eyes and hands stay where they belong.
Auto Connect – If "Auto Connect" is activated,
the device automatically connects with known
Bluetooth® devices as soon as they are in range.
Auto Answer – If "Auto Answer" is activated,
incoming phone calls are automatically answered.
Synchronous Phone-Book – To be able to access
the phone book of a connected telephone, you must
rst synchronise it via this menu entry.
Press top left of the screen to exit the options menu.
10
Voice
To activate Siri voice control, just press [ ] button on
the front panel.
Touch
you can use the touch screen of the unit to control
CarPlay.
Page 11

Android Auto| External audio/video sources| Sound settings
Android Auto
Connect Android phone by standard micro USB cable,
drivers can enjoy the music from their phone, show the
way with Google map or other map App and make or
receive a call.
User need to enable Bluetooth on phones and the
product at the same time.
Required Android OS: 5.0. (Android Auto App must be
installed on the phone before connecting).
Play with Android Auto
Select the Andorid Auto source to play music.
Map
Touch the ( ) icon of Android Auto to let the phone
show you the way.
Call Out / Receive Call
Touch the ( ) icon on Android Auto for Calling.
Back to Android Auto
Touch the ( ) icon of Android Auto to back on main
menu.
External audio/video sources
AV inputs
This device features two external AV inputs for audio and
video playback:
• AV-IN is implemented as a cinch socket on a cable at
the rear of the device. You can specify the installation
location of the port during the installation of the
device.
Danger!
Increased risk of injury from connector.
In case of an accident, the protruding connector in the
front AV-IN socket may cause injuries. The use of straight
plugs or adapters leads to an increased risk of injury.
Start the AV-IN mode with the button AV In .
The display shows the audio or video playback of the
selected AV source.
DEUTSCHENGLISH
Play Music
Touch the ( ) icon of Android Auto to play music.
Talk with Google
1. Touch the ( ) on product for using Google voice
assistant, such as issuing a call, playing music, opening
the map and other voice commands.
2. Touch the (
3. When Phone is connected, enable Google voice by
steering wheel control
This function is only available on cars equipped with the
equivalent key
4. Control with “Ok, Google”.
) on the top right of LCD .
Back to unit menu
Touch the ( ) icon of Android Auto to back on unit
main menu.
Sound settings
Volume distribution (fader/balance)
You can adjust the volume distribution in the vehicle
for all sources.
In the main menu or on the control bar of the current
audio source, press the button.
The equalizer menu is displayed.
Press the button.
The menu for fader and balance is displayed.
11
Page 12
Steering Wheel Control
Adjust fader and balance with / or
/ .
Equalizer
You can adjust the equalizer for all sources.
In the main menu or on the control bar of the current
audio source, press the button.
The equalizer menu is displayed.
Select a preset equalizer via the buttons.
- Or -
Press the Customize button to adjust the level
of the available frequency bands according to your
preferences.
Note:
With the [ Original ] button, you can reset the
customised setting again.
- Or -
Press the LoudNess button to switch increasing
the bass at low volume on or o.
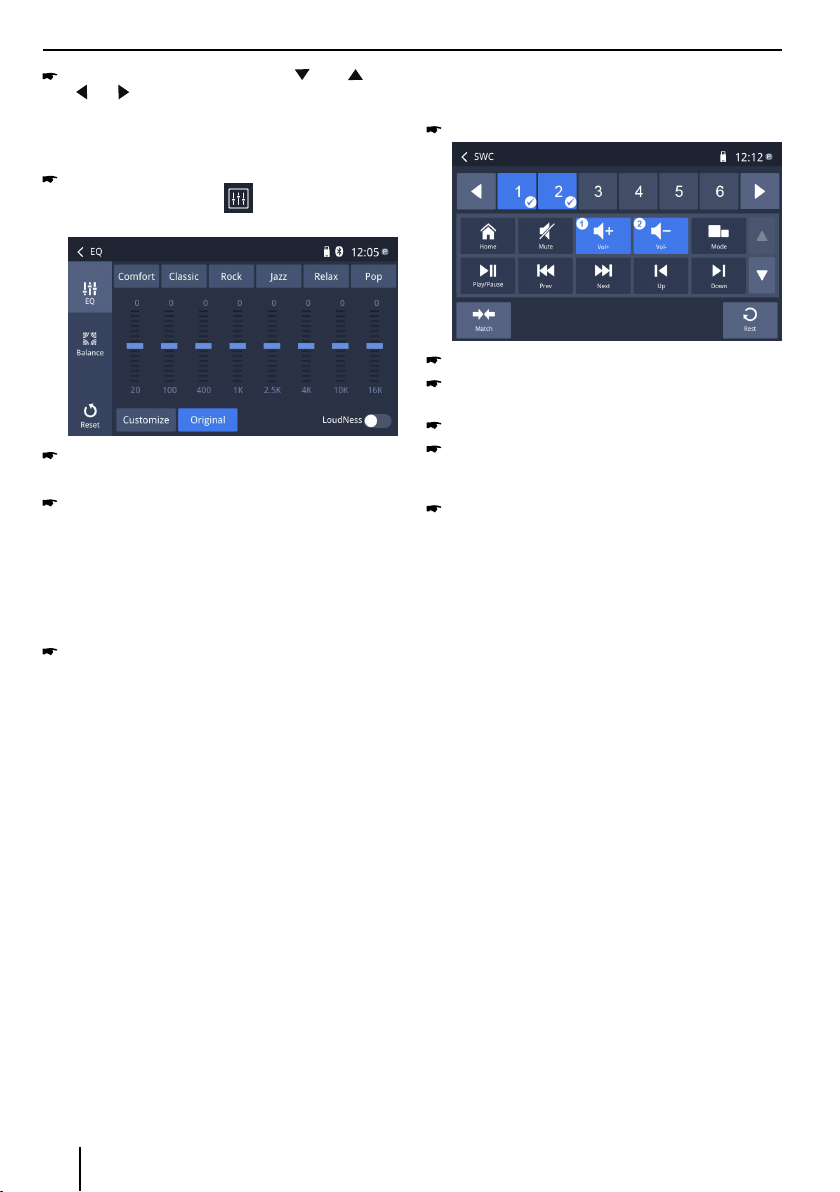
Steering Wheel Control
Select [SWC] on the General settings menu.
Touch number button to select a SWC button.
Select a function.
Press each individual steering wheel control button
for each corresponding function.
Touch [Match] to program.
Once the nal steering wheel control button is
programmed, the functions are saved and the
programming will end.
Touch [Rest] to reset he programming.
12
Page 13

Basic settings | Useful information | Technical data
Basic settings
In the settings menu, you can adjust the basic settings for
the dierent functions of the device to your requirements.
In the main menu, press the [ ] button.
The settings menu is displayed, the General
submenu is activated.
1
Note:
Scroll through the list, if necessary, to access the
desired setting.
The settings display features the following functions
and displays:
Menu items
①
Change to the main menu
②
Currently selected menu item
③
Clock
④
Submenu items
⑤
General
The following setting are possible:
∙ Select on-screen display language.
∙ You can select the key color.
∙ Select the reception region for the radio reception.
∙ Switch conrmation beep on/o.
∙ You can select the wall paper
∙ When local seeking is on, only radio stations with
strong radio signal will be received.
∙ Switch RDS on/o.
∙ The buttons of a connected steering wheel control
can be congured here.
Time
Making settings for date and time:
∙ Selecting time and date format
System settings
∙ To view software version information.
∙ Restore to default settings.
Useful information
Warranty
We provide a manufacturer's warranty for products
bought within the European Union. For devices purchased outside the European Union, the warranty
terms issued by our respective responsible domestic
agency are valid. The warranty terms can be called
up from www.blaupunkt.com.
Service
If you ever need to use a repair service, you will nd
information about service partners in your country
under www.blaupunkt.com.
Technical data
Operating system linux
Voltage supply
Operating voltage: 10.8~16V
Current consumption
In operation: ≤15A
10 sec. after ACC-OFF: ≤5mA
DEUTSCHENGLISH
Video
∙ Day/Night Mode
∙ Adjust the display brightness.
∙ If "Parking" is activated, video/pictures will not be
displayed during driving. Please set according to
local laws.
Volumes
You can adjust the volume ratio for all audio sources
in the volume menu.
13
Page 14

Controles - Dispositivo
9
1
Micrófono
2
botón
En la operación: Mantenga pulsado para entrar en el modo de
espera
En modo de espera: Pulse para activar la unidad.
8
14
3
botón
Llamar al menú principal
4
botón
Activar el Asistente de voz (Google o Siri)
5
botón
Silencia la fuente de audio
6.
botón
Aumentar el nivel de volumen
7
botón
Disminuir el nivel de volumen.
8
Reset botón
Presione para restablecer la conguración del sistema a los
valores predeterminados de fábrica (excepto la conguración de
contraseña y bloqueo de los padres).
9
Interfaz de usuario de pantalla táctil
Page 15

Contenido
Notas de seguridad .................................................. 16
Simbolos utilizados ............................................................. 16
Seguridad vial........................................................................ 16
Notas generales de seguridad ........................................ 16
Declaración de conformidad ........................................... 16
Notas de limpieza ..................................................... 16
Notas de disposición ................................................ 16
Actualización de software ....................................... 16
Poniendo el dispositivo en funcionamiento .......... 17
Encendiendo / apagando ................................................. 17
Volumen .................................................................................. 17
Menú principal ...................................................................... 17
Congurando el área de recepción ............................... 17
Modo de radio ........................................................... 18
Iniciar modo ........................................................................... 18
Seleccione banda ................................................................. 18
Sintonizando estación ........................................................ 18
Almacenando manualmente ........................................... 18
Almacenando automáticamente ................................... 18
Ajustando sensibilidad de búsqueda ........................... 18
Ajuste de RDS ........................................................................ 18
Reproducción de medios USB.................................. 19
Información básica .............................................................. 19
Portador de datos USB ....................................................... 19
Reproducción de audio desde USB ............................... 19
Video playback from USB .................................................. 20
Reproducción de imágenes desde USB ....................... 20
Modo Bluetooth ........................................................ 21
Starting Bluetooth mode .................................................. 21
Registrando dispositivos Bluetooth .............................. 21
Modo de telefono ................................................................ 21
Búsqueda alfabética ........................................................... 22
Reproducción de audio a través de transmisión
Bluetooth ................................................................................ 22
Ajustes Bluetooth................................................................. 22
Apple CarPlay ............................................................ 22
Cómo entrar en el modo CarPlay ................................... 22
Cómo usar CarPlay ............................................................... 23
Voz ............................................................................................. 23
Toques ......................................................................................23
Android Auto ............................................................ 23
Reproduciendo Android Auto ......................................... 23
Mapa ......................................................................................... 23
Llamar / Recibir llamada .................................................... 23
Retornando a Android Auto ............................................. 23
Música ...................................................................................... 23
Hablar con google ............................................................... 23
Volver al menú ...................................................................... 23
Fuentes externas de audio / video .......................... 23
Entradas AV ............................................................................ 23
Ajustes de sonido ..................................................... 24
Distribución del volumen (fader / balance) ................ 24
Ecualizador ............................................................................. 24
Mandos al volante .................................................... 24
Ajustes básicos.......................................................... 25
Información útil ........................................................ 25
Garantía ................................................................................... 25
Servicio .................................................................................... 25
Datos técnicos ........................................................... 25
DEUTSCHESPAÑOL
15
Page 16

Notas de seguridad | Notas de limpieza | Notas de disposición
Notas de seguridad
El sistema automotriz de audio ha sido
manufacturado con tecnología de punta y
deniciones de seguridad. Sin embargo, pueden
surgir peligros si no observas las notas de seguridad
en esas instrucciones.
Esas instrucciones fueron hechas para que te
familiarices con las funciones más importantes.
Información más detallada puede ser encontrada
en el sitio web www.blaupunkt.com.
• Lea completamente y con atención a esas
instrucciones antes de utilizar el sistema
automotriz de audio.
• Mantenga las instrucciones donde esté
accesible a todos los usuarios.
• Siempre adjunte esas instrucciones cuando
entregues el sistema automotriz de audio a
terceros.
Además, observe las instrucciones de los
dispositivos utilizados junto con ese sistema
automotriz de audio.
Simbolos utilizados
Estas instrucciones emplean los siguientes
símbolos.:
PELIGRO!
Advierte sobre lesiones
PELIGRO!
Advierte sobre alto volumen
La marca CE conrma el cumplimiento de
las directivas de la UE
Identica un paso de secuenciación
• Identica un listado
.
• Siempre escucha a un volumen moderado
para proteger su audición y poder escuchar
señales de advertencia acústicas (por ejemplo,
sirenas de policía). Durante las fases de silencio
(por ejemplo, al cambiar la fuente de audio), el
cambio de volumen no es audible. No aumente
el volumen durante esta fase de silencio.
Notas generales de seguridad
Observe la siguiente nota para protegerse contra
lesiones:
No modique ni abra el dispositivo..
Utilizar como se indica
Este sistema de sonido para automóvil está diseñado
para su instalación y operación en un vehículo con
12 V de voltaje del sistema del vehículo. Observe los
límites de salida del dispositivo. Las reparaciones e
instalaciones, si es necesario, deben ser realizadas
por un especialista.
Declaración de conformidad
Blaupunkt Technology GmbH declara que el
dispositivo cumple con los requisitos básicos y las
demás regulaciones relevantes de la directiva.
1999/5 / EC.
La declaración de conformidad se encuentra en la
Internet en www.blaupunkt.com.
Notas de limpieza
Los disolventes, los productos de limpieza y
desengrasado, así como los productos de aerosol
y plásticos para el tablero de instrumentos pueden
contener ingredientes que dañarán la supercie del
sistema de sonido automotriz.
Use solo un paño seco o ligeramente humedecido
para limpiar el sistema de sonido automotriz.
Seguridad vial
Observe las siguientes notas sobre seguridad vial:
• Use su dispositivo de tal manera que siempre
pueda controlar su vehículo de manera
segura. En caso de duda, deténgase en un
lugar adecuado y opere su dispositivo mientras
el vehículo esté parado. Como conductor, no
puede utilizar las aplicaciones que lo distraerá
del tráco (dependiendo del tipo de funciones
del dispositivo, por ejemplo, ver videos, ingresar
un destino).
• Siga las recomendaciones de conducción
durante la guía de ruta solamente si no
estés violando ninguna regulación de
tráco! Las señales de tráco y las normas
de tráco siempre tienen prioridad sobre las
recomendaciones de conducción.
16
Notas de disposición
No deseche su antigua unidad en la basura
doméstica!
Utilice los sistemas de devolución y
recolección disponibles para desechar el dispositivo
antiguo, el control remoto y las baterías agotadas.
Actualización de software
En www.blaupunkt.com, encontrará el último
software para su dispositivo, incluidas las
instrucciones para la actualización del software.
Las actualizaciones de software se encuentran en:
http://www.blaupunkt.com/en/servicesupport/car-
audio/downloads/updates/
Page 17

Startup
Poniendo el dispositivo en
funcionamiento
Encendiendo / apagando
Enciendendo / apagando con el botón
Para el encendido, pulse el botón.
Para el apagado, mantenga pulsado el botón
durante más de 2 segundos.
Encendido / apagado a través del encendido del
vehículo
Si el sistema de sonido del automóvil está conectado con
el encendido del vehículo y se apagó con el botón, se
enciende o apaga con el encendido.
Volumen
Ajustando el volumen
Puede ajustar el volumen en pasos de 0 (apagado) a 39
(máximo).
Presione el / botón y arrastre hacia la izquierda
/ derecha en la barra de volumen para cambiar el
volumen.
Silenciar el sistema de sonido automotriz (Mudo)
Presione brevemente el botón para silenciar el
dispositivo o para reactivar el volumen anterior.
Menú principal
En el menú principal, presiona los botones en la pantalla
táctil para acceder a las diferentes fuentes y modos de
operación.
Presiona el [ ] botón.
- O -
En la fuente actual, presione la esquina superior
izquierda. El menu principal es mostrado.
DEUTSCHESPAÑOL
Siempre que no seleccione una nueva fuente de
audio, se reproducirá la última fuente de audio activa.
Nota:
Las guras utilizadas en estas instrucciones están
destinadas a facilitar las explicaciones y los detalles
pueden desviarse de su dispositivo.
Congurando el área de recepción
Este sistema de sonido para automóvil está diseñado
para funcionar en diferentes regiones con diferentes
rangos de frecuencia y tecnologías de estación. El valor
predeterminado de fábrica del área de recepción es
"USA1 (FM / AM)". Puede congurar un área de recepción
diferente.
En el menú principal, presione el botón.
Se muestra el menú de conguración.
En el área izquierda del menú Conguración,
presione el botón General .
La conguración actual se muestra bajo "Área de
radio".
Toque el botón Área de radio para mostrar la lista
de áreas de recepción disponibles.
Seleccione la zona de recepción deseada.
La lista está oculta, el área de recepción seleccionada
está congurada.
Presiona el botón.
El menú principal se muestra nuevamente.
17
Page 18

Modo de radio
Modo de radio
Iniciar modo
En el menú principal, pulse .
Se muestra el menú de reproducción de radio..
Seleccione banda
Diferentes bandas de memoria y bandas de onda están
disponibles. Se pueden almacenar hasta 18 estaciones
FM y 12 AM en cada banco de memoria.
Pulse FM / AM para cambiar banda.
Sintonizando estación
Sintonizando manualmente
Presione brevemente o una o varias veces
para cambiar la frecuencia en incrementos.
Ingrese la frecuencia directamente
Si se conoce la frecuencia de las estaciones deseadas, se
puede ingresar directamente.
Pulse .
Se muestra un teclado numérico para la entrada de
frecuencia.
Introduzca la frecuencia de la estación deseada con
el teclado numérico.
Pulse OK .
Aparece el menú de reproducción de radio, se
reproduce la estación de la frecuencia ingresada.
Búsqueda de estación
Pulse o por aproximadamente 2 segundos
para empezar la búsqueda de estación.
La radio sintoniza en la próxima estación receptible.
Almacenando manualmente
Seleccione la banda deseada.
Establecer la estación deseada.
Presione uno de los botones de memoria en el
centro de la pantalla durante aprox. 2 segundos para
almacenar la estación actual en el botón.
La estacion está almacenada.
Almacenando automáticamente
Solo las estaciones con suciente potencia de señal serán
detectadas y almacenadas en la memoria.
Para iniciar la búsqueda automática de estaciones, toque
[
] en la barra de operaciones.
Nota:
Después del almacenamiento automático,
las estaciones almacenadas anteriormente se
sobrescribirán.
Ajustando sensibilidad de búsqueda
La sensibilidad de sintonización de búsqueda decide si
la sintonización de búsqueda de estación automática
encuentra solo estaciones fuertes o también estaciones
más débiles que pueden ser ruidosas.
Pulse en el menu principal.
Presione el botón derecho hacia [LOC] para ajustar
la sensibilidad de la sintonización de búsqueda de
estación.
Si LOC está activado, solo se encuentran estaciones
con una señal fuerte durante la sintonización de
búsqueda.
Si LOC está desactivado, se encuentran estaciones
con una señal fuerte y débil durante la sintonización
de búsqueda.
Ajuste de RDS
Muchas estaciones de FM transmiten una señal RDS
(Sistema de datos de radio) además de su programa
en el área de recepción de Europa que permite
funciones adicionales, como la visualización del
nombre de la estación.
RDS Alternative Frequency : Activa / desactiva
RDS AF.
Si RDS AF está activado, el dispositivo cambia
automáticamente a la frecuencia más fuerte de la
estación establecida.
Activar / desactivar la prioridad de los anuncios
de tráco : En la región de recepción de Europa,
una estación de FM puede identicar anuncios de
tráfico a través de una señal RDS. Si la prioridad
para los informes de tráfico está activada, un
informe de tráco se conmuta automáticamente,
incluso si el sistema de sonido automotriz no está
en modo de radio.
Hora RDS : Activa / desactiva el tiempo RDS.
Con RDS CT activado, la hora del dispositivo se
configura automáticamente a través de la señal
RDS recibida.
Lista de PTY : Opens a list of programme types.
Toque el tipo de programa deseado para restringir
la recepción a las estaciones correspondientes.
18
Page 19

Reproducción de medios USB
Reproducción de medios USB
Información básica
Soportes de datos y medios reproducibles
∙ USB data carriers
∙ Archivos MP3 o WMA, películas e imágenes.
Notas:
La reproducción de películas e imágenes en
la pantalla del dispositivo solo está permitida
mientras el vehículo está parado y se aplica el
freno de mano. El cable de “ESTACIONAMIENTO”
debe conectarse con la conexión del freno de
mano del vehículo. La reproducción de películas
en un monitor externo (Entretenimiento del
asiento trasero) también es posible mientras se
conduce.
Tenga en cuenta la siguiente información cuando
prepare un soporte de datos MP3 / WMA:
∙ Formato USB / sistema de archivos: FAT / FAT16 /
FAT32 / NTFS
∙ Extensión de archivo de archivos de audio:
– .MP3 para MP3
– .WMA para WMA
∙ Archivos WMA solo sin Digital Rights Management
(DRM) y creados con Windows Media® Player
versión 8 o posterior
∙ Etiquetas MP3 ID3: versión 1 y 2
∙ Tasa de bits para crear archivos de audio:
– MP3: 32 a 320 kbps
– WMA: 32 a 192 kbps
∙ Número máximo de archivos y directorios:
– Hasta 40,000 archivos (dependiendo de la
estructura del directorio / archivo)
Reproducción de audio desde USB
Los principios de la reproducción de audio (MP3 / WMA)
de los portadores de datos son idénticos para todas las
fuentes.
Seleccione la fuente deseada a través del menú
principal.
El dispositivo cambia a la fuente deseada y comienza
la reproducción.
Si la reproducción no comienza con la reproducción
de audio, pulse para cambiar al listado de
archivos/carpetas.
Pulse para visualizar todos los archivos de
audio del soporte de datos.
Presione brevemente el nombre de la carpeta / pista.
Se abre la carpeta / se inicia la pista.
Después de comenzar un título, se muestra el menú de
reproducción.
DEUTSCHESPAÑOL
Portador de datos USB
Este dispositivo cuenta con dos puertos USB en la
parte posterior.
∙ Puerto USB 1 para dispositivos USB con archivos
multimedia y teléfono móvil.
∙ Puerto USB2 para dispositivos USB con archivos
multimedia.
Conexión de un soporte de datos USB
Inserte el soporte USB en el conector USB.
El dispositivo cambia automáticamente al modo
USB. Los datos se leen, la reproducción comienza
con el primer archivo multimedia reconocido.
Extracción de un soporte de datos USB
Apague el sistema.
Desconecte el USB.
[ ] Pulsación corta: Selección de título.
Pulsación larga: Búsqueda rápida.
[
/ ] Interrumpe y continua la reproducción.
[
] Pulsación corta: Selección de título.
Pulsación larga: Búsqueda rápida.
[
] Mostrar la lista de carpetas / archivos.
[
] Mostrar opciones de operación adicionales.
Toque para visualizar opciones de operación
adicionales del menú de reproducción.
19
Page 20

Reproducción de medios USB
[ ] Ocultar opciones de operación adicionales.
Reproducción de audio desde USB:
[
] Inicio y nalización de la función REPEAT..
El modo REPEAT cambia cada vez que pulsa [
[ ] Repetir carpeta: Reproducir todo
[ ] Repetir sencillo: reproduce la
[ ] Repetir apagado: cancelar la
reproducción repetida.
en la carpeta actual.
canción actual repetidamente.
[ ] Reproducción aleatoria.
[
] Exhibe ecualizador.
].
Video playback from USB
Seleccione la fuente deseada a través del menú
principal.
El dispositivo cambia a la fuente deseada y comienza
la reproducción.
Si la reproducción no comienza con la reproducción
de video, toque para cambiar al listado de
archivos/carpetas.
Toque para visualizar todos los archivos de
video del soporte de datos.
Si seleccionó una película, se inicia la reproducción.
Durante la reproducción, el menú está oculto.
Toque brevemente la pantalla una vez para mostrar
nuevamente el menú de reproducción.
Se muestra el menú de reproducción.
[ ] Seleccione la película anterior.
[
/ ] Interrumpir la reproducción y continuar la
reproducción.
[
] Seleccione la siguiente pelicula.
[
] Mostrar la lista de carpetas / archivos.
[
] Mostrar opciones de operación adicionales.
Toque para visualizar opciones de operación
adicionales del menú de reproducción.
[ ] Ocultar opciones de operación adicionales.
[
] Inicio y nalización de la función REPEAT.
[
] Reproducción aleatoria.
[
] Exhibe ecualizador.
Reproducción de imágenes desde USB
Seleccione la fuente deseada a través del menú
principal.
El dispositivo cambia a la fuente deseada y comienza
la reproducción.
Si la reproducción de imágenes no empieza
automaticamente,
pulse para cambiar al listado de archivos/
carpetas.
Pulse para visualizar todas las imagenes del
soporte de datos.
20
Page 21

Modo Bluetooth
La función Bluetooth® permite registrar teléfonos
celulares y dispositivos de reproducción de medios con
el sistema de sonido automotriz.
Cuando registra un teléfono celular con el sistema de
sonido del automóvil, puede hacer llamadas con la
función de manos libres incorporada. Puede acceder a
las listas de números marcados y la guía telefónica del
teléfono celular registrado.
Si el dispositivo Bluetooth® conectado es compatible con
las funciones A2DP y AVRCP, puede reproducir la música
a través del sistema de sonido del automóvil y controlar
la reproducción. Durante una llamada, la reproducción
de música se interrumpe y continúa de nuevo después
de la llamada.
Si un teléfono celular está registrado a través de Bluetooth®
y se recibe una llamada durante la reproducción de otra
fuente, se interrumpe la reproducción de la fuente y se
muestra el menú de llamadas.
Starting Bluetooth mode
En el menú principal, pulse .
Se muestra el menú Bluetooth®. Contiene la lista de
dispositivos Bluetooth® conocidos. Otras fuentes de
audio están apagadas.
Modo Bluetooth
Cuando el dispositivo está dentro del alcance, se
establece la conexión y se muestra el menú del
dispositivo.
Pulse si desea eliminar el dispositivo
Bluetooth® de la lista.
Registrando dispositivos Bluetooth
Si desea registrar un dispositivo con el sistema de sonido
automotriz por primera vez, haga lo siguiente:
Asegúrese de que Bluetooth® esté activado en el
sistema de sonido automotriz y en su dispositivo
Bluetooth®.
Busque nuevos dispositivos / conexiones en su
dispositivo Bluetooth®.
El sistema de sonido automotriz aparece como
"HM4Z05A" en la lista de dispositivos Bluetooth®.
Establecer la conexión; es posible que deba ingresar
el código de emparejamiento que se ingresó
previamente en el sistema de sonido del automóvil.
Se está estableciendo la conexión y se muestra el
menú para el dispositivo registrado.
Nota:
Si un teléfono está conectado con el sistema de
sonido automotriz, el icono de Bluetooth®
muestra en el borde superior derecho de la pantalla
en todas las fuentes de audio / video.
se
Modo de telefono
Si conectó un teléfono con el sistema de sonido del
automóvil a través de Bluetooth®, aparece el siguiente
menú.
DEUTSCHESPAÑOL
[ ] Añadir nuevo dispositivo Bluetooth®.
[
] Mostrar menú de opciones.
Pulse en el dispositivo Bluetooth® con el que
desea establecer una conexión.
[ ] Visualizar el menú de teclado de marcación.
[
] Desconectar la conexión con el dispositivo
actual..
[
] Llamar a la guía telefónica.
[
] Llamar a la guía telefónica.
[
] Mostrar menú de opciones.
Ingrese un número de teléfono con el teclado de
marcación y presione .
- O -
21
Page 22

Modo Bluetooth | Apple CarPlay
Seleccione un contacto / número a través de las listas
de registros o la guía telefónica.
Se está estableciendo la conexión.
Si entra una llamada, se muestra el menú de llamadas.
[ ](Hang up): Reject a call.
[
](Answer): Answer a call.
Búsqueda alfabética
Pulse [ ] en la parte inferior izquierda de la pantalla
para acceder a la agenda telefónica. Si desea buscar
un contacto, pulse [ ] e introduce los caracteres
mediante el teclado.
Reproducción de audio a través de
transmisión Bluetooth
Si un dispositivo de transmisión de audio está conectado
con el sistema de sonido del automóvil a través de
Bluetooth®, puede reproducir la música a través
del sistema de sonido del automóvil y controlar la
reproducción.
Pulse [ BT Music ] en el menú principal para cambiar
a la reproducción de audio.
Ajustes Bluetooth
En el menú de opciones para Bluetooth®, puede realizar
las conguraciones básicas para el modo Bluetooth®.
Pulse .
Se muestra el menú de opciones.
Autoconectar – Si "Auto Connect" está activado,
el dispositivo se conecta automáticamente con los
dispositivos Bluetooth® conocidos tan pronto como
estén dentro del alcance.
Respuesta automática – Si se activa "Respuesta
automática", las llamadas entrantes se contestan
automáticamente.
Agenda Telefónica Sincrónica – Para poder acceder
a la agenda telefónica de un teléfono conectado,
primero debe sincronizarlo a través de esta entrada
de menú.
Presione la esquina superior izquierda de la pantalla
para salir del menú de opciones.
Apple CarPlay
CarPlay es una forma más inteligente y segura de usar
su iPhone en el automóvil. CarPlay toma las cosas que
quieres hacer con tu iPhone mientras conduces y las
coloca directamente en la pantalla. Puede obtener
indicaciones, hacer llamadas, enviar y recibir mensajes, y
escuchar audiolibros y música, todo de una manera que
le permite mantenerse concentrado en la carretera.
[ ] Pulsación corta: Selección de título.
Pulsación larga: Búsqueda rápida.
[
] Interrumpir la reproducción y continuar la
reproducción.
[
] Pulsación corta: Selección de título.
Pulsación larga: Búsqueda rápida.
22
Cómo entrar en el modo CarPlay
1. Conecte su iPhone al conector CarPlay de la unidad a
través del cable digital de Apple. La unidad entrará al
modo CarPlay automaticamente.
Page 23

Android Auto| Fuentes externas de audio / video
2. Para salir del modo CarPlay, toque [ ] en el panel
frontal.
Si desea volver al modo CarPlay, toque [CarPlay] en el
menu principal.
Cómo usar CarPlay
Las funciones de CarPlay y el control de voz Siri
están especialmente diseñados para situaciones de
conducción. También funciona con los controles de
su coche. Y las aplicaciones que desea utilizar en el
automóvil se han vuelto a imaginar, por lo que puede
usarlas mientras sus ojos y manos permanecen donde
es necesario.
Voz
Para activar el control de voz Siri, simplemente presione
el botón [
] en el panel frontal.
Toques
Puede utilizar la pantalla táctil de la unidad para controlar
CarPlay.
Android Auto
Conecte el teléfono Android con un cable USB estándar,
los conductores pueden disfrutar de la música de su
teléfono, mostrar el camino con el mapa de Google u
otra aplicación de mapas y hacer o recibir una llamada.
El usuario debe habilitar Bluetooth en los teléfonos y en
la unidad al mismo tiempo.
Requiere sistema operativo a partir de Android: 5.0.
(La aplicación Android Auto debe estar instalada en el
teléfono antes de conectar).
Reproduciendo Android Auto
Seleccione la fuente de Android Auto para reproducir
música.
Mapa
Tocar el ícono ( ) de Android Auto para que el teléfono
te muestre el camino.
Música
Tocar el ícono ( ) de Android Auto para tocar musica.
Hablar con google
1. Tocar el ( ) en la unidad para usar el asistente de
voz de Google, para llamar, reproducir música, abrir el
mapa y otros comandos de voz.
2. Tocar el ícono (
pantalla.
3. Cuando el teléfono está conectado, habilite la voz de
Google mediante el control del volante
Esta función solo está disponible en vehículos equipados
con el botón equivalente.
4. Controla con “Ok, Google”.
) en la parte superior derecha de la
Volver al menú
Tocar el ícono ( ) de Android Auto para retroceder en
el menú principal de la unidad.
Fuentes externas de audio / video
Entradas AV
Este dispositivo cuenta con dos entradas AV externas
para la reproducción de audio y video:
• AV-IN se implementa en un conector con cable en
la parte posterior del dispositivo. Puede especicar
la ubicación de instalación del puerto durante la
instalación del dispositivo.
Peligro!
Mayor riesgo de lesiones por conector.
En caso de accidente, el conector que sobresale en la
toma AV-IN delantera puede causar lesiones. El uso de
enchufes o adaptadores rectos aumenta el riesgo de
lesiones.
Inicie el modo AV-IN con el AV In .
La pantalla muestra la reproducción de audio o video
de la fuente AV seleccionada.
DEUTSCHESPAÑOL
Llamar / Recibir llamada
Tocar el ícono ( ) en Android Auto para llamadas.
Retornando a Android Auto
Tocar el ícono ( ) de Android Auto para retroceder en
el menú principal.
23
Page 24

Ajustes de sonido | Mandos al volante
Ajustes de sonido
Distribución del volumen (fader / balance)
Puede ajustar la distribución de volumen en el vehículo
para todas las fuentes.
En el menú principal o en la barra de control de la
fuente de audio actual, presione .
Se muestra el menú del ecualizador.
Pulse .
Se muestra el menú para fader y balance.
Ajuste el fader y el balance con / o /
.
Ecualizador
Puedes ajustar el ecualizador para todas las fuentes.
En el menú principal o en la barra de control de la
fuente de audio actual, presione
Se muestra el menu del ecualizador.
.
Mandos al volante
Seleccione [SWC] en el menú de Ajustes.
Toque el botón numérico para seleccionar un botón
de mando al volante.
Seleccione una función.
Presione cada botón de control del volante individual
para cada función correspondiente.
Toque [Match] para programar.
Una vez programado el botón de control nal del
volante, las funciones se guardan y la programación
terminará.
Toque [Rest] para restablecer la programación.
Seleccione un ecualizador preestablecido a través de
los botones.
- O -
Presione el botón [Personalizar] para ajustar el nivel
de las bandas de frecuencia disponibles de acuerdo
con sus preferencias.
Nota:
Con el botón [Original], puede restablecer la
conguración personalizada de nuevo.
- O -
Presione el botón [LoudNess] para activar o
desactivar el aumento de graves a bajo volumen.
24
Page 25

Ajustes básicos | Información útil | Datos técnicos
Ajustes básicos
En el menú de conguración, puede ajustar la
conguración básica para las diferentes funciones del
dispositivo a sus requisitos.
En el menú principal, pulse [ ].
Aparece el menú de ajustes, el submenú General
está activado.
1
Nota:
Desplácese por la lista, si es necesario, para
acceder a la conguración deseada.
La pantalla de ajustes presenta las siguientes
funciones y pantallas:
Elementos de menú
①
Cambiar al menú principal
②
Elemento de menú actualmente
③
Reloj
④
Elementos de submenú
⑤
General
Los siguientes ajustes son posibles:
∙ Seleccione el idioma de visualización en pantalla.
∙ Puede seleccionar el color de las teclas.
∙ Seleccione la región de recepción para la
recepción de radio.
∙ Activar / desactivar el pitido de conrmación.
∙ Puedes seleccionar el fondo de pantalla.
∙ Cuando la búsqueda local está activada, solo se
recibirán estaciones de radio con una señal de
radio fuerte.
∙ Enciende / apaga el RDS.
∙ Los botones de un mando de volante pueden ser
congurados aquí.
Volúmenes
Puede ajustar la relación de volumen para todas las
fuentes de audio en el menú de volumen.
Hora
Haciendo ajustes para fecha y hora:
∙ Selección de hora y formato de fecha:
Ajustes del sistema
∙ Para ver la información de la versión del software.
∙ Restaurar a la conguración predeterminada.
DEUTSCHESPAÑOL
Información útil
Garantía
Ofrecemos una garantía del fabricante para los
productos comprados dentro de la Unión Europea.
Para los dispositivos comprados fuera de la Unión
Europea, los términos de la garantía emitidos por
nuestra respectiva agencia nacional responsable
son válidos. Los términos de la garantía se pueden
consultar en www.blaupunkt.com.
Servicio
Si alguna vez necesita utilizar un servicio de
reparación, encontrará información sobre los socios
de servicio en su país en www.blaupunkt.com.
Datos técnicos
Sistema operative linux
Suministro de voltaje
Tensión de funcionamiento: 10.8~16V
Consumo de corriente
En operación: ≤15A
10 seg. después de ACC-OFF: ≤5mA
Video
∙ Modo día / noche
∙ Ajuste el brillo de la pantalla.
∙ Si "Estacionamiento" está activado, los videos /
imágenes no se mostrarán durante la conducción.
Por favor, establecer de acuerdo con las leyes
locales.
25
Page 26

FCC Statement
1. This device complies with Part 15 of the FCC Rules.
Operation is subject to the following two conditions:
(1) This device may not cause harmful interference, and
(2) This device must accept any interference received,
including interference that may cause undesired
operation.
2. Changes or modications not expressly approved
by the party responsible for compliance could void the
user's authority to operate the equipment.
NOTE: This equipment has been tested and found
to comply with the limits for a Class B digital device,
pursuant to Part 15 of the FCC Rules. These limits are
designed to provide reasonable protection against
harmful interference in a residential installation.
This equipment generates uses and can radiate radio
frequency energy and, if not installed and used in
accordance with the instructions, may cause harmful
interference to radio communications. However, there
is no guarantee that interference will not occur in a
particular installation. If this equipment does cause
harmful interference to radio or television reception,
which can be determined by turning the equipment
o and on, the user is encouraged to try to correct the
interference by one or more of the following measures:
• Reorient or relocate the receiving antenna.
• Increase the separation between the equipment and
receiver.
• Connect the equipment into an outlet on a circuit
dierent from that to which the receiver is connected.
• Consult the dealer or an experienced radio/TV
technician for help.
•
FCC Radiation Exposure Statement
This equipment complies with FCC radiation exposure limits
set forth for an uncontrolled environment. This equipment
should be installed and operated with minimum distance of
20 centimeters between the radiator and your body.
26
Page 27

Blaupunkt Technology Americas S.A.
Zona America Ruta 8 km
Costa Park, Montevideo, Uruguay
P/N:1270750020900/A0
 Loading...