

Page 1
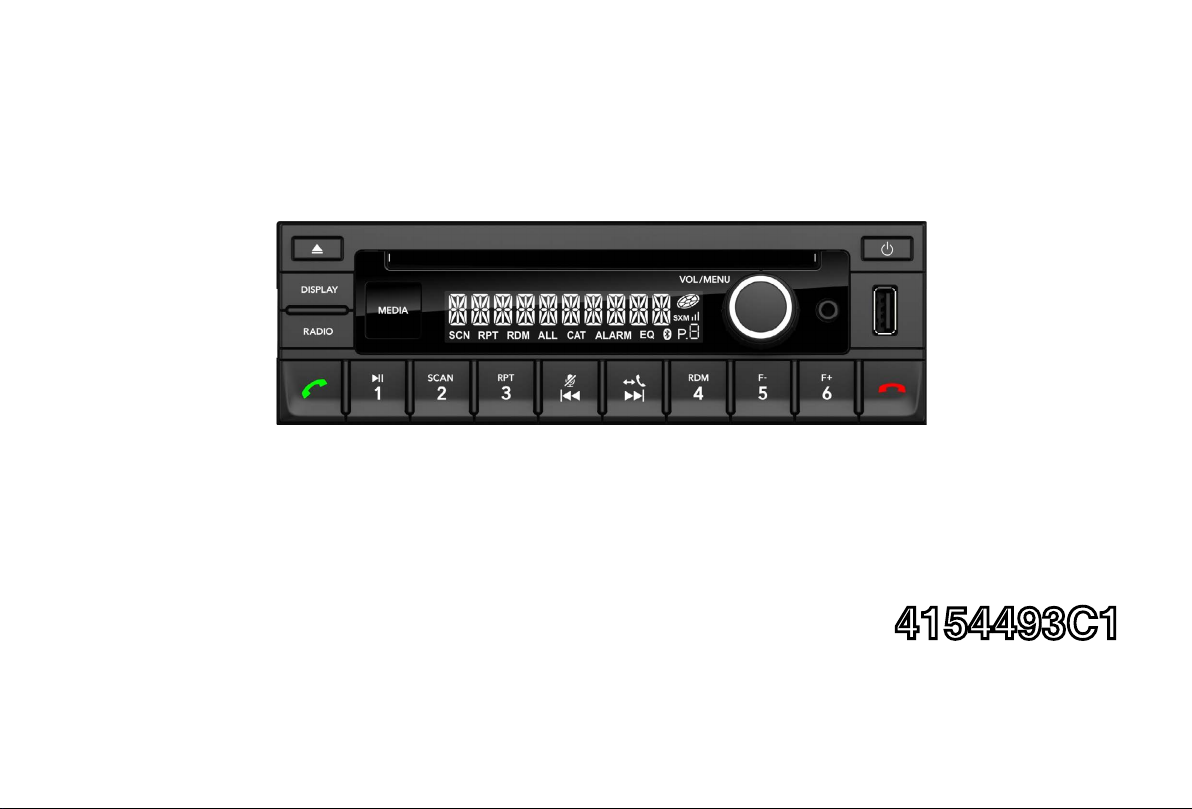
4154493C1
AM, FM, Clock, Weather Band, AUX input, USB, Bluetooth, SXM, CD
Operating Instructions
Page 2

SAFETY INFORMATION
CONTENTS
Thank you for purchasing this product. Please
read through these operating instructions
so you will know how to operate your model
properly. After you have finished reading the
instructions, keep this manual in a safe place
for future reference.
PRECAUTIONS
Use only in a 12-volt DC negative-ground
electrical system.
Disconnect the vehicle's negative battery
terminal while mounting and connecting the
unit.
When replacing the fuse, be sure to use
one with an identical amperage rating.
Using a fuse with a higher amperage rating
may cause serious damage to the unit.
DO NOT attempt to disassemble the unit.
Laser beams from the optical pickup are
dangerous to the eyes.
Make sure those pins or other objects do
not get inside the unit, they may cause
malfunctions, or create safety hazards such
as electrical shock or laser beam exposure.
If you have parked the car for a long
time in hot or cold weather, wait until the
temperature in the car become normal
before operating the unit.
Keep the volume at a level at which you can
hear outside warning sounds (horns sirens,
etc.).
Stop the car before performing any
complicated operation.
CD NOTES
Playing a defective or dusty CD can cause
dropouts in sound.
Handle the disc by holding its inner and
outer edges. Do not touch the surface of
the unlabeled side of the disc.
Do not touch the unlabeled side.
Do not attach any seal, label or data
protection sheet to either side of a disc.
Do not expose a CD to direct sunlight or
excessive heat.
Wipe a dirty CD from the center outward
with a cleaning cloth.
Never use solvents such as benzine or
alcohol.
This unit can not play 3-inch ( 8cm ) CDs.
Never insert a 3-inch CD contained in the
adapter or an irregularly shaped CD. The
unit may not be able to eject it, resulting in
a malfunction.
In addition to ordinary CDs, this unit can
play back a CD-R/CD-RW/MP3/UDF/CD-
TEXT.
CAUTION
Please power off this unit at once and send it
back to the after-sales service center or the
dealer /distributor you purchased from if one
of the following symptoms is found:
(1) Water or other obstacle enters the unit;
(2) Smoking;
(3) Peculiar smell.
Safety Information ........................................ 1
Panel Controls .............................................. 2
General Operation ........................................ 3
Sound Setting ............................................... 3
CD/USB/iPod Operations ............................. 4
Tuner Operation ........................................... 6
Menu Function .............................................. 6
Bluetooth Operations .................................... 7
Electrical Connections .................................. 9
Troubleshooting .......................................... 10
Specications ............................................. 11
To provide a clear demonstration and an
alternative for easy understanding of the
operation of this unit, graphic illustration
was used. However, this illustration is not
necessary printed as the actual image found
on the unit.
1
Page 3
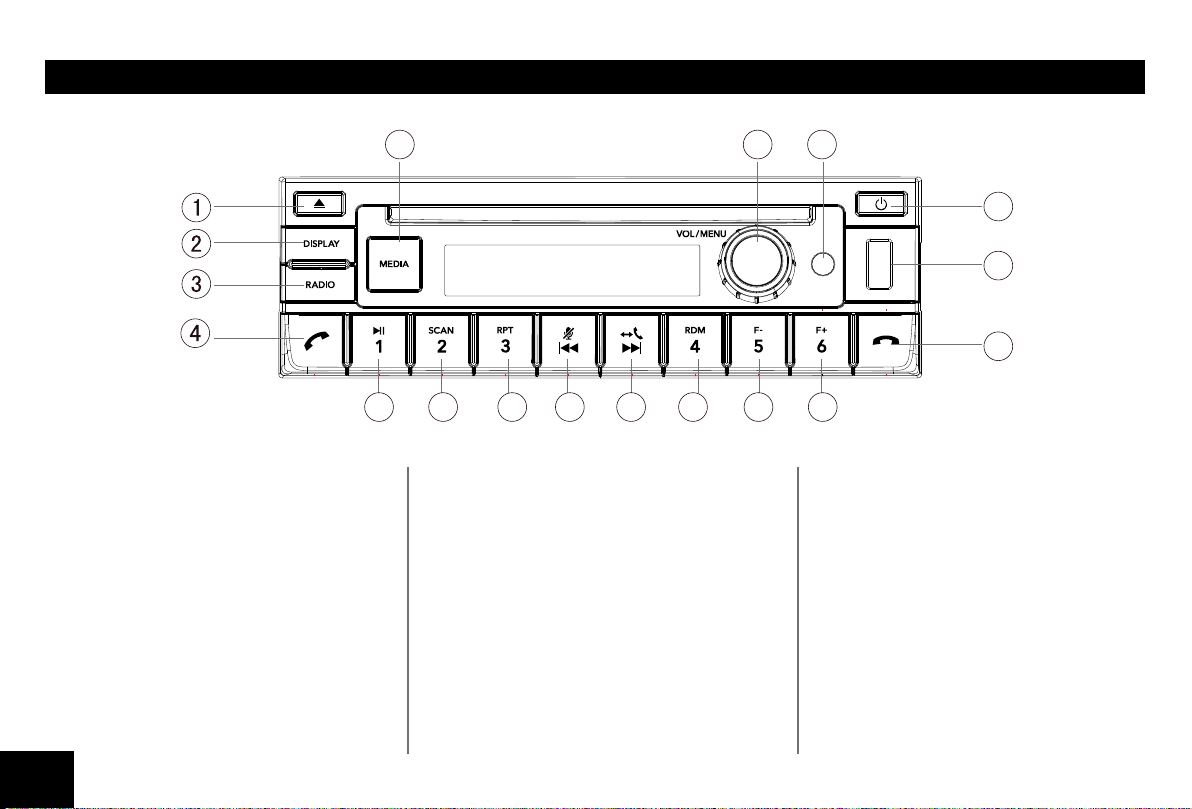
PANEL CONTROLS
181716
15
14
13
9 10 11 128765
1. - Press to eject disc.
2. - Radio mode: Press [DISPLAY] to
access: Display radio info/ID3 Tag info/
clock
Time Zone Setting (long press)
3 - Band switch:
FM1>FM2>FM3>AM1>AM2>WX>SXM1 >SXM2->SXM3->FM1
4. -RADIO/CD/USB/iPod/AUX/SXM/
BT Audio mode :Enter Call List menu
-Calling Mode:.Answer call
-Redial (long press)
5. - Play/pause (when USB / BT music)
2
6. - Scan on/off(For CD and USB only)
7. - Repeat track/folder
8. -Previous track/Channel/Seek previous station
-Fast rewind/Manual seek (long press)
9. -Next track/Channel/Seek next station
-Fast forward/Manual seek (long press)
10. -Random on/off
11. -Previous folder
12. -Next folder
(5,6,7,10,11,12).
-1-6 radio preset
Press to select tune in a preset station.
Hold for more than 2 seconds to
save current station.
13. - Reject/End call
- Disconnect Bluetooth(long press)
14. - USB connector
15. - Power on/Power off
16. - Select source
(CD > USB > F-AUX > R-AUX > BT AUDIO )
17. - Adjust volume level
- Enter Audio Setting menu(press)
- Enter Setup menu(long press)
18. - Aux-in jack
Page 4

GENERAL OPERATION
Audio setting
Power On/Off Button
Press the [ ] button to turn the unit on when
the vehicle ignition switch is on. Press and
hold the button to turn the unit off.
Adjust Volume level
Rotate the knob to adjust volume level. Rotate
it clockwise to increase and anticlockwise to
decrease the volume.
MODE Button (MEDIA)
Press the [ MEDIA ] button to change between
CD (when disc is in), USB (when USB is
connected),BT AUDIO,or AUX play.
MP3 Playback
Track skip
Press the [
or next track.
MP3 track fast search
Hold it [
back mode.
Folder select
Press the [5F-]/[6F+] button to select MP3
folder back/ahead.
/ ] button to go to the previous
/ ] to enter fast forward or reverse
Set Clock
Radio mode:
Press [DISPLAY] button, display Frequency/
Radio text/Clock;
CD/USB/iPod playback mode:press
[DISPLAY] button, display Playtime->Title/
Artist/Album->File name/Folder name->Clock>Playtime
AUX/Calling mode: press [DISPLAY] button,
display Clock Info.
BT Audio mode: press [DISPLAY] button,
display BT AUDIO->Title/Artist/Album ->Clock
Auxiliary Input
To access an auxiliary device:
1. Connect the portable audio player to the
AUX interface on the front panel.
2. Press the [MEDIA] button to select Aux-In
mode.
Press [MEDIA] again to cancel Aux-In mode
and go to the next mode.
Press the knob, and Rotate the knob to
select EQ/BASS/MIDDLE/ TREBLE/LOUD/
BALANCE/FADER function, rotate the knob to
adjust.
First press shows current EQ. Rotate the knob
to changes BEAT EQ in this order:JAZZ ->
POP -> CLASSIC -> ROCK -> USER -> FLAT
BASS/MIDDLE/TREBLE:(-7)- (+7)
LOUD: ON/OFF
BALANCE:LEFT 1-7->RIGHT 1-7
FADER:FRONT 1-7->REAR 1-7
3
Page 5

CD/USB/iPod OPERATIONS
This unit can play back MP3/WMA
les
Notes:
If you play a WMA file with active DRM (Digital
Rights Management), no audio is output.
To disable DRM
(Digital Rights Management)
When using Windows Media Player 9/10/11,
click on Tool -> Options -> Copy music tab,
then under Copy settings, unclick the Check
box for Copy protect music. Then, reconstruct
les.
Personally constructed WMA les are used at
your own responsibility.
Precautions when creating MP3/
WMA le
Usable sampling rates and bit rates
1. MP3: Sampling rate 8 kHz-48 kHz, Bit rate
8 kbps-320 kbps / VBR
2. WMA: Bit rate 8 kbps-320 kbps
File extensions
1. Always add a le extension “.MP3”, “.WMA”
to MP3, WMA file by using single byte
letters. If you add a file extension other
than specified or forget to add the file
extension, the le cannot be played.
2. Files without MP3/WMA data will not play.
The les will be played soundlessly if you
attempt to play files without MP3/WMA
data.
4
* When VBR files are played, the play
time display may differ the play location.
* When MP3/WMA files are played, a
little no sound part is caused between
tunes.
Logical format (File system)
1. When writing MP3/WMA file on a CD-R
disc or CD-RW disc, please select
“ISO9660 level 1, 2 or Joliet or Romeo” or
Apple ISO as the writing software format.
Normal play may not be possible if the disc
is recorded on another format.
2. The folder name and file name can be
displayed as the title during MP3/WMA
play but the title must be within 32 single
byte alphabetical letters and numerals
(including an extension).
3. Do not afx a name to a le inside a folder
having the same name.
Folder structure
A disc with a folder having more than 8
hierarchical levels will be impossible.
Number of les or folders
1. Up to 999 files can be recognized per
folder.
Up to 3000 les can be played.
2. Tracks are played in the order that they
were recorded onto a disc. (Tracks may not
always be played in the order displayed on
the PC.)
3. Some noise may occur depending on
the type of encoder software used while
recording.
Eject function
Just pressing the [ ] button, ejects the disc
even if the power to the unit was not turned
on.
Notes:
• If you force a CD into before auto
reloading, this can damage the CD.
• If a CD (12 cm) is left ejected for 15
seconds, the CD is automatically reloaded
(Auto reload).
Listening to a disc already loaded
in the unit
Press the [ MEDIA ] button to select the CD
mode.
When the unit enters the CD mode, play starts
automatically.
Loading a CD
Insert a CD into the center of the CD
SLOT with label facing up. The CD plays
automatically after loading.
Notes:
• Never insert foreign objects into the CD
SLOT.
• If the CD is not inserted easily, there may
be another CD in the mechanism or the
unit may require service.
Page 6

CD/USB/iPod OPERATIONS
or
• Discs without the
CD-ROMs cannot be played by this unit.
• Some CD-R/CD-RW discs may not be
usable.
mark and
TEXT
Loading/Take out USB equipment
1. Open the USB cap located on the bottom
right of the unit, insert a USB device into
the connector and the unit will begin to
play automatically.
2. To stop playback of USB device, press
[ MEDIA ] button and rotate the knob to
non USB mode and then remove the USB
device.
Pausing play
1. Press the [ 1 ] button on the front panel to
pause play.
“PAUSE” appears in the display.
2. Press the above button again to resume CD
play.
Displaying titles
This unit can display title data for MP3/WMA .
Each time you press the [DISPLAY] button to
change display: FILE --> TITLE --> Clock
Selecting a track
Track-up
1. Press the [
beginning of the next track.
2. Each time you press the [
track advances to the beginning of the
next track.
Track-down
1. Press the [ ] button to move back to the
beginning of the current track.
2. Press the [ ] button twice to move back
to the beginning of the previous track.
] button to move to the
] button, the
Fast-forward/Fast-reverse
Fast-forward
Press and hold the [ ] button .
Fast-reverse
Press and hold the [ ] button .
Folder select
This function allows you to select a folder
containing MP3/WMA files and start playing
from the rst track in the folder.
1. Press the [ 5 ] or [ 6 ] button.
Press the [ 5 ] button to move the previous
folder. Press the [ 6 ] button to move the
next folder.
2. To select a track, press the [
button.
] or [ ]
Search Function
Press the [MENU], then rotate the knob to
choose FOLD SCH or TRK SCH.
Direct Song/File Access
1. Press the knob to enter the track list
search mode.
2. Turn the knob to select a digit.
3. Press the knob to conrm entry and the tens
digit will ash.
4. Turn the knob to select digit.
5. Repeat above steps to enter the hundreds
and thousands digit, if necessary.
NOTE: The unit will only allow the selection
of digits that correspond with the number of
les on the media you are searching.
6. Once the track number appears on the
screen, press the knob to play the selected
song/le.
Searching Folders/Files
1. Press the knob to enter the folder list
search mode.
2. Turn the knob to select a folder.
3. Press the knob to enter the le list search
mode. And then the track list appears in
the display.
4. Turn the knob to select a track.
5. Press the knob to play.
* When play back MP3 / WMA file, this
function is performed in the current folder.
5
Page 7

CD/USB/iPod OPERATIONS
TUNER OPERATION
MENU FUNCTION
Other various play functions
Scan play
This function allows you to locate and play the
rst 10 seconds of all the tracks recorded on a
disc.
1. Press the [ 2 ] button to perform scan play.
2. Press the above button again to resume
play.
Repeat play
This function allows you to play the current
track repeatedly or play a track currently being
played in the MP3/WMA folder repeatedly.
CD:
1. Press the [ 3 ] button once or more until
“RPT ON” appears on the LCD to perform
repeat play.
2. Press [ 3 ] button repeatedly until “RPT
OFF” appears on the LCD to cancel repeat
playback.
Band
During radio play, press the [RADIO] button to
choose FM1,FM2,FM3,AM1,AM2,WX,SXM1,S
XM2,SXM3.
Up Tuning
Press the seek up [ ] button to tune
stations upward step-by-step. The current
frequency will be shown in digital format on
the display panel.
Press and hold the seek [ ] button to the
next available station.
Down Tuning
Press the seek down [ ] button to tune
stations downward step-by-step.
Press and hold the seek down [ ] button
to the previous available station.
Press and hold the knob to enter system
setup. rotate the knob to select options.
BT CONNECT
AUTO/MANU selectable, enable/disable
Bluetooth auto connect function.
BT ANSWER
AUTO/MANU selectable, enable/disable
Bluetooth auto answer function.
SPEED -> VOL
Speed dependent Volume Range: OFF/LOW/
MID/HI
12/24H
Rotate the knob to choose time format: 12 or
24 HOURS.
CLOCK
Press the knob to enter clock setting mode,
rotate the knob to set clock, press the knob to
conrm.
ALARM
ALARM ON/OFF Select. When ALARM is turn
on, the bellow items selectable: SET TIME/
SOUND/VOLUME
CLOCK DISP
If Clock Display set to on, clock display on
screen regularly.
6
Page 8

BLUETOOTH OPERATIONS
The Bluetooth allows you to utilize your car’s
built-in audio system for wireless mobile phone
or music handsfree communication. Some
Bluetooth mobile phones have the audio
features, and some portable audio players
support Bluetooth feature. This system can
play audio data stored in a Bluetooth audio
device. The car stereo with Bluetooth will be
able to retrieve phonebook contacts, received
call, dialed call, missed call, incoming calls,
outgoing call and listen to music.
Notes:
• Do not leave the microphone of Bluetooth
handsfree in the places with wind passing
such as air outlet of the air conditioner, etc.
This may cause a malfunction.
• If leave it in the places subjected to direct
sun, high temperature can cause distortion,
discoloration which may result in a
malfunction.
• This system will not operate or may operate
improperly with some Bluetooth audio
players.
• Cannot guarantee the compatibility of all
mobile phones together with unit.
• Audio playback will be set to the same
volume level as set during telephone call.
This might cause problems, if extreme
volume level is set during telephone call.
Handsfree Operations
Pairing
1. The Bluetooth of radio always keeps in
invisible mode, that the phone can not search
the radio via Bluetooth directly. So, Long
press [
1. Turn on Bluetooth function of your mobile
phone.
2. Enter mobile phone’s Bluetooth setup
menu,and then search for new Bluetooth
devices.
4. Click “Navistar Radio” to connect device.
5. Press [
6. Click “allow pairing” on the phone.
Notes:
• Display pairing phone name on LCD for 10s
when user select the Bluetooth of Radio form
cell phone.
•
Press
request.
• Display connected cell phone name on LCD
for 5s when Bluetooth connected, then back
to normal display mode.
] enter Phone Menu mode.
] to allow this deivice to connect.
]
[
to refuse this device connecting
Making a call
Operation from Bluetooth menu
Press [
select REDIAL/MISSEDS/CALLS IN/CALLS
OUT/PHONEBOOK item in the menu to make a
DIALING.
] button to enter the phone menu,
• Dial Number
1. Press the
2. Rotate the knob on the front panel to switch: “
PHONE SYNC”.
3. Press the knob to conrm the selection, Start
to download the phone book form pone to
Radio.
4. Rotate the knob to select REDIAL/MISSEDS/
CALLS IN/CALLS OUT/PHONEBOOK.
> Press the knob to enter the selected history.
> Turn the knob to scroll through the contacts.
> When the contact’s name or mobile phone
number is displayed, press the [
to call the mobile phone number of this
contact.
Press the [
[
] button
]
key to end the call.
to enter.
] button
Hang up/Answer
Press [ ] button to answer a call,
Press [ ] button to hang up.
PHONE SYNC
Start to download the phone book form pone to
Radio.
PAIR DEV
Perform Pairing Mode
SELECT DEV
Connect to the selected phone device in pair
list.
7
Page 9

BLUETOOTH OPERATIONS
Other functions
DELETE DEV
Delete the paired device from the pair list
Audio Streaming Operations
What is audio streaming?
Audio streaming is a technique for transferring
audio data such that it can be processed as
a steady and continuous stream. Users can
stream music from their external audio player to
their car stereo wirelessly and listen to the tracks
through the car’s speakers. Please consult
your nearest dealer for more information on the
product of wireless audio streaming transmitter
offered.
CAUTION
Please avoid operating your connected
mobile phone while audio streaming as this
may cause noise or sound choppy on the
song playback.
Audio streaming may or may not resume
after telephone interrupt as this is dependent
on mobile phone.
System will always return to Radio mode if
audio streaming is disconnected.
Note:
Be sure to read the chapter “Pairing” before
proceeding.
Play / Pause a track
1. Push the [ 1 ] button to pause audio playback.
2. To resume audio playback, push the [ 1 ]
knob again.
Selecting a track
Track-up
Press the [ ] button to move to the beginning
of the next track.
Track-down
Press the [ ] button to move to the beginning
of the previous track.
Note:
Playing order will depend on Bluetooth
player. When [ ] button is pressed, some
A2DP devices will restart the current track
depends on the duration of playback.
During music streaming playback, “A2DP” will
be shown on the display. When A2DP device
is disconnected, “BT MUSIC” will be shown on
the display Some Bluetooth audio players may
not have play / pause synchronized with this
unit. Please make sure both device and main
unit are in the same play / pause status in BT
MUSIC mode.
audio
AUX mode
When radio is on, press [MEDIA] button several
time, to display F-AUX/ R-AUX mode.
SIRIUSXM mode
When radio is on, press [RADIO] button several
time, to display SXM1,SXM2,SXM3 mode.
• Long press [RADIO] button, display SXM
turner diagnosis info.
• Press 1-6 Button to load preset station 1-6 in
current band.
• Press and hold 1-6 Button to save current
station to preset station 1-6 in current band.
8
Page 10

ELECTRICAL CONNECTIONS
Wiring Diagram
SXM Antenna
AM/FM/WB Antenna
CAN-High
CAN-Low
Park light
Accessory(HW-ACC)
PWR_ ANT/PA_MC_PWR
Dim PWM/ANALOG
Battery
GND
C
3
6
2
5
18
12
15
9
20
14
17
8
11
19
13
16
7
10
1
4
B
A
C
C1
Power Ground
C2
C3
C4
C5
C6
C7
C8
C9
C10
Amp Sense
Vehicle in Reverse Gear Mute
Lane Departure Warning System Mute
ASWC(Analog Steering Wheel Control)
Mute GND Output
L_AUX _IN 1
AUX _SHIELD_GND
AUX 1_COM
R_AUX _IN_1
C11
C12
C13
C14
C15
C16
C17
C18
C19
C20
AUX 1_ON_OFF
EXT/INT*
Spare AIN1
Spare AIN2
MC+(BT)
MC-(BT)
Power Ground
Audio(+) PA MIC
Mute GND Input
GND(PA- Imput)
9
Page 11

TROUBLESHOOTING
The following checklist can help you solve some problems which you may encounter when using the unit. Before consulting it, check the connections
and follow the instructions in the user manual. Do not use the unit in abnormal condition, for example without sound, or with smoke or foul smell can
cause re or electric shock, immediately stop using it and call the store where you purchased it.
Problem Possible cause Solution
General
The unit will not switch on.
No sound
The unit or screen does not work normally. The unit system is unstable. Press the RESET button.
DISC mode
The appliance will not play discs.
Sound skips due to vibration.
TUNER mode
Unable to receive stations. The antenna is not connected properly. Connect the antenna properly.
Poor quality reception of radio station.
Preset stations are lost. The battery cable is not properly connected.
USB mode
Unable to insert USB device.
The USB device cannot be read. NTFS format is not supported.
Car ignition is not on.
Cable is not properly connected.
Fuse is burnt.
Volume is set at minimum or the mute
function is on.
The disc is inserted incorrectly.
The disc is dirty or damaged.
Mounting angle is over 30˚.
Mounting is unstable.
The antenna is not fully extended or it is
broken.
USB device has been inserted the wrong
way round.
Turn your car key in the ignition.
Check cable connection.
Replace fuse with a new fuse of the same capacity.
Check the volume or switch the mute function off.
Disc must be inserted with the label side facing up. Clean
the disc and check for damage. Try another disc.
Adjust mounting angle to less than 30˚.
Mount the unit securely with the supplied parts.
Fully extend the antenna and if broken, replace it with a
new one.
Connect the permanent live on the unit to the permanent
live on the vehicle.
Insert it the other way around.
Check that the le system is in FAT or FAT32 format. Due
to different formats, some models of storage devices or
MP3 players may not be read.
10
Page 12

SPECIFICATION
General
12V DC (9V-16V)
Power supply:
Maximum power output: 30.25x4 channels(4
Continuous power output: 25Wx4 channels (4 ,10% T.H.D.)
Suitable speaker impedance: 4-8 ohm
Pre-Amp output voltage:
Fuse: 25A
Dimensions(WxHxD): 188.9x59.1x213.6mm
Weight: 1.6kg
Aux-in: ≥300mV
Test voltage 14.4V, negative
ground
)
4.0V (CD play mode: 1KHz, 0 dB, 10 K
load)
FM Stereo Radio
Frequency range: 87.9-107.9MHz
Step:
200 KHz
AM Radio
Frequency range: 540-1600 KHz
Step:
10 KHz
WX Radio
Frequency range: 162.400-162.550MHz
Step:
0.025 MHz
BT
Frequency range: 2402-2480MHz
EIRP power: ≤10dBm
Disc Player
System: Disc digital audio system
Frequency response: 20Hz-20kHz
Signal/noise ratio: >80 dB
Total harmonic distortion: Less than 0.20% (1kHz)
Wow and utter: Below measurable limits
Channel separation: >55 dB
Note: Specications and the design are subject to change without notice
due to improvements in technology.
11
Page 13

FCC
FCC STATEMENT
1. This device complies with Part 15 of the
FCC Rules. Operation is subject to the
following two conditions:
(1) This device may not cause harmful
interference, and
(2) This device must accept any interference
received, including interference that may
cause undesired operation.
2. any Changes or modifications not
expressly approved by the party responsible
for compliance could void the user's authority
to operate the equipment.
NOTE: This equipment has been tested and
found to comply with the limits for a Class B
digital device, pursuant to Part 15 of the FCC
Rules. These limits are designed to provide
reasonable protection against harmful
interference in a residential installation.
This equipment generates uses and can
radiate radio frequency energy and, if not
installed and used in accordance with the
instructions, may cause harmful interference
to radio communications. However, there
is no guarantee that interference will not
occur in a particular installation. If this
equipment does cause harmful interference
to radio or television reception, which can
be determined by turning the equipment
off and on, the user is encouraged to try to
correct the interference by one or more of
the following measures:
• Reorient or relocate the receiving antenna.
• Increase the separation between the
equipment and receiver.
• Connect the equipment into an outlet on a
circuit different from that to which the receiver
is connected.
• Consult the dealer or an experienced radio/
TV technician for help.
FCC Radiation Exposure Statement
This equipment complies with FCC radiation
exposure limits set forth for an uncontrolled
environment. This equipment should be
installed and operated with minimum distance
20cm between the radiator & your body
12
Page 14

PN.: 12707500xxxx
 Loading...