

670 010 rf
DE
FERNBEDIENUNG FÜR FUNK-DIMMER &
-SCHALTAKTOREN (ROLLLADEN/ JALOUSIE)
TECHNISCHE DATEN
Stromversorgung 1 Batterie 3V CR2032 (enthalten)
Batterielebensdauer > 8 Jahre
Übertragungsfrequenz
Anzahl Kanäle 5
Kompatibel zu
Schutzart IP20
Betriebstemperatur -10ºC bis +70ºC
Abmessungen 105 x 50 x 12mm
Passend zu
Kodierte Übertragung auf 868,3MHz mit einer
effektiven Sendeleistung >8mW und einer
Reichweite von 100m (freies Feld)
KNX-RF:
· CH_Generic_Switch_5 (0311h)
· CH_Battery_Status (0021h)
672 730 rf, 673 520 rf, 674 730 rf, 673 730 rf,
673 830 rf, 673 831 rf, 673 832 rf, 673 833 rf,
673 834 rf , 674 830 rf
GB
REMOTE CONTROL FOR LIGHTING
& BLINDS/SHUTTERS RF ACTUATORS
TECHNICAL DATA
Power supply 1 battery 3V CR2032 (included)
Battery life (estimated) > 8 years
Radio-Frequency
Channels 5
Compatible with
Protection degree IP20
Working temperature -10ºC ~ +70ºC
Dimensions 105 x 50 x 12mm
Compatible receivers
Codified transmission in 868,3MHz with
ERP>8mW and a coverage of
100m (in the free field)
KNX-RF:
· CH_Generic_Switch_5 (0311h)
· CH_Battery_Status (0021h)
672 730 rf, 673 520 rf, 674 730 rf, 673 730 rf,
673 830 rf, 673 831 rf, 673 832 rf, 673 833 rf,
673 834 rf , 674 830 rf
BITTE VOR BENUTZUNG DIE FOLIE AN DER BATTERIE ENFERNEN
BESCHREIBUNG
Bei diesem Gerät handelt es sich um eine KNX-RF kompatible Fernbedienung zur
Steuerung von Dimmern, Rollladen/Jalousie-Aktoren und Funk-Aktoren.
Bis zu 5 Kanäle können angesteuert und bis zu 5 verschiedene Szenen
programmiert werden. Zusätzlich stehen zwei "ALL ON" / "ALL OFF" Tasten zur
Verfügung.
Folgende Funktionen stehen zur Verfügung:
· Schalten EIN/AUS und Dimmen.
· AUF/AB von Rollladen / Jalousien.
· Speichern und Aufrufen von Szenen.
VERLINKUNG
Die Fernbedienung hat einen Drehwahlschalter mit 5 Positionen, mit dem die
Betriebsart während des Verlinkungsprozesses ausgewählt werden kann:
3
2
4
1
5
Abb. 1
1. Rollladen/Jalousie AUF / AB.
2. Schalten: EIN / AUS.
3. Standardmodus: Normale Betriebsart. Nach Verlinken mit dem Aktor muss der
Drehwahlschalter der Fernbedienung in diese Position gedreht werden.
4. Dimmer Modus: Schalten EIN-/AUS, Dimmen.
5. Szenenmodus: Szenen speichern und aufrufen (Beleuchtungssteuerung oder
Rollladensteuerung).
Um einen Kanal der Fernbedienung mit einem anderen KNX-RF kompatiblen
-Gerät zu verlinken, gehen Sie wie folgt vor:
1.- KNX-Funk-Aktor in den Verlinkungs-Modus versetzen (gemäß den Angaben
des Herstellers).
2.- Drehknopf der Funkfernbedienung auf die gewünschte Betriebsart (1,2 oder 4)
stellen.
3.- Die „ON“-Taste des entsprechenden Kanals der Funkfernbedienung, der
verlinkt werden soll, für mehr als eine Sekunde gedrückt halten.
4.- Überprüfen Sie die korrekte Verlinkung des Senders und des
angeschlossenen KNX-Funk-Aktors gemäß den Angaben des Herstellers.
5.- Stellen Sie den Drehknopf auf Position 3.
Um eine Szene der Funkfernbedienung mit einem Aktor zu verlinken, gehen sie
wie folgt vor:
1.- Versetzen sie den Aktor in den Verlinkungsmodus (s. Bedienungsanleitung des
Herstellers).
2.- Drehen Sie den Drehknopf der Funkfernbedienung in den Szenenmodus
(Position 5).
3.- Drücken Sie die Taste des gewünschten Kanals (A, B, C, D, oder E) länger als
eine Sekunde.
4.- Überprüfen Sie die Bestätigung des Aktors (gemäß der Bedienungsanleitung
des Herstellers).
5.- Stellen Sie den Drehknopf der Funkfernbedienung zurück auf Position 3
(Normalbetrieb).
BETRIEB
Bevor die Fernbedienung betriebsbereit ist, muss diese mit den Empfängern (s.o.
„Verlinkung“) verbunden werden. Die Fernbedienung ermöglicht die Steuerung von
bis zu 5 verschiedenen Kanälen und Szenen.
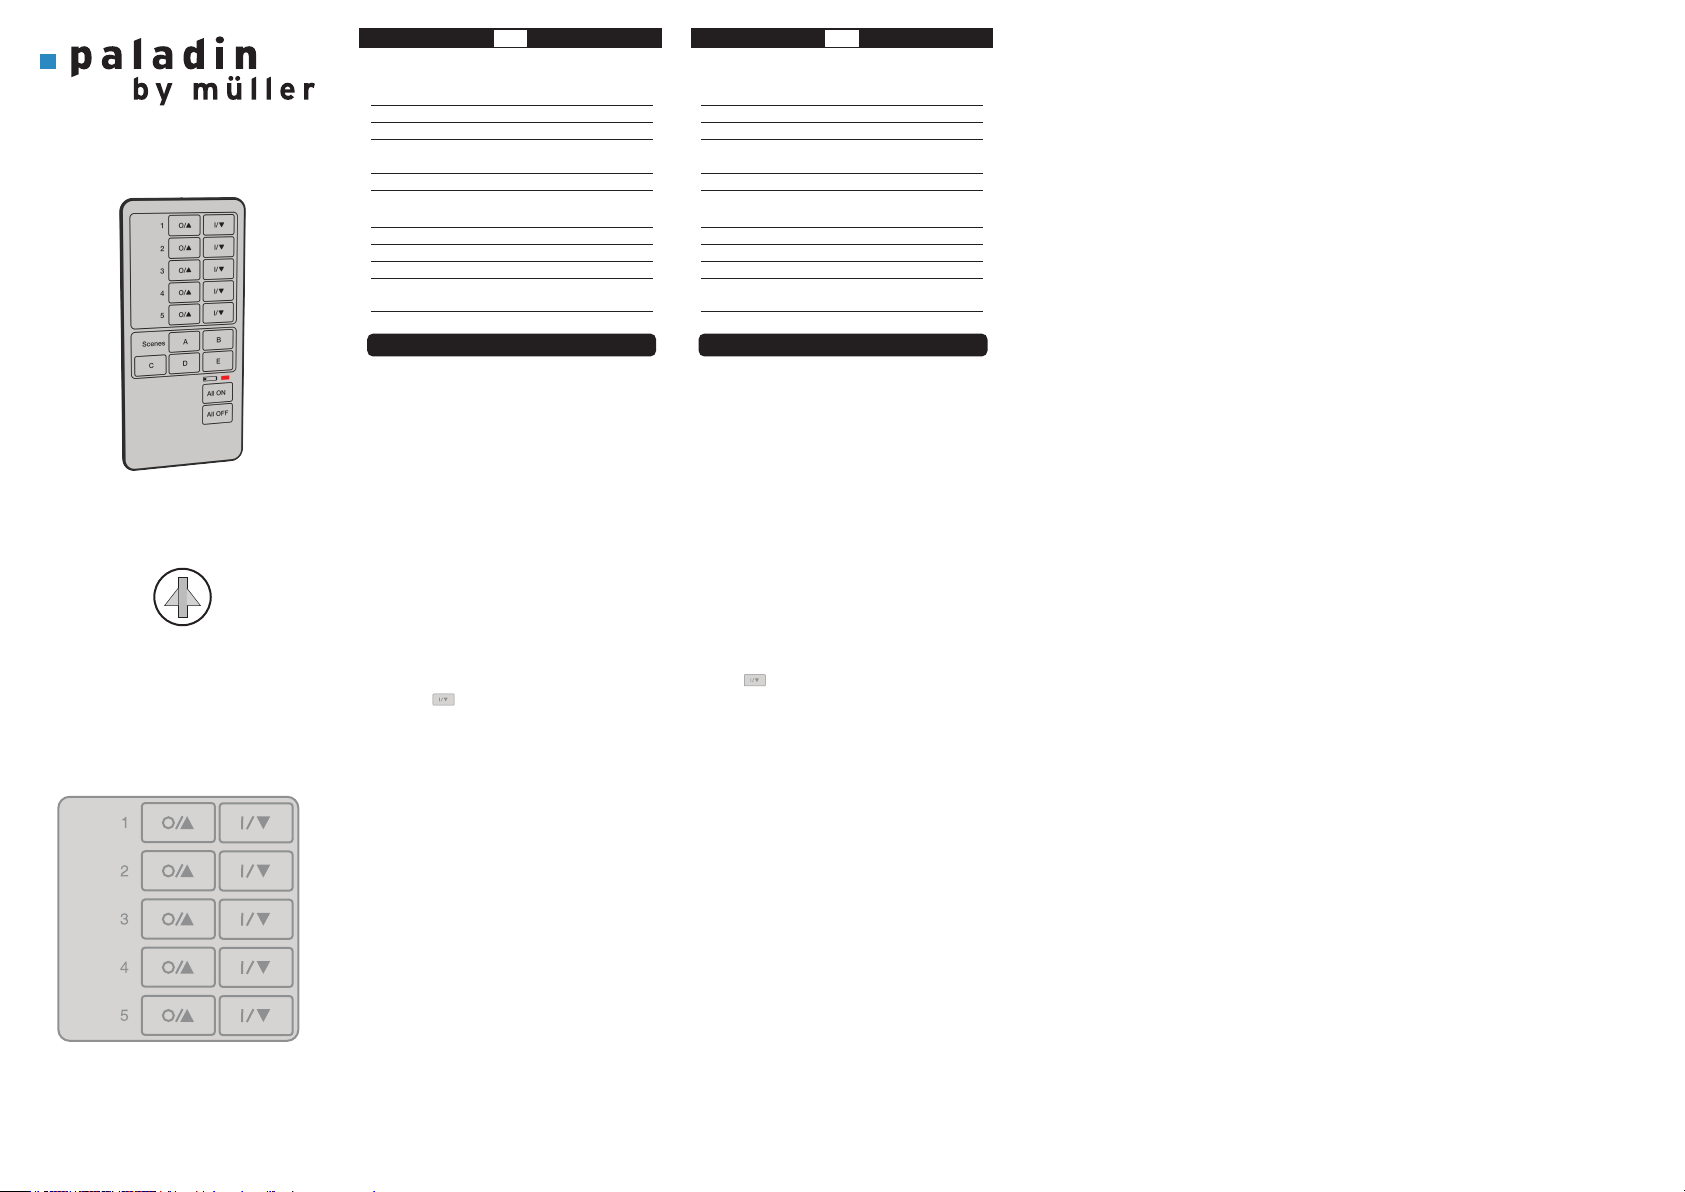
· Rollladen-Funktion (Abb. 1):
- Kurzer Tastendruck: Schritt AUF/AB
- Langer Tastendruck (> 1 Sekunde): Bewegung AUF/AB für 3 Minuten:
· Wenn während dieser Zeit ein kurzer Tastendruck erfolgt, wird der Rollladen
gestoppt.
· Wenn während dieser Zeit kein Tastendruck erfolgt, wird der Rollladen
automatisch gestoppt.
· Wenn der Rollladen hochfährt und ein langer Tastendruck auf die Bewegung
AB –Taste erfolgt, wechselt der Rollladen seine Bewegungsrichtung.
· Dimmer-Funktion (Abb. 1):
- Kurzer Tastendruck: Beleuchtung EIN/AUS
- Langer Tastendruck (> 1 Sekunde): Lichtstärke HELLER/DUNKLER
· Schalt-Funktion (Abb. 1):
- Kurzer Tastendruck: Schalten EIN/AUS
PULL THE PLASTIC FOIL OUT TO ACTIVATE THE BATTERY
DESCRIPTION
Remote control for RF (compatible with KNX-RF) lighting and blinds/shutters
actuators.
Up to 5 channels can be controlled and up to 5 different scenes can be created.
All On and All Off keys.
Different functions are available:
· Switch On/Off and Dim the lighting.
· Move Up/Down blinds/shutters.
· Save and Recall scenes.
LINK PROCEDURE
The remote control has a control knob with 5 positions in order to select the
operation mode during the linking procedure:
1. Blinds/Shutters control mode: move up/down blinds or shutters.
2. Switch mode: switch on/off the load.
3. Standard mode: normal operation mode. After doing the link procedure with
the actuator, is necessary to set the 670 010 rf's knob in this position.
4. Dimming mode: switch on/off and dim the lighting.
5. Scenes mode: save and recall scenes with lighting and/or blinds
(move up/down).
In order to link one channel from the 670 010 rf with an actuator, it is necessary
to follow these steps:
1.- Set the actuator in link mode, according to the instructions given by the
manufacturer.
2.- Set the 670 010 rf's knob in the desired working mode: 1, 2 or 4.
3.- Press the key from the channel of the 670 010 rf which is going
to be linked for more than 1 second.
4.- Check the acknowledgment of the actuator according to the instructions
given by the manufacturer.
5.- Set the control knob of the 670 010 rf at 3 position.
In order to link one scene from the 670 010 rf with an actuator, it is necessary
to follow these steps:
1.- Set the actuator in link mode, according to the instructions given by the
manufacturer.
2.- Set the 670 010 rf's knob in scenes programming mode: 5.
3.- Press the channel key (A, B, C, D or E) for more than 1 second.
4.- Check the acknowledgment of the actuator according to the instructions
given by the manufacturer.
5.- Set the control knob of the 670 010 rf at 3 position.
OPERATION
Before being operative the remote control must be linked to the receptors
according to the above point (procedure link).
The remote control allows controlling up to 5 different channels and scenes.
· Blinds function (Fig. 1):
- Short press: Step Up / Down.
- Long press (>1second): Move Up / Down for 3 minutes:
· If during this time a short press is done the blind will be stopped.
· If no press is done during the 3 minutes, the blind will be stopped
automatically.
· If the blind is moving up and a long press is done in the move down key the
blind will change its movement direction.
· Dimming function (Fig. 1):
- Short press: Switch On/Off the lighting.
- Long press (>1second): Increases or decreases the lighting level.
· Switch function (Fig. 1):
- Short press: Switch On/Off the load.

GB DE
· Scenes function (Fig. 2):
- Long press (2 seconds): Saves or create a scene according to the values set in
the different channels. The battery's LED will be on for 2 seconds and after
saving the scene it will be switched off.
- Short press: Recalls a saved scene.
· All On/ All Off:
It behaves like another channel. It allows switching on the lights at
maximum from the linked devices in this channel.
It behaves like another channel. It allows switching off the lights at
maximum from the linked devices in this channel.
In order to use these two keys it is necessary to link this channel with the
different devices, according to the procedure previously described (Switch mode).
· Battery LED:
This LED will remain on while the keyboard is active and constantly
flashes to indicate that the battery is running low.
BATTERY REPLACEMENT
Release the cover with help of a screwdriver inserting it into the slots of the two
grips. Remove the cover of the socle and change the battery being careful with the
components of the printed circuit.
The 670 010 rf has a channel type CH_Battery_Status (Channel code 0021h).
This channels allows to inform to an actuator compatible with the battery status
about this information.
When the battery is worned-down the transmitter will send the respective message
and a ‘battery empty’ message each time it is activated.
This function is optional. In order to link the 670 010 rf with a compatible actuator
for this function:
1.- Remove the battery from the transmitter.
2.- Set the RF-KNX actuator in link mode according to the instructions given by
the manufacturer.
3.- Put the battery again in the socle.
4.- Check the correct link between the two devices in the actuator according to
the instructions given by the manufacturer.
RECOMMENDATIONS
Avoid using the device near radio equipments or microwaves.
Leave at least 2m separation between the control and the associated receiver.
· Szenen-Funktion (Abb. 2):
- Langer Tastendruck (> 2 Sekunden): Speichert oder definiert eine Szene
entsprechend den in den verschiedenen Kanälen eingegebenen Werten. Die
Batterie -LED leuchtet für 2 Sekunden. Nach erfolgtem Speichern der Szene
wird die LED wieder ausgeschaltet.
- Kurzer Tastendruck: Ruft eine gespeicherte Szene auf.
· All On/ All Off:
Verhält sich analog zu den anderen Kanaltasten. Ermöglicht, alle Lichter
der verlinkten Geräte dieses Kanals auf maximale Helligkeit
einzuschalten.
Verhält sich analog zu den anderen Kanaltasten. Ermöglicht, alle Lichter
der verlinkten Geräte dieses Kanals auszuschalten.
Um diese zwei Tasten nutzen zu können, ist es notwendig, diesen Kanal mit den
verschiedenen Geräten zu verlinken (s. vorhergehende Verlinkungsbeschreibung –
Schaltmodus).
· Batterie-LED:
Diese LED bleibt an, während die Tastatur aktiv ist. Sie blinkt, wenn der
Batterieladungszustand niedrig ist.
BATTERIETAUSCH
Öffnen Sie die Batterieabdeckung mittels eines Schraubendrehers. Entfernen Sie
anschließend die Abdeckung und ersetzen die Batterie. Hierbei sollten Sie darauf
achten, die Leiterplatte nicht zu beschädigen.
Die Fernbedienung kann den KNX-RF kompatiblen Befehl „CH_Battery_Status
(Channel code 0021h)“ versenden.
Mittels dieses Befehls ist es möglich, einem kompatiblen Aktor die Information über
den Batteriestatus zu übermitteln. Im Falle eines niedrigen Batteriestandes wird
diese Meldung alle 15 Minuten übertragen. Diese Funktion ist optional.
Um die Funkfernbedienung für diesen Status mit einem kompatiblen Aktor zu
verlinken, der diese Funktion unterstützt, gehen Sie wie folgt vor:
1.- Entfernen Sie die Batterie aus dem Sender.
2.- Empfängerkanal des gewünschten KNX-RF kompatiblen Gerätes in den
Verlinkungsmodus stellen (gemäß den Vorgaben des Herstellers).
3.- Batterie einsetzen.
4.- Erfolgreiche Verlinkung der zwei Geräte am Aktor (gemäß den Vorgaben des
Herstellers) prüfen.
EMPFEHLUNGEN
Vermeiden Sie es, das Gerät in der Nähe von Funkanlagen oder
Mikrowellengeräten zu benutzen. Halten Sie mindestens 2 m Abstand zwischen
der Fernbedienung und dem verbundenen Empfänger ein.
Abb. 2
CR20323VCR2032
3V
CR2032
3V
 Loading...