

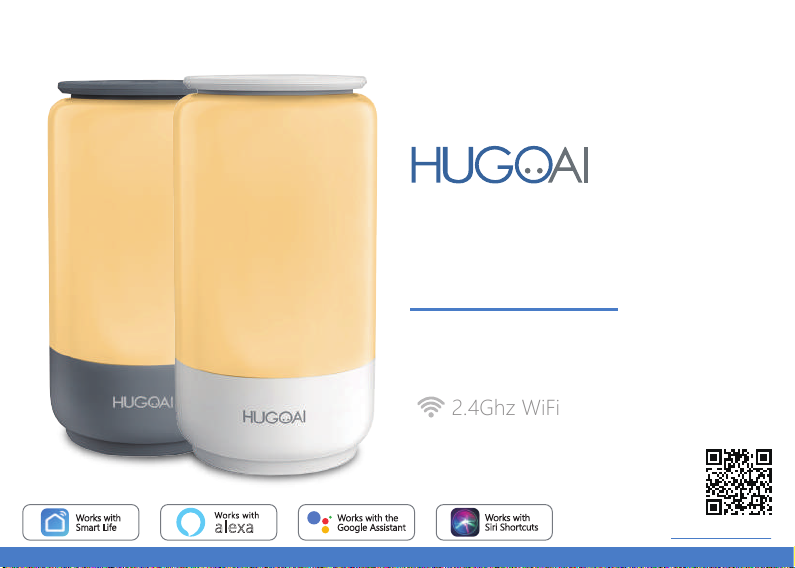
Smart Table Lamp
2.4Ghz WiFi
User Guide
Setup instructions for Smart Life App,
Alexa and Google Assistant.
Works with
Smart Life
Works with
alexa
Works with the
Google Assistant
Works with
Siri Shortcuts
Scan the QR code to read the detailed
instruction in https://www.hugo-ai.com.

Product Specification 1
C
O
N
T
E
N
T
S
2Product Diagram
3-6Smart Life App Setup
7-8APP Operation Instructions
9-10Connect to Alexa
11Connect to Google Assistant
12Enable Siri Shortcuts (For use with iPhone)
13-14Problems and Solutions
15Federal Communication Commission (FCC) Statement for Users
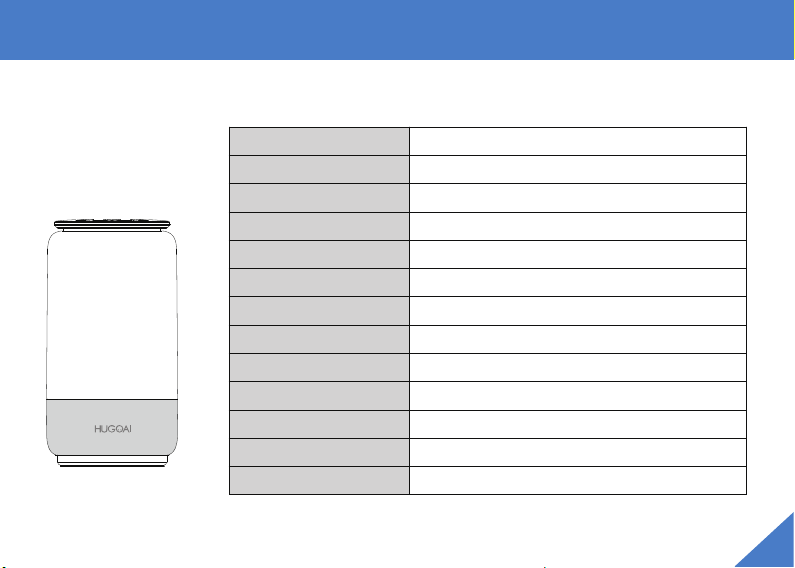
Product Specification
Package Includes Specification
● 1 x LED Table Lamp
● 1 x AC Adapter
● 1 x User Manual
Model
Wattage
Adapter Input
Adapter Output
Current Ripple
Network
Luminous Flux / Intensity
CCT / Color
CRI
IP Rating
Operation Temperature
Lifespan
Dimensions
HG02
6W
100-240V/AC 50/60Hz
5V/1A
Flicker Free ±3%
WIFI IEEE802.11b/g/n(2.4GHz)
450lm@4000K, Red:7.2cd, Green:12cd, Blue:6.6cd
2000K-4000K / 16 Million Colors
Ra:>80, Ra:>90@2000K/3000K
IP20
-20°C~40°C/-4°F~104°F
30,000hrs
4.3'' X 4.3'' X 8.3'' (110mm X 110mm X 210mm)
1
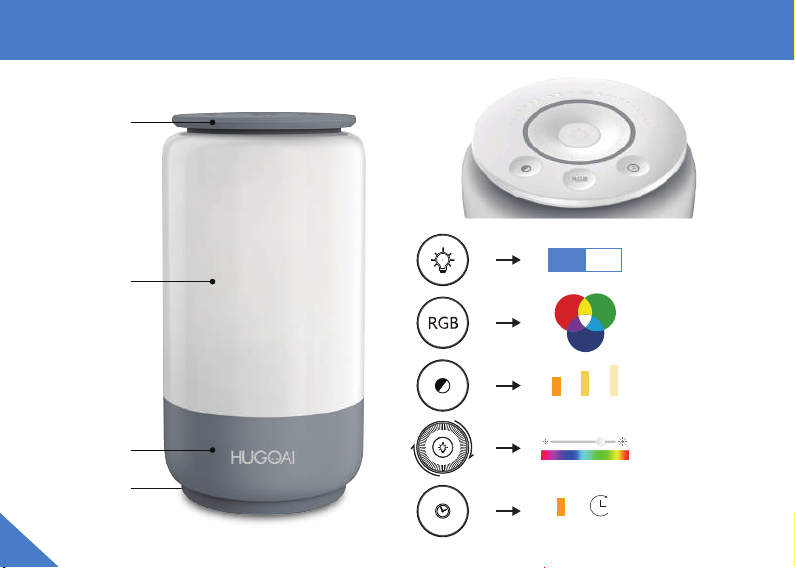
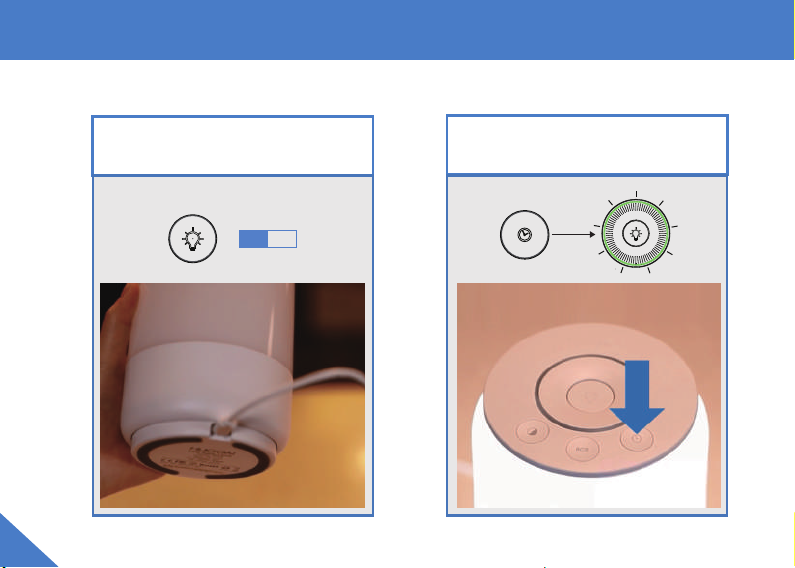
Product Diagram
Control Panel
Lamp Cover
Type-C Port
2
Base
ON OFF
R G
B
2000K 3000K 4000K
OFF
2000K
30 minutes
Press to turn on
and off the lamp
Press to turn
on RGB Mode
Press to switch
color temperature
Slide to adjust
brightness or color
Press to set timers.
It will set the light to
2000K and auto-off
in 30 min
Smart Life App Setup
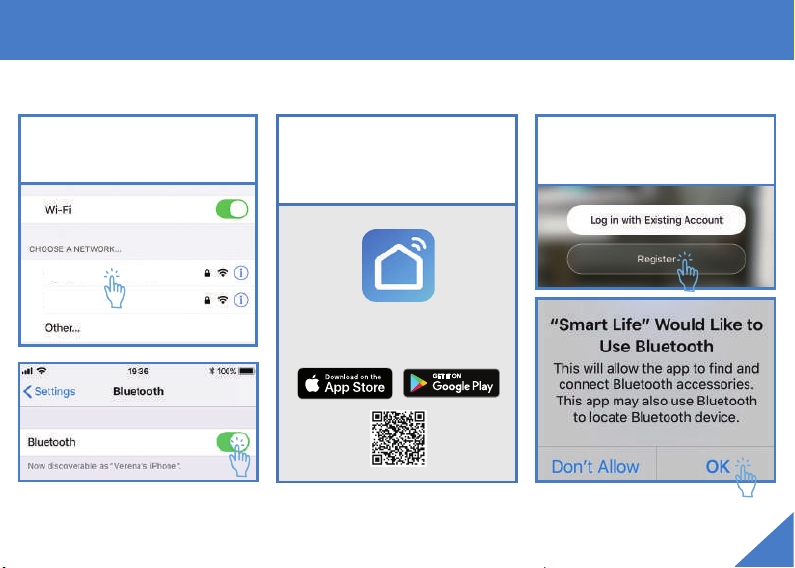
Preparation
1. Connect to 2.4GHz Wi-Fi net-
work and turn Bluetooth on.
Wi-Fi 2.4GHz
Wi-Fi 5GHz
2. Install the Smart Life app from the
Apple Store/ Google Play Store,
or via scanning the QR code.
Download and launch
the
Smart Life
3. Register an account and allow
the app to use Bluetooth.
3
Smart Life App Setup
Prepare the Lamp for Connection
① Charge and turn on the lamp.
ON OFF
② Press the timer button for more than 5s
until the indicator flashes quickly in green.
more than 5s
4

Smart Life App Setup
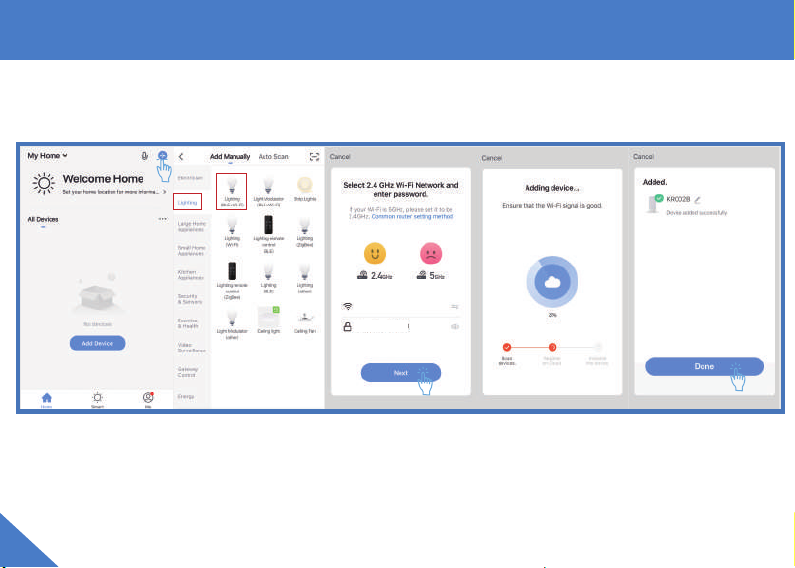
Add the Lamp to Smart Life (via Bluetooth)
① The lamp will appear automatically waiting to be added when you open the Smart Life App.
********
**********
Click “Go to add”. Select the table lamp. Enter 2.4GHz Wi-Fi
network name and
password, then tap
"Next".
Wait for adding device. You can edit the lamp
name and click “Done”.
5
Smart Life App Setup
Add the Lamp to Smart Life (Manually)
② Or you could add the lamp to Smart Life manually.
********
**********
Tap "+" in the upper
right corner or you can
also select "Add Device".
Tap "Lighting" and then
tap "Lighting(BLE+Wi-Fi)".
Enter 2.4GHz Wi-Fi
network name and
password, then tap
"Next".
NOTE: If you have trouble setting up the lamp, please contact us via
6
Wait for adding device. You can edit the lamp
name and click “Done”.
support@hugo-ai.com.

APP Operation Instructions
Tunable White RGB Mode Scene Mode
3
1
1
2
3
① Brightness Control
② Color Temperature Control
③ Slip these area can enter the color selector
2
① Brightness Control
② Brightness Saturation / Color Control
③ Click to know more details of the device,
or rename the lamp, share it to your families
Note: For the scene modes: Night, Read,
Working and Leisure, their color settings
are fixed and could not be customized.
However, you can customize the color
setting of other scene modes (Soft, Colorful,
Dazzling, and Gorgeous) according to your
requirements.
7
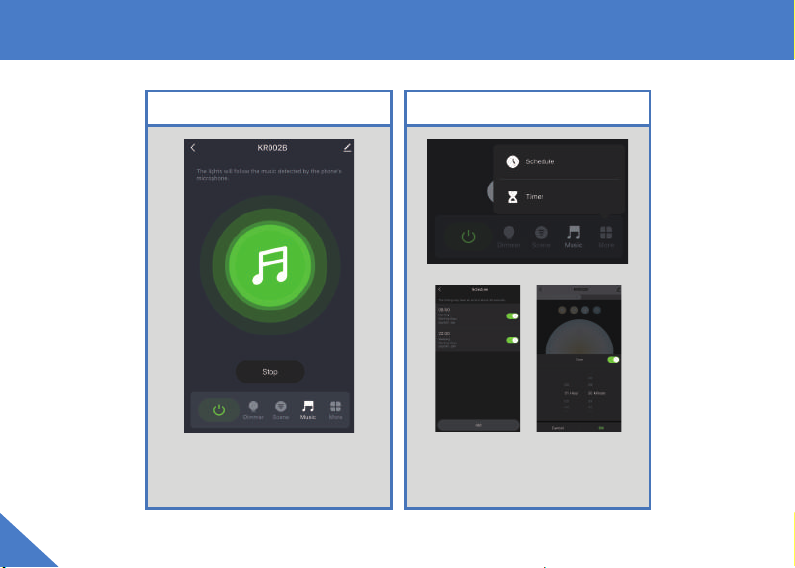
APP Operation Instructions
Music Mode Schedules & Timers
Schedules Timer
Choose Music Sync to match color changes
to the beat of the music playing on your
speakers.
Set schedules
based around
your preferences
and daily needs.
Set the timer to
turn off the lamp
automatically.
8

Connect to Alexa
Launch the Alexa App then tap
on the Menu. Choose “Skills&
Games” in the option bar.
2
Search "Smart Life" in the input box and
select Smart Life App in the search results.
3
4
1
Click "ENABLE TO USE".
5
9
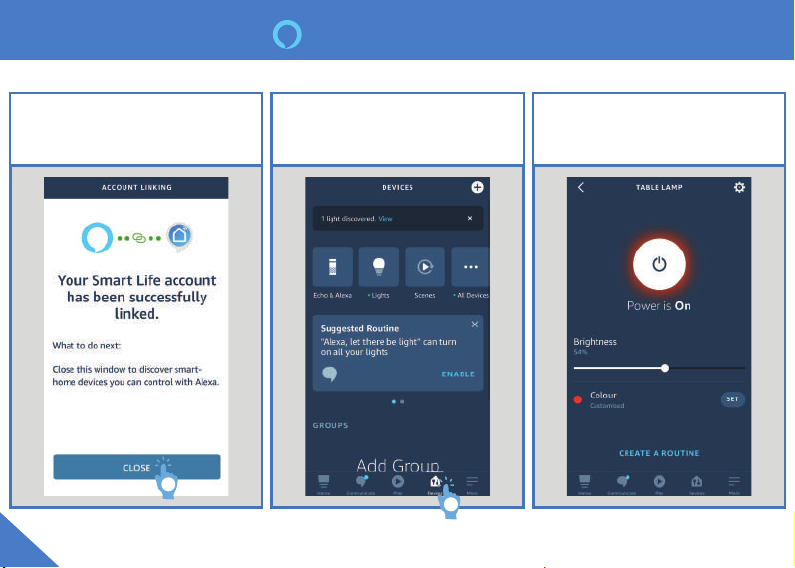
Connect to Alexa
Log in Smart Life account and authorize
Alexa. Then click “CLOSE”.
1
10
Tap “Devices” on the Menu. Here is a
message “1 lightdiscovered” on the top.
The lamp is connected to alexa successfully.
2
Then you could control the lamp via Alexa.

Connect to Google Assistant
Launch the Google Assistant
App then tap on the icon in
the upper right.
Tap "Assistant" and Choose
"Home Control".
To add a device tap on the
Circle(+) located in the lower
right corner.
Search "Smart Life" App.
Then log in your Smart Life
account, tap "Link Now".
1
4
2
3
After you assign rooms for devices, your devices will be listed in the Home Control Page. Then you can control the lamp
through Google Home.
11

Enable Siri Shortcuts (For use with iPhone)
Tap ”Smart” on the bottom
menu bar and then create
a “Tap to Run” command.
Set a condition and setting
of “Tap-to-Run” command.
Click “Add to Siri” on the
right corner.
2
1
Now you can use the “Hey Siri” command to control this action from your iOS device.
12
Edit the wake-up command
and save shortcut.
3
4

Problems and Solutions
If the app can't control your lamp but its status shows "on":
Check if the device you're using is connected to network and if the lamp is within range of your Wi-Fi.
Check if the power supply of the lamp is working and make sure the power adapter is plugged into a working socket.
If the indicator turns red:
The red light indicates that the lamp is disconnected with the network. Please check your WI-FI and make sure that
the lamp is in good connection with network. Usually, the red light will stop in about 2 minutes and then the status
of lamp on the app will be “offline". When the network is back up, the lamp will reconnect automatically.
Unbind the Lamp from a Certain Account
To unbind the lamp from a certain account, please press the Timer button for more than 5 seconds till the indicator
flashes quickly in green. Then the device will return to the initial connecting status and be available for another
account.
13

Problems and Solutions
How to find Mac Address of the lamp?
Here are two ways to find the MAC address of your smart lamp out.
The first way is to connect your lamp with AP mode:
1. Click "Switch Paring Mode" in the Smart Life App when you fail to connect the lamp with Wifi.
2. Press the "Timer" button on the lamp for about 10-15 seconds till the indicator blinks slowly in green. Then click
"confirm indicator slowly blink".
3. Click "Go to Connect" and then choose the WiFi of your lamp.
4. Click and link the Table Lamp's WiFi.
When the connection succeed, please click the lamp icon on the app home page and enter the lamp setting
interface by clicking the "pencil" icon on the top right corner. Then, press "Device Information" and you will see
the detailed information about the table lamp, in which the MAC address is included.
(If you cannot find the MAC address by this way successfully, please try the second way.)
The second way is to use a hotspot from another phone:
1. Please prepare 2 phones and use one of them as a hotspot (Setting-->Hotspot-->Switch On).
2. Connect the other phone to that hotspot.
3. Switch the smart table lamp on and hold the "Timer" button for 10-15 seconds until the indicator flashes green rapidly.
4. Open the app "Smart Life" on the connected phone and press "+"-->"Lighting"-->"Lighting(BLE+Wi-Fi)".
5. Enter the hotspot password and connect the lamp to the app.
6. When the connection succeed, please click the lamp icon on the app home page and enter the lamp setting interface
by clicking the "pencil" icon on the top right corner.
7. Press "Device Information" and you will see the detailed information about the table lamp, in which the MAC address
is included.
14

Federal Communication Commission (FCC) Statement for Users
Federal Communication Commission (FCC) Statement for Users
Warning: Changes or modifications to this unit not expressly approved by the party responsible for compliance could void
the user’s authority to operate the equipment.
This device complies with Part 15 of the FCC Rules.
Operation is subject to the following two conditions:
(1)This device may not cause harmful interference, and (2)This device must accept any interference received, including
interference that may cause undesired operation.
NOTE: This equipment has been tested and found to comply with the limits for a Class B digital device, pursuant to Part 15
of the FCC Rules. These limits are designed to provide reasonable protection against harmful interference in a residential
installation. This equipment generates, uses and can radiate radio frequency energy and, if not installed and used in
accordance with the instructions, may cause harmful interference to radio communications.
However, there is no guarantee that interference will not occur in a particular installation. If this equipment does cause
harmful interference to radio or television reception, which can be determined by turning the equipment off and on, the
user is encouraged to try to correct the interference by one or more of the following measures:
•Reorient or relocate the receiving antenna.
•Increase the separation between the equipment and receiver.
•Connect the equipment into an outlet on a circuit different from that to which the receiver is connected.
•Consult the dealer or an experienced radio/TV technician for help.
FCC RF Radiation Exposure Statement Caution: To maintain compliance with the FCC's RF exposure guidelines, place the
product at least 20cm from nearby persons.
15

 Loading...