

Page 1

HUGO BOSS WATCHES
OPERATING INSTRUCTIONS, CARE & MAINTENANCE,
AND WARRANTY & SERVICE INFORMATION
Page 2

HUGOBOSSWATCHES
Hugo Bosshas a unique heritage in the fashion market. Developed with the meticulous attention to function and detail,
the water-resistant Hugo Boss watch collection offers easy, elegant designs that reflect Hugo Boss’ style codes and
trademark logo – one of the most recognizedbrand symbols in the world.
Congratulations on your purchase.
2
CONTENTS
OPERATING INSTRUCTIONS
(1) 2- AND 3-HAND MODELS
(2) DATE/DAY – DATE MODELS
(3) DUAL TIMEMODELS– With GMT24-hour and minute hand
(4) MULTI-EYEMODELSTYPE A – With day/date with or without 24-hour hand without pushers
(5) MULTI-EYEMODELSTYPE B– With day/date with or without 24-hourhand with pushers
(6) ANALOGCHRONOGRAPHS TYPE A – Analog chronograph minutes/seconds counters/24-hour hand/date
(7) ANALOGCHRONOGRAPHS TYPE B– Analog Chronograph 1/10 Second
(8) ANALOGCHRONOGRAPHS TYPE C – Analog chronograph with 30-minute counter and date
(9) SPECIAL FEATURES
- ScrewDown Crown
- Mesh Bracelet Sliding Clasp
CAREAND MAINTENANCE
WARRANTY
OBTAINING SERVICE
Page 3

(1)2- AND 3-HAND MODELS
Legend
1, 2 – Crown positions
H – Hour hand
M – Minute hand
S – Secondhand
Crown Positions:
Position 1 - Normal position. Crown pushed into case.
Position 2 - To set TIME: Rotate crown in either direction.
NOTE:When setting the minute hand, advance it 4 to 5
minutes ahead of the desired time and then turn it back to the
exact time.
Power depletion warning function: When the battery nears its
end, the second hand moves at two-second intervals instead of
the normal one-second intervals. In that case, have the battery
replaced with a new one as soon as possible.The watch remains
accurate while the second hand is moving at two-second intervals.
Figure A Figure C
1 – 2
S
Figure B
1 – 2
M
M
M
H
H
H
M
H
S
3
Page 4

(2)DATE/DAY-DATE MODELS
Legend
1, 2, 3 – Crown positions
H – Hour hand
M – Minute hand
S– Secondhand
K – Date window
E – Day window
Crown Positions:
Position 1 - Normal position. Crown pushed into case.
Position 2 - To set DATE:Rotate crown clockwise.
NOTE:For models with DAY/DATE display(s):
Rotate crown clockwise to set DATE,
and counterclockwise to set DAY.
Position 3 - To set TIME: Rotate crown in either direction.
CAUTION: Never set the date when the hands are between 9:00
PM and 3:00 AM. Doing so could damage the calendar mechanism.
NOTE: The functioning of the watch is not affected during
date setting. When the watch is running, the date will change
gradually during the period from 9:00 PM to 3:00AM.
Power depletion warning function:When the battery nears its
end, the second hand moves at two-second intervals instead of
the normal one-second intervals. In that case, have the battery
replaced with a new one as soon as possible.The watch remains
accurate while the second hand is moving at two-second intervals.
1 – 2 – 3
H
Figure A
K
Figure B
H
S
S
M
1 – 2 – 3
M
4
K
E
Page 5
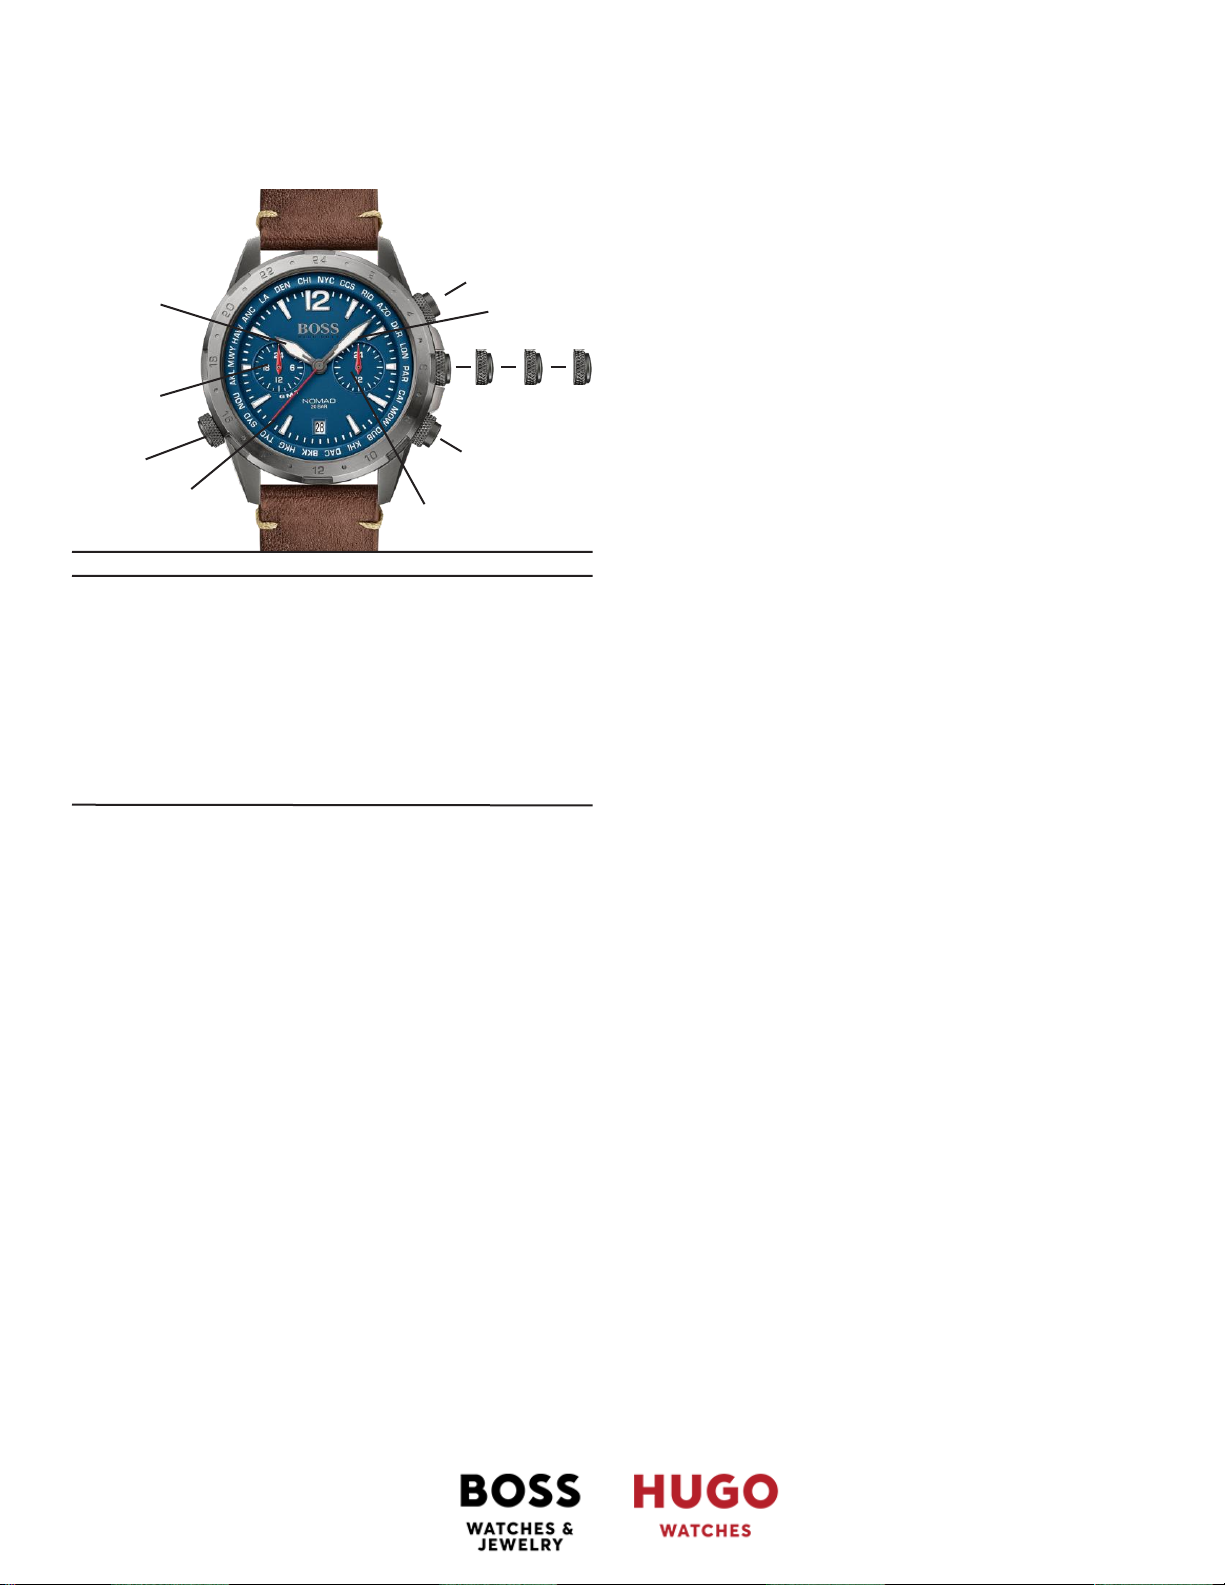
(3)DUAL-TIME MODELS - TYPEA
With rotating reflectoring, GMT 24-hour hand and date
Legend
0, 1, 2, 3 – Crown positions
A – Push (-)button to set dual time
B – Push (+) button to set dual time
H – Hour hand
M – Minute hand
S – Secondhand
F – Dualtime hand (24 hrs)
J– 24hours hand
Z – Time zone crown
Crown Positions:
Position 0 - Crownblockedand pushedinto case. Turn unclockwise to liberate the crown in position 1. Push and turn clockwiseto block the crown into case
Position 1 – Normal running position; crown liberated from the
case.
Position 2 – To set DATE and DUALTIME:Date setting and correction of dual time with the pushers.
Position 3 - To set TIMEand DUAL TIME: Time setting and rapid
correction of dual time with the pushers
Local time is indicated by the hour H, minute M and second S
hands,while left-mounted Dualtime hand indicates dual time
hours.
After changing the battery, before setting the time, check if the
dual time hour hand and dual time minute hand are at «0» (12
o’clock position). If either the dual time hour hand or the dual
time minute hand is not in the «0» position, reset it/them with
the following procedure:
1. Pullcrown out to position 2.
2. Keep the buttons A & B pressedat the same time for more
than 2 seconds, then release the buttons (dual time hands
move and return to where they were).
3. Pressbutton A or Bto reset the dual time hands to
«0»position.
Button A: dual time hour hand move clockwise.
Button B: dual time minute hand move clockwise.
Thedual time hands move quickly if the respective buttons
are kept pressed.
4. Pushcrown back in to position 1.
To set the localtime:
1. Pullcrown out to position 3, watch stops.
2. Rotate crown in either direction to move hands to desired
time.
3. Pushcrown back in to position 1; watch restarts, now set to
correct time.
To set the date:
1. Pullcrown out to position 2.
2. Turnthe crown counterclockwise to set the date hand. Do
not set the date hand between 9:00pm and 2:00am. The
date hand will not move back by turning the crown clockwise.
3. Pushcrown back in to position 1; watch restarts, now set to
correct date.
To set the dualtime (in short pushmode):
1. Crown should be in position 2.
2. Adjust the Dual time hand Fby pushing button Ato go back
1 hour per push orby pushingbutton Bto advance 1 hour
per push.
3. Pushcrown back into position 1; watch restarts,now set to
correct time.
To set the dualtime (in long pushmode):
1. Crown should be in position 3.
2. Adjust the Dual time hand Fby long pushing button A to go
back until reaching the desired hour or by long pushing button Bto advanceuntil reaching the desired hour.
3. Pushcrown back into position 1; watch restarts, now set to
correct time.
To set time zone reflectoring:
• Rotate clockwisely or unclockwisely the crown Z to set the
time zone.
1 – 2 – 3
A
Figure A
H
F
Z
S
M
J
B
5
Page 6

(3)DUAL-TIME MODELS- TYPE B
Dual-Time with 24-hour hand and date
Legend
0, 1, 2, 3 – Crown positions
A – Push (-)button to set dual time
B – Push (+) button to set dual time
H – Hour hand
M – Minute hand
S – Secondhand
F – Dual time hour hand (12 hrs)
J– 24hours hand
Z – Dual time minute hand (60 min)
K - Date window
Crown Positions:
Position 0 - Crownblockedand pushedinto case. Turn unclockwise to liberate the crown in position 1. Push and turn clockwiseto block the crown into case
Position 1 – Normal running position; crown liberated from the
case.
Position 2 – To set DATE and DUALTIME:Date setting and correction of dual time with the pushers.
Position 3 - To set TIMEand DUAL TIME: Time setting and rapid
correction of dual time with the pushers
Local time is indicated by the hour H, minute M and second S
hands,while left-mounted Dualtime hand indicates dual time
hours.
After changing the battery, before setting the time, check if the
dual time hour hand and dual time minute hand are at «0» (12
o’clock position). If either the dual time hour hand or the dual
time minute hand is not in the «0» position, reset it/them with
the following procedure:
1. Pullcrown out to position 2.
2. Keep the buttons A & B pressedat the same time for more
than 2 seconds, then release the buttons (dual time hands
move and return to where they were).
3. Pressbutton A or Bto reset the dual time hands to
«0»position.
Button A: dual time hour hand move clockwise.
Button B: dual time minute hand move clockwise.
Thedual time hands move quickly if the respective buttons
are kept pressed.
4. Pushcrown back in to position 1.
To set the localtime:
1. Pullcrown out to position 3, watch stops.
2. Rotate crown in either direction to move hands to desired
time.
3. Pushcrown back in to position 1; watch restarts, now set to
correct time.
Note :
The24 hour hand Jmoves correspondingly with the hour hand.
To set the date:
1. Pullcrown out to position 2.
2. Turnthe crown counterclockwise to set the date window K.
Do not set the date between 9:00pm and 2:00am. The date
window will notmove back by turning the crown clockwise.
3. Pushcrown back in to position 1; watch restarts, now set to
correct date.
To set the dualtime (Quick set):
1. Crown should be in position 1.
2. Adjust the Dual time hand Fby pushing button Ato go back
1 hour per push orby pushingbutton Bto advance 1 hour
per push.
To set the dualtime (Preciseadjustment):
1. Crown should be in position 3.
2. Adjust the Dual time hand Z by pushing button Ato go back
1 minute per push or by pushing button B to advance 1
minute per push.
3. Pushcrown back into position 1; watch restarts,now set to
correct time.
Note : The dual time minute hand Z rotates one revolution at
every quarter (15 minutes). Thereis no problem as it is typical
function of the movement.
1 – 2 – 3
A
Figure A
H
F
Z
S
M
J
B
K
6
Page 7

(4)MULTI-EYEMODELS – TYPEA
With day/date with or without 24-hour hand without pushers
1, 2, 3 – Crown positions
H – Hour hand
M – Minute hand
S– Seconds hand
J – 24 Hour hand
T – Date hand
D – Dayhand
Crown positions:
Position 1 – Normal running position; crown pushed into case.
Position 2 – To set DATE: Rotate crown clockwise.
Position 3 – To set TIME: Rotate crown in either direction.
To set the time:
1. Pull crown out to position3 when the secondhand is at the
12 o’clock position, watch stops.
2. Turncrown clockwise to advance the hour and minute hands
until the day hand is set to the desired day of the week, if
applicable for your model. The day hand will not move back
by turning the crown counterclockwise.
3. Turn crown in either direction to move hands to desired
time. The 24 hour hand Jis moving correspondingly with the
hour hand. When setting the minute hand, advance it 4 to 5
minutes ahead of the desired time and then turn it back to
the exact time.
4. Pushcrown back in to position 1; watch restarts, now set to
correct time.
To set the date:
1. Pull crown out to position2.
2. Turn the crown counterclockwise to set the date hand.
Do not set the date hand between 9:00pm and 2:00am.
Thedate hand will not move back by turning the crown
clockwise.
3. Pushcrown back in to position 1; watch restarts, now set to
correct date.
H
D
M
S
Figure A
J
1 – 2 – 3
H
S
M
Figure B
Legend
T
D
1 – 2 – 3
T
H
M
S
Figure C
J
1 – 2 – 3
7
T
Page 8

(4)MULTI-EYEMODELS – TYPE B
With day/date with retrograde sub-eyes without pushers
Legend
1, 2, 3 – Crown positions
H – Hour hand
M – Minute hand
S– Seconds hand
J – 24 Hour hand
T – Date hand
D – Dayhand
Crown positions:
Position 1 – Normal running position; crown pushed into case.
Position 2 – To set DATE: Rotate crown clockwise.
Position 3 – To set TIME: Rotate crown in either direction.
To set the time:
1. Pull crown out to position3 when the secondhand is at the
12 o’clock position, watch stops.
2. Turncrown clockwise to advance the hour and minute hands
until the day hand is set to the desired day of the week, if
applicable for your model. The day hand will not move back
by turning the crown counterclockwise.
3. Turn crown in either direction to move hands to desired
time. The 24 hour hand Jis moving correspondingly with the
hour hand. When setting the minute hand, advance it 4 to 5
minutes ahead of the desired time and then turn it back to
the exact time.
4. Pushcrown back in to position 1; watch restarts, now set to
correct time.
To set the date:
1. Pull crown out to position2.
2. Turn the crown counterclockwise to set the date hand.
Do not set the date hand between 9:00pm and 2:00am.
Thedate hand will not move back by turning the crown
clockwise.
3. Pushcrown back in to position 1; watch restarts, now set to
correct date.
H
D
M
S
Figure A
J
1 – 2 – 3
S
M
Figure B
1 – 2 – 3
8
T
T
J
H
D
Page 9

(5)MULTI-EYEMODELS – TYPE C
With day/date with or without 24-hours hand with pushers
Legend
1, 2 – Crown positions
A – Pushbutton to set the day
B – Pushbutton to set the date
H – Hour hand
M – Minute hand
S – Second hand
T – Date hand
J– 24-hourhand
D – Dayhand
Crown Positions:
Position 1 - Normal position. Crown pushed into case.
Position 2 - To set TIME: Rotate crown in either direction.
To set the time:
1. As soon as the second hand reaches 12 o’clock,
pull the crown out to position 2; watch will stop.
2. Turn crown in either directionto move hands to correct time,
taking AM/PM into consideration (J).
3. Pushcrown back into position 1.
To set the day andthe date:
1. Presspushbutton A to set the day. Eachpressand release
will advance the Day hand by one day.
2. Presspushbutton Bto setthe date. Eachpressand release
will advance Date hand by one number.
IMPORTANT:Never correct the Date when the time isbetween
9:00 PM and 4:00 AM when automatic calendar changes are in
progress;doingsocould damagethe mechanism.
3. Following a month with fewer than 31 days, you will need to
adjustthe Date.
Figure A
A
J
T
D
S
1 – 2
B
H
M
9
Page 10

(6)ANALOG CHRONOGRAPHS – TYPE A
With day/date/24-hour hand
Legend
1, 2, 3 – Crown positions
Button A – Start/Stop
Button B– Reset
H – Hour hand
M – Minute hand
S– Secondhand
P – Chronograph Minutes Counter
Q – Chronograph Seconds Counter
J– 24-Hour hand
K– Date window
Crown Positions:
Position 1 - Normal running position; crown pushed into case.
Position 2 - To set TIME: if no date function.
To set DATE: applicable with date function.
Position 3 - To set TIME: applicable with date function.
The time measured indicatedby the stopwatchhandsis independentfrom the center hands.
The stopwatchcan measure up to 30 minutes.
To set the time:
1. Pull crown out to position 2 when the second hand is at the
12 o’clock position, watch stops.
2. Turncrown in either direction to move hands to desired time.
*If applicable for your model, make sureto respect AM/PM (J)
*Do notpress any button, otherwise the chronographhands
will
move.
3. Pushcrown back in to position 1; watch restarts, now set to
correct time.
To set the date (if applicable):
If your watch has a date window, your crown will have 3 positions.
Position 2 is used to set the date:
1. Pull crown out to position2.
2. Turncrown clockwise until the correct date appears.
Crown Position 3 is usedto set the time as per above
explanation.
Simple Chronograph Functions:
To measure the duration of asingle, non-stop event (up to 60
minutes):
1. Presspushbutton A to start chronograph.
2. Presspushbutton A a second time to stop chronograph.
3. Presspushbutton B to reset chronographhands to zero.
Measuring Cumulative Times:
1. Presspushbutton A to start chronograph.
2. Presspushbutton A to stop chronographtiming.
3. Presspushbutton A to restart.
4. Repeatsteps 2 and 3 as many times as desired.
5. When through timing, pressbutton Bto reset chronograph
hands to zero.
Measuring SplitTimes:
1. Presspushbutton A to start chronograph.
2. Presspushbutton B to momentarily stop chronographand
read an intermediate or split time.
3. Presspushbutton B to restart; chronograph hands will
advance rapidly to catch up with ongoing event.
4. Repeatsteps 2 and 3 to take as many intermediate or split
times as desired.
5. Presspushbutton A to stop chronographtiming.
6. Presspushbutton B to reset chronographhands to zero.
Figure A
P
S
H
M
A
1 – 2 – 3
B
K
Q
J
10
Page 11

(6)ANALOG CHRONOGRAPHS – TYPE B
With day/date/24-hour hand and retrograde sub-eye
Legend
1, 2, 3 – Crown positions
Button A – Start/Stop
Button B– Reset
H – Hour hand
M – Minute hand
S– Secondhand
P– Chronograph Minutes Retrograde Counter
Q – ChronographSeconds Counter
J– 24-Hour hand
K– Date window
Crown Positions:
Position 1 - Normal running position; crown pushed into case.
Position 2 - To set TIME: if no date function.
To set DATE: applicable with date function.
Position 3 - To set TIME: applicable with date function.
The time measured indicatedby the stopwatchhandsis independentfrom the center hands.
The stopwatchcan measure up to 30 minutes.
To set the time:
1. Pull crown out to position 2 when the second hand is at the
12 o’clock position, watch stops.
2. Turncrown in either direction to move hands to desired time.
*If applicable for your model, make sureto respect AM/PM (J)
*Do notpress any button, otherwise the chronographhands
will
move.
3. Pushcrown back in to position 1; watch restarts, now set to
correct time.
To set the date (if applicable):
If your watch has a date window, your crown will have 3 positions.
Position 2 is used to set the date:
1. Pull crown out to position2.
2. Turncrown clockwise until the correct date appears.
Crown Position 3 is usedto set the time as per above
explanation.
Simple Chronograph Functions:
To measure the duration of asingle, non-stop event (up to 60
minutes):
1. Presspushbutton A to start chronograph.
2. Presspushbutton A a second time to stop chronograph.
3. Presspushbutton B to reset chronographhands to zero.
Measuring Cumulative Times:
1. Presspushbutton A to start chronograph.
2. Presspushbutton A to stop chronographtiming.
3. Presspushbutton A to restart.
4. Repeatsteps 2 and 3 as many times as desired.
5. When through timing, pressbutton Bto reset chronograph
hands to zero.
Measuring SplitTimes:
1. Presspushbutton A to start chronograph.
2. Presspushbutton B to momentarily stop chronographand
read an intermediate or split time.
3. Presspushbutton B to restart; chronograph hands will
advance rapidly to catch up with ongoing event.
4. Repeatsteps 2 and 3 to take as many intermediate or split
times as desired.
5. Presspushbutton A to stop chronographtiming.
6. Presspushbutton B to reset chronographhands to zero.
Figure A
P
S
H
M
A
1 – 2 – 3
B
K
Q
J
11
Page 12

(7)ANALOG CHRONOGRAPHS– TYPE C
Chronographs 1/10 Second
Legend
1, 2, 3 – Crown positions
Button A – Start/Stop
Button B– Reset
H – Hour hand
M – Minute hand
S– Secondhand
P– Chronograph Minutes hand
Q – ChronographSeconds hand
X – Chronograph1/10-of-a-seconds Chronograph hand
Crown Positions:
Position 1 - Normal running position; crown pushed into case.
Position 2 - To set TIME: if no date function.
To set DATE: applicable with date function.
Position 3 - To set TIME: applicable with date function.
The time measured indicatedby the stopwatchhandsis independentfrom the center hands.
The stopwatchcan measure up to 60 minutes.
The stopwatchmeasuresin 1/10 second increments.
To set the time:
1. Pull crown out to position 2 when the second hand is at the
12 o’clock position, watch stops.
2. Turncrown in either direction to move hands to desired time.
If applicable for your model, make sureto respect AM/PM
Do not press any button, otherwise the chronograph hands
will move.
3. Pushcrown back in to position 1; watch restarts, now set to
correct time.
To set the date (if applicable):
If your watch has a date window, your crown will have
3 positions. Position 2 is usedto set the date:
1. Pull crown out to position2.
2. Turncrown clockwise until the correct date appears.
Crown Position 3 is usedto set the time as per above explanation.
Simple Chronograph Functions:
To measure the duration of asingle, non-stop event (up to 60
minutes):
1. Presspushbutton A to start chronograph.
2. Presspushbutton A a second time to stop chronograph.
3. Presspushbutton B to reset chronographhands to zero.
Measuring Cumulative Times:
1. Presspushbutton A to start chronograph.
2. Presspushbutton A to stop chronographtiming.
3. Presspushbutton A to restart.
4. Repeatsteps 2 and 3 as many times as desired.
5. When through timing, pressbutton Bto reset chronograph
hands to zero.
Measuring SplitTimes:
1. Presspushbutton A to start chronograph.
2. Presspushbutton B to momentarily stop chronographand
read an intermediate or split time.
3. Presspushbutton B to restart; chronograph hands will
advance rapidly to catch up with ongoing event.
4. Repeatsteps 2 and 3 to take as many intermediate or split
times as desired.
5. Presspushbutton A to stop chronographtiming.
6. Presspushbutton B to reset chronographhands to zero.
1 – 2 – 3
Figure A
1 – 2 – 3
Figure B
M
H
S
S
M
X
B
A
T
P
Q
B
Q
A
X
H
P
12
Page 13

(8)ANALOG CHRONOGRAPHS – TYPEC
Chronograph with minutes and seconds hands and date
Legend
1, 2, 3 – Crown positions
Button A – Start/Stop
Button B– Reset
H – Hour hand
M – Minute hand
S– Secondhand
P – Chronograph Minutes hand
Q – Chronograph Seconds hand
K– Date Window
Crown positions:
Position 1 - Normal running position; crown pushed into case.
Position 2 - To set DATE: Rotate crown clockwise.
Position 3 - To set TIME:Rotate crown in either direction.
Settingthe time:
1. Pull crown out to position 3. Watch will stop.
2. Turncrown in either direction to move hands to correct time.
3. Pushcrown back into position 1.
Settingthe date:
1. Pull crownout to position2.
2. Turn crown clockwise until the correct date.
IMPORTANT: Never correct date between 9:00 PM and 3:00 AM
when
automatic calendar changesare in progress;doing so could
damage the mechanism.
3. Pushcrown back into position 1.
Chronograph Functions:
NOTE: After 2 hours of continuous running, the chronograph
stops and resetsautomatically to save battery.
Measuring Cumulative Times:
To measure the combined time of a series of shorter events:
1. Presspushbutton A to start chronograph.
2. Presspushbutton A to stop chronographand read
elapsedtime.
3. Presspushbutton A to resume measurement.
4. Repeatsteps 2 and 3 to add each interval of time.
NOTE: Eachtime you stop chronograph, chronograph hands will
indicate total accumulatedtime.
5. After final reading, push button Bto reset chronograph
hands.
Measuring SplitTimes:
To take intermediate time readings as an event progresses:
1. Pushbutton A to start timing.
2.Pushbutton Bto stop chronograph and read split time.
NOTE:Chronograph continues to run in background.
3. Pushbutton B to restart; chronograph hands to catch up with
ongoing event.
4. Repeatsteps 2 and 3 to take any additional split times.
5. Pushbutton A to stop chronograph.
6. Pushbutton B to reset chronograph hands.
Q
Figure A
P
S
M
1 – 2 – 3
B
K
H
A
13
Page 14

(9)AUTOMATIC
With or without 24-hour hand
Legend
1, 2 – Crown positions
H – Hour hand
M – Minute hand
S– Secondhand
J – 24 hours hand
Crown Positions:
Position 1 - Normal position. Crown pushed into case.
Position 2 - To set TIME: Rotate crown in either direction.
Automatic functioning:
NOTE:Automatic winding watch can also be hand winded by
turning the crown clockwisein Normal position. Wind several
times clockwise.It will start to move naturally.
To set the time:
1. Pull crown out to position2.
2. Turncrown in either direction to move hands to desired time.
3. Pushcrown back in to position 1; watch restarts, now set to
correct time.
*(24-hour hand moveslinked with the center Hour and Min-
ute
hand).
1 – 2
H
S
Figure A
Figure B
H
J
14
M
1 – 2
M
S
Page 15

(9)SPECIALFEATURES
SCREWDOWNCROWN
15
Somemodels are equipped with a specialscrew-down crown
that helps seal the case against water and moisture. Before
attempting to set the time or date, you must first unlock the
screw-down crown by turning it counterclockwise until it
loosens(approximately six rotations).
Unlocking is not requiredwith standard crowns.
A. To unlock the crown:
Rotate the crown counterclockwise (left) until it releases
from the case.
B. To re-lock the crown after time/date setting:
Rotate the crown clockwise (right) while pushingit in, and
tighten firmly.
A B
Page 16

(9)SPECIALFEATURES
MESHBRACELET SLIDINGCLASP
The mesh bracelets found on select modelsfeature a hooking
jewelry clasp that allows you to size the bracelet by sliding
the pin-bar half of the clasp along the bracelet to achieve a
customized fit.
Above: Open mesh bracelet side with pin-bar halfof sliding
clasp locked in position.
To size the bracelet:
1. Use tool such as a small flat-head screwdriver to pop open
metal plate on pin-bar half of clasp, releasing the claspposition
locking mechanism.
2. Slide pin-bar halfof clasp along the mesh bracelet in either
direction to desired position.
3. Close metal plate, locking the pin-bar half of the clasp in new
position on the bracelet.
16
Page 17

CAREAND MAINTENANCE
17
YourHUGOBOSSWATCHhas been developed with meticulous attention to quality, function and detail. Pleaseread the following information and instructions carefully to learn about the features, proper care and operation of your new timepiece.
Foradditional information on service and repairs,pleaseseethe Serviceand Warranty section.
Never open the watch yourself. If your watch needs repair or adjustment, take or mail it directly to an authorized Service
Center. Fora complete worldwide listing, visit us online at www.mgiservice.com
SHOCK
All of our watches have shock-resistant movements and are tested to meet international standards for shock resistance.
MAGNETISM
Theexposure of a timepiece to a strong magnetic field will affect its time-keeping, and may causeit to stop. A quartz watch
should resume working with its original accuracy when removed from the magnetic field; an automatic or hand-wound mechanical timepiece, however, may require demagnetization before it will operate again.
WATERRESISTANCE
All our watches are tested to meet international standards for water resistance. Most styles are water resistant to 3 bar
(3ATM/30 meters/99feet); certain modelsare water resistant to even greater pressures,as marked on the dial or case-back.
Theseindications do not correspond to a diving depth but rather refer to the pressureat which the tests required to meet
the international water resistance standard were conducted.
CAUTION: If the water resistance limit is not marked on your watch, do not subject it to a pressure/depth greater than 3 bar
(3 ATM/30 meters/99 feet), or your watch could be damaged and your warranty will be voided. Do not operate the watch
crown, push-buttons on a chronograph model, or any other pushers/buttons when the timepiece is wet or under water.
Water resistance applies only to the watch case;some watch straps should not be worn under water or subjected to wet
conditions. PleaseseeSTRAPCARE.
Avoid exposing your watch to sudden and excessive temperature variations.
Do not drop your watch or bang it against a hard surface. Water resistance must be recheckedafter every violent shock.
Carefully wipe your watch using a soft cloth dampened with fresh water after exposure to chlorine or seawater.
OTHERPRECAUTIONS:
If your watch is equipped with a screw-down crown, be sure to screw it back down into the caseafter every operation.
STRAP CARE
While the life span of a watch strap dependson your careand wearing habits, as well as the climate in which you live,
proper care will extend its life.
Leather strap should be kept dry. Exposure to water may cause a leather watch strap to become brittle and eventually
break. To preserve the finish of the leather, contact with perfumes should be avoided. Following exposureto chlorinated or
salt water, gently damp wipe your leather strap with fresh water, and air dry.
To help preserve the natural elasticity and quality of a silicone or rubber strap, rinse it using a soft cloth soakedin fresh water following exposureto salt water, chemicalsor abrasivesubstances.
Use warm water and a neutral pH soapapplied to a soft cloth to gently clean a white silicone or rubber strap; then wipe
with a second clean cloth dipped in warm water, or rinse carefully under warm running water. Contact with acetone and
ethyl alcohol should be avoided.
NOTE: Watchstraps arenot covered by the watch warranty.
BATTERY INFORMATION
Your quartz analog watch or chronograph hasa battery speciallydesignedfor watches. It will last approximately 18-36
months under normal use.
Page 18

CAREAND MAINTENANCE
NOTE: Frequent useof special functions, like the stopwatch timer on chronograph models,may shorten battery life.
End-of-lifefeature: The second hand on many models will start to move haltingly in 2 or 4 secondincrements when the
battery is almost exhausted, signalingthe need to have it replaced.
Battery replacement:Takeor sendyour watch to an Authorized Service Centerto have battery changed – your old battery
will be disposedof/recycled properly. Do not attempt to changethe battery yourself.
Collectionand treatment of endof life quartz watches*
This product should not be discardedwith household waste. To protect the environment and human health, it must
be returned to a local authorized collection system for proper recycling.
*Validin the EU member states and in any countrieswith corresponding legislation.
18
Page 19

WARRANTY INFORMATION
19
WARRANTY INFORMATION
Not only is each Hugo Boss watch beautiful in design, it is crafted with quality materials and components to offer precise,
reliable performance. Weproudly stand behind every Hugo Bosswatch we sell.
HugoBossWatchesLimitedWarranty
Hugo Boss Watches warrants to the original consumer that, for a period of two (2) years from the date of purchase, his/
her watch will be free from defects in materials and workmanship that prevent the watch from functioning properly under
normal use.
Our responsibility for defects covered by this warranty is limited to repairing or (at the solediscretion of Hugo Boss Watches)replacing the defective watch, free of charge.
This limited warranty does not cover batteries, straps, bracelets, crystals, gold- or ionic-plating or PVD finishing, cosmetic
issues such as scratches or normal wear and tear, or any damage arising from accidents or misuse, or from any alteration,
serviceor repair performed by any party other than a Hugo Boss Watches Authorized ServiceCenter.
This warranty is void if the timepiece was not purchased from an Authorized Hugo Boss Watches Dealer, as evidenced by
valid proof of purchase– adated sales or gift receipt showing the name of the retailer and an identifying style number for
the Hugo Bosswatch.
Any other warranty provided by the retailer is entirely their responsibility. No person or company is authorized to change
the terms of this warranty. This warranty gives the consumer specific legal rights. He/she may also have other statutory
rights which may vary from state to state and country to country. However, to the extent not prohibited by law, this limited
warranty is exclusive and in lieuof all other warranties, oral, written, statutory, express or implied (including without limitation the warranties of merchantability and fitness for a particular purpose),all of which are expresslydisclaimed.
Page 20

OB TAININ G S E RVICE
20
Should your HUGO BOSSwatch require service or repair, you may take it to an Authorized HUGO BOSS Watches Dealer,
or mail it directlyto one of the HUGO BOSSWatches AuthorizedService Centers found on this website– justreturn to the
HUGO BOSS Watchesservice websitehomepageand click onthe Warranty andService Informationlink.
Be sureto include your completereturn address and phone numberalong with a brief note describingthe problem with
your watchand/or serviceneeded.
NOTE:To obtain serviceunder the HUGOBOSSWatches two-year limited warranty, you will be required to present dated
proof of purchase.
Seepreceding Warranty Information sectionfor requirements.
OUTOF WARRANTY
The Hugo BossWatches Service Center can also perform repairs not covered by the Hugo BossWatches warranty as well as
service after the expiration of the warranty period. Shouldyour watch require parts or service not covered under the terms
of your warranty, a written estimate will be sent for your approval and payment before the work is undertaken. Pleasecopy
and usethe form(s) from this file.
BATTERY REPLACEMENT
TheHugo bossWatchesServiceCenter can alsochange the battery on your Hugo Bosswatch, for a fee.
PACKING YOUR WATCH
When mailing your watch, it shouldbe packedsecurely in padded wrapping materials (for protection against shock) ina
sturdy box sealedwith tape.
CAUTION: Do not usethe gift box your watch came in. It was not designedto withstand shipping, and your watch could be
damagedin transit. We recommend that you useregistered mail and insure your watch for its full replacement value.
INSURINGYOURWATCH
Werecommend that you use registered mail and insureyour watch for its full replacement value.
ADDITIONAL INSTRUCTIONS
Chargeswill be made for all repairs unless the original dated purchaseor gift receipt showing the name of the retailer and
an identifying watch style number is returned with the product, and repairs are covered under terms of warranty.
Authorized Service Center locations can be accessedfrom the link on the www.mgiservice.com/hugoboss homepage.
 Loading...