


BEDIENUNGSANLEITUNG
ENGLISH
MANUAL
DEUTSCH
illustrations
-50+5-50+5
-50+5
0510
INPUT
FOOT
SWITCH
BASSMID
TREBLE
POWER
LEADTONE CONTROLS CLEANREVERB
MAX. POWER
CONSUMPTION 100 VA
CAUTION!
TO PREVENT THE RISK OF FIRE AND SHOCK HAZARD DON´T
EXPOSE THIS APPLIANCE TO MOISTURE OR RAIN.
DO NOT OPEN CASE;
NO USER SERVICEABLE PARTS INSIDE.REFER SERVICING TO
QUALIFIED SERVICE PERSONNEL.
FX-LOOP
SEND
RETURN
Ser. No.
50 - 60 Hz
230 V~ T 0,5 A
117 V~ SB 1000 mA
100 V~ SB 1000 mA
LEAVE ENOUGH SPACE FOR PROPER VENTILATION!
REAR PANEL MAY BECOME TOO HOT TO TOUCH!
20 WATTS
@
8 -16 OHMS
EXTERNAL SPEAKER
NEVER USE THIS AMP
WITHOUT SPEAKERS CONNECTED!
MADE IN ST. WENDEL GERMANY
ENGLISH
DEUTSCH
HOME

WE’RE DELIGHTED THAT YOU CHOSE TO PURCHASE
AN HUGHES & KETTNER EDITION TUBE!
loudspeaker do their part to give the EDITION TUBE the kind of
sonic wallop you need to be heard loud and clear at
rehearsals and club gigs.
The EDITION TUBE delivers mighty all-tube tone in Hughes &
Kettner’s handy Edition format. Sporting two channels and a
nifty retro design, it mates simple functional elegance to
bodacious tube tone, giving you an easy-to-use, portable
combo that looks and sounds great.
The EDITION TUBE’s Clean channel delivers a remarkably varied
spectrum of vintage sounds from squeaky-clean yet warm
skank to rough-and-ready blues-approved bite, and all points
in between. Taking up where Clean leaves off, the Lead
channel ups the dirt factor, giving you the full bandwidth, from
a throaty growl to creamy,
searing rock lead tone.
Two EL84 tubes toil away in the EDITION TUBE’s engine room they’re responsible for the amp’s striking sound. These power
amp tubes are known and cherished by tube freaks for a
unique property - they begin saturating at medium volume
levels, and squeezing the signal with ever so sweet
compression. And that’s why the EDITION TUBE is better suited
for situations that call for moderate volume levels.
However, we’re not talking wallflower here - au contraire, it
can rock out with the best of them. Living up to Hughes &
Kettner’s rep for building ultra-responsive tone generating
machines, the preamp reacts very dynamically to your touch,
and packs plenty of punch when you attack those strings
hard. With a back that is almost fully closed, the cabinet
provides additional bottom end oomph. Twenty genuine tubedriven watts and the 12" Celestion RockDriver Junior
Rounding out the EDITION TUBE’s complement of features are
a variable spring reverb, an effects loop, and a connector for
external cabinets. But then that shouldn’t come as a huge
surprise because any Hughes & Kettner amp boasting the
“EDITION” mark of distinction promises a touch of class.
HERE’S YOU WISHING YOU LOTS OF FUN WITH THE
TONE OF YOUR EDITION TUBE!
BEFORE POWERING UP
• Check that your local wall socket voltage and the
amp's AC power rating are identical before you plug
the amp in.
• Ensure air can circulate around your amp's ventilation
ducts.
• Make sure the amp sits securely on a stable platform
where it is not exposed to mechanical shocks or
temperature extremes which may damage the amp
or endanger the safety of bystanders.
• Hughes & Kettner is not liable for damages due to
improper use.
HOME

TABLE OF CONTENTS
SAFETY PRECAUTIONS . . . . . . . . . . . . . . . . . . . . . . . . . . . . . .
BEFORE POWERING UP . . . . . . . . . . . . . . . . . . . . . . . . . . . . .
1.0 JACKS AND CONTROLS . . . . . . . . . . . . . . . . . . . . . . . . . .
2.0 STANDARD SETUP/CABLE CONNECTIONS . . . . . . . . . . .
3.0 OPERATION . . . . . . . . . . . . . . . . . . . . . . . . . . . . . . . . . . . .
3.1 SELECTING SOUNDS . . . . . . . . . . . . . . . . . . . . . . . . . . . . .
3.2 USING SIGNAL PROCESSORS . . . . . . . . . . . . . . . . . . . . .
4.0 REPLACING TUBES, SERVICE
AND PREVENTIVE MAINTENANCE . . . . . . . . . . . . . . . . . .
5.0 TROUBLESHOOTING . . . . . . . . . . . . . . . . . . . . . . . . . . . . .
6.0 TECHNICAL SPECIFICATIONS . . . . . . . . . . . . . . . . . . . . . .
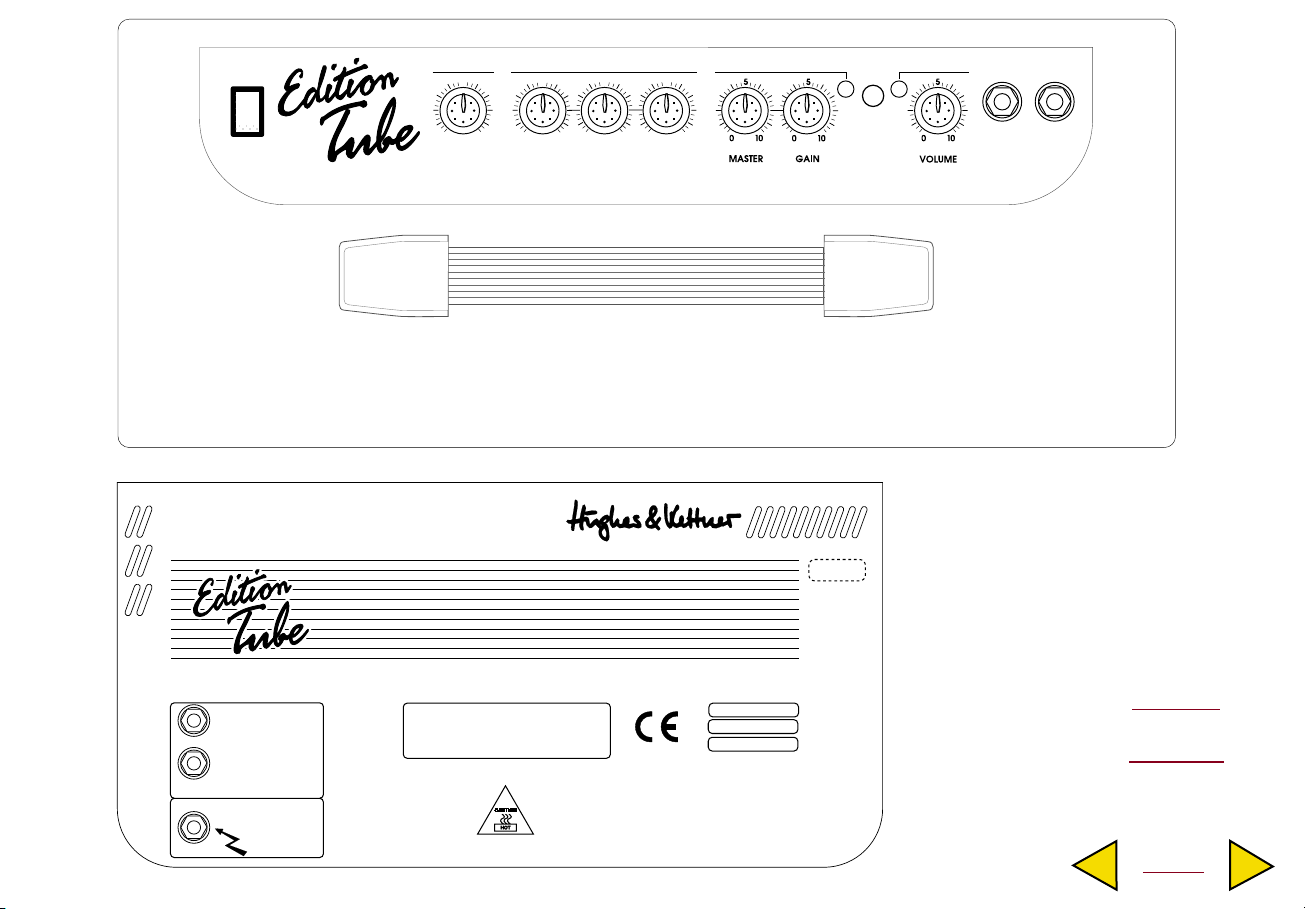
1.0 JACKS AND CONTROLS
RED CHANNEL SELECT LED: This one illuminates up to indicate
the LEAD channel is active.
GAIN: Rotate this knob to determine the amount of distortion
in the LEAD channel.
MASTER: Dial this knob to control the LEAD channel’s volume
level.
EQ SECTION: The Bass, Mid and Treble knobs affect both
channels. Mid and Treble influence one another, an attribute
considered normal and desirable in a tube amp. Boosting
treble decreases midrange honk and vice versa: jacking up
the mids cuts back on the high-end shimmer.
REVERB: Controls the intensity of the on-board reverb effect.
INPUT: Plug your guitar into this jack.
FOOTSWITCH: Plug a footswitch (e.g. the Hughes & Kettner TTY-
1) into this jack when you want to change channels remotely.
If you choose to use a footswitch, make sure that the
CHANNEL SELECT switch is set to the CLEAN channel (yellow
LED lights up).
VOLUME: This knob controls the CLEAN channel’s volume and
saturation levels. Depending on your guitar’s output level, you
can dial in fat, crunchy sounds at higher VOLUME settings.
YELLOW CHANNEL SELECT LED: Lights up to indicate the CLEAN
channel is active.
CHANNEL SELECT BUTTON: This selector lets you change
channels by pushing the button by hand as opposed to
stomping on a footswitch, which is also an option.
POWER: The EDITION TUBE’s mains power switch.
MAINS IN: Connect the included Euro-norm mains cord to this
socket. Ensure the amp's voltage rating matches your local AC
power rating before you plug the cord into the wall outlet.
EXTERNAL SPEAKER: Use this jack to connect external speaker
enclosures with an overall impedance ranging from 8 to 16
ohms (an 8-ohm cabinet, for example, would work nicely). The
internal loudspeaker remains in operation.
RETURN: Connect this jack to the output of your signal
processor.
SEND: Connect this jack to the input of your signal processor.
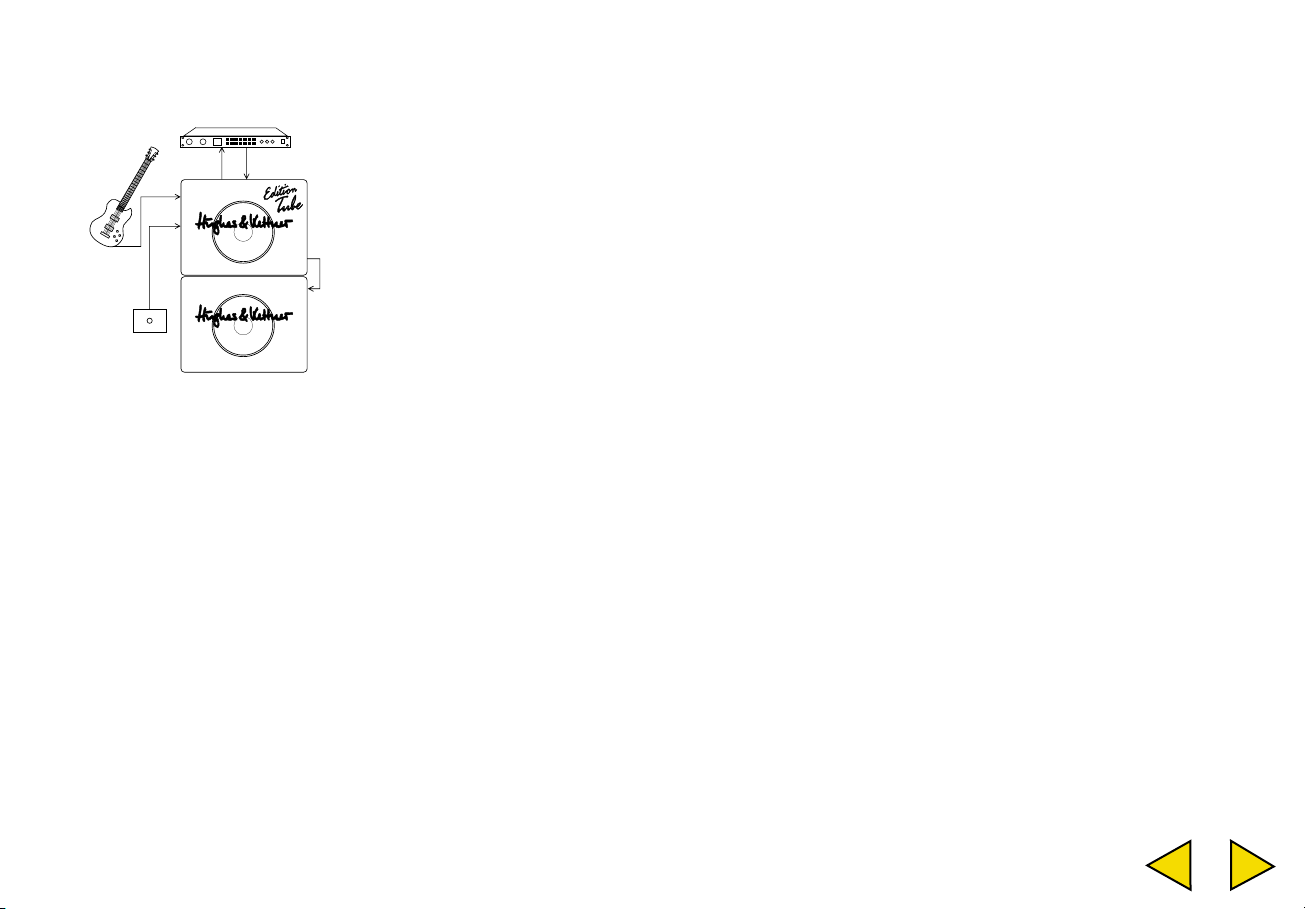
2.0 STANDARD SETUP/CABLE CONNECTIONS
FX-UNIT
IN OUT
SEND RETURN
INPUT
SPEAKER OUT
FOOTSWITCH
FS-1
3.0 OPERATION
3.1 SELECTING SOUNDS
• Now adjust the LEAD MASTER to dial in the desired balance
of levels between the LEAD and CLEAN channels.
3.2 USING SIGNAL PROCESSORS
The EDITION TUBE is equipped with a serial effects loop. This
means that the entire preamp signal is routed to the FX device
and processed there. For this reason, use only high-quality
signal processors that do not color the signal unnecessarily,
add undue noise, or impair its sound quality.
CONNECTING EFFECT DEVICES:
• Connect the SEND jack to the processor‘s input, and the
RETURN jack to the processor‘s output.
• To avoid noise, signal loss, and signals from being cut off, use
high-quality patch cords only.
When you’re ready to tweak the settings for both of the
fundamental sounds that the EDITION TUBE has to offer, we
recommend you proceed as follows:
• Dial in all your sound settings with the guitar’s volume knob
turned all the way up so that it give the amp the highest
possible level to work with.
• First concentrate on tuning the CLEAN channel VOLUME
knob to dial in the desired volume level and amount of
overdrive.
• Once you’re satisfied with that sound, activate the LEAD
channel and use the GAIN knob to shape the second
fundamental sound to suit your taste.
• Make sure the processor is not distorting the signal. Check
the processor's level meter and use its input and output
controls to dial in a suitable level.
• Unless you’re going for bizarre lo-fi effects, distortion devices
are not designed for use in an FX loop. As a rule of thumb,
any kind of device that compresses the signal should be
connected first in the signal chain. Depending on the type of
effect you want to achieve, you may want to connect a
compressor to the amp's input.
• If you are using several processors or stomp boxes, ensure
you connect them in the proper sequence.

Volume pedals, wah-wahs and the like evoke a slightly
different sound and elicit a different response when you plug
them into the EDITION TUBE’s front panel input rather than the
effects loop. Both can sound hip, so which option you choose
is a matter of personal preference.
4.0 REPLACING TUBES, SERVICE AND
PREVENTIVE MAINTENANCE
power supply dips below a minimum value, all-tube amps tend
to malfunction when the power level rises above a certain
value. Generators and faulty high-power circuits often cause
these power fluctuations.
• Did a fuse trip although there was no plausible cause?
Aging fuses, particle ionization in the tube or spark-over due to
power spikes may cause this type of problem. In this case,
replacing a tube will not solve the problem.
Your EDITION TUBE features factory-equipped EL84 and 12AX7A
tubes. They are first burned in and then checked for their
electrical and mechanical properties (microphonics), selected
and matched, and then given a final audio and response test
once they have been installed in a EDITION TUBE. One of the
most important steps in the testing process is power tube
matching, i.e. selecting and pairing tubes with identical
characteristics.
WHEN SHOULD YOU REPLACE TUBES?
The tubes in your EDITION TUBE are of exceptionally high
quality and will last extremely long. If you do encounter a
problem, first check whether one of the following situations
apply:
• Is the defect a problem caused by a faulty or worn-out tube,
or is there actually a peripheral problem, for instance a
defective speaker cable that caused damage to the tube? If
this is the case, unless you correct the defect first, the problem
will recur once you have installed a new tube.
• Did the AC power supply fluctuate during operation?
Whereas digital equipment often malfunctions when the
• Old tubes begin to show signs of wear after they have been
in operation for a very long time: increased microphonics and
noise, treble loss, weak power output, muddy sound, etc. are
all indicators of pending tube failure. Power amp tubes wear
out faster than preamp tubes. If you encounter these
problems, replace the tubes. Not only do old tubes sound bad,
they also have a tendency to fail altogether.
NOTE: We recommend you refrain from exchanging tubes
solely for sound experimentation purposes. Improper use runs
the risk of damaging your amp and will not be covered under
warranty. Besides, we tested every conceivable tube option
and installed the tube types
that deliver the best possible performance.
KEEP THE FOLLOWING IN MIND WHEN YOU ARE READY TO
REPLACE TUBES:
• We recommend only qualified service personnel replace
tubes.
• Before removing the chassis, ensure the mains cord is
unplugged from the wall socket! Wait at least 2 minutes for
the amp to power down.

• If you are replacing a power amp tube, ensure the
replacement tube bears identical specs.
• Use only matched pairs of power amp tubes.
• If you install a matched pair of tubes bearing precisely the
same specs as the original tubes, the amp does not have to
be re-biased. Conversely, if the specs are not identical, the
amp must be biased. Biasing is a complex procedure
requiring special tools and should only be executed by a
qualified amp technician.
HOW CAN YOU EXTEND THE LIFE OF YOUR TUBES?
• Never operate the EDITION TUBE without a proper load
(speaker) connected to the output.
- Be very careful about the kind of peripheral devices you
connect to your amp and always check out their specs before
you plug them in. Never connect speaker cabinets with an
impedance (ohm) rating lower than the EDITION TUBE is
designed to handle. Under no circumstances should you
connect devices with high output signal levels (e.g. power
amps) to your amp’s input.
- Be sure the AC power source delivers the current that your
amp is designed to handle before you plug it in. When in
doubt about the local rating, ask the venue’s sound
technician or a stage hand.
- Refrain from DIY repairs! To be on the safe side, you should
also have a qualified technician replace internal fuses.
Switch the amp off and let the tubes cool down before
transport. A quality flight case is a good investment and is only
slightly more expensive than a complete set of tubes.
• Proper bias and trim are essential. If you find the tubes need
to be replaced too often, consult a qualified technician.
All other EDITION TUBE components do not require
maintenance. Use a slightly dampened cloth for all metal
parts and the exterior surfaces. Avoid exposure to mechanical
shocks, extreme heat, dust and moisture. Ensure the cooling
vents are not obstructed during operation.
Here are a few more basic rules that will extend the service life
of your amp enormously if you follow them:
- Make sure all peripheral devices and connecting cables are
in a state of good repair! - Ensure plenty of air can circulate
around the amp’s ventilation slots at all times - your EDITION
TUBE’s life depends on it.- Definitely avoid exposure to
mechanical shocks and extreme heat, dust and particularly
moisture.
5.0 TROUBLESHOOTING
1) The EDITION TUBE is not getting any power:
• Check the mains cable to see if it is connected properly.
• The mains fuse may be defective. Replace the fuse with
another identical fuse. If this fuse also trips, consult your
Hughes & Kettner dealer.
2) The EDITION TUBE is connected properly, but no sound is
audible.
• One or several GAIN and MASTER controls may be turned all
the way down. Dial in a higher setting.
• A short circuit in the speaker signal chain may have tripped
an internal fuse, or one of the power tubes is defective.
Replace the speaker cable and have a qualified service
technician replace the fuse/tube (identical specifications
are a must). Please read Section 4.0 on how to replace
tubes correctly.

3) The sound is slightly distorted and you cannot get a truly
clean tone.
• The input section is being overdriven. Depending on the type
of pickups in your guitar, this effect is very pronounced or
may not be audible at all. If you don't want this slight
distortion (although many players prefer a little dirt in their
sound), reduce the volume of your guitar or volume pedal,
turn the screws on the frame of your pickups so the distance
between the strings and pickups is greater, or try a different
combination of pickups.
• If the distortion has an annoying gritty edge to it, there may
be some type of fault due to improper use of a signal circuit,
for instance a speaker output connected to the EDITION
TUBE's input. In this case, consult your Hughes & Kettner
dealer.
4) You have connected an FX processor to the SEND jack and
the signal is totally distorted, even when you have dialed in
a clean sound.
• The LINE OUT signal is overloading the input of the FX
processor. Reduce the processor‘s input sensitivity ("INPUT" or
"GAIN").
6.0 TECHNICAL SPECIFICATIONS
PREAMP SECTION:
INPUT: -20 dBV/ 1 MOhm
FX-RETURN: 0 dBV/ 47 kOhms
FX-SEND: 6 dBV/ 100 Ohms
POWER AMP SECTION:
EL84 tube amp
OUTPUT POWER: 20 W RMS (into 8 Ohms)
FREQUENCY RESPONSE (1W): 20 Hz - 25 kHz
SPEAKERS:
CELESTION Rock Driver Junior, 12“, 8 Ohms
GENERAL TECHNICAL DATA:
VOLTAGE: 230 V~ (European model)
117 V~ (North American model)
100 V~ (Japanese model)
5) You have connected an FX processor to the SEND jack of
the EDITION TUBE and the signal's volume level is way too
low.
• The FX processor's output level is set incorrectly. Turn it up.
MAX. POWER-CONSUMPTION: 100 VA
MAINS FUSE: Slo-Blo 500 mA (230 V model)
Slo-Blo 1000 mA (117 V model)
Slo-Blo 1000 mA (100 V model)
ANODE FUSE: 1x Slo-Blo 200 mA
SECONDARY FUSES: 1x Slo-Blo 100 mA (low voltage)
DIMENSIONS 555 x 480 x 260 mm
(22“ x 19“ x 10 1/4“)(W x H x D)
WEIGHT: 16 kg (35 lb.) (approx.)

WIR FREUEN UNS, DASS SIE SICH FÜR EINEN
HUGHES & KETTNER EDITION TUBE
ENTSCHIEDEN HABEN!
Der EDITION TUBE bietet amtlichen Vollröhrensound im
kompakten Hughes & Kettner Edition-Format. Mit seinen
beiden Kanälen und dem bewährten Retro-Design vereint er
funktionelle Schlichtheit und großartigen Röhrenton in einem
portablen, einfach zu bedienenden Combo.
Der Clean-Kanal des EDITION TUBE bietet ein breites Spektrum
an Vintage Sounds, vom warmen Clean-Ton bis zum rotzigen
Blues. Daran knüpft der Lead Kanal nahtlos an, dessen
Bandbreite bis zum cremigen, singenden
Rock´n Roll Solosound reicht.
Seine besonderen Soundqualitäten schöpft der EDITION TUBE
aus den beiden EL84 Röhren in der Endstufensektion. Ihre
herausragende Eigenschaft ist es, schon bei mittleren
Lautstärken kräftig in die Sättigung zu gehen und feine
Kompression zu erzeugen. Somit eignet sich der EDITION TUBE
speziell für Situationen, in denen eher eine moderate
Lautstärke gefragt ist.
Dabei kann er aber auch richtig kraftvoll zur Sache gehen.
Seine Eingangsstufe reagiert in bester Hughes & Kettner Manier
sehr dynamisch auf den Anschlag und liefert somit den
Grundstein für eine druckvolle Wiedergabe. Die fast
geschlossene Gehäuserückwand sorgt für zusätzlichen Punch
im Bereich der Bassfrequenzen. 20 satte "Röhrenwatt" und der
12" Celestion RockDriver Junior Lautsprecher tun ihr übriges, um
dem EDITION TUBE für den Proberaum und für Clubgigs das
nötige Pfund Durchsetzungskraft mitzugeben.
Ein regelbarer Federhall, ein Effektweg und die Buchse für den
Anschluss einer Zusatzbox vervollständigen die Ausstattung des
EDITION TUBE. Denn ein wenig Luxus darf bei einem Hughes &
Kettner Amp mit dem Prädikat
EDITION natürlich nicht fehlen.
WIR WÜNSCHEN IHNEN VIEL FREUDE UND SPASS
AM "TONE" MIT IHREM EDITION TUBE!
VOR DER INBETRIEBNAHME
• Vergewissern Sie sich vor dem Anschluß des EDITION TUBE,
daß der nahe der Netzbuchse angegebene Spannungswert
mit der vorhandenen Netzspannung übereinstimmt.
• Stellen Sie eine ausreichende Luftzufuhr an die Kühlschlitze
des Gerätes sicher.
• Achten Sie auf einen festen Stellplatz, der mechanische und
thermische Fremdeinwirkungen, welche die
Betriebssicherheit des Gerätes oder die Sicherheit von
Personen beeinträchtigen könnten, ausschließt.
• Für Schäden am Gerät, die durch unsachgemäßen Betrieb
entstehen, wird seitens des Herstellers keine Haftung
übernommen.
HOME

INHALT
ROTE CHANNEL SELECT LED: Zeigt den aktiven LEAD Kanal an.
WICHTIGE SICHERHEITSHINWEISE
VOR DER INBETRIEBNAHME . . . . . . . . . . . . . . . . . . . . . . . . . .
1.0 ANSCHLÜSSE UND BEDIENELEMENTE . . . . . . . . . . . . . . . .
2.0 STANDARD SET UP/VERKABELUNG . . . . . . . . . . . . . . . . . .
3.0 BEDIENUNG DES EDITION TUBE . . . . . . . . . . . . . . . . . . . . .
3.1 DIE ABSTIMMUNG DER GRUNDSOUNDS . . . . . . . . . . . . .
3.2 DER EDITION TUBE MIT EFFEKTGERÄTEN . . . . . . . . . . . . . .
4.0 RÖHREN, WARTUNG & PFLEGE . . . . . . . . . . . . . . . . . . . .
5.0 MÖGLICHE FEHLERQUELLEN / TROUBLESHOOTING . . . . .
6.0 TECHNISCHE DATEN . . . . . . . . . . . . . . . . . . . . . . . . . . . . .
1.0 ANSCHLÜSSE UND BEDIENELEMENTE
INPUT: Eingang zum Anschluß der Gitarre.
FOOTSWITCH: Anschlußbuchse für einen Fußschalter (z.B.
Hughes & Kettner FS-1) zum Umschalten zwischen den
Kanälen. Der CHANNEL SELECT Schalter muss dabei auf den
CLEAN Kanal geschaltet sein (gelbe LED leuchtet).
VOLUME: Regelt die Lautstärke und Sättigung des CLEAN
Kanals. Bei höheren VOLUME Einstellungen (abhängig vom
Ausgangspegel der Gitarre) können satte Crunchsounds
realisiert werden.
GAIN: Regelt den Grad der Übersteuerung im LEAD Kanal.
MASTER: Regelt die Lautstärke des LEAD Kanals.
KLANGREGELUNG: Gemeinsame Bass, Mid und Treble Regler für
beide Kanäle. MID und TREBLE beeinflussen sich (wie bei
Röhrenamps üblich und erwünscht) gegenseitig: eine
Höhenanhebung bewirkt eine Mittenabsenkung und
umgekehrt.
REVERB: Regelt den Anteil des integrierten Hall-Effektes am
Gesamtsound.
POWER: Netzschalter des EDITION TUBE.
MAINS IN: Netzbuchse für das mitgelieferte Euronetzkabel.
Bevor der Netzstecker eingesteckt wird, vergewissern Sie sich,
daß die vorhandene Netzspannung mit dem angegebenen
Wert übereinstimmt.
EXTERNAL SPEAKER: Buchse zum Anschluß von
Lautsprecherboxen, deren Gesamtimpedanz zwischen 8 Ohm
und 16 Ohm liegt (z.B. eine 8 Ohm- Box). Der interne
Lautsprecher bleibt dabei in Betrieb.
RETURN: Verbinden Sie diese Buchse mit dem Ausgang Ihres
Effektgerätes.
GELBE CHANNEL SELECT LED: Zeigt den aktiven CLEAN Kanal
an.
CHANNEL SELECT Schalter: Wahlschalter zum manuellen
Umschalten zwischen den Kanälen. Diese Schaltfunktion ist
ebenfalls via Fußschalter ausführbar.
SEND: Verbinden Sie diese Buchse mit dem Eingang Ihres
Effektgerätes.

2.0 STANDARD SET UP / VERKABELUNG
FX-UNIT
IN OUT
SEND RETURN
INPUT
SPEAKER OUT
FOOTSWITCH
FS-1
3.0 BEDIENUNG DES EDITION TUBE
3.1 DIE ABSTIMMUNG DER GRUNDSOUNDS
Möchten Sie beide Grundsounds des EDITION TUBE nutzen, so
empfehlen wir die folgende Vorgehensweise:
• Nehmen Sie sämtliche Soundeinstellungen bei maximalem
Ausgangspegel an der Gitarre vor.
• Konzentrieren Sie sich zunächst auf die Abstimmung des
VOLUME Reglers im CLEAN Kanal, stellen Sie die gewünschte
Lautstärke / den gewünschten Übersteuerungsgrad ein.
• Schalten Sie nun auf den LEAD Kanal um und stimmen Sie
mit GAIN den zweiten Grundsound entsprechend ab.
• Mittels LEAD MASTER wird nun das Lautstärkeverhältnis
zwischen LEAD- und CLEAN Kanal festgelegt.
3.2 DER EDITION TUBE MIT EFFEKTGERÄTEN
Der EDITION TUBE ist mit einem seriellen Effektweg ausgestattet.
Dabei wird das Vorstufensignal des Amps komplett durch ein
eingeschleiftes Effektgerät geführt und bearbeitet. Verwenden
Sie daher nur hochwertige Effektgeräte, die das Signal nicht
unnötig verfälschen oder verschlechtern.
ANSCHLUSS DES EFFEKTGERÄTES:
• Verbinden Sie die SEND Buchse mit dem Input, die RETURN
Buchse mit dem Output Ihres Effektgerätes.
• Verwenden Sie ausschließlich hochwertige Patchkabel, um
Signalverluste, Störgeräusche oder Aussetzer zu verhindern.
• Achten Sie stets darauf, daß das Effektgerät nicht
übersteuert wird. Beachten Sie dazu ggf. die Aussteuerungsanzeige des Effektgerätes und benutzen Sie ”Input” und
”Output” Regler am Effektgerät zum Auspegeln.
• ”Verzerrer” haben im Einschleifweg nichts zu suchen.
Grundsätzlich gehören komprimierende Effekte immer an
den Anfang der Signalkette. Auch Kompressoren sollten (je
nach gewünschtem Soundeffekt) ggf. vor den Input des
Amps geschaltet werden.
• Achten Sie immer darauf, daß mehrere eingeschleifte
Effektgeräte in korrekter Reihenfolge angeschlossen werden.
Volumepedale, Wah-Wah’s u.ä. haben vor den EDITION TUBE
geschaltet ein anderes Soundverhalten als im Effektweg - hier
entscheidet Ihr persönlicher Geschmack.

4.0 RÖHRENTAUSCH, WARTUNG UND PFLEGE
Der EDITION TUBE ist ab Werk mit EL84 und 12AX7A Röhren
bestückt. Sie werden nach dem “Burn-In” (ein erster Dauerlauf
unter Last) in aufwendigen Selektionsverfahren auf ihre
elektrischen Werte, mechanische Beschaffenheit (Mikrofonie),
und darüber hinaus im akustischen Test am fertigen Gerät auf
ihr Soundverhalten geprüft. Einer der wichtigsten Schritte ist
dabei das “Matching” (also Zusammenstellen von
Röhrensätzen gleicher Kennlinie) für die Endstufenbestückung.
WANN IST EIN RÖHRENTAUSCH SINNVOLL?
Die im EDITION TUBE eingesetzten Röhren zeichnen sich durch
vorbildliche Verarbeitungsqualität und eine hohe Lebensdauer
aus. Sollte dennoch einmal ein Problem auftauchen, so
überprüfen Sie vor einem Röhrentausch bitte folgende Fragen:
Lag die Ursache des Fehlers bzw. Ausfalls an der Röhre selbst
oder vielleicht an der Geräteperipherie, z.B. defektes
Speakerkabel? (Falls der Fehler nicht behoben wird, könnte
das Problem nach einem Röhrentausch erneut auftreten).
War während des Betriebes die Netzspannung konstant? Bei
Vollröhrenamps kann eine Überspannung im Netz die Ursache
für einen Ausfall sein. Überspannungen entstehen z.B. bei
Generatoren oder unsachgemäß ausgeführten
Starkstromverbindungen.
Hat vielleicht nur eine Sicherung angesprochen, ohne daß ein
wirklicher Defekt vorliegt? “Gealterte” Sicherungen,
Teilchenentladungen in einer Röhre oder Überschläge durch
Netzspannungsspitzen könnten die Ursache sein. Ein
Röhrentausch wäre dann wenig sinnvoll.
Röhren zeigen nach entsprechender Betriebsdauer
Verschleißerscheinugnen (erhöhte Mikrofonie,
Brummempfindlichkeit, Höhenverluste, Leistungsverluste etc.).
Solche Anzeichen machen einen Austausch nötig, denn sie
führen nicht nur zu schlechteren Klangergebnissen, sondern
sind Vorboten für ein bevorstehendes Ausfallen der
betroffenen Röhre.
Hinweis: Von einem Röhrentausch aus Spaß am
Soundexperiment ist abzusehen. Die hierbei entstehenden
Kosten könnten bei unsachgemäßem Handeln unerwartet
hoch ausfallen.
WAS IST BEIM RÖHRENTAUSCH ZU BEACHTEN?
Der Röhrentausch sollte ausschließlich durch technisch
qualifiziertes Fachpersonal erfolgen.
Vor dem Entfernen des Bleches auf der Rückseite ist der
Netzstecker des EDITION TUBE zu ziehen und eine
Mindestentladungszeit von 2 Minuten abzuwarten! Ist das
Blech demontiert, so können die Röhren vorsichtig aus ihren
Sockeln gezogen werden. Eine einzelne Endstufenröhre darf
nur dann getauscht werden, wenn sie exakt in das Match paßt
(gleiche Kennlinie aufweist).
Für die Endstufenröhren grundsätzlich nur gematchte Sätze
einsetzen.
Wird ein neuer Satz gematchter Endstufenröhren mit den
gleichen Kennliniendaten des alten Satzes verwendet, so ist
ein Biasabgleich nicht zwingend notwendig. Wird dagegen ein
Match mit abweichenden Kennliniendaten verwendet, so muß
ein Biasabgleich erfolgen. Der Abgleich setzt umfangreiche
Meßkenntnisse voraus und ist ausschließlich von im
Röhrenampbereich qualifizierten Technikern vorzunehmen.

WIE KANN MAN DIE LEBENSDAUER VON RÖHREN
VERLÄNGERN?
Betreiben sie den EDITION TUBE niemals ohne Last
(Lautsprecher)! Vermeiden Sie Erschütterungen, insbesondere
bei laufendem Gerät. Vor dem Transport den Amp
ausschalten und die Röhren abkühlen lassen.
Ein korrekt eingestelltes Bias und ein sauberer Brummabgleich
verlängern die Lebensdauer. Bei erhöhtem Röhrenverschleiß
sind diese Einstellungen zu überprüfen.
5.0 MÖGLICHE FEHLERQUELLEN / TROUBLESHOOTING
F1) Der EDITION TUBE läßt sich nicht einschalten:
• Es liegt keine Netzspannung an. Überprüfen Sie den
korrekten Anschluß des Netzkabels!
• Die Netzsicherung ist defekt. Bitte ersetzen Sie die interne
Netzsicherung durch eine neue Sicherung mit
entsprechendem Wert. Wenden Sie sich bei erneutem
Defekt an Ihren Hughes & Kettner Fachhändler.
Und hier noch einige Grundregeln, deren Einhaltung die
Lebensdauer Ihres Amps enorm verlängern:
• Sorgen Sie immer für eine technisch einwandfreie
Geräteperipherie!
• Freie Lüftungsschlitze für eine ungestörte Luftzirkulation sind
lebenswichtig für den EDITION TUBE.
• In jedem Fall zu vermeiden sind extreme Hitze, das
Eindringen von Staub und insbesondere Nässe.
• Die Spezifikationen von Zusatzgeräten muss genauestens
beachtet werden. Niemals Lautsprecherboxen mit zu kleiner
Impedanz (Ohmzahl) am EDITION TUBE betreiben. Nie Geräte
mit zu großem Pegel (z.B. Endstufen) an den Amp
anschließen.
• Vor Anschluss des Gerätes immer die vorhandene
Netzspannung prüfen. Im Zweifelsfall den Bühnentechniker,
Hausmeister o.ä. kontaktieren.
• Keine ”do it yourself” Reparaturen bei Problemen! Auch der
Tausch interner Sicherungen wird besser von einem
erfahrenen Techniker vorgenommen.
Alle weiteren Teile des EDITION TUBE sind wartungsfrei. Zum
Säubern der Metall- oder Gehäuseoberflächen kann ein leicht
angefeuchtetes Tuch benutzt werden.
Vermeiden Sie in jedem Fall starke Erschütterungen, extreme
Hitze, Staub und Nässe. Die Lüftungsschlitze des Amps dürfen
beim Betrieb nicht abgedeckt werden.
F2) Der EDITION TUBE ist korrekt verkabelt, aber es ist nichts zu
hören:
• Einer oder mehrere der Gain- bzw. Masterregler sind
abgedreht. Ziehen Sie den/die Regler auf.
• Durch ein defektes Lautsprecherkabel hat eine der internen
Sicherungen (Anodensicherung) angesprochen / ist eine
Endstufenröhre defekt. Ersetzen Sie das Lautsprecherkabel
und lassen Sie durch einen Servicetechniker die Sicherung
wechseln (korrekten Wert beachten!) bzw. die defekte Röhre
tauschen. Beachten Sie hierzu auch das Kapitel 4.0 dieser
Bedienungsanleitung!
F3) Der Sound erscheint beim Anschlag immer leicht verzerrt,
ein absolut sauberer Cleansound ist nicht erreichbar:
• Die Eingangssektion der EDITION TUBE- Röhrenvorstufe wird
übersteuert. Abhängig von der Tonabnehmerbestückung der
verwendeten Gitarre ist dieser Effekt deutlich oder auch
nicht hörbar. Wenn Sie diesen (oft auch erwünschten) Sound
nicht möchten, sollten Sie die Lautstärke an der Gitarre oder
am Volumenpedal zurücknehmen, den Tonabnehmer Saitenabstand verringern oder sich sogar für eine andere
Pickup-Kombination entscheiden.

• Ist ständig eine unangenehm ”kratzige” Verzerrung hörbar, so
könnte durch unsachgemäßen Gebrauch (z.B. Anschluß
eines Lautsprecherausganges an den INPUT Ihres EDITION
TUBE) ein Defekt vorliegen. Wenden Sie sich in diesem Fall an
Ihren Hughes & Kettner Fachhändler.
F4) Beim Anschluß eines Effektgerätes ist das Signal (selbst bei
Cleansounds) völlig verzerrt.
• Der Eingang des Effektgerätes wird übersteuert. Regeln Sie
die Eingangsempfindlichkeit (”Input” oder ”Gain”) am
Effektgerät zuück.
F5) Beim Anschluß eines Effektgerätes wird das
Ausgangssignal zu klein.
• Das Effektgerät ist an seinem Ausgang falsch ausgepegelt.
Regeln Sie den ”Output” am Effektgerät hoch.
6.0 TECHNISCHE DATEN
VORSTUFENSEKTION:
INPUT: -20 dBV/1 MOhm
FX-RETURN: 0 dBV/47 kOhm
FX-SEND: 6 dBV/100 Ohm
ENDSTUFENSEKTION: 2 x EL 84 Leistungsröhren
AUSGANGSLEISTUNG: 20 W rms (an 8 Ohm)
FREQUENZGANG: 20 Hz - 25 kHz (an 4 Ohm oder 8 Ohm)
LAUTSPRECHER: CELESTION Rock Driver Junior,
12”, 8 Ohm
ALLGEMEINE DATEN:
NETZSPANNUNG: 230 V~ (europäisches Modell)
117 V~ (nord amerikanisches Modell)
100 V~ (japanisches Modell)
MAXIMALE LEISTUNGSAUFNAHME: 100 VA (an 4Ohm)
NETZSICHERUNG: 500 mA(t) (230 V Modell)
1000 mA(t) (117 V Modell)
1000 mA(t) (100 V Modell)
ANODENSICHERUNG: 200 mA(t)
SEKUNDÄRSICHERUNGEN: 1x 100 mA(t)
(Niederspannung)
MAßE: 55 x 480 x 260 mm (B x H x T)
GEWICHT: ca. 16 kg
 Loading...