

Page 1
BEDIENUNGSANLEITUNG
ENGLISH
MANUAL
DEUTSCH
illustrations
Page 2
CAUTION!
TO PREVENT THE RISK OF FIRE AND
SHOCK HAZARD DON´T EXPOSE THIS
APPLIANCE TO MOISTURE OR RAIN.
DO NOT OPEN CASE; NO USER
SERVICEABLE PARTS INSIDE. REFER
SERVICING TO QUALIFIED SERVICE
PERSONNEL.
LEAVE ENOUGH SPACE FOR PROPER VENTILATION!
Ser. No.
230 V~
117 V~
100 V~
T 0,5 A
SB 1000 mA
SB 1250 mA
Max. power
consumption 175 VA
50 - 60 Hz
MADE IN ST. WENDEL GERMANY
FX-UNIT
RED
BOX
LINE OUT LINE IN
IN OUT
INPUT
FOOTSWITCH
FS-1
LINE OUT
PHONES
ENGLISH
DEUTSCH
HOME
Page 3

Congratulations and thank you for choosing the
HUGHES & KETTNER CLUB REVERB amp!
A team of guitarists and technicians developed the ATTAX
amps with a single purpose in mind: To provide you with
sophisticated guitar sounds and practical features in an easyto-handle package.
The CLUB REVERB is the ideal workhorse for discerning
players who want happening tone in a compact amp.
The CLUB REVERB's high-performance Current Feedback
power amp delivers not only 65 watts of punch, but also the
sought-after tone of a classic tube amp.
BEFORE POWERING UP
1.0 CHANNELS
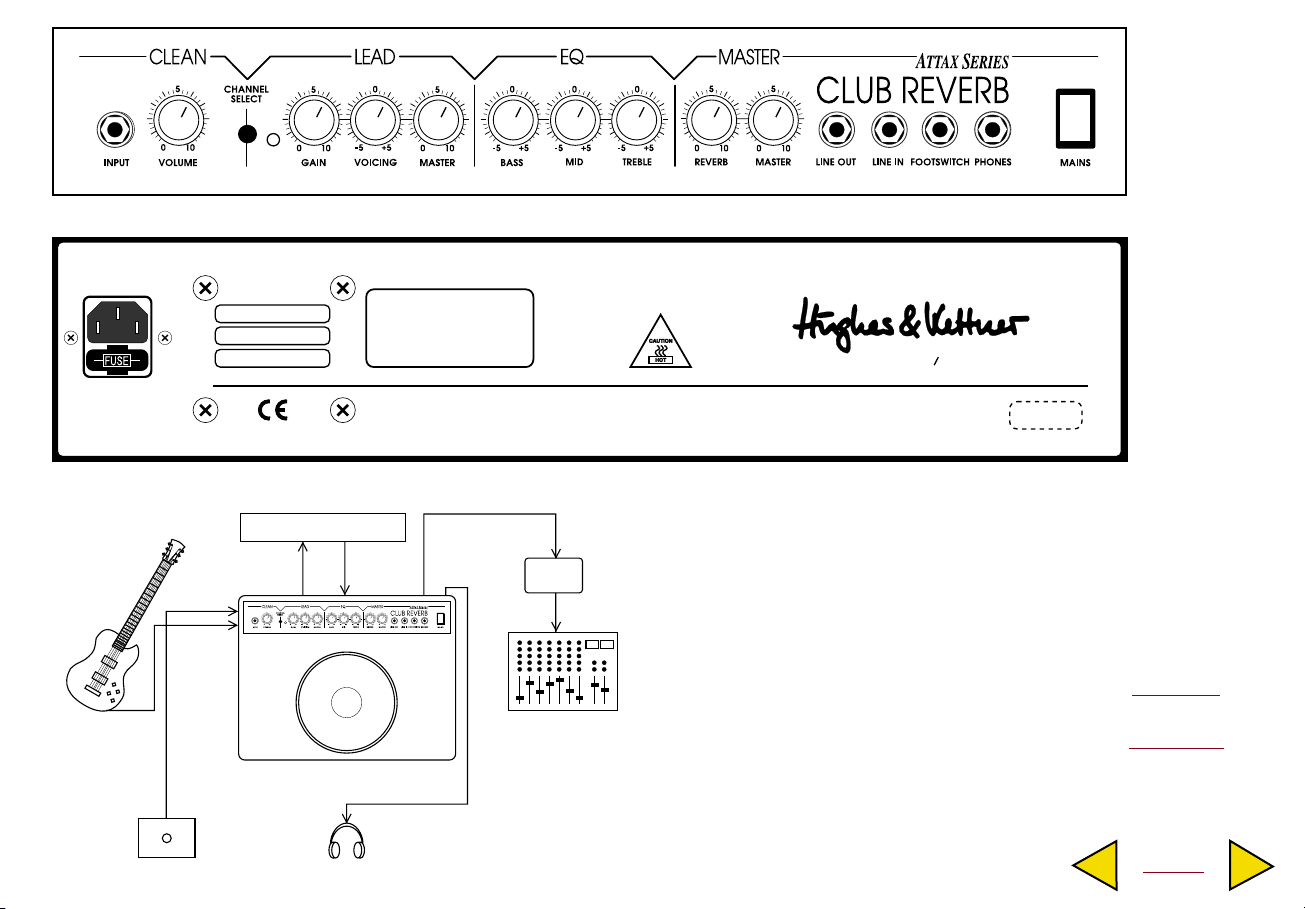
2.0 JACKS AND CONTROL FEATURES
3.0 STANDARD SETUP/CABLE CONNECTIONS
4.0 OPERATING THE CLUB REVERB
4.1 SELECTING CHANNELS
4.2 THE CLUB REVERB AND SIGNAL PROCESSORS
4.3 THE CLUB REVERB AND MIXING CONSOLES
5.0 SERVICE AND PREVENTIVE MAINTENANCE
6.0 TROUBLESHOOTING
7.0 TECHNICAL SPECIFICATIONS
One component playing a major role in the overall tone of the
amp is the RockDriver Junior 12“ speaker. Custom-made for
Hughes & Kettner to our specifications by Celestion, this
speaker not only perfectly captures the essence of vintage
sound, but also is extremely efficient. This makes your CLUB
REVERB substantially louder than most other amplifiers having
the same output power rating.
Its logical control layout gives you immediate access to the
CLUB REVERB's world of sound. This manual introduces you
to its many features and application options.
We wish you a lot of fun and success
with your new CLUB REVERB!
BEFORE POWERING UP...
- Check that the local current and the amp's AC power rating
are identical before you plug the power cord into an AC
outlet.
- Ensure that air can circulate freely around your amp's
ventilation ducts.
- Place the amp on a stable platform where it is not exposed to
mechanical shocks and temperature extremes which may
damage the amp or endanger the safety of bystanders.
- Hughes & Kettner is not liable for damages due to
improper use.
HOME
Page 4

1.0 CHANNELS
The CLUB REVERB features a newly developed
preamp that not only produces authentic harmonic
overdrive but also responds dynamically to your
picking style. Based on semiconductors, this innovative circuitry simulates the sound-shaping elements
of tube amps and delivers sound quality unparalleled
in this price range. It also provides the dynamics
demanding guitarists require for musical expression.
CLEAN:
Depending on the preamp control settings, the CLUB
REVERB delivers a variety of contemporary and
vintage clean tones. At higher VOLUME settings, the
"SoftClick" circuitry delivers that slight edge you
would expect from a vintage tube amp. If desired,
the CLEAN channel can put out plenty of crunch.
LEAD:
The Voicing control on this channel enables you to
achieve a broad spectrum of lead tones ranging from
the classic 'British' style of wide-open rock sounds
with a very in-your-face character to the more
'American' style of blues sounds that are extremely
responsive to the way you attack the strings.
Experiment with various settings of the Voicing
control, Lead Gain and Lead Master - and your
dynamics - and you'll discover a wealth of tone.
REVERB:
In the signal chain, the CLUB REVERB reverb section
is located after the FX loop so you can use it for
external effects and still achieve a clean reverb
sound.
2.0 JACKS AND CONTROL FEATURES
2.1. FRONT PANEL:
INPUT: Input sensitivity is broad enough to handle guitars
equipped with humbuckers, active pickups, or single coils.
CLEAN VOL: Determines the CLEAN channel's volume.
Depending on the type of pickups in your instrument, the amp
will begin to clip somewhere around the 12 o'clock setting
(SoftClick). The special SoftClip circuitry in this channel enables
you to achieve the sound of a vintage tube amp gently overdriven to the point where it just starts to 'break up'.
Page 5

CHANNEL SELECT: This channel selector switch activates either
the CLEAN or LEAD channel. The LEAD channel is active when
the button is pressed.
LINE OUT: Use this jack to feed the signal to the input of an FX
processor. You can also route the signal to a second power amp
or through a RED BOX to a mixing console.
RED LEAD LED: The red LED illuminates when the LEAD
channel is active.
LEAD GAIN: Controls the amount of distortion in the
LEAD channel.
VOICING: pre-shapes the Lead Channel for a spectrum of tone
ranging from ‘British’ to ‘American’.
LEAD MASTER: Determines the LEAD channel volume level in
relation to the CLEAN channel volume level.
EQ SECTION: Common BASS, MID and TREBLE controls for
the both channels. MID and TREBLE controls influence each
other, as is standard in tube amps: if you boost the treble, the
mids are cut and vice versa. This sound-shaping feature allows
you to dial in a wide variety of subtle
tonal variations.
REVERB: Controls how much integrated reverb is added to the
signal. Reverb is automatically adjusted for each channel when
you switch channels.
MASTER: Controls the amp‘s master volume level. The LINE
OUT signal is unaffected by the MASTER control.
LINE IN: If you are sending the LINE OUT signal to an FX
processor, connect the output from that processor to this jack.
FOOTSWITCH: This jack is for a standard footswitch (e.g.
Hughes & Kettner FS-1) and it allows you to switch back and
forth between the CLEAN and LEAD channels. When using a
footswitch, ensure the CHANNEL SELECT switch on the amp‘s
front panel is set to CLEAN.
PHONES: Headphone jack. The speaker is automatically
switched off when a plug is inserted into this jack.
2.2 REAR PANEL:
MAINS: Connect the included Euro-norm mains cord to this
socket. Ensure the amp's voltage rating matches your local AC
voltage rating before you plug the cord into the wall socket.
3.0 STANDARD SETUP/
CABLE CONNECTIONS
Page 6

4.0 OPERATING THE CLUB REVERB
4.1 SELECTING CHANNELS
Use the CHANNEL SELECT switch or an external footswitch
to change channels. We recommend a Hughes & Kettner
footswitch FS-1.
4.2 THE CLUB REVERB AND SIGNAL PROCESSORS
- Distortion devices are not designed for use in an FX loop.
As a rule of thumb, any kind of device that compresses the
signal should be connected first in the signal chain. Depending
on the type of effect you want to achieve, you may want to
connect your compressor directly between the instrument and
the amp's input.
- If you are using several processors or stomp boxes, ensure you
connect them in the proper order. For the sake of the best
sound, try changing the order to determine which
arrangement yields the best results.
The effects loop on the CLUB REVERB is a serial effects loop,
meaning that the entire preamp signal is routed to the FX
device and processed there.
TO CONNECT A SIGNAL PROCESSOR:
- Connect the processor‘s INPUT to the CLUB REVERB LINE
OUT jack and the processor‘s OUTPUT to the LINE IN jack.
- To avoid noise, signal degradation, and interrupted signals,
only use high-quality patch cables.
- Make sure the processor is not distorting the signal. Check the
processor's gain LEDs (if it is equipped with this type of
display) and use the input and output controls to dial in a
suitable level.
4.3 THE CLUB REVERB AND MIXING CONSOLES
If you want to feed the CLUB REVERB's signal to a mixing
console, we recommend you route it through a Hughes &
Kettner RED BOX PRO. Patch the signal from the LINE OUT
jack, as this signal path's level is not influenced by the MASTER
setting. The RED BOX PRO balances the signal and simulates a
speaker cabinet.
5.0 SERVICE AND PREVENTIVE
MAINTENANCE
The CLUB REVERB does not require service of any type.
However, there are a few precautions you should heed to
ensure your amp lasts for many years.
Page 7

- Make certain your amp's ventilation ducts are not blocked or
covered. Proper cooling will prolong the life of your amp
(rear panel amp chassis).
- Avoid mechanical shocks and exposure to extreme heat, dust
and especially moisture.
- When connecting peripheral devices, always pay close
attention to their specifications. Never connect devices with
high output signal levels (e.g. power amps) to your amp's
input.
- Ensure you have the correct AC power rating available before
you plug in the amp. If in doubt, ask the venue's sound
technician or the custodian of the building you are rehearsing
in.
- Refrain from do-it-yourself repairs! Have a qualified service
technician replace internal fuses.
identical fuse. If this fuse also trips, consult your Hughes &
Kettner dealer.
6.2 The CLUB REVERB is connected properly, but no
sound is audible.
- One or several GAIN and MASTER controls may be turned all
the way down. Dial in a higher setting.
- Never overlook the possibility that the guitar cable may be
damaged. Try another one.
- A short circuit in the speaker signal chain may have tripped
an internal fuse. Make sure none of the connections are shorted out and have a qualified service technician replace the
fuse (identical specifications are a must).
6.3 The footswitch does not switch channels:
- The footswitch is not connected to the CLUB REVERB. Plug it
into the appropriate jack.
- Check whether your footswitch is of the correct type. We
recommend a Hughes & Kettner FS-1.
With the unit off and unplugged, use a soft damp cloth to clean
the exterior surface of the CLUB REVERB.
6.0 TROUBLESHOOTING
6.1 The CLUB REVERB will not switch on:
- The amp is not getting any AC power. Check the mains cable
to see if it is connected properly.
- The mains fuse is defective. Replace the fuse with another
6.4 When accessed, the LINE OUT/LINE IN jacks
cause annoying hum.
- An electrical or magnetic field is causing interference. Use
higher-quality cables or re-arrange the cables you are using to
reduce interference to a minimum. If this still
doesn't improve the situation, use a DI box.
- The grounding of the connected devices may be causing a
ground loop. DO NOT SEVER THE GROUND OF THE
CONNECTED DEVICES UNDER ANY CIRCUMSTANCES!
Page 8

Try plugging all devices into the same socket via an AC power
distributor/power strip. If this doesn't eliminate the noise, you
must ensure the connection is galvanically separated by routing
the signal through a DI box.
Output Power: 65 watts rms into 8 ohms
Freqency response: 20 Hz - 30 kHz (into 8 ohms)
6.5 You have connected an FX processor to the LINE
OUT jack and the signal is totally distorted,
even when you have dialed in a clean sound.
- The LINE OUT signal is overloading the input of the FX
processor. Reduce the processor‘s input sensitivity ("INPUT" or
"GAIN").
6.6 You have connected an FX processor to the LINE
OUT jack of the CLUB REVERB and the signal's
volume level is way too low.
- The FX processor's output level is set incorrectly. Turn it up.
7.0 TECHNICAL DATA
Preamp Section
Preamp section:
CLEAN + LEAD solid state channels
INPUT: -10 dBV/ 1 M ohm
LINE OUT: 0 dBV/ 1k ohm
LINE IN: 0 dBV/ 47 k ohms
Power amp section::
'CURRENT FEEDBACK' solid state power amp
Speaker:
CELESTION RockDriver Junior, 12”, 8 ohms
General features:
Voltage:
230 V~ (European model)
117 V~ (North American model)
100 V~ (Japanese model)
Max. power consumption: 175 VA
Mains Fuse: slo-blo 500 mA (230 V model)
slo-blo 1000 mA (117 V model)
slo-blo 1250 mA (100 V model)
Dimensions: (W x H x D)
464 x 480 x 265 mms
18“ x 18.9“ x 10.4“
Weight: approx. 33 lbs./approx.15 kgs.
Page 9

Wir freuen uns, daß Du Dich für einen
HUGHES & KETTNER CLUB REVERB
entschieden hast!
Ein Team aus Gitarristen und Technikern hat die Verstärker der
ATTAX Series mit dem Ziel entwickelt, anspruchsvolle
Gitarrensounds mit einfachster Bedienung und praxisgerechter
Ausstattung zu kombinieren.
Der CLUB REVERB ist das ideale Arbeitsgerät für anspruchsvolle Gitarristen, die amtliche Grundsounds in einem kompakten Amp fordern. Seine leistungsstarke Current Feedback
Endstufe sorgt nicht nur für 65 Watt Leistung, sondern auch
für offenen ”Röhrencharakter”.
Einen besonderen Anteil an der Soundqualität hat dabei der
Celestion RockDriver Junior 12” Speaker. Dieser überzeugt
durch seinen authentischen Vintage Soundcharakter und einen
hervorragenden Wirkungsgrad. Damit ist Dein CLUB REVERB
deutlich lauter als die meisten anderen Verstärker mit gleicher
Ausgangsleistung.
Das übersichtliche und komfortable Bedienkonzept macht es
einfach, direkt in die Soundwelt des CLUB REVERB einzusteigen - diese Bedienungsanleitung wird Dir darüber hinaus
interessante Aspekte über die Möglichkeiten und Features
Deines CLUB REVERB vermitteln.
VOR DER INBETRIEBNAHME
1.0 DIE KANÄLE DES CLUB REVERB
2.0 ANSCHLÜSSE UND BEDIENELEMENTE
3.0 STANDARD SET UP/VERKABELUNG
4.0 BEDIENUNG DES CLUB REVERB
4.1 DAS ANWÄHLEN DER KANÄLE
4.2 DER CLUB REVERB MIT EFFEKTGERÄTEN
4.3 DER CLUB REVERB AM MISCHPULT
5.0 WARTUNG UND SERVICE
6.0 FEHLERBESEITIGUNG/TROUBLESHOOTING
7.0 TECHNISCHE DATEN
VOR DER INBETRIEBNAHME
- Vergewissere Dich vor dem Anschluß des CLUB REVERB, daß
der nahe der Netzbuchse angegebene Spannungswert mit der
vorhandenen Netzspannung übereinstimmt.
- Stelle eine ausreichende Luftzufuhr an die Kühlflächen des
Gerätes sicher.
- Achte auf einen festen Stellplatz, der mechanische und thermische Fremdeinwirkungen, welche die Betriebssicherheit des
Gerätes oder die Sicherheit von Personen beeinträchtigen
könnten, ausschließt.
Viel Erfolg und Spaß am ”Tone” Deines
CLUB REVERB!
- Für Schäden am Gerät, die durch unsachgemäßen Betrieb entstehen wird seitens des Herstellers keine Haftung übernommen.
HOME
Page 10

1.0 Die Kanäle des CLUB REVERB
Die weiterentwickelte Vorstufe des CLUB REVERB
realisiert nicht nur harmonischen Overdrive, sondern
auch ein besonders dynamisches Reagieren auf die
Spielweise. Sein innovatives Schaltungskonzept, das
alle soundgestaltenden Elemente von Röhrenamps in
Halbleitertechnik simuliert, verleiht dem CLUB
REVERB eine bisher in dieser Preisklasse nicht
erreichte Tonqualität und ermöglicht die Dynamik,
die ein anspruchsvoller Gitarrist für seinen musikalischen Ausdruck braucht.
CLEAN:
Je nach Einstellung der Vorstufe können moderne
oder ”Vintage”- Cleansounds realisiert werden.
Bei höheren Einstellungen des VOLUME Reglers
sorgt die ”SoftClick” Schaltung für weichen
Overdrive, bekannt durch alte Vollröhrenamps. Bei
Bedarf wird so aus diesem ”Clean”- ein ”Crunch”Kanal.
LEAD:
Durch den Voicing-Regler lassen sich im Lead Kanal
klassische, offene Rocksounds mit einem sehr ”britischen” Charakter - direkt und dynamisch - sowie
weiche, bluesige Sounds mit sehr “amerikanischem”
Ton verwirklichen. Mit verschiedenen Einstellungen
des Voicingreglers lassen sich unterschiedliche
Charakteristiken ineinander überblenden und geben
Dir somit neue und bisher nicht gekannte
Variationsmöglichkeiten.
HALL:
Der Hall des CLUB REVERB ist dem Effektweg vorgeschaltet, so bleibt auch im Zusammenspiel mit externen Effekten die Hallqualität erhalten.
2.0 ANSCHLÜSSE UND BEDIENELEMENTE
INPUT: Anschlußbuchse für Gitarren mit Humbuckern, aktiven
Tonabnehmersystemen oder Single Coils.
CLEAN VOL: Regelt die Lautstärke des CLEAN Kanals, je nach
Ausgangsleistung der Pickups lassen sich ab ca. ”12 Uhr”
Stellung leicht übersteuerte ”Clip” Sounds realisieren
(SoftClick). Dadurch kann man leichte Verzerrungen mit dem
Anschlag kontrollieren.
Page 11

CHANNEL SELECT: Schaltet zwischen CLEAN Kanal und dem
LEAD Kanal um. Bei gedrücktem Schalter ist der LEAD Kanal
aktiv.
ROTE LEAD LED: Die leuchtende LED zeigt den aktiven LEAD
Kanal an.
LEAD GAIN: Kontrolliert den Übersteuerungsgrad des LEAD
Kanals.
VOICING: Überblendet verschiedene Charakteristiken von britischen bis amerikanischen Sounds.
LEAD MASTER: Regelt die Lautstärke des LEAD Kanals im
Verhältnis zum CLEAN Kanal.
Klangregelung: Bass, Mid und Treble Regler für beide Kanäle.
Mid und Treble beeinflussen sich (wie auch bei Röhrenamps
üblich und erwünscht) gegenseitig: eine Höhenanhebung
bewirkt eine Mittenabsenkung und umgekehrt. Diese
Charakteristik ermöglicht ein größtmögliches Spektrum von
Soundnuancen.
REVERB: Regelt den Anteil des integrierten Halleffektes. Die
Anpassung des Hallpegels erfolgt automatisch bei der
Kanalumschaltung.
MASTER: Kontrolliert die Gesamtlautstärke des CLUB REVERB.
Der Pegel des LINE OUT bleibt von diesem Regler
unbeeinflußt.
LINE OUT: Verbinde diese Buchse mit dem Eingang des
Effektgerätes. Weiterhin ist hier der Anschluß einer
Zusatzendstufe oder einer RED BOX zwecks Signalführung zum
Mischpult möglich.
LINE IN: Verbinde diese Buchse mit dem Return des
Effektgerätes.
FOOTSWITCH: Anschluß für einen handelsüblichen
Fußschalter (z.B. Hughes & Kettner FS-1). Damit kann zwischen
CLEAN und LEAD Kanal umgeschaltet werden. Der CHANNEL
SELECT Schalter auf der Frontseite muß dabei auf CLEAN
geschaltet sein.
PHONES: Klinkenbuchse zum Anschluß eines Kopfhörers. Die
Buchse schaltet den internen Lautsprecher ab.
Rückseite:
MAINS: Netzbuchse für das mitgelieferte Euronetzkabel. Bevor
der Netzstecker eingesteckt wird, vergewissere Dich, daß die
vorhandene Netzspannung mit dem auf dem Gerät angegebenem Wert übereinstimmt.
3.0 STANDARD SET UP / VERKABELUNG
Page 12

4.0 BEDIENUNG DES CLUB REVERB
4.1 DAS ANWÄHLEN DER KANÄLE
Die Kanäle des CLUB REVERB werden über den CHANNEL
SELECT Schalter oder einen externen Fußschalter angewählt.
Ein geeigneter Fußschalter (FS 1) wird im Zubehörprogramm
von Hughes & Kettner angeboten.
4.2 DER CLUB REVERB MIT EFFEKTGERÄTEN
Grundsätzlich gehören komprimierende Effekte immer an den
Anfang der Signalkette. Auch Kompressoren sollten (je nach
gewünschtem Soundeffekt) ggf. vor den Input des Amps
geschaltet werden.
- Achte immer darauf, daß mehrere eingeschleifte Effektgeräte
in korrekter Reihenfolge angeschlossen werden. Das heißt,
wenn das Sound Ergebnis nicht zufriedenstellend ausfällt,
sollte man mit der Reihenfolge der Effektgeräte experimentieren.
Der CLUB REVERB ist mit einem seriellen Effektweg ausgestattet. Dabei wird das Vorstufensignal des Amps komplett durch
ein eingeschleiftes Effektgerät geführt und bearbeitet.
Anschluß des Effektgerätes:
- Verbinde die LINE OUT Buchse mit dem Input, die LINE IN
Buchse mit den Output Deines Effektgerätes.
- Verwende ausschließlich hochwertige Patchkabel, um
Signalverluste, Störgeräusche oder Aussetzer zu verhindern.
- Achte stets darauf, daß das Effektgerät nicht übersteuert wird.
Beachte dazu ggf. die Aussteuerungsanzeige des Effektgerätes
und benutze ”Input” und ”Output” Regler am Effektgerät zum
Auspegeln.
- ”Verzerrer” haben im Einschleifweg nichts zu suchen.
4.3 DER CLUB REVERB AM MISCHPULT
Zum Anschluß des CLUB REVERB an ein Mischpult empfehlen
wir die Signalführung über eine Hughes & Kettner RED BOX
PRO. Diese sollte an der LINE OUT Buchse des Amps angeschlossen werden, da der Ausgangspegel hier masterunabhängig ist. Das Signal ist dann symmetrisch ausgeführt (=
balanced) und mit einer Speakersimulation versehen.
5.0 WARTUNG UND SERVICE
Die Amps der ATTAX Serie sind wartungsfrei. Dennoch gibt es
einige Grundregeln, deren Einhaltung die Lebensdauer Deines
Amps enorm verlängern.:
- Sorge immer für eine technisch einwandfreie
Geräteperipherie!
Page 13

- Sorge stets für freie Luftzirkulation an die Kühlflächen Deines
Amps (Rückseite Ampchassis).
- Vermeide in jedem Fall starke mechanische Erschütterungen,
extreme Hitze, das Eindringen von Staub und insbesondere
Nässe.
- Beachte peinlich genau die Spezifikationen von
Zusatzgeräten. Schließe nie Ausgänge mit zu großem Pegel
(z.B. Endstufen) an Deinen Amp an.
- Prüfe vor Anschluß des Gerätes immer die vorhandene
Netzspannung. Kontaktiere im Zweifelsfall den
Bühnentechniker, Hausmeister o.ä. .
- Versuche keine ”do it yourself” Reparaturen! Auch der Tausch
interner Sicherungen wird besser von einem erfahrenen
Techniker vorgenommen.
Die Oberfläche des CLUB REVERB läßt sich am besten mit
einem leicht angefeuchtetem Tuch säubern.
6.0 MÖGLICHE FEHLERQUELLEN /
TROUBLESHOOTING
6.1 Der CLUB REVERB läßt sich nicht einschalten:
- Es liegt keine Netzspannung an. Überprüfe den korrekten
Anschluß des Netzkabels!
- Die Netzsicherung ist defekt. Bitte ersetze die Netzsicherung
durch eine neue Sicherung mit entsprechendem Wert. Wende
dich bei erneutem Defekt an Deinen Hughes & Kettner
Fachhändler.
6.2 Der CLUB REVERB ist korrekt verkabelt, aber es
ist nichts zu hören:
- Einer oder mehrere der Gain- bzw. Masterregler sind abge-
dreht. Drehe den/die Regler auf.
- Das Gitarrenkabel ist evtl. nicht in Ordnung, probiere es mit
einem anderen.
- Durch einen Kurzschluß am Lautsprecheranschluß hat eine
der internen Sicherungen angesprochen. Stelle sicher, daß die
Anschlüsse überbrückungsfrei sind und lasse durch einen
Servicetechniker die Sicherung wechseln (korrekten Wert
beachten!).
6.3 Der CLEAN Kanal kann über einen externen
Fußschalter nicht aktiviert werden:
- Der Stecker des Fußschalters ist nicht eingesteckt. Verkabele
den CLUB REVERB entsprechend.
- Prüfe ob der angeschlossene Fußschalter dem richtigen Typ
entspricht. Wir empfehlen den FS 1 aus dem Hughes &
Kettner Zubehörprogramm.
6.4 Beim Benutzen der LINE OUT / LINE IN BUCHSE
entsteht ein Brummgeräusch:
- Ein elektrisches / magnetisches Wechselfeld streut auf die
Leitung ein. Benutze ein besseres Kabel und versuche durch
geschicktes Verlegen der Leitung die Einstreuung zu minimie-
Page 14

ren. Hilft dies nicht, empfiehlt sich die Benutzung einer DI
Box.
- Über die Erdung der verbundenen Geräte entsteht eine
Brummschleife. Unterbreche in keinem Fall die Schutzleiter
der Geräte! Betreibe beide Geräte am selben Netzverteiler.
Schafft dies noch keine Abhilfe, muß die Verbindung mittels
einer DI Box galvanisch getrennt werden.
Endstufe:
'CURRENT FEEDBACK' Halbleiterendstufe
Ausgangsleistung:
65 Watt rms an 8 Ohm
Frequenzgang: 20 Hz - 30 kHz
6.5 Beim Anschluß eines Effektgerätes am LINE OUT
ist das Signal (selbst bei Cleansounds) völlig
verzerrt.
- Der Eingang des Effektgerätes wird übersteuert. Regle die
Eingangsempfindlichkeit (”Input” oder ”Gain”) am Effektgerät
zuück.
6.6 Beim Anschluß eines Effektgerätes am LINE
OUT wird das Ausgangssignal deutlich leiser.
- Das Effektgerät ist an seinem Ausgang falsch ausgepegelt.
Regle den ”Output” am Effektgerät hoch.
7.0 TECHNISCHE DATEN
Vorstufensektion:
CLEAN + LEAD Kanäle in Halbleitertechnik
Input: -10 dB/1 MOhm
LINE OUT: 0 dBV/1 kOhm
LINE IN: 0 dB/47 kOhm
Speaker :
CELESTION RockDriver Junior, 12”, 8 Ohm
Allgemeine Daten:
Betriebsspannung:
230 V~ (europäisches Modell)
117 V~ (nordamerikanisches Modell)
100 V~ (japanisches Modell)
Max. Leistungsaufnahme: 175 VA
Netzsicherung:
T 500 mA (230 V Modell)
T 1000 mA (117 V Modell)
T 1250 mA (100 V Modell)
Abmessungen:
464 x 480 x 265 mm (B x H x T)
Gewicht: ca.15 kg
 Loading...