

Page 1
3-CHANNEL
GUITAR PREAMPLIFIER
Hughes & Kettner Musical Instruments
Telefon
GmbH
Magdeburgerstr.6 6690
51)20
(068
21
Telefax(068
St.Wendel
51)4886
Page 2

WE AT HUGHES &
YOU ON YOUR CHOICE OF THE
The HUGHES & KETTNER ATTAX preamp is designed to meet the rigorous demands
placed on contemporary musicians: superior sound quality, flexibility, and userfriendly operating define the ATTAX as a valuable tool in your quest for the ultimate
sound.
The streamlined operating and control concept enables you to immediately dial in
hot sounds. No fuss, no endless knob twiddling.This Operator’s Manual introduces
you to the
3 CHANNELS - THE STANDARD OF THE
The ATTAX features three separate channels: One solid state CLEAN for vintage and
contemporary clean tones. The two tube channels, CRUNCH and LEAD, are carefully
tuned for a broad overdrive spectrum, from a slight crunch to heavy duty shred.
TWO EFFECTS LOOPS!
The ATTAX features two separate loops for effects/multi-effects devices: a standard
MONO FX LOOP with SEND and RETURN jacks and a STEREO LOOP with a SEND
and two RETURN jacks (Left/Right).
ATTAX's
KETTNER
features and options.
WOULD LIKE TO CONGRATULATE
ATTAX PREAMP!
90's
STEREO SETUP
The output, effect, and master sections feature stereo circuits enabling stereo setups,
o. g. with a stereo power amp and two cabinets. Stereo effects processors can be
added through the STEREO LOOP for optimum effects utilization.
FREQUENCY-CORRECTED RECORDING OUT JACKS
The two Recording Out jacks feature frequency-corrected signal paths that simulate
the sound of a miked 4 x
situations, and on stage DI to the mixer.
MIDI
-
THE ULTIMATE CONTROL FEATURE!
The MIDI option requires no soldering. Installation is simple, and offers the ATTAX
user all the comfort of MIDI capabilities. All three channels and the effects loop can
be called via MIDI program change messages.
We hope you have fun and enjoy success with your ATTAX!
-
NO PROBLEM!
12"
cabinet, an ideal tool for home recording, studio
Page 3
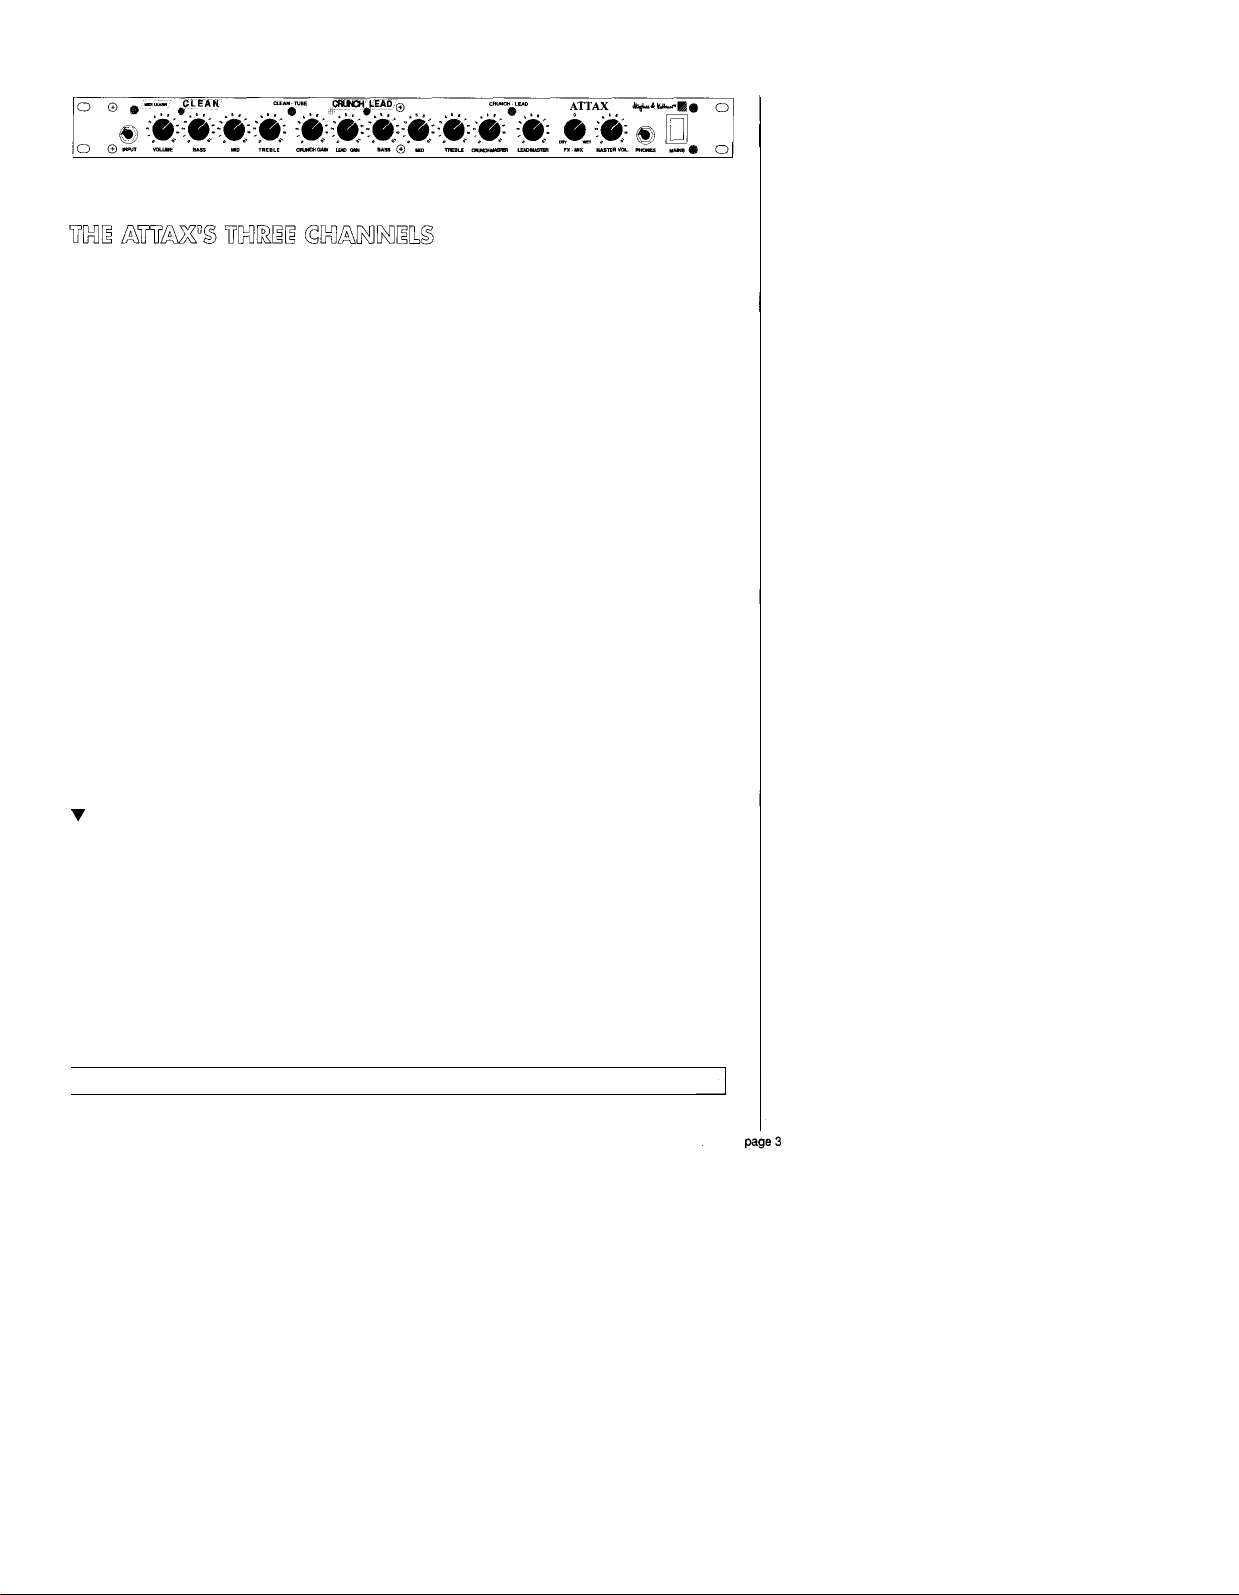
THE SOLID STATE CLEAN CHANNEL
This channel utilizes innovative solid state circuitry that is capable of producing
warm, dynamic vintage tones, as well as contemporary,
The HUGHES
tube amp at high volumes, except that you don’t have to alienate your neighbors to
get that warm tone. It “feels” like a vintage amp; the preamp’s dynamics and response
are true to classic tube performance criteria.
&
KETTNER “SOFT CLICK” circuitry delivers the soft clip of a vintage
hi-fi
clean sounds.
ATTAX CRUNCH
The ATTAX CRUNCH tube channel covers the tonal spectrum from clean to
overdrive. The emphasis on attack response in this channel enables you to control
overdrive levels with your guitar’s volume pot. At higher gain settings, your tone is
carried by lengthy sustain ideal for a singing blues tone with superior dynamic punch.
AT-TAX LEAD
The LEAD channel’s extreme gain reserves deliver the distinct performance character-
istics of modified tube amps: fat, searing tube overdrive at any volume, ideal for
modern lead playing and heavy-duty power chord chunk.
v
SELECTING THE THREE CHANNELS: CLEAN / CRUNCH / LEAD
Channel switching is executed via the switch on the FRONT PANEL or the
included STAGEBOARD.
The CLEAN /TUBE SWITCH (5) activates either the SOLID STATE (CLEAN channel),
or the TUBE
The CRUNCH /TUBE SWITCH (12) activates either the CRUNCH or LEAD channel
in the tube section.
An LED DESIGNATES the currently ACTIVE CHANNEL.:
-
THE VINTAGE TUBE CHANNEL
-
HOT-RODDED HEAVY TUBE OVERDRIVE
(
CRUNCH/LEAD ) sections.
CLEAN
= GREEN, CRUNCH = YELLOW, LEAD = RED
Page 4
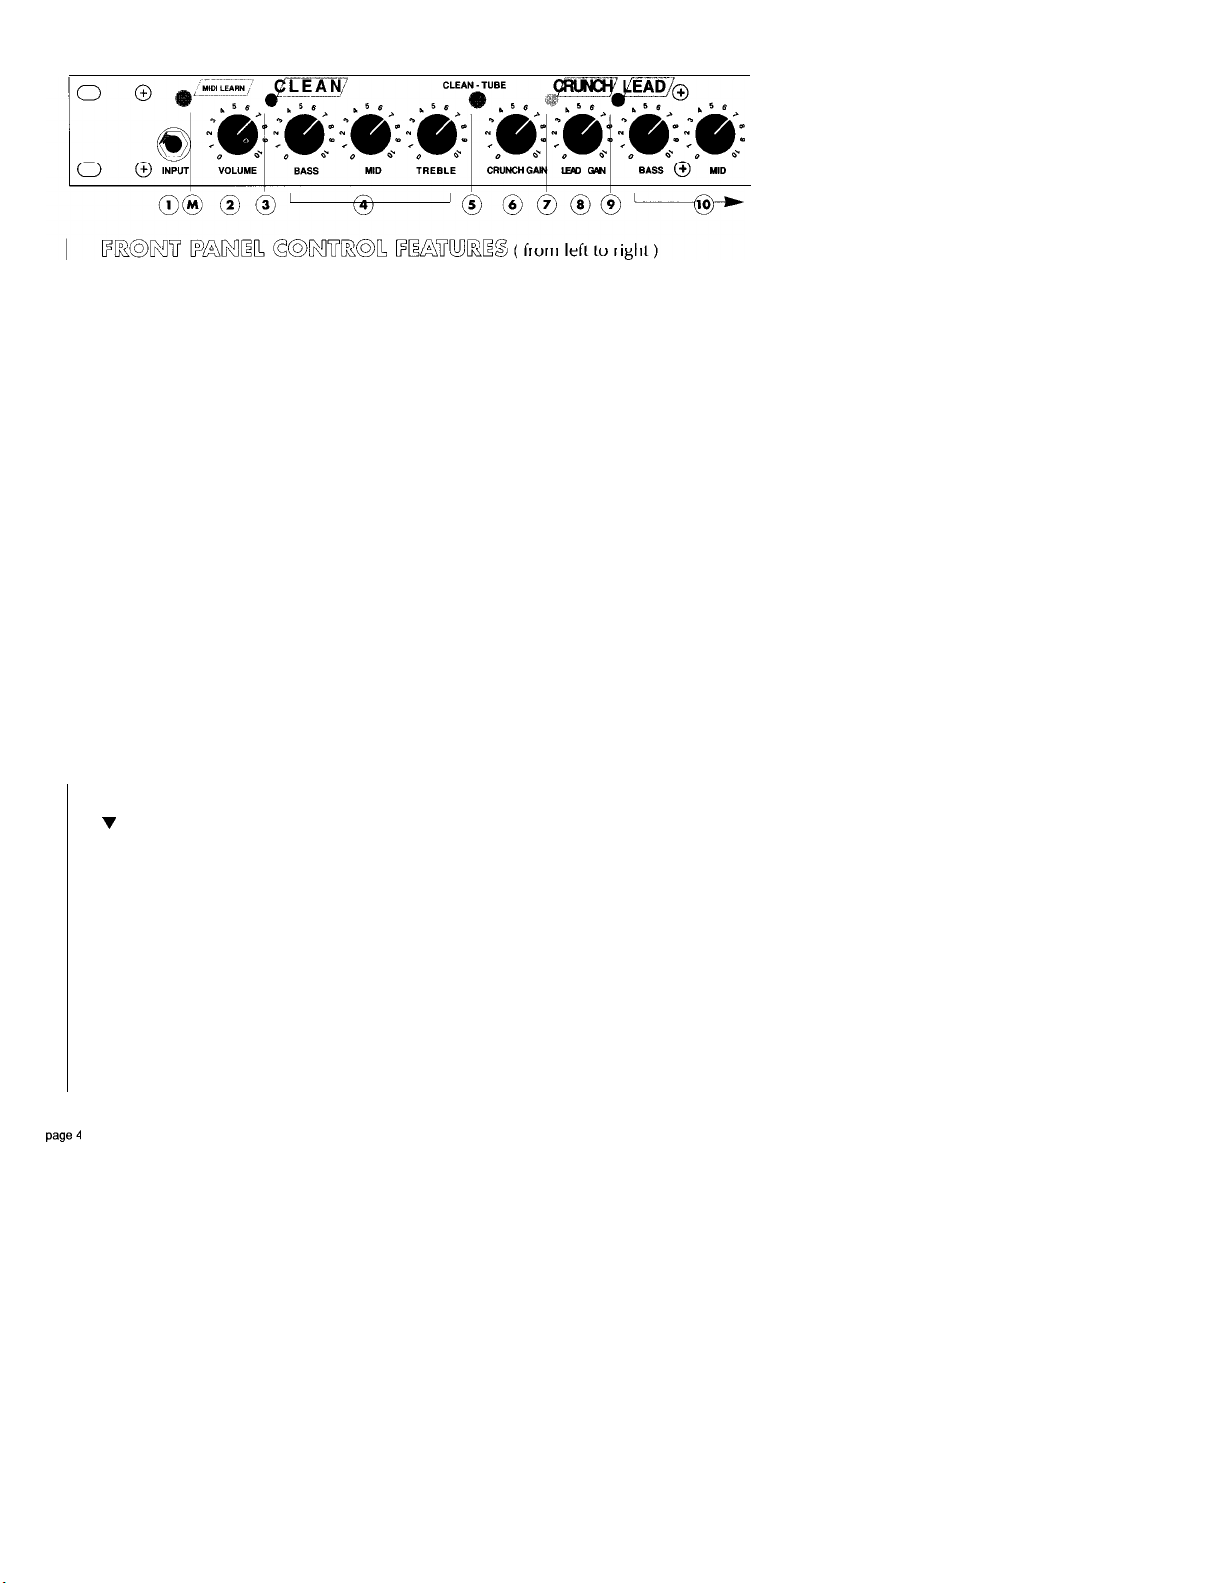
1. INPUT
1/4"
instrument input jack.
( M )
MIDI LEARN
MIDI OPTION installation is a prerequisite to MIDI capability. Upon MIDI OPTION
installation, press the MIDI LEARN BUTTON on the ATTAX'a front panel to save the
current sound/effect parameter settings. Installation is a matter of just a few minutes, it
requires no soldering. Talk to your HUGHES & KETTNER DEALER for the details.
2. (CLEAN ) VOLUME
Regulates the CLEAN channel’s volume. Depending on your instrument’s pickups, a
setting of 7
3. GREEN CLEAN LED
The GREEN LED illuminates when the solid state
/
4. CLEAN
The THREE-BAND, PASSIVE VOICING section defines the
teristics in the CLEAN channel. Precise tuning and balance of filter frequencies enable
you to quickly and efficiently dial in diverse sounds.
v
SETTING VOICING PARAMETERS
Dial in the standard setting (BASS, MID, TREBLE in the 12 o’clock position), and then
modify the settings to suit your requirements.
BASS / TREBLE
BUTTON
-
8 is the clip threshold (SOFT CLICK).
(
CLEAN ) section is active.
ATTAX's
tonal charac-
5. CLEAN
Activates either the SOLID STATE ( CLEAN channel
(
CRUNCH and LEAD channels).
6. CRUNCH GAIN
The CRUNCH GAIN POT regulates the CRUNCH channel’s input sensitivity. Try
different settings to achieve everything from ultra-clean sound to vintage tube
overdrive.
/
TUBE SELECTOR SWITCH
),
or the TUBE SELECTION
Page 5

7. CRUNCH LED
The YELLOW LED illuminates when the CRUNCH channel is active.
8. LEAD GAIN
The LEAD GAIN pot regulates the amount of disortion in the tube preamp’s LEAD
channel. The intensity of the compression effect inherent in tube technology increases
parallel to the amount of overdrive.
9. LEAD LED
The RED LED illuminates when the LEAD channel is active.
10. CRUNCH AND LEAD TUBE CHANNELS VOICING SECTION
The two tube channels’ tone controls are a combination of active and passive circuits
designed to respond in a more musical manner. For instance, the active bass filters
provide mid-range characteristics and provides additional presence (without
unnecessary bending of frequency bands). The voicing section follows the tube
section in the amp’s circuitry.
v
SETTING VOICING PARAMETERS
Dial in the standard setting (BASS, MID, TREBLE in the 12 o’clock position), and then
modify the settings to suit your requirements.
In addition to the tree channel’s respective VOLUME and/or GAIN controls, the
CRUNCH and LEAD channels each incorporate a MASTER control (CRUNCH
MASTER
/
LEADMASTER). The overall output of the ATTAX is defined via the STEREO
MASTER VOLUME knob (15). These features allow for an optimum volume balance
between the three channels, an essential feature for gigs.
11. CRUNCHMASTER
Regulates the CRUNCH channel’s volume in relation to the CLEAN and LEAD
channel’s respective volumes.
12. CRUNCH
/
LEAD SELECTOR SWITCH
Activates either the ATTAX's CRUNCH or LEAD channel.
page
5
Page 6

13. LEADMASTER
Regulates the LEAD channel’s volume in relation to CLEAN and CRUNCH channels’
respective volumes.
14.
FX-MIX
The FX MIX pot regulates the original signal’s volume and its relationship to that of
the processed signal, i. e. the one sent from the effects device connected to the
STEREO EFFECTS LOOP. DRY = original signal only, WET = processed signal only.
You can dial in any signal blend between these two extreme settings.
NOTE: If no signal procession is
pot can be used as a master volume. The FX-MIX has no influence on overall
output when it is set to DRY (refer to the “Activating a Second MASTER VOLUME”
paragraph on the following page
connected
).
to the STEREO LOOP, then the FX-MIX
15. MASTER VOL
The
ATTAX's
all outputs.
overall output is defined via the MASTER VOLUME knob. It influences
16. PHONES
1/4"
head phone jack. The PHONES output jack delivers a speaker-simulated signal,
so the
ATTAX
sounds similar to your stage setup at headphone volumes.
17. MAIN SWITCH:
AC mains power switch
18. MAINS
The included Euro-norm mains cable is connected to this socket. Ensure the voltage
selector is set to the correct voltage (refer to the safety guidelines).
19. FUSE
Use a screwdriver to unlock and unscrew the FUSE holder. Ensure replacement fuses’
specifications are identical to the original. The
norm of 230 V.
ATTAX
is factory-set to the European
ATTAX
20.
RECORDING OUT JACKS
The RECORDING OUT jacks deliver a frequency-corrected STEREO SIGNAL,
comparable to a that of a miked 4 x 12” cabinet, ideal for home recording, studio,
and DI-to-mixer applications.
Page 7

21. MONO FX LOOP
Serial signal path for external effects processors. Connect the ATTAX’S LOOP
RETURN
at the processor.
22.
STEREO FX LOOP
The parallel
(14). The effects signal can be activated via the STAGEBOARD or MIDI messages.
to the device’s OUTPUT jack. The output signal’s dry/wet mix is regulated
STEREO EFFECTS LOOP’s dry/wet mix
is regulated via the
FX MIX pot
Connect the
ATTAX's
LOOP SEND jack to the device’s INPUT, and the
ATTAX's
LOOP LEFT/RIGHT RETURN jacks to the device’s LEFT/RIGHT OUTPUT jacks.
ATTAX
Use the
The LOOP sends a mono signal if only the
TIP 1: You can connect other instruments/sound generation equipment to the
via the STEREO LOOP’S RETURN jacks instead of a signal processor/effects device.
A second guitar, keyboard, drum machine, tape player, etc. can be used for rehearsals
/
practice sessions.
v
Adding a STEREO SIGNAL (tape deck, keyboard, etc.):
l Connect the device’s LEFT /RIGHT OUTPUTS to the ATTAX STEREO LOOP’S
LEFT
l Step on the STAGEBOARD’S FX footswitch (the loop is activated).
l Regulate the device’s volume via the FX MIX pot located on the front panel (to
the left towards DRY =
TIP 2: You
provided you do not connect a signal processor.
v
Activating the additional MASTER VOLUME
l Step on the STAGEBOARD’S FX footswitch (the LED illuminates).
l Dial in a separate MASTER VOLUME setting for the ATTAX via the
the left towards
l You can switch back and forth between the two MASTER VOLUMES via the
FX
footswitch.
STEREO LOOP’S RIGHT RETURN jack for mono signal processors.
RIGHT RETURN jack is connected.
/
RIGHT INPUTS.
volume down, to the right towards WET = volume up).
can also use the loop to activate an additional MASTER VOLUME,
DRY = volume up, to the right towards WET = volume down).
FX
MIX pot (to
ATTAX
Upon MIDI option installation, you can also call MASTER VOLUME changes via MIDI
messages.
23. LINE OUT ( LEFT / RIGHT
)
The two LINE OUT jacks (Left/Right) feed the preamp’s signal to a power amp(s). Use
a single
LINE OUT jack to drive a mono power amp and speaker cabinet.
page 7
Page 8

24. STAGEBOARD JACK
Connect the included ATTAX STAGEBOARD to this MULTIPIN jack.
Your ATTAX preamp package includes the STAGEBOARD which enables you to
activate the 3 CHANNELS and the STEREO EFFECTS LOOP via footswitches.
NOTE: Ensure the CLEAN /TUBE and CRUNCH
the
FRONT PANEL
STAGEBOARD
A combination of the two operating modes ( footswitch /front panel ) is not
recommended.
QUICK
ACCESS TO THE CHANNELS VIA THE STAGEBOARD.
When you switch from the solid state preamp section to the tube section via the
STAGEBOARD, it is advisable to pre-select the channel via the LEAD /CRUNCH
SELCECTOR SWITCH. You can then switch channels in one motion.
LEDs
are integrated in the STAGEBOARD to give you a clearer picture of the channel
switching status for on-stage applications.
These
LEDs
panel
LEDs
EFFECTS LOOP SWITCHING VIA THE
In addition to channel selection feature, the STAGEBOARD can also be used
activate/deactivate the STEREO EFFECTS LOOP via the FX ON
appropriate LED illuminates when the LOOP is active.
are set to OFF (not
footswitch
tell you
denete the currently active channel.
mode.
which
of the two CRUNCH / LEAD channels is preset. The front
pushed
ATTAX
/
LEAD SELECTOR SWITCHES on
in) when operating the
STAGEBOARD
/
ATTAX
OFF SWITCH. The
in
the
Circuitry:
Channels:
Jacks:
Dimensions:
1 Solid-State CLEAN ,2 Tube preamps CRUNCH / LEAD
CLEAN:
CRUNCH:
LEAD:
Input, Phones, Recording Out ( Left / Right
Stereo Loop ( Send / Return Left - Return Right ), Line Out ( Left / Right
Footswitch.
19” / 1 HU
Volume,
Volume,
Volume,
Bass, Mid, Treble
> Bass, Mid, Treble <
),
Mono Loop ( Send / Return
-
Master Volume
-
Crunch Master
Lead Master
),
),
Page 9

HUGHES & KETTNER
POWERAMP
E:G: HUGHES & KETTNER CF 200 / VS 250
ATTAX
n._--
,zm.,“.__
----
-&Law-
>
CF 200
Line Out Left Line Out Right
Input Left Input Right
Stereo Speaker Outs
Left
Input
HUGHES & KETTNER
GL 112/GL 212/GL-GR 412
Right
Input
Line Out L /
Recording Out L /
Mono FX Send
Mono FX Return
Stereo Send L
Stereo Return L /
Phones
Stageboard
R
/ R
Poweramp
R
R
Signal for Recording
Studio Applications
Effect
Effect Output
Input L
Output L /
Phones
Stageboard
/
Cabinets
/
Tuner In
/ R
R
/
page
9
Page 10

The above examples are just hat examples. Your sound is ulimatly dependant on the
type of instrument and the playing style you use. Nevertheless, these settings will
give you a general impression of the ATTAX's sound spectrum.
VOL. BASS MID TREBLE CR. GAIN LEA. GAIN BASS MID TREBLE CFIMAST.~
VOL.
BASS MID TREBLE CR. GAIN LEA.
VOL. BASS MID TREBLE CR.GAlN LEA.GAlN BASS MID TREBLE CR. MAST. LEA. MAST.
I---- -
VOL. BASS MID TREBLE CR. GAIN LEA. GAIN BASS MID TREBLE CR. MAST. LEA. MAST.
GAIN- BASS- AMID
TREBLE CR.
MAST.
CEA.MASY j
LEA.MAST.]
Page 11

I MPORTANT SAFETY INSTRUCTIONS!
EFORE CONNECTING,READ INSTRUCTIONS
B
.
Read all of these instructions
.
Save these instructions for later use
.
Follow all warnings and instructions marked on the product
.
Do not use this product near water
.
Do not place this product on an unstable cart, stand or table. The product may
fall, causing serious damage to the product.
.
Slots and openings in the cabinet and the back or bottom are provided for ventilation; to ensure reliable operation of the product and to protect it from overheating, these openings must not be blocked or
covered. This product should not be placed in a built-in installation unless proper ventilation is
provided.
.
This product should be operated from the type of power source indicated on the marking label. If you
are not sure of the type of power available, consult your dealer or local power company.
.
This product is equipped with a 3-wire grounding type plug, a plug having a third pin. This plug will
only fit into a grounding-type power outlet. This is a safety feature. If you are unable to insert the plug
into the outlet, contact your electrician to replace your obsolete outlet. Do not defeat the purpose of the
grounding type plug.
.
Do not allow anything to rest on the power cord. Do not locate this product where persons will walk
on the cord.
.
If an extension cord is used with this product make sure that it is a 3-wire grounding- type and that the
total of the amp ere ratings on the products plugged into the extension cord do not exceed the
extension cord ampere rating. Also make sure that the total of all products plugged into the wall outlet
does not exceed 15 amperes.
.
Never push objects of any kind into this product through cabinet slots as may touch dangerous voltage
points or short out parts that could result in risk of fire or electric shock. Never spill liquid of any kind
on the product.
.
Do not attempt to service this product yourself, as opening or removing covers may expose you to
dangerous voltage points or other risks. Refer all servicingto service personnel.
.
Unplug this product from the wall outlet and refer servicing to qualified service personnel under the
following conditions:
w
Page 12

l When the power cord or plug is damaged or frayed
l If liquid has been spilled into the product
l If the product has been exposed to rain or water
l
If the product does not operate normally when the operating instructions are followed. Adjust only
these controls that are covered by the operating instructions since improper adjustment of other
controls may result in damage and will often require extensive work by a qualified technician to
restore the product to normal operation.
l If the product has been dropped or the cabinet has been damaged
l
If
the product exhibits a distinct change in performance, indicating a need of service! Selection of
power supply cord. Use only a listed detachable power supply cord type SVT or
AWC, 3 conductor, one end configured for NEMA 5-l 5 other end for IEC
l Fuses: For continued protection against risk of fire, replace fuses only with same type and ratings
SJT
320/CEE 22!
minimum 18
TO PREVENT THE RISK OF FIRE AND
MOISTURE OR RAIN. DO NOT OPEN
SHOCK HAZARD, DO NOT EXPOSE THIS APPLIANCE TO
CASE; NO USER SERVICEABLE
SERVICING TO QUALIFIED SERVICE PERSONNEL.
PARTS INSIDE. REFER
page 12
 Loading...