

Page 1
-?:LUK 5VPZL.H[L:WLHRLYV\[ (\_0U7V^LY 0UW\[-?9L[\YU7OVULZ =VS\TL *HI;`WL VUVMM4PJ3PUL9LK)V_+06\[
中文
中文
•
MASTER
VOLUME SAGGING PRESENCE RESONANCE
SPIRIT™ AMPMAN SERIES
BOOSTFX LOOPSOLO CHANNEL A/B
TONE GAIN A
• 日本語
B
Manual 1.1
• English • Deutsch • Français • Italiano • Español
Page 2
Important Safety Instructions!
Read before connecting!
This product has been built by the manufacturer in
accordance with IEC 62368-1 and left the factory in
safe working order. To maintain this condition and
ensure non-risk operation, the user must follow the
advice and warning comments found in the operating
instructions. The unit conforms to Protection Class
1 (protectively earthed). If this product shall be used
in vehicles, ships or aircraft or at altitudes exceeding
2000 m above sea level, take care of the relevant
safety regulations which may exceed the IEC 62368-1
requirements.
WARNING: To prevent the risk of fire and shock
hazard, do not expose this appliance to moisture or
rain. Do not open case – no user serviceable parts
inside. Refer service to qualified service personnel.
This symbol, wherever it appears, alerts you to
the presence of uninsulated dangerous voltage inside
the enclosure – voltage that may be sufficient to
constitute a risk of shock.
This symbol, wherever it appears, alerts you to
the presence of externally accessible hazardous
voltage. External wiring connected to any terminal
marked with this symbol must be a "ready made cable”
complying with the manufacturers recommendations,
or must be a wiring installed by instructed persons only.
This symbol, wherever it appears, alerts you to
important operating and maintenance instructions in
the accompanying literature. Read the manual.
This symbol, wherever it appears, tells you: Take
care! Hot surface! To prevent burns you must not
touch.
All electrical and electronic products including
batteries should be disposed of separately from the
municipal waste stream via designated collection
facilities appointed by the government or the local
authorities.
Read these instructions. Keep these instructions.
Follow all warnings and instructions marked on the
product and in this manual.
• Do not use this product near water. Do not place the
product near water, baths, wash basins, kitchen sinks,
wet areas, swimming pools or damp rooms.
• Do not place objects containing liquid on the product
– vases, glasses, bottles etc.
• Clean only with dry cloth.
• Do not remove any covers or sections of the housing.
• The set operating voltage of the product must match
the local mains supply voltage. If you are not sure of
the type of power available consult your dealer or
local power company.
• To reduce the risk of electrical shock, the grounding
of this product must be maintained. Use only the
power supply cord provided with this product, and
maintain the function of the center (grounding) pin
of the mains connection at any time. Do not defeat
the safety purpose of the polarized or grounding-type
plug.
• Do not defeat the safety purpose of the polarized or
grounding-type plug. A polarized plug has two blades
with one wider than the other. A grounding type
plug has two blades and a third grounding prong.
The wide blade or the third prong are provided for
your safety. If the provided plug does not fit into your
outlet, consult an electrician for replacement of the
obsolete outlet.
• Protect the power cord from being walked on
or pinched particularly at plugs, convenience
receptacles, and the point where they exit from
the device! Power supply cords should always be
handled carefully. Periodically check cords for cuts
or sign of stress, especially at the plug and the point
where the cord exits the device.
• Never use a damaged power cord.
• Unplug this product during lightning storms or when
unused for long periods of time.
• This product can be fully disconnected from mains
only by pulling the mains plug at the unit or the wall
socket. The product must be placed in such a way
at any time, that disconnecting from mains is easily
possible.
• Fuses: Replace with IEC127 (5x20mm) type and rated
fuse only! It is prohibited to use "patched fuses”
or to short the fuse-holder. Replacing any kind of
fuses must only be carried out by qualified service
personal.
• Refer all servicing to qualified service personnel.
Servicing is required when the unit has been
damaged in any way, such as:
- When the power cord or plug is damaged or frayed.
- If liquid has been spilled or objects have fallen into
the product.
- If the product has been exposed to rain or moisture.
- If the product does not operate normally when the
operating instructions are followed.
- If the product has been dropped or the cabinet has
been damaged.
• Do not connect external speakers to this product with
an impedance lower than the rated impedance given
on the product or in this manual. Use only cables
with sufficient cross section according to the local
safety regulations.
• Keep away from direct sunlight.
• Do not install near heat sources such as radiators,
heat registers, stoves or other devices that produce
heat.
• This apparatus is for moderate climates areas use, not
suitable for use in tropical climates countries.
• Do not block any ventilation openings. Install in
accordance with manufacturer’s instructions. This
product must not be placed in a built-in installation
such as a rack unless proper ventilation is provided.
• Always allow a cold device to warm up to ambient
temperature, when being moved into a room.
Condensation can form inside it and damage the
product, when being used without warming up.
• Do not place naked flame sources, such as lighted
candles on the product.
• The device must be positioned at least 20 cm/8"
away from walls with free air space inbetween, and
there must be free air space of at least 50 cm / 20"
immediately above the unit within which no object(s)
may be placed or positioned.
• Make sure that the device is always placed on a solid,
flat surface.
• Use only with the cart, stand, tripod, bracket or
table specified by the manufacturer or sold with the
product. When a cart is used, use caution when
moving the cart /product combination to avoid injury
from tip-over.
• Use only accessories recommended by the
manufacturer, this applies for all kind of accessories,
for example protective covers, transport bags,
stands, wall or ceiling mounting equipment. In case
of attaching any kind of accessories to the product,
always follow the instructions for use, provided by
the manufacturer. Never use fixing points on the
product other than specified by the manufacturer.
• This appliance is NOT suitable to be used by any
person or persons (including children) with limited
physical, sensorial or mental ability, or by persons
with insufficient experience and/or knowledge to
operate such an appliance. Children under 4 years
Version 2.5 07/2018
of age must be kept away from this appliance at all
times.
• Never push objects of any kind into this product
through cabinet slots as they may touch dangerous
voltage points or short out parts that could result in
risk of fire or electric shock.
• This product is capable of delivering sound
pressure levels in excess of 90 dB, which may cause
permanent hearing damage! Exposure to extremely
high noise levels may cause a permanent hearing
loss. Wear hearing protection if continuously exposed
to such high levels.
• The manufacturer only guarantees the safety,
reliability and efficiency of this product if:
- Assembly, extension, re-adjustment, modifications
or repairs are carried out by the manufacturer or by
persons authorized to do so.
-
The electrical installation of the relevant area
complies with the requirements of IEC (ANSI)
specifications.
- The unit is used in accordance with the operating
instructions.
- The grounding of the center pin of the mains plug is
maintained to reduce the risk of shock.
Things to do before operating the amp
• Please read these instructions carefully,
particularly the notes on safety, before
operating the amp.
• The manufacturer disclaims any liability on
responsibility whatsoever for any damage or
defect to this and other devices resulting from
misuse.
• Before you plug this amp into a mains power
outlet, make sure its Power switche is off and
that the voltage rating indicated on its rear
panel matches your local mains current.
• A word of warning before you fire up your
AmpMan: It’s loud, and high volume levels can
cause hearing damage. To avoid very loud and
unwelcome surprises, make a habit of backing
the Volume knob of the guitar connected
to the AmpMan all the way down before
switching on the amp!
Page 3

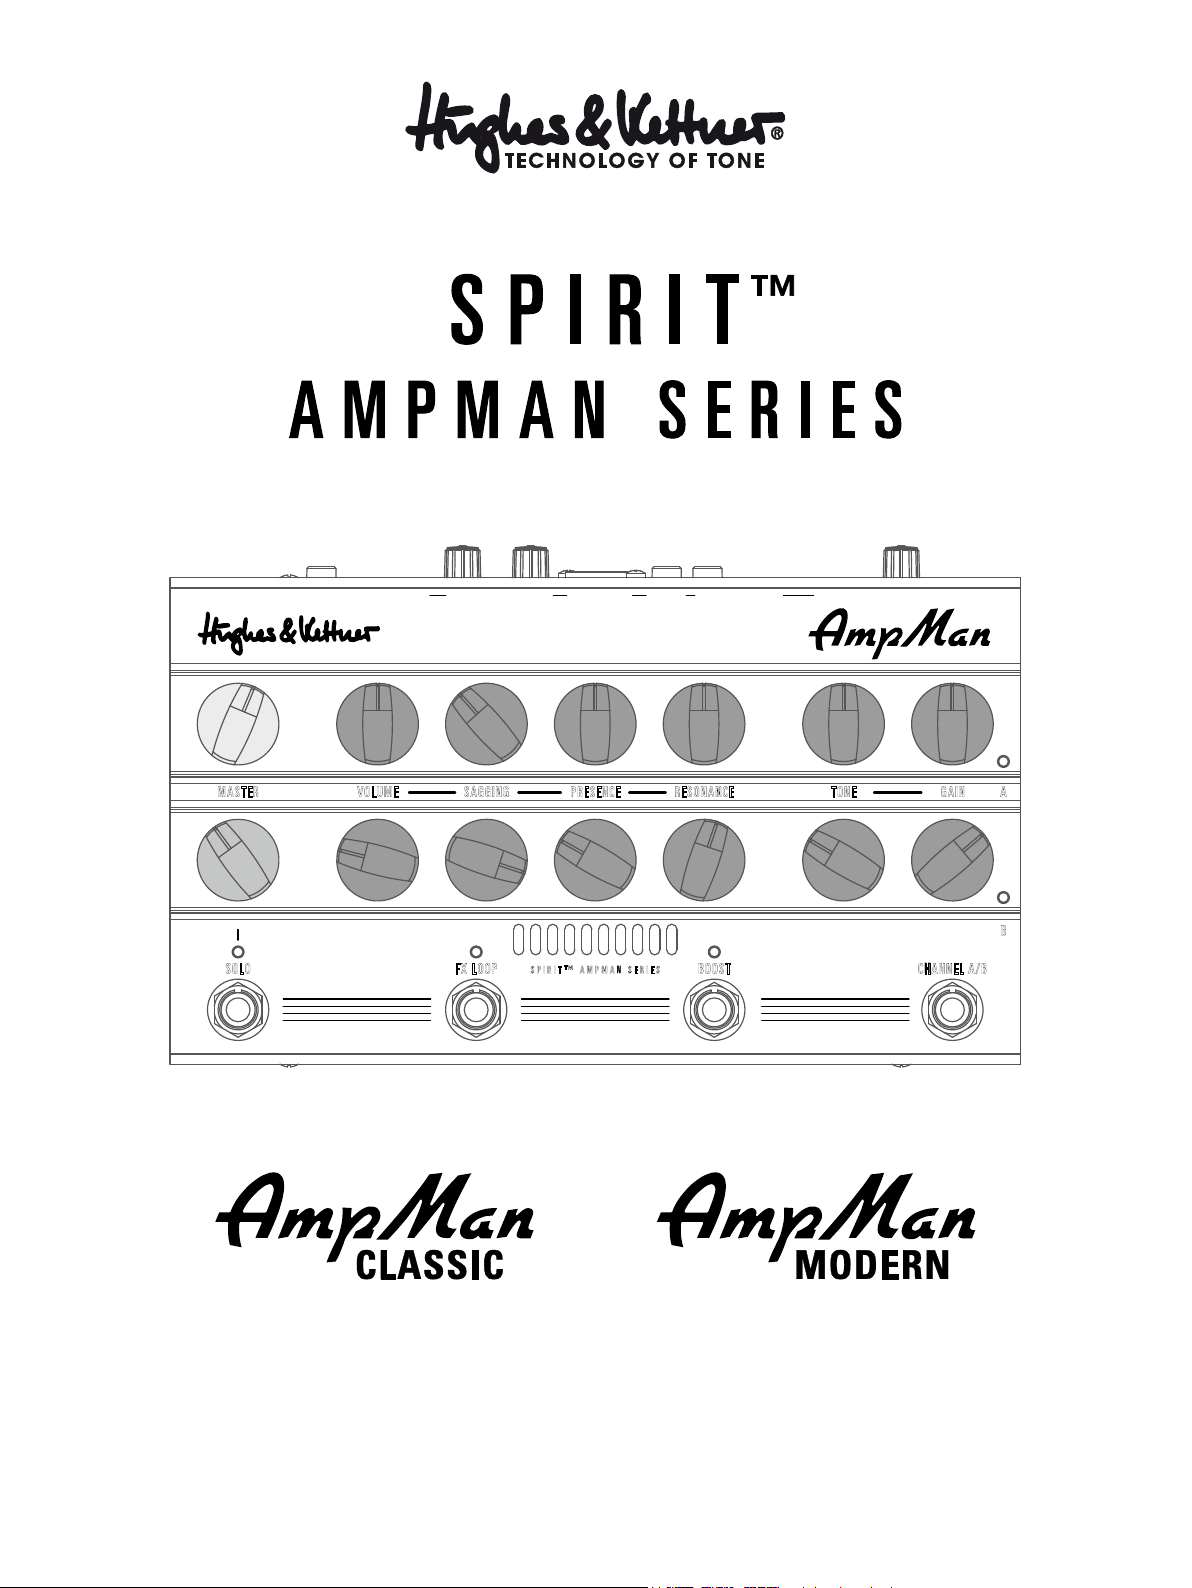
Spirit™ AmpMan Series – Manual 1.1
中文
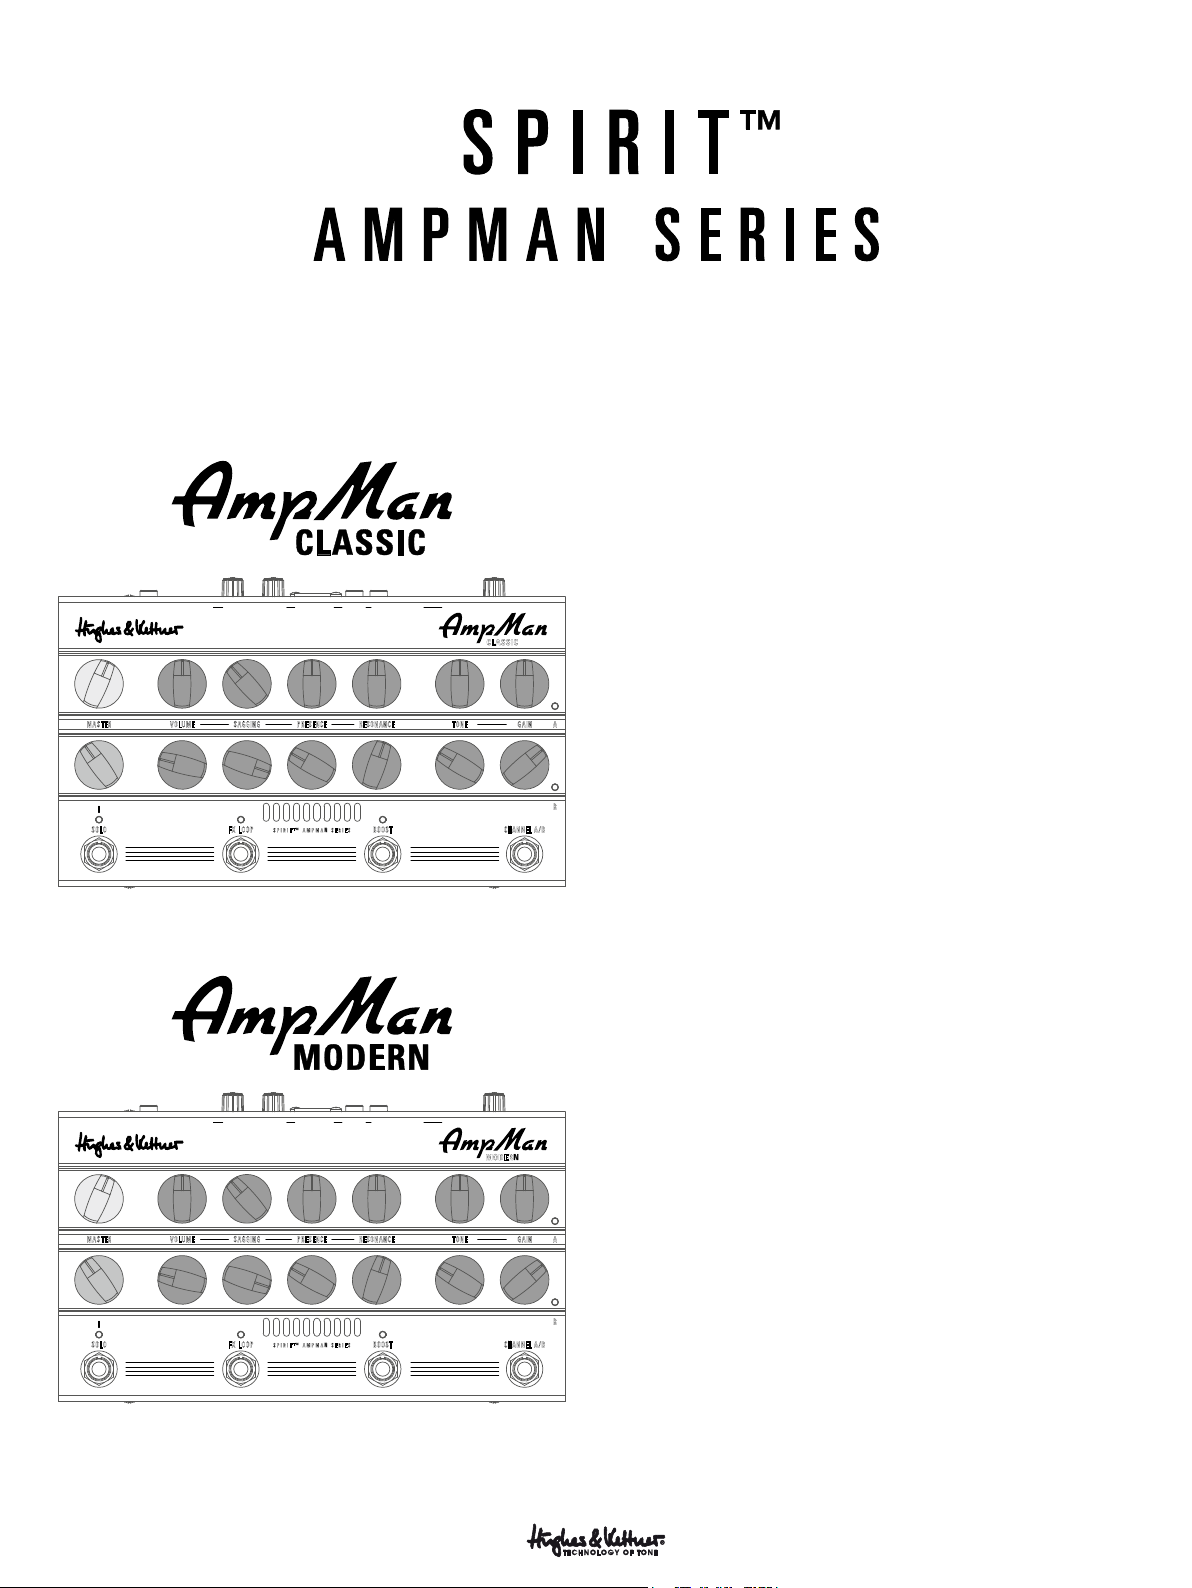
1 General Information
AmpMan Classic and AmpMan Modern share the same feature set. Each
has two independently variable channels. They come with just one Master
section, Solo Master knob, FX Loop and Boost button each, but these control
features address both channels.
Heads up: You can set AmpMan to Smart mode (see section 3, Smart Mode)
to store different Boost and FX Loop settings for each channel.
Channel A on both AmpMan Classic and AmpMan Modern delivers
中文
•
MASTER
VOLUME SAGGING PRESENCE RESONANCE
-?:LUK 5VPZL.H[L:WLHRLYV\[ (\_0U7V^LY 0UW\[-?9L[\YU7OVULZ =VS\TL *HI;`WL VUVMM4PJ3PUL9LK)V_+06\[
CLASSIC
TONE GAIN A
everything from Californian clean back to the British crunch with a voicing
that harks back the untamed tones sounds of the Woodstock era. Channel
B is voiced differently. On the AmpMan Classic, it delivers the big sound of
B
SPIRIT™ AMPMAN SERIES
BOOSTFX LOOPSOLO CHANNEL A/B
the ‘80s/’90s stadium rock era, putting everything from British lead to brown
sound at your fingertips. AmpMan Modern serves up all flavors of metal to
• 日本語
deliver high-gain tone for wailing solos and edgy riffs.
MASTER
VOLUME SAGGING PRESENCE RESONANCE
SPIRIT™ AMPMAN SERIES
BOOSTFX LOOPSOLO CHANNEL A/B
-?:LUK 5VPZL.H[L:WLHRLYV\[ (\_0U7V^LY 0UW\[-?9L[\YU7OVULZ =VS\TL *HI;`WL VUVMM4PJ3PUL9LK)V_+06\[
MODERN
TONE GAIN A
B
• English • Deutsch • Français • Italiano • Español
3
Page 4
Spirit™ AmpMan Series – Manual 1.1
-?:LUK 5VPZL.H[L:WLHRLYV\[ (\_0U7V^LY 0UW\[-?9L[\YU7OVULZ =VS\TL *HI;`WL VUVMM4PJ3PUL9LK)V_+06\[
11
12
13
MASTER
6
VOLUME SAGGING PRESENCE RESONANCE
6
5
5
10 9
4
4
SPIRIT™ AMPMAN SERIES
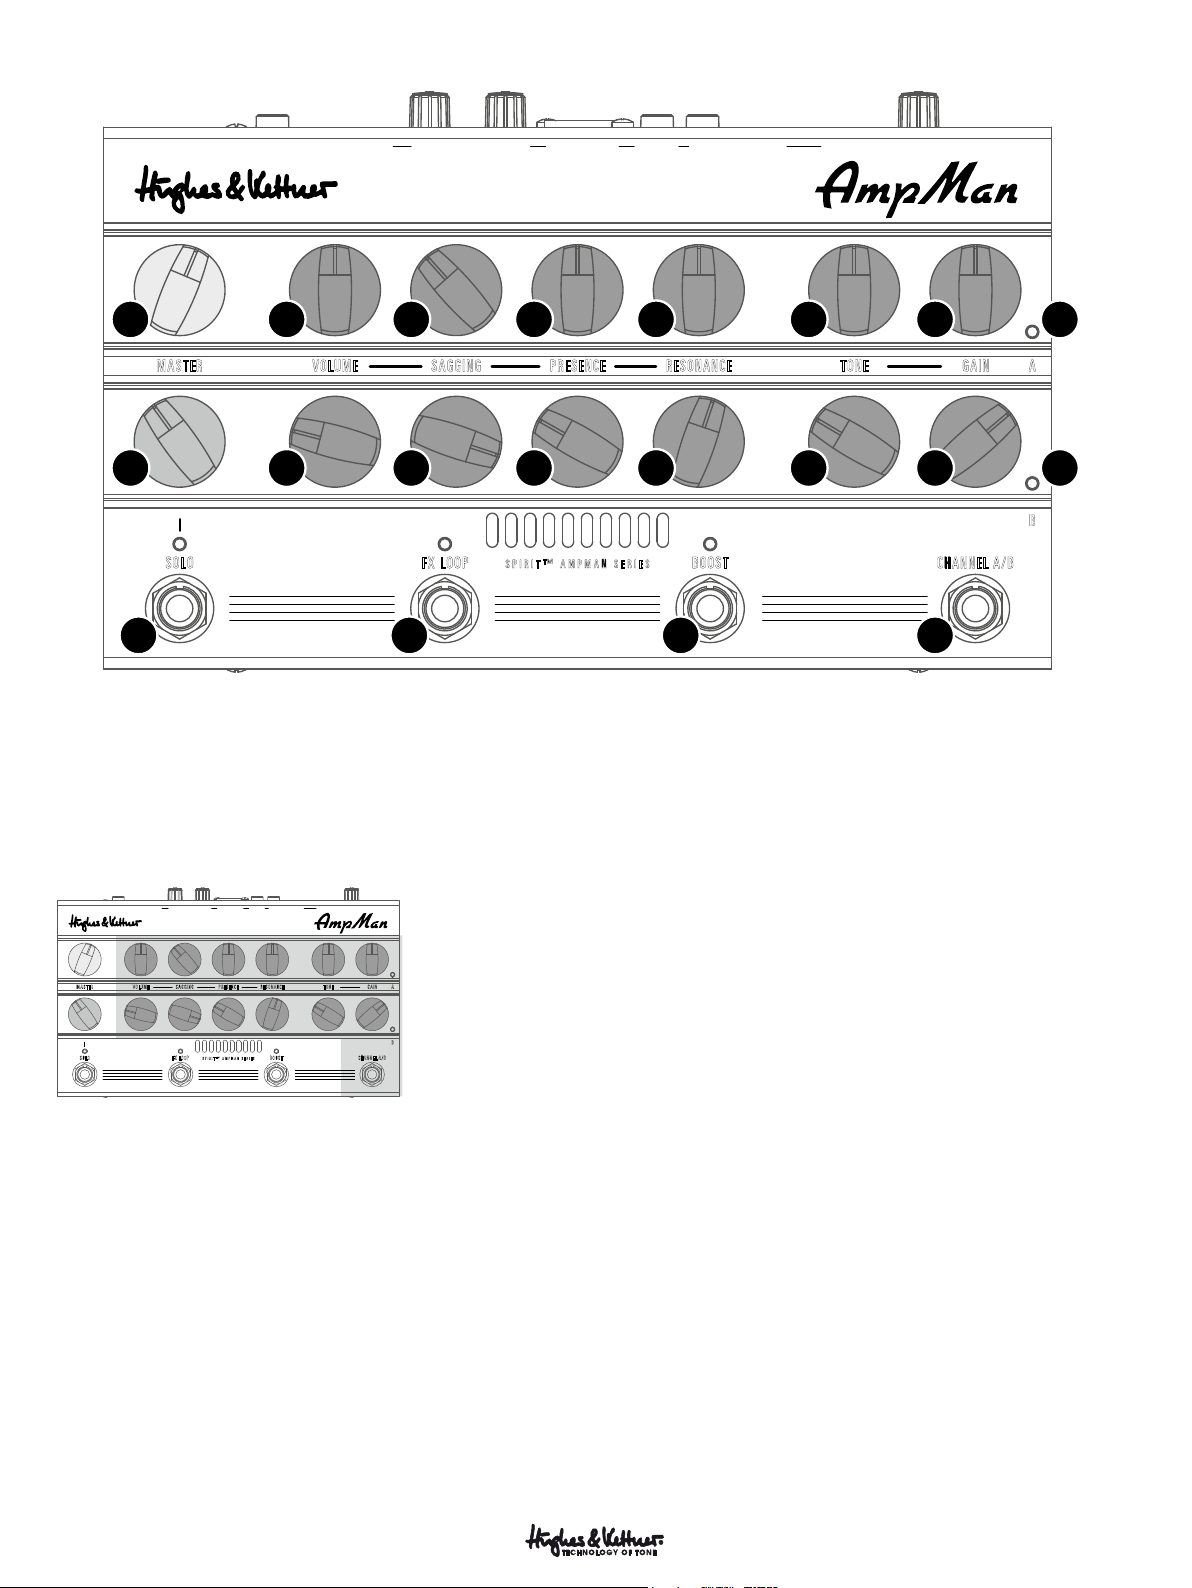
2 Control Features
2.1 The channel section
-?:LUK 5VPZL.H[L:WLHRLYV\[ (\_0U7V^LY 0UW\[-?9L[\YU7OVULZ =VS\TL *HI;`WL VUVMM4PJ3PUL9LK)V_+06\[
MASTERBVOLUME SAGGING PRESENCE RESONANCE
SPIRIT™ AMPMAN SERIES
1
●
Gain: The Gain knob determines input sensitivity and therefore the
preamp‘s saturation level. Along with the Tone and Sagging controls, it is
your most important sound-sculpting tool.
2
●
Ton e: We tuned the Tone knob to let you make the most of each channel.
It shapes the given channel’s characteristic frequency range to give you a
very big tonal palette.
TONE GAIN A
BOOSTFX LOOPSOLO CHANNEL A/B
3
3
BOOSTFX LOOPSOLO CHANNEL A/B
2
TONE GAIN A
2
1
1
8
8
B
7
4
●
Presence: This knob controls the amount of harmonic overtones genera-
ted by the amp – the higher the setting, the more intense the effect.
5
●
Sagging: This knob, alongside the Gain and Tone knobs, is the most
powerful tool in your kit for dialing in fresh and inspiring tone. It affords you
total control over the power amp's saturation levels and response at any volume. Nudge it to dial in just the right amount of cream or sweep it through
the control range to tap into decades of great tone at a twist of the wrist.
Note: The more sag you dial in, the more saturated the power amp. The
Sagging knob may also affect the power amp's output level the extent of
which also depends on the Gain setting. Volume increases as you turn the
Sagging knob from the far left to the 12 o'clock position, but may drop again
as the knob sweeps from the center to the far right. You can compensate for
this by adjusting the Volume knob.
Heads up: Going overboard with the Sagging control when playing through
Channel B on the Spirit AmpMan Modern can be counterproductive. The
Sagging knob adds a creamy touch for singing high-gain solos, but too much
of it can muddy up riffs and power chords. Go easy on the Sagging knob
when playing down-tuned or seven-string guitars.
3
●
Resonance: Set the Resonance knob to 12 o'clock, and you will hear the
normal resonance created by the amp-and-cabinet combination. Twisting
it counterclockwise dampens the speakers' and the cabinet's resonance for
a looser, softer sound that sweetens up your clean tone. Turning the knob
clockwise intensifies resonance for a tighter, punchier low end that works
well with distorted sounds.
4
6
●
Volume: Turn this knob to adjust the two channels’ levels.
Caution: Please don't use this knob to control the amp's overall output level
– that's the Master knob's job!
Page 5

Spirit™ AmpMan Series – Manual 1.1
中文
7
●
Channel A/B: Use this button to switch between Channel A and
Channel B.
8
●
Channel LED: The blue LED to the right of the respective channel’s Gain
knob lights up to tell you that that channel is active.
2.2 FX Loop and Boost
-?:LUK 5VPZL.H[L:WLHRLYV\[ (\_0U7V^LY 0UW\[-?9L[\YU7OVULZ =VS\TL *HI;`WL VUVMM4PJ3PUL9LK)V_+06\[
MASTERBVOLUME SAGGING PRESENCE RESONANCE
SPIRIT™ AMPMAN SERIES
9
●
Boost: This sound-shaping option brings up specific frequencies to deli-
ver creamier or more assertive sounds, depending on the channel. The LED
above the Boost button lights up red when you engage it.
10
●
FX Loop: This button activates the serial effects loop on the rear panel.
The LED above the button lights up red when the loop is active.
Heads up: In the amp’s default operating mode, these two buttons work
independently of the two channels. However, you can assign these controls
to the channels using the Smart Mode button to switch their settings along
with the channels. See section 3, Smart Mode, for more on this.
TONE GAIN A
BOOSTFX LOOPSOLO CHANNEL A/B
2.3 The Master Section
-?:LUK 5VPZL.H[L:WLHRLYV\[ (\_0U7V^LY 0UW\[-?9L[\YU7OVULZ =VS\TL *HI;`WL VUVMM4PJ3PUL9LK)V_+06\[
MASTERBVOLUME SAGGING PRESENCE RESONANCE
SPIRIT™ AMPMAN SERIES
11
●
Master: The beige Master knob controls AmpMan’s overall volume
level. It affects both channels.
12
●
Solo(Master): The red knob below the Master control lets you bump
up the volume beyond the Master level. Its control range is 0 to +6 dB. This
gives you an instant gain boost so you can simply step on the Solo button to
get the extra volume to let lead lines stand out. Turning the Master knob to
adjust the overall level automatically adjusts the Solo volume by the same
measure.
Caution: Bumping up the volume with the Solo button also increases the
level of the signals sent to the Red Box and the Phones output, so be sure to
audition the Solo volume level during sound checks so you don’t overdrive
the mixer’s input when using the Red Box on stage. Take similar precautions
when using headphones: Always adjust the maximum Phones level using
the rear panel Volume control with the Solo button engaged!
13
●
Solo: Activate this switch to push the volume up beyond the Master
level by the number of dBs set on the Solo knob. The red LED above the
button lights up to indicate Solo is active.
TONE GAIN A
BOOSTFX LOOPSOLO CHANNEL A/B
中文
•
• 日本語
2.4 Rear Panel
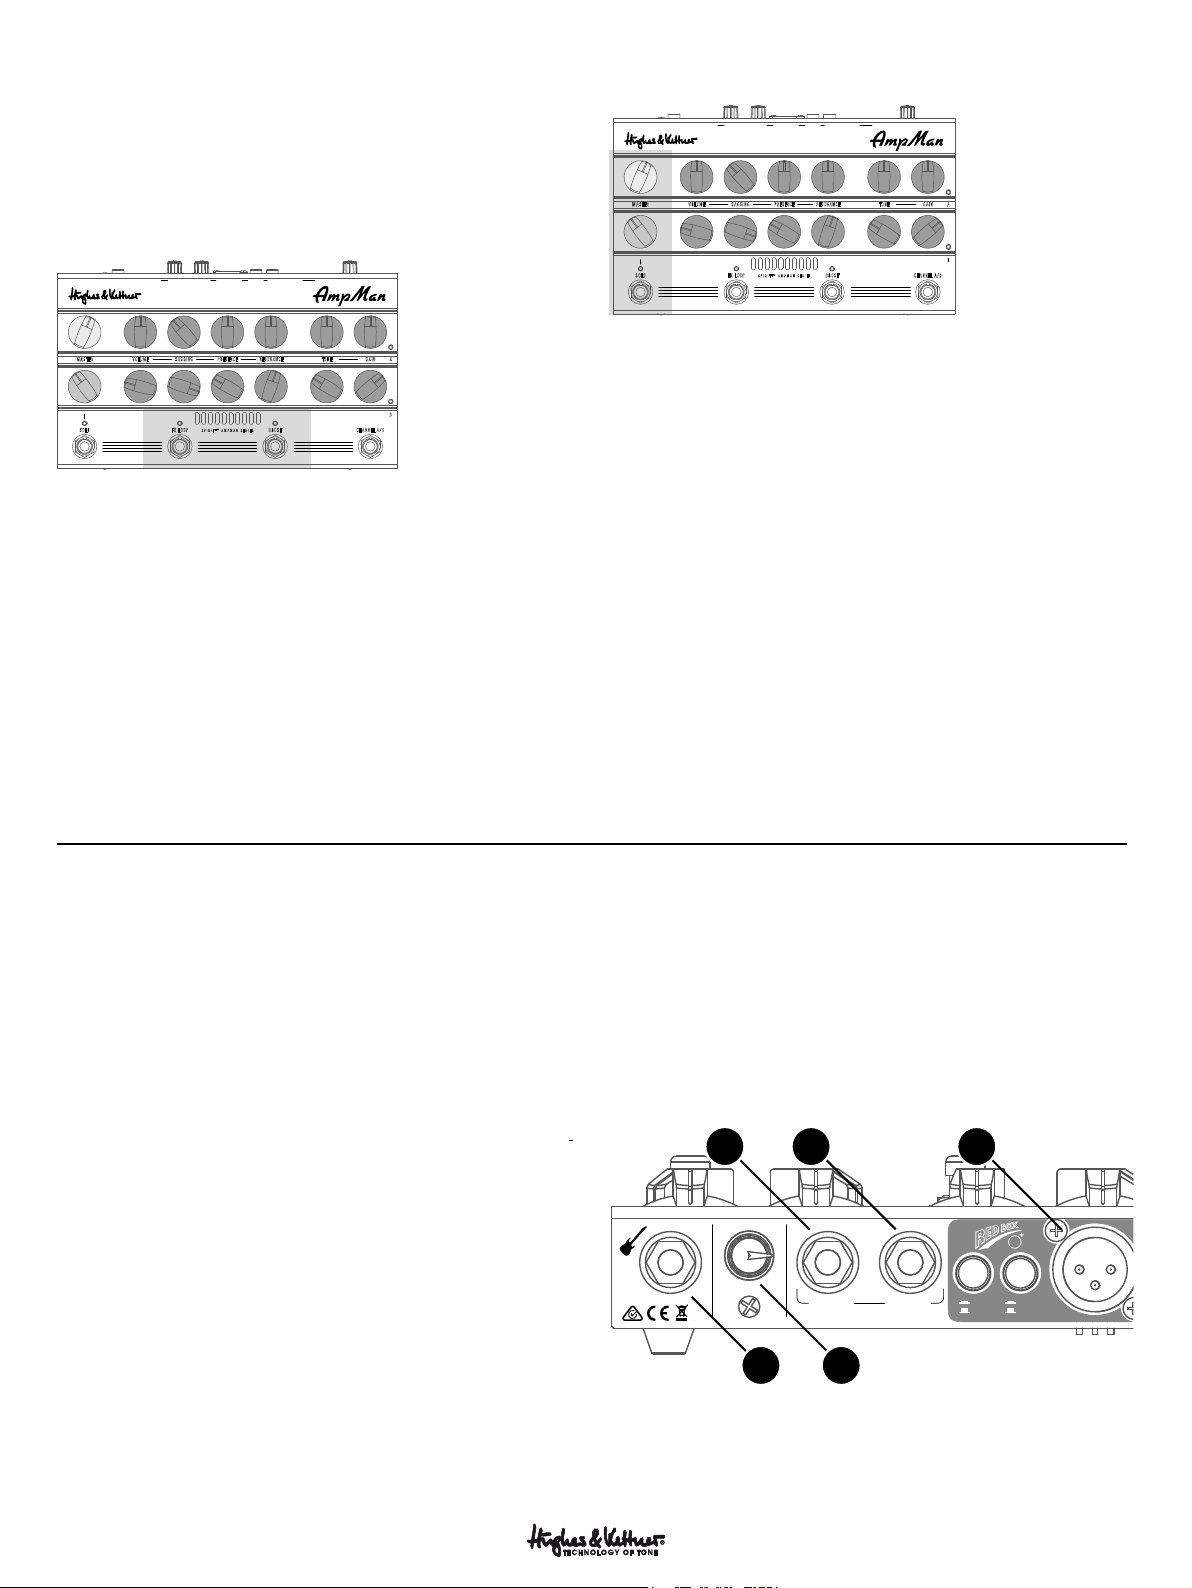
1
●
Input: Connect your guitar to this input using a shielded cord equipped
with 6.3 mm (1/4") jack plugs.
2
●
Noise Gate: This knob controls the noise gate's sensitivity. The Noise
Gate's IDB™ technology automatically adapts the attack and threshold
parameters. Turning the knob all the way down – that is, counterclockwise
as far as it will go – bypasses the noise gate. The further you turn up the noise
gate, the more aggressively it responds. Set it to 9 o'clock if you want it to
open up at very soft signal levels. The further you twist the knob to the right,
the harder the Noise Gate kicks in.
Heads up: AmpMan automatically recalls the Noise Gate setting for each
channel. For example, if you turn the knob to the far left to deactivate the
Noise Gate for a Channel A clean sound, but activate the Noise Gate for a
Channel B lead sound, the amp will retain these settings when you switch
channels.
3
●
FX Send: Connect the FX Send to your external effects processor's input.
4
●
FX Return: Connect the FX Return to your external effects processor's
output.
5
●
Red Box AE+ DI Out: The original Red Box has been the industry
standard tool for capturing the sound of guitar amps without using
microphones since Hughes & Kettner invented it in 1988. The Red Box
delivers unvarying sound quality at every gig or recording session, putting
an end to crosstalk with other instruments and the hassles of experimenting
with microphone placement. The Red Box AE+ is the latest version of the
award-winning speaker simulator. The DSP-powered Ambience Emulation
delivers a perfect mix of authentic cabinet ambience and that ultra-direct
attack of purely analog tone.
3 4 5
NOISE GATEINPUT FX LOOP
VMM
1
2
9L[\YU:LUK
AE
6U
3PUL
6MM
4PJ
• English • Deutsch • Français • Italiano • Español
5
Page 6

Spirit™ AmpMan Series – Manual 1.1
3 4 6 10 12 14 15117
NOISE GATEINPUT FX LOOP
VMM
9L[\YU:LUK
1
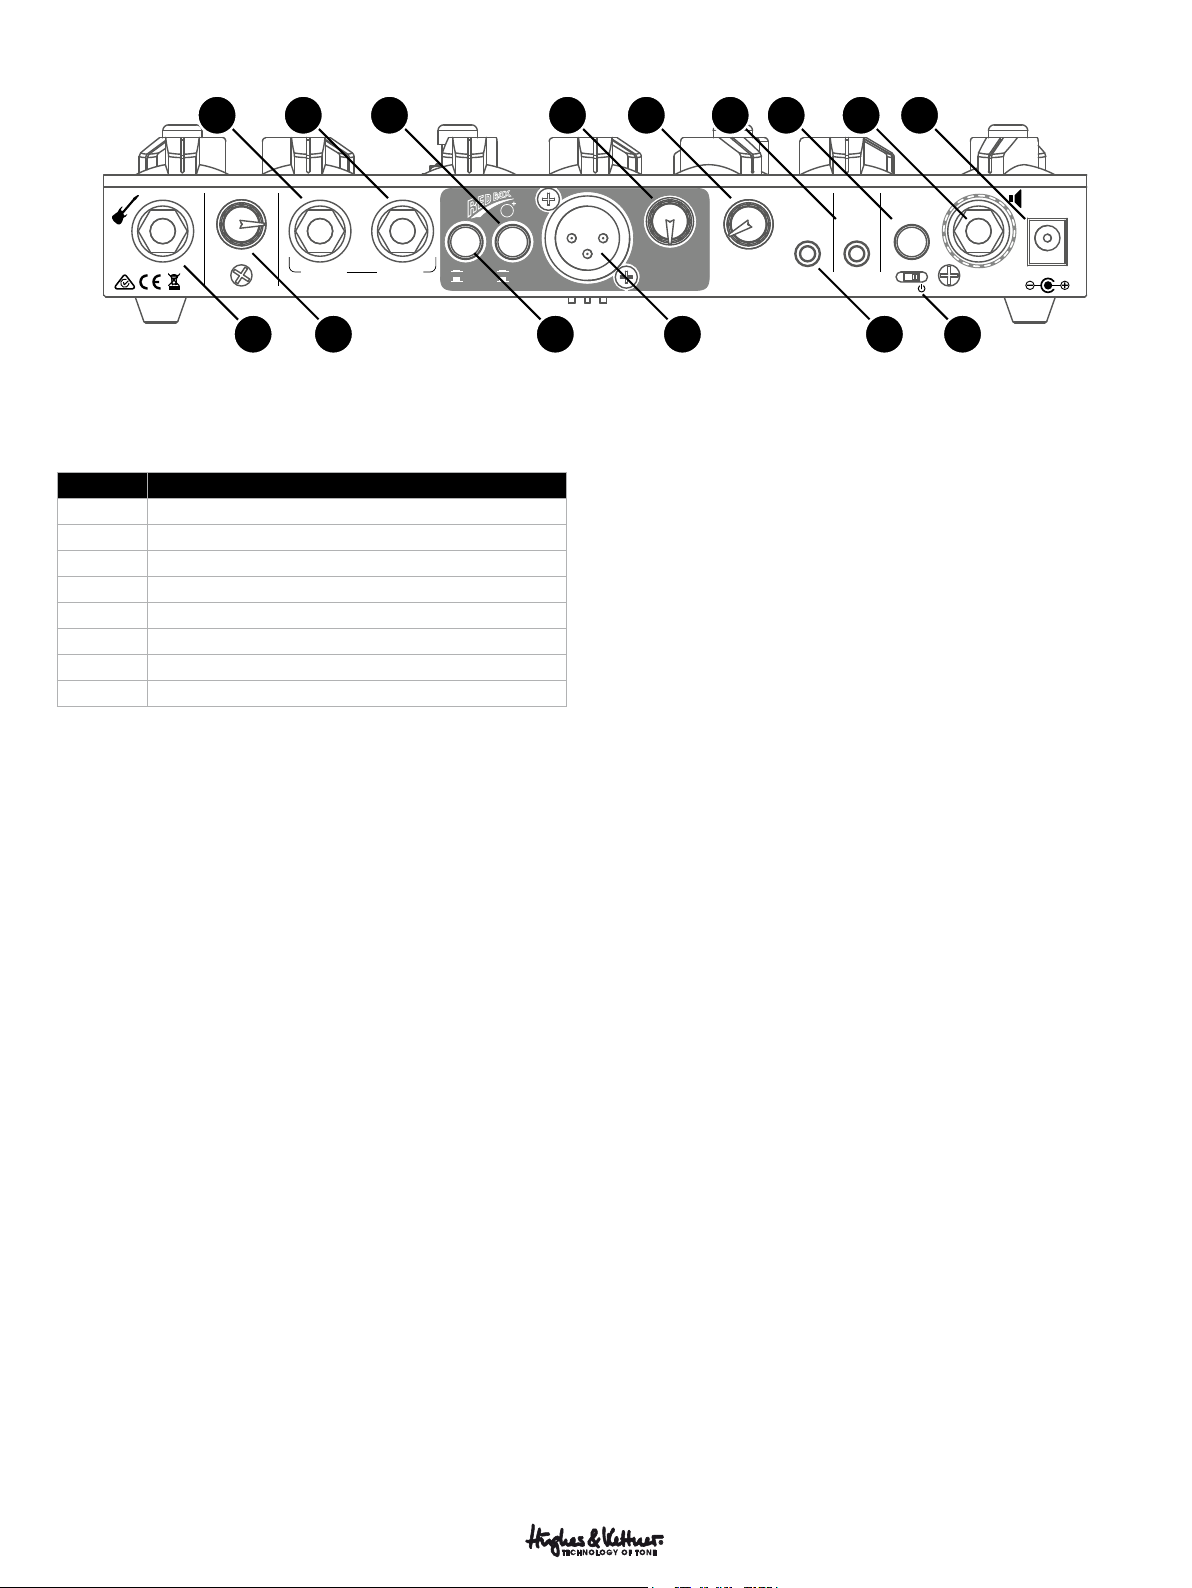
6
●
Cab Type: This control selects one of the eight cabinet simulations:
No. Cabinet Types
1 1x12" Modern Thiele Port
2 2x12" Modern Front Port
3 2x12" Vintage Open Back
4 4x10" Alnico Open Back
5 4x12" Vintage Cab
6 4x12" British Cab
7 4x12" Modern Cab
8 4x12" American Cab
Heads up: AmpMan automatically recalls the Cab Type setting for each
channel. For example, you could choose an open-back cab to add some
sparkly chime to your Channel A clean tone and a 4x12" cab to conjure
a tighter, punchier sound for Channel B. This option of assigning different
cab simulations comes in very handy, especially when using the Red Box:
Simply choose the speaker that suits each channel and tone best.
Heads up, again: You can use the Red Box and Speaker Out simultaneously,
for example, by connecting an on-stage speaker cabinet to the Speaker Out
and the Red Box to a mixing console. If you do this, please be sure to select
the same Cab Type for both channels, otherwise the cabinet on stage is not
going to sound at all like the signal sent from the Red Box.
7
●
Red Box Mic/Line: Be sure to set the Red Box to the proper level.
We recommend using the Line setting when running long cables to send
the signal over greater distances, for example, at gigs. The higher output
compensates for the signal level lost along the way. If the mixing console
or soundcard/audio interface lacks XLR inputs, you will need an XLR to 6.3
mm (1/4") jack adapter, which should be readily available in music stores.
Please make sure the Red Box is set to Line when it is connected to 6.3
mm (1/4") jack inputs.
Caution: Some recording interfaces come with special Hi-Z inputs. These
high-impedance jacks are designed for instrument levels and intended
exclusively for connecting guitars. Do not connect the Red Box to this
type of input. Its higher output levels will saturate it and cause undesirable
distortion.
2 5 9 138
AE
6U
3PUL
6MM
4PJ
*HI;`WL
8
●
Red Box on/off: When you switch the cabinet emulation off, the Red
Box out sends an unfiltered signal for use with your favorite cabinet and
microphone simulation software or processor.
9
●
Phones: Connect standard headphones equipped with a 3.5 mm
stereo mini jack plug to this output.
Note: You can also use this output to feed a line signal to any stereo
multimedia input found on home stereo systems and the like. Your local
dealer should have the proper adapters or cables for this. To connect this
output to a typical stereo sound system's Aux In you will need a cable
with a TRS stereo jack on one end to plug into your AmpMan's Phones
jack and two RCA connectors on the other end to plug into your stereo
sound system's left and right inputs. You can also connect this output to
any mixing desk using a cable with a TRS connector on one end and two
TS mono 6.3 mm (1/4") jack plugs or two XLR connectors on the other.
Be sure to pan the inputs of your desk hard left/right to get the full stereo
effect.
Caution: These amps are unlike Black Spirit and Spirit Nano series amps in
that their Speaker Out is not muted when you insert a plug into the Phones
jack. The advantage of this circuit design is that it enables you to use the
Phones jack as a variable line out to route the signal to a connected speaker
cabinet. This gives you an alternative to the Red Box with its fixed output
level. To mute the power amp, turn the Master knob all the way down or
operate the AmpMan without a connected cab, in which case you can
leave the Master knob setting where you wish.
10
●
Phones Volume: Turn this knob to adjust the Phones output’s volume
level.
11
●
Aux In: You can connect any audio source to the Aux Input. The amp
blends the Aux In signal with your guitar's signal. You can also use it to
connect drum machines or other instruments. The Aux In signal is routed
in full-fledged stereo quality to the Phones jack for you to jam to backing
tracks without having to fuss with an outboard mixer.
12
●
Power: This button switches your AmpMan on and off.
13
●
AES: EC Commission Regulation no. 1275/2008 requires electronic
devices to be equipped with a power-saving function that switches off the
device after a specified period of non-use. Your AmpMan does this with a
circuit called AES. The mini switch next to the Power button and Speaker
Out jack enables and disables this auto shutdown feature.
=VS\TL
POWER
AUX INPHONES
(,:
VOTZ
> ' VOTZ
=+*(
6
Page 7

Spirit™ AmpMan Series – Manual 1.1
中文
Your amp comes with AES activated (the mini switch is set to the right
to the On position). In this mode, the amp shuts down if it's left to idle
continuously for around 90 minutes. Any kind of input signal, even a
briefly played note, will bring the amp back on line, resetting its internal
auto shutdown clock to the 90-minute timeout period. If AES shuts the
amp down, you can wake it up by engaging the Power button. Slide the
mini switch to the right if you wish to deactivate AES and its automatic
shutdown function.
14
●
Speaker: Designed to drive speaker cabinets with impedances from
4 to 16 ohms, this speaker out lets you connect any kind of guitar speaker
cabinet , from small enclosure s up to a full 4x12" stack. Yes, your A mpMan
can drive even the biggest of speakers!
Caution: If you wish to connect two speaker cabinets, always make sure
they are of the same type. NEVER mix the two by connecting one of each
type! If you want to connect two cabinets, make sure the impedance of
each cabinet is 8 ohms minimum, as the overall impedance is halved in
a parallel circuit.
The Hughes & Kettner TS 112 Pro, TM 112 and TM 212 speakers come
highly recommended. Each has an impedance of 16 ohms and a parallel
output that lets you connect a second speaker of the same type.
15
●
VDC: Input jack for the included power supply. AmpMan comes
with a universal power supply that works reliably at any mains voltage
worldwide and maintains the sound quality wherever you go. Please only
use the original power supply.
Caution: Always connect the power supply to AmpMan first, and then
connect the power supply to a wall outlet.
3 Smart Mode
AmpMan’s Smart mode lets you store Boost and FX Loop settings for each
channel. For example, you could enable Boost and the FX Loop in Channel
B and disable these functions for Channel A. The amp will recall these
settings when you switch channels, so a single touch of a button lets you
switch from a dry rhythm sound in Channel A to a wet lead sound in
Channel B with Boost and the FX Loop activated. The amp ships with
Smart mode deactivated.
Activating/deactivating Smart mode: Simultaneously press and hold the
Solo and Channel A/B for three seconds – that is, the two switches at the far
left and right – to set AmpMan to Smart mode. The Channel LEDs will flash
to confirm you have activated Smart mode. AmpMan retains this setting
even after you switch the device off. The same procedure deactivates
Smart mode.
Heads up: There is no indicator to tell you Smart mode is active. If you
want to check to make sure, simply switch Boost on in Channel A and off
in Channel B. AmpMan is in Smart mode if Boost remains active when you
switch back to Channel A.
4 Technical Data
Spirit AmpMan Series
Max.powerconsumption 50 W
DC input +24 V / 2.5 A (Polarity: center = +)
External power supply 100 – 240 V, 50 – 60 Hz
Mains voltage tolerance range +/-10 %
Ambient operating temperat ure range 0° to +35° C
Input jack 6.3 mm (1/4"), unbalanced, 1 MOhms
Sensitivity (Clean, all knobs at 12 o'clock,
Master maxed)
Max. level 0 dBV
FX Send jack 6.3 mm (1/4"), unbalanced, 220 ohms
Nominal level (Clean, all knobs at 12
o'clock, Tone knob turned down)
Max. level +10 dBV
FX Return jack 6.3 mm (1/4"), unbalanced, 20 kOhms
Sensitivity (Clean, all knobs at 12 o'clock,
Master maxed)
Max. level +9 dBV
Aux In mini jack 3.5 mm stereo, 10 kOhms
Sensitivity –6 dBV
Max. level +26 dBV
Phones jack 6.3 mm (1/4") stereo, 50 ohms
Nominal level (Clean, all knobs at 12
o'clock, Tone knob turned down, Master
maxed, Phones 70% volume)
Max. level (Clean, all knobs at 12 o'clock,
Tone knob turned down, Master maxed,
Phones 100 % volume)
Max. level +11 dBV
Red Box AE+ Out X LR, balanced, Line: 400 ohms, Mic: 600
Nominal level (Clean, w/o Boost, all knobs
at 12 o'clock, Tone knob turned down)
Max. level Line: +6 dBV, Mic: –14 dBV
Speaker jack 6.3 mm (1/4"), bridged mode, 4 – 16 ohms
Power output @ 16 ohms 13 W
Power output @ 8 ohms 25 W
Power output @ 4 ohms 48 W
Dimensions amp (W x H x D) 250 x 52 x 153 mms
Weight amp 1150 g
Dimensions power supply (W x H x D) 129 x 32 x 52 mms
Weight power supply 280 g
All mentioned trademarks and copyrights belong to their respective owners.
–13 dBV
–6 dBV
–6 dBV
–6 dBV
0 dBV
ohms
Line: –6 dBV, Mic: –26 dBV
中文
•
• 日本語
• English • Deutsch • Français • Italiano • Español
7
Page 8
Wichtige Sicherheitshinweise!
Bitte vor Anschluss lesen!
Dieses Produkt wurde gemäß IEC 62368-1 hergestellt
und hat das Werk in einem sicheren, betriebsfähigen
Zustand verlassen. Um diesen Zustand zu erhalten und
um einen gefahrlosen Betrieb zu gewährleisten, ist es
notwendig, dass der Benutzer die Empfehlungen und
Warnhinweise befolgt, die in der Betriebsanleitung zu
finden sind. Dieses Gerät entspricht der Schutzklasse
1 (Erdungsschutz). Bei Einsatz dieses Produktes in
Fahrzeugen, Schiffen oder Flugzeugen, oder in Höhen
oberhalb 2000 m Meereshöhe müssen die entsprechenden Sicherheitsstandards zusätzlich zur IEC 62368-1
beachtet werden.
WARNUNG: Um das Risiko von Feuer oder Stromschlag zu verhüten, darf dieses Gerät nicht Feuchtigkeit
oder Regen ausgesetzt werden. Öffnen Sie das Gehäuse nicht – im Inneren gibt es keine Bauteile, die vom
Benutzer wartbar sind. Die Wartung darf nur von einem
qualifiziertem Kundendienst durchgeführt werden.
Dieses Symbol, wo immer es erscheint, warnt
Sie vor gefährlicher, nicht isolierter Spannung im
Gehäuse – Spannung, die möglicherweise genügt, eine
Stromschlaggefahr darzustellen.
Dieses Symbol, wo immer es erscheint, warnt
Sie vor außen zugänglicher, gefährlicher Spannung.
Eine Verbindung zu jeder Anschlussklemme, die mit
diesem Symbol versehen ist, darf nur mit konfektioniertem Kabel hergestellt werden, dass den Empfehlungen
des Herstellers genügt, oder mit Kabel, das von
qualifiziertem Personal installiert wurde.
Dieses Symbol, wo immer es erscheint, macht
Sie auf wichtige Bedienungs- und Wartungsanweisungen aufmerksam, die in beiliegenden Unterlagen zu
finden sind. Bitte lesen Sie das Handbuch.
Dieses Symbol, wo immer es erscheint, sagt
Ihnen: Vorsicht! Heiße Oberfläche! Um Verbrennungen
zu vermeiden, nicht anfassen.
Elektro- und Elektronikgeräte einschließlich
Batterien sind getrennt vom Hausmüll über offizielle
Sammelstellen fachgerecht zu entsorgen.
Bitte lesen Sie diese Anweisungen. Bewahren Sie
diese Anweisungen auf. Befolgen Sie alle Warnhinweise
und Anweisungen auf dem Gerät und in dieser
Anleitung.
• Benutzen Sie dieses Gerät nicht in der Nähe von
Wasser. Stellen Sie das Gerät nicht in der Nähe von
Wasser, Badewannen, Waschbecken, Küchenspülen,
nassen Stellen, Schwimmbecken oder in feuchten
Räumen auf.
• Stellen Sie keine Gefäße, wie Vasen, Gläser, Flaschen
usw., die Flüssigkeiten enthalten, auf das Gerät.
• Reinigen Sie das Gerät nur mit einem trockenen Tuch.
• Entfernen Sie keine Abdeckungen oder Teile des
Gehäuses.
• Die auf dem Gerät eingestellte Betriebsspannung
muss mit der örtlichen Spannung der Netzstromversorgung übereinstimmen. Wenn Sie sich nicht sicher
sind, welche Spannung in Ihrem Netz zur Verfügung
steht, konsultieren Sie bitte Ihren Händler oder den
örtlichen Stromversorger.
• Um das Risiko eines Stromschlags zu verringern,
muss die Erdung des Gerätes beibehalten werden.
Verwenden Sie nur das mitgelieferte Stromführungskabel und behalten Sie die Funktion der seitlichen,
geerdeten Schutzkontakte des Netzanschlusses
immer aufrecht. Versuchen Sie nicht, die Sicherheitsaufgabe des geerdeten Steckers zu umgehen.
• Schützen Sie das Stromführungskabel vor Betreten
und Quetschen, besonders in der Nähe der Stecker,
Gerätesteckdosen – und dort, wo sie am Gerät austreten! Stromführungskabel sollten immer vorsichtig behandelt werden. Kontrollieren Sie die Stromführungskabel in regelmäßigen Abständen auf Einschnitte und
Anzeichen von Abnutzung, besonders in der Nähe
des Steckers und an der Verbindung zum Gerät.
• Benutzen Sie niemals ein beschädigtes Stromführungskabel.
• Ziehen Sie bei Gewittern den Stecker des Gerätes
und wenn das Gerät über einen längeren Zeitraum
nicht benutzt wird.
• Dieses Gerät wird nur vollständig von Stromnetz
getrennt, wenn der Stecker vom Gerät oder aus der
Steckdose gezogen wird. Das Gerät sollte so aufgestellt werden, dass das Trennen vom Stromnetz leicht
möglich ist.
• Sicherungen: Ersetzen Sie Sicherungen nur mit dem
Typ IEC127 (5x20mm) und dem korrekten Nennwert!
Es ist untersagt, kurzgeschlossene Sicherungen zu
verwenden oder den Sicherungshalter zu überbrücken. Sicherungen dürfen nur von qualifiziertem
Personal gewechselt werden.
• Alle Wartungsarbeiten sollten nur von qualifiziertem
Personal ausgeführt werden. Wartung ist notwendig,
wenn das Gerät auf irgendeine Weise beschädigt
wurde, wie zum Beispiel:
- Wenn das Stromführungskabel oder der Stecker
beschädigt oder abgenutzt ist.
- Wenn Flüssigkeit oder Gegenstände in das Gerät
gelangt sind.
- Wenn das Gerät Regen oder Feuchtigkeit ausgesetzt
war.
- Wenn das Gerät nicht ordnungsgemäß funktioniert,
obwohl die Bedienungsanleitung beachtet wurde.
- Wenn das Gerät hingefallen ist oder das Gehäuse
beschädigt wurde.
• Beim Anschluss von Lautsprechern an dieses Gerät
darf die auf dem Gerät oder in dieser Anleitung angegebene Mindestimpedanz nicht unterschritten werden. Die verwendeten Kabel müssen entsprechend
den lokalen Regelungen über einen ausreichenden
Querschnitt verfügen.
• Halten Sie das Gerät vom Sonnenlicht fern.
• Installieren Sie das Gerät nicht in der Nähe von Wärmequellen, wie zum Beispiel Heizkörper, Heizregister, Öfen oder anderen Geräten, die Hitze erzeugen.
• Dieses Gerät wurde für die Verwendung in gemäßigten Klimazonen entwickelt. Nicht geeignet zur
Verwendung in tropischen Klimazonen.
• Verstopfen Sie nicht die Lüftungsöffnungen. Installieren Sie das Gerät entsprechend der Anleitung des
Herstellers. Das Gerät darf nicht eingebaut werden
– wie zum Beispiel in einen Gestellrahmen, es sei
denn, dass für angemessene Belüftung gesorgt wird.
• Ein kaltes Gerät sollte immer auf die Umgebungstemperatur erwärmt werden, wenn es in einen Raum
transportiert wird. Es könnte sich Kondensation im
Inneren bilden, die das Gerät beschädigt, wenn es
ohne vorherige Erwärmung benutzt wird.
• Stellen Sie keine offenen Flammen, wie brennende
Kerzen, auf das Gerät.
• Das Gerät sollte mindestens 20 cm von Wänden aufgestellt werden, das Gerät darf nicht bedeckt werden,
es muss ein Freiraum von mindestens 50 cm über
dem Gerät gewährleistet sein.
• Achten Sie stets auf sicheren Stand auf einer stabilen,
ebenen Fläche.
• Das Gerät darf nur mit Rollwagen, Ständern, Stativen,
Tischen oder Halterungen benutzt werden, die vom
Hersteller spezifiziert sind oder zusammen mit dem
Gerät verkauft wurden. Wenn ein Rollwagen benutzt
wird, seien Sie vorsichtig, wenn Sie die Rollwagen/
Geräte-Kombination transportieren, um Verletzungen
durch Umkippen zu vermeiden.
• Verwenden Sie nur Zubehör, das vom Hersteller
empfohlen ist. Das gilt für alle Arten von Zubehör,
wie zum Beispiel Schutzabdeckungen, Transporttaschen, Ständer sowie Wand- und Deckenhalterungen.
Wenn Sie irgendein Zubehör am Gerät anbringen,
befolgen Sie immer die Anleitungen des Herstellers.
Benutzen Sie nur die Befestigungspunkte des Geräts,
die vom Hersteller vorgesehen sind.
• Dieses Gerät ist NICHT geeignet für eine Person
oder Personen (einschließlich Kindern) mit eingeschränkten physischen, sensorischen und geistigen
Fähigkeiten, oder für Personen mit unzulänglicher
Erfahrung und/oder Fachkenntnis, um solch ein Gerät
zu bedienen. Kinder unter 4 Jahren sollten stets von
diesem Gerät fern gehalten werden.
• Es sollten keinerlei Gegenstände durch die Gehäuseschlitze eingeführt werden, da dadurch gefährliche,
spannungsführende Bauteile berührt oder kurzgeschlossen werden können. Dies könnte zu einer
Feuer- oder Stromschlaggefahr führen.
• Dieses Gerät ist imstande, Schalldruckpegel von
mehr als 90 dB zu produzieren. Dies könnte zu einem dauerhaften Hörschaden führen! Eine Belastung
durch extrem hohe Geräuschpegel kann zu einem
dauerhaften Gehörverlust führen. Bei einer anhaltenden Belastung durch solch hohe Pegel sollte ein
Gehörschutz getragen werden.
• Der Hersteller gewährleistet die Sicherheit, Zuverlässigkeit und Leistung des Gerätes nur unter folgenden
Voraussetzungen:
-
Einbau, Erweiterung, Neueinstellung, Modifikationen
oder Reparaturen werden vom Hersteller oder autorisiertem Personal ausgeführt.
- Die elektrische Installation des betreffenden Berei-
ches entspricht den Anforderungen der IEC (ANSI)
Maßgaben.
- Das Gerät wird entsprechend der Bedienungsanlei-
tung benutzt.
Vor Inbetriebnahme
• Vor der Inbetriebnahme diese Anleitung in-
klusive der Sicherheitshinweise bitte sorgfaltig
durchlesen.
• Für Schäden am Gerät oder an anderen
Geräten, die durch unsachgemäßen Betrieb
entstehen, kann seitens des Herstellers keine
Haftung übernommen werden.
• Vor dem Anschluss an das Stromnetz muss
sichergestellt sein, dass der Power-Schalter
ausgeschaltet ist und der angegebene Spannungswert auf der Rückseite des Geräts mit der
ortsüblichen Netzspannung übereinstimmt.
• Ein Wort der Mahnung bevor der AmpMan
in Betrieb genommen wird: Er ist laut! Hohe
Lautstärkepegel können Gehörschäden verursachen.
• Um laute und nicht willkommene Überra-
schungen zu vermeiden, solltest du es dir zur
Angewohnheit machen, das Lautstärke-Poti
deiner mit dem AmpMan verbundenen Gitarre
ganz zurückzudrehen, bevor du den Amp
anschaltest!
Version 2.5 07/2018
Page 9

Spirit™ AmpMan Series – Manual 1.1
中文
1 Allgemeines
AmpMan Classic und AmpMan Modern verfügen über die gleichen
technischen Features und bieten jeweils zwei Kanäle, die voneinander
unabhängig regelbar sind. Die Master-Sektion inklusive des Solo-Master
-?:LUK 5VPZL.H[L:WLHRLYV\[ (\_0U7V^LY 0UW\[-?9L[\YU7OVULZ =VS\TL *HI;`WL VUVMM4PJ3PUL9LK)V_+06\[
ist nur einmal vorhanden – ebenso wie FX-Loop und Boost – und gelten
für beide Kanäle.
CLASSIC
MASTER
VOLUME SAGGING PRESENCE RESONANCE
TONE GAIN A
Hinweis: AmpMan bietet einen Smart-Mode (siehe Kapitel 3 "Smart
Mode"), in dem die Einstellungen für Boost und den FX-Loop pro Kanal
gespeichert werden.
中文
•
Bei beiden Modellen AmpMan Classic und AmpMan Modern liefert Kanal
A den ungebändigten Sound der Woodstock-Ära – von Californian Clean
SPIRIT™ AMPMAN SERIES
B
BOOSTFX LOOPSOLO CHANNEL A/B
bis zu British Crunch. Kanal B ist bei beiden Modellen unterschiedlich
abgestimmt: Beim AmpMan Classic steht er für den großen Sound der
• 日本語
80er/90er Stadion-Rock-Ära – von British Lead bis Brown Sound. Der
AmpMan Modern bedient alle Metal-Genres und liefert High-Gain-Sound
für singende Soli und kantige Riffs.
MASTER
VOLUME SAGGING PRESENCE RESONANCE
SPIRIT™ AMPMAN SERIES
BOOSTFX LOOPSOLO CHANNEL A/B
-?:LUK 5VPZL.H[L:WLHRLYV\[ (\_0U7V^LY 0UW\[-?9L[\YU7OVULZ =VS\TL *HI;`WL VUVMM4PJ3PUL9LK)V_+06\[
MODERN
TONE GAIN A
B
• English • Deutsch • Français • Italiano • Español
9
Page 10

Spirit™ AmpMan Series – Manual 1.1
-?:LUK 5VPZL.H[L:WLHRLYV\[ (\_0U7V^LY 0UW\[-?9L[\YU7OVULZ =VS\TL *HI;`WL VUVMM4PJ3PUL9LK)V_+06\[
11
MASTER
12
6
6
13
2 Bedienelemente
2.1 Die Kanal-Sektion
MASTERBVOLUME SAGGING PRESENCE RESONANCE
5
VOLUME SAGGING PRESENCE RESONANCE
5
4
4
SPIRIT™ AMPMAN SERIES
3
3
BOOSTFX LOOPSOLO CHANNEL A/B
10 9
4
●
Presence: Dieser Regler bestimmt den Anteil an generierten, harmo-
nischen Obertönen. Je weiter er aufgedreht wird, desto "präsenter" wirkt
der Sound.
5
●
-?:LUK 5VPZL.H[L:WLHRLYV\[ (\_0U7V^LY 0UW\[-?9L[\YU7OVULZ =VS\TL *HI;`WL VUVMM4PJ3PUL9LK)V_+06\[
TONE GAIN A
Sagging: In Kombination mit Gain und Tone ist Sagging das Werkzeug
für das Kreieren neuer, frischer, begeisternder Sounds. Mit diesem Regler
hast du die vollständige Kontrolle über das Sättigungsverhalten der Endstufe
bei jeder beliebigen Lautstärke. Sagging veredelt deinen Sound und lässt
dich sprichwörtlich im Handumdrehen durch die Jahrzehnte der GitarrenSound-Geschichte reisen.
2
TONE GAIN A
2
1
1
7
8
8
B
SPIRIT™ AMPMAN SERIES
1
●
Gain: Der Gain-Regler bestimmt die Eingangsempfindlichkeit und damit
die Sättigung bzw. den Grad der Verzerrung der Vorstufe. In Kombination
mit Tone und Sagging ist er das maßgebliche Werkzeug zur Sound-Gestaltung.
2
●
Tone: Die Wirkung des Tone-Reglers ist präzise auf den jeweiligen Ka-
nal abgestimmt. Die Klang-Regelung greift in die für den Grundsound charakteristischen Frequenzbereiche ein und liefert eine extrem große SoundPalette.
3
●
Resonance: Bei Mittelstellung des Reglers hört man das "normale" Re-
sonanz-Verhalten zwischen Amp und Box. Durch Linksdrehung wird der
Effekt der Boxen-Resonanz gedämpft. Dies rundet Clean-Sounds noch weicher ab. Durch Rechtsdrehung wird der Effekt verstärkt, was vor allem bei
verzerrten Sounds für heftigen Bass-Schub sorgt.
BOOSTFX LOOPSOLO CHANNEL A/B
10
Hinweis: Je mehr Sagging, desto höher die Endstufensättigung! Je nach
Gain-Einstellung beeinflusst Sagging auch die Gesamtlautstärke mal mehr
oder weniger. Bei Linksanschlag (kein Sagging) bis Mittelstellung erhöht
Sagging die Lautstärke, von Mittelstellung bis Rechtsanschlag (maximales
Sagging) kann die Lautstärke abnehmen und muss mit dem Volume-Regler
angepasst werden.
Hinweis: Im Kanal B des Spirit AmpMan Modern kann zu viel Sagging
kontraproduktiv sein. Für singende High-Gain-Soli bringt Sagging die nötige Portion Cremigkeit, beim Spielen von Riffs kann Sagging aber schnell
zu „matschig“ klingenden Akkorden führen. Besonders in Verbindung mit
tiefer gestimmten Gitarren oder 7-Saitern ist hier eher sparsamer Umgang
angesagt.
6
●
Volume: Mit Volume wird die Lautstärke der beiden Kanäle unterein-
ander angepasst.
Achtung: Bitte benutze diesen Regler nicht, um die Gesamtlautstärke des
Amps zu kontrollieren. Dafür ist der Master-Regler zuständig!
Page 11
Spirit™ AmpMan Series – Manual 1.1
中文
7
●
Channel A/B: Mit diesem Taster kann zwischen Kanal A und Kanal B
umgeschaltet werden.
8
●
Channel-LED: Welcher Kanal aktiv ist, zeigt die blaue LED rechts neben
dem Gain-Regler des jeweiligen Kanals.
2.2 FX Loop und Boost
-?:LUK 5VPZL.H[L:WLHRLYV\[ (\_0U7V^LY 0UW\[-?9L[\YU7OVULZ =VS\TL *HI;`WL VUVMM4PJ3PUL9LK)V_+06\[
MASTERBVOLUME SAGGING PRESENCE RESONANCE
SPIRIT™ AMPMAN SERIES
9
●
Boost: Hebe mit Boost spezielle Frequenzbereiche im Tonspektrum an.
Dadurch werden je nach Kanal noch bissigere, cremigere oder druckvollere
Sounds erreicht. Bei aktiviertem Boost leuchtet die LED über dem Schalter
rot.
10
●
FX Loop: Hier wird der serielle Effektweg auf der Rückseite aktiviert. Ist
der Effektweg aktiv, leuchtet die LED über dem Schalter rot.
Hinweis: Diese beiden Schalter funktionieren in der Grundeinstellung Kanal-unabhängig. Mit Hilfe der Smart Mode-Schaltung können sie aber auch
den Kanälen zugewiesen werden – und schalten dann beim Umschalten des
Kanals mit um (siehe Kapitel 3 "Smart Mode").
TONE GAIN A
BOOSTFX LOOPSOLO CHANNEL A/B
2.3 Master-Sektion
-?:LUK 5VPZL.H[L:WLHRLYV\[ (\_0U7V^LY 0UW\[-?9L[\YU7OVULZ =VS\TL *HI;`WL VUVMM4PJ3PUL9LK)V_+06\[
MASTERBVOLUME SAGGING PRESENCE RESONANCE
SPIRIT™ AMPMAN SERIES
11
●
Master: Der Master-Regler (beige) bestimmt die Gesamtlautstärke des
AmpMan, er beeinflusst beide Kanäle.
12
●
Solo(-Master): Mit dem roten Poti unter dem Master-Regler lässt sich
ein Pegelsprung zwischen 0 und +6 dB gegenüber dem Master fest einstellen, um z.B. beim Wechsel zum Solo das gewünschte Mehr an Lautstärke
auf Knopfdruck abzurufen. Durch dieses Konzept braucht bei der Anpassung der Gesamtlaustärke nur der Master geregelt werden, die Solo-Lautstärke regelt sich automatisch mit.
Achtung: Der Pegelsprung des Solo-Reglers wird auch an die Red Box und
den Kopfhörerausgang weitergegeben. Bei Nutzung der Red Box auf der
Bühne bitte darauf achten, dass beim Soundcheck die Solo-Lautstärke berücksichtigt wird, um eine Übersteuerung des Mischpult-Eingangs zu vermeiden. Bei Benutzung eines Kopfhörers immer dessen Maximallaustärke
(Volume-Regler auf der Rückseite) bei aktiviertem Solo-Taster einstellen!
13
●
Solo: Hier aktiviert man den über den Solo-Regler voreingestellten
Pegelsprung gegenüber Master. Ob Solo aktiv ist wird durch die rote LED
über dem Taster angezeigt.
TONE GAIN A
BOOSTFX LOOPSOLO CHANNEL A/B
中文
•
• 日本語
2.4 Die Rückseite
1
●
Input: Instrumenten-Eingang zum Anschluss einer Gitarre über ein
abgeschirmtes Klinkenkabel.
2
●
Noise Gate: Dieser Regler bestimmt die Empfindlichkeit des Noise Gates.
Die IDB™-Technologie des Noise Gates passt die Attack- und ThresholdParameter automatisch an. Bei Linksanschlag des Reglers wird das Noise
Gate komplett aus dem Signalweg geschaltet (Bypass). Je mehr der Regler
nach rechts gedreht wird, umso härter greift das Noise Gate ein. Auf der
9-Uhr-Position reagiert das Gate bereits sehr sensibel auf Signale. Je weiter
der Regler nach rechts gedreht wird, umso härter greift das Noise Gate ein.
Hinweis: AmpMan merkt sich automatisch die Einstellung des Noise Gates
pro Kanal. Das heißt: wenn z.B. in Kanal für einen Clean-Sound das Noise
Gate deaktiviert (Linksanschlag) und in Kanal B für einen Lead-Sound aktiv,
bleibt die Einstellung beim Umschalten der Kanäle erhalten.
3
●
FX Send: Verbinde diese Buchse mit dem Eingang eines externen
Effektgeräts.
4
●
FX Return: Verbinde diese Buchse mit dem (Mono-) Ausgang eines
Effektgeräts.
5
●
Red Box AE+ DI Out: Seit Hughes & Kettner die Original-Red Box 1988
erfunden hat, gilt sie als Industriestandard, um den Sound von Gitarren- Amps
ohne Mikrofon abzunehmen. Ob Live oder im Studio – die Red Box überträgt
den Sound in gleichbleibender Qualität. Übersprechen anderer Instrumente
und zeitraubendes Experimentieren mit Mikrofonpositionen gehören der
Vergangenheit an. Die Red Box AE+ ist die neuste Version der preisgekrönten
DI-Box mit Speaker-Emulation. Die DSP-gesteuerte Ambience-Emulation
erzeugt die authentische Raumfülle einer Box und einen ultradirekten Attack
reinsten Gitarrentons.
3 4 5
NOISE GATEINPUT FX LOOP
VMM
1
2
9L[\YU:LUK
AE
6U
3PUL
6MM
4PJ
• English • Deutsch • Français • Italiano • Español
11
Page 12
Spirit™ AmpMan Series – Manual 1.1
3 4 6 10 12 14 15117
NOISE GATEINPUT FX LOOP
VMM
9L[\YU:LUK
1
6
●
Cab Type: Mit diesem Regler wird eine der acht Cabinet-Simulationen
ausgewählt:
No. Cabinet Types
1 1x12" Modern Thiele-Port
2 2x12" Modern Front-Port
3 2x12" Vintage Open Back
4 4x10" Alnico Open Back
5 4x12" Vintage Cab
6 4x12" British Cab
7 4x12" Modern Cab
8 4x12" American Cab
Hinweis: AmpMan merkt sich automatisch die Einstellung des Cab Types
pro Kanal. So kann z.B,. in Kanal für einen Clean-Sound eine spritzige OpenBack-Box, und für Kanal B eine fette 4x12-Box gewählt werden. Gerade bei
Nutzung der Red Box macht der bringt dies den großen Vorteil, dass pro
Kanal eine andere Cabinet-Simulation zugewiesen kann, um den Sound des
Kanals zu perfektionieren.
Achtung: Bei gleichzeitiger Nutzung von Red Box und Speaker Out, z.B. auf
der Bühne mit Gitarren-Box am Speaker Out und Red Box zum Pult, bitte
darauf achten, dass für beide Kanäle der gleiche Cab Type ausgewählt wurde,
da es sonst die Box auf der Bühne im Vergleich zum Signal der Red Box stark
unterschiedlich klingen würde.
7
●
Red Box Mic/Line: Achte darauf, dass du die Red Box mit dem
passenden Pegel betreibst. Bei der Verwendung von langen Kabelwegen,
wie z.B. im Livebetrieb, empfehlen wir die Red Box in der Einstellung "Line"
zu betreiben. Der höhere Output kompensiert so den Pegelverlust aufgrund
der Kabellänge. Sollte das Mischpult ausschließlich über Mikrofoneingänge
verfügen, schalte die Red Box in Position "Mic", so kannst du Übersteuerungen
am Mikrofoneingang vermeiden. Sollte das Mischpult bzw. Audio-Interface
über keinen XLR-Eingang verfügen, so benötigst du einen XLR-KlinkeAdapter (6,3 mm), den du im Fachhandel erwerben kannst. Achte darauf,
dass die Red Box in Position "Line" betrieben wird, solltest du einen 6,3 mm
(1/4") Klinkeneingang benutzen.
Achtung: Manche Recording-Interfaces bieten explizite „Hi-Z“-Eingänge,
hochohmig ausgeführte Klinken-Buchsen für Instrumenten-Pegel, die
ausschließlich zum Anschluss von Gitarren gedacht sind. An diese Art Eingänge
kann die Red Box nicht angeschlossen werden, es würde zwangsläufig zu
Verzerrungen durch zu hohe Pegel führen.
2 5 9 138
AE
6U
3PUL
6MM
4PJ
*HI;`WL
8
●
Red Box On/Off: Hier kannst du die Speaker-Simulation der Red Box
ausschalten. Die Red Box sendet dann ein ungefiltertes Signal zur Verwendung
mit der von dir bevorzugten Boxen- und Mikrofon-Emulationssoftware oder
eines Effektgerätes.
9
●
Phones: An diesen Ausgang werden handelsübliche Kopfhörer mit
3,5 mm Stereo-Mini-Klinkenstecker angeschlossen.
Hinweis: Dieser Ausgang kann auch verwendet werden, um ein Line-Signal
an einen beliebigen Stereo-Multimedia-Eingang wie z.B. ein HiFi-System zu
senden. Bitte beim Händler nach entsprechenden Adaptern oder Kabeln
fragen. Um diesen Ausgang mit einem typischen Aux-In oder einem HiFiSystem zu verbinden, werden ein Kabel mit einem Stereo-Klinkenstecker
an einem Ende zum Anschluss an den Kopfhörerausgang deines AmpMan,
sowie zwei Cinch-Steckern am anderen Ende zum Anschluss an den linken
und rechten Eingang des HiFi-Systems gebraucht.
Zum Anschluss an ein Mischpult werden statt der Cinch-Stecker zwei Mono-Klinke bzw. XLR-Stecker gebraucht. Dabei ist darauf zu achten, dass die
Mischpulteingänge hart links/rechts im Panorama platziert werden, damit
die Stereo-Wiedergabe bei Verwendung des Aux-In richtig zur Geltung
kommt.
Achtung: Anders als bei der Black Spirit- und der Spirit Nano-Serie wird bei
Belegung der Phones-Buchse der Speaker-Out nicht stumm geschaltet! Dies
hat den Vorteil, dass man den Kopfhörerausgang alternativ zum fixen Pegel
der Red Box als regelbaren Line-Ausgang bei gleichzeitig angeschlossener
Gitarren-Box nutzen kann. Zum "Stummschalten" der Endstufe dient dann
der Master-Regler, bzw. kann AmpMan auch ohne angeschlossene GitarrenBox bei aufgedrehtem Master bedenkenlos genutzt werden.
10
●
Phones Volume: Regele hier die Lautstärke des Kopfhörer-Ausgangs.
11
●
Aux In: An den Aux-Eingang kannst du jede beliebige Audioquelle
anschließen. Die Audioquelle wird zu deinem Gitarrensound hinzugemixt.
Über den Aux In-Eingang können ebenfalls Drum-Machines oder
zusätzliche Instrumente angeschlossen werden. Das Aux In-Signal wird in
vollwertiger Stereoqualität auf den Kopfhörerausgang übertragen. So kannst
du ohne zusätzliches Mischpult zu deinen Jamtracks spielen.
12
●
Power: Mit diesem Knopf wird dein AmpMan ein- und ausgeschaltet.
13
●
AES: Gemäß Verordnung Nr. 1275/2008/EG müssen Geräte, unter
die laut EU-Richtlinie auch dein AmpMan fällt, mit einer EnergiesparVorrichtung versehen werden, die das Gerät nach einer bestimmten Zeit
der Nichtbenutzung abschaltet. Diese Aufgabe übernimmt beim AmpMan
=VS\TL
POWER
AUX INPHONES
(,:
VOTZ
> ' VOTZ
=+*(
12
Page 13

Spirit™ AmpMan Series – Manual 1.1
中文
das AES, das über den Minischalter neben der Speaker-Buchse aktiviert
und deaktiviert werden kann.
Im Auslieferzustand ist das AES aktiviert; der Minischalter befindet sich in
der On-Stellung (rechts). In dieser Einstellung schaltet der Amp nach einer
Ruhephase von ca. 90 Minuten ab. Die Ruhephase wird zurückgesetzt
und beginnt von vorne, sobald der Verstärker ein Eingangssignal erhält,
wenn also z.B. ein kurzer Ton gespielt wird. Ein leises Signal reicht bereits
aus und die 90 Minuten bis zum Abschalten beginnen von vorne. Hat
das Gerät nach vollständigem Durchlaufen der 90-minütigen Ruhephase
abgeschaltet, kann es mit dem Power-Schalter erneut in Betrieb
genommen werden. Durch Schieben des Minischalters (nach links) wird
das AES und somit das automatische Abschalten des Gerätes deaktiviert.
14
●
Speaker: Der Lautsprecher-Ausgang ist für Boxen mit einer Impedanz
von 4 bis 16 Ohm ausgelegt. Es können jede Art von Gitarren-Boxen
angeschlossen werden, die Endstufe hat genügend Leistung, um auch
4x12-Boxen anzutreiben. Wer möchte, auch gerne im Fullstack-Aufbau.
Bitte unbedingt beachten: Bei Anschluss von zwei Boxen muss die Impedanz jeder einzelnen Box mindestens 8 Ohm betragen, da sich bei parallelem Anschluss die Gesamtimpedanz auf 4 Ohm halbiert.
Die empfohlenen Gitarrenboxen Hughes & Kettner TS 112 Pro, TM 112
und TM 212 haben jeweils eine Impedanz von 16 Ohm und bieten einen
parallelen Ausgang, an denen eine zweite Box gleichen Typs angeschlossen werden kann.
15
●
VDC: Eingang zum Anschluss des mitgelieferten Weitbereichsnetzteils,
das weltweit bei jeder Netzspannung zuverlässig funktioniert und eine
immer gleichbleibende Sound-Qualität garantiert. Bitte stets das OriginalNetzteil benutzen.
Achtung: Bitte stets zuerst das Netzteil mit dem AmpMan verbinden, und
dann erst das Netzteil an eine Steckdose anschließen.
3 Smart-Mode
AmpMan bietet einen Smart-Mode in dem die Einstellung für Boost,
und FX-Loop pro Kanal gespeichert werden. Das heißt z.B.: sind Boost
und FX-Loop in Kanal B aktiviert und in Kanal A deaktiviert, bleiben
die Einstellungen beim Kanalwechsel erhalten. So kann man von einem
trockenen Rhythmus-Sound in Kanal A auf einen Solo-Sound in Kanal
B inklusive Boost und aktivem FX-Loop mit einem einzigen Tastendruck
umschalten. Im Auslieferungszustand ist der Smart-Mode nicht aktiv.
Aktivierung/Deaktivierung: Werden die beiden äußeren Schalter Solo und
Channel A/B gleichzeitig gedrückt und für drei Sekunden gehalten, schaltet
AmpMan in den Smart-Mode. Zur Bestätigung blinken die Channel-LEDs
auf. Diese Einstellung bleibt auch nach Ausschalten des AmpMan erhalten.
Deaktiviert wird der Smart-Mode auf die gleiche Weise.
4 Technische Daten
Spirit AmpMan Series
Max. Leistungsaufnahme 50 W
DC-Eingang +24 V / 2.5 A (Polarität: + innen)
Externes Netzteil 100 – 240 V, 50 – 60 Hz
Netzspannungs-Toleranzbereich +/-10 %
Umgebungstemperaturbereich im
Betrieb
Input – Klinkenbuchse 6.3 mm (1/4"), unsymmetrisch, 1MOhm
Sensitivity (Clean, alle Potis in
Mittelstellung, Master in Maximalstellung)
Max. Level 0 dBV
FX Send – Klinkenbuchse 6.3 mm (1/4"), unsymmetrisch, 220 Ohm
Nominal Level (Clean, alle Potis in
Mittelstellung, Tone-Regler auf Minimum)
Max. Level +10 dBV
FX Return – Klinkenbuchse 6,3 mm (1/4"), unsymmetrisch, 20 kOhm
Sensitivity (Clean, alle Potis in
Mittelstellung, Master in Maximalstellung)
Max. Level +9 dBV
Aux Input – Mini-K linkenbuchse 3,5 mm, stereo, 10 kOhm
Sensitivity –6 dBV
Max. Level +26 dBV
Phones-Klinkenbuchse 6.3 mm (1/4"), stereo, 50 Ohm
Nominal Level (Clean, ohne B oost, alle Potis
in Mittelstellung, Tone-Regler auf Minimum,
Master in Maximalstellung, Phones-Volume
70%)
Max. Level (Clean, ohne Boost, alle Potis in
Mittelstellung, Tone-Regler auf Minimum,
Master in Maximalstellung, Phones-Volume
100%)
Max. Level +11 dBV
Red Box AE+ Out X LR, symmetrisch, Line: 40 0 Ohm, Mic: 600
Nominal Level (Clean, alle Potis in
Mittelstellung, Tone-Regler auf Minimum)
Max. Level L ine: +6 dBV, Mic: –14 dBV
Speaker – Klinkenbuchse 6,3 mm (1/4"), Bridged-Mode, 4 – 16 Ohm
Ausgangsleistung @ 16 Ohm 13 W
Ausgangsleistung @ 8 Ohm 25 W
Ausgangsleistung @ 4 Ohm 48 W
Abmessungen A mp (B x H x T) 250 x 52 x 153 mm
Gewicht Amp 115 0 g
Abmessungen Netzteil (B x H x T ) 129 x 32 x 52 mm
Gewicht Netzteil 280 g
0° bis +35° C
–13 dBV
–6 dBV
–6 dBV
–6 dBV
0 dBV
Ohm
Line: –6 dBV, Mic: –26 dBV
中文
•
• 日本語
Hinweis: Eine Anzeige, ob der Smart-Mode aktiv ist, gibt es nicht. Wenn
du prüfen willst, ob der Smart-Mode aktiv ist, einfach in Kanal A Boost
deaktivieren und in Kanal B aktivieren. Bleibt beim Zurückschalten in
Kanal A der Boost aktiv, befindet sich AmpMan im Smart-Mode.
Alle erwähnten Warenzeichen und Copyrights gehören ihren jeweiligen
Eigentümern.
• English • Deutsch • Français • Italiano • Español
13
Page 14
Consignes de sécurité
importantes ! A lire avant de se
connecter !
Ce produit a été construit conformément à la norme
IEC 62368-1 par le fabricant et a quitté l’usine en
bon état de marche. Pour garantir son intégrité et un
fonctionnement sans risque, l’utilisateur se doit de
suivre les conseils et les avertissements préconisés dans
cette notice d’utilisation. Les unités sont conformes
à la classe de protection 1 (protection par mise à
la terre). En cas d’utilisation de ce produit dans un
véhicule terrestre, un navire ou un avion, ou encore
à une altitude supérieure à 2 000 mètres, il convient
de prendre en considération les normes de sécurité
suivantes, en plus de la norme IEC 62368-1.
ATTENTION : Afin d’éviter tout risque d'incendie et
d'électrocution, n'exposez pas cet appareil à l’humidité
ou à la pluie. N’ouvrez pas le boîtier ; les pièces se
trouvant à l’intérieur ne nécessitent pas d’entretien de
la part des utilisateurs. Adressez-vous à un spécialiste
qualifié pour procéder à l'entretien de l'appareil.
Ce symbole, quel que soit l’endroit où il
apparaît, vous signale des pièces sous tension non
isolées dans le boîtier. Une tension suffisante pour
présenter un risque d’électrocution.
Ce symbole, quel que soit l’endroit où il
apparaît, vous signale des pièces sous tension
accessibles depuis l’extérieur du boîtier. Tous les câbles
extérieurs raccordés à un composant marqué de ce
symbole doivent être de type préfabriqués et conformes
aux spécifications du fabricant ou doivent avoir été
installés par des spécialistes qualifiés.
Ce symbole, quel que soit l’endroit où il
apparaît, vous signale des instructions importantes
relatives à l’utilisation ou l’entretien de l’appareil à lire
dans les documents l’accompagnant. Lisez la notice
d’utilisation.
Ce symbole, quel que soit l’endroit où il
apparaît, vous signale un risque de brûlure dû à une
surface chaude. Ne touchez pas cette surface afin
d’éviter de vous brûler.
Tous les appareils électriques et électroniques y
compris les piles doivent être éliminés séparément des
déchets ménagers auprès des points de collecte
officiels prévus à cet effet.
Lisez ces instructions. Conservez ces instructions.
Prenez en compte tous les avertissements et toutes les
instructions mentionnés sur le produit ou dans cette
notice d’utilisation.
• N’utilisez pas ce produit à proximité de l’eau. Ne le
placez pas près de l’eau, d’une baignoire, d’un bassin,
d’un évier, d’une surface humide, d’une piscine ou
d’une pièce humide.
• Ne mettez pas d’objet contenant du liquide sur
l’appareil, par exemple, un vase, un verre ou une
bouteille, etc.
• Nettoyez-le exclusivement avec un chiffon sec.
• N’enlevez pas le boîtier, ne serait-ce que
partiellement.
• La tension de fonctionnement de l’appareil doit
être réglée de manière à correspondre à la tension
d’alimentation de l’endroit où vous vous trouvez.
Si vous n’êtes pas sûr de connaître la tension
d’alimentation, demandez à votre revendeur ou à la
compagnie d’électricité locale.
• Afin de réduire le risque d’électrocution, vous
ne devez jamais supprimer la mise à la terre
de l’appareil. Utilisez uniquement le câble
d’alimentation fourni avec le produit et maintenez la
broche centrale de la prise (mise à la terre) en état de
fonctionnement. Ne négligez pas la sécurité offerte
par les prises polarisées ou avec mise à la terre.
• Protégez le câble d’alimentation afin d’éviter
que quelqu’un marche dessus ou qu’il soit pincé,
notamment près de la prise, de la prise murale ou à la
sortie de l’appareil même ! Les câbles d’alimentation
doivent être tout le temps maniés avec précaution.
Vérifiez régulièrement que le câble n’est pas fendu ou
qu’il ne présente pas de signe d’usure, en particulier
près de la prise et à la sortie de l’appareil.
• N’utilisez jamais de câble d’alimentation usé.
• Débranchez l’appareil en cas d’orage ou si vous ne
l’utilisez pas pendant une longue période.
• Débranchez l’appareil uniquement en le tenant par la
prise au niveau de la prise murale ou de la rallonge.
L’appareil doit être placé de telle manière à ce qu’il
puisse être débranché facilement à tout moment.
• Fusibles : si nécessaire, remplacez-les uniquement
par des fusibles de type IEC127 (5x20 mm). Il
est interdit d’utiliser des fusibles bricolés ou de
raccourcir le porte-fusible. Seul un personnel qualifié
est habilité à remplacer les fusibles.
• Confiez tous les travaux d’entretien à des spécialistes
qualifiés. Il est nécessaire d’effectuer de tels travaux
lorsque l’unité a été endommagée, comme par
exemple dans les cas suivants :
- Lorsque le câble d’alimentation est endommagé ou
effiloché.
- Si du liquide a pénétré ou un objet est tombé dans le
boîtier.
- Si l’appareil a été exposé à la pluie ou à l’humidité.
- Si l’appareil ne fonctionne pas correctement alors que
vous avez suivi toutes les instructions à la lettre.
- Si l’appareil est tombé ou que le boîtier est
endommagé.
• En cas de raccordement de haut-parleurs à cet
appareil, il faut veiller à ne pas descendre sous
l’impédance minimale indiquée sur ledit appareil ou
dans la présente notice. Les câbles employés doivent
présenter une section suffisante, qui soit conforme
aux réglementations locales en vigueur.
• Ne l’exposez pas directement aux rayons du soleil.
• Ne l’installez pas à proximité d’une source de
chaleur, telle qu’un radiateur, une grille de chauffage,
un four ou tout autre appareil susceptible de produire
de la chaleur.
• Cet appareil est conçu pour une utilisation dans des
zones climatiques modérées. Il n'est pas adapté pour
une utilisation dans des pays à climat tropical.
• Ne masquez pas les bouches d’aération. Installez
l’appareil conformément aux instructions du
fabricant. Il ne doit pas être placé dans un
emplacement confiné, comme un rack ou une
console, sauf si une ventilation suffisante est garantie.
• Si vous déplacez l’appareil, attendez qu’il soit à
température ambiante avant de le démarrer, sinon
de la condensation peut se former à l’intérieur et
endommager l’appareil.
• Ne posez pas de d’objet à flamme ouverte sur
l’appareil, comme par exemple une bougie allumée.
• L'appareil doit être situé à 20 cm minimum des murs,
il ne doit en aucun cas être couvert et il convient de
prévoir un espace d'au moins 50 cm au-dessus de
l'appareil.
• Assurez-vous que l'appareil est toujours placé sur une
surface plane et solide.
• Utilisez l’appareil uniquement avec un chariot,
un support, un trépied, des fixations ou une table
recommandés par le fabricant ou vendus avec le
produit. Si vous utilisez un chariot, maniez-le avec
précaution afin d’éviter tout risque de blessure s’il se
renverse.
• Utilisez uniquement les accessoires recommandés
par le fabricant. Cette consigne concerne toute
sorte d’accessoires, qu’il s’agisse de couvercles de
protection, de sacs de transport, de supports ou de
dispositifs de fixation au mur ou au plafond. Si vous
fixez un accessoire à l’appareil, suivez toujours les
instructions d’utilisation du fabricant. N’utilisez pas
d’autres points de fixation que ceux préconisés par
le fabricant.
• Cet appareil NE convient PAS aux personnes dont
les capacités motrices, sensorielles ou mentales
sont déficientes (y compris les enfants) ou aux
personnes ne disposant pas de l’expérience ou des
connaissances nécessaires pour faire fonctionner le
présent appareil. Cet appareil doit dans tous les cas et
être tenu constamment hors de portée des enfants de
moins de quatre ans.
• N’insérez jamais d'objets à travers les grilles du
boîtier, car ils pourraient toucher des pièces sous
tension dangereuses ou provoquer un courtcircuit pouvant causer un risque d’incendie ou
d’électrocution.
• Cet appareil est capable de délivrer un niveau de
pression acoustique de 90 dB, pouvant ainsi causer
des troubles irréversibles de l’audition ! L’exposition
continue à une nuisance sonore peut provoquer une
perte d’audition permanente. Portez des protections
auditives adéquates si vous vous exposez de manière
continue à un tel niveau de pression acoustique.
• Le fabricant garantit la sécurité, la fiabilité et
l’efficacité de fonctionnement de son produit
uniquement si :
- l’assemblage, l’extension, le réajustement, la
modification ou la réparation de l’appareil ont été
effectués par le fabricant ou par des personnes
agréées pour ce genre de travaux.
-
l’installation électrique concernée est conforme aux
normes IEC (ANSI).
- l’unité est utilisée conformément aux instructions
d’utilisation.
Avant la mise en service
• Avant la mise en service, lire attentivement la
présente notice, consignes de sécurité comprises.
• Le fabricant décline toute responsabilité en
cas de dommages à l’appareil ou à d’autres
appareils, qui résulteraient d’une utilisation
inappropriée.
• Avant de raccorder l’appareil au réseau élec-
trique, il est nécessaire de s’assurer que
l’interrupteur d’alimentation est en position
arrêt et que la tension indiquée sur le bord de
l’appareil correspond à la tension du réseau
électrique local.
• Un petit avertissement avant de mettre vot-
re AmpMan sous tension : il a du coffre ! Un
volume élevé peut entraîner des troubles de
l’audition.
• Pour éviter les surprises sonores agressives, pre -
nez l'habitude de ramener sur zéro les potentiomètres de volume de la guitare raccordée au
AmpMan avant de brancher l'ampli !
Version 2.5 07/2018
Page 15
Spirit™ AmpMan Series – Manual 1.1
中文
1 Généralités
AmpMan Classic et AmpMan Modern possèdent les mêmes caractéristiques
techniques et proposent chacun deux canaux pouvant être réglés
indépendamment l’un de l’autre. La section Master y compris Solo Master
-?:LUK 5VPZL.H[L:WLHRLYV\[ (\_0U7V^LY 0UW\[-?9L[\YU7OVULZ =VS\TL *HI;`WL VUVMM4PJ3PUL9LK)V_+06\[
n’est disponible qu’une seule fois - ainsi que FX Loop et Boost - et s’applique
aux deux canaux.
CLASSIC
中文
•
MASTER
VOLUME SAGGING PRESENCE RESONANCE
Nota : AmpMan propose un mode intelligent (voir chapitre 3 « SmartMode ») où les réglages Boost et FX-Loop sont enregistrés par canal.
TONE GAIN A
Sur les deux modèles AmpMan Classic et AmpMan Modern, le canal A
délivre le son débridé de l’ère Woodstock - du Californian Clean au British
Crunch. Le canal B est réglé différemment pour les deux modèles : Sur
SPIRIT™ AMPMAN SERIES
BOOSTFX LOOPSOLO CHANNEL A/B
B
l’AmpMan Classic, il représente le grand son de l’ère du rock des stades des
années 80/90 - du British Lead au Brown Sound. L’AmpMan Modern sert
• 日本語
tous les genres de métal et offre un son à haut gain pour les solos et les riffs
nerveux.
MASTER
VOLUME SAGGING PRESENCE RESONANCE
SPIRIT™ AMPMAN SERIES
BOOSTFX LOOPSOLO CHANNEL A/B
-?:LUK 5VPZL.H[L:WLHRLYV\[ (\_0U7V^LY 0UW\[-?9L[\YU7OVULZ =VS\TL *HI;`WL VUVMM4PJ3PUL9LK)V_+06\[
MODERN
TONE GAIN A
B
• English • Deutsch • Français • Italiano • Español
15
Page 16

Spirit™ AmpMan Series – Manual 1.1
-?:LUK 5VPZL.H[L:WLHRLYV\[ (\_0U7V^LY 0UW\[-?9L[\YU7OVULZ =VS\TL *HI;`WL VUVMM4PJ3PUL9LK)V_+06\[
11
12
13
MASTER
6
VOLUME SAGGING PRESENCE RESONANCE
6
5
5
10 9
4
4
SPIRIT™ AMPMAN SERIES
2 Éléments de commande
2.1 Section Canaux
-?:LUK 5VPZL.H[L:WLHRLYV\[ (\_0U7V^LY 0UW\[-?9L[\YU7OVULZ =VS\TL *HI;`WL VUVMM4PJ3PUL9LK)V_+06\[
MASTERBVOLUME SAGGING PRESENCE RESONANCE
SPIRIT™ AMPMAN SERIES
1
●
Gain : Le potentiomètre gain détermine la sensibilité d‘entrée et donc
la saturation ou le degré de distorsion du préamplificateur. En combinaison
avec Tone et Sagging, c‘est l‘outil déterminant en matière de conception
sonore.
2
●
Tone : L’effet du potentiomètre tonalité de est adapté avec précision
au canal respectif. Le réglage de la tonalité intervient dans les plages de
fréquences caractéristiques du son de base et délivre une gamme de sons
extrêmement large.
3
●
Resonance : Lorsque ce potentiomètre est en position centrale, vous en-
tendez le comportement en résonance « normal » entre ampli et enceinte.
En le tournant vers la gauche, vous atténuez l’effet de résonance des hautparleurs, ce qui arrondit et assouplit encore les sons Clean. En le tournant
vers la droite, vous renforcez l’effet, ce qui se traduit par une puissante
poussée des basses, surtout sur les sons saturés.
TONE GAIN A
BOOSTFX LOOPSOLO CHANNEL A/B
3
3
BOOSTFX LOOPSOLO CHANNEL A/B
2
TONE GAIN A
2
1
1
8
8
B
7
4
●
Presence : Ce potentiomètre permet de déterminer la part d’harmoniques
générées. Plus il est tourné vers la droite, plus la présence du son est forte.
5
●
Sagging : En combinaison avec Gain et Tone, Sagging est l‘outil per-
mettant de créer des sons nouveaux, frais et exaltants. Ce potentiomètre
vous donne une maîtrise totale du comportement en saturation de l‘étage
final à n‘importe quel volume. Sagging améliore votre son et vous permet
littéralement de voyager à travers les décennies de l‘histoire du son des
guitares en un rien de temps.
Nota : Plus le Sagging est important, plus la saturation de l‘étage final est
élevée ! Selon le réglage du gain, Sagging influence également le volume
global dans une mesure plus ou moins grande. De la position butée gauche
(pas de Sagging) à la position centrale, le Sagging augmente le volume, de
la p osition centrale à la posit ion butée droite (Sagging maximum), le volume
peut diminuer et doit être ajusté à l‘aide du Volume.
Nota : Dans le canal B du Spirit AmpMan Modern, un Sagging trop important peut s’avérer contre-productif. Pour les solos à haut gain, le Sagging apporte la part d’onctuosité nécessaire, mais lorsqu’on joue des riffs,
le Sagging peut rapidement conduire à des accords au son « boueux ». Une
utilisation plus modérée est ici nécessaire, notamment en combinaison avec
des guitares accordées plus bas ou à 7 cordes.
6
●
Volume : Volume permet d’ajuster le volume des deux canaux l’un par
rapport à l’autre.
Attention : Veillez à ne pas employer ce potentiomètre pour contrôler le
volume général de l’ampli. C’est la commande Master qui est prévue à cet
effet !
16
Page 17

Spirit™ AmpMan Series – Manual 1.1
中文
7
●
Canal A/B : Ce bouton vous permet de passer du canal A au canal B.
8
●
Channel-LED : Le canal actif est indiqué par la LED bleue à droite du
potentiomètre de gain du canal respectif.
2.2 FX Loop et Boost
-?:LUK 5VPZL.H[L:WLHRLYV\[ (\_0U7V^LY 0UW\[-?9L[\YU7OVULZ =VS\TL *HI;`WL VUVMM4PJ3PUL9LK)V_+06\[
MASTERBVOLUME SAGGING PRESENCE RESONANCE
SPIRIT™ AMPMAN SERIES
9
●
Boost : La fonction Boost permet d’augmenter des plages de fréquences
particulières du spectre sonore. Il en résulte des sons encore plus mordants,
plus crémeux ou plus percutants, selon le canal. Lorsque le Boost est activé,
la LED au-dessus du commutateur s’allume en rouge.
10
●
FX Loop : Ici, la voie à effet série sur le panneau arrière est activée.
Lorsque la voie à effet est activée, la LED au-dessus du commutateur
s’allume en rouge.
Nota : Ces deux commutateurs fonctionnent indépendamment des canaux
dans le réglage de base. Cependant, ils peuvent également être assignés aux
canaux en utilisant le circuit mode intelligent - et commuter ensuite lorsque
le canal est commuté (voir chapitre 3 « Smart-Mode »).
TONE GAIN A
BOOSTFX LOOPSOLO CHANNEL A/B
2.3 Section Master
-?:LUK 5VPZL.H[L:WLHRLYV\[ (\_0U7V^LY 0UW\[-?9L[\YU7OVULZ =VS\TL *HI;`WL VUVMM4PJ3PUL9LK)V_+06\[
MASTERBVOLUME SAGGING PRESENCE RESONANCE
SPIRIT™ AMPMAN SERIES
11
●
Master : Le potentiomètre Master (beige) contrôle le volume global de
l’AmpMan, il affecte les deux canaux.
12
●
Solo(-Master) : Le potentiomètre rouge sous le potentiomètre Master
permet de fixer un saut de niveau entre 0 et +6 dB par rapport au Master,
par exemple pour obtenir le volume additionnel souhaité en appuyant sur
un bouton lors du passage en solo. Avec ce concept, seul le Master a besoin d’être réglé pour l’ajustement du volume global, le volume solo étant
asservi automatiquement.
Attention : Le saut de niveau de la commande Solo est également transmis
à la Red Box et à la sortie casque. Lorsque vous utilisez la Red Box sur
scène, veuillez vous assurer que le volume solo est pris en compte lors de la
vérification du son pour éviter de surcharger l’entrée du pupitre de mixage.
Lorsque vous utilisez un casque, réglez toujours le volume maximum (potentiomètre de volume sur le panneau arrière) avec le bouton solo activé !
13
●
Solo : Ici, vous activez le saut de niveau préréglé par rapport au Master
via le potentiomètre Solo. Le fait que Solo soit actif est indiqué par la LED
rouge au-dessus du bouton.
TONE GAIN A
BOOSTFX LOOPSOLO CHANNEL A/B
中文
•
• 日本語
2.4 Face arrière
1
●
Input : Entrée instruments permettant de brancher une guitare via un
câble jack blindé.
2
●
Noise Gate : Ce potentiomètre détermine la sensibilité du noise gate.
La technologie IDB™ du noise gate adapte automatique les paramètres
d’attaque et de Threshold. Si le potentiomètre est en butée gauche, le noise
gate est totalement commuté sur le trajet de signal (Bypass). Plus on tourne
le potentiomètre vers la droite, plus l’intervention du noise gate est forte. Sur
la position 9 heure, le noise gate réagit déjà très sensiblement aux signaux.
Plus on continue à tourner le potentiomètre vers la droite, plus l’intervention
du noise gate est forte.
Nota : AmpMan mémorise automatiquement le réglage du Noise Gate par
canal. Cela signifie que si, par exemple, le noise gate est désactivé (butée à
gauche) dans le canal A pour un clean-sound et actif dans le canal B pour
un lead-sound, le réglage est conservé lors de la commutation des canaux.
3
●
FX Send : Raccordez cette prise avec l’entrée de votre générateur d’effets
externe.
4
●
FX Return : Raccordez cette prise avec la sortie (mono) de votre
générateur d’effets externe.
5
●
Red Box AE+ DI Out : Depuis que Hughes & Kettner a inventé la Red
Box originale en 1988, elle est considérée comme un standard du secteur
pour restituer le son des amplis de guitare sans microphone. Que ce soit en
live ou en studio, la Red Box transmet le son avec une qualité constante.
Les diaphonies d’autres instruments et les expérimentations fastidieuses
avec les positions du microphone font partie du passé. La Red Box AE+
est la dernière version de l’enceinte DI primée avec émulation d’hautparleur. L’émulation d’ambiance commandée par DSP produit l'acoustique
authentique d’une enceinte et une attaque ultradirecte d’un son de guitare
de la plus grande pureté.
3 4 5
NOISE GATEINPUT FX LOOP
VMM
1
2
9L[\YU:LUK
AE
6U
3PUL
6MM
4PJ
• English • Deutsch • Français • Italiano • Español
17
Page 18

Spirit™ AmpMan Series – Manual 1.1
3 4 6 10 12 14 15117
NOISE GATEINPUT FX LOOP
VMM
9L[\YU:LUK
1
6
●
Cab Type : Ce commutateur permet de sélectionner l’une des huit
simulations de baffle :
N° Types d’enceinte
1 1x12" Modern Thiele-Port
2 2x12" Modern Front-Port
3 2x12" Vintage Open Back
4 4x10" Alnico Open Back
5 4x12" Vintage Cab
6 4x12" British Cab
7 4x12" Modern Cab
8 4x12" American Cab
Nota : AmpMan mémorise automatiquement le réglage du type de baffle
par canal. Ainsi, il est p.ex. possible de sélectionner dans le canal A pour
un clean-sound une Open-Back Box pétillante et pour le canal B, une box
4x12 musclée. Surtout lorsque l’on utilise la Red Box, cela présente le grand
avantage de pouvoir attribuer une simulation de baffle différente par canal
pour parfaire le son du canal.
Attention : Lorsque vous utilisez simultanément la Red Box et le Speaker Out,
par exemple sur scène avec un baffle de guitare raccordée à Speaker Out
et la Red Box au pupitre, veuillez vous assurer que le même type de baffle
est sélectionné pour les deux canaux, sinon l’enceinte sur scène aurait une
sonorité très différente par rapport au signal de la Red Box.
7
●
Red Box Mic/Line : Veillez à faire fonctionner la Red Box avec le niveau
adéquat. Si les longueurs de câblage sont importantes, comme en concert,
par exemple, nous recommandons d’activer le réglage « Line » sur la Red Box.
Le niveau de sortie supérieur compense ainsi la perte de niveau résultant de
ces grandes longueurs de câbles. Si la table de mixage dispose uniquement
d’entrées microphones, commutez la Red Box en position « Mic », vous
pourrez ainsi éviter les surmodulations de l’entrée microphone. Si la table
de mixage ou l’interface audio ne dispose pas d’une entrée XLR, vous aurez
alors besoin d’un adaptateur jack XLR (6,3 mm) que vous pourrez obtenir
dans un magasin spécialisé. Si vous utilisez une entrée jack 6,3 mm (1/4"),
veillez à faire fonctionner la Red Box en position « Line ».
Attention : Certaines interfaces d’enregistrement offrent des entrées "Hi-Z"
explicites, des prises jack haute impédance pour les niveaux des instruments,
qui sont exclusivement destinées au branchement de guitares. La Red Box ne
peut pas être connectée à ce type d’entrée, cela entraînerait inévitablement
une distorsion due à des niveaux trop élevés.
2 5 9 138
AE
6U
3PUL
6MM
4PJ
*HI;`WL
8
●
Red Box On/Off : Vous pouvez ici éteindre la simulation de haut-
parleur de la Red Box. La Red Box envoie alors un signal non filtré à utiliser
avec votre logiciel d’émulation d’enceintes ou de microphones préféré ou un
générateur d’effets.
9
●
Phones : Un casque d’écoute usuel avec une prise mini-jack stéréo de
3,5 mm peut être connecté à cette sortie.
Nota : Cette sortie peut également être utilisée pour envoyer un signal Line
vers n‘importe quelle entrée multimédia stéréo, telle qu’un système hi-fi.
Veuillez vous rapprocher de votre revendeur concernant les adaptateurs
ou les câbles appropriés. Pour connecter cette sortie à une entrée Aux In
ou à un système hi-fi typique, un câble doté d’une fiche jack stéréo à une
extrémité pour la connexion à la sort ie casque de vot re AmpMan et de deux
fiches RCA à l‘autre extrémité pour la connexion aux entrées gauche et
droite du système hi-fi est requis.
Pour la connexion à un pupitre de mixage, deux connecteurs mono jack
ou XLR sont nécessaires à la place des connecteurs Cinch. A cet effet, il
convient de s‘assurer que les entrées de la table de mixage sont fermement
placées à droite / gauche dans le panorama pour que l’effet stéréo soit
correctement mis en valeur lors de l‘utilisation de l‘entrée Aux-In.
Attention : Contrairement aux séries Black Spirit et Spirit Nano, la sortie hautparleur n’est pas coupée lorsque la prise casque est occupée ! Cela présente
l’avantage que la sortie casque peut être utilisée comme alternative au niveau
fixe de la Red Box en tant que sortie ligne réglable lorsqu’un baffle de guitare
est connecté. Le potentiomètre Master est alors utilisé pour « couper » l’ampli
de puissance et l’AmpMan peut également être utilisé sans baffle de guitare
connecté, le Master étant activé.
10
●
Phones Volume : Utilisez cette fonction pour régler le volume de la
sortie casque
11
●
Aux In : Vous pouvez connecter n‘importe quelle source audio à
l‘entrée Aux. La source audio est mixée au son de votre guitare. L’entrée Aux
permet également de raccorder des Drum-Machines ou des instruments
supplémentaires. Le signal de l‘entrée Aux est transféré en qualité stéréo
intégrale à la sortie casque. Vous pouvez donc jouer avec vos pistes jam
sans avoir besoin d‘un pupitre de mixage supplémentaire.
12
●
Power : Ce bouton permet d’allumer et d’éteindre votre AmpMan.
=VS\TL
POWER
AUX INPHONES
(,:
VOTZ
> ' VOTZ
=+*(
18
Page 19

13
中文
●
AES : Selon le règlement n° 1275/2008/CE, les appareils qui, en vertu
de la directive CE, comprennent également votre AmpMan, doivent être
équipés d‘un dispositif d‘économie d‘énergie qui éteint l‘appareil après une
certaine période de non-utilisation. Sur le AmpMan, c’est l‘AES, activable
et désactivable via le mini-interrupteur situé près de la douille Speaker qui
prend cette fonction en charge.
À la livraison, le système AES est activé ; le mini-interrupteur est en position
On (à droite). Dans cette configuration, l’ampli s’éteint après une phase
de repos d’environ 90 minutes. La phase de repos est réinitialisée et le
décompte relancé dès que l’amplificateur reçoit un signal d’entrée, par
ex. lorsqu’un son court est joué. Un faible signal suffit pour relancer le
compte à rebours de 90 minutes. Si l’appareil s’est éteint après l’écoulement
complet de la phase de repos de 90 minutes, il peut à nouveau être remis
en fonctionnement à l’aide du commutateur Power. En faisant glisser le
mini-interrupteur (vers la gauche), l’AES et donc l’arrêt automatique de
l’appareil sont désactivés.
14
●
Speaker : La sortie haut-parleur est conçue pour des baffles ayant
une impédance de 4 à 16 ohms. Tout type de baffle de guitare peut être
connecté, l‘étage final ayant assez de puissance pour piloter 4x12 baffles. Si
vous le souhaitez, vous pouvez également utiliser une structure Fullstack.
À respecter impérativement : En cas de raccordement de deux baffles,
l‘impédance de chaque baffle individuel doit être d‘au moins 8 ohms,
puisque l‘impédance totale est réduite de moitié à 4 ohms lorsqu‘ils sont
connectés en parallèle.
Les baffles guitare recommandés Hughes & Kettner TS 112 Pro, TM 112
et TM 212 présentent tous une impédance de 16 ohms et disposent d’une
sortie parallèle qui permet de raccorder un deuxième baffle de même type.
15
●
VDC : Entrée pour la connexion de l‘alimentation à plage élargie
fournie, qui fonctionne dans le monde entier de manière fiable sous
n‘importe quelle tension réseau et garantit une qualité sonore constante.
Veuillez toujours utiliser le bloc d‘alimentation d‘origine.
Attention : Veuillez toujours brancher d’abord l’alimentation électrique à
l’AmpMan et ensuite seulement à une prise de courant.
3 Smart-Mode
AmpMan propose un mode intelligent où les réglages Boost et FX-Loop sont
enregistrés par canal. Cela signifie p. ex. que si Boost et FX-Loop sont activés
sur le canal B et désactivés sur le canal A, les réglages sont conservés lors
du changement de canal. Vous pouvez donc passer d’un son rythmique sec
sur le canal A à un son solo sur le canal B, y compris un boost et une boucle
d’effets active, d’une simple pression sur une touche. Le mode intelligent
n’est pas actif à la livraison.
Activation/désactivation : Si les deux commutateurs extérieurs Solo et
Channel A/B sont enfoncés simultanément et maintenus pendant trois
secondes, l’AmpMan passe en mode Smart. Les LED des canaux clignotent
pour le confirmer. Ce réglage est conservé même après que l’AmpMan a été
éteint. Le mode intelligent se désactive de la même manière.
Nota : Il n’y a pas d’affichage pour indiquer si le mode intelligent est actif. Si
vous voulez vérifier que le mode intelligent est actif, il suffit de désactiver le
boost sur le canal A et de l’activer sur le canal B. Si le boost reste actif lors du
retour sur le canal A, l’AmpMan est en mode intelligent.
Spirit™ AmpMan Series – Manual 1.1
2 Caractéristiques techniques
Spirit AmpMan Series
Puissance absorbée max 50 W
Entrée CC +24 V / 2.5 A (polarité: + intérieur)
Alimentation externe 100 – 240 V, 50 – 60 Hz
Plage de tolérance de tension secteur +/-10 %
Plage de température ambiante en
fonctionnement
Jack Input 6,3 mm (1/4"), asymétrique, 1Mohm
Sensibilité (Clean, tous potentiomètres en
position centrale, Master en position maxi)
Niveau max. 0 dBV
Jack FX Send 6,3 mm (1/4"), asymétrique, 220ohms
Niveau nominal (Clean, tous potentiomètres en position centrale, Potentiomètre
Tone sur minimum)
Niveau max. +10 dBV
Jack FX Return 6,3 mm (1/4"), asymétrique, 20kohms
Sensibilité (Clean, tous potentiomètres en
position centrale, Master en position maxi)
Niveau max. +9 dBV
Entrée Aux – prise mini-jack 3,5 mm, stéréo, 10 kOhms
Sensibilité –6 dBV
Niveau max. +26 dBV
Prises jack Phones/Line 6,3 mm (1/4"), stéréo, 50 Ohms
Niveau nominal (Clean, tous les
potentiomètres en position centrale,
Potentiomètre Tone sur minimum
en position maximale, Volume du casque
70%)
Niveau max. (Clean, tous les potentiomètres en position centrale, Potentiomètre
Tone sur minimum, Master en position
maximale, Volume du casque 100%)
Niveau max. +11 dBV
Red Box AE+ Out XLR, symétrique, Line : 400 ohms,
Niveau nominal (Clean, tous potentiomètres en position centrale, Potentiomètre
Tone sur minimum)
Niveau max. Line: + 6 dBV, Mic: –14 dBV
Speaker – prise jack 6,3 mm (1/4"), Bridged-Mode, 4 – 16 ohms
Puissance de sortie @ 16 Ohms 13 W
Puissance de sortie @ 8 Ohms 25 W
Puissance de sortie @ 4 Ohms 48 W
Dimensions ampli (l x H x P) 250 x 52 x 153 mms
Poids ampli 1150 g
Dimensions alimentation
(l x H x P)
Poids alimentation 280 g
Tous les produits et droits d’auteurs mentionnés appartiennent à leurs propriétaires
respectifs.
, Master
0° à +35° C
–13 dBV
–6 dBV
–6 dBV
–6 dBV
0 dBV
Mic : 600 ohms
Line: –6 dBV, Mic: –26 dBV
129 x 32 x 52 mms
中文
•
• 日本語
• English • Deutsch • Français • Italiano • Español
19
Page 20

Istruzioni di sicurezza
importanti. Leggere prima di
effettuare il collegamento!
Il presente prodotto è stato fabbricato dal produttore
in conformità alla norma IEC 62368-1 ed è uscito dallo
stabilimento in perfette condizioni di funzionamento.
Per preservare tali condizioni e garantirne l’uso sicuro,
l’utente deve attenersi alle indicazioni e alle avvertenze
riportate nelle istruzioni per l’uso. L’unità è conforme
alla Classe di protezione 1 (apparecchio con messa a
terra di protezione). Se volete usare questo prodotto su
veicoli, a bordo di navi o di aerei oppure ad altitudini
superiori a 2000 m dovete badare alle rispettive norme
di sicurezza suppletive alla norma IEC 62368-1.
AVVISO: Per evitare il rischio di incendio o
folgorazione, non esporre l’apparecchio ad umidità
o pioggia. Non aprire l’involucro poiché al suo
interno non vi sono parti riparabili dall’utente. Per la
riparazione rivolgersi a personale tecnico qualificato.
Questo simbolo segnala la presenza all’interno
dell’involucro di tensione pericolosa priva di
isolamento sufficientemente alta da costituire un
pericolo di folgorazione.
Questo simbolo segnala la presenza di tensione
pericolosa accessibile dall’esterno. Il cablaggio esterno
collegato ad un qualunque morsetto contrassegnato da
questo simbolo deve essere un cavo preconfezionato
conforme ai requisiti indicati dal produttore o un
cablaggio installato da personale qualificato.
Questo simbolo segnala importanti istruzioni
per l’uso e la manutenzione nella documentazione
allegata. Leggere il manuale.
Questo simbolo ha il seguente significato:
Attenzione! Superficie calda! Non toccare per evitare
scottature.
Apparecchiature elettriche o elettroniche di
qualsiasi tipo, batterie incluse, non appartengono
nell'immondizia - smaltite questo tipo di rifiuti presso
gli ufficiali centri di raccolta.
Leggere queste istruzioni. Conservare queste
istruzioni. Attenersi a tutti gli avvisi e istruzioni riportati
sul prodotto e nel manuale.
• Non utilizzare il prodotto vicino all’acqua. Non
collocare il prodotto vicino ad acqua, vasche,
lavandini, zone umide, piscine o stanze con presenza
di vapore.
• Non collocare sul prodotto oggetti contenenti liquidi,
quali vasi, bicchieri, bottiglie ecc.
• Pulire solo con un panno asciutto.
• Non togliere alcun coperchio o parti dell’involucro.
• La tensione di esercizio prescritta per il prodotto deve
corrispondere alla tensione di alimentazione della
rete locale. In caso di dubbi sul tipo di alimentazione
disponibile, rivolgersi al proprio rivenditore o
all’azienda di fornitura elettrica locale.
• Per ridurre il rischio di folgorazione, la messa a terra
del prodotto deve essere mantenuta. Utilizzare solo
il cavo di alimentazione in dotazione al prodotto e
mantenere sempre in funzione il connettore centrale
(di terra) del collegamento alla rete. Non escludere la
funzione di sicurezza del connettore polarizzato o di
messa a terra.
• Proteggere il cavo di alimentazione affinché non
venga calpestato o pizzicato, in particolare in
corrispondenza delle prese e degli innesti e nel punto
di uscita dal dispositivo. Maneggiare sempre con cura
i cavi di alimentazione. Controllare periodicamente
la presenza di tagli o usura sui cavi, soprattutto
all’altezza della presa e nel punto di uscita dal
dispositivo.
• Non utilizzare mai il cavo di alimentazione se
danneggiato.
• Scollegare il prodotto in caso di temporale o di lunghi
periodi di inutilizzo.
• Il prodotto si scollega completamente
dall’alimentazione di rete solo staccando la spina
di alimentazione dall’unità o dalla presa a muro.
Il prodotto va collocato sempre in modo che sia
possibile scollegarlo dall’alimentazione con facilità.
• Fusibili: I fusibili utilizzati come ricambio devono
essere di tipo IEC127 (5x20 mm) e dell’amperaggio
nominale richiesto. È vietato utilizzare fusibili riparati
o cortocircuitare il portafusibili. Fate sostituire i
fusibili soltanto da un tecnico qualificato.
• Per tutte le operazioni di riparazione, rivolgersi a
personale qualificato. L’unità va riparata nel caso
abbia subito danni, come nei seguenti casi:
- Il cavo o la presa di alimentazione sono danneggiati
o usurati.
- È penetrato del liquido o degli oggetti all’interno del
prodotto.
- Il prodotto è stato esposto a pioggia o umidità.
- Il prodotto non funziona correttamente seguendo le
istruzioni.
- Il prodotto ha subito una caduta o l’armadio è stato
danneggiato.
• Quando collegate altoparlanti badate di non scendere
sotto l’impedenza minima dichiarata sull’apparecchio
oppure in questo manuale. Usate sempre cavi dello
spessore adatto e corrispondenti alle vigenti norme
locali.
• Non esporre ai raggi solari diretti.
• Non installare accanto a fonti di calore quali
radiatori, bocchette di diffusione d’aria calda, fornelli
o altri dispositivi che generano calore.
• Questo apparecchio è stato concepito per l'uso nelle
zone di clima temperate - e non per essere usato
nelle zone tropicali.
• Non chiudere le aperture di ventilazione. Installare
l’unità seguendo le istruzioni fornite dal produttore.
Il prodotto non è adatto all’installazione ad incasso,
ad esempio in un rack, a meno di non garantire
un’adeguata ventilazione.
• Quando viene spostato all’interno di un locale,
attendere sempre che il dispositivo, se freddo,
raggiunga la temperatura ambiente. Qualora venga
utilizzato senza che si sia riscaldato, sussiste il
rischio di formazione di condensa al suo interno e di
conseguenti danni.
• Non collocare sul prodotto fiamme libere, come ad
esempio candele accese.
• Posate l’apparecchio mantenendo una distanza
minima di 20 cm da pareti. Non copritelo e
provvedete a lasciare uno spazio libero di almeno 50
cm al di sopra dell’apparecchio.
• Badate sempre a piazzare l’apparecchio su una
superficie piana e stabile.
• Utilizzare solo in abbinamento al carrello, supporto,
piedistallo, staffa o tavola specificati dal produttore
o venduti insieme al prodotto. Qualora si utilizzi un
carrello, prestare attenzione nello spostare il carrello/
la combinazione di prodotto per evitare lesioni
causate dall’inciampamento.
• Utilizzare solo accessori consigliati dal produttore.
Tale prescrizione si applica a tutti i tipi di accessori,
ad esempio coperchi di protezione, borse per il
trasporto, supporti, dispositivi per il montaggio a
parete o a soffitto, ecc. In caso di applicazione di
qualsiasi tipo di accessorio al prodotto, osservare
sempre le istruzioni per l’uso fornite dal produttore.
Non utilizzare mai punti di fissaggio sul prodotto
diversi da quelli indicati dal produttore.
• Questo apparecchio NON è adatto all’uso da parte
di persone (compresi i bambini) con capacità fisiche,
mentali o sensoriali limitate o da persone prive
Version 2.5 07/2018
della necessaria esperienza e/o conoscenza. Tenere
sempre l’apparecchio al di fuori della portata dei
bambini di età inferiore ai 4 anni.
• Non inserire mai oggetti di alcun tipo all’interno del
prodotto attraverso le fessure dell’armadio, poiché
potrebbero toccare punti con presenza di tensione
pericolosa o causare il cortocircuito dei componenti,
con il conseguente rischio di incendio o folgorazione.
• Questo prodotto genera livelli di pressione sonora
superiori a 90 dB in grado di causare danni
permanenti all’udito. L’esposizione a livelli di
rumore estremamente elevati può causare la perdita
permanente dell’udito. In caso di esposizione
continua, indossare protezioni per l’udito.
• Il produttore garantisce la sicurezza, l’affidabilità e
l’efficienza del prodotto solo se:
- l’assemblaggio, l’ampliamento, la reimpostazione,
le modifiche o le riparazioni sono eseguiti dal
produttore o da personale autorizzato.
- l’impianto elettrico dell’area interessata è conforme ai
requisiti specificati nelle norme IEC (ANSI).
- l’unità è utilizzata secondo le istruzioni per l’uso.
Prima di usare l'amplificatore
• Leggere attentamente questo manuale
e gli avvisi di sicurezza prima di usare
l'amplificatore.
• Hughes & Kettner non è responsabile per
qualunque danno causato da un utilizzo
improprio dell'amplificatore.
• Prima di collegare l’apparecchio alla rete,
verificare che l’interruttore Power sia spento e
che la tensione elettrica locale corrisponda al
valore indicato sul retro.
• Un ultimo avviso prima di usare il AmpMan:
L'amplificatore produce alti livelli di volume
che possono danneggiare l’udito!
• Per evitare una sorpresa assordante, vi
consigliamo di assuefarvi a chiudere il
controllo volume della vostra chitarra
collegata al AmpMan prima di accendere
l'amplificatore.
Page 21

Spirit™ AmpMan Series – Manual 1.1
中文
1 Informazioni generali
I modelli AmpMan Classic e AmpMan Modern hanno più o meno le stesse
caratteristiche tecniche e vi offrono due canali che potete controllare
indipendentemente l'uno dall'altro. La sezione Master che include anche il
-?:LUK 5VPZL.H[L:WLHRLYV\[ (\_0U7V^LY 0UW\[-?9L[\YU7OVULZ =VS\TL *HI;`WL VUVMM4PJ3PUL9LK)V_+06\[
Solo-Master è disponibile una sola volta – così come il FX-Loop e il Boost – e
si applica ad entrambi i canali.
CLASSIC
MASTER
VOLUME SAGGING PRESENCE RESONANCE
TONE GAIN A
Nota: L’AmpMan vi offre uno Smart-Mode (cfr. Capitolo 3 “Smart-Mode”)
che vi permette di memorizzare le impostazioni di Boost e FX-Loop per
canale.
中文
•
Il canale A dei due modelli AmpMan Classic e AmpMan Modern vi offre
il suono indomato dell'era di Woodstock – dal Californian Clean al British
B
SPIRIT™ AMPMAN SERIES
BOOSTFX LOOPSOLO CHANNEL A/B
Crunch. Il canale B, invece, presenta caratteristiche diverse secondo il
modello: L’AmpMan Classic vi offre il grandioso suono della grande era del
• 日本語
rock degli anni '80 e '90 – dal British Lead al Brown Sound. L'AmpMan
Modern invece è il modello di scelta per i metallari, offrendo un suono ad
alto guadagno per assoli tintinnanti e riff potenti.
MASTER
VOLUME SAGGING PRESENCE RESONANCE
SPIRIT™ AMPMAN SERIES
BOOSTFX LOOPSOLO CHANNEL A/B
-?:LUK 5VPZL.H[L:WLHRLYV\[ (\_0U7V^LY 0UW\[-?9L[\YU7OVULZ =VS\TL *HI;`WL VUVMM4PJ3PUL9LK)V_+06\[
MODERN
TONE GAIN A
B
• English • Deutsch • Français • Italiano • Español
21
Page 22

Spirit™ AmpMan Series – Manual 1.1
-?:LUK 5VPZL.H[L:WLHRLYV\[ (\_0U7V^LY 0UW\[-?9L[\YU7OVULZ =VS\TL *HI;`WL VUVMM4PJ3PUL9LK)V_+06\[
11
MASTER
12
6
VOLUME SAGGING PRESENCE RESONANCE
6
13
2 Elementi di Controllo
2.1 La sezione canali
-?:LUK 5VPZL.H[L:WLHRLYV\[ (\_0U7V^LY 0UW\[-?9L[\YU7OVULZ =VS\TL *HI;`WL VUVMM4PJ3PUL9LK)V_+06\[
MASTERBVOLUME SAGGING PRESENCE RESONANCE
TONE GAIN A
5
5
4
4
SPIRIT™ AMPMAN SERIES
3
3
10 9
4
●
Presence: Controllo per regolare la quantità delle armoniche. Tanto più
alzate questo controllo, quanto più il suono si dimostra «presente».
5
●
Sagging: In combinazione coi controlli Gain e Tone, Sagging ti sarà utile
a creare nuovi, entusiasmanti suoni. Questo controllo ti permette di regolare precisamente il comportamento di saturazione della finale di potenza a
qualsiasi volume. Sagging raffinerà il tuo suono, permettendoti di scegliere
in un battibaleno fra i vari suoni tipici per i rispettivi decenni della storia
della chitarra elettrica.
2
TONE GAIN A
2
BOOSTFX LOOPSOLO CHANNEL A/B
1
1
7
8
8
B
SPIRIT™ AMPMAN SERIES
1
●
Gain: Il controllo Gain regola la sensibilità d’ingresso e quindi anche il
livello di saturazione ossia la distorsione del preamplificatore. In combinazione coi controlli Tone e Sagging, Gain servirà da attrezzo più importante
per creare il tuo sound personale.
2
●
Tone: Le caratteristiche del controllo Tone sono meticolosamente abbi-
nati ai rispettivi modelli. Questo controllo tratta le bande di frequenza caratteristiche del suono basilare del rispettivo modello ed offre una vasta gamma
di suoni.
3
●
Resonance: Quando il controllo si trova in posizione «ore 12», si sen-
te il «normale» comportamento di risonanza fra amplificatore e cabinet.
Girando il controllo in senso antiorario, attenuate l’effetto della risonanza
del cabinet. Questo rende i suoni Clean ancora più armoniosi. Girando il
controllo in senso orario, aumentate l’effetto di risonanza per suoni distorti
con bassi più potenti.
BOOSTFX LOOPSOLO CHANNEL A/B
22
Avviso: Più alzi il controllo Sagging, più alta risulterà la saturazione della
finale di potenza. Secondo la posizione del controllo Gain, Sagging influisce
più o meno sul livello generale di volume. Dalla posizione minima (controllo
Sagging girato completamente in senso antiorario) fino alla posizione media,
il volume si alzerà – aumentando il Sagging oltre alla posizione media fino
al massimo, il volume potrebbe ridursi e deve essere regolato col controllo
Volume.
Nota: Non esagerare con Sagging nel canale B dell'AmpMan Modern! Certo: Per assoli high-gain tintinnanti, Sagging vi offre una certa porzione di
cremosità – che si potrebbe però rivelare “infangante” per gli accordi dei
vostri riff. Soprattutto se suonate una chitarra con accordatura abbassata o
con sette corde, vi consigliamo di usare Sagging con cautela.
6
●
Vo lume: Il controllo Volume serve a bilanciare il volume di un canale
rispetto al volume dell’altro.
Attenzione: Non usare questo controllo per regolare il volume
dell’amplificatore – di questo si occupa il controllo master!
Page 23

Spirit™ AmpMan Series – Manual 1.1
中文
7
●
Channel A/B: Con questo tasto potete cambiare fra il canale A e il
canale B.
8
●
Channel-LED: La spia LED blu a destra del controllo Gain del rispettivo
canale vi segnala il canale attivato.
2.2 FX Loop e Boost
-?:LUK 5VPZL.H[L:WLHRLYV\[ (\_0U7V^LY 0UW\[-?9L[\YU7OVULZ =VS\TL *HI;`WL VUVMM4PJ3PUL9LK)V_+06\[
MASTERBVOLUME SAGGING PRESENCE RESONANCE
SPIRIT™ AMPMAN SERIES
9
●
Boost: Con Boost potete aumentare certe bande di frequenza del suo-
no. Questo vi permette di realizzare suoni ancora più mordenti, cremosi o
imponenti, secondo il canale attivato. Il Boost attivato viene indicato dalla
spia LED rossa sopra il selettore.
10
●
FX Loop: Qui potete attivare il loop effetti seriale sul retro. Il loop effetti
attivato viene indicato dalla spia LED rossa sopra il selettore.
Nota: Nell’impostazione basilare, questi due selettori influiscono su entrambi i canali. Usando il circuito Smart-Mode, potete assegnarli individualmente ai canali. In questo caso, cambiando canale, cambierà anche lo stato
dei due selettori (cfr. Capitolo 3 “Smart-Mode”).
TONE GAIN A
BOOSTFX LOOPSOLO CHANNEL A/B
2.3 La sezione master
-?:LUK 5VPZL.H[L:WLHRLYV\[ (\_0U7V^LY 0UW\[-?9L[\YU7OVULZ =VS\TL *HI;`WL VUVMM4PJ3PUL9LK)V_+06\[
MASTERBVOLUME SAGGING PRESENCE RESONANCE
SPIRIT™ AMPMAN SERIES
11
●
Master: Il controllo Master (beige) regola il volume totale dell’AmpMan
e influisce su entrambi i canali.
12
●
Solo(-Master): Il controllo rosso sotto il controllo Master serve a fissare
uno sbalzo di livello da 0 a +6 dB fra Master e Solo. Questo vi permette di
alzare il volume del vostro assolo in un baleno, semplicemente premendo
il tasto Solo. Grazie a questo concetto, la quota entro i livelli Master e Solo
rimane constante, perché alternando il volume Master, il volume Solo viene
regolato automaticamente.
Attenzione: Lo sbalzo di livello scelto col controllo Solo viene anche trasmesso alla Red Box e all’uscita cuffia. Se usate la Red Box sul palcoscenico,
verificate il volume Solo durante il soundcheck per evitare una sovramodulazione dell’ingresso del mixer. Se usate una cuffia, regolate il rispettivo volume massimo (controllo Volume sul retro) sempre con tasto Solo attivato!
13
●
Solo: Questo tasto serve ad attivare lo sbalzo di livello preselezionato
con il controllo Solo. Il Solo attivato viene indicato dalla spia LED rossa
sopra il tasto.
TONE GAIN A
BOOSTFX LOOPSOLO CHANNEL A/B
中文
•
• 日本語
2.4 Retro
1
●
Input: Ingresso strumenti per collegare una chitarra usando un cavo
schermato.
2
●
Noise Gate: Controllo per regolare la sensitività del noise gate. La
tecnologia IDB™ adatta automaticamente i parametri Attack e Threshold del
noise gate. Se il controllo è girato completamente verso sinistra, il noise gate
è tolto dalla catena del segnale (bypass). Più girate il controllo a destra, più
dura sarà la reazione del noise gate. Sulla posizione «ore 9», il gate reagisce
già molto sensibilmente ai segnali. Più girate il controllo a destra, più dura
sarà la reazione del noise gate.
Nota: L’AmpMan memorizza automaticamente l’impostazione del Noise
Gate per canale. Vale a dire: Se avete disattivato il Noise Gate del canale A
per un suono clean mentre lo avete attivato nel canale B per un suono lead,
queste impostazioni rimangono conservate quando cambiate canali.
3
●
FX Send: Collegate questa presa all’ingresso del vostro processore
effetti.
4
●
FX Return: Collegate questa presa all’uscita (mono) del vostro
processore effetti.
5
●
Red Box AE+ DI Out: Da quando Hughes & Kettner ha inventato la Red
Box nel 1988, questa si è imposta come standard per trasmettere il sound di
amplificatori da chitarra a un mixer senza dover ricorrere a un microfono.
Sia sul palco, sia nello studio – la Red Box permette di trasmettere il suono
in ottima qualità. Diafonie di altri strumenti e il fastidioso sperimentare con
varie posizioni del microfono sono una cosa superata. La Red Box AE+
è l’ultimissima versione della premiata DI-box con emulazione speaker.
L’Ambience-Emulation con controllo DSP crea l’autentica profusione di un
cabinet per un direttissimo e purissimo suono di chitarra.
3 4 5
NOISE GATEINPUT FX LOOP
VMM
1
2
9L[\YU:LUK
AE
6U
3PUL
6MM
4PJ
• English • Deutsch • Français • Italiano • Español
23
Page 24

Spirit™ AmpMan Series – Manual 1.1
3 4 6 10 12 14 15117
NOISE GATEINPUT FX LOOP
VMM
9L[\YU:LUK
1
6
●
Cab Type: Controllo per scegliere una delle otto emulazioni cabinet.
N. Tipo di cabinet
1 1x12" Modern Thiele-Port
2 2x12" Modern Front-Port
3 2x12" Vintage Open Back
4 4x10" Alnico Open Back
5 4x12" Vintage Cab
6 4x12" British Cab
7 4x12" Modern Cab
8 4x12" American Cab
Nota: L’AmpMan memorizza automaticamente l’impostazione di Cab Type
per canale. Questo vi permette per esempio di usare un brioso cabinet OpenBack per il suono clean e un voluminoso cabinet 4x12 per il canale B. La Red
Box poi vi offre il grande vantaggio di poter assegnare diverse emulazioni
cabinet a ciascuno dei due canali per ottimizzare il rispettivo suono.
Attenzione: Se usate simultaneamente la Red Box e lo Speaker Out - per
esempio sul palcoscenico con un cabinet collegato allo Speaker Out e la Red
Box collegata al mixer, dovete scegliere lo stesso Cab Type per entrambi i
canali – altrimenti, il suono del cabinet sul palco risulterà troppo diverso dal
segnale della Red Box.
7
●
Red Box Mic/Line: È molto importante di scegliere il livello giusto
quando state usando la Red Box. Se utilizzate canalette per cavi lunghe,
come nelle esibizioni live, vi consigliamo di usare la Red Box in posizione
«Line». Grazie all’elevata potenza di uscita vengono compensate perdite
dovute alla lunghezza dei cavi. Se invece il mixer al quale vi volete collegare
offre soltanto ingressi da microfono, scegliete la posizione «Mic» per
evitare sovramodulazioni all’ingresso. Se il mixer o l’interfaccia audio non
dispongono di un ingresso XLR , dovete ser virvi di un adat tatore XLR-jack (6,3
mm) disponibile nel commercio specializzato o presso il vostro rivenditore.
Se usate un ingresso jack 6,3 mm (1/4"), verificate che il selettore della Red
Box sia messo su «Line».
Attenzione: Alcune interfacce da recording offrono ingressi espliciti “HiZ” – prese per jack ad alta impedenza per livelli da strumento, disegnate
esclusivamente per collegare chitarre. Non collegare la Red Box a questi
ingressi! Altrimenti, i livelli elevati risulteranno in distorsioni.
8
●
Red Box On/Off: Interruttore per disattivare l’emulazione speaker della
Red Box. In questo caso, la Red Box trasmette un segnale non filtrato per
poterlo trattare con un software d’emulazione di cabinet o microfoni o con
un processore effetti.
2 5 9 138
AE
6U
3PUL
6MM
4PJ
*HI;`WL
9
●
Phones: Uscita per collegare una cuffia conforme alle pratiche
commerciali con connettore jack stereo da 3,5 mm (mini).
Nota: Questa uscita servirà anche per trasmettere un segnale linea a qualsiasi
ingresso stereo di apparecchi multimedia, per esempio per collegare un
impianto Hi–Fi. Gli adattatori o cavi necessari sono disponibili presso il
commercio specializzato. Per collegare quest’uscita a un tipico Aux In o un
impianto Hi–Fi serve un cavo con connettore jack stereo ad un lato – che
verrà inserito nell’uscita cuffia del AmpMan – e con due connettori cinch
(RCA) all’altro lato per collegare l’ingresso sinistro e destro dell’impianto
Hi–Fi.
Per collegare un mixer, invece dei due connettori RCA servono due
connettori jack mono oppure XLR. In questo caso, e necessario verificare
che gli ingressi del mixer siano piazzati nettamente su sinistra/destra del
panorama stereo per poter valorizzare l’effetto stereo al meglio.
Attenzione: In contrario ai modelli delle serie Black Spirit e Spirit Nano, una
cuffia collegata alla presa Phones non ammutolisce lo Speaker Out! Questo
vi offre il vantaggio di poter usare l’uscita cuffia come uscita linea regolabile
– e quindi come alternativa alla Red Box con il suo livello fisso – quando
avete collegato un cabinet da chitarra. Per “ammutolire” la finale di potenza,
usate semplicemente il controllo Master. Ossia, potete tranquillamente usare
l’AmpMan con controllo Master aperto anche senza cabinet da chitarra.
10
●
Phones Volume: Controllo per regolare il volume dell’uscita cuffia.
11
●
Aux In: L’ingresso Aux In permette di collegare una qualsiasi fonte
audio,. Il segnale della fonte audio viene aggiunto al suono della chitarra.
L’ingresso Aux In serve anche a collegare un drum computer o altri strumenti
addizionali. Il segnale Aux In viene trasmesso in stereo all’uscita cuffia.
12
●
Power: Interruttore per spegnere e accendere l’AmpMan.
13
●
AES: Il Regolamento (CE) n. 1275/2008 della Commissione
Europea prevede un dispositivo automatico di risparmio energetico per
apparecchiature elettriche (quindi anche per lo AmpMan) che li spegne
dopo un certo tempo di non-utilizzo. Il rispettivo dispositivo dello AmpMan,
il circuito AES, viene attivato o disattivato con un piccolo selettore accanto
all’uscita Speaker.
Franco fabbrica, AES è attivato e il piccolo selettore è posizionato su On
(destra). Questo significa che l’amplificatore si spegne dopo una pausa di 90
minuti circa. Dal momento che l’amplificatore riceve un segnale d’ingresso
(per esempio un breve tono), questa funzione sarà resettata e ricomincia
da zero. Questo significa che basta già un piccolo segnale per iniziare
=VS\TL
POWER
AUX INPHONES
(,:
VOTZ
> ' VOTZ
=+*(
24
Page 25

Spirit™ AmpMan Series – Manual 1.1
中文
nuovamente il conto alla rovescia di 90 minuti. Se l’apparecchio si è spento
dopo questo periodo di 90 minuti, potete riaccenderlo coll’interruttore
Power. Per disattivare AES e quindi evitare che l’apparecchio si spegne
automaticamente, il piccolo selettore viene messo sulla posizione sinistra.
14
●
Speaker: Uscita altoparlante per collegare cabinet con un’impedenza
tra 4 e 16 Ohm. È possibile di collegare qualsiasi tipo di cabinet da chitarra
– la finale di potenza si presenta all’altezza di alimentare anche un cabinet
4x1 e perfino un sistema full stack.
Si prega di notare che: Per collegare due cabinet, ciascuno dei cabinet
deve avere un’impedenza minima di 8 Ohm perché collegandoli in modo
parallelo, risulterà un’impedenza totale dimezzata, cioè di 4 Ohm.
Consigliamo di usare i cabinet Hughes & Kettner TS 112 Pro, TM 112 e
TM 212 – ciascuno con un’impedenza di 16 Ohm e un’uscita parallela per
collegare un cabinet dallo stesso tipo.
15
●
VDC: Ingresso per collegare l’alimentatore ad ampio spettro che
permette di usare il lo AmpMan ovunque, con qualsiasi tensione di rete e
senza perdite di qualità tonale. Consigliamo di usare soltanto l’alimentatore
originale.
Attenzione: Collegare sempre l’alimentatore all’AmpMan prima di collegarlo a una presa di corrente!
3 Smart-Mode
L’AmpMan vi offre uno Smart-Mode che vi permette di memorizzare le
impostazioni di Boost e FX-Loop per canale. Vale a dire: Se Boost e FX-Loop
in canale B sono attivati mentre sono disattivati in canale A, le impostazioni
rimangono conservate se cambiate canale. Questo vi permette di cambiare
fra un asciutto suono da ritmo in canale A e un suono d’assolo con Boost e
loop effetti attivati in canale B premendo un solo tasto. Al momento della
consegna, lo Smart-Mode non è attivato.
Attivazione/disattivazione: Premendo il due selettori Solo e Channel A/B
contemporaneamente per tre secondi, attivate lo Smart-Mode dell’AmpMan.
Questo viene confermato dalle spie Channel lampeggianti. Questa
impostazione rimane memorizzata anche dopo aver spento l’AmpMan. Per
disattivare lo Smart-Mode, ripetete la procedura descritta qui sopra.
Nota: Non esiste una spia che vi indica lo Smart-Mode attivo. Per verificare
lo stato dello Smart-Mode, disattivate semplicemente Boost in canale A e
attivatelo in canale B. Se, dopo aver nuovamente selezionato il canale A,
Boost resta attivato, lo Smart-Mode dell’AmpMan è attivato.
4 Caratteristiche tecniche
Spirit AmpMan Series
Assorbimento di potenza massimo 50 W
Ingresso DC +24 V / 2.5 A (Polarità: + interiore)
Alimentatore esterno 100 – 240 V, 50 – 60 Hz
Zona di tolleranza tensione rete +/-10 %
Temperatura ambiente per l’esercizio 0° fino a +35°C
Presa jack Input 6,3 mm (1/4"), non bilanciato, 1 MOhm
Sensibilità (Clean, tutti i controlli in
posizione « ore 12», controllo Master alzato
al massimo)
Livello massimo 0 dBV
Presa jack FX Send 6,3 mm (1/4"), non bilanciato, 220 Ohm
Livello nominale (Clean, tutti i controlli
in posizione «ore 12», Controllo Tone su
minimo)
Livello massimo +10 dBV
Presa jack FX Return 6,3 mm (1/4"), non bilanciato, 20 kOhm
Sensibilità (Clean, tutti i controlli in
posizione « ore 12», controllo Master alzato
al massimo)
Livello massimo +9 dBV
Aux Input – presa jack mini 3,5 mm, stereo, 10 kOhm
Sensitività –6 dBV
Livello massimo +26 dBV
Phones /Line – presa jack 6,3 mm (1/4"), stereo, 50 Ohm
Livello nominale (Clean, tutti i controlli
in posizione centrale, Controllo Tone su
minimo, Master in posizione massima,
Phones-Volume 70%)
Livello massimo (Clean, tutti i controlli
in posizione centrale, Controllo Tone su
minimo, Master in posizione massima,
Phones-Volume 100%)
Livello massimo +11 dBV
Red Box AE+ Out X LR, bilanciato, L ine: 400 Ohm, Mic: 600 Ohm
Livello nominale (Clean, tutti i controlli
in posizione «ore 12», Controllo Tone su
minimo)
Livello massimo Line: +6 dBV, Mic: –14 dBV
Speaker – Presa jack 6,3 mm (1/4"), Bridged-Mode, 4 – 16 Ohm
Potenza di uscita @ 16 Ohm 13 W
Potenza di uscita @ 8 Ohm 25 W
Potenza di uscita @ 4 Ohm 48 W
–13 dBV
–6 dBV
–6 dBV
+6 dBV
0 dBV
Line: –6 dBV, Mic: –26 dBV
中文
•
• 日本語
Dimensioni amplificatore
(L x A x P)
Peso amplificatore 1150 g
Dimensioni alimentatore
(L x A x P)
Peso alimentatore 280 g
Tutti i marchi di fabbrica e copyright menzionati appartengono ai rispettivi proprietari.
250 x 52 x 153 mm
129 x 32 x 52 mm
• English • Deutsch • Français • Italiano • Español
25
Page 26

Importantes instrucciones
de seguridad. ¡Leer antes de
encender!
Este producto ha sido elaborado por el fabricante de
conformidad con IEC 62368-1 y ha salido de fábrica
en perfecto estado. Para que se mantenga en perfectas
condiciones y asegurar que no exista riesgo alguno,
el usuario deberá observar los avisos y advertencias
que se encuentran en el manual de instrucciones.
La unidad es conforme a la Clase de Protección 1
(puesta a tierra de protección). En caso de utilizar este
producto en vehículos, embarcaciones o aviones, así
como a altitudes superiores a los 2.000 m sobre el nivel
del mar, además de la norma IEC 62368-1 también
se deberán cumplir las demás normas de seguridad
aplicables
ADVERTENCIA: Para prevenir el riesgo de incendio y el
peligro de electrocución, evite la exposición del equipo
a humedad o lluvia. No abra la cubierta: en el interior
no hay elementos que deba manipular el usuario. El
mantenimiento deberá quedar a cargo de personal
cualificado.
La presencia de este símbolo advierte de la
existencia de tensión peligrosa sin aislar en el interior
que podría ser suficiente para provocar una
electrocución.
La presencia de este símbolo advierte de la
existencia de tensión peligrosa accesible desde el
exterior. Todo cableado externo conectado con algún
terminal marcado con este símbolo deberá ser un
cableado preelaborado que satisfaga las
recomendaciones del fabricante o deberá ser instalado
por personal cualificado.
La presencia de este símbolo advierte de
importantes instrucciones de uso y mantenimiento en
la bibliografía adjunta. Lea el manual.
La presencia de este símbolo indica:
¡Precaución! ¡Superficie caliente! No tocar para evitar
quemaduras.
Todos los aparatos eléctricos y electrónicos
inclusive las baterías, se han de evacuar por separado
de la basura doméstica, a través de centros de recogida
y reciclaje oficiales.
Lea las presentes instrucciones. Conserve las
presentes instrucciones. Observe todas las advertencias
e indicaciones señaladas en el producto y en las
instrucciones.
• No utilice el producto cerca del agua. No coloque el
producto cerca de agua, baños, bañeras, fregaderos,
zonas húmedas, piscinas o saunas.
• No coloque objetos que contengan líquidos sobre el
producto, como jarrones, vasos, botellas, etcétera.
• Limpie exclusivamente con paños secos.
• No retire ninguna cubierta ni elementos del armazón.
• La tensión operativa del producto deberá ajustarse
a la tensión del suministro eléctrico local. Si no está
seguro del tipo de electricidad disponible, consulte
con su distribuidor o con la compañía eléctrica local.
• Para reducir el riesgo de electrocución, deberá
mantenerse la puesta a tierra del producto. Utilice
solamente el cable de alimentación suministrado con
el producto y mantenga siempre activo de la patilla
central (puesta a tierra) del cuadro de conexiones.
No desactive la función de seguridad del enchufe
polarizado o con puesta a tierra.
• Proteja el cable de alimentación de pisadas o
pinzamientos, especialmente junto a enchufes,
soportes de dispositivos y el punto de salida desde
el equipo. Los cables de alimentación deberán
manipularse siempre con precaución. Compruebe
periódicamente que los cables no tengan cortes ni
signos de desgaste, especialmente en el enchufe y en
el punto de salida desde el equipo.
• No utilice nunca un cable dañado.
• Desenchufe el producto durante las tormentas con
aparato eléctrico o cuando vaya a estar en desuso
durante periodos prolongados.
• El producto solamente se puede desconectar por
completo de la red extrayendo el enchufe de red
de la unidad o de la toma de la pared. El producto
deberá colocarse en todo momento de tal modo que
su desconexión de la red sea sencilla.
• Fusibles: Reemplace solamente con fusibles de tipo
(5x20 mm) y amperaje según IEC 127. Está prohibido
usar "fusibles parcheados" o cortocircuitar los
portafusibles. La sustitución de los fusibles debe ser
realizada únicamente por personal cualificado.
• El mantenimiento deberá quedar a cargo de personal
cualificado. Será necesaria una revisión si la unidad
resulta dañada de cualquier forma, por ejemplo:
- si el cable de alimentación o el enchufe están
dañados o deshilachados;
- si se han derramado líquidos sobre el producto o han
caído objetos en él;
- si el producto se ha visto expuesto a lluvia o
humedad;
- si el producto no funciona con normalidad pese a
seguirse las instrucciones de uso;
- si el producto ha sido salpicado o el cajetín ha sido
dañado.
• Cuando se conecten altavoces a este aparato no se
podrá sobrepasar el límite de impedancia mínima
especificado en el aparato o en las presentes
instrucciones. La sección de los cables empleados
debe ser suficiente en conformidad con la
reglamentación local.
• Proteja de la luz solar directa.
• No instale cerca de fuentes de calor como
radiadores, difusores de calor, estufas u otros
dispositivos que produzcan calor.
• Este aparato ha sido desarrollado para su uso en
zonas climáticas moderadas – y no para su uso en
zonas climáticas tropicales.
• No bloquee ninguna abertura de ventilación. Instale
de conformidad con las instrucciones del fabricante.
No deberá situarse el producto en una instalación
integrada, como una rejilla, a no ser que exista la
ventilación necesaria.
• Permita siempre que un dispositivo frío se caliente
a temperatura ambiente cuando se traslade a
alguna sala. Pueden formarse condensaciones en
el interior del producto y dañarlo cuando se usa sin
precalentamiento.
• No sitúe fuentes de llama abierta, como velas
encendidas, sobre el producto.
• El aparato debe colocarse, como mínimo, a 20 cm de
cualquier pared, no se debe tapar y debe garantizarse
un espacio libre de, como mínimo, 50 cm por encima
del aparato.
• Asegúrese de que el dispositivo esté siempre
colocado sobre una superficie sólida y plana
• Utilice solamente con el carro, soporte, trípode,
abrazadera o tablero especificado por el fabricante
o vendido junto con el producto. Cuando se use
un carro, deberá tenerse precaución al mover la
combinación de carro/producto para evitar daños por
vuelcos.
• Utilice solamente accesorios recomendados por el
fabricante; esto será de aplicación para todo tipo de
accesorios, por ejemplo, cubiertas protectoras, bolsas
de transporte, pies, soportes murales o de techo. En
caso de instalación de cualquier tipo de accesorio
en el producto, siga siempre las instrucciones de
uso suministradas por el fabricante. Nunca utilice
puntos de fijación distintos de los especificados por
el fabricante.
• El dispositivo NO es apropiado para su uso por parte
de cualquier persona o personas (niños incluidos)
con las capacidades físicas, sensoriales o mentales
limitadas o sin la experiencia o el conocimiento
suficientes con productos de este tipo. El dispositivo
deberá mantenerse siempre fuera del alcance de los
niños menores de 4 años.
• Nunca introduzca objetos de ninguna clase en
el producto a través de las ranuras del cajetín, ya
que podrían tocar puntos de tensión peligrosa, ni
cortocircuite elementos que pudieran causar riesgo
de incendio o electrocución.
• El producto puede emitir niveles de presión sonora
por encima de 90 dB, lo que puede causar daños
auditivos permanentes. La exposición a niveles
sonoros extremadamente altos puede causar pérdidas
auditivas permanentes. Lleve protección auditiva si
va a estar expuesto de forma continua a dicho tipo de
elevados niveles.
• El fabricante solamente garantiza la seguridad, la
fiabilidad y la eficiencia del producto si:
- el montaje, la extensión, el reajuste, las
modificaciones o las reparaciones son realizados por
el fabricante o por personal autorizado
- la instalación eléctrica del área interesada es
conforme con los requisitos de las especificaciones
de IEC (ANSI)
- la unidad se utiliza conforme a las instrucciones de
uso
Leer antes de usar
• Por favor leer cuidadosamente estas
instrucciones y el aviso de seguridad antes
de usar.
• El fabricante no se responsabiliza por daños en
el aparato, los cuales sean causados por
un manejo no adecuado.
• Antes de conectar a la red eléctrica es necesa-
rio asegurarse de que el interruptor Power esté
desconectado y el valor de tensión indicado
en la parte posterior del dispositivo coincida
con la tensión de red local.
• Advertencia antes de utilizar el AmpMan:
¡Suena muy alto! Volumenes de sonido muy
altos pueden causar daños auditivos.
• Para evitar sorpresas, debes acostumbrarte a
girar la perilla del volumen de la guitarra, que
tengas conectada al AmpMan, hasta el tope
mínimo antes de encender el amplificador.
Version 2.5 07/2018
Page 27

Spirit™ AmpMan Series – Manual 1.1
中文
1 Generalidades
AmpMan Classic y AmpMan Modern poseen las mismas características
técnicas y ofrecen en ambos casos dos canales que se pueden ajustar de
forma independiente. La sección Master (incluida la Solo), al igual que FX-
-?:LUK 5VPZL.H[L:WLHRLYV\[ (\_0U7V^LY 0UW\[-?9L[\YU7OVULZ =VS\TL *HI;`WL VUVMM4PJ3PUL9LK)V_+06\[
Loop y Boost, está presente una sola vez, por lo que actúa sobre ambos
canales.
CLASSIC
MASTER
VOLUME SAGGING PRESENCE RESONANCE
Nota: AmpMan ofrece un modo Smart (véase el capítulo 3, "Modo Smart ")
que memoriza los ajustes de Boost y FX-Loop para cada canal.
TONE GAIN A
中文
•
En ambos modelos, AmpMan Classic y AmpMan Modern, el canal A
proporciona el sonido indomable de la era de Woodstock, desde el sonido
limpio de California hasta el crunch británico. El canal B, sin embargo, está
B
SPIRIT™ AMPMAN SERIES
BOOSTFX LOOPSOLO CHANNEL A/B
sintonizado de forma diferente en ambos modelos: en el AmpMan Classic
ofrece el gran sonido de la era del rock en los estadios de los años 80 y 90
• 日本語
—desde el sonido lead británico hasta el brown—, mientras que el AmpMan
Modern controla todos los géneros del metal y ofrece un sonido de alta
ganancia para solos de voz y riffs angulosos.
MASTER
VOLUME SAGGING PRESENCE RESONANCE
SPIRIT™ AMPMAN SERIES
BOOSTFX LOOPSOLO CHANNEL A/B
-?:LUK 5VPZL.H[L:WLHRLYV\[ (\_0U7V^LY 0UW\[-?9L[\YU7OVULZ =VS\TL *HI;`WL VUVMM4PJ3PUL9LK)V_+06\[
MODERN
TONE GAIN A
B
• English • Deutsch • Français • Italiano • Español
27
Page 28

Spirit™ AmpMan Series – Manual 1.1
-?:LUK 5VPZL.H[L:WLHRLYV\[ (\_0U7V^LY 0UW\[-?9L[\YU7OVULZ =VS\TL *HI;`WL VUVMM4PJ3PUL9LK)V_+06\[
11
MASTER
12
6
VOLUME SAGGING PRESENCE RESONANCE
6
13
3 Elementos de mando
3.1 La sección de canal
-?:LUK 5VPZL.H[L:WLHRLYV\[ (\_0U7V^LY 0UW\[-?9L[\YU7OVULZ =VS\TL *HI;`WL VUVMM4PJ3PUL9LK)V_+06\[
MASTERBVOLUME SAGGING PRESENCE RESONANCE
TONE GAIN A
5
5
4
4
SPIRIT™ AMPMAN SERIES
3
3
10 9
4
●
Presence: Este regulador determina la proporción de armónicos genera-
dos. Cuanto más se abre, más «presente» se hace el sonido.
5
●
Sagging: En combinación con Gain y Tone, el Sagging es la herramienta
para la creación de sonidos nuevos, frescos y fascinantes. Con este regulador tienes pleno control sobre el comportamiento de saturación de la etapa
final, con cualquier volumen. El Sagging mejora tu sonido y te permite viajar a través de las décadas de historia del sonido de guitarra, literalmente
en un momento.
2
TONE GAIN A
2
BOOSTFX LOOPSOLO CHANNEL A/B
1
1
7
8
8
B
SPIRIT™ AMPMAN SERIES
1
●
Gain: El regulador Gain determina la sensibilidad de entrada y, de este
modo, la saturación o el grado de distorsión de la etapa previa. En combinación con Tone y Sagging, es la herramienta fundamental para el diseño
del sonido.
2
●
Tone: Los efectos del regulador de tono se adaptan con precisión al
canal correspondiente. La regulación del sonido incide en las gamas de frecuencias características del sonido básico y aporta un abanico de sonido
extremadamente amplio.
3
●
Resonance: Con el regulador en la posición central, puede escucharse
el comportamiento de resonancia «normal» entre el amplificador y la caja.
Girando a la izquierda se atenúa el efecto de la resonancia de las cajas.
Esto completa los sonidos limpios todavía más suavemente. Girando a la
derecha se amplifica el efecto, que principalmente con los sonidos distorsionados proporciona un potente empuje de los graves.
BOOSTFX LOOPSOLO CHANNEL A/B
28
Nota: ¡Cuando más Sagging, mayor es la saturación de la etapa final! En
función del ajuste de Gain, el Sagging influye también, más o menos, en
el volumen total. Desde el tope izquierdo (cero Sagging) hasta la posición
central, el Sagging aumenta el volumen, desde la posición central hasta el
tope derecho (Sagging máximo) puede reducirse el volumen y tiene que
adaptarse con el Volume.
Nota: En el canal B del Spirit AmpMan Modern, el exceso de Sagging puede
resultar contraproducente. Si bien el Sagging aporta la parte de cremosidad
que se necesita en los solos de voz de alta ganancia, puede dar lugar rápidamente a acordes que suenen “fangosos” al tocar riffs. La tendencia más
actual es hacer un uso más bien moderado, especialmente en combinación
con guitarras con un afinado más grave o de 7 cuerdas.
6
●
Volu me: Volume permite ajustar el volumen de ambos canales entre sí.
Atención: ¡No utilices este regulador para controlar el volumen general del
amplificador, ya que para ello está el regulador Master!
Page 29

Spirit™ AmpMan Series – Manual 1.1
中文
7
●
Channel A/B: Este pulsador permite cambiar entre los canales A y B.
8
●
Channel-LED: El LED azul a la derecha del regulador Gain indica el
canal que está activo en un momento dado.
2.2 FX Loop y Boost
-?:LUK 5VPZL.H[L:WLHRLYV\[ (\_0U7V^LY 0UW\[-?9L[\YU7OVULZ =VS\TL *HI;`WL VUVMM4PJ3PUL9LK)V_+06\[
MASTERBVOLUME SAGGING PRESENCE RESONANCE
SPIRIT™ AMPMAN SERIES
9
●
Boost: Boost permite elevar los rangos de frecuencia especiales de la
gama de sonido. Así, se pueden lograr sonidos aún más mordaces, cremosos o poderosos en función del canal. Cuando Boost está activado, el LED
que hay encima del interruptor se ilumina en rojo.
10
●
FX Loop: Aquí se activa la vía de efecto serie de la parte trasera. Cuando la vía de efecto está activada, el LED que hay encima del interruptor
se ilumina en rojo.
Nota: En la configuración predeterminada, estos dos interruptores funcionan con independencia del canal. Sin embargo, también es posible asignarlos a los canales por medio del circuito del modo Smart, de forma que
también conmutan cuando se cambia cambiar de canal (véase el capítulo 3
"Modo Smart").
TONE GAIN A
BOOSTFX LOOPSOLO CHANNEL A/B
2.3 La sección Master
-?:LUK 5VPZL.H[L:WLHRLYV\[ (\_0U7V^LY 0UW\[-?9L[\YU7OVULZ =VS\TL *HI;`WL VUVMM4PJ3PUL9LK)V_+06\[
MASTERBVOLUME SAGGING PRESENCE RESONANCE
SPIRIT™ AMPMAN SERIES
11
●
Master: El regulador Master (beige) determina el volumen total del
AmpMan, afectando a ambos canales.
12
●
Solo(-Master): con el potenciómetro rojo que hay debajo del regula-
dor Master se puede definir un salto de nivel fijo entre 0 y +6 dB respecto
al maestro, por ejemplo, para solicitar la cantidad adicional de volumen
deseada al cambiar a Solo con solo pulsar un botón. Con este concepto,
cuando se modifica el volumen general basta con regular únicamente el
Master, ya que el volumen de Solo se adapta automáticamente.
Atención: El salto de nivel del regulador Solo se transfiere también a la Red
Box y a la salida de auriculares. Al usar la Red Box en el escenario, se debe
prestar atención a que se tenga en cuenta el volumen de Solo durante la
prueba de sonido, con el fin de prevenir una saturación en la entrada de la
mesa de mezclas. Al utilizar un auricular se debe ajustar siempre el volumen
máximo (regulador de volumen de la parte trasera) con el pulsador Solo
activado.
13
●
Solo: Aquí se activa, mediante el regulador Solo, el salto de nivel pre-
ajustado respecto al maestro. Cuando Solo está activado, se ilumina el LED
rojo que hay encima del pulsador a modo de indicación.
TONE GAIN A
BOOSTFX LOOPSOLO CHANNEL A/B
中文
•
• 日本語
2.4 Parte trasera
1
●
Input: Entrada de instrumentos para conectar una guitarra por medio
de un cable con jack apantallado.
2
●
Noise Gate: Este regulador determina la sensibilidad del Noise Gate.
La tecnología IDB™ del Noise Gate se adapta automáticamente a los
parámetros de umbral y de ataque. En el tope izquierdo del regulador se
conmuta totalmente el Noise Gate fuera del trayecto de señal (bypass).
Cuanto más se gira a la derecha el regulador, más intensidad adquiere el
Noise Gate. En la posición a las 9, el Gate reacciona ya muy sensiblemente
a las señales. Cuanto más se gira el regulador a la derecha, más intensidad
adquiere el Noise Gate
Nota: AmpMan memoriza automáticamente el ajuste de Noise Gate para
cada canal. En otras palabras: si el Noise Gate se desactiva (máximo hacia la
izquierda) en un canal para el sonido Clean y se activa en el canal B para un
sonido Lead, este ajuste se conserva al cambiar de canal.
3
●
FX Send: Conecta esta toma con la entrada de tu dispositivo de efectos
externo.
4
●
FX Return: Conecta esta toma con la salida (mono) de tu dispositivo de
efectos externo.
5
●
Red Box AE+ DI Out: Desde que Hughes & Kettner inventó la Red Box
original en 1988, se ha convertido en un estándar industrial, para captar el
sonido de amplificadores para guitarra sin micrófono. Ya sea para directo o
grabación, la Red Box ofrece una excepcional calidad de sonido, evitando
de una vez por todas las interferencias provocadas por otros instrumentos
y los problemas de microfonear un amplificador. Red Box AE+ es la versión
más reciente de la caja de inyección con simulación de altavoces que
ha ganado premios. La simulación de ambiente controlada por DSP crea
la auténtica sensación espacial de una caja y un ataque ultradirecto del
sonido de guitarra más puro.
3 4 5
NOISE GATEINPUT FX LOOP
VMM
1
2
9L[\YU:LUK
AE
6U
3PUL
6MM
4PJ
• English • Deutsch • Français • Italiano • Español
29
Page 30

Spirit™ AmpMan Series – Manual 1.1
3 4 6 10 12 14 15117
NOISE GATEINPUT FX LOOP
VMM
9L[\YU:LUK
1
6
●
Cab Type: Este regulador permite seleccionar una de las ocho
simulaciones de armario:
No Tipos de armarios
1 1x12" Modern Thiele-Port
2 2x12" Modern Front-Port
3 2x12" Vintage Open Back
4 4x10" Alnico Open Back
5 4x12" Vintage Cab
6 4x12" British Cab
7 4x12" Modern Cab
8 4x12" American Cab
Nota: AmpMan memoriza automáticamente el ajuste de Cab Type para cada
canal. Así, por ejemplo, se puede seleccionar una Open-Back-Box de amplia
dispersión para un sonido Clean y una Box 4x12 potente para el canal B.
Sobre todo al usar la Red Box, ofrece la gran ventaja de p ermitir que se a signe
una simulación de armario diferente por canal para perfeccionar su sonido.
Atención: Al usar simultáneamente la Red Box y Speaker Out (por ejemplo,
en el escenario con una Box de guitarras en Speaker Out y la Red Box en la
mesa de mezclas) se ha de prestar atención a que se haya seleccionado el
mismo Cab Type para ambos canales. De lo contrario, la Box del escenario
produciría un sonido muy diferente de la señal de la Red Box.
7
●
Red Box Mic/Line: Debe comprobarse que la Red Box se usa con el nivel
apropiado. Si es posible, utiliza la posición «Line». Cuando se utilizan tramos
de cable largos como, p. ej. en el funcionamiento en directo, recomendamos
usar la Red Box en el ajuste «Line». La salida superior compensa la pérdida
de nivel en base a la longitud de cable. Si la mesa de mezclas solamente
posee entradas de micrófono, pon la Red Box en la posición «Mic» y
así podrás evitar saturaciones en la entrada de micrófono. Si la mesa de
mezclas o la interfaz de audio no dispone de ninguna entrada XLR, necesitas
un adaptador de jack XLR (6,3 mm) que puedes comprar en un comercio
especializado. Debes comprobar que la Red Box se utilice en la posición
«Line», debes utilizar una entrada de jack de 6,3 mm (1/4").
Atención: Algunas interfaces de grabación ofrecen entradas "Hi-Z" explícitas
con tomas para jack de alta impedancia para niveles de instrumentos
reservados exclusivamente para la conexión de guitarras. La Red Box
no se puede conectar a este tipo de entradas, ya que siempre produciría
distorsiones como consecuencia de un nivel excesivamente alto.
2 5 9 138
AE
6U
3PUL
6MM
4PJ
*HI;`WL
8
●
Red Box On/Off: Aquí puedes desconectar la simulación de altavoz
de la Red Box. La Red Box envía entonces una señal sin filtrar para usar
con el software de emulación de cajas y de micrófono que prefieras o un
dispositivo de efectos.
9
●
Phones: Aquí se conectan auriculares convencionales con conector jack
Mini estéreo de 3,5 mm.
Nota: Esta salida puede utilizarse también para enviar una señal Line a una
entrada multimedia estéreo cualquiera como, p. ej., un sistema HiFi. Consulte
con su distribuidor cuáles son los adaptadores o cables correspondientes.
Para conectar esta salida con una entrada Aux In típica o un sistema HiFi se
utiliza un cable con un conector jack estéreo en un extremo para conectar
a la salida de auriculares de tu AmpMan, así como dos conectores Cinch
en el otro extremo para conectar en la entrada izquierda y derecha del
sistema HiFi.
Para conectar a una mesa de mezclas, en lugar de los conectores Cinch se
usan dos jacks mono o conectores XLR. Para ello debe tenerse en cuenta
que las entradas de la mesa de mezclas estén firmemente conectadas a
izquierda/ derecha en el Panorama, para que la reproducción estéreo
destaque correctamente cuando se utilice la entrada Aux-In.
Atención: A diferencia de las series Black Spirit y Spirit Nano, la salida de
altavoces no se silencia cuando se usa la toma Phones. Esto tiene la ventaja
de que, de forma alternativa al nivel fijo de la Red Box, la salida de auriculares
se puede utilizar como una salida de línea regulable cuando hay una Box
de guitarras conectada al mismo tiempo. En este caso, para "silenciar" la
etapa final se utiliza el regulador Master, aunque el AmpMan también se
puede usar perfectamente con el Master encendido sin que haya conectada
ninguna Box de guitarras.
10
●
Phones Volume: Permite regular el volumen de la salida de auriculares.
11
●
Aux In: Puedes conectar cualquier fuente de audio que desees a la
entrada Aux. La fuente de audio se mezcla con el sonido de tu guitarra.
A través de la entrada Aux In pueden conectarse también cajas de ritmos
o instrumentos adicionales. La señal Aux In se transfiere a la salida de
auriculares en alta calidad estéreo. De este modo puedes conectar tu
sistema estéreo a la salida de auriculares.
12
●
Power: Este botón permite encender y apagar el AmpMan.
13
●
AES: De acuerdo con el Reglamento N.º 1275/2008/CE, los aparatos
entre los que se encuentra también tu AmpMan según la directiva UE, deben
estar equipados con un dispositivo de ahorro de energía que desconecte
el aparato después de un tiempo determinado de inactividad. Esta tarea la
=VS\TL
POWER
AUX INPHONES
(,:
VOTZ
> ' VOTZ
=+*(
30
Page 31

Spirit™ AmpMan Series – Manual 1.1
中文
asume en el AmpMan el AES, que puede activarse y desactivarse por medio
del miniinterruptor que hay junto a la toma de altavoz.
En el estado original, el AES está activado; el miniinterruptor se encuentra
en la posición On (a la derecha). En este ajuste, el amplificador se apaga
después de aproximadamente 90 minutos de inactividad. La fase de reposo
se reinicia y comienza de nuevo en el momento que el amplificador recibe
una señal de entrada (por ejemplo, si se toca un tono corto). Basta con
una señal muy baja para que la cuenta atrás de apagado de 90 minutos
vuelva a empezar desde el principio. Si el dispositivo se ha apagado
después de transcurrir completamente la fase de reposo de 90 minutos,
puede ponerse en marcha de nuevo con el interruptor Power. Desplazando
el miniinterruptor (hacia la izquierda) se desactiva el AES y, con ello, el
apagado automático del dispositivo.
14
●
Speaker: La salida de altavoz está diseñada para cajas con una
impedancia de 4 a 16 ohmios. Pueden conectarse cajas de guitarra de
cualquier tipo, la etapa final tiene potencia suficiente para operar también
cajas 4x12. Si se desea, también en la composición Fullstack.
Debe tenerse en cuenta lo siguiente: Si se conectan dos cajas, la
impedancia de cada una de las cajas debe ser de un mínimo de 8 ohmios
ya que, en el caso de conexión paralela, la impedancia total se reduce a la
mitad, 4 ohmios.
Las cajas de guitarra recomendadas Hughes & Kettner TS 112 Pro, TM 112 y
TM 212 tienen una impedancia de 16 ohmios y ofrecen una salida paralela
en la que pueden conectarse dos cajas del mismo tipo.
15
●
VDC: Entrada para conectar la fuente de alimentación universal
suministrada, que funciona de manera fiable con cualquier tensión de red,
en todo el mundo, y garantiza una calidad de sonido siempre uniforme.
Debes utilizar siempre la fuente de alimentación original.
Atención: Le rogamos que empiece siempre conectando la fuente de alimentación al AmpMan y que, a continuación, conecte la fuente de alimentación a una toma de corriente.
4 Datos técnicos
Spirit AmpMan Series
Consumo de potencia máx. 50 W
Entrada de CC +24 V / 2.5 A (polaridad: + interior)
Fuente de alimentación externa 100 – 240 V, 50 – 60 Hz
Rango de tolerancia de la tensión de red +/-10 %
Rango de temperatura ambiente
durante el funcionamiento
Toma de entrada (Input jack) 6.3 mm (1/4"), desequilibrado, 1MOhm
Sensitivity (Clean, todos los Pots en posición
central, Master en posición máx.)
Nivel máximo 0 dBV
Toma FX Send 6.3 mm (1/4"), desequilibrado, 220 Ohm
Nivel nominal (Clean, todos los Pots en
posición central, regulador Tone al mínimo)
Nivel máximo +10 dBV
Toma FX Return 6.3 mm (1/4"), desequilibrado, 20 kOhm
Sensitivity (Clean, todos los Pots en
posición central, M aster en posición
máxima)
Nivel máximo +9 dBV
Aux Input – Toma de minijack 3,5 mm, estéreo, 10 kohmios
Sensibilidad –6 dBV
Nivel máximo +26 dBV
Toma de jack Phones 6,3 mm (1/4"), estéreo, 5 0 ohmios
Nominal Level (Clean, todos los potenciómetros en la posición media, regulador
Tone al mínimo, máster en la posición
máxima, Volumen de Phones al 70%)
Nivel máximo (Clean, todos los potenciómetros en la posición media, regulador
Tone al mínimo, máster en la posición
máxima, Volumen de Phones al 100%)
Nivel máximo (Max. Level) +11 dBV
0° hasta +35° C
–13 dBV
–6 dBV
–6 dBV
–6 dBV
0 dBV
中文
•
• 日本語
3 Modo Smart
AmpMan ofrece un modo Smart que almacena el ajuste de Boost y FX-Loop
para cada canal. Es decir, si, por ejemplo, Boost y FX-Loop están activados en
el canal B y desactivados en el canal A, los ajustes se mantienen al cambiar
de canal. Esto facilita el cambio de un sonido rítmico seco en el canal A a un
sonido solo en el canal B con Boost y FX-Loop activado con solo pulsar un
botón. El modo Smart no está activado en la configuración original.
Activación/desactivación: Si se presionan al mismo tiempo los dos
pulsadores externos Solo y Channel A/B y se mantienen presionados durante
3 segundos, el AmpMan cambia al modo Smart. Los LED Channel parpadean
a modo de confirmación. Este ajuste se conserva incluso después de apagar
el AmpMan. El modo Smart se desactiva de la misma forma.
Nota: No hay nada que indique si el modo Smart está activo. Para saber si el
modo Smart está activo, basta con desactivar Boost en el canal A y activarlo
en el canal B. Si Boost está activo al volver a cambiar al canal A, significa que
el AmpMan se encuentra en el modo Smart.
Red Box AE+ Out X LR, equilibrado, Line: 400 Ohm, Mic: 600 Ohm
Nivel nominal (Clean, todos los Pots en
posición central, regulador Tone al mínimo)
Nivel máximo (Max. Level) Line: +6 dBV, Mic: –14 dBV
Speaker – Jack hembra 6,3 mm (1/4"), Bridged-Mode, 4 – 16 ohmios
Potencia de salida @ 16 ohmios 13 W
Potencia de salida @ 8 ohmios 25 W
Potencia de salida @ 4 ohmios 48 W
Dimensiones del amplificador (ancho x
alto x fondo)
Peso del amplificador 1150 g
Dimensiones de la fuente de
alimentación (ancho x alto x fondo)
Peso de la fuente de alimentación 280 g
Todas las marcas comerciales y los copyrights mencionados son propiedad de sus
propietarios respectivos.
Line: –6 dBV, Mic: –26 dBV
250 x 52 x 153 mm
129 x 32 x 52 mm
• English • Deutsch • Français • Italiano • Español
31
Page 32

安全のために
•初めて使用開始前に本説明書および安全上の注
意を注意してよく読んでください。
•不正な操作から発生する本装置または他の装置
への損害の場合当方はメーカーとして賠償責任を
免責されます。
•電源に接続する前にPowerスイッチがオフになっ
ており、装置背面に表記されている電圧値が地域
の電源電圧と同じであることを確認してください。
•AmpMan(グランドマイスター)の使用開始前必
ず注意しておくべきことがあります:とにかくうる
さい!音量レベルが極めて高くなると聴力障害の
原因になることがあります。
•大音量で驚くのを防止するため、AmpManと接続
された君のギターの音量ポテンショメーターが最
低レベルまで回し切られてからアンプをオンにす
ることを必ず守る習慣にしてください!
Version 2.3b 01/2015
Page 33

Spirit™ AmpMan Series – Manual 1.1
中文
1概要
AmpManClassicとAmpManModernの技術仕様は同じであり、どちらも独
立して制御できる2つのチャンネルがあります。Solo-Masterを含むマスター・セ
クションは、FXLoopとBoostと同様に1回だけ使用でき、両方のチャンネルに
適用されます。
MASTER
VOLUME SAGGING PRESENCE RESONANCE
-?:LUK 5VPZL.H[L:WLHRLYV\[ (\_0U7V^LY 0UW\[-?9L[\YU7OVULZ =VS\TL *HI;`WL VUVMM4PJ3PUL9LK)V_+06\[
CLASSIC
TONE GAIN A
注記:AmpManは、BoostとFXLoopの設定がチャンネルごとに保存され
るスマート・モ ー ド(第3章「スマート・モ ー ド 」参照)があります。
AmpManClassicおよびAmpManModernの両モデルで、チャンネルAはカ
リフォルニア・クリーンからブリティッシュ・クランチまで、ウッドストック・エイジ
の野性的なサウンドを提供します。チャンネルBは 、両モデルで異なる方法でチ
ューニングされています。AmpManClassicは、80〜90年代におけるブリティ
中文
•
ッシュ・リードからブラウン・サウンドまでのスタジアムロック・エイジ のグレ ート
なサウンドを表現します。AmpManModernは、すべ てのメタルジャンルに対応
し、Soloやエッジーなリフを弾くためのHighGainサウンドを提供します。
SPIRIT™ AMPMAN SERIES
B
BOOSTFX LOOPSOLO CHANNEL A/B
• 日本語
MASTER
VOLUME SAGGING PRESENCE RESONANCE
SPIRIT™ AMPMAN SERIES
BOOSTFX LOOPSOLO CHANNEL A/B
-?:LUK 5VPZL.H[L:WLHRLYV\[ (\_0U7V^LY 0UW\[-?9L[\YU7OVULZ =VS\TL *HI;`WL VUVMM4PJ3PUL9LK)V_+06\[
MODERN
TONE GAIN A
B
• English • Deutsch • Français • Italiano • Español
33
Page 34

Spirit™ AmpMan Series – Manual 1.1
-?:LUK 5VPZL.H[L:WLHRLYV\[ (\_0U7V^LY 0UW\[-?9L[\YU7OVULZ =VS\TL *HI;`WL VUVMM4PJ3PUL9LK)V_+06\[
11
MASTER
12
13
2 操作要素
2.1 チャンネル・セクション
MASTERBVOLUME SAGGING PRESENCE RESONANCE
6
VOLUME SAGGING PRESENCE RESONANCE
6
5
5
4
4
SPIRIT™ AMPMAN SERIES
3
3
10 9
4
●
PRESENCEノブ
アンプから発生する高音域の倍音の量をコントロールします。設定を上げるほ
ど、効果が強調されます。
5
●
-?:LUK 5VPZL.H[L:WLHRLYV\[ (\_0U7V^LY 0UW\[-?9L[\YU7OVULZ =VS\TL *HI;`WL VUVMM4PJ3PUL9LK)V_+06\[
TONE GAIN A
SAGGING
SAGGINGは、GAINとTONEと組み合わせることで、新しくフレッシュでエキサイ
ティング な サウンドを 生 み 出す た め のツールで す。このノブで、任意の音量でパワ
ー・アンプの飽和特性を完全にコントロールできます。SAGGINGは、あなたの音
を洗練化し、文字通り、何十年にもわたるギターの音の歴史をあっという間旅す
ることができます。
2
TONE GAIN A
2
BOOSTFX LOOPSOLO CHANNEL A/B
1
1
7
8
8
B
SPIRIT™ AMPMAN SERIES
1
●
GAIN
GAINレギュレーターは入力感度を決定し、これでサチュレーションまたは前ステ
ージの歪曲度が決まってきます。ToneとSaggingとの組み合わせによる、サウン
ド加工のベンチマーク的ツールです。
2
●
TONE
TONEコントロールのエフェクトは、それぞれのチャンネルに合わせて正確にチュ
ーニングされます。Toneレギュレータは、モデルの基本サウンドに特徴的な周波
数領域に介入し、極めて幅広いサウンドを提供します。
3
●
RESONANCEノブ
このRESONANCEノブを12時の位置に設定すると、アンプとキャビネットの組
み合わせが生み出す、通常の鳴りが得られます。12の位置から反時計方向に回す
と、スピーカーとキャビネットの鳴りが抑えられ、クリ ーン なトーンがまろや かに
響く、ゆったりとした柔らかいサウンドになります。時計方向に回すと、それらの鳴
りが強 調されて、ディストー ション・サウンドに最適な、よりタイトでパンチの効い
た低音域が得られます。
BOOSTFX LOOPSOLO CHANNEL A/B
34
注意:SAGGINGが増えるほど、パワー・アンプの飽和度が高くなりま
す!GAIN設定に応じて、SAGGINGも全体の音量にある程度影響します。左
いっぱい(SAGGINGなし)から中心位置までは、SAGGINGは音量を増大さ
せます。中心位置から右いっぱい(SAGGING最大)までは、音量が下がるた
め、VOLUMEでの調整が必要となります。
注記:Sprit AmpMan ModernのチャンネルBでは、過剰なSAGGING
は、逆効果になるかもしれません。High Gain Soloを弾く場合、SAGGING
は必要なクリーミネスを生じますが、リフを演奏する場合、SAGGINGでは「キ
レのない」サウンドコードが発生しやすくなります。特にLow-tuneや7弦ギタ
ーでは、この傾向が強くなります。
6
●
VOLUME
VOLUMEで2つのチャンネルの音量をそれぞれ調整します。
警告:このノブは 、アンプ全体の出力レベルの調節には使わないでください。全
体のレベル調節は、MASTERノブで!
7
●
チャンネルA/B
このボタンで、チャンネルAとBを切り替えることができます。
Page 35

Spirit™ AmpMan Series – Manual 1.1
中文
8
●
ChannelLED
各チャンネルのGAINコントロールの右側にある青色LEDは、現在、アクティブに
なっているチャンネルを示します。
2.2FXLoopとBoost
-?:LUK 5VPZL.H[L:WLHRLYV\[ (\_0U7V^LY 0UW\[-?9L[\YU7OVULZ =VS\TL *HI;`WL VUVMM4PJ3PUL9LK)V_+06\[
MASTERBVOLUME SAGGING PRESENCE RESONANCE
SPIRIT™ AMPMAN SERIES
9
●
BOOST
BOOSTを使用して、サウンド・スペクトルでの特定の周波数レンジを増幅します。
これによってチャンネルごとに、よりシャープ、クリーミー、あるいはパンチの効 い
たサウンドが得られます。BOOSTがアクティブになると、スイッチ上部のLEDが
赤く点灯します。
10
●
FXLOOP
ここで背面シリアル・エフェクト・パスをオンにします。エフェクト・ループをオンに
すると、スイッチ上部のLEDが赤く点灯します。
注記:基本設定では、この2つのスイッチはチャンネルとは関係なく機能します
が、スマート・モ ー ド・スイッチを使 用して、それらをチャンネルに割り当てること
もできます。こうすれ ば チャンネルを切り替えるとスイッチも 切り替 わります(第
3章「スマート・モ ー ド 」を参照)。
TONE GAIN A
BOOSTFX LOOPSOLO CHANNEL A/B
2.3 マスター・セクション
-?:LUK 5VPZL.H[L:WLHRLYV\[ (\_0U7V^LY 0UW\[-?9L[\YU7OVULZ =VS\TL *HI;`WL VUVMM4PJ3PUL9LK)V_+06\[
MASTERBVOLUME SAGGING PRESENCE RESONANCE
SPIRIT™ AMPMAN SERIES
11
●
MASTER
マスター・コントロール(ベージュ)はAmpManの全体的な音量を決定し、両方の
チャンネルに影 響 を与えます。
12
●
SOLO(マスター)
マスター・コントローラーの下にある赤色のノブを使用すると、マスターとの 差
0〜+6dBのレベルジャンプを設定できます。SOLOに切り替えるときは、ボタ
ンを押すだけで希望の音量を呼び出すことができます。このコンセプトにより、全
体の音量を調整する場合、マスターを調節するだけで、SOLOの音量も自動的に
制御されます。
注意:SOLOコントローラーのレベル・ジャンプは、RED BOXとヘッドフォン
出力にも伝達されます。ステージでRED BOXを使用する場合は、過剰なミキ
サー入力を防ぐために、サウンドチェック中に必ずSOLO音量に注意してくだ
さい。ヘッドフォンを使用するときは、常にSOLOボタンをオンにして最大音量
(背面の音量調節)を設定してください!
13
●
SOLO
このスイッチで、SO LOコントローラーによってプリセットされているマスターへ
のレベル・ジャンプをアクティブにします。ボタン上部にある赤色LEDは、Soloが
アクティブであることを表示します。
TONE GAIN A
BOOSTFX LOOPSOLO CHANNEL A/B
中文
•
2.4背面
1
●
INPUT
シールドケーブルで、ギターを接続するためのINSTRUMENT入力端子です。
2
●
NOISEGATE
このノブはノイズゲートの感度を調節します。ノイズゲートのIDB™テクノロジー
が、標準アタック・パラメーターとスレッショルドパラメーターを自動的に調整し
ます。ノブ を左に回し切 ると、ノイズゲートは完全に信号経路からオフになります
(バイパス)。ノブを右 に回すほど、ノイズゲートの効果がより高くなります。9時の
位置で、ゲートは信号に対してすでに非常に敏感に反応します。ノブ を右に回 す
ほど、ノイズゲートの効果がより高くなり、小さな信号がカットされます。
注記:AmpManは、チャンネルごとにノイズゲートの設 定を自動的に記憶しま
す。たとえばクリーンサウンド用チャンネルAでノイズゲートを無 効にし(左いっ
ぱいまで回す)、リードサウンド用チャンネルBでノイズゲートを有効にすると、
チャンネルを切り替えても設定が保持されます。
3
●
FXSEND
このソケットを外付けエフェクターの入力と接続します。
4
●
FXRETURN
このソケットを外付けエフェクターの(Mono)出力と接続します。
5
●
REDBOXAE+DIOUT
Hughes&KettnerがオリジナルのREDBOXを1988年に考案して以来、この
REDBOXはギター・アンプのサウンドをマイクなしで増幅させるための業界標
準になっています。ライブでもスタジオでも、REDBOXは一貫した品質のサウン
ドをお届けします。他楽器との干渉や、マイキングポジションによる時 間のかかる
作業は、過去のものになっています。REDBOXAE+は、受賞歴のあるDIボック
ス付きスピーカー・エミュレーションです。DSP制御のアンビエンス・エミュレー
ションは、本物のアンビエンス効果とピュアなアナログトーンによるダイレクトな
アタックをもたらします。
3 4 5
NOISE GATEINPUT FX LOOP
VMM
1
2
9L[\YU:LUK
AE
6U
3PUL
6MM
4PJ
• 日本語
• English • Deutsch • Français • Italiano • Español
35
Page 36

Spirit™ AmpMan Series – Manual 1.1
3 4 6 10 12 14 15117
NOISE GATEINPUT FX LOOP
VMM
9L[\YU:LUK
1
6
●
CabType
このスイッチは、8つのキャビネット・シ ミ ュ レ ー シ ョ ン か ら 1 つ を 選 択 す る た め に
使用されます。
No. キャビネット・タイプ
1 1x12インチのモダンなThieleポート
2 2x12インチのモダンなフロント・ポート
3 2x12インチのヴィンテージ・オープンバック
4 4x10インチのAlnicoオープンバック
5 4x12インチのヴィンテージ・キャビネット
6 4x12インチのブリティッシュ・キャビネット
7 4x12インチのモダンなキャビネット
8 4x12インチのアメリカン・キャビネット
注記:AmpManは、チャンネルごとにキャブタイプの設定を自動的に記憶しま
す。例えば、 クリーンサウンド用チャンネルAではダイナミックなオープンバッ
ク・ボ ッ ク ス を 選 択 し 、チャンネルBでは大型の4x12キャビネットを選択する
ことが できま す。特にRED BOXを使用する場合、各チャンネルのサウンドをパ
ーフェクトなものにするために、チャンネルごとに異なるキャビネット・シ ミ ュ レ
ーションを割り当てることができるという大きな利点があります。
注意:ギターボックスをスピーカーアウトに、RED BOXをキャビネットにそれ
ぞれ接続した状態でREDBOXとスピーカーアウトを例えばステージで同時に
使用する場合、必ず両方のチャンネルに同じキャブタイプを選択するようにして
ください。そうしないとステージのギターボックスがRED BOXの信号と全く
違うものになってしまいます。
7
●
REDBOXMic/Line
REDBOXを適度な音量で使用するように注意してください。ライブ 演 奏の場合
など長いケーブルを使用する場合、REDBOXの設定を「Line」にして使うように
してください 。こうすると 高 い アウトプット が 長 い ケーブ ル に よる 減 衰 を 補 償 で き
ます。ミキシングコンソールでマイク入力しかない場合は、REDBOXを「Mic」位
置に切り替えてください。ミキシングコンソールまたはオーディオ・インターフェイ
スにXLR入力がない場合、専門店で購入できるXLR-フォーン変換アダプターが
必要になります。その際はREDBOXを「Line」位 置 にセットしてください 。
注 意:一 部 の レ コ ー デ ィ ン グ・イ ン タ ー フ ェ イ ス に は 、著しい「Hi-Z」入力、ギター
との接続のみを目的とした楽器レベル用のハイインピーダンス・ジャックソケッ
トがあります。REDBOXはこのタイプの入力に接続できません。過剰なレベル
のために必然的にディストーションが発生します。
2 5 9 138
AE
6U
3PUL
6MM
4PJ
*HI;`WL
8
●
REDBOXOn/Off
REDBOXのスピーカー・シミュレーションをオフにすることができます。オフに
すると、REDBOXが、お好みのキャビネット/マイク・エミュレーション・ソフト
ウェアあるいはエフェクターで使用するためのフィルターされていない信号を送
信します。
9
●
PHONES
この出力には、市販の3.5mmステレオミニジャックプラグ付きヘッドフォンを接
続します。
注意:この出力は 、Line信号をハイファイ・システムなどの任意のステレオ・マ
ルチメディア入力に送信するために使用することも可能です。アダプターやケー
ブルについては、販売店にお尋ねください。この出力を通常のAuxInまたはハ
イファイ・システムに接続するには、一端にAmpManのヘッドフォン出力を接
続するためのステレオ・ジャックプラグ付きケーブル1本と、もう一 端 にハイファ
イ・システムの左右入力に接続するためのシンチプラグが2本必要です。
ミキシングコンソールに接続するには 、シンチプラグの代わりに2ホンのモノラ
ル・ジャックプラグまたはXLRプラグが必要です。その際、AUXIN使用時のス
テレオ再生を引き立たせるために、ミキシングコンソール入力をパノラマの左/
右にしっかり位置付けるよう注意してください。
注意:Black SpiritやSpirit Nanoシリーズとは異なり、フォーンジャック
にプラグが差し込まれていると、スピーカーアウトはミュートされません!これ
には、ギターボックスを同時接続したRED BOXの固定レベルの代わりに、ヘ
ッドフォン出力をアジャスタブル・ライン出力として利用できるという利点があ
ります。さらにマスター・コントローラーを使用して出力ステージを「ミュート」で
きます。また、マスターをターンアップしたとき、ギターボックスを接続しなくて
も、AmpManを問題なく使用できます。
10
●
フォーンの音量
ここでヘッドフォン出力の音量を調 整します。
11
●
AUXIN
あらゆる音源をAUXINPUTに接続できます。音源はギター・サウンドにミキシン
グされます。同様に、AUXININPUTからドラム・マシーンやその他の楽器を接続
することも可能です。Aux In信号は、フルステレオ・クォリティでヘッドフォン出力
に伝送されます。したがって、ミキサーを追加しなくても、ジャムトラックと一緒に
演奏できます。
12
●
POWER
このボタンを使用して、AmpManのオンとオフを切り替えます。
13
●
AES
欧州司令1275/2008/ECに従い、AmpManも同司令によると対象となるデバ
イスは、デバイスを一定時間使用しないと自動的に電源が切れる省エネ設備を搭
載している必 要があります。この課題をAmpManではAESが解決しています。こ
れはスピーカーソケットの横にあるミニスイッチによりオン/オフできるようにな
って い ます。
=VS\TL
POWER
AUX INPHONES
(,:
VOTZ
> ' VOTZ
=+*(
36
Page 37

納入時、AESはアクティブになっており、ミニスイッチはオン位置(右)にあります。
中文
この設 定では、約90分間、休止状態が続くと、アンプは自動的に電 源が切れま
す。ショートトーンを演奏するなどアンプが入力信号を受け取ると、休止状態は
リセットされまたゼロから開始します。弱い信号でもリセットされ、アンプ電源断
までの90分間がゼロから開始します。90分間の休止時間が経過してアンプがオ
フになった時は、電源スイッチを使ってリスタートさせることができます。ミニス
イッチ を 左 にスライドさ せ る と 、AESがオフになり、アンプの自動停止が無効にな
ります。
14
●
SPEAKER
スピーカー出力部は、インピーダンスが4または16Ωのボックススピーカー用で
す。あらゆるタイプのギター用スピーカーを接続 でき、パワー・アンプには4x12
のスピーカーを駆動するのに十分なパワーを備えています。フルスタック構 造も
可能。
注意事項:2つのボックススピーカーを接続するときは並列接続で合計インピ
ーダンスが4Ωに半減するので各ボックスのインピーダンスは少なくとも8Ω
とします。
推奨ギター用スピーカーボックスHughes&KettnerのTS112Pro,、TM
112、TM212はそれぞれインピーダンスが16Ωで、同種のボックスをもう一つ
接続できる並列アウトプットがあります。
15
●
VDC
AmpManには、広域対応電源アダプターが内蔵されており、世 界中どこの電 圧に
も対応し、サウンド品質が常時一定に提供されます。必ず純正電源アダプタ。
注意:必ず最初に電源をAmpManに接続してから、コンセントに接続するよう
にしてください。
3つのスマート・モ ー ド
AmpManには、BOOSTとFX LOOPの設定がチャンネルごとに保存されるスマ
ート・モードがあります。これは、たとえば 、BOOSTとFX LOOPがチャンネルB
でオンになり、チャンネルAでオフになっている場合、チャンネルを変 更しても設
定が保持されることを意味します。ボタンを1回押すだけで、BOOSTとアクティ
ブなFX LOOPを含め、チャンネルA のドライリズムサウンドからチャンネルBの
SOLOサウンドに切り替えることができるのです。納入時、スマート・モ ー ド は オ
ンになっていません。
オン/オフ
2つの外部スイッチSOLOとチャンネル A/ Bを同時に押して、3秒間押し続ける
と、AmpManはスマート・モードに切り替わります。チャンネルLEDが点滅して確
認できます。この設定は、AmpManの電源を切った後も保持されます。同様にス
マート・モードもオフになります。
注記:スマート・モードがアクティブであるかどうかは表示されません。スマー
ト・モ ー ド が ア ク テ ィ ブ か ど う か を 確 認 す る 場 合 は 、BOOSTをチャンネルAで
オフにし、チャンネルBではアクティブにします。チャンネルAに切り替えたとき
にBOOSTがアクティブのままである場合、AmpManはスマート・モ ー ド に
なっています。
Spirit™ AmpMan Series – Manual 1.1
4テクニカル・データ
SpiritAmpManSeries
最大消費電力
DC入力 +24V/2.5A極性+=センター
外部電源 100‒240V,50‒60Hz
主電源電圧許容範囲 +/-10%
稼働時周囲温度範囲 0〜+35C
INPUT端子
入力感度(CLEANチャンネル、全ての
ノブは中央位置、MASTER最大)
最大レベル 0dBV
FXSEND端子
定格出力(CLEANチャンネル、全て
のノブは中央位置、TONEレギュレ
ータ最小)
最大レベル +10dBV
FXRETURN端子
入力感度:(CLEANチャンネル、全て
のノブは中央位置、MASTER最大)
最大レベル +9dBV
外部入力‒ミニ・ジャックソケット
感度 -6dBV
最大レベル +26dBV
PHONESのジャックソケット
公称レベル(CLEAN、BOOSTなし、全て
のノブは中央位置、TONEレギュレータ最
小、MASTER最大、PHONE音量70%)
最大レベル(CLEAN、BOOSTなし、全て
のノブは中央位置、TONEレギュレータ最
小、MASTER最大、PHONE音量100%)
最大レベル +11dBV
REDBOXAE+OUT端子
定格出力(CLEANチャンネル、全て
のノブは中央位置、TONEレギュレ
ータ最小)
最大レベル Line+6dBV,Mic‒14dBV
スピーカー-1/4インチジャック
出力電力@16Ohm
出力電力@8Ohm 25W
出力電力@4Ohm 48W
アンプ寸法(幅x高さx奥行)
アンプ重量
50W
6.3mm(1/4インチ)アンバランス、1MΩ
-13dBV
6.3mm(1/4インチ)アンバランス、220Ω
-6dBV
6.3mm(1/4インチ)アンバランス、20kΩ
-6dBV
3.5mm、ステレオ、10kΩ
6.3mm(1/4インチ)、ステレオ、50Ω
-6dBV
0dBV
XLRバランス、Line:400Ω,Mic:600
Ω
Line‒6dBV,Mic‒26dBV
6.3mm(1/4インチ)、ブリッジモー
ド、4〜16Ω
13 W
250x52x153mm
115 0 g
中文
•
• 日本語
電源アダプタ寸法(幅x高さx
奥行)
電源アダプタ重量
上述の全ての商標および著作権は、それぞれの所有者に帰属します。
129x32x52mm
280g
• English • Deutsch • Français • Italiano • Español
37
Page 38

重要安全说明!连接之前请认真阅读!
本产品由制造商按照 IEC 62368-1 规格生产,出厂
时设置安全。为维持安全状况,确保无风险操作,
用户必须遵守操作说明中的建议和警告注释。如果
该产品用于车辆、船只或飞机或高于海平面 2000
米的高空,请注意遵守相关安全规章,这些规章可
能比 IEC 62368-1 更加严格。
警告︰为预防火灾和电击危险,请勿将此器械暴露
在潮湿的空气或雨中。请勿打开机箱,机箱内不含
用户可用部件。如有需要,请向合资格服务人员
求助。
出现该符号,意在警告您封装内部存在非绝
缘危险电压-即足以构成电击危险的电压。
出现该符号,意在警告您存在外部可触及的
危险电压。与任何标有此符号的终端相连的外部接
线,必须是符合制造商建议的"预制电缆”,或必须
是仅由指示人员安装的接线。
出现该符号,意在提示您随附手册中含有重
要的操作和维护说明。请阅读手册。
出现该符号,表示:请当心!表面灼热!为
防止灼伤,请勿触摸。
阅读这些说明。保存好这些说明。遵守所有标
在产品上及本手册的警告和说明。
· 请勿在靠近水的地方使用该产品。请勿将该产品
置于水、浴缸、洗涤盆、厨房水槽、潮湿区域、
泳池或潮湿的房间附近。
· 请勿在该产品上放置含有液体的物体,如花瓶、
玻璃杯、瓶子等。
· 仅用干布清洁。
· 请勿卸除任何封盖或外壳的任何部分。
· 产品设定的操作电压必须匹配当地电网的供电电
压。如果您不确定所用电源类型,请咨询经销商
或当地电力公司。
· 为降低电击危险,必须对该产品接地装置进行维
护。请仅使用本产品提供的电源线,并随时维护
电源接线的中心(接地)引脚功能。切勿损坏极
化或接地类型插头的安全作用。
· 请避免踩踏或挤压电源线,特别是插头、电源插
座和电源线从设备拔出的地方!请谨记小心处理
电源线。定期检查电源线是否有切口或被压迹
象,特别是插头处和电源线从设备拔出的地方。
· 切勿使用损坏的电源线。
· 在雷雨期间或长时间不用时,请拔出该产品电
源插头。
· 只有拔出该设备或壁插座上的电源插头后,该
产品方能完全从电源处断开。该产品必须总是
以断开电源的方式放置,将其从电源处断开只是
举手之劳。
· 保险丝︰以 IEC127 (5x20mm) 类型额定保险丝
替换,以获得最佳性能!禁止使用经修补的保险
丝或让保险丝盒断路。更换任何类型的保险丝均
必须由合资格的服务人员执行。
· 请让合资格服务人员处理所有的维修。无论设备
出现何种形式的损坏,均需要维修,如:
- 电源线或插头损坏或磨损。
- 液体洒到或物体掉入该产品。
- 该产品暴露在雨中或潮湿的环境中。
- 遵守了操作说明,产品仍运转异常。
- 产品功能下降或机箱损坏。
· 产品请勿连接阻抗若低于对本产品或在该手册中
给出额定阻抗的外部扬声器。请按照当地安全规
章,仅使用横截面足够大的电缆。
· 避免阳光直射。
· 请勿在热源附近安置本产品,如散热器、热风调
节器、火炉或其他产生热量的装置。
· 请勿堵住任何通风口。请按照制造商说明进行安
装。除非提供合适的通风设备,否则该产品不可
置于机架等内置装置中。
· 搬动至某房间时,请总是加热冷设备的温度至室
温。如果未进行加热,产品内部可能发生冷凝,
从而造成损坏。
· 请勿将明火源放在产品上,如燃烧的蜡烛。
· 此设备必须放置在离墙面至少20cm/8"的地方,
后面保持通风。设备上方至少保持50cm/20"的
通风距离,并且不允许放置其他物品。。
· 只能使用由制造商指定或随产品一起出售的推
车、架子、三脚架、支架或桌子。使用推车时,
请在移动推车/产品组合时小心,避免倾翻而受
到伤害。
· 仅使用制造商推荐的配件,所有类型的配件均是
如此,例如防护罩、运输包、架子、壁装或天花
板安装设备。在附加任何配件至该产品时,请总
是遵照制造商提供的使用说明。请勿使用制造商
未指定的安装点。
· 该器械不适合任何体格、知觉或心智受限的人员
(包括儿童)使用,也不适合经验不足和/或知
识不足的人员操作。必须始终避免 4 岁以下儿童
接触该器械。
· 请勿将任何物体推入机箱插槽,它们可能触碰到
危险电压点或短路部件,造成火灾或电击风险。
· 该产品可传递超过 90 分贝的声压值,这可能造
成永久的听力损伤!极高噪音可能会造成永久的
听力损失。长期置身于如此高水平噪音的环境中
时,请戴上听力防护。
· 制造商仅在以下情况下保证该产品的安全、可
靠和有效:
- 装配、重新调整、修改或修理由制造商或授权人
员执行。
- 相关区域的电力装置符合 IEC (ANSI) 规格的要
求。
- 按照操作说明使用该设备。
制造商:Stamer Musikanlagen GmbH,
Magdeburger Str.8, 66606 St. Wendel, Germany
仅适用于海拔2000m 以下地区安全使用。
仅适用于非热带气候条件下安全使用。
调试本设备之前的注意事项
· 调试本设备之前,请仔细阅读本说明
书,包括安全说明。
· 未正确使用本设备而导致的设备损坏或
其它设备损坏,制造商不承担任何责
任。
· 连接电源之前,要确保 Power 开关已关
闭,且本设备背面标示的额定电压要与
当地电源电压相匹配。
· 启动 AmpMan 之前的警告:声音很
大!高音量级别可能造成听力损伤。
· 为了避免声音过大和发生意外,在接
通功放之前,使用者要习惯于关闭和
AmpMan 相连接的吉他音量电位器!
产品中有害物质的名称及含量
部件名称 有害物质
铅
(Pb)
电路板组件 X ○ X ○ ○ ○
机壳装配件 X ○ ○ ○ ○ ○
附件 ○ ○ ○ ○ ○ ○
本表格依据 SJ/T 11364 的规定编制。
○: 表示该有害物质在该部件所有均质材料中的含量均在 GB/T 26572 规定的限量要求以下。
X : 表示该有害物质至少在该部件的某一均质材料中的含量超出 GB/T 26572 规定的限量要求。
注: 含有有害物质的部件由于全球技术发展水平限制而无法实现有害物质的替代。
汞
(Hg)
镉
(Cd)
六价铬
(Cr(VI))
多溴联苯
(PBB)
多溴二苯醚
(PBDE)
Version 2.4 08/2019
Page 39

Spirit™ AmpMan Series – Manual 1.1
中文
1 综述
AMPMAN Classic 和 AMPMAN Modern 具有相同的技术特性,
并分别提供两个可独立控制的声道。包括独奏大师在内的 MasterSektion 只存在一次 -- 如同 Fx-循环和升压一样 -- 适用于两个声
道。
-?:LUK 5VPZL.H[L:WLHRLYV\[ (\_0U7V^LY 0UW\[-?9L[\YU7OVULZ =VS\TL *HI;`WL VUVMM4PJ3PUL9LK)V_+06\[
CLASSIC
提示:AMPMAN 提供了一个智能模式(参见第 3 章“智能
模式”),其中存储了每个声道的升压和 FX- 循环设置。
中文
•
在 AMPMAN Classic 和 AMPMAN Modern 两款车型中,A 声道
MASTER
VOLUME SAGGING PRESENCE RESONANCE
TONE GAIN A
提供了 Woodstock 时代无法控制的声音--从 Californian Clean 到
British Crunch。两种型号的声道 B 调整方式不同:在 AMPMAN
Classic 中,他代表了 80-90 年代体育场摇滚时代的伟大声音 -- 从
British Lead 到 Brown Sound。AMPMAN Modern 支持所有金属
B
SPIRIT™ AMPMAN SERIES
流派,并为演唱独奏和前卫即兴演奏提供了 High-Gain-Sound。
BOOSTFX LOOPSOLO CHANNEL A/B
• 日本語
MASTER
VOLUME SAGGING PRESENCE RESONANCE
SPIRIT™ AMPMAN SERIES
BOOSTFX LOOPSOLO CHANNEL A/B
-?:LUK 5VPZL.H[L:WLHRLYV\[ (\_0U7V^LY 0UW\[-?9L[\YU7OVULZ =VS\TL *HI;`WL VUVMM4PJ3PUL9LK)V_+06\[
MODERN
TONE GAIN A
B
• English • Deutsch • Français • Italiano • Español
39
Page 40

Spirit™ AmpMan Series – Manual 1.1
-?:LUK 5VPZL.H[L:WLHRLYV\[ (\_0U7V^LY 0UW\[-?9L[\YU7OVULZ =VS\TL *HI;`WL VUVMM4PJ3PUL9LK)V_+06\[
11
MASTER
12
13
2 操作元件
2.1 通道区
MASTERBVOLUME SAGGING PRESENCE RESONANCE
6
VOLUME SAGGING PRESENCE RESONANCE
6
5
5
4
4
SPIRIT™ AMPMAN SERIES
3
3
10 9
4
●
Presence
该控制器控制和音比例。将该控制器旋的越高,声音越具"真实
感”。
-?:LUK 5VPZL.H[L:WLHRLYV\[ (\_0U7V^LY 0UW\[-?9L[\YU7OVULZ =VS\TL *HI;`WL VUVMM4PJ3PUL9LK)V_+06\[
TONE GAIN A
5
●
Sagging:
Sagging 工具 与 Gain 和 Tone 配合使用,会带来意料之外、新鲜
而又让人兴奋的声音。通过该控制器您可以在任意音量上全面掌控
功放饱和特性。Sagging 让声音更精致,转动旋钮便可穿行于几十
年不断变化的吉他音色中。
2
TONE GAIN A
2
BOOSTFX LOOPSOLO CHANNEL A/B
1
1
7
8
8
B
SPIRIT™ AMPMAN SERIES
1
●
Gain:
增益控制器控制输入灵敏度,从而控制初始阶段的饱和度和失真
度。通过与 Tone 和 Sagging 控件配合,该通道是针对声音设计
的标准化工具。
2
●
Tone:
声音控制器的效果与各个声道精确匹配。声音控制器以型号的基础
声音为基础提供特色的频率范围,拥有极广泛的声音选择。
3
●
Resonance
该控制器处于中间位置时,人们可以听到功放和音箱之间的"正
常”共振效果。向左旋转会缓和音箱共振效果。这样使得干净的
声音更加圆滑。向右旋转会加强这个效果,这主要适用于激烈低
频冲击的奇特声音。
40
BOOSTFX LOOPSOLO CHANNEL A/B
注意:Sagging 加得越多,功放的饱和度就越高!根据增
益设置的情况,Sagging 对总音量也有或多或少的影响。将
Sagging 从左挡块(未加 Sagging)调整到中间位置,音量
会提高,从中间位置调整到右挡块(Sagging 开到最大),
则音量会降低,此时必须与主控配合。
提示:在 Spirit AMPMAN Modern 的 B 声道中,过多
的 Sagging 可能会适得其反。对于 High-Gain-Soli 来
说,Sagging 带来了必要平滑,但是当演奏即兴演奏
时,Sagging 会很快导致“晦涩”的和弦。特别是当与较低
调音的吉他或 7 弦相结合时,需要更加经济的处理。
6
●
音量
音量控制器让音量与预先设置匹配。
注意:如果要控制功放的总音量,请不要使用该控制
器。Master 控制器才有这样的功能!
Page 41

Spirit™ AmpMan Series – Manual 1.1
中文
7
●
声道 A/B。
此按钮可用于在声道 A 和声道 B 之间切换。
8
●
声道 LED
每个声道的增益旋钮右侧的蓝色 LED 显示哪个声道处于活动状
态。
2.2 FX 循环和升压
-?:LUK 5VPZL.H[L:WLHRLYV\[ (\_0U7V^LY 0UW\[-?9L[\YU7OVULZ =VS\TL *HI;`WL VUVMM4PJ3PUL9LK)V_+06\[
MASTERBVOLUME SAGGING PRESENCE RESONANCE
SPIRIT™ AMPMAN SERIES
9
●
Boost
使用升压提升声音频谱中的特定频率范围。这样不同的声道会有
更明丽、更平滑、更有力的声音效果。当升压激活时,开关上方
的 LED 亮起红色。
10
●
FX 循环
激活背面的串行音效环路。如果音效环路处于激活状态,则开关上
方的 LED 亮起红色。
提示:这两个开关在默认设置中独立于声道工作。在智能模
式切换的帮助下,它们也可以分配给声道 -- 然后在切换声
道时共同切换(参见第 3 章“智能模式”)。
TONE GAIN A
BOOSTFX LOOPSOLO CHANNEL A/B
2.3 Master 区
-?:LUK 5VPZL.H[L:WLHRLYV\[ (\_0U7V^LY 0UW\[-?9L[\YU7OVULZ =VS\TL *HI;`WL VUVMM4PJ3PUL9LK)V_+06\[
MASTERBVOLUME SAGGING PRESENCE RESONANCE
SPIRIT™ AMPMAN SERIES
11
●
Master
主控制器(米色)控制 AMPMAN 的总音量,它可影响两个声
道。
12
●
独奏(-大师)
使用主控制器下方的红色电位器,可以将电平跳变设置为与主控制
器相比在 0 到 +6 dB之间,例如切换到独奏时,只需按一下按钮
即可获得所需的音量。通过这个设计,在调整总音量时,只需要调
节主音量即可,此时独奏音量会自动调节。
注意:独奏控制器的电平跳变也会传递到红盒和耳机输出。
在舞台上使用红盒时,请确保在声音检查时考虑独奏音量,
以避免混音器输入过载。使用耳机时,始终在激活独奏按钮
的情况下设置最大音量(背面的音量控制)!
13
●
独奏
您可通过独奏控制器激活预先设置的相对于Master的电平跳跃。
按钮上方的红色 LED 显示独奏是否处于激活状态。
TONE GAIN A
BOOSTFX LOOPSOLO CHANNEL A/B
中文
•
• 日本語
2.4 背面
1
●
Input
通过屏蔽电缆连接吉他的乐器输入端。
2
●
Noise Gate
该控制器决定了 Noise Gate 的灵敏度。Noise Gate 采用的 IDB™
技术可自动调整标准起动参数和阀限参数。控制器调到左挡块位
置时,Noise Gate 将完全从信号通路切出(旁路)。控制器右旋
转得越多,Noise Gate 的干预将越强。在 9 点钟位置上时,Noise
Gate 对信号的反应就已经非常敏感。控制器越向右旋转,Noise
Gate 的干预将越强并且会将低声的信号阻断。
提示:AMPMAN 会自动记住每个声道的噪声门设置。这表
示:例如在干净声音的声道中,噪声门被停用(左击),在
传导声音的声道 B 中,噪声门被激活,当切换声道时,该
设置保持不变。
3
●
FX Send
将外部效果器的输入端与这个插口连接。
4
●
FX Return
外部效果器的(单输出端)输出端与这个插座连接。
5
●
RED BOX AE+ DI OUT
自 Hughes & Kettner 1988 年发明了初始版本的 Red Box 之后,
该产品就成为无麦克风接收吉他功放声音的行业标准。无论是在现
场还是在录音室中,Red Box 都能以稳定的质量传输声音。其它乐
器的串音和耗时的麦克风位置调试成为历史。Red Box AE+ 是获
奖的 DI-Box 的最新版本,带有模拟扬声器。DSP 控制的模拟环境
混响 (Ambience) 可产生 4x12 箱体的真实空间充实感和非常直接
的纯粹吉他音冲击。
3 4 5
NOISE GATEINPUT FX LOOP
VMM
1
2
9L[\YU:LUK
AE
6U
3PUL
6MM
4PJ
• English • Deutsch • Français • Italiano • Español
41
Page 42

Spirit™ AmpMan Series – Manual 1.1
3 4 6 10 12 14 15117
6
●
NOISE GATEINPUT FX LOOP
VMM
1
2 5 9 138
9L[\YU:LUK
AE
6U
3PUL
6MM
4PJ
空间类型
该控制器可从八个空间模拟中选择一个:
编号 箱体类型
11x12" Modern Thiele-Port
2 2x12" Modern Front-Port
3 2x12" Vintage Open Back
4 4x10" Alnico Open Back
5 4x12" Vintage Cab
6 4x12" British Cab
74x12" Modern Cab
84x12" American Cab
提示:AMPMAN 自动记住每个声道的空间类型设置。因
此,例如干净声音的声道中,您可以选择一个活泼的开背
扬声器,而在声道 B 中,您可以选择一个厚实的 4x12 扬声
器。特别是当使用红盒时有一个很大的优点,即每个声道可
分配一个不同的空间模拟,以优化声道的声音。
8
●
*HI;`WL
=VS\TL
POWER
AUX INPHONES
(,:
VOTZ
> ' VOTZ
=+*(
On/Off
此时,您可以关闭 Bed Box 的扬声器模拟功能。然后,Red Box
发送未经过滤的信号,让您用于自己喜欢的音箱和麦克风模拟软
件或效果器。
9
●
Phones
带有 3.5 mm 立体声迷你插孔插头的标准耳机连接到此输出。
提示:该输出端也可以用于将线路信号发送到任意一个立体
声多媒体输入端,例如发送到 HiFi 系统上。请询问经销商
是否有相应的适配器或线缆。若要将该输出端与典型的 Aux
In 或 HiFi 系统相连,所用的电缆一端要有一个立体声插头
与 AmpMan 的耳机输出端相连,另一端要有两个用于与
HiFi 系统左右两个输入端相连的插头。
连接至混音控制台时,另一端的两个插头要换成两个单插孔
或 XLR 插头。此时要注意,混音控制台的左右输出端要切
实地置于 Panorama 中,以保证使用 Aux-In 时能真正再现
立体声。
注意:当同时使用红盒和扬声器输出时,例如在舞台上,在
扬声器处有吉他盒,在控制台处有红盒,请确保为两个声道
选择了相同的空间类型,否则舞台上的扬声器听起来会与红
盒信号相比有很大不同。
7
●
Red Box Mic/Line
请确保以适当的电平运行 Red Box。使用长电缆时,例如在实况
(Live) 模式中,我们建议设置 "Line" 模式来运行 Red Box。较高
的输出可补偿由于电缆长度造成的电平损失。 因具有较高的输出
功率,故此其是音调方面的第一选择,并提供了最佳的声音。如果
混音控制台仅提供了麦克风输入端,则请将 Red Box 调至"Mic”
位置,这样您便可以避免麦克风输入端过调现象的发生。如果混音
控制台和音频接口未提供任何 XLR 输入端,则您需要一个 XLR 插
孔适配器 (6.3 mm),您可在专营店购得该插孔适配器。注意,如
果您使用的是 6.3 mm (1/4") 的插孔输入端,应在"Line”位置上
运行 Red Box。
注意:一些录音接口提供显式的“Hi-Z”输入,高阻抗插孔
用于乐器电平,仅用于连接吉他。红盒不能连接到这种类型
的输入,这将不可避免地导致过高的电平失真。
注意:与 Black Spirit 和 Spirit Nano 系列不同,当使用手
机插孔时,扬声器输出不会切换静音!这样做的优点是,在
同时连接吉他盒时,您可使用耳机输出作为可调线路输出,
而不是红盒的固定电平。使用主控制器或 AmpMan“静
音”功率放大器。AMPMAN 也可以在不连接吉他盒的情况
下使用,并且可以在打开主控器的情况下使用。
10
●
电话音量
设置耳机输出的音量。
11
●
辅助输入
您可以将任何音频源连接到辅助输入。该音频源将被混入到您的
吉他音中。通过辅助输入同样可以连接电子鼓或附加的乐器。辅
助输入信号以百分百的立体声音质传输到耳机输出端。这样你就
可以在没有额外混音器的情况下播放你的 Jamtracks 了。
12
●
电源
通过此按钮可以打开和关闭 AMPMAN。
42
Page 43

Spirit™ AmpMan Series – Manual 1.1
中文
13
●
AES
根据第 1275/2008/EG 号条例,(根据欧盟条例包括 AmpMan
在内的)设备必须配备节能装置,该装置在停止运行一定时间后断
开设备。在 AmpMan 设备中,这个任务由 AES 来承担,可以通
过 Speaker 插座旁边的小型开关来激活和关闭 AES。
在交付状态下,AES 被激活;迷你开关位于 ON 位置(右侧)。
在这样的状态下,停止运行约 90 分钟后会断开功放。只要功放接
收到输入信号并且发出声音,停止运行的时间就要重新计算。即
便接收到一个微弱信号,也同样会重新计算 90 分钟的断开时间。
在 90 分钟停止运行阶段结束后,设备断开,可以通过电源开关再
次启动设备。如果把小型开关推到左边位置,会禁用 AES 以及自
动断开功能。
14
●
Speaker
扬声器输出端专为电阻为 4 到 16 欧姆的音箱而设计。可以接任
何类型的吉他音箱,功放的功率完全足以带动 4x12 的音箱。如果
你喜欢,也可以连锥盆式音箱。
请注意:当连接两个音箱时,每个音箱的电阻必须至少为 8
欧姆,因为并联时总电阻减半为 4 欧姆。
推荐的 Hughes & Kettner TS 112 Pro、TM 112 和 TM 212 吉
他音箱的电阻都是 16 欧姆并有一个并联输出端,还可以连接一个
相同型号的音箱。
15
●
VDC
连接随附的宽范围稳压电源的输入端,该电源可在全球任何电源电
压下可靠工作,并保证音质始终如一。请始终使用原装电源。
注意:请始终先将电源连接到 AMPMAN,再将电源连接到
插座。
3 智能模式
AMPMAN 提供了一个智能模式,可以存储每个声道的升压和 FX循环设置。这意味着,如果在声道 B 中激活升压和 FX- 循环,而
在声道 A 中停用,在声道切换时会保持设置。通过这种方式,只
需按下一个按钮您可以从声道 A 中的干燥节奏声音切换到声道 B
中的独奏声音,包括升压和有源 FX- 循环。在出厂状态下,智能
模式不处于激活状态。
激活 / 停用:
如果同时按下两个外部开关, 独奏和声道 A/B 并保持三秒
钟,AMPMAN 将切换到智能模式。声道 LED 闪烁表示确认。关
闭 AMPMAN 后,此设置将保持不变。 以相同的方式禁用智能模
式。
提示:不显示智能模式是否处于活动状态。如果您想检查智
能模式是否处于活动状态,只需在声道 A 中禁用升压,在
声道 B 中激活升压。当切换回声道 A 时,如果升压处于激
活状态,则 AMPMAN 处于智能模式。
4 技术规格
Spirit AmpMan Series
最大耗电量 50 瓦
直流输入 +24 伏 / 2.5 安
外接电源 100-240 伏,50-60 赫兹
电源电压公差范围 +/-10%
工作环境温度范围 0°至 + 35 摄氏度
Input 插座
Sensitivity(Clean,所有电位器在中间位
置,Master 在最大限度位置)
Max. Level 0 dBV
FX Send 插座
Nominal Level (Clean,所有电位器在中
间位置 , 最小音调旋钮)
Max. Level +10 dBV
FX Return 插座
Sensitivity(Clean,所有电位器在中间位
置,Master 在最大限度位置)
Max. Input +9 dBV
Aux Input – 迷你插孔
Sensitivity -6 dBV
Max. Level +26 dBV
Phones 插孔
标称电平(清洁、无升压、所有电位器处
于中间位置、音调控制处于最小位置、主
控处于最大位置、电话音量 70%)
最大电平(清洁、无升压、所有电位器处
于中间位置、音调控制处于最小位置、主
控处于最大位置、电话音量 100%)
Max. Level +11 dBV
Red Box AE+ Out
Nominal Level (Clean,所有电位器在中
间位置 , 最小音调旋钮)
Max. Level Line: +6 dBV, Mic: –14 dBV
Speaker 接口 6.3 毫米(1/4),桥接模式,4-16
输出功率 @ 16 欧姆 13 W
输出功率 @ 8 欧姆 25 W
输出功率 @ 4 欧姆 48 W
放大器尺寸(宽x高x纵深) 250 x 52 x 153 mm
放大器重量 1150 g
电源尺寸 129 x 32 x 52 mm
电源重量 280 g
所涉及的所有商标和版权均为其各自持有者所有。
6.3 mm (1/4"),非均
衡,1 MOhm
-13 dBV
6.3 mm (1/4"),非均衡,220 Ohm
-6 dBV
6.3 mm (1/4"),非均衡,20 kOhm
-6 dBV
3.5 mm,立体声,10 kO hm
6.3 mm (1/4"),立体声,50 Ohm
-6 dBV
0 dBV
XLR,均衡,Line 400 Ohm ,Mic
600 Ohm
Line: –6 dBV, Mic: –26 dBV
欧姆
中文
•
• 日本語
• English • Deutsch • Français • Italiano • Español
43
Page 44

Spirit™ AmpMan Series – Manual 1.1
44
Page 45

Spirit™ AmpMan Series – Manual 1.1
45
Page 46

Spirit™ AmpMan Series – Manual 1.1
46
Page 47

Spirit™ AmpMan Series – Manual 1.1
47
Page 48

Manufacturer • Hersteller • Fabricant • Produttore • Fabricante • メーカー • 制造商:
D-3163 c
Stamer Musikanlagen GmbH, Magdeburger Str. 8, 66606 St. Wendel, Germany
Hughes & Kettner
Postfach 1509
66595 St. Wendel
Germany
Tel: +49 (0) 68 51 - 905 0
Fax: +49 (0) 68 51 - 905 103
International Inquiries:
Fax: +49 - 68 51 - 905 200
hkinternational@hughes-and-kettner.com
www.hughes-and-kettner.com
facebook.com/hughesandkettner
Copyright 10/2020 by Music & Sales GmbH.
Subject to change without notice.
 Loading...