

Page 1

User Guide
ThurayaIP
Satellite Modem
Revision A.1
3500175-0001
All rights reserved. This publication and its contents are proprietary to Hughes Network Systems, LLC. No part of this
publication may be reproduced in any form or by any means without the written permission of Hughes Ne twork Systems,
LLC., 11717 Exploration Lane, Germantown, Maryland 20876. Hughes Network Systems, LLC., has made every effort to
ensure the correctness and completeness of the material in this document. Hughes Network Systems, LLC., shall not be
liable for errors contained herein. The information in this document is subject to change wi tho ut n ot ic e. Hug he s N etw or k
Systems, LLC. makes no warranty of any kind with regard to this material, including, but not limited to, the implied
warranties of merchantability and fitness for a particular purpose.
All trademarks, marks, names, or product names referenced in this publication are the property of their respective
owners, and Hughes Network Systems, LLC. neither endorses nor otherwise sponsors any such products or services
referred to herein. HUGHES and Hughes Network Systems are trademarks of Hughes Network Systems, LLC. THURAYA
trademark is the sole and exclusive property of Thuraya Satellite Telecommunications Company.
Copyright 2008 Hughes Network Systems, LLC.
Trademarks
Page 2

Page 3
Safety Information
For your safety and protection, read this entire user guide before you
attempt to use ThurayaIP Satellite Modem. In particular, read this
safety section carefully. Keep this safety information where you can
refer to if necessary.
Warning Symbols Used in this Guide
This section introduces the various types of warnings used in this
document to alert you to possible safety hazards.
WARNING
Potential radio frequency (RF) hazard. Where you see this
alert symbol and WARNING heading, strictly follow the
warning instructions to avoid injury to eyes or other
personal injury.
WARNING
Where you see this alert symbol and WARNING heading,
strictly follow the warning instructions to avoid personal
injury.
DANGER
Electric shock hazard: Where you see this alert symbol
and DANGER heading, strictly follow the warning
instructions to avoid electric shock injury or death.
ThurayaIP Satellite Modem User Guide
i
Page 4
Warnings for THURAYAIP
Do not stand in front of the Antenna
This device emits radio frequency energy when in the transmit
mode. To avoid injury, do not place head or other body parts
in front of the satellite antenna when system is operational.
Maintain a distance of one meter away from the front of
ThurayaIP’s antenna.
Properly ground the Antenna
Failure to properly ground the optional external antenna may
result in severe personal injury or death. Do not attempt to
ground the optional external antenna unless you have the skills
to do so in accordance with local electrical codes.
Do not operate during Electrical Storms
Operation of ThurayaIP during electrical storms may result in
severe personal injury or death. Disconnect ThurayaIP from
computer and store unit indoors if lightning is anticipated in
the area of operation.
General
Handle your ThurayaIP with care. The enclosure is weather
resistant per IEC 60529 IP55. However, do not submerge the
unit or expose it to severe rainstorms. Avoid exposing your
ThurayaIP to extreme hot or cold temperatures. The operating
temperature range of ThurayaIP is -10ºC to +55ºC.
Avoid placing your ThurayaIP close to cigarettes, open flames
or any source of heat.
Changes or modifications to ThurayaIP not expressly approved
by Hughes Network Systems could void your authority to
operate this equipment.
Use a soft damp cloth only to clean your ThurayaIP.
To avoid impaired Modem performance, please ensure your
ThurayaIP’s antenna is not damaged or covered with foreign
material like paint or labelling.
When inserting the SIM, do not bend the SIM or damage the
contacts in any way. When connecting the interface cables,
do not use excessive force.
ii ThurayaIP Satellite Modem User Guide
Page 5

In the vicinity of blasting work and in explosive environments
Never use ThurayaIP where blasting work is in progress.
Observe all restrictions and follow any regulations or rules.
Areas with a potentially explosive environment are often, but
not always, clearly marked. Do not use ThurayaIP while at a
petrol filling station. Do not use near fuel or chemicals.
Qualified service
Do not attempt to disassemble your ThurayaIP. ThurayaIP
does not contain consumer-serviceable components. Only
qualified service personnel may install or repair equipment.
Batteries and accessories
Use approved batteries (HNS P/N 3500108-0001) and
accessories only. Use of non-approved accessories may result
in loss of performance, damage to ThurayaIP, fire, electric
shock or injury.
AC Mains power adapter (HNS P/N 3500114-0001) is for indoor
use only. It has an indoor operating temperatur e range of 10ºC to +55ºC and provides an output voltage o f 12 VDC.
The storage capability of the battery decreases when
operated below 0ºC. If the battery is charged at too high a
temperature, this will be indicated on the LCD display.
Battery Door
To ensure safety, ensure that the battery door is properly
closed and latched at all times during operation. To close the
battery door, hook the battery door tab under the edge of the
large opening in the enclosure near the data conne ctor ports.
Firmly press the battery door into the opening. The seal around
the battery door should snugly fit between the door and the
enclosure with no pinch points visible. Once a good seal has
been made, screw the retaining fastener into the enclosure
until hand tight.
Connecting devices
Never connect incompatible products. When connecting
ThurayaIP to any other device, read the device’s User Guide
for detailed safety instructions.
ThurayaIP Satellite Modem User Guide
iii
Page 6

Pacemakers
The various brands and models of cardiac pacemakers
available exhibit a wide range of immunity levels to radio
signals. Therefore, people who wear a cardiac pacemaker
and who want to use a Satellite Modem should seek the
advice of their cardiologist. If, as a pacemaker user, you are
still concerned about interaction with ThurayaIP, we suggest
you follow these guidelines:
• Maintain a distance of 15 cm between ThurayaIP and
your pacemaker;
• Maintain a distance of one meter away from the front
of ThurayaIP’s antenna;
• Refer to your pacemaker product literature for
information on your particular device.
If you have any reason to suspect that interference is taking
place, turn off your ThurayaIP immediately!
Hearing aids
Most new models of hearing aids are immune to radio
frequency interference from Satellite Modems that are more
than 2 metres away. Many types of older hearing aids may be
susceptible to interference, making it very difficult to use them
near a Satellite Modem. Should interference be experienced,
maintain additional separation between you and ThurayaIP.
INFORMATION TO USER
Hughes Network Systems, LLC, declares under our sole responsibility that the product Hughes 9103 Satellite IP Terminal
to which this declaration relates, is in conformity with the following standards and/or other normative documents: ETSI
EN 301 681 , ETSI EN 300 328, ETSI EN 301 489-1, ETSI EN 301 489-17, ETSI EN 301 48 9-20, IEC 60950-1. We hereby declare
that all essential radio test suites have been carried out and that the above named product is in conformity to all the
This device complies with Part 15 of the FCC Rules. Operation is subject to the following two conditions: (1) This
device may not cause harmful interference, and (2) This device must accept any interference received, including
This equipment has been tested and found to comply with the limits for Class B Digital Device, pursuant to Part 15 of
the FCC Rules. These limits are designed to provide reasonable protection against harmful interference in a
residential installation. This equipment generates and can radiate radio frequency energy and, if not installed and
used in accordance with the instructions, may cause harmful interference to radio communications. However, there
is no guarantee that interference will not occur in a particular installation. If this equipment does cause harmful
interference to radio or television reception, which can be determined by turning the equipment off and on, the user
• Reorient or relocate the receiving antenna
• Increase the separation between the equipment and receiver
• Connect the equipment into an outlet on a circuit different from that to which the receiver is connected
• Consult the dealer or an experienced radio/TV technician for help
Any changes or modifications not expressly approved by the party responsible for compliance could void the user’s
is encouraged to try to correct the interference by one or more of the following measures.
essential requirements of R&TTE Directive 1999/5/EC.
interference that may cause undesired operation.
authority to operate the equipment.
iv ThurayaIP Satellite Modem User Guide
Page 7

Contents
SAFETY INFORMATION .................................................................................. I
WARNING SYMBOLS USED IN THIS GUIDE ............................................................... I
WARNINGS FOR THURAYAIP................................................................................ II
CONTENTS ................................................................................................... V
INTRODUCTION ............................................................................................ 1
FIRST TIME SET-UP .......................................................................................... 1
UNPACKING ..................................................................................................... 1
SOFTWARE INSTALLATION AND CONFIGURATION .................................................. 2
SETTING UP THE MODEM .................................................................................... 2
STEP 1: SIM INSERTION ..................................................................................3
STEP 2: POWER CONNECTION AND BATTERY CHARGING ..................................3
STEP 3: OBTAIN INITIAL GPS USING THE ThurayaIP .........................................3
STEP 4: DATA CONNECTIONS ........................................................................4
STEP 5: POINTING TO THE SATELLITE .................................................................4
QUICK REFERENCE ....................................................................................... 7
GLOBAL POSITIONING SYSTEM OPERATION ......................................................... 7
STORED GPS LOCATION ...............................................................................7
INTEGRATED MAN MACHINE INTERFACE (IMMI) .................................................. 8
CONTROL BUTTONS ......................................................................................8
STATUS/MENU DISPLAY .................................................................................9
NAVIGATION OF THE IMMI ............................................................................9
DATA RATE SELECTION ............................................................................... 10
RECEIVE SIGNAL STRENGTH DISPLAY ............................................................ 11
DISPLAY ICONS ......................................................................................... 12
WEB MAN MACHINE INTERFACE (WMMI) SCREENS........................................... 13
HOME SCREEN .......................................................................................... 14
PROPERTIES SCREEN .................................................................................. 15
STATISTICS SCREEN ..................................................................................... 16
CONNECTION MANAGEMENT SCREEN ........................................................ 17
STATUS SCREEN ......................................................................................... 18
SETTINGS SCREENS ..................................................................................... 19
NETWORK SETTINGS SCREEN ....................................................................... 19
SECURITY MANAGEMENT SCREEN ................................................................ 20
LOGIN SETTINGS SCREEN ............................................................................ 22
ThurayaIP Satellite Modem User Guide
v
Page 8

CONFIGURATION SCREEN ............................................................... 22
WLAN
WLAN SECURITY SCREEN .......................................................................... 23
ADVANCED SETTINGS SCREEN .................................................................... 24
POINTING SCREEN ..................................................................................... 25
UPGRADING THURAYAIP ................................................................................. 27
UPGRADING SOFTWARE ............................................................................. 27
TROUBLESHOOTING .................................................................................... 28
GENERAL TROUBLESHOOTING .......................................................................... 28
STATUS CODES ............................................................................................... 33
GLOSSARY .................................................................................................. 44
INDEX .......................................................................................................... 46
vi ThurayaIP Satellite Modem User Guide
Page 9
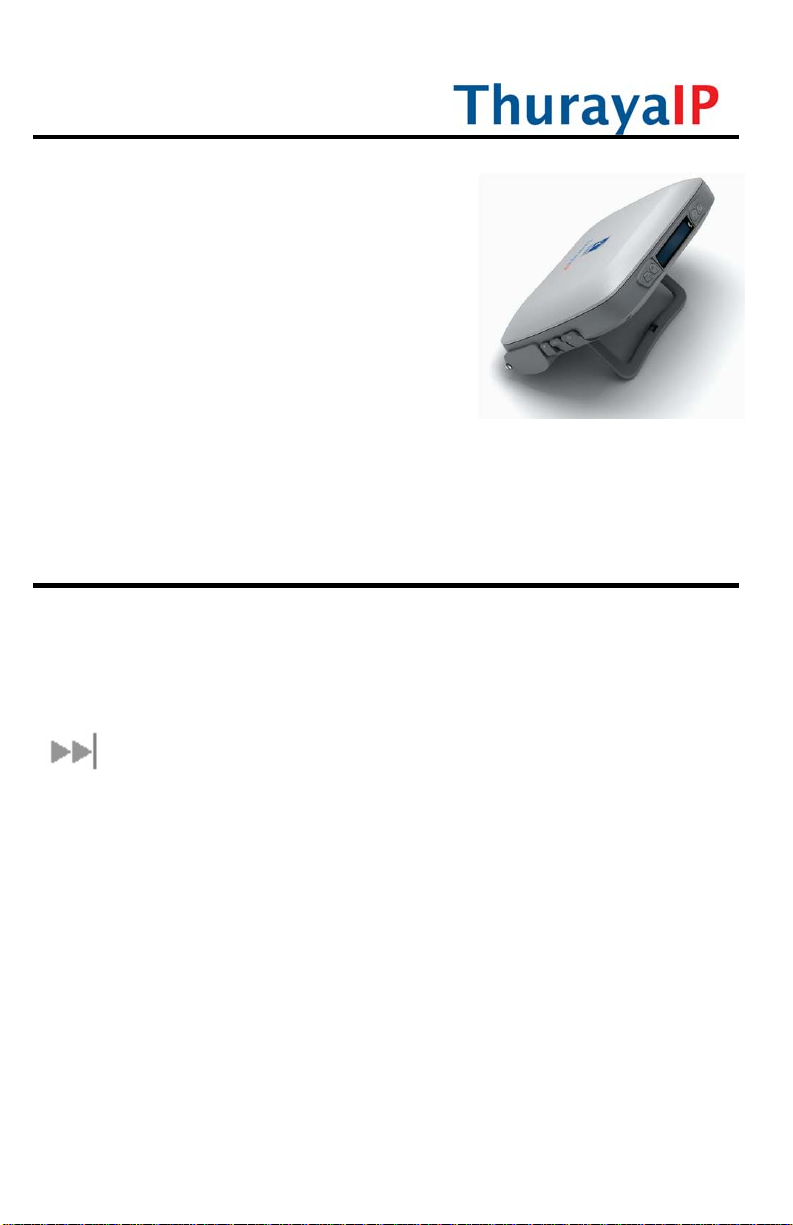
Introduction
Your ThurayaIP is a Satellite Modem that
provides portable, high-speed data
communications via satellite. Using
“Always On” technology, you can remain
connected to the Internet while only
sending or receiving the data that you
need at speeds of up to 444kbits/s, just as
if you were sitting at your office desk.
ThurayaIP works with your computer using
an Ethernet, USB or Wi-Fi connection. While
ThurayaIP operates very similarly to other
data modems that you may be familiar with, there are a few important
operating differences to note. Please read this user guide carefully to
understand all the aspects of operating your ThurayaIP.
First Time Set-Up
This section guides you through the process of setting up and
configuring your ThurayaIP for the first time. The steps presented should
be followed in the order given. When you are finished, your computer
and modem will both be set up and ready to use.
Unpacking
Unpack the modem and accessory box items.
ThurayaIP Satellite Modem
AC Mains Power Adapter and cable (100 – 240V AC)
Universal AC power plug travel adapter
Rechargeable Lithium Ion Battery pack
Ethernet cable (do not use cross-over cable)
USB cable
CD ROM
User Guide (this document)
Your Service Provider will supply a Subscriber Identification Module (SIM).
ThurayaIP Satellite Modem User Guide 1
Page 10

Software Installation and Configuration
Your PC must support an Ethernet, USB or Wireless LAN interface to
operate with ThurayaIP.
The CD ROM contains USB drivers for Windows 2000, XP, Vista and MAC
OS10.3 and later operating systems. If y ou intend to use the ThurayaIP
with a USB connection, please insert the CD RO M into the computer
and follow the instructions to install the USB driver. MAC users will also
need to carry out the following steps after the USB driver install
completes:
1) plug in USB cable
2) Select Apple Menu->System Prefer ences on the MAC
3) Go to "Network"
4) A new network port should then be recognised
Note: You must verify that the proxy server settings in your
browser are disabled. For Microsoft Internet Explorer, select
Tools / Internet Options / Connections / LAN Settings and
uncheck the box labelled ‘Use a proxy server for your LAN’.
For Netscape, go to Advanced Preferences and select
‘Direct connection to the Internet’. When complete please
close your browser.
DO NOT FORGET THAT YOU MAY NEED TO RECHECK THIS BOX
ON RETURN TO YOUR OTHER INTERNET CONNECTION.
Setting Up the Modem
There are five basic steps to getting your Modem up and running:
Step 1: SIM insertion
Step 2: Power Connection and Battery Charging
Step 3: Obtain Initial GPS Fix using the ThurayaIP
Step 4: Data Connections
Step 5: Pointing to the Satellite
2 ThurayaIP Satellite Modem User Guide
Page 11
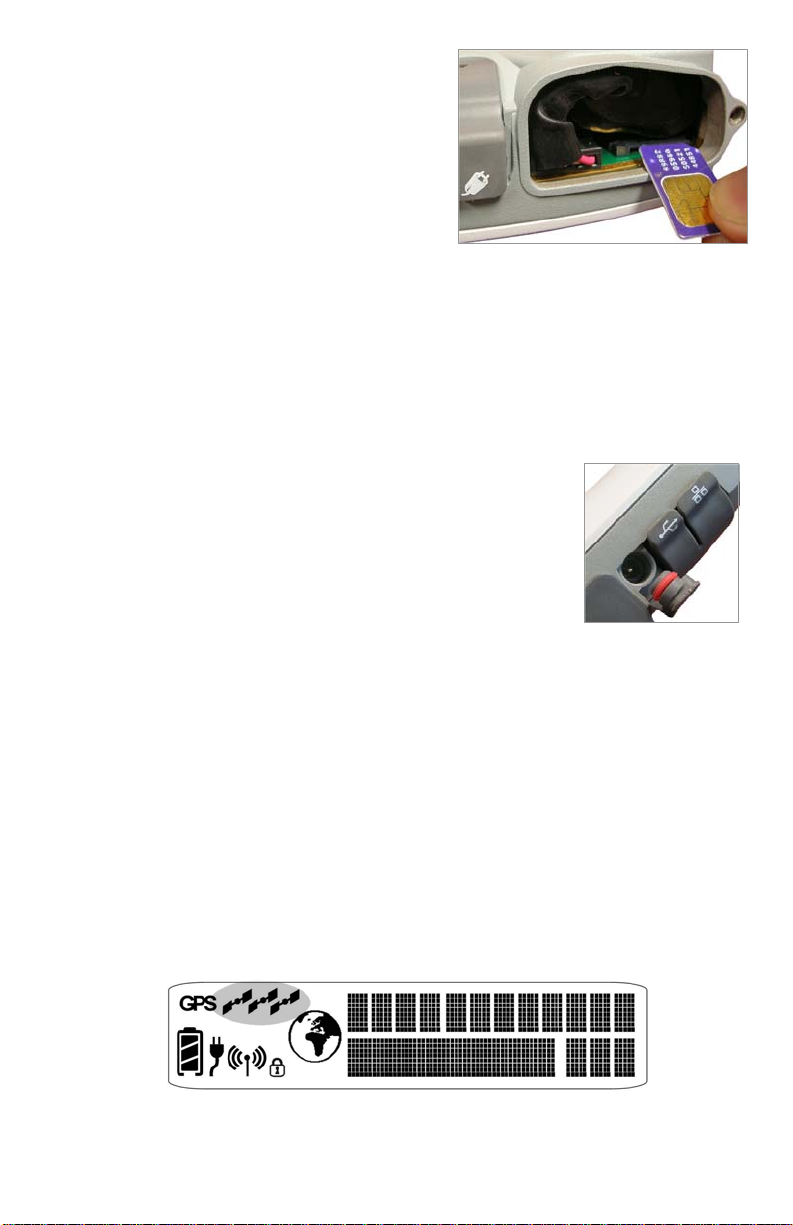
STEP 1: SIM INSERTION
1. Unpack the modem and
accessories. Your service provider
will have provided you with a SIM
card.
2. Insert SIM provided by your Service
Provider into the SIM holder inside
the battery compartment as shown. SIM Insertion Orientation
3. To close the battery door, hook the battery door tab under the
edge of the large opening in the enclosure near the data
connector ports. Firmly press the battery door into the opening. The
seal around the battery door should snugly fit between the door and
the enclosure with no pinch points visible. Once a good seal has
been made, screw the retaining fas tener into the enclosure until
hand tight.
STEP 2: POWER CONNECTION AND BATTERY CHARGING
1. The ThurayaIP ships with the battery preinstalled;
however, if needed, install the battery in the
compartment pictured in Step 1.
2. Plug in Power cable and charge the battery for at
least three hours.
DC Power Jack
STEP 3: OBTAIN INITIAL GPS USING THE ThurayaIP
1. Put the ThurayaIP outside on a flat surface with a clear view of the
sky away from building, trees and other obstructions.
2. Power up Satellite Modem by pressing the Power button.
3. Once powered up, ThurayaIP will automatically attempt to locate
itself using GPS. This may take up to five minutes. The small GPS
satellite icons on the display (shaded area in the picture below)
show how many GPS satellites are in view at any given time. You
need all three satellite icons to be on solidly to obtain a GPS fix. If
any are missing or flashing then the GPS signal is being blocked.
GPS Satellite Icon Location on Display
ThurayaIP Satellite Modem User Guide 3
Page 12
When the GPS icon stops flashing then ThurayaIP has successfully
updated its GPS position.
STEP 4: DATA CONNECTIONS
Connect the ThurayaIP to your PC using
Ethernet or USB. It is also possible to connect
using the wireless LAN facility, but us e one of the
wired connection s for the f irst time setup.
Data Connections
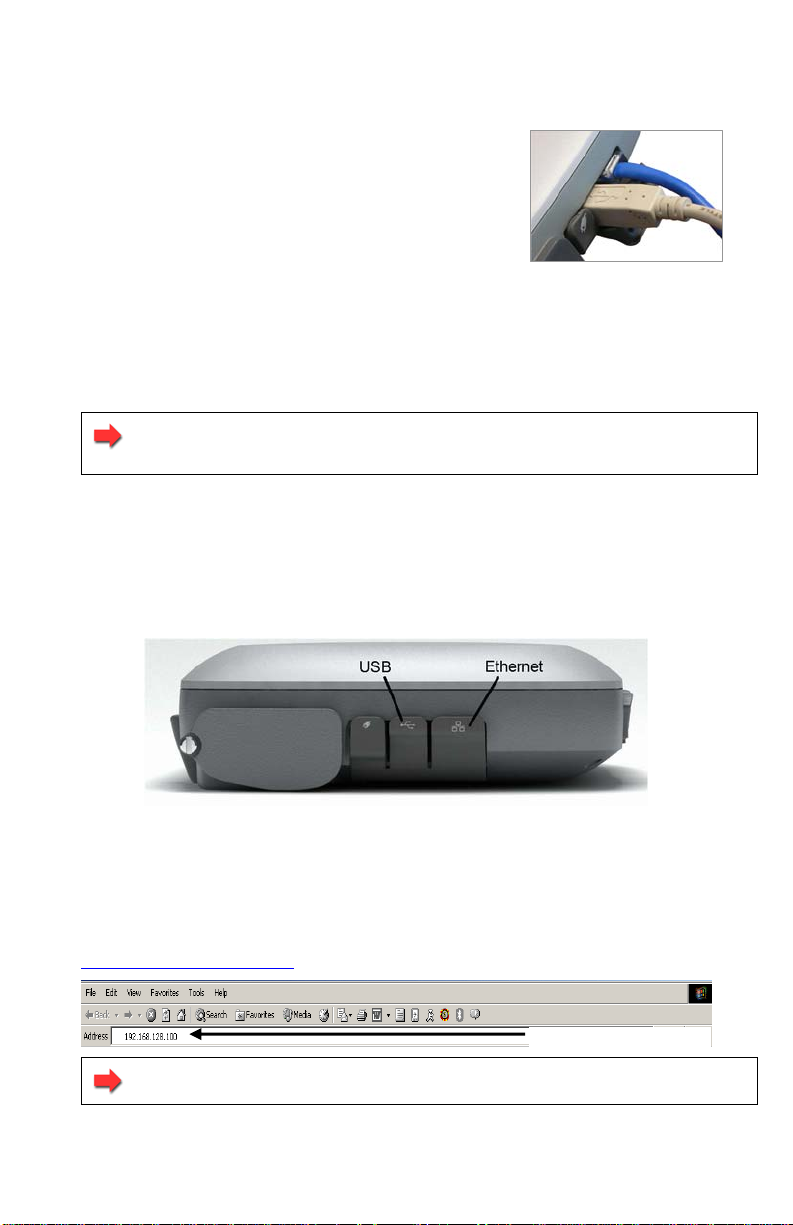
ETHERNET
Connect the Ethernet cable to your laptop’s network interface and
insert the other end of the connector into the ThurayaIP.
Note: Any Ethernet cable can be used to connect the laptop
and modem as long as it is less than100 meters in length.
USB
You will first need to install the USB driver from the CD ROM following the
instructions in the Software Installation and Configuration section above.
Next, connect the USB cable to your laptop’s USB interface and insert
the other end of the connector into the ThurayaIP.
USB and Ethernet Data Connection Locations
STEP 5: POINTING TO THE SATELLITE
1. ThurayaIP is controlled through a web browser interface (wMMI). To
activate the wMMI, open the browser on your laptop. Enter
http://192.168.128.100
Note: You may want to store this URL as a browser bookmark.
in the browser URL address field.
URL address field
4 ThurayaIP Satellite Modem User Guide
Page 13
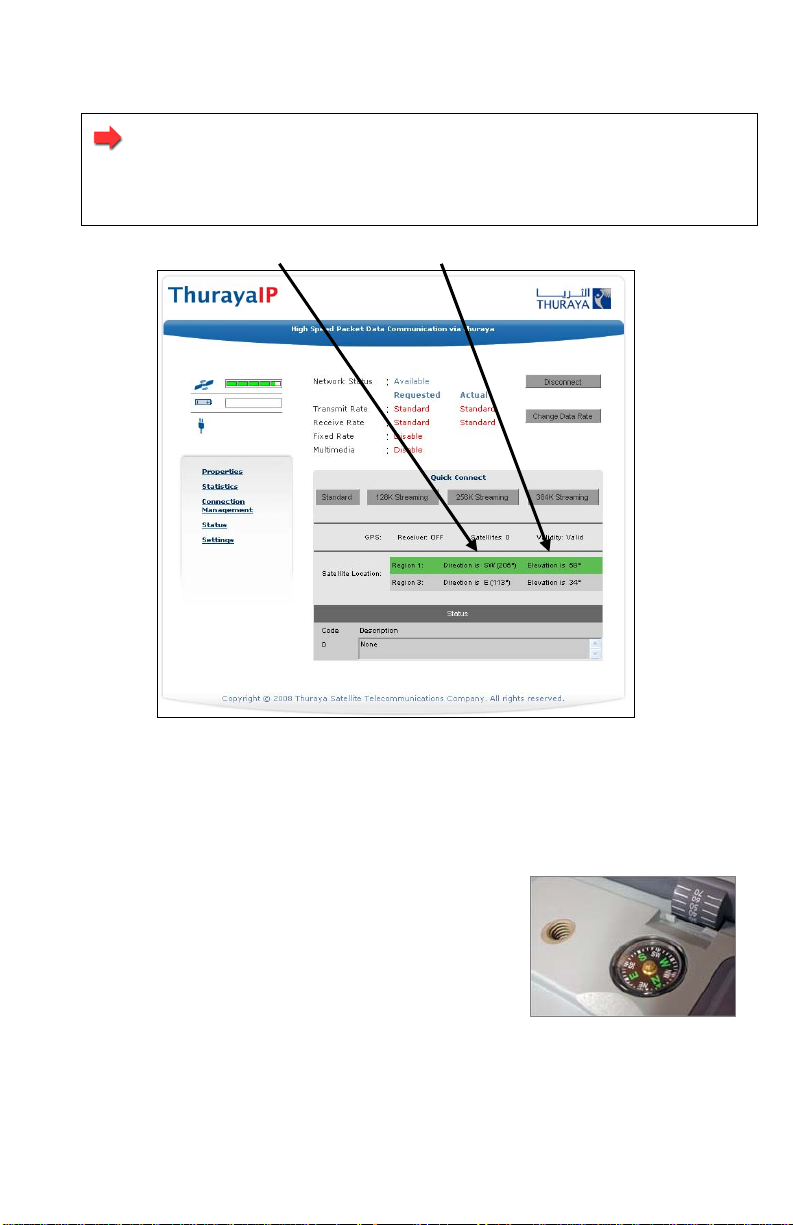
A
2. If you have PIN security enabled on your SIM, you will be prompted
to enter your PIN before proceeding.
Note: You must have a valid GPS location for the compass
direction and Antenna Angle to be displayed. If the GPS is
not valid, go back to step 3 and allow ThurayaIP to obtain a
GPS fix.
Compass Direction
ntenna Angle
Home Page Satellite Location Display
3. Look at the wMMI home page display and note the compass
bearings and elevations for both ThurayaIP satellites in the “Satellite
Location” section. The recommended satellite for your location will
be highlighted in green. With the ThurayaIP terminal upside down,
use the integrated compass to determine
the direction of the recommend ed satellite.
You must be able to obtain a clear view of
the satellite in the sky for the ThurayaIP to
connect to the network. If the
recommended satellite is obstructed from
your location, consider using the alternate
satellite instead. If neither satellite is Compass
accessible from your location, you will need to move to a location
that has visibility to at least one of the satellites.
ThurayaIP Satellite Modem User Guide 5
Page 14
4. Once you have determined the best satellite to us e, mo ve the
antenna stand to the correct elevation angle
using the integrated protractor. Recall that the
elevation angle is indicated on the wMMI home
page. With the elevation angle correctly set,
place the ThurayaIP on a flat surface with the
antenna facing in the direction of the satellite as
determined in step 3. Protractor
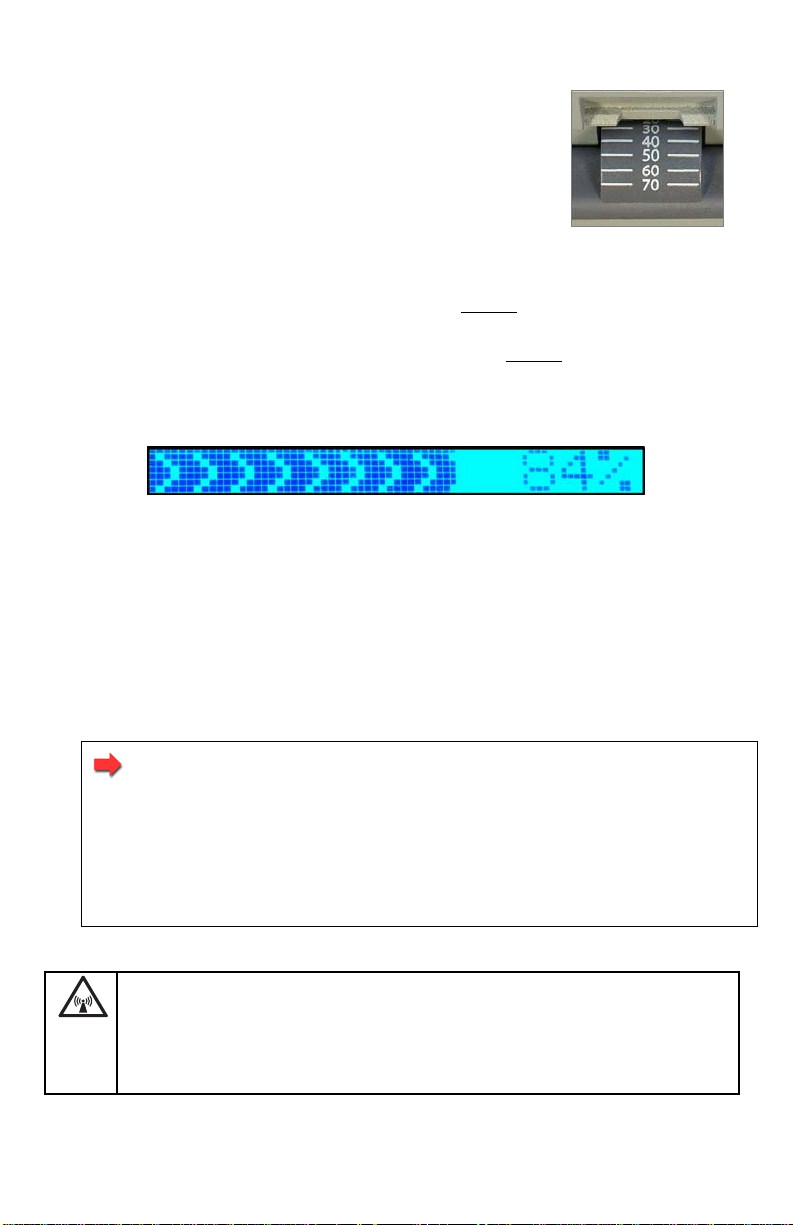
5. You can optimise the receive signal strength by observing the signal
strength display on the ThurayaIP while slowly
a few degrees clockwise and counter clockwise. Find the direction
that maximizes the signal strength. Likewise, slowly
the antenna a few degrees and find the elevation that maximizes
the signal strength. This step fine tunes the pointing of the antenna in
the direction of the ThurayaIP satellite.
Receive Signal Strength on the ThurayaIP Display
6. Once the ThurayaIP obtains sufficient signal strength from the
satellite it will automatically connect and establish an IP data
session. Check this on the home page by confirming that the
“Network Status” line shows “Connected”.
rotating the ThurayaIP
raise and lower
Congratulations! Your ThurayaIP is successfully connected. You should
now be able to send and receive data from your laptop to the internet.
Note: If you are unable to successfully connect to the
Internet, ensure that nothing but open sky is between the
ThurayaIP and the ThurayaIP Satellite. If the view is blocked by
trees, mountains, buildings, metalized glass or similar objects
then you must relocate the ThurayaIP. Additional assistance
can be found in the troubleshooting section towards the end
of the ThurayaIP User Guide.
Do not stand in front of the Antenna
ThurayaIP emits radio frequency energy when in the transmit
mode. To avoid injury, do not place head or other body parts
in front of the antenna when system is operational.
6 ThurayaIP Satellite Modem User Guide
Page 15

Quick Reference
This section serves as a reference guide, identifying the key operational
aspects of using the ThurayaIP system and the Controls and Indicators
on ThurayaIP and their functions.
Global Positioning System Operation
The ThurayaIP contains an integrated Global Positioning System (GPS)
receiver that is used to provide location information. GPS location
information is required for system access, and the reception of a new
GPS location is attempted automatically every time ThurayaIP is
powered on.
For optimum GPS signal reception, make sure ThurayaIP is positioned in
a roughly horizontal placement. Since GPS receivers must “see” a large
part of the sky without obstructions from buildings, mountains or trees, it
may be necessary to take your ThurayaIP out to a clear space to obtain
a new GPS location. It may be possible to obtain a new GPS location in
a less favourable circumstance, but the time to completion may be
longer.
Once updated, ThurayaIP remembers your location so the unit can be
relocated to a more convenient working area, such as inside a building
by a window facing toward the satellite.
Once you have established a session on ThurayaIP you will not need
another GPS location while you remain connected in the “Always On”
condition. This is convenient if you intend to operate from one location
for an extended period of time since there is no need to move
ThurayaIP to refresh the GPS receiver. Also, your stored GPS location
remains good for a period of time even if you power down and move a
short distance between sessions. When you believe this is the case,
simply skip the GPS location step and complete the ThurayaIP satellite
pointing operation prior to going directly onto the network. Be sure to
carefully point your unit every time it is moved.
STORED GPS LOCATION
The most recent GPS location is stored in ThurayaIP even when powered
down. Upon power up, the ThurayaIP will attempt to update this GPS
location since the Thuraya system will only allow access if your GPS
location is not too old. If ThurayaIP has a valid GPS location then the
GPS icon on the display will go from flashing to solid. Likewise, the web
MMI will indicate if the currently available GPS location is valid or invalid.
ThurayaIP Satellite Modem User Guide 7
Page 16
r
t
Integrated Man Machine Interface (iMMI)
The ThurayaIP has an Integrated Man Machine Interface (iMMI) which
allows you to control the operational features of the terminal without the
need of a PC or a browser. The iMMI includes buttons labelled with
defining icons, an LCD, and an audible pointing aid integrated into the
ThurayaIP itself.
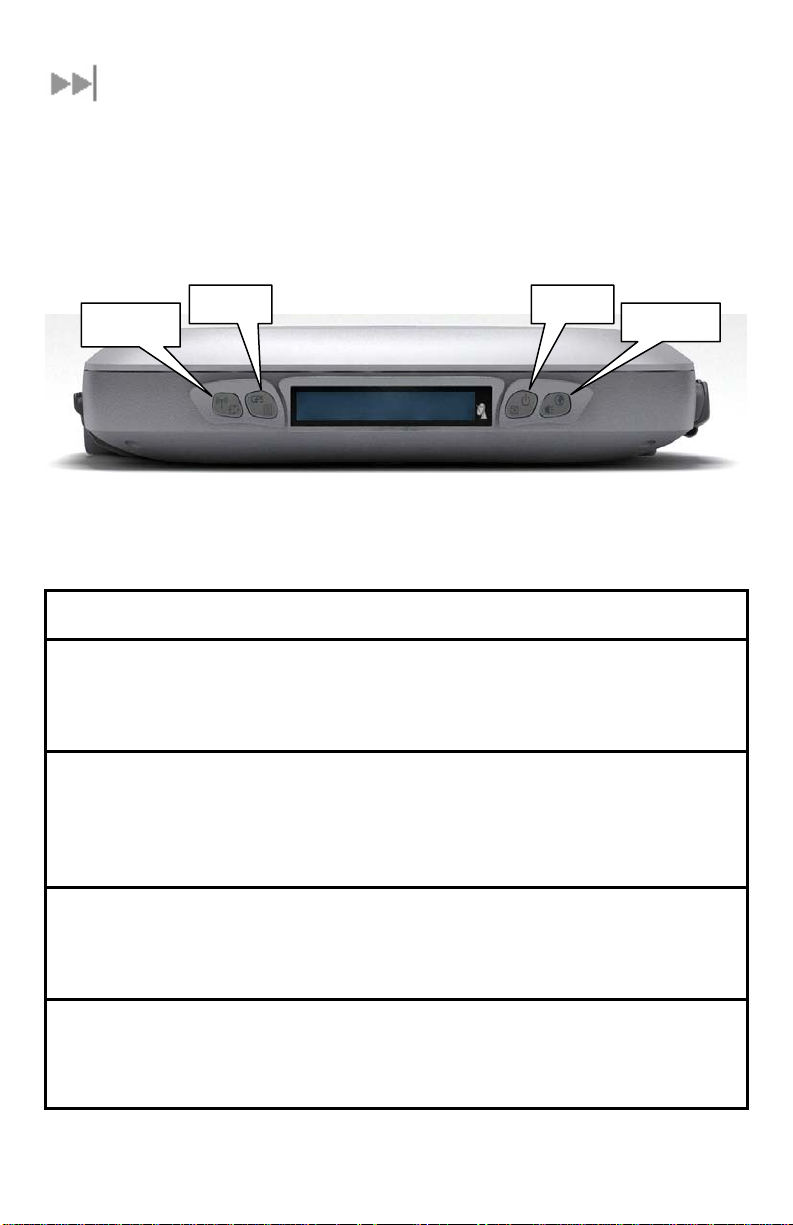
The figure below shows the layout of the ThurayaIP iMMI.
Modify
Menu Powe
Connec
iMMI Button Locations
CONTROL BUTTONS
The following table gives you a summary of the four ThurayaIP buttons.
Button Action Result
Power button
Long Press Turn unit on or off
Connect button Short press Toggle audio pointing state
Long press
Short press Backlight on, cancel any menu
operation, return to status menu
(sound on/off)
• Toggle connection state
(connect/disconnect)
• Exit pointing mode
Menu button Short press Scroll to next menu item
Modify button Short press Scroll to next option of displayed
Long press Toggle Wi-Fi on/off (when not in
Long press Start GPS receiver manually
menu item when in menu
menu display)
8 ThurayaIP Satellite Modem User Guide
Page 17

STATUS/MENU DISPLAY
The upper level of the LCD displays status messages and menu items.
Status messages are summarized in the table below.
Display Description
Powering Off Displayed while ThurayaIP is powering down
Fault {code} A hardware fault exists, preventing operation (see
troubleshooting section for code explanati ons)
Too Hot A temporary thermal shutdown is about to occur
Battery Hot A temporary thermal shutdown is about to occur
due to battery heating
No SIM No SIM is detected in ThurayaIP
Locked A security code is needed (entered via wMMI)
PIN A SIM pin code is needed (entered via wMMI)
Pointing In pointing mode
GPS old GPS is older than the system time period allows
Disconnected The terminal has no IP connection to the network,
preventing data transfer
Acquiring The terminal is attempting to connect to the network
Tx{rate}/Rx{rate} Transmit and Receive streaming rates in kilobits per
second
Standard Best efforts quality of service in both directions
NAVIGATION OF THE IMMI
You navigate among the options availab le i n the iMMI by utilizing the
Menu and Modify buttons. With the unit in its “normal” state displaying
status indicators, you press the Menu button to view and modify Quality
of Service (QoS) settings and LCD display parameters. Pressing the
Modify button within a Menu option allows you to change the current
setting.
The status display is the default display; after 30 seconds of inactivity, the
display always reverts to the status display. Pressing the Menu button
takes you through a circular list of menu items and then back to the
status display. The two major menu optio ns are the following:
Change Rate
LCD Contrast
ThurayaIP Satellite Modem User Guide 9
: Modify the QoS settings for Transmit and Receive.
: Modify the contrast on your LCD.
Page 18

DATA RATE SELECTION
• With the unit in the default status display, press the Menu button.
The Change Rate menu option is then displayed.
• Press the Modify button. You are then brought to the first value in
the series of QoS settings.
Change Rate Menu Comment
Standard Selects Background QoS for both the
transmit and receive directions
Tx: 384Kbps Selects 384Kbps Tx Streaming QoS
Hidden unless external antenna attached
Tx: 16Kbps Selects 16Kbps Tx Streaming QoS
Tx: 32Kbps Selects 32Kbps Tx Streaming QoS
Tx: 64Kbps Selects 64Kbps Tx Streaming QoS
Tx: 128Kbps Selects 128Kbps Tx Streaming QoS
Tx: 256Kbps Selects 256Kbps Tx Streaming QoS
Hidden unless external antenna attached
Rx: 384Kbps Selects 384Kbps Rx Streaming QoS
Hidden unless external antenna attached
Rx: 16Kbps Selects 16Kbps Rx Streaming QoS
Rx: 32Kbps Selects 32Kbps Rx Streaming QoS
Rx: 64Kbps Selects 64Kbps Rx Streaming QoS
Rx: 128Kbps Selects 128Kbps Rx Streaming QoS
Rx: 256Kbps Selects 256Kbps Rx Streaming QoS
• Press the Modify button to scroll down the Standard and Tx QoS
values until you see the setting you want. When you scroll to
each setting, the displayed QoS value blinks, indicating that this
selection is pending. Press the Modify button to move to the next
setting without changing the pre-existing value.
• When the list of values is exhausted, press the Modify button to
lead you back to the first value. You can cancel the selection
10 ThurayaIP Satellite Modem User Guide
Page 19

and transition back to the status display via a short press of the
Power button.
• When you have found the value you want, press the Menu
button. This action selects the new rate. Once you select the
rate, you are transitioned to the Rx set of values unless you
selected “Standard” in which case you will exit rate selection.
• Navigation through and selection of the Rx values is the same as
for the Tx values. Use the Modify button to scroll through the list in
a circular manner, with cancellation achieved via the short press
of the Power button. Pressing the Menu button selects and stores
the new Rx rate, and you will then exit rate selection.
• When you select a new QoS, the old PDP context is deactivated
and a new PDP context is activated with the new rate selection.
If the rate selection did not change as a result of the selection ,
then no PDP context change occurs.
RECEIVE SIGNAL STRENGTH DISPLAY
The lower row of the LCD is dedicated to RSSI (signal strength)
information. This is used to monitor incoming signal strength from the
Thuraya satellite and permit pointing or re-pointing to occur at any time
during operation. The display provides both a graphical and digital
indication of the signal strength.
The digital RSSI indication consists of a value between zero and 99. The
graphical RSSI indication is a 50-element bar graph of the RSSI.
The RSSI display updates rapidly for at least five minutes after a satellite
signal has been acquired or reacquired. After that acquisition, the RSSI
display may be updated less rapidly to conserve power if the modem is
running on battery. Hint: If the rate is reduced to save power, the rapid
RSSI update mode can be re-enabled for 5 minutes if you short press the
Modify button while the status display is present.
Audible Pointing Indicator
An audible pointing indicator provides an audible repr esentation of the
signal strength during antenna pointing. When on, the indicator emits
pointing tones that increase in tempo as the pitch increases. If the
satellite is not found, one tone is followed by a pause. The indicator
always defaults to off when the unit powers on. Use a short press of the
Connect b utton to to ggle the audio pointing indicator on and off.
ThurayaIP Satellite Modem User Guide 11
Page 20

DISPLAY ICONS
Battery Icon
The battery icon displays the estimated life of the battery while
under battery power. The battery icon also displays the
charging state while under external power.
Power Icon
The power icon displays the state of the external power input.
GPS Icon
The GPS icon indicates the state of the GPS information in
the ThurayaIP, specifically whether the information is up-to-
date or should be refreshed.
Satellite Icons
The satellite icons, located next to the GPS icon,
indicate the status of the GPS receiver in the ThurayaIP
and the number of visible satellites.
• On if external power is connected.
• Off if external power is disconnected.
• The icon flashes when the stored GPS information is older
than the GPS validity period.
• The icon is on steady when the stored GPS information is
within the GPS validity period.
• The icons are off when the GPS receiver is off.
• The icons are active when the GPS receiver is on, either
flashing or steady state. The number of icons in steady state
indicates the number of GPS satellites i n view. You will need
all three on solidly to acquire a new GPS location.
Wireless LAN Icon
The wireless LAN icon displays the state of the WLAN feature.
• Off if Wireless LAN operation is turned off.
• On if Wireless LAN is on.
Wireless LAN Lock Icon
The lock icon displays the state of encryption for the WLAN
feature. It is displayed only if the Wireless LAN is on and WLAN
encryption is turned on.
12 ThurayaIP Satellite Modem User Guide
Page 21

Globe ICON
The globe icon displays the state of IP connection over the
satellite.
• Off if no PDP context exists (no data traffic possible).
• On if a PDP context exists (ready for data traffic).
Web Man Machine Interface (wMMI) Screens
The ThurayaIP can be accessed through a standard web browser
interface. To accomplish this, the connected computer must have one
of the following supported browsers installed along with Java enabled
(Java Runtime Environment 1.3.1 or later).
• Internet Explorer 6.0 or later
• Netscape Communicator version 7.2
• Firefox 2.0
• AOL Explorer
• Macintosh Safari
To access the ThurayaIP, connect your computer, run a supported
browser and enter http://192.168.128.100
field. You may wish to add this address to the browser’s bookmark list so
the address will be easier to find i n the future. When active, the browser
interface will allow you to access the wMMI.
Each of the main web pages contains important status information in
the upper left hand corner. The bar graph next to the
represents receive signal strength. The bar graph next to the
provides an indication of the battery’s level and charging state. The
icon area below these indicators mirrors the icons described in the iMMI
section above.
into the browser’s address
icon
icon
ThurayaIP Satellite Modem User Guide 13
Page 22

HOME SCREEN
The Home screen provides you with key summary status information
about ThurayaIP and is also a gateway into ThurayaIP management.
Home Screen
Network Status: Provides the status of the network connection.
Transmit Rate
data rate. The actual allocated data rate may vary from the one
requested due to subscription or system capacity restrictions.
Receive Rate:
rate. The actual allocated data rate may vary from the one requested
due to subscription or system capacity restrictions.
Fixed Rate:
Rate when using a stre aming connection that must mat c h t he
requested data rate. If the rate is unavailable, the connection will not
be made.
Multimedia:
Multimedia when using streaming applications like Voice over Internet
Protocol (VoIP) or live video playback.
Connect/Disconnect
on or off. When Disconnected no data can be sent or received.
: Provides the requested and actual transmit channel
Provides the requested and actual receive chann el data
Provides the status of the Fixed Rate control. Enable Fixed
Provides the status of the Multimedia con trol. Enable
: This button toggles the network connection state
14 ThurayaIP Satellite Modem User Guide
Page 23

Change Data Rate
: This button allows you to change the connection
parameters for the current session.
Quick Connect:
GPS:
The display includes the GPS receiver sta te (On/Off), GPS satellites
These buttons access pre-stored connection profiles.
visible, GPS validity, compass direction and antenna angle. To obtain a
GPS fix, make sure there are at least three visible satellites reported.
Once a GPS position is obtained, the ThurayaIP w ill provide the compass
direction and degrees of elevation to the satellite. This information is
used in the pointing operation described earlier.
PROPERTIES SCREEN
The Properties screen displays a summary of current communications
parameter settings. You can also use this screen to do the following:
• Restore Factory Defaults
• Reset Terminal
• Power Off Terminal
• Upgrade Modem Software (a link to the upgrade website)
Properties Screen
About Restoring Factory Defaults: When you click this button, the restore
message confirmation screen informs you that the terminal is about to
reset to factory defaults. Restoring the factory defaults returns the
ThurayaIP settings to their original, just out-of-the-box state. This does not
change the security code or SIM parameters. Please exercise caution
when proceeding. If you invoke Restore Factory Defaults, you will need
ThurayaIP Satellite Modem User Guide 15
Page 24

to re-enter any configuration information supplied by your Service
Provider. You must enter the security code to complete the reset.
Current Settings
• Software Version
• Interface Mode
• Public Network IP Address
• Private Satellite Modem IP Address
• Modem Inte r national Mobi le E q u i p m e nt Identity (IMEI)
• Satellite Modem Media Access Control (MAC) Addresses.
: provides the current communications parameters.
STATISTICS SCREEN
This screen provides you with an estimate of your data usage. Data
usage figures are obtained by counting the bytes in the IP packets
received by and sent from the ThurayaIP terminal. You can view both
“since power on” (per session) and “Cumulative” (lifetime) data usage
counts. To reset the data counters of a session, simply select the reset
button for either transmit or receive and click the Apply button.
Statistics Screen
Note: The data usage figures provided on the screen are
estimates only. This feature is not tied into the actual billing
system. Hughes assumes no liability if differences are found
between data usage figures and your actual bill.
16 ThurayaIP Satellite Modem User Guide
Page 25

CONNECTION MANAGEMENT SCREEN
Accessible from the Main Menu, the Connection Management Screen
allows you to select Quality of Service (QoS) parameters separately for
transmit and receive data. Note that the “384Kbps” selection requires
an external antenna.
Connection Management Screen
Transmit Rate and Receive Connection Rate: Allows you to select the
transmit and receive rates from the list of Bandwidth values.
Multimedia Control
: Allows you to enable or disable Automatic RepeatreQuest (ARQ) over the satellite. Typically, ARQ--an error control
protocol for data transmission–-is best disabled for voice or video traffic.
Fixed Rate Control
: Allows you to enable or disable fixed rate service
over the satellite. You can force the connection to match the
requested QoS. If disabled, the best streaming rate possible -- up to and
including the selected rate -- will be allowed. If enabled, the terminal will
not set up a connection unless the requ ested rate is available from the
network.
Remember to click Apply to save any changes or they will be lost.
ThurayaIP Satellite Modem User Guide 17
Page 26

STATUS SCREEN
The Status Screen, displayed in a separate window, provides you with a
constantly updated flow of dynamic information and a concise
summary of the ThurayaIP status.
Status Screen
This display gives you a summary of current Satellite Modem system
configuration and performance. When the Status Window is open, its
information is updated every minute. Note that if you are running on
battery power, your available operating time wi ll be reduced.
Network Status
Signal Quality
Signal Strength
the satellite and permit pointing or re-pointing to occur at any time
during operation.
Note: Signal Quality vs. Signal Strength. The Signal Quality
status is a different measure of the received satellite signal
than the Signal Strength status. Seeing differences between
these two levels is normal and not an indication of a problem
with your ThurayaIP.
Satellite Antenna Type: Use this display to determine which satellite
antenna is in use. The standalone terminal will use its internal antenna.
Optional external antennas, active and passive, can be hooked up to
the ThurayaIP for convenience and higher performance. See yo ur
service provider regarding these accessories.
: Provides the status of the network connection.
: This bar graph displays satellite signal quality.
: Use this display to monitor incoming signal strength from
18 ThurayaIP Satellite Modem User Guide
Page 27

Battery Status
: On battery, charging or charged.
Battery Level
: This bar graph provides an indication of remaining battery
capacity.
• Green: normal indication of battery level
• Red: almost fully discharged
• Amber: charging under external power
Status:
Any current system status codes (see Troubleshooting section).
SETTINGS SCREENS
From the Main menu you can select Settings to navigate among all the
various Settings functions from the menu on the left side of the screen:
• Network Settings
• Security Management Settings
• Login Settings
• Advanced Settings
NETWORK SETTINGS SCREEN
After executing the necessary First Time Set-up steps to configure
ThurayaIP, you may want to select the Network Settings screen to check
your network configuration.
Network Settings Screen
This screen provides you with control over key network access
parameters. Here you find the appropriate Domain Name Service (DNS)
ThurayaIP Satellite Modem User Guide 19
Page 28

and the Access Point Name (APN) information configured by your
Service Provider. You are also given the ability to make changes.
Note: Generally your Service Provider has already pe rformed
this configuration step for you. Whenever you modify the
addresses on the Network Settings screen, you must press
SAVE and exit the wMMI, reboot your computer, and power
the ThurayaIP off and then back on so that the new settings
can take effect.
NET IP:
Obtain Add ress Automatically
uses an IP address automatically assigned by the network during
the period when the Modem connects to the network.
Statically Configure Address
uses the IP address you enter in the Static Public Network IP
Address field. You should check this box and enter an IP address
only if directed to do so by your Service Provider.
DNS:
Obtain DNS Address Automatically
ThurayaIP uses a Primary Host Domain Name Service (DNS)
automatically assigned by the network during the period when
the Modem connects to the network.
Statically Configure Address
uses the DNS address you enter in the DNS Address field. You
should check this box and enter an IP address only if directed to
do so by your Service Provider.
APN Selection
you can modify the current Access Point Nam e ( APN) value. You should
modify these fields only if directed to do so by your Service Provider. The
choices are the following: Streaming-CBR, Refill, <BLANK> (enter the
desired name) and Disabled.
SAVE/ CANCEL
processed, click the SAVE button, exit the wMMI, and reboot your
computer. You will also need to turn ThurayaIP off and then on again so
that the new settings can take effect. If you want the values you have
entered to be ignored, click the CANCEL button and the Network
Settings remain as they were with no reboot required.
: If use of multiple Internet Service Providers is required,
: If you want the values you have entered to be
: If this button is selected, ThurayaIP
: If this button is selected, the Modem
: If this button is selected,
: If this button is selected, the Modem
SECURITY MANAGEMENT SCREEN
The Security Management screen allows you to impose a tighter level of
security on your ThurayaIP.
20 ThurayaIP Satellite Modem User Guide
Page 29

Security Management Screen
SIM PIN Disable/Enable: If Enabled, a prompt requests you to enter the
SIM PIN each time you power up the modem. This helps prevent
unauthorised use of your SIM. Disable this feature to skip the PIN entry
process. To change the setting, click the desired one, enter the current
SIM PIN (required), and click the Save button.
Note: If the SIM PIN code is incorrectly entered three times,
the SIM will be locked until the PUK (Pin Unlock Key) number is
entered. Consult your Service Provider if you do not have your
PUK number.
Change SIM PIN
: If the SIM PIN is enabled, and you would like to change
the existing PIN, click this link. You will be required to enter the Old PIN,
the New PIN, and the New PIN again for confirmation.
Lock Upon SIM Change
: When this setting is enabled, you must enter a
security code when the terminal powers up with a new SIM.
Restricted Administrative Access
: When Restricted Administrative
Access is enabled, protected web pages can only be accessed after
you enter a username and password. The userna me is the fixed string
“admin” and the password is the security code.
Change Security Code
: The security code is 12345 when shipped from
the factory. To change an existing Security Code, click this link. You will
be required to enter the Old Code, the New Code, and the New Code
again for confirmation. Click Save to store the changes.
ThurayaIP Satellite Modem User Guide 21
Page 30

Note: If you forget the security code you will need to consult
with your service provider.
LOGIN SETTINGS SCREEN
Utilize the login screen only if you have been given the necessary
information from your Service Provider.
Service Provider Security
and Password for authentication between ThurayaIP and your Service
Provider. Your Service Provider will let you know if this step is required
and give you the necessary information.
User Name, Password, Confirm Password
twice to ensure accuracy.
: If this is enabled, you can enter a User Name
: You must enter the password
WLAN CONFIGURATION SCREEN
The WLAN Configuration screen allows you to configure WLAN
characteristics, including enabling/disabling WLAN, setting a timer that
will force WLAN to power down if no host connects within the timeout,
and setting up security.
WLAN Configuration Screen
WLAN Power: Select ON or OFF to turn the feature on or off.
WLAN Power Off timeout
parameter is enabled, the WLAN will remain powered up for the
: If disabled, there is no timeout. If this
22 ThurayaIP Satellite Modem User Guide
Page 31

selected timeout value after the terminal powers on. If no WLAN activity
is detected during the timeout, the WLAN card will power down.
WLAN SSID
WLAN Region
: The WLAN network ID (SSID) can be entered as desired.
: Select the WLAN region from a drop down list (X10, X20,
X30, X31, X32, X40 and X41). If you try to activate a channel not
supported in the selected region, the request shall be rejected wi th an
error message.
WLAN Channel
: Select the WLAN channel from a dr op down list (1
through 14).
WLAN SECURITY SCREEN
The WLAN Security screen allows you to configure WLAN security
parameters, including enabling/disabling Wired Equivalent Privacy
(WEP), hiding the SSID and setting Media Access Control (MAC) filters.
Access this screen by clicking the WLAN Security Settings
the bottom of the WLAN Configuration Screen.
link towards
WLAN Security Screen
WLAN SSID Broadcast: Enable or Disable SSID broadcast.
Security (WEP)
: Enable or Disable security for Wired Equivalent Privacy
(WEP), a security protocol for the wireless local area network.
ThurayaIP Satellite Modem User Guide 23
Page 32

WLAN Key to Use
down menu. Note that in 128-bit key mode only Key1 is available.
: Select the active key--Key1 through Key4--from a pull
64-bit WEP/128bit-WEP
128-bit WEP mode.
WLAN Key Fields, Key 1 through Key 4
character (0-9, A-F) key value in each of four text boxes. In 128-bit WEP
mode, enter a 26 character (0-9, A-F) key value in the Key1 text box.
Generate
Generate button to automatically generate a key value.
Hide Keys
MAC Filtering
can enter up to eight MAC addresses. Only these addresses will be
permitted to access the terminal.
: Instead of manually entering a key value, you may press the
: Click this button to hide the keys from this display.
: Enable or disable MAC filtering. If filtering is enabled, you
: Use this button to toggle between 64-bit and
: In 64-bit WEP mode, enter a 10
ADVANCED SETTINGS SCREEN
The advanced settings screen allows you to modify several key
operating parameters in the unit.
Advanced Settings Screen
Satellite Search Method: Normal is the default method to use unless your
Service Provider specifies the Full Method. The Full method takes longer
24 ThurayaIP Satellite Modem User Guide
Page 33

and utilizes more resources since it will search all possible frequencies for
ThurayaIP service. This full search can take up to 20 minutes.
Auto Power ON
: When Enabled, the terminal will automatically power
up when external DC is present.
Antenna Pointing
: This drop-down menu determines whether the
Pointing Display comes up each time ThurayaIP is powered up or
restarts. The factory default for this setting is Disabled to bypass the
pointing state upon power up. However, antenna pointing can be
Enabled to provide pointing information prior to going online.
LCD Backlight Config
: LCD backlighting can be On (15 sec), Off, or
Auto (off after 15 seconds of inactivity unless external DC present).
Power Up Profile
: You can select the power up profile from a drop
down list, including Standard and three customizable streaming profiles.
Each streaming profile can be customized by name, multimedia mode,
fixed rate mode, transmit rate, and receive rate.
Select the Save button to implement your modifications.
POINTING SCREEN
The antenna pointing step can be enabled using the Antenna Pointing
option on advanced settings screen described above. When this option
is enabled, the ThurayaIP will stop in a pointing mode prior to accessing
the network after powering up. This can be useful when optimal pointing
is important, such as with fixed installations using an external antenna.
Pointing Screen
ThurayaIP Satellite Modem User Guide 25
Page 34

The pointing screen has a signal strength bar graph and numeric value
to assist in accurate antenna pointing. The green bar identifies the signal
strength measured during antenna pointing and will help you optimise
the pointing direction. Note that obtaining the highest signal strength
possible will ensure that you have an optimum connection to the
network.
GPS Receiver
GPS Satellites
GPS Validity
Operation section for more details on GPS.
Point An tenna to These Settings
to help orient ThurayaIP toward the s atellite. On ce this rough pointin g is
accomplished, use the Signal Strength meter described below to
optimise the pointing direction.
Signal Strength
from the satellite gets stronger. The numeric display to the right of the
bar is simply a digital representation of the bar. The orange peak-hold
bar at the end of the blue bar identifies the highest signal strength
measured during antenna pointing and will h elp you optimise the
pointing direction. Use this display when fine tuning ThurayaIP’s
orientation to the satellite. Signal strength is only a relative measure of
the satellite signal strength and may vary from location to location.
Exit Pointing
strength has been achieved. This action will take you to the Home
screen on the wMMI.
: Status codes (see end of guide for a list).
Status
: On/Off
: The number of satellites visible to the u nit
: Invalid, Stored or Valid. See the Global Positioning System
: Compass Direction and Antenna Angle
: This blue bar moves to the right as the signal received
: Select this button to leave the screen after optimum signal
26 ThurayaIP Satellite Modem User Guide
Page 35

Upgrading THURAYAIP
Should a ThurayaIP Modem software upgrade become available, yo u
can complete the upgrade process yourself. The so ftware can be
downloaded directly from the Internet using any available access
method, including ThurayaIP.
UPGRADING SOFTWARE
In order to upgrade software you must first connect to the Internet and
follow the steps listed below:
1. Connect your PC/Notebook to the Internet using ThurayaIP
(satellite service), wired LAN, or dial up connection.
2. Go to www.thuraya.com
Properties Page if connected to the ThurayaIP.
3. Go to the web site area for ThurayaIP updates.
4. To download, select the latest u p grade package. The
browser proceeds to retrieve the package.
5. Once the package is downloaded, you are prompted to
execute the package. Select Yes and the upgrader
application will self-extract onto the PC’s hard drive.
6. Once the package is installed, it puts a shortcut on the
desktop and prompts you to upgrade now. Make sure the
ThurayaIP is now connected to the PC via Ethernet
(recommended) or USB and is powered up. Select the
upgrade option on the PC, and the program will allow you to
upgrade the terminal.
7. The upgrader will query the current software version of the
terminal. You should choose whether you want to upgrade
to the newer version of software.
8. If you choose to upgrade the terminal, the process
automatically downloads the new release of software and
forces a terminal reboot.
9. When the terminal returns from reboot, you can verify that
the download was successful via the Properties page in the
wMMI.
10. Once loaded onto a PC, the upgrade program can be used
to upgrade any number of ThurayaIP terminals. Just connect
them one at a time and execute the upgrade pr ogram.
or use the Upgrade link on the
ThurayaIP Satellite Modem User Guide 27
Page 36

Troubleshooting
This section details the following:
Some general hardware and software problems you may encounter
in the installation and operation of ThurayaIP along with the
possible source of these problems and how to co rrect them.
System fault codes and descriptions reported to you by ThurayaIP on
the wMMI screens, along with their possible causes and solutions.
If unable to correct a problem please contact the ThurayaIP dealer
you purchased the unit from.
General Troubleshooting
Problem Possible Cause Action
ThurayaIP will not
switch on, or will
not stay on when
under battery
power.
SIM card error.
Battery needs
recharging.
The battery is not
inserted properly.
The battery
contacts are dirty or
damaged.
The Modem was
reset while under
battery power
SIM card or SIM
card contacts may
be damaged.
SIM card may not
be present.
SIM card may be
inserted incorrectly.
Charge the battery. Check
Battery Light or wMMI screen for
battery charging indication.
Remove and reinsert the battery.
Make sure the battery cable
connector is latched.
Check the battery connector
contacts. Clean them if
necessary. If you find any
damage, replace battery.
When the Modem is reset while
under battery power (no AC
Mains connected), you must turn it
back on manually. This is a normal
operation for the Modem.
Visually inspect the SIM card and
SIM card contacts and return SIM
card to your Service Provider if it is
damaged.
Remove the battery door and
verify that the SIM card is present.
Remove the SIM card and make
sure that it is inserted according to
the instructions in the User Guid e.
28 ThurayaIP Satellite Modem User Guide
Page 37

Problem Possible Cause Action
The wMMI does not
work from browser.
Primary LAN
connection to the
Modem does not
function.
The compass does
not appear to work
correctly.
The Security Code
appears to be
invalid.
SIM card contacts
may be dirty.
The browser may
not be correctly
configured.
The interface cable
is not plugged in
correctly.
The PC Windows
network settings
may not be
configured
correctly.
The PC can only
have one active
LAN connection.
When connected
to the PC, the
Modem must be
the only active LAN
connection.
The compass is not
level or is near
metal.
The code may
have been
changed.
Clean the SIM card contacts with
a dry cloth.
For Netscape, go to Advanced
Preferences and select ‘Direct
connection to the Internet .’
For Microsoft Internet Explorer,
select Tools / Internet Options /
Connections / LAN Settings and
uncheck the box labelled ‘Use a
proxy server for your LAN.’
You May Need To Recheck This
Box Upon Returning To Your Other
Internet Connection.
Remove and reinsert the interface
cable from both the PC and the
Modem.
Make sure the Windows network
settings in the PC are set to
choose IP settings automatically
(DHCP). Then reboot the PC.
Disconnect all other LAN
connections. Make sure the
Modem is the only active LAN
connection.
Windows limits the number of
network bindings to six. If you have
more than six, you must remove
one in order for the PC to
communicate with the Modem.
Hold the ThurayaIP upside down
and level, away from metallic
objects.
After ten failed attempts to enter the
Security Code, you must switch the
Modem off and on again to h ave
access to another 10 retries. If you
forgot the Security Code, contact your
Service Provide r.
ThurayaIP Satellite Modem User Guide 29
Page 38

Problem Possible Cause Action
The SIM PIN code
appears to be
invalid.
ThurayaIP cannot
locate itself using
GPS.
The Signal Strength
meter on the
pointing screen
does not change
when moving the
antenna.
ThurayaIP cannot
find the satellite.
ThurayaIP cannot
access the internet
after successful
pointing.
The code may
have been
changed.
No signal or weak
signal.
Determining GPS
position can take
up to 5 minutes.
The Modem is
configured to use
an external GPS
antenna.
Java not enabled
on the browser.
Rough pointing not
completed
correctly.
No signal or weak
signal.
You did not exit
antenna pointing
mode.
If the SIM PIN is blocked, contact
your Service Provider to obtain the
PUK (PIN Unlock Key) code. Enter
the PUK when prompted.
Make sure no obstruction is blocking
the GPS antenna and that the
Modem has a clear view of at least
3/4 of the sky. Make sure that you do
not place your hand or another object
over the main antenna radome.
Wait for 5 minutes. Switch the
Modem off and on again.
The antenna switch is automati c, i f
you have connected a GPS
antenna make sure it can see the
full sky
Enable Java applications on the
browser.
Follow the instructions in the User
Guide to correctly complete
rough pointing.
Make sure no obstruction is blocking
the satellite signal. Make sure that the
Modem has a clear view of the sky in
the direction of the satellite. Be aware
that metalized window glass may
reduce or entirely block the signal.
Check that the antenna is pointed
using the correct compass direction
and antenna angle from the wMMI
Pointing screen.
Click the ‘Exit Pointing’ button
from the Pointing page or press
the Connect button on the face
of the terminal.
30 ThurayaIP Satellite Modem User Guide
Page 39

Problem Possible Cause Action
No network access
or poor network
performance.
The battery will not
charge
.
The antenna may
not be pointed
properly.
The Modem
network settings
may not be
correctly
configured.
The browser may
not be correctly
configured.
Interference from
other satellite
mobile terminals.
The battery is
defective.
The battery
contacts are dirty or
damaged.
Turn ThurayaIP off and then back
on again, and attempt antenna
pointing again to improve the
signal strength. You may need to
reposition ThurayaIP, verifying that
there are no obstructions blocking
the satellite signal and that the
Modem has a clear view of the
sky in the direction of the satellite.
Refer to the network settings
supplied by your Service Provider.
If the DNS Host settings are
changed, the PC must be
rebooted.
For Netscape, go to Advanced
Preferences and select ‘Direct
connection to the Internet .’
For Microsoft Internet Explorer,
select Tools / Internet Options /
Connections / LAN Settings and
uncheck the box labelled ‘Use a
proxy server for your LAN.’
YOU MAY NEED TO RECHECK THIS
BOX UPON RETURNING TO YOUR
OTHER INTERNET CONNECTION.
If you are near another satellite
mobile terminal, switch the other
satellite mobile terminal off or
move as far away as possible to
avoid interference.
Replace the battery. After several
years of average use, a gradual
decline may be expected.
Check the battery connector
contacts. Clean them if
necessary. If the battery is
damaged, replace it.
ThurayaIP Satellite Modem User Guide 31
Page 40

Problem Possible Cause Action
Satellite Modem
stops sending data
even with good
network
connection and
sufficiently
charged battery.
The Signal Quality
meter on the
wMMI changes
from time to time.
Modem/battery is
overheated.
Normal behaviour. There are several types of
It the LCD display indicates an
over temperature condition l et the
ThurayaIP cool down before
attempting to resume operation.
channels used by the Modem,
each with different signal
strengths. Because the Signal
Quality meter measures the
channel currently in use, there
may be slight differences in what
the meter shows as channels are
changed from one type to
another.
32 ThurayaIP Satellite Modem User Guide
Page 41

Status Codes
Number and
Description
1 SIM card is not
installed. Power down,
install SIM card properly
and try again.
2 SIM card read/write
error. Power down and
try again.
Cause Solution
Absence or
incorrect
installation of the
SIM card.
Failure to read
from or write to
the SIM card.
SIM card may not be present.
Remove the battery cover and
verify that the SIM card is present.
SIM card may be inserted
incorrectly. Remove SIM card and
make sure it is inserted according to
the instructions in the User Guide.
SIM card may be damaged.
Visually insp ect the SIM card and
return it to you r Service Provider if
damaged.
SIM card contacts may be dirty.
Clean the SIM card contacts with a
dry cloth.
If problem continues, replace S IM
card with a known good SIM card. If
problem persists, return the unit to
your Service Pro vider fo r service.
Power down ThurayaIP and try
again.
SI M c a r d m a y b e damaged.
Visually insp ect the SIM card and
return it to you r Service Provider if
damaged.
SIM card contacts may be dirty.
Clean the SIM card contacts with a
dry cloth.
If the problem continues, replace
SIM card with a known good SIM
card. If the problem persists, return
the unit to your Service Provider for
service.
ThurayaIP Satellite Modem User Guide 33
Page 42

Number and
Description
3 SIM card access has
been blocked. Please
contact your Service
Provider.
4 SIM card has been
improperly changed
during an active
session. Power down
and try again.
5 SIM card is not
responding. Power
down and try again.
Cause Solution
Failure to access the
SIM card due to too
many failed
attempts with an
invalid PIN.
You replaced a
SIM card with
another after the
Modem was
turned on.
Hardware failure
to access the SIM
card.
This occurs after 3 failed
attempts to enter the PIN. The
SIM card is locked. Enter the PUK
to unlock the SIM card.
The SIM card must be replaced
when the unit is turned off.
Make sure the unit is turned off
before replacing the SIM.
Power down ThurayaIP and try
again.
SIM card may be damaged.
Visually insp ect the SIM card and
return it to you r Service Provider if
damaged.
SIM card contacts may be dirty.
Clean the SIM card contacts with a
dry cloth.
If problem continues, replace SIM
card with a known good SIM card. If
problem persists, return the unit to
your Service Pro vider fo r service.
6 A required data field
is missing from the SIM
card. Please contact
your Service Provider.
7 This subscriber is not
allowed to connect to
the network. Please
contact your Service
Provider.
Absence of a
required data
field on the SIM
card.
Network
connection
failure because
the user is not
allowed to
connect to the
Network.
SIM card was incorrectly
programmed and is missing one or
more required fields. The SIM card
must be replaced by another from
your Service Pro vider.
Your authorisation has been
removed by your Service
Provider (SIM card IMSI is not
authorised). Contact your
Service Provider to regain
service.
34 ThurayaIP Satellite Modem User Guide
Page 43

Number and
Description
8 This terminal is not
allowed to connect to
the network. Please
contact your Service
Provider.
9 This user has no
subscription, service is
not allowed. Please
contact your Service
Provider.
10 This Mobile Terminal
was detached by the
network. Cause
unknown. Power down
and try again.
11 Network connection
failure – Invalid
parameters used for
network attach
procedure. Please
contact your Service
Provider.
Cause Solution
Network
connection
failure because
the Modem is not
allowed to
connect to the
Network.
Network
connection
failure because
you are not
identified as a
subscriber to the
service.
Network
connection
broken with an
unknown cause.
Network
connection
failure due to use
of invalid
parameters.
The Modem authorisation has
been removed by your Service
Provider (Modem IMEI is not
authorised). Contact your
Service Provider to regain
authorised service.
Contact your Service Provider to
receive authorised service. Your
Service Provider should check
the subscription entries in the
Home Location Registry.
Power do wn ThurayaIP and try
again. If the problem continues,
contact your Service Provider.
Contact your Service Provider.
12 Network connection
failure - LLC or SNDCP
failure. Power down
and try again.
13 Network connection
failure – Unknown PDP
type. Please contact
your Service Provider.
Network
connection
failure caused by
LLC or SNDCP
failure.
Network
connection
failure.
Power do wn ThurayaIP and try
again. If the problem continues,
contact your Service Provider.
Power do wn ThurayaIP and try
again. If the problem continues,
contact your Service Provider.
ThurayaIP Satellite Modem User Guide 35
Page 44

Number and
Description
14 Network connection
failure - User
authorisation failed.
Please contact your
Service Provider.
15 Network connection
failure – Service option
not supported. Please
contact your Service
Provider.
16 Network connection
failure - Service option
not subscribed. Please
contact your Service
Provider.
17 Network connection
failure - N-SAPI has already
been used. Power down
and try again.
Cause Solution
Network
connection
failure because
the user is not
authorised for
service.
Network
connection
failure because
the service option
is not supported.
Network
connection
failure because
user was not
subscribed to the
service option.
Network
connection
failure because
network assigned
an N-SAPI that is
already being
used.
Contact your Service Provider to
regain authorised service. Your
Service Provider should check
the subscription entries in the
Home Location Registry.
Contact your Service Provider to
regain authorised service. The
Service Provider should check
the subscription entries in the
Home Location Registry.
Contact your Service Provider to
regain authorised service. The
Service Provider should check
the subscription entries in the
Home Location Registry.
Power do wn ThurayaIP and try
again. If the problem continues,
contact your Service Provider.
18 Network connection
failure – Regular PDP
deactivation by
network. Power down
and try again.
The connection
was deactivated
by the Network.
Power do wn ThurayaIP and try
again. If the problem continues,
contact your Service Provider.
19 Network connection
failure - SM network
failure. Power down
and try again.
Connection
failure due to the
network Session
Manager (SM).
Power do wn ThurayaIP and try
again. If the problem continues,
contact your Service Provider.
36 ThurayaIP Satellite Modem User Guide
Page 45

Number and
Description
20 Network connection
failure – Too many
failures to activate PDP
context. Power down
and try again.
21 Network connection
failure - Network
assigned an invalid IP
address. Power down
and try again.
22 Network connection
failure – No response
from network. Power
down and try again.
23 Network connection
failure – Protocol error
received from network.
Power do wn and try
again.
Cause Solution
Too many failed
attempts (4) to
connect to the
Network.
Assignment of an
invalid IP address
by the network
during
connection.
Network
connection
failure due to lack
of a response
from the network.
Network
connection
failure due to a
protocol error.
This failure may occur because
of a weak signal due to
obstructions or geographic
position (such as extreme
latitude or longitude). Contact
your Service Provider to verify
coverage for your location.
Power do wn ThurayaIP and try
again. If the problem continues,
contact your Service Provider.
The Service Provider should
verify that you have the correct
network settings.
Power do wn ThurayaIP and try
again. If the problem continues,
contact your Service Provider.
Power do wn ThurayaIP and try
again. If the problem continues,
contact your Service Provider.
24 Network connection
failure – GPRS stack
could not attach to
MUX interface. Power
down and try again.
Internal software
error.
Power do wn ThurayaIP and try
again. If the problem continues,
contact your Service Provider.
25 Network connection
failure - GPRS stack
could not detach from
MUX interface. Power
down and try again.
Internal software
error.
Power do wn ThurayaIP and try
again. If the problem continues,
contact your Service Provider.
ThurayaIP Satellite Modem User Guide 37
Page 46

Number and
Description
26 SIM card error - IMSI
field is longer than 8
bytes and is invalid.
Please contact your
Service Provider.
27 GPRS software
internal failure - GPRS
stack message
subscription failure.
Please contact your
Service Provider.
28 Terminal Equipment
has been
disconnected from the
Mobile Terminal. Please
establish the
connection
Cause Solution
SIM card may
have been
programmed
incorrectly.
Internal software
error.
The connection
between Terminal
Equipment and
Mobile Terminal
has been
removed, or
The interface
cable between
Terminal
Equipment and
Mobile Terminal is
not plugged in
properly.
SIM card was incorrectly
programmed. The SIM card
must be replaced by another
from your Service Provider.
Power do wn ThurayaIP and try
again. If the problem continues,
contact your Service Provider.
Remove and reinsert the
interface cable from both the
PC and the ThurayaIP. When
done reboot the ThurayaIP.
29 Network access
blocked – GPS fix is too
old. Power down and
try again. ThurayaIP will
attempt to reacquire
connection after
receiving a new GPS
fix.
30 Network service is
not available – Invalid
position for selected
LAI. Please power
down and contact
your Service Provider.
The GPS fix is
invalid or
ThurayaIP is
unable to obtain
the valid GPS fix.
Network
connection
failure due to
invalid position.
Verify that the Modem has an
open view of the sky to get a
GPS fix.
If the problem continues,
contact your Service Provider.
If the problem continues,
contact your Service Provider.
38 ThurayaIP Satellite Modem User Guide
Page 47

Number and
Description
101 This user was
detached by the
network. Trying to
reattach…
103 Network connection
failure – P LMN is not
allowed. Re acquirin g
connection.
104 Network
connection failure - LA
is not allowed.
Reacquiring
connection…
105 Network
connection failure –
Roaming is not
allowed. Reacquiring
connection.
Cause Solution
Connection
broken by the
Network.
Network
connection
failure due to
PLMN not
allowed.
Network
connection
failure because
ThurayaIP is in a
service not
allowed Location
Area (LA).
You are using a
SIM card from a
carrier that does
not have a
roaming
agreement with
your Service
Provider.
Power do wn ThurayaIP and try
again. If the problem continues,
contact your Service Provider.
If the problem continues,
contact your Service Provider.
If the problem continues in other
areas where service is allowed,
contact your Service Provider.
If the problem continues with an
authorised SIM card, contact
your Service Provider.
106 Network
connection failure Mobile Terminal
implicitly detached by
the network.
Reacquiring
connection…
107 Net work ser v i c e i s n o t
available – Network
resources not available.
Reacquirin g
connection…
Network
connection
failure because
Modem was
implicitly
detached by the
Network.
Network service
not available due
to lack of network
resources.
If the problem continues,
contact your Service Provider.
If the problem continues,
contact your Service Provider.
ThurayaIP Satellite Modem User Guide 39
Page 48

Number and
Description
108 Network service is
not available.
Reacquiring
connection…
109 Net work ser v i c e i s n o t
available – No network.
Reacquirin g
connection…
110 Net work ser v i c e i s n o t
available - Cell access
barred. Reacq uiring
connection…
111 Network service is
not available – Limited
network service.
Reacquiring
connection…
112 Network service is
not available - Invalid
position. Reacquiring
connection…
Cause Solution
Network service
not available.
Network service
not available.
Network service
not available
because cell
access is barred.
Network service
not available due
to limited service.
Network service
not available
because the GPS
position is not
valid.
If the problem continues,
contact your Service Provider.
If the problem continues,
contact your Service Provider.
If the problem continues,
contact your Service Provider.
If the problem continues,
contact your Service Provider.
You should verify that the
Modem has an open view of
the sky to get a GPS fix. If the
problem continues, contact
your Service Provider.
113 Network service is
not available – Invalid
position for the
selected Service
Provider. Reacquiring
connection…
Network
connection
failure because
the of an invalid
GPS position.
Verify that the Modem has an
open view of the sky to get a
GPS fix. If the problem
continues, contact your Service
Provider.
114 Network service is
not available - Invalid
position for selected
RAI. Reacquiring
connection…
The GPS fix does
not match the
selected Routing
Area Information
(RAI).
You should verify that the
terminal has an open view of
the sky to get a current GPS fix.
If the problem continues,
contact your Service Provider.
40 ThurayaIP Satellite Modem User Guide
Page 49

Number and
Description
115 Network service is
not available –
Unknown cause.
Reacquiring
connection…
116 Network
connection failure Insufficient resources.
Reacquiring
connection…
117 Network
connection failure –
PDP rejected for
unspecified reason.
Reacquiring
connection…
118 Network
connection failure Service option
temporarily out of
order. Reacquiring
connection…
Cause Solution
Network service
not available –
cause unknown.
Network
connection
failure due to
insufficient
resources.
Network
connection
failure – unknown
cause.
Network
connection
failure because
service option is
temporarily out of
order.
If the problem continues,
contact your Service Provider.
If the problem continues,
contact your Service Provider.
Network may be down.
If the problem continues,
contact your Service Provider.
Network may be down.
If the problem continues,
contact your Service Provider.
Network may be down.
119 Network
connection failure PDP deactivated by
network. Reacquiring
connection…
120 No network
connection - User
initiated PDP
deactivation.
Network
connection
failure.
The Modem was
powered down
while connected
to the network.
If the problem continues,
contact your Service Provider.
Network may be down.
You will generally not see this
code. In order for you to
deactivate the PDP, you must
power down the terminal. If the
problem continues, contact
your Service Provider.
ThurayaIP Satellite Modem User Guide 41
Page 50

Number and
Description
121 Network
connection failure Missing or invalid APN.
Please provide correct
information and try
again.
122 Network
connection failure Rejected by GGSN.
Please re-enter User
ID/Password and try
again.
123 Network
connection failure Requested QoS
rejected by network.
Please modify
parameters and try
again.
Cause Solution
Network
connection
failure because
the APN is missing
or invalid.
Network
connection
failure due to
rejection by the
GGSN.
Network
connection
failure because
the requested
QoS was rejected
by the Network.
Contact your Service Provider to
get the correct network settings.
Verify that your Service Provider
User ID and password are
correctly set on the Network
Settings screen. If they are
correct and the problem
continues, contact your Service
Provider.
Modify the QoS settings and try
again. If the problem continues,
set all QoS settings to the
default values and try again. If
the problem continues with the
default values, contact your
Service Provider.
124 Network
connection failure Invalid transaction id.
Reacquiring
connection…
125 Network
connection failure –
Unknown Session
Manager error.
Reacquiring
connection…
126 Network access
blocked - ThurayaIP will
attempt to reacquire
connection.
Network
connection
failure due to
invalid
transaction ID.
Network
connection
failure due to
unknown session
manager error.
Network
connection
failure because
network access is
blocked.
If the problem continues,
contact your Service Provider.
If the problem continues,
contact your Service Provider.
Network access is blocked. The
network will send the Modem a
timer value, and the Mo d em will
attempt to connect again
when the timer is complete. If
the problem continues, contact
your Service Provider.
42 ThurayaIP Satellite Modem User Guide
Page 51

Number and
Description
127 Network access
blocked – Radio priority
is less than threshold.
ThurayaIP will attempt
to reacquire
connection.
128 GPS fix is too old.
Modem will attempt to
reacquire connection
after receiving a new
GPS fix.
129 Network access
blocked - GPS location
may be too old. If
condition does not
clear, please obtain a
new GPS location.
Cause Solution
Network access is
blocked due to
the user’s priority.
Notification of a
GPS fix during or
after Network
connection
procedure.
GPS fix may be
too old.
You are blocked from Network
access due to your network
priority. If the problem
continues, contact your Service
Provider.
A new GPS fix was obtained
during the connection process,
superseding the old fix. The
Modem will reacquire the
connection. If the problem
continues and a new
connection cannot be made,
contact your Service Provider.
Verify that the Modem has an
open view of the sky to get a
GPS fix. If the problem
continues, contact your Service
Provider.
130 Network access
unavailable - GPS
location needs
updating.
131 Battery
temperature too high.
GPS fix is too old. The ThurayaIP terminal will
acquire a new GPS location
and connection. Do not power
off the terminal.
The battery is too
hot.
Allow the terminal to cool down.
132 Terminal
temperature too high.
The terminal is too
hot.
Allow the terminal to cool down.
133 An externalantenna is
recommended to
achieve the requested
data-rates.
The 384kbps
streaming data
rate requires an
external antenna.
Attach an approved high gain
external antenna to the terminal
to obtain the highest streaming
rate.
ThurayaIP Satellite Modem User Guide 43
Page 52

Glossary
APN: Access Point Name. APNs can be assigned to each external
network interface to allow communications among multiple Internet
Service Providers (ISPs). If use of multiple ISPs is required in your
network, on ThurayaIP wMMI Network Settings screen you can
enable APN and enter the value supplied by your Service Provider.
DHCP: Dynamic Host Configuration Protocol. DHCP is a communications
protocol that lets network administrators manage centrally and
automate the assignment of IP addresses in an organization's
network. With use of the Internet Protocol, each machine that can
connect to the Internet needs a unique IP address. You must make
sure that the Windows network settings on your PC are set to allow
the network to choose IP settings automatically.
DNS: Domain Name Service, a static, hierarchic al name service for
TCP/IP hosts. The network administrator configures the DNS with a list
of host names and IP addresses, allowing users of workstations
configured to query the DNS to specify remote systems by host
names rather than IP addresses. On ThurayaIP wMMI Network
Settings screen, a primary and possibly a secondary DNS address
supplied by your Service Provider must be assigned.
Ethernet: Ethernet is a local area networking method used widely
throughout the computer industry. It is the only communication
interface supported by ThurayaIP.
GGSN: Gateway GPRS Support Node.
GPRS: General Packet Radio System.
GPS: Global Positioning System. When the GPS receiver in ThurayaIP gets
a bearing on a GPS satellite, the receiver computes and stores the
Modem’s location on earth. That location is used in the Pointing
Process to obtain your location relative to the Thuraya Satellite.
LAI: Location Area Identity.
Normal Operational Mode: In this mode, ThurayaIP is connected to your
network, allowing you to perform standard system activities such as
Internet browsing. The other mode of Modem operation is Pointing
Mode.
N-SAPI: Network Service Access Point Identifier.
44 ThurayaIP Satellite Modem User Guide
Page 53

MUX: Multiplexer.
PDP: Packet Data Protocol.
Pointing Mode: In this mode, using ThurayaIP Protractor and Compass,
and referencing the Pointing Screen for indications of signal
strength, you manipulate the Modem ante nna to get the optimum
Thuraya Satellite signal strength for your network connection.
Pointing is required during Modem set-up or if the Modem has been
moved from its previous location. Once you have obtained the best
antenna position, you can enter Normal Operational Mode and be
ready to perform standard activities.
Protractor: An instrument that measures angles, ThurayaIP protractor
provides the current angle of the antenna so that you can adjust it
to the antenna angle specified on the Pointing Screen.
QoS: Quality of Service.
SIM: Subscriber Identification Module. Your Service Provider issues you a
SIM, containing your SIM Personal Identification Number (PIN) and
other security-related information. You insert the SIM into ThurayaIP
SIM holder as part of Modem hardware setup. If you configure the
Modem to enable SIM PIN secu rity, each time you invoke the
Modem wMMI after turning on the Modem, PIN authorisation is
required in order to use the system.
SIM PIN: A Subscriber Identification Module (SIM) Personal Identification
Number (PIN) may be supplied by your Service Provider. If SIM PIN
entry is enabled on ThurayaIP wMMI Security Management screen, a
prompt requests you to enter the SIM PIN each time you run the
wMMI. This helps prevent unauthorised use of your SIM.
SNDCP: Sub-network Dependent Convergence Protocol.
Static IP Address: A static Internet Protocol (IP) address is a number that
is assigned to a computer by an Internet Service Provider (ISP) to be
its permanent address on the Internet. Computers use IP addresses
to locate and talk to each other on the Internet. If Static IP
addressing is enabled on ThurayaIP wMMI Network Settings screen,
you must enter an IP address supplied by your Service Provider in the
Static Public Network IP Address field that follows.
Status Code: A number which uniquely references an event or condition
in a hardware or software system. In ThurayaIP, if there is a fault
detected, the status code and a description are displayed at the
bottom of the Modem wMMI Home and Status screens.
ThurayaIP Satellite Modem User Guide 45
Page 54

Index
address ...............14, 22, 40, 48, 49
Administrative Access .............. 23
antenna ... ii, iv, v, 6, 7, 11, 12, 16,
18, 20, 27, 28, 29, 33, 34, 47, 49
APN ........................... 21, 22, 45, 48
ARQ ............................................. 19
audio pointing indicator .......... 13
backlighting ............................... 28
battery .. iii, 3, 9, 12, 13, 14, 20, 21,
31, 32, 35, 36, 46
battery door ............................ iii, 3
browser .. 2, 5, 8, 14, 30, 32, 33, 34
browser URL address .................. 5
compass ..................... 5, 16, 32, 33
Connect button .............. 9, 13, 34
connection profiles .................. 16
data usage .......................... 17, 18
DNS............................ 21, 22, 34, 48
drivers ........................................... 2
elevation angle ........................... 6
Ethernet .................... 1, 2, 4, 30, 48
external power .................... 13, 21
fault codes ................................. 31
Fixed Rate ............................ 15, 19
GPS .... 2, 3, 4, 5, 7, 8, 9, 10, 13, 16,
28, 29, 33, 41, 43, 44, 46, 48
hearing aids ................................ iv
IMEI ........................................ 17, 38
IMMI .................. 8, 9, 10, 12, 13, 14
Java ...................................... 14, 33
LCD .............. iii, 8, 9, 10, 12, 28, 35
login ............................................ 24
MAC ............................ 2, 17, 25, 27
Menu button.................... 9, 10, 12
Modify button ............ 9, 10, 11, 12
Multimedia ........................... 16, 19
pacemakers ............................... iv
password ....................... 23, 24, 45
PIN .................... 5, 9, 23, 33, 37, 49
pointing . 6, 8, 9, 10, 12, 16, 20, 27,
28, 29, 33, 34
Power button .............. 3, 9, 11, 12
Private Satellite Modem IP
Address ................................... 17
proxy server ..................... 2, 32, 34
Public Network IP Address 17, 22,
50
QoS ......... 10, 11, 12, 18, 19, 45, 49
Quality of Service ......... 10, 18, 49
region .......................................... 25
Restore Factory Defaults .... 16, 17
RSSI .............................................. 12
safety ......................................... i, iii
satellite .. ii, 1, 3, 6, 7, 8, 12, 13, 14,
16, 19, 20, 29, 30, 33, 34, 48
security code ............ 9, 17, 23, 24
Signal Quality ....................... 20, 35
Signal Strength .......... 6, 20, 29, 33
SIM ... ii, 1, 2, 3, 5, 9, 17, 23, 31, 32,
33, 36, 37, 41, 42, 49
Software Version ....................... 1 7
SSID ........................................ 25, 26
temperature........... ii, iii, 35, 46, 47
timeout ................................. 24, 25
upgrade ........................ 16, 29, 30
USB .................................. 1, 2, 4, 30
video ..................................... 16, 19
voice ........................................... 19
WEP........................................ 25, 26
WiFi ............................................ 1, 9
wireless LAN ............................ 4, 13
WLAN ....... vi, vii, 13, 14, 24, 25, 26
wMMI vi, 5, 6, 9, 14, 22, 29, 30, 31,
32, 33, 35, 48, 49, 50
46 ThurayaIP Satellite Modem User Guide
 Loading...