

Page 1
Page 2

User Manual
Satellite IP Modem
Revision K
Page 3

Copyright 2005 Hughes Network Systems, LLC
All rights reserved. This publication and its contents are proprietary to Hughes Network Systems LL C. No part
of this publication may be reproduced in any form or by any means without the written permission of
Hughes Network Systems, LLC, 11717 Exploration Lane, Germantown, Maryland 20876.
Hughes Network Systems, LLC has made every effort to ensure the correctness and completeness of the
material in this document. Hughes Network Systems, LLC shall not be liable for errors contained herei n. The
information in this document is subject to change without notice. Hughes Network Systems, LLC makes no
warranty of any kind with regard to this material, includi ng, but not limited to, the implied warranties of
merchantability and fitness for a particular purpo se.
Trademarks
All trademarks, marks, names, or product names referenced in this publication are the property of their
respective owners, and Hughes Network Systems, LLC neither endorses nor otherwise sponsors any such
products or services referred to herein.
HUGHES and Hughes Network Systems are trademarks of Hughes Network Systems LLC . Bluetooth is a
trademark owned by Bluetooth SIG, Inc. and is used by Hughes Network Systems under license.
INMARSAT is a trademark of the International Mobile Satellite Organisation. The Inmarsat LOGO and th e
trademark BGAN are trademarks of Inmarsat (IP ) Company Limited. All trademarks are licensed to
Inmarsat Limited.
Page 4

Page 5
S
AFETY INFORMATION
For your safety and protection, read this entire user manual before you attempt to use the
Regional BGAN Satellite IP Modem. In particular, read this safety section carefully. Keep this
safety information where you can refer to it if necessary.
W
ARNING SYMBOLS USED IN THIS MANUAL
This section introduces the various types of warnings used in this document to alert you to
possible safety hazards.
WARNING
Potential radio Frequency (RF) hazard. Where you see this alert symbol and
WARNING heading, strictly follow the warning instructions to avoid injury to eyes
or other personal injury.
WARNING
Where you see this alert symbol and WARNING heading, strictly follow the
warning instructions to avoid personal injury.
DANGER
Electric shock hazard: Where you see this alert symbol and DANGER headin g,
strictly follow the warning instructions to avoid electric shock injury or death.
W
ARNINGS FOR THE SATELLITE IP MODEM
Do not stand in front of the Antenna.
This device emits radio frequency energy when in the transmit mode. To avoid injury,
do not place head or other body parts in front of the satellite antenna when system
is operational. Maintain a distance of one meter away from the front of the Satellite
IP Modem’s antenna.
Properly ground the Antenna
Failure to properly ground the optional external antenna may result in severe
personal injury or death. Do not attempt to ground the optional external antenna
unless you have the skills to do so in accordance with local electrical codes.
Do not operate during Electrical Storms
Operation of the Satellite IP Modem during electrical storms may result in severe
personal injury or death. Disconnect the Satellite IP Modem from computer and store
unit indoors if lightning is anticipated in the area of operation.
R-BGAN Satellite IP Modem User Manual i
Page 6

General
Handle your Satellite IP Modem with care. The enclosure is weather resistant per IEC
60529 IP44; however do not submerge the unit or expose it to severe rain storms.
Avoid exposing your Satellite IP Modem to extreme hot or cold temperatures. The
operating temperature range of the Satellite IP Modem is -10ºC to +55ºC.
Avoid placing your Satellite IP Modem close to cigarettes, open flames or any source
of heat.
Changes or m o dificatio ns to the Satellite IP Modem not expressly approved by
Hughes Network Systems could void your authority to operate this equipment.
Only use a soft damp cloth to clean your Satellite IP Modem.
To avoid impaired Modem performance, please ensure your Satellite IP Modem’s
antenna is not damaged or covered with foreign material like paint or labelling.
When inserting the SIM, do not bend the SIM or damage the contacts in any way.
When connecting the interface cables, do not use excessive force.
In the vicinity of blasting work and in explosive environments
Never use the Satellite IP Modem where blasting work is in progress. Observe all
restrictions and follow any regulations or rules. Areas with a potentially explosive
environment are often, but not always, clearly marked. Do not use the Satellite IP
Modem while at a petrol filling station. Do not use near fuel or chemicals.
Qualified service
Do not attempt to disassemble your Satellite IP Modem. The Satellite IP Modem does
not contain consumer serviceable components. Only qualified service personnel
may install or repair equipment.
Batteries and accessories
Use approved batteries (HNS P/N 3003082-0001) and accessories only. Use of nonapproved accessories may result in loss of performance, damage to the Satellite IP
Modem, fire, electric shock or injury.
AC Mains power adapter (FRIWO Model SDA5012) is for indoor use only. It has an
indoor operating temperature range of -10ºC to +55ºC and provides an output
voltage of 12 VDC.
The storage capability of the battery decreases when operated
below -10ºC. If the battery is charged at too high a temperature, the battery light
will flash red.
Connecting devices
Never connect incompatible products. When connecting the Satellite IP Modem to
any other device, read the device’s User Manual for detailed safety instructions.
Pacemakers
The various brands and models of cardiac pacemakers available exhibit a wide
range of immunity levels to radio signals. Therefore, people who wear a cardiac
R-BGAN Satellite IP Modem User Manual
ii
Page 7
pacemaker and who want to use a Satellite IP Modem should seek the advice of
their cardiologist. If, as a pacemaker user, you are still concerned about interaction
with the Satellite IP Modem, we suggest you follow these guidelin es:
Maintain a distance of 15 cm between the Satellite IP Modem and your pacemaker;
Maintain a distance of one meter away from the front of the Satellite IP Modem’s
antenna;
Refer to your pacemaker product literature for information on your particular device.
If you have any reason to suspect that interference is taking place, turn off your
Satellite IP Modem immediately!
Hearing aids
Most new models of hearing aids are immune to radio frequency interference from
Satellite IP Modems that are more than 2 metres away. Many types of older hearing
aids may be susceptible to interference, making it very difficult to use them near a
Satellite IP Modem. Should interference be experienced, maintain additional
separation between you and the Satellite IP Modem.
R-BGAN Satellite IP Modem User Manual
iii
Page 8

T
ABLE OF CONTENTS
SAFETY INFORMATION...............................................................................................................................I
W
ARNING SYMBOLS USED IN THIS MANUAL
W
ARNINGS FOR THE SATELLITE IP MODEM
TABLE OF CONTENTS............................................................................................................................... IV
INTRODUCTION.........................................................................................................................................1
C
OVERAGE
FIRST TIME SET-UP ......................................................................................................................................3
U
NPACKING
M
INIMUM SYSTEM REQUIREMENTS AND SOFTWARE INSTALLATION
Satellite IP Modem Software Installation...........................................................................................5
L
AUNCH PAD -- QUICKSTART WIZARD
QuickStart Wizard Overview...............................................................................................................6
Step 1: Unpack the Satellite IP Modem ............................................................................................7
Step 2: Unpack the Satellite IP Modem – Power..............................................................................7
Step 3: Conn e cting the Satellite IP Modem to you r PC..................................................................8
Step 4: Connecting Using USB............................................................................................................8
Step 4: Connecting Using Ethernet ...................................................................................................9
Step 4: Connecting Using Bluetooth .................................................................................................9
Step 5: GPS Location.........................................................................................................................10
Step 6: Change the Modem Antenna Switch...............................................................................10
Step 7: Rough Pointing to Satellite...................................................................................................11
Step 8: Fine Pointing to the Satellite................................................................................................15
Step 9: Exiting Pointing Mode...........................................................................................................17
.....................................................................................................................................................1
....................................................................................................................................................3
..........................................................................................................
............................................................................................................
..........................................................................4
...............................................................................................................6
I
I
QUICK REFERENCE..................................................................................................................................18
G
LOBAL POSITIONING SYSTEM OPERATION
Stored GPS Location .........................................................................................................................18
A
NTENNA POINTING
C
ONTROLS AND INDICATORS
Power Button......................................................................................................................................20
Power Light.........................................................................................................................................20
Select Button......................................................................................................................................21
Interface Lights ..................................................................................................................................21
Battery Light........................................................................................................................................21
Satellite IP Modem Antenna Protractor..........................................................................................22
Compass.............................................................................................................................................22
L
AUNCH PAD
View QuickStart Wizard.....................................................................................................................23
Launch Control Pad..........................................................................................................................23
Upgrade Satellite IP Modem............................................................................................................23
Upgrade System Information ...........................................................................................................23
View Documentation........................................................................................................................23
Exit........................................................................................................................................................23
C
ONTROL PAD
.......................................................................................................................................19
..........................................................................................................................20
................................................................................................................................................23
..............................................................................................................................................25
......................................................................................................18
R-BGAN Satellite IP Modem User Manual
iv
Page 9

Pointing...............................................................................................................................................25
Security Management......................................................................................................................26
Home...................................................................................................................................................27
Status Window....................................................................................................................................28
Network Settings................................................................................................................................31
Change Service Provider Login Information..................................................................................32
Advanced Settings............................................................................................................................32
User Options .......................................................................................................................................34
Bluetooth ............................................................................................................................................34
Bluetooth Passkey..............................................................................................................................35
Properties............................................................................................................................................36
Restore Factory Defaults...................................................................................................................36
U
PGRADE SATELLITE IP MODEM
Upgrading Software..........................................................................................................................36
No Local Copy Present.....................................................................................................................37
Local Copy Present...........................................................................................................................37
Upgrading Software Using a Macintosh.........................................................................................37
Lease User Group (LUG) Operation ................................................................................................39
Upgrade System Information ...........................................................................................................40
......................................................................................................................36
TROUBLESHOOTING ................................................................................................................................42
G
ENERAL TROUBLESHOOTING
F
AULT CODES
GLOSSARY...............................................................................................................................................54
................................................................................................................................................46
.........................................................................................................................42
R-BGAN Satellite IP Modem User Manual v
Page 10

Page 11

I
NTRODUCTION
Your Inmarsat Regional BGAN Satellite IP Modem provides portable, high-speed data
communications via satellite. Using “Always On” technology you can remain connected to the
Internet while only sending or receiving the data that you need at speeds of up to 144kbits/s, just
as if you were sitting at your office desk. The Satel lite IP Modem works with your computer using
one of three common networking connections: Universal Serial Bus (USB), Ethernet or Bluetooth™
wireless technology. While the Satellite IP Modem is very similar to other wireless data modems
that you may be familiar with, there are a few important operating differences to note. Please
read this user manual carefully to understand all the aspects of operating your Satellite IP
Modem. For further information regarding the BGAN servic e please consult
http://www.inmarsat.com/mmi_latest
C
OVERAGE
Phase 1 Coverage Area
R-BGAN Satellite IP Modem User Manual
1
Page 12

Phase 2 Coverage Area with I4 Satellites
The coverage map shows the region where satellite coverage is possible with the two new
Inmarsat I4 satellites. Note that the actual ability to get Regional BGAN service in this coverage
area is dependent upon a variety of factors, including licensing conditions, and the figure does
not represent a guarantee of service in any particular location (contact your Service Provider for
the latest information on service coverage).
R-BGAN Satellite IP Modem User Manual
2
Page 13
FIRST TIME SET-UP
This section guides you through the process of setti ng up and configuring your Satellite IP
Modem for the first time. The steps presented should be followed in the order given. When you
are finished, your computer and Modem will bo th be set up and ready to use.
U
NPACKING
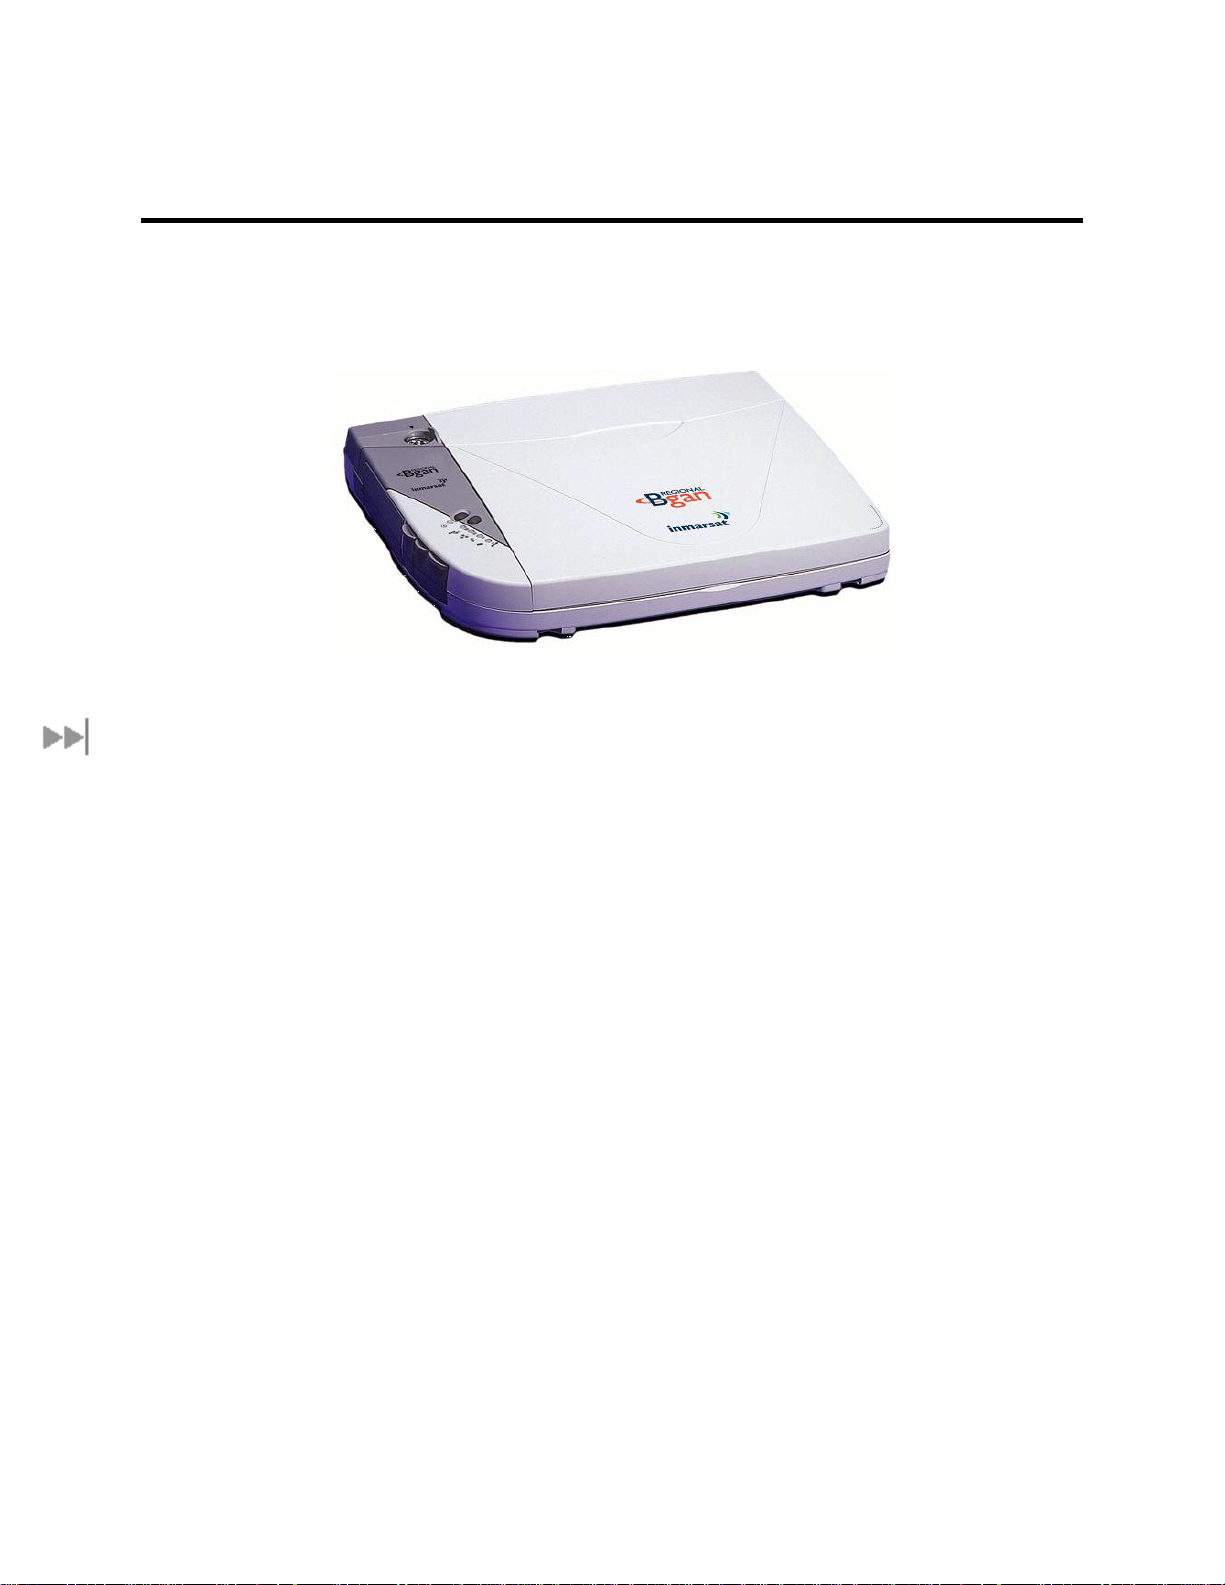
Regional BGAN Satellite IP Modem
Unpack the modem and accessory box items.
Regional BGAN Satellite IP Modem
AC Mains Power Adapter and cable (100 – 240 VAC)
Rechargeable Lithium Ion Battery pack
USB cable
Ethernet cable
Installation CD
User Manual (this document)
Tie-down Clips
Your Service Provider will supply a Subscriber Identification Module (SIM) and Modem
configuration instructions – you will need those to access the network.
R-BGAN Satellite IP Modem User Manual
3
Page 14

y
T
w
M
INIMUM SYSTEM REQUIREMENTS AND SOFTWARE INSTALLATION
; You must have a desktop or laptop Personal Computer (PC) running one of the following
supported operating systems:
Windows
Windows 98 second edition
Windows 2000
Windows ME
Windows XP
Macintosh OS X v10.1 or later
; Your PC must have a CD-ROM drive in order to run the software installation programme.
; The computer must also have one of the following supported Internet browsers. If you do not
currently have a browser, the installation process will allow you to install one (Windows only).
Microsoft Internet Explorer version 5.5 or later. Java Run tim e Environment (JRE) 1.3.1 or
later must be installed (this will be installed for you by the installation CD).
Netscape Communicator version 7.0 or later. Java must be active.
Microsoft Internet Explorer 5 for Macintosh or later.
Macintosh Safari 1.0 Beta or later.
®
NT 4.0 (service pack 3)
; Your PC must support one of the following interfaces:
Universal Serial Bus (USB)
Ethernet (RJ45)
Bluetooth™ wireless technology running the IP protocol
You must disconnect any existing LAN conn ections on your
;
Notes
;
Notes
PC before proceeding with installation. This avoids any
conflict with the network configuration that you are setting
up for the Satellite IP Modem.
You must verify that the proxy server settings in your browser
are disabled. For Microsoft Internet Explorer, select Tools /
Internet Options / Connections / LAN Settings and uncheck
the box labeled ‘Use a proxy server for your LAN’. For
Netscape, go to Advanced Preferences and select ‘Direct
connection to the Internet’. When complete ple ase clos e
our browser. DO NOT FORGET YOU MAY NEED TO RECHECK
HIS BOX ON RETURN TO YOUR OTHER INTERNET
CONNECTION.
The USB and Bluetooth interfaces are not supported with
Windows NT or Macintosh OS X.
The Bluetooth control software on your computer must allow
the direct entry of DNS information. Please consult your
Bluetooth device vendor to confirm that DNS entry is possible
ith your device.
R-BGAN Satellite IP Modem User Manual
4
Page 15

S
ATELLITE IP MODEM SOFTWARE INSTALLATION
Insert th e i n stallatio n C D into the CD- ROM drive of your PC or Macintosh computer to initiate the
software installation. If the programme does not automatically begin, use your Windows
®
Explorer utility to find setup.exe on the installation CD. Double-click that programme to start the
installation process. Follow the steps provided by the Installation Wizard. When installing the
Satellite IP Modem Software for Macintosh, a new volume will appear on your Desktop called
"Regional BGAN Satellite IP Modem", and a window will appear with installer and
documentation icons. Double-click the "Regional BGAN Satellite IP Modem" installation
package to start the installation process. Follow the steps provided by the Installer.
If you are ready to start working with your Satellite IP Modem, leave the Start the Launch Pad
option enabled. Just click on the Finish button to complete the software installation and begin
the next phase of setting up your Satellite IP Modem. If you wish to defer this activity until later,
uncheck this option and click on the Finish button. You will find a Satellite IP Modem icon on your
Windows desktop that allows you to start the next phase of set-up whenever you are ready.
If you are using a Macintosh, the Launch Pad will be automatically launched after installation is
complete. You will also find an alias to the Satellite IP Modem Launch Pad application on your
desktop.
R-BGAN Satellite IP Modem User Manual
5
Page 16
L
AUNCH PAD -- QUICKSTART WIZARD
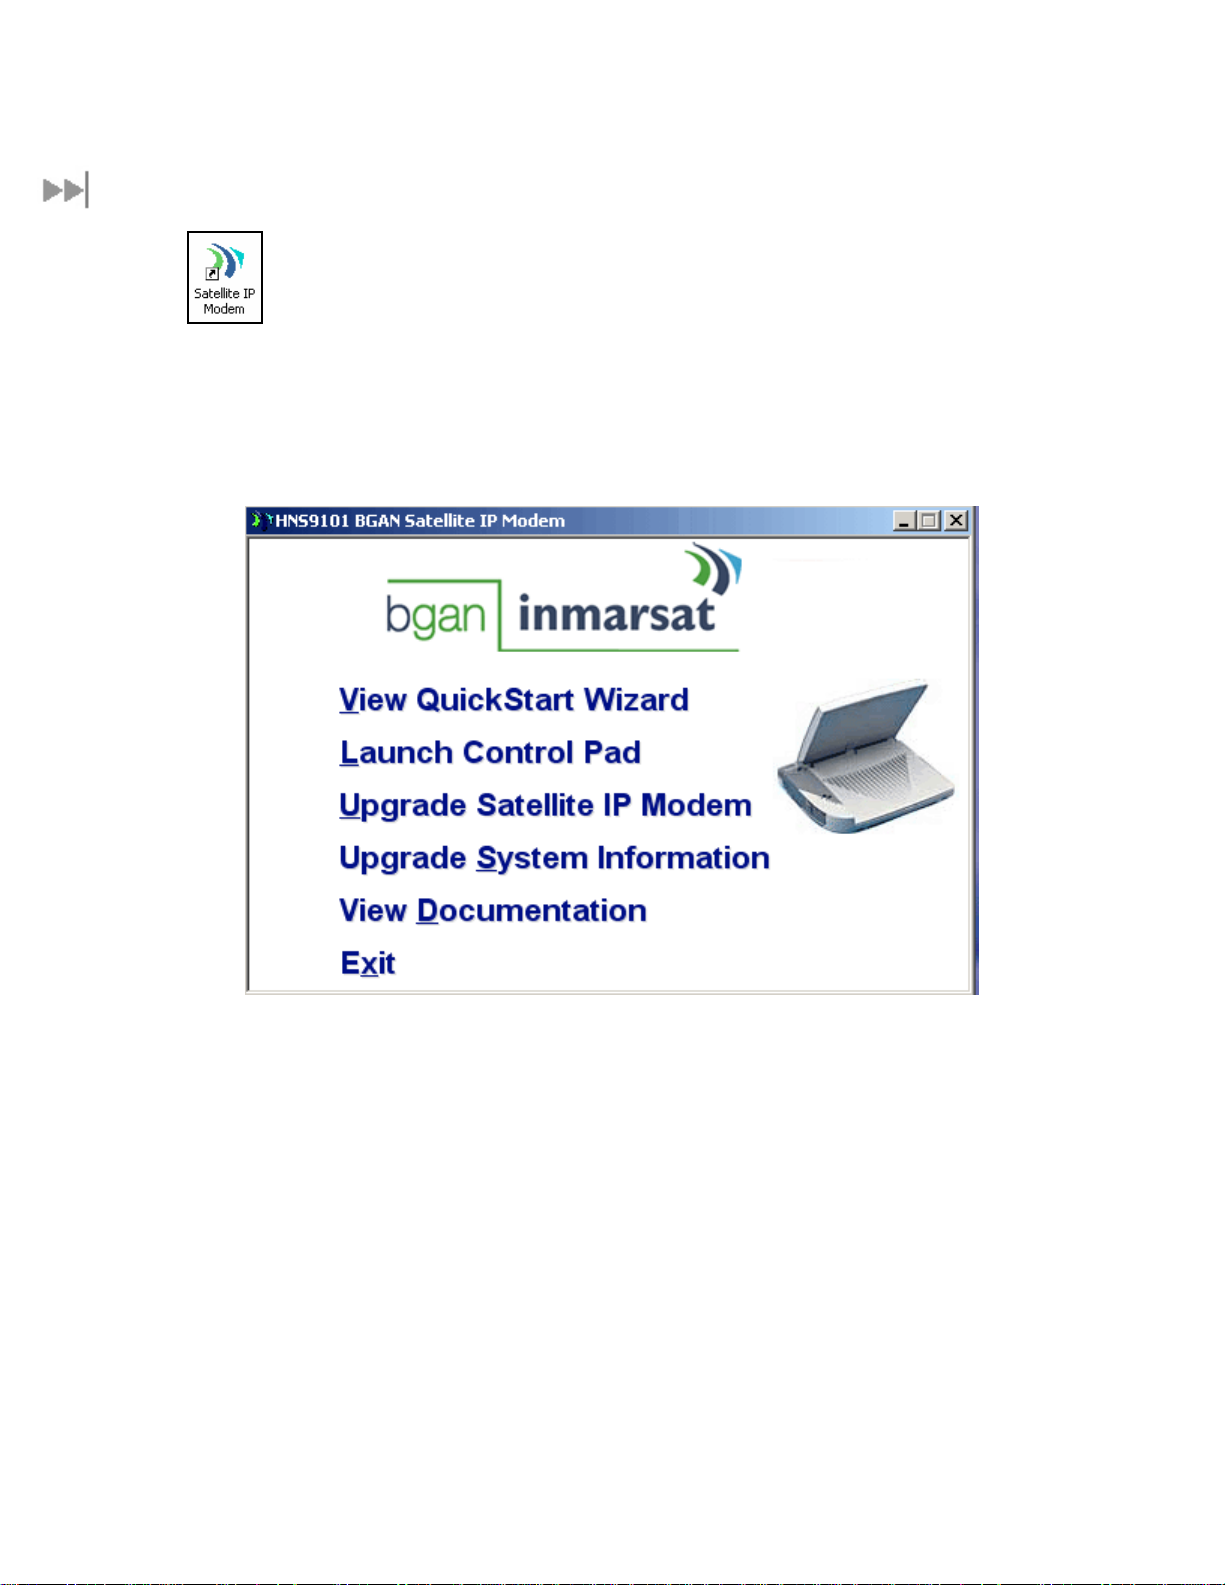
The Satellite IP Modem Launch Pad menu is
displayed once you complete the installation steps
and click the Installation Wizard Finish button with
Start the Launch Pad enabled. Alternately, the
Desktop Icon
Choose View QuickStart Wizard from the Launch Pad menu. This option leads you through the
steps necessary to connect your Satellite IP Modem with the BGAN network. Note that you will
need to follow the configuration instructions supplied by your Service Provider (supplier of your
SIM) to ensure that you have the correct configuration information.
Launch Pad can be started by double-clicking on
the Satellite IP Modem desktop icon.
Launch Pad Screen
Q
UICKSTART WIZARD OVERVIEW
There are 9 basic steps to get your Modem up and running:
Step 1: Unpack the Satellite IP Modem
Step 2: Unpack the Satellite IP Modem – Power
Step 3: Connecting the Satellite IP Modem to your PC
Step 4: Connecting Using USB, Ethernet or Bluetooth
Step 5: GPS Location
Step 6: Change Modem Antenna switch
Step 7: Rough Pointing to Satellite
Step 8: Fine Pointing to the Satellite
Step 9: Exiting Pointing Mode
R-BGAN Satellite IP Modem User Manual
6
Page 17
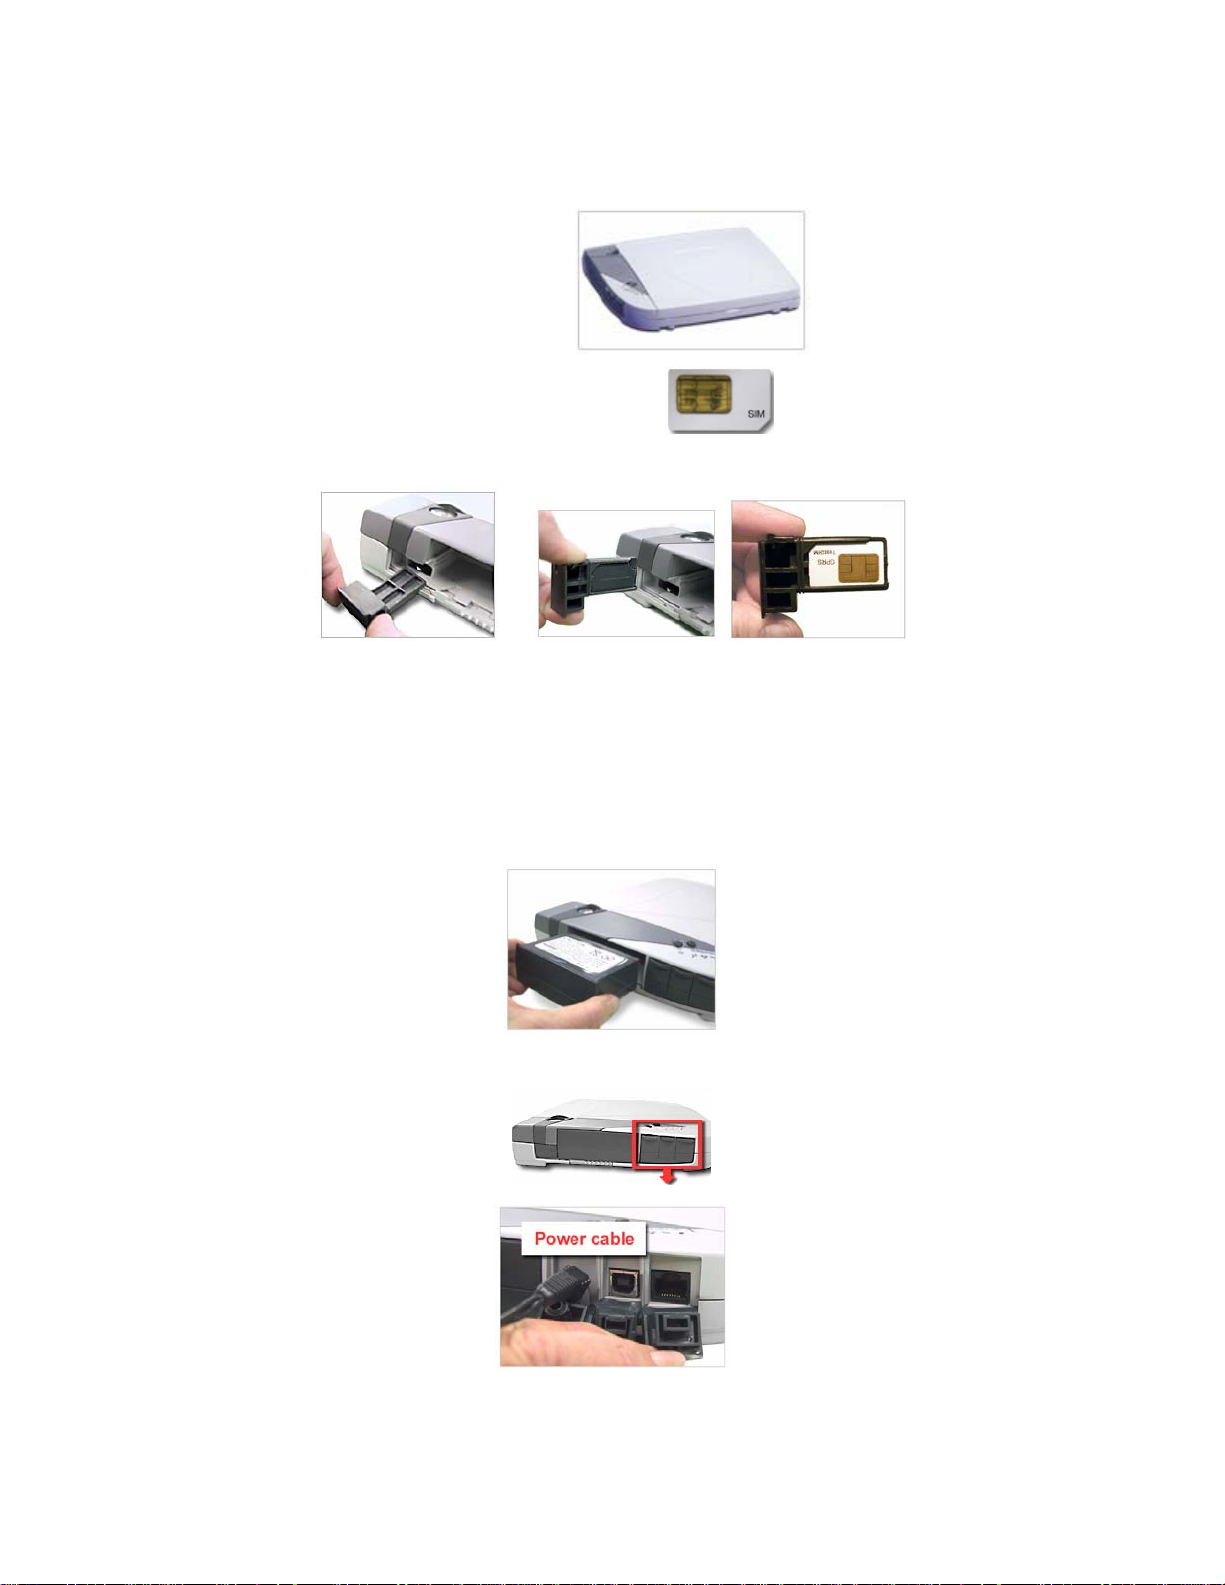
S
TEP 1: UNPACK THE SATELLITE IP MODEM
1. Unpack the modem and accessories. Battery, AC mains
power adapter, USB and Ethernet cables are included
with the modem.
2. Your service provider will have provided a SIM and
configuration instructions separately.
3. Insert SIM in SIM holder, then insert the SIM holder into the modem as
shown below.
S
TEP 2: UNPACK THE SATELLITE IP MODEM – POWER
4. Insert Battery after the SIM has been installed.
5. Plug in Power cable and charge the battery for 3 hours.
R-BGAN Satellite IP Modem User Manual
7
Page 18
S
TEP 3: CONNECTING THE SATELLITE IP MODEM TO YOUR
1. Place Satellite IP Modem outside on a flat
surface with a clear view of the sky.
2. Power up Satellite IP Modem by pressing
the Power button.
3. Choose one of the following options to
connect your PC to the Satellite IP Modem:
USB
Ethernet
Bluetooth
IMPORTANT: You must disconnect any
existing LAN connections on your PC before
proceeding with installation. You must verify
that the proxy server settings in your browser are disabled. For Microsoft Internet Explorer, select
Tools / Internet Options / Connections / LAN Settings and uncheck the box labelled 'Use a proxy
server for your LAN'. For Netscape, go to Advanced Preferences and select 'Direct connection
to the Internet'. When complete please close your browser. DO NOT FORGET YOU MAY NEED TO
RECHECK THIS BOX ON RETURN TO YOUR OTHER INTERNET CONNECTION.
PC
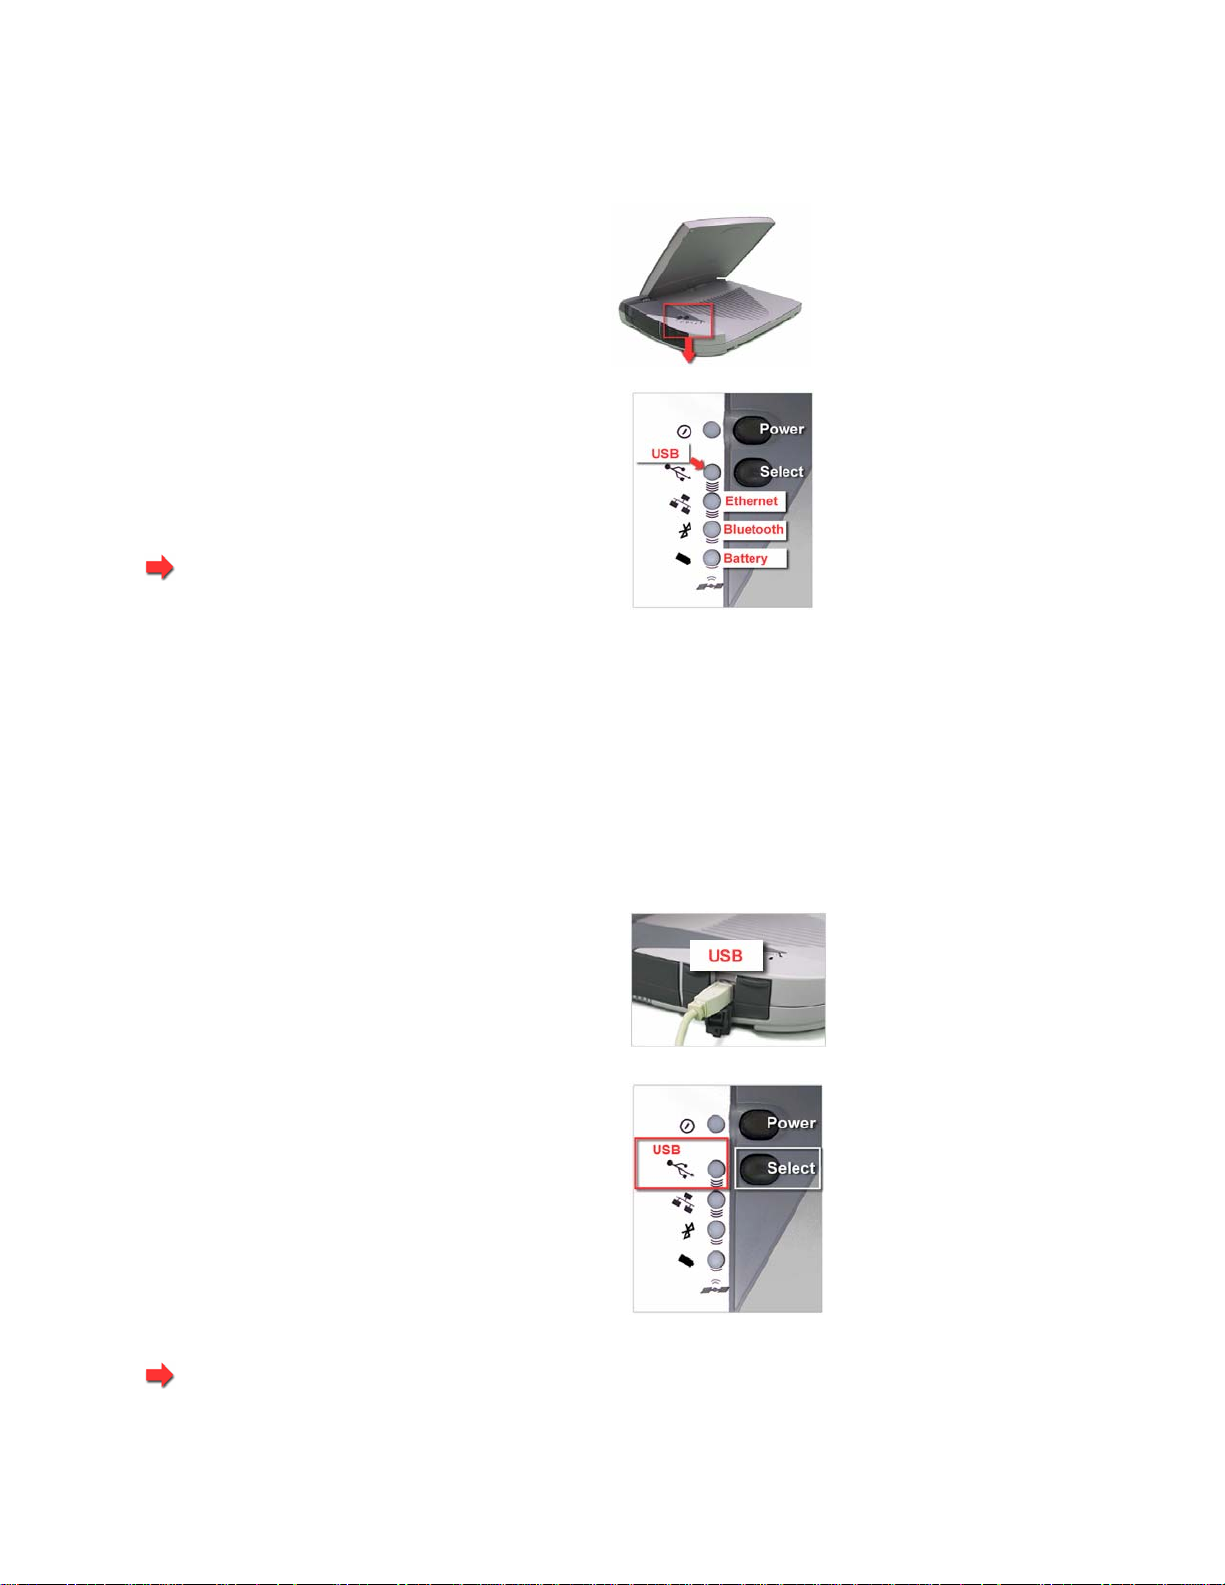
S
TEP 4: CONNECTING USING
1. Connect the white USB cable to your
computer, and insert the other end of the
connector into the Satellite IP Modem.
2. To check the active interface, press and
hold the SELECT button for a few seconds. If
the USB light flashes red then USB is already
selected. If not, press the SELECT button
once or twice as needed to change the
selection to USB. After a short pause, the
Satellite IP Modem will restart with the USB
interface selected. If the Satellite IP Modem
is under battery power it will power down; press and hold power button to reapply power.
USB
Note: When plugging in the USB cable for the first time, you will see Windows installing a new
driver for the device.
R-BGAN Satellite IP Modem User Manual
8
Page 19
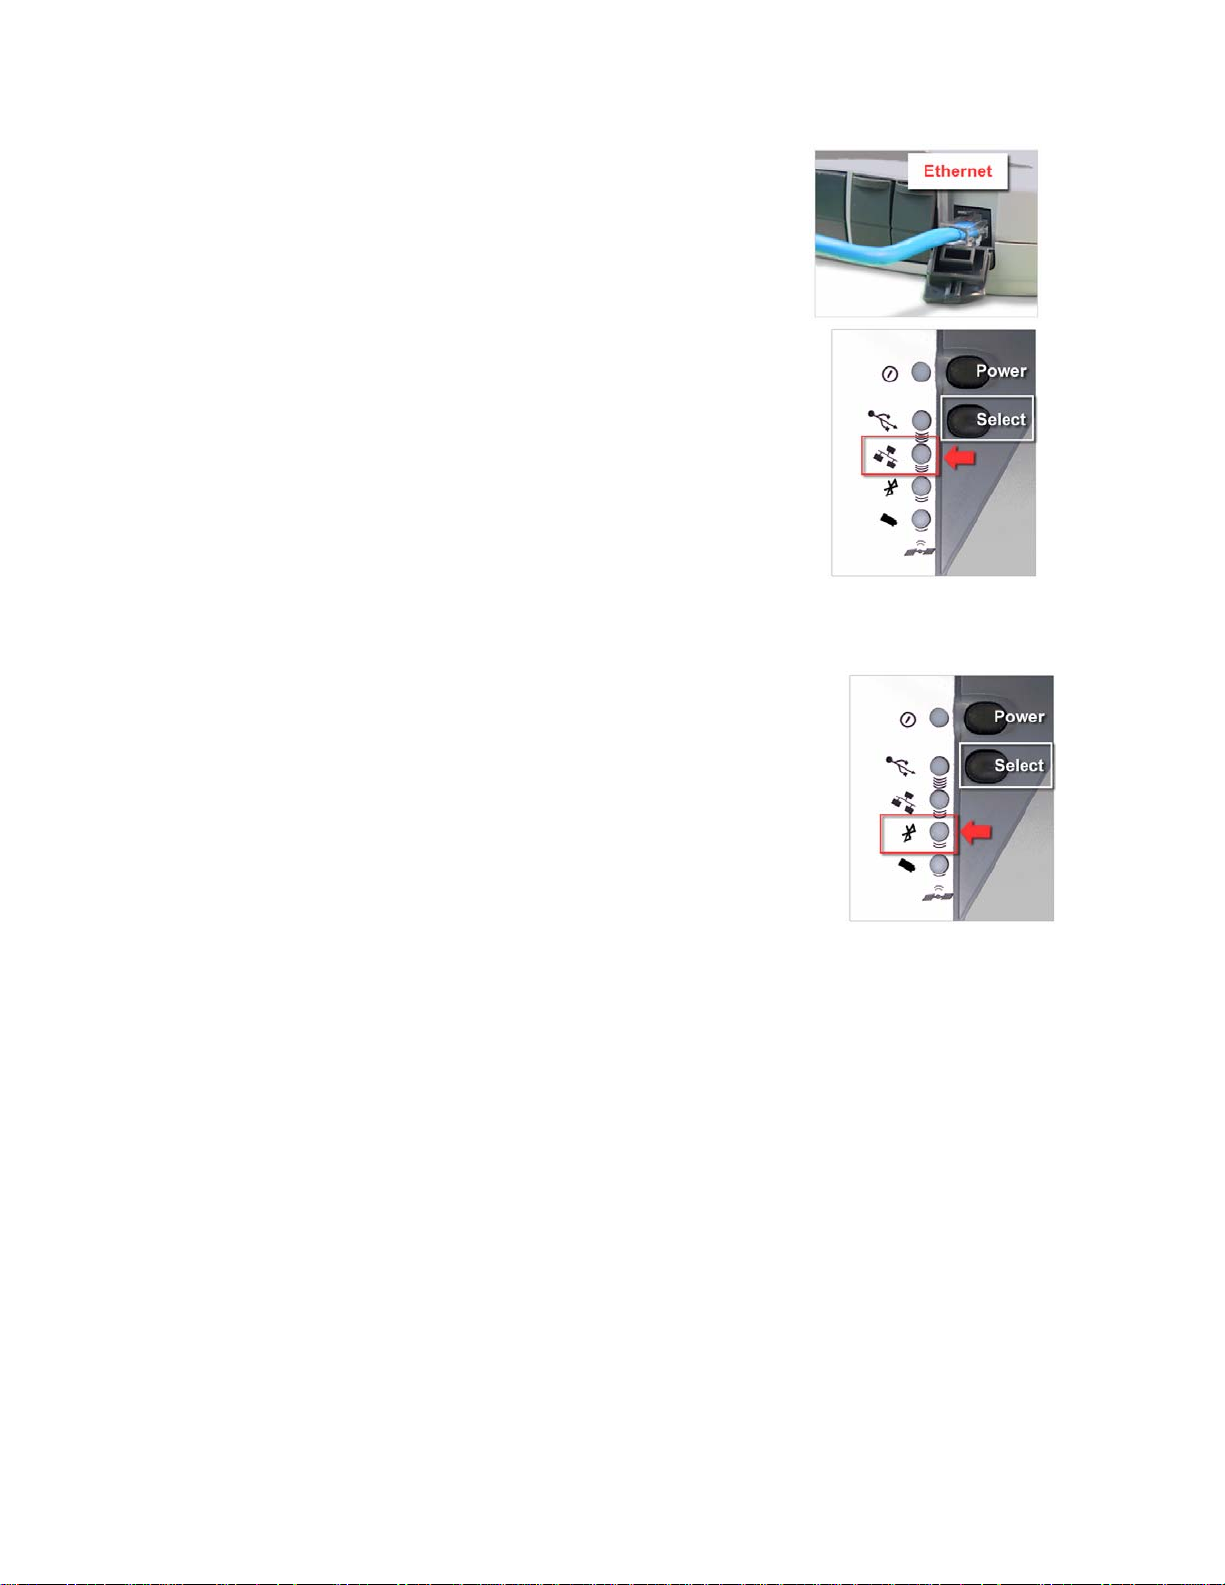
S
TEP 4: CONNECTING USING ETHERNET
1. Connect the blue Ethernet cable to yo ur laptop’s network
interface and insert the other end of the connector into the
Satellite IP Modem.
2. To check the active interface, press and hold the SELECT
button for a few seconds. If the Ethernet light flashes red then
Ethernet is already selected. If not, press the SELECT button once
or twice as needed to change the selection to Ethernet. After a
short pause, the Satellite IP Modem will restart with the Ethernet
interface selected. If the Satellite IP Modem is under battery
power it will power down; press and hold power button to
reapply power.
S
TEP 4: CONNECTING USING BLUETOOTH
1. To check the active interface, press and hold the SELECT button
for a few seconds. If the Bluetooth light flashes red then Bluetooth
is already selected. If not, press the SELECT button once or twice as
needed to change the selection to Bluetooth. After a short pause,
the Satellite IP Modem will restart with the Bluetooth interface
selected. If the Satellite IP Modem is under battery power it will
power down; press and hold power button to reapply power.
2. Place your Bluetooth enabled PC in proximity to the Satellite IP
Modem so the PC can bond to it. Use the factory def a ult
Bluetooth passkey “blue” when prompted for it by the Bluetooth
control application on your PC.
3. Enter into the Bluetooth control application the DNS values from the configuration
instructions given to you by your service provider. This must be done even if those values are
already entered into the Satellite IP Modem previously. You may need to consult with your
PC’s Bluetooth Device vendor regarding how DNS values can be entered into their Bluetooth
Control application.
R-BGAN Satellite IP Modem User Manual
9
Page 20
S
TEP 5:
GPS L
OCATION
1. The Satellite IP Modem is now attempting to locate itself using GPS. This may take up to five
minutes. It is important that the Satellite IP Modem is placed away from buildings, trees and
other obstacles that might block a clear view of the sky.
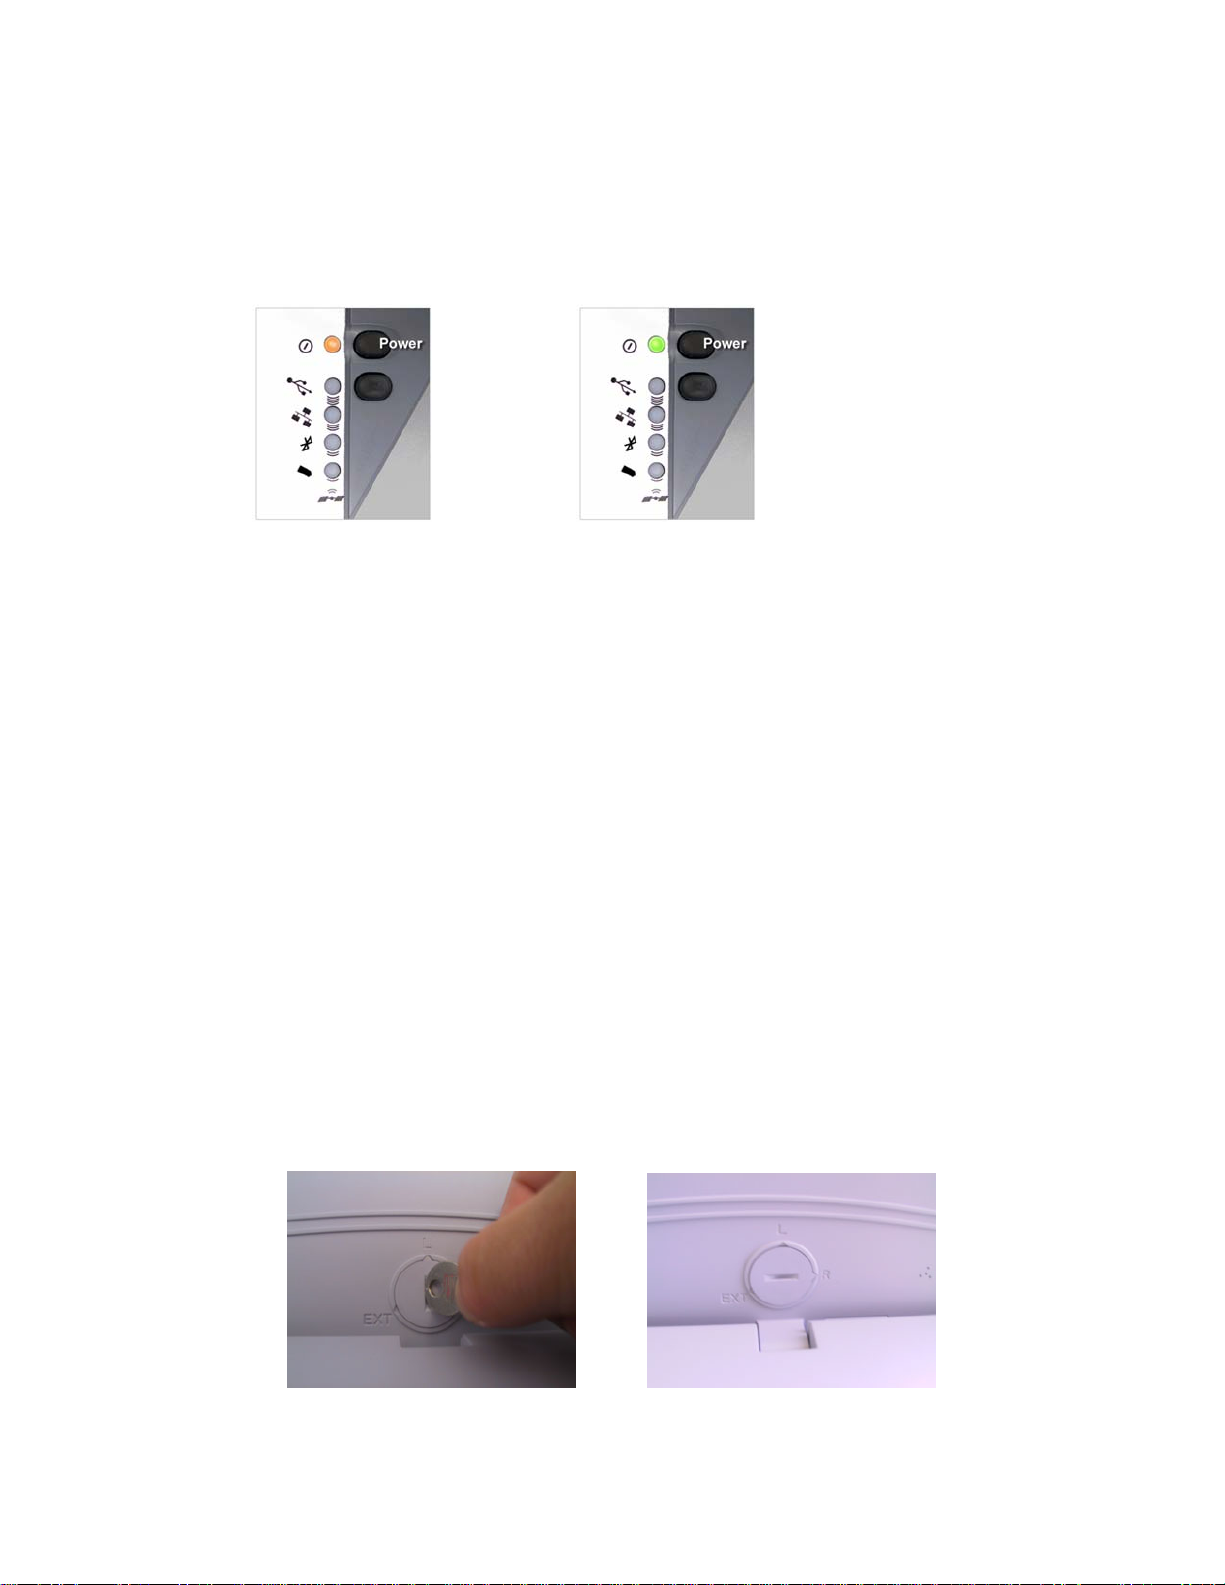
Wait – Power light alternating
red / amber
Proceed – Power light
alternating green / amber
2. When the power light changes from a red/amber flash to an amber/green flash proceed to
the next step. If the power light is solid green or flashing green, the Satellite IP modem is not in
antenna pointing mode. In this case turn the Satellite IP modem off and then back on.
S
TEP 6: CHANGE THE MODEM ANTENNA SWITCH
1. Use the following instructions to change the modem anten n a switch:
• Open the modem antenna to the full upright position.
• On the bottom center of the inside of the antenna, you will see a round slotted disk.
• Using a coin, rotate the disk:
o pointing to t h e “ R” position for normal operation
o pointing to “EXT” for the operation using an external a ntenna
Normal Position Rotated to “R” Position
R-BGAN Satellite IP Modem User Manual
10
Page 21

S
TEP 7: ROUGH POINTING TO SATELLITE
Use the following instructions to initiate the rough pointing sequence. Please obtain a current
GPS Fix before starting the rough pointing sequence. With the modem software installed, the
antenna pointing screen will show which Inmarsat 4 satellite i s in view. See satellite coverage
maps below:
Satellite Coverage Maps
R-BGAN Satellite IP Modem User Manual
11
Page 22

Note: If you are in an overlap region of the satellite’s coverage, the pointing screen will show
two satellites, two compass directions, and two antenna angles.
Antenna Pointing Screen – Satellite Overlap Region
Try pointing to the IOR satellite first and check the signal quality meter as you point the antenna
following Steps 7-8. Do not exit antenna pointing at this point in time. Next try pointing to the
AOR satellite and again check the signal quality meter as you point the antenna following Steps
7-8. Pick the satellite with the highest signal quality reading and then re-point the antenna
following Steps 7-8. Once this is complete, you can proceed to Step 9 and Exit Pointing. If the
network is not acquired after exiting pointing, reboot th e modem and try pointing to the other
satellite.
R-BGAN Satellite IP Modem User Manual
12
Page 23

R-BGAN Satellite IP Modem User Manual
13
Page 24

R-BGAN Satellite IP Modem User Manual
14
Page 25

S
TEP 8: FINE POINTING TO THE SATELLITE
Use the following instructions to fine point the antenna.
R-BGAN Satellite IP Modem User Manual
15
Page 26

R-BGAN Satellite IP Modem User Manual
16
Page 27

S
TEP 9: EXITING POINTING MODE
Use the following instructions to complete the connection of your Satellite IP Modem to the
Internet.
Your service provider may have supplied additional instructions for configuring your Satellite IP
Modem along with your SIM card. If provided, please refer to the configuration instructions and
make the required changes now. If you are unable to successfully connect to the Internet,
please see the troubleshooting section of the Regional BGAN Satellite IP Modem User Manual.
Congratulations your modem is successful ly connected.
17
R-BGAN Satellite IP Modem User Manual
Page 28

Q
UICK REFERENCE
This section serves as a reference guide, identifying the key operational aspects of using the
Regional BGAN system, the Controls and Indicators on the Satellite IP Modem and the functions
of the Launch Pad software.
G
LOBAL POSITIONING SYSTEM OPERATION
Your Satellite IP Modem contains an integrated Global Positioning System (GPS) receiver that is
used to provide location information to the Regional BGAN system. GPS location information is
required for system access and the reception of a new GPS location is attempted automatically
every time the Satellite IP Modem is powered on.
For optimum GPS signal reception, make sure the Satellite IP Modem is positioned in a roughly
horizontal placement with the lid closed. Since GPS receivers must “see” a large part of the sky
without obstructions from buildings, mountains or trees, it may be necessary to take your Satellite
IP Modem out to a clear space to obtain a new GPS location. It may be possible to obtain a
new GPS location in a less favourable circumstance, but the time to co m pletion may be longer.
Once updated, the Satellite IP Modem remembers your location so the unit can be relocated to
a more convenient working area, such as inside a building by a window facing toward the
satellite.
Once you have established a session on the Regional BGAN system you will not need another
GPS location while you remain connected in the “Always On” condition. This is convenient if you
intend to operate from one location for an extended period of time since there is no need to
move the Satellite IP Modem to refresh the GPS receiver. Also, your stored GPS location remains
good for a period of time (consult with your service provider for this information) even if you
power down and move a short distance between sessions. When you believe this is the case,
simply skip the GPS location step and complete the Regional BGAN satellite pointing operation
prior to going directly onto the network. Be sure to carefully point your unit after every time it is
moved.
S
TORED
GPS L
OCATION
The most recent GPS location is stored in the Satellite IP Modem even when powered down.
Upon power up, if this stored GPS location is available the display indicates “Using Stored
Location.” Even so, the Satellite IP Modem will attempt to update this GPS location since the
Regional BGAN system will only allow access if your GPS location is not too old. If the Satellite IP
Modem is able to update the GPS location, the statu s changes from “Stored” to “Valid.” GPS
location is shown as “Invalid” only under special circumstances when the stored information has
been erased. In any case, you may wish to attempt network access to see if service will be
granted.
R-BGAN Satellite IP Modem User Manual
18
Page 29

A
NTENNA POINTING
Establishing a new connection requires the careful orientation of the Satellite IP Modem towards
the Regional BGAN Satellite. The more precise this alignment, the faster your da ta will be able to
travel over the network. To ensure precise alignment, the pointing operation is divided into a
rough pointing operation followed by a fine pointing operation.
To assist in rough Satellite IP Modem orientation, the stored GPS location is used to obtain your
location relative to the satellite. Using this geographic location data, direction and elevation
angle information is supplied to you on your computer’s display. You can use this information in
conjunction with the Satellite IP Modem’s compass and elevation angle scale to obtain an initial
orientation towards the satellite.
Once you have done this, station yourself with your Satellite IP Modem’s “lid” (the antenna)
opened away from you (like the display screen of a laptop computer) and look out and over it
to ensure that nothing but open sky is between the Modem’s lid and the Regional BGAN
Satellite. If the view is blocked by trees, mountains, buildings or similar obj ects then you must
relocate the Satellite IP Modem. This manipulation is called the Rough
Pointing procedure.
Do not stand in front of the Antenna
The Satellite IP Modem emits radio frequency energy when in
the transmit mode. To avoid injury, do not place head or
other body parts in front of the antenna when system is
operational.
Once you have completed rough pointing, the connection can be “tuned” using the fine
pointing procedure. The tuning consists of small changes in direction (rotation of the modem)
and small changes in elevation angle (small up and down movement of the modem’s lid).
Signal meters are located on the modem and computer display; you can use either one to
maximize your signal strength. Finding the maximum for both the direction and elevation angle
settings ensures the best performance from your modem.
R-BGAN Satellite IP Modem User Manual
19
Page 30

C
ONTROLS AND INDICATORS
The figures below illustrate where the Control Buttons and Lights are located on the Satellite IP
Modem and the functions of each.
P
OWER BUTTON
The Power Button turns the Satellite IP Modem power on and off. To turn on the Regional BGAN
Satellite IP Modem, push the Power button down until the Power Light illuminates. To turn off the
Satellite IP Modem, push the Power button down until the Power Light darkens (at least two
seconds). The Modem will shut off a few seconds later.
When the Satellite IP Modem is first connected with the AC Main power, the Modem will power
on immediately. Note that when the Satellite IP Modem is attached to AC Main power, the
Modem still supports battery charging while the Modem is turned off.
P
OWER LIGHT
When the Satellite IP Modem is powered down, the Power Light is off.
Normal Operational Mode: The Power Light is green if the Modem is running on AC Mains power
and flashing green if the Modem is on battery power.
Pointing Mode: The Power Light displays as one of two “switching colour” states related to GPS
acquisition. If the Light is switching between red and amber, then the GPS location has not been
updated since power up. If the Light is switching between amber and green, then the GPS
location has been updated since power up.
In any mode, if the Power Light is flashing red, there is a fault or error in the Satellite IP Modem.
R-BGAN Satellite IP Modem User Manual
20
Page 31

S
ELECT BUTTON
The Select Button controls the selection of the interface between your computer and the
Satellite IP Modem.
All Operational Modes: Pressing and holding this button down for two seconds will display the
current selected interface and battery state. Pressing this button again changes from the active
interface to the next one, cycling through Universal Serial Bus (USB), Ethernet, and Bluetooth until
you have made the desired selection (indicated by the illumination of the selected interface
Light).
Once you have selected the new interface, the Modem will shut itself off after appro ximately
three seconds. If AC Mains is connected to the Modem, it will restart itself. If the Modem is under
battery power, you will need to restart the modem by pressing the Power Button
I
NTERFACE LIGHTS
The USB, Ethernet, and Bluetooth Lights i ndicate the state of the currently-active interface.
Normal Operational Mode: Only the Light of the selected, active interface is lit. If the Interface
Light is green, the Satellite IP Modem is properly connected to the Regional BGAN network. If the
Interface Light is amber, the appropriate interface has been selected but a connection to the
network has not yet been established. If the Interface Light is flashing red, there is a fault or error
in the Satellite IP Modem.
Pointing Mode: In this mode, all Interface Lights are lit and used as a bar graph to indicate
relative signal strength. The Lights turn from red (poor signal strength) to amber (better signal
strength) to green (best signal strength) as the antenna is manipulated to get the optimum
signal.
B
ATTERY LIGHT
The Battery Light is off when the Satellite IP Modem is powered down.
Normal Operational Mode: If the Battery Light is flashing amber, the Satellite IP Modem is
powered on and not connected to AC mains power. If the Light i s flashing green, the Modem is
connected to AC mains power and the battery is charging. If the Light is green, the Modem is
connected to AC mains power and the battery is fully charged. If the Light is flashing red, the
battery is low and is not charging.
Pointing Mode: In this mode, the Battery Light is lit along with the in terface lights to be used as a
bar graph to indicate relative signal strength. The Light turns from red (poor signal strength) to
amber (better signal strength) to green (best signal strength) as the antenna is manipulated to
get the optimum signal.
;
Note
When the Satellite IP Modem is on battery power (no AC
Mains) the Power, Interface, and Battery Lights will flash to
conserve power.
R-BGAN Satellite IP Modem User Manual
21
Page 32

S
ATELLITE IP MODEM ANTENNA PROTRACTOR
When you are positioning the antenna
during the Antenna Pointing process, the
protractor provides the current angle of the
antenna so that you can adjust it to the
Antenna Angle specified on the pointing
screen.
C
OMPASS
Reference the compass during the Antenna Pointing
process to get the correct Compass Direction needed
for the antenna. The illustration shows an example of a
South-West orientation.
;
Note
The compass can be affected when close to magnetic fields
or metallic objects.
R-BGAN Satellite IP Modem User Manual
22
Page 33

L
AUNCH PAD
The Satellite IP Modem Launch Pad menu will appear after you have completed the installation steps and clicked the Finish or Done button on the last Installation panel. Alternately the Launch Pad can be started by a double click on the Satellite IP Modem desktop icon.
V
IEW QUICKSTART WIZARD
The QuickStart Wizard is always there to guide yo u through the Satellite IP Modem setup
procedures. Should you experience problems after the initial setup or if you are required to set
up or reinitialize the Satellite IP Modem from scratch, you can again run through the steps
outlined in the Wizard to ensure correct Modem performance.
L
AUNCH CONTROL PAD
The Control Pad is used for modem administration tasks. This programme gives you the ability to
check the current Satellite IP Modem status and performance, manage Modem security,
initialize and update network parameters, and review the “properties” of your system. You can
also access the Control Pad by typing 192.168. 128.100 in your browser’s address window.
U
PGRADE SATELLITE IP MODEM
The Upgrade Satellite IP Modem option allows you to connect to the Regional BGAN website and compare the software version currently installed in your Satellite IP Modem with the latest version available for use. You can then download and install the latest version at your convenience.
U
PGRADE SYSTEM INFORMATION
The Upgrade System Information option allows you to connect to the Regional BGAN website and compare the System Information versions currently installed in your Satellite IP Modem with the latest System Information versions available for use. You can then download and install the latest version at your convenience.
V
IEW DOCUMENTATION
The View Documentation option allows you to view this and other documents on-line rather than having to search for the printed versions.
E
XIT
Choosing the Exit option ends the Launch Pad programme and returns you to your computer desktop.
R-BGAN Satellite IP Modem User Manual
23
Page 34

R-BGAN Satellite IP Modem User Manual
24
Page 35

y
C
ONTROL PAD
The Control Pad is used for Satellite IP Modem administration. For the Control Pad to execute correctly, you must have your computer properly connected to the Satellite IP Modem and have a supported web browser that is java-enabled.
Selecting the Apply Button implements any modifications
;
Note
P
OINTING
The Pointing Screen provides the best way to orient the Satellite IP Modem towards the satellite.
The screen comes up automatically on the Control Pad when the Satellite IP Modem is powered
up.
ou make on the Control Pad screens, and selecting the
Cancel Button undoes any current (not yet applied)
modifications. After making any changes to the
configuration settings, you must turn the Satellite IP Modem
off and then on again.
If you enable a SIM Personal Identification Number (PIN) and a Security Code, you are
prompted to enter these values before advancing to other Modem Administration pages in the
Control Pad.
Pointing Screen
25
R-BGAN Satellite IP Modem User Manual
Page 36

A
If Antenna Pointing is disabled, the Pointing Screen will be bypassed. See the
;
Note
Follow the directions in the QuickStart Wizard for using this screen while going through the
Pointing process.
GPS Validity: Invalid, Stored or Valid. See the Global Positioning System Operation section for
more details on GPS.
Point Antenna to These Settings: Compass Direction and Antenna Angle to help orient the
Satellite IP Modem toward the satellite. Once this rough pointing is accomplished, use the Signal
Strength m eter below to optimise the pointing directio n .
Acquired Satellite: This tells you which satellite was acquired (e.g. IOR or AOR).
dvanced Settings section for additional information.
Signal Strength: This blue bar moves to the right as the signal received from the satellite gets
stronger. The numeric display to the right of the bar is simply a digital representation of the bar.
The orange peak-hold bar at the end of the blue bar identifies the highest signal strength
measured during antenna pointing and will help you optimise the pointing direction. Use this
display when fine tuning the Satellite IP Modem’s orientation to the satellite. Signal strength is
only a relative measure of the satellite si gnal strength and may vary from location to location.
Switch GPS Antenna: You can switch between an Internal and External GPS Antenna by
selecting one of these two radio buttons. Once you have made the change, select the Apply
button to implement the change. The External option should only be selected when using the
optional external GPS antenna accessory. Instructions on how to connect the optional external
GPS antenna accessory are included with the accessory package.
Mute/Unmute Signal Beep: An audible beep to provide a relative indicator of signal status (faster
beep = higher signal quality) can be emitted from your computer speaker during the Pointing
Process. Select this button to Mute or Unmute the sound.
Exit Pointing: Select this button to leave the screen after optimum signal strength has been
achieved. This action will take you to the home screen on the Control Pad.
S
ECURITY MANAGEMENT
The Security Management screen allows you to impose a tighter level of security on your Satellite IP Modem.
SIM PIN Enable: If this box is not checked, there is no prompt for a SIM PIN after you invoke the
Control Pad. If this box is checked, a prompt requests you to enter the SIM PIN each time you run
the Control Pad. This helps prevent unauthorised use of your SIM. To change the setting, simply
modify the check box as desired, enter the current SIM PIN, and click on the Apply button.
Change SIM PIN: If the SIM PIN Enable box is checked, and you would like to change the existing
PIN, click this link or choose the CHANGE SIM PIN option on the menu. You will be required to
enter the Old PIN, the New PIN, and the New PIN again for confirmation. Apply or Cancel the
changes.
R-BGAN Satellite IP Modem User Manual
26
Page 37

S
S
Security Code Enable: If this box is not checked, there is no prompt for a Security Code after you
invoke Control Pad. If this box is checked, a prompt displays for the Security Code entry each
time you run the Control Pad with a different SIM than the one that was in the Modem when the
Security Code was enabled. By default, the Security Code is not enabled.
Change Security Code: If the Security Code Enable box is checked, and you would like to enter
the Code for the first time or change an existing Code, click this option. You will be required to
enter the Old Code, the New Code, and the New Code again for confirmation. Apply or
Cancel the changes.
If you forget the security code you will not be able to use the
;
Notes
H
OME
atellite IP Modem with a different SIM.
When you enter the Security Code for the first time, no old
ecurity Code entry is required. Whenever you enter or
modify the Security Code, you must exi t the Control Pad, exit
the Launch Pad, and turn the Satellite IP Modem off and
then on again so that the new settings can take effect.
The Home screen displays summary status information about the Satellite IP Modem.
Home Screen
You can navigate among all the various Control Pad functions by selecting them from the menu
on the left side of the screen.
Signal Quality: Displayed on all Control Pad screens, this bar graph provides an indication of
satellite signal quality. To save power, this indication updates slowly over time. To ensure you
27
R-BGAN Satellite IP Modem User Manual
Page 38

have fresh information, press the reload button on your browser to update the page display.
The Signal Quality status is a different measure of the
;
Note
Battery Level: Displayed on all Control Pad screens, this bar graphs provides an indication of
remaining battery capacity.
To save power, this indication updates slowly over time. To ensure you have fresh information,
press the reload button on your browser to update the page display.
Fault Status: Any faults or errors detected by Control Pad are displayed near the bottom of the
screen.
received satellite signal than the Signal Strength status shown
on the pointing screen. Seeing differences between these
two levels is normal and not an indication of a problem with
your Satellite IP Modem.
Green: normal indication of battery level
Red: almost fully discharged
Amber: charging under external power
Network Status: Available, Acquiring, or U navailable. If the status is Available then the Satellite IP
Modem is ready to send and receive your data over the network. If the status is Unavailable
then see the Fault Status for an indication of why a network connection is not available.
Connection Type: USB (default), Ethernet, or Bluetooth.
S
TATUS WINDOW
The Status Window is displayed as a separate window to provide a concise summary of Satellite IP Modem status.
R-BGAN Satellite IP Modem User Manual
28
Page 39

Status Window
This window gives you a summary of current Satellite IP Modem system configuration and
performance. When the Status Window is open, its information is updated every minute. If you
are running on battery power, this will reduce the available operating time.
Network Status: Available or Unavailable. If the status is Available then the Satelli te IP Modem is
ready to send and receive your data over the network. If the status is Unavaila ble then see the
Fault Status for an indication as to why a network connection is not available.
Connection Type: USB, Ethernet, or Bluetooth.
Battery Status: Battery, charging on AC Mains, or charged on AC Mains.
Signal Quality: This bar graph provides an indication of satellite signal quality.
The Signal Quality status is a different measure of the
;
Note
Beam Type: Indicates which beam type is being used (e.g. Global beam, Regional beam, spot
beam)
Battery Level: This bar graph provides an indication of remaining battery capacity.
received satellite signal than the Signal Strength status shown
on the pointing screen. Seeing differences between these
two levels is normal and not an indication of a problem with
your Satellite IP Modem.
Green: normal indication of battery level
R-BGAN Satellite IP Modem User Manual
29
Page 40

Red: almost fully discharged
Amber: charging under external power
GPS Antenna: Internal or External.
Fault Status: Any current system faults or errors.
S
ATE
llite: Indicates AOR or IOR satellite
R-BGAN Satellite IP Modem User Manual
30
Page 41

S
N
ETWORK SETTINGS
After executing the necessary QuickStart Wizard steps to set up and configure the Sat ellite IP Modem, you must select the Network Settings screen to complete your network configuration. On this screen, you enter the appropriate Domain Name Service (DNS) and the Access Point Name (APN) information given to you by your Service Provider.
Your Service Provider may have already performed this
;
Notes
configuration step for you.
Your Service Provider must give you a ll the information
necessary to complete these fields accurately. Do not
attempt to input any of these settings without Service
Provider information.
Whenever you modify the DNS addresses on the Network
ettings screen, you must exit the Control Pad, exit the
Launch Pad, reboot your computer, and power the Satel lite
IP Modem off and then back on so that the new settings can
take effect.
Network Settings Screen
Use Static Public Network IP Address: If this box is not checked, the Satellite IP Modem uses an IP
address automatically assigned by the network during the period when the Modem connects to
31
R-BGAN Satellite IP Modem User Manual
Page 42

the network. This setting is the default. If this box is checked, the Modem uses the IP address you
enter in the Static Public Network IP Address field that follows. You should only check this box
and enter an IP address if directed to d o so by your Service Provider.
DNS Host 1: Primary Host Domain Name Service (DNS) Address. An IP address is required in this
field and will be supplied by your Service Provider.
DNS Host 2: Secondary Host DNS Address.
Service Provider Security Enable: If this box is checked, you can enter a User ID and Password for
authentication between the Satellite IP Modem and your Service Provider. Your Service Provider
will let you know if this step is required and give you the necessary information.
APN Enable: If use of multiple Internet Service Providers is required, you can check this box and
enter the appropriate Access Point Name (APN) value. You should modify these fields only if
directed to do so by your Service Provider.
Apply / Cancel: If you want the values you have entered to be processed, click the Apply
button, exit the Control Pad and Launch Pad, and reboot your computer. You will also need to
turn the Satellite IP Modem off and then on again so that the new settings can take effect. If you
want the values you have entered to be ignored because of error or uncertainty, click the
Cancel button and the Network Settings remain as they were with no reboot required.
C
HANGE SERVICE PROVIDER LOGIN INFORMATION
The Service Provider Login Information screen is a subset of Network Settings.
Utilize this screen only if you have been given the necessary information from your Service
Provider.
To change the Service Provider Password, you are required to enter the Old Service Provider
Password, the New Password, and the New Password again for confirmation. Apply or Cancel
the changes.
A
DVANCED SETTINGS
The Advanced Settings screen is a subset of Network Settings.
R-BGAN Satellite IP Modem User Manual
32
Page 43

Enable Antenna Pointing Display: This checkbox determines whether the Pointing Display comes
up each time the Satellite IP Modem is booted. If the Modem is not moved between sessi ons,
this option can be deselected to bypass the pointing state upon power up. However, if the
Satellite IP Modem is moved, antenna pointing must be enabled to ensure optimum data
throughput and performance.
Enable Antenna Pointing Audio Signal: This checkbox, associated with the Antenna Pointing
display, enables or mutes audio through your computer speakers during pointing.
Switch GPS antenna: This radio button should be set to whatever type of GPS antenna is installed
in your Satellite IP Modem, Internal or External. The External option should be selected only when
using the optional external GPS antenna accessory.
NEW FEATURE:
;
Note
Fixed Installation: The Fixed Installation check box is for those Users that have their terminal
installed in a fixed location and want to be able to leave it unattended. If this box is checked
and the terminal receives an error message that requires a manual reboot of the terminal, the
terminal will now automatically reboot on its own and bypass antenna pointing. This will allow
the terminal to obtain a new connection with the satellite without any User intervention.
FIXED INSTALLATION
Select the Apply button to implement your modifications.
Whenever you modify any settings on the Advanced
;
Note
R-BGAN Satellite IP Modem User Manual
Network Settings screen, you must exit the Control Pad, exit
the Launch Pad, and power the Satellite IP Modem off and
33
Page 44

then back on so that the new settings can take effect.
U
SER OPTIONS
The User Options screen allows you to monitor data usage.
Data Usage Monitor: Click on this link or choose the Data Usage option on the menu if you would
like to view estimates of your data usage. Data usage figures are obtained by counting the
bytes in the IP packets received by and sent from the R-BGAN terminal. You can view both “per
session” and “lifetime” data usage counts. To reset the data counters of a session, simply select
the reset button for either transmit or receive and click on the Apply button.
Data Usage Monitor
The data usage figures provided on the screen are estimates
;
Note
B
LUETOOTH
The Bluetooth screen is limited to use with the Bluetooth interface.
Note the following warnings before you attempt to modify the interface parameters:
only. This feature is not tied in to the actual billing system.
HNS assumes no liability if differences are found between
data usage figures and your actual bill.
If the Satellite IP Modem is shutdown improperly, user data
values on the lifetime session may be lost and not recorded.
Utilize this screen only if you are using the Bluetooth interface
R-BGAN Satellite IP Modem User Manual
34
Page 45

y
The Bluetooth control software on your computer must allow the direct entry of DNS
information. Please consult your Bluetooth device vendor to confirm that DNS entry is
possible with your device.
Ensure that your Bluetooth device supports LAN access profile. For configuration of LAN
access profile please refer to your Bluetooth device user manual.
Bluetooth Device Address: System-assigned, display-only.
Bluetooth Device Name: The default name is “Regional BGAN Satellite IP Modem.” Click on and
select the current name field, enter the new name, then select the Change Name button to
apply the new name.
Discoverability: These radio buttons determine whether the Satellite IP Modem is discoverable or
not discoverable by other devices using Bluetooth. The default setting is discoverable, which
means that other Bluetooth devices can find the Satellite IP modem when they are in the same
proximity.
Bonding: These radio buttons that determine whether the Satellite IP Modem accepts bonding or
does not accept bonding with other devices using Bluetooth. The default setting is accepts
bonding (bonding may sometimes be referred to as “pairing”), which means that other
Bluetooth devices can establish a connection to the Satellite IP Modem. Generally, the
Bluetooth Passkey must be entered on the bonding Bluetooth device for bonding to be
successful. Bonding must occur before data exchange can occur between two Bluetooth
devices.
List of up to the last four devices
connection status. These are display-only fields. You can click on the Unbond button next to
each entry the remove the device information from memory. Once a Bluetooth device is in the
Known Devices table, the device information is “known” to the Satellite IP Modem. If you want to
prevent other devices (e.g.,. other laptops or PDAs within Bluetooth RF range of the Satellite IP
Modem) from communicating with the Modem, you can disable Discoverability and Bonding as
explained in the previous paragraph. You should only do this if the devices you wish to use with
the Modem are already in the Known Devices table.
Whenever you modify any settings on the Bluetooth screen,
;
Note
B
LUETOOTH PASSKEY
The Bluetooth Passkey screen is accessed from the main Bluetooth screen. The Bluetooth Passkey is used to prevent unauthorised Bluetooth de vices from bonding with your Satellite IP Modem. The default passkey is “blue.” To increase security, you should change this passkey to a sequence of letters and numbers of your choosing up to a maximum of 10 characters.
On the screen, you are shown the current Bluetooth Passkey and prompted to enter the new
one. Apply or Cancel the change.
ou must exit the Control Pad, exit the Launch Pad, and
power the Satellite IP Modem off and then back on so that
the new settings can take effect.
bonded to the Satellite IP Modem, their description and current
35
R-BGAN Satellite IP Modem User Manual
Page 46

P
ROPERTIES
The Properties screen displays a summary of current communications parameter settings.
Current Settings: Software Version, IOR and AOR Information Versions, Interface Mode, Public
Network IP Address, Private Satellite Modem IP Address, APN Value, Satellite Modem
International Mobile Equipment Identity (IMEI), Satellite Modem Media Access Control (MAC)
Address and Closed User Group ID.
R
ESTORE FACTORY DEFAULTS
The Restore Factory Defaults screen is a subset of Properties. Restoring the factory defaults returns the Satellite IP Modem's settings to their original, just out-of-
the-box state. This does not change the security code or SIM parameters. Please exercise
caution when proceeding. If you Restore Factory Defaults, you will need to re-enter any
configuration information supplied by your Service Provider.
U
PGRADE SATELLITE IP MODEM
On occasion, Satellite IP Modem software upgrades are made available to you. These upgrades
may add new features or fix minor problems. The Launch Pad provides an option to upgrade the
software. The software can be downloaded directly from the Internet using any available
access method, including the Satellite IP Modem.
U
PGRADING SOFTWARE
In order to upgrade software you must first connect to the Internet. You can connect to the
Internet using the Satellite IP Modem, dial-up, or LAN connection.
R-BGAN Satellite IP Modem User Manual
36
Page 47

Once connected to the Internet, choose the Upgrade Satellite IP Modem option from the
Launch Pad. The upgrade programme first checks if your computer has a copy of the Satellite IP
Modem software – the Local Copy.
Each time you upgrade the Satellite IP Modem, a local copy
;
Note
NO L
If no local copy is present on your computer, the upgrade programme connects to the Internet.
If an upgrade is available, you are prompted to download the upgrade to your PC. Once the
upgrade has been downloaded, a dialogue box displays prompting you to disconnect the LAN
or Dial-Up and connect the Satellite IP Modem to your PC (With some Windows Operating
Systems, you may need to reboot your PC after connecting to the Satellite IP Modem to enable
the communications link.). If the Sa tellite IP Modem was used to access the Internet, you do not
need to disconnect. If you are not read y to complete the upgrade by connecting the Satellite
IP Modem to your PC, you can click the Complete Upgrade Later button. If you are ready to
complete the upgrade and the Satellite IP Modem is connected to the PC, click the Complete
Upgrade Now button.
of the software is placed on your computer.
OCAL COPY PRESENT
The upgrade programme then launches the Satellite IP Modem Upgrader to install the new
software on the Satellite IP Modem. The Upgrader shows you the versions of the local copy
software and the software currently ins ta lled on the Satellite IP Modem. If the version stored
locally is newer (higher numbered version) than the installed Satellite IP Modem software, click
the Upgrade button. The Upgrader then completes the upgrade process.
L
OCAL COPY PRESENT
If a local copy is already present on the PC, a dialogue box displays asking you if you want to
check the Internet for a newer version. If you click Yes, the upgrade programme co nnects to the
Internet to check for a newer version. If a newer version is not available, a dialogue box displays
stating that the local version is the latest version. You can then choose to complete th e upgrade
by clicking the Complete Upgrade Now button. Click the Complete Upgrade Later button to
stop the upgrade process.
If a newer version on the Internet is available, you are prompted to download the upgrad e to
your PC. Once the upgrade has been downloaded, a dialogue box displays prompting you to
disconnect the LAN or Dial-Up and connect the Satellite IP Modem to the PC (With some
Windows Operating Systems, you may need to reboot your PC after connecting to the Satellite
IP Modem to enable the communications link.). If you are not ready to complete the upgrade
by connecting the Satellite IP Modem to your PC, you can click the Complete Upgrade Later
button. If you are ready to complete the upgrade and the Satellite IP Modem is connected to
the PC, click the Complete Upgrade Now button to perform the upgrade.
U
PGRADING SOFTWARE USING A MACINTOSH
In order to upgrade software you must first connect to the Internet. You can connect to the
Internet using the Satellite IP Modem, dial-up, or LAN connection.
Once connected to the Internet, choose the Upgrade Satellite IP Modem option from the
Launch Pad to launch the Satellite IP Modem Upgrader. To check the Internet for software
R-BGAN Satellite IP Modem User Manual
37
Page 48

upgrades, click on Options and select Check for Upgrade. If an upgrade is available, you are
prompted to download the upgrade to your computer. Once the upgrade has been
downloaded, the Upgrader will show the new software version in the New Software Version box.
If the Satellite IP Modem was used to access the Internet, you do not need to disconnect. If you
are not ready to complete the upgrade by connec ting the Satellite IP Modem to your
computer, you can close the Upgrader and complete the upgrade later. If you are ready to
complete the upgrade and the Satellite IP Modem is connected to your Macintosh computer,
click the Upgrade button. The Upgrader then comple tes the upgrade process.
If you previously downloaded the latest upgrade and are currently connected to the Satellite IP
Modem, the Upgrader shows you the versions of the new software and the software currently
installed on the Satellite IP Modem. Click the Upgrade button to complete the upgrade process.
R-BGAN Satellite IP Modem User Manual
38
Page 49

L
EASE USER GROUP
The LUG operation mode allows the User to subscribe to and receive a dedicated sub-band
resource from the network. Please ask your Service Provider for details regarding subscription
and cost of this service. This feature is controlled by the SIM card. Once you subscribe to a LUG
and insert the SIM into the modem, the following screen options will be present on the MMI:
• The PROPERTIES screen will have the added feature to show IOR and AOR System
Information Versions, plus it will also show the LUG ID.
(LUG) O
PERATION
Properties Screen for LUG User
R-BGAN Satellite IP Modem User Manual
39
Page 50

U
PGRADE SYSTEM INFORMATION
On occasion, the user is requested by the Fault Status display or their Service Provider to update
the System Information version. The Launch Pad provides an option to upgrade the System
Information version.
In order to upgrade the System Information version you must first connect to the Internet using
the Satellite IP Modem, dial-up, or LAN connection.
Once connected to the Internet, choose the Upgrade System Information option from the Launch Pad. You will then be asked to chec k the Internet for the newest versions. If you click YES (preferred option) the upgrader program connects to the Internet to check for a newer version. If a newer version is not available, a dialogue box displays that you already have the latest version on your PC.
You can then choose to complete the upgrade by clicking the Complete upgrade now button.
Click the Complete upgrade later button to stop the upgrade process.
If a newer version on the Internet i s available, you are prompted to download it to your PC.
Once the new version has been downloaded, a dialogue box displays prompting you to
disconnect the LAN or Dial-Up and connect the Satellite IP Modem to the PC (Note: With some
Windows Operating Systems, you may need to reboot your PC after connecting to the Satellite
IP Modem to enable the communications link). If you are not ready to complete the upgrade by
connecting the Satellite IP Modem to your PC, you can click the Complete upgrade later
button. If you are ready to complete the upgrade and the Satellite IP Modem is connected to
the PC, click the Complete upgrade now button.
R-BGAN Satellite IP Modem User Manual
40
Page 51

The upgrade program then launches the System Information Upgrader to install the new versions
on the Satellite IP Modem. The Upgrader shows you the PC versions and the Modem versions
currently installed on the satellite IP Modem.
If the PC versions are newer (higher numbered version) than the installed Modem versions, click
the Upgrade button. The Upgrader then completes the upgrade process. Caution: Do Not
interrupt the upgrade process.
R-BGAN Satellite IP Modem User Manual
41
Page 52

T
ROUBLESHOOTING
This section details the following:
Some general hardware and software problems you may encounter in the installation
and operation of the Satellite IP Modem along with the possible source of these
problems and how to correct them.
System fault codes and descriptions reported to you by the Satellite IP Modem on the
Control Pad screens, along with their possible causes and solutions.
G
ENERAL TROUBLESHOOTING
Problem Possible Cause Action
Satellite IP Modem
will not switch o n,
or will not stay on
when under
battery power.
SIM card error.
SIM card contacts
The Control Pad
will not launch
when the ‘Launch
Control Pad’
option is selected
from the Launch
Pad window.
Battery needs
recharging.
The battery is not
inserted properly.
The battery
contacts are dirty or
damaged.
The Modem was
reset while under
battery power
SIM card or SIM
card contacts may
be damaged.
SIM card may not
be present.
SIM card may be
inserted incorrectly.
may be dirty.
The correct
interface (USB,
Ethernet, Bluetooth)
was not chosen.
If the correct
interface was
chosen, the PC
may not have been
able to discover the
Satellite IP LAN
connection.
Charge the battery. Check Battery Light or Control Pad for
charging indication.
Remove and reinsert the battery. Make sure the battery latch
is in its farthest right hand position after the battery is inserted.
Check the battery contacts. Clean them if necessary. If you
find any damage, replace battery.
When the Modem is reset while under battery power (no AC
Mains connected), you must turn it back on manual ly. This is
a normal operation for the Modem.
Visually inspect the SIM card and SIM card contacts and
return SIM card to your Service Provider if it is damaged.
Remove the SIM boot according to the instructions in
QuickStart Wizard and verify that the SIM card is present.
Remove the SIM card and make sure that it is inserted
according to the instr uctions in QuickS tart Wizard.
Clean the SIM card contacts with a dry cloth.
Follow the instructions in the QuickStart Wizard to select the
correct interface on the Satellite IP Modem.
Reboot the PC or go to a Command Prompt and enter
“ipconfig /release” followed by “ipconfig /rene w.”
R-BGAN Satellite IP Modem User Manual
42
Page 53

Problem Possible Cause Action
The browser may
not be correctly
configured.
The Control Pad
appears to “lock
up” after it has
been successfully
launched.
Primary LAN
connection to the
Modem does not
function.
The compass does
not appear to work
correctly.
The Security Code
appears to be
invalid.
The SIM PIN code
appears to be
invalid.
The Satellite IP
Modem cannot
locate itself using
GPS.
The Signal Strength
meter on the
Java is not enabled
on your browser.
The interface cable
is not plugged in
correctly.
The PC Windows
network settings
may not be
configured
correctly.
The PC can only
have one active
LAN connection.
When connected
to the PC, the
Modem must be
the only active LAN
connection.
The compass is not
level or is near
metal.
The code may
have been
changed.
The code may
have been
changed.
No signal or weak
signal.
Determining GPS
position can take
up to 5 minutes.
The Modem is
configured to use
an external GPS
antenna.
Java not enabled
on the browser.
For Netscape, go to Advanced Preferences and select
‘Direct connection to the Internet’.
For Microsoft Internet Explorer, select Tools / Internet Options /
Connections / LAN Settings and uncheck the box labelled
‘Use a proxy server for your LAN’.
YOU MAY NEED TO RECHECK THIS BOX UPON RETURNING TO
YOUR OTHER INTERNET CONNECTION.
If using Netscape, enable Java. If using Internet Explorer,
download the latest version of the Java Runtime Environment
(JRE) from http://java.sun.com.
Remove and reinsert the interface cable from both the PC
and the Modem.
Make sure the Windows network settings in the PC are set to
choose IP settings automatically (DHCP). Then reboot the PC.
Disconnect all other LAN connections. Make sure the Modem
is the only active LAN connection.
Windows limits the number of network bindings to six. If you
have more than six, you must remove one in order for the PC
to communicate with the Modem.
Place the Satellite IP Modem on a flat and level surface
away from metallic objects.
After three failed attempts t o enter the Security Code, you
must switch the Modem off and on again. If you forgot the
Security Code, contact your Service Provider.
If the SIM PIN is blocked, contact your Service Provider to
obtain the PUK (PIN Unlock Key) code. Enter the PUK when
prompted.
Make sure no obstruction is blocking the GPS antenna and
that the Modem has a clear view of at least 3/4 of the sky.
Make sure that you do not place your hand or another
object over the GPS antenna.
Wait for 5 minutes. Switch the Modem off and on again.
Go to the Advanced Network Settings page on the Control
Pad and set ‘Switch GPS Antenna’ to ‘internal.’
Enable Java applications on the browser.
R-BGAN Satellite IP Modem User Manual
43
Page 54

Problem Possible Cause Action
pointing screen
does not change
when moving the
antenna.
The Satellite IP
Modem cannot
find the satellite.
The Control Pad
can be
successfully
activated, but the
Satellite IP Modem
cannot access the
internet after
successful pointing.
No network access
or poor network
performance.
The battery will not
charge
.
Rough pointing not
completed
correctly.
No signal or weak
signal.
You did not exit
antenna pointing
mode.
The antenna may
not be pointed
properly.
The Modem
network settings
may not be
correctly
configured.
The browser may
not be correctly
configured.
Interference from
other satellite
mobile terminals.
The battery is
defective.
The battery
contacts are dirty or
damaged.
Follow the instructions in the QuickStart Wizard to correctly
complete rough pointing
Make sure no obstruction is blocking the satellite signal . Make
sure that the Modem has a clear view of the sky in the
direction of the satellite. Be aware that window glass may
reduce the signal level.
Check that the antenna is pointed using the correct
compass direction and antenna angle from the Control Pad
Pointing screen.
Check the antenna switch to make sure that ‘L’ is selected
for Regional BGAN service.
Click on the ‘Exit Pointing’ button from the Pointing page.
Turn the Satellite IP Modem off and then back on again, and
attempt antenna pointing again to im prove the signal
strength. You may need to reposition the Satell ite IP Modem,
verifying that there are no obstructions blocking the satellite
signal and that the Modem has a clear view of the sky in the
direction of the satellite.
Refer to the network settings supplied by your Service
Provider. If the DNS Host settings are changed, the PC must
be rebooted.
For Netscape, go to Advanced Preferences and select
‘Direct connection to the Internet’.
For Microsoft Internet Explorer, select Tools / Internet Options /
Connections / LAN Settings and uncheck the box labelled
‘Use a proxy server for your LAN’.
YOU MAY NEED TO RECHECK THIS BOX UPON RETURNING TO
YOUR OTHER INTERNET CONNECTION.
If you are near another satellite mobile terminal, switch the
other satellite mobile terminal off or move as far away as
possible to avoid interference.
Replace the battery. After several years of average us e, a
gradual decline may be expected.
Check the battery contacts. Clean them if necessary. If the
battery is damaged, replace it.
R-BGAN Satellite IP Modem User Manual
44
Page 55

Problem Possible Cause Action
Satellite IP Modem
stops sending data
even with good
network
connection and
sufficiently
charged battery.
The indicator lights
blink red.
The Satellite IP
Modem cannot
enter antenna
pointing mode
while you are
trying to reposition
the antenna.
After Satellite IP
Modem exits
antenna pointing
mode, the Signal
Quality meter on
the Control Pad
changes from time
to time.
Antenna moves
after pointing.
Modem/battery is
overheated.
Antenna pointing
mode cannot be
accessed without
power cycling the
Modem.
The Modem is
configured to skip
antenna pointing.
Normal behaviour. There are several types of channels used by the Modem,
The Satellite IP
Modem was moved
by the wind.
Let the Modem/battery c ool down. Wait until the I ndicator
Lights stop blinking red to continue.
Turn the Modem off and on again to enter antenn a pointing
mode.
Go to the Advanced Network Settings page on the Control
Pad and check ‘Enable Antenna Pointing Display.’
each with different signal strength s. Because the Signal
Quality meter measures the channel curren tl y in use, there
may be slight differences in what the meter sho ws as
channels are changed from one type to another.
Use tie-down clips provided with the Modem to fix the unit in
place.
R-BGAN Satellite IP Modem User Manual
45
Page 56

F
AULT CODES
Number and Description Cause Solution
1
SIM card is not installed.
Power down, install SIM card
properly and try again.
2
SIM card read/write error.
Power down and try again.
Absence or incorrect
installation of the SIM card.
Failure to read from or write
to the SIM card.
SIM card may not be present. Remove
the SIM boot according to the
instructions in the User Manual and
verify that the SIM card is present.
SIM card may be inserted incorrectly.
Remove SIM card and make sure it is
inserted according to the instructions in
the User Manual.
SIM card may be damaged. Visually
inspect the SIM card and return it to
your Service Provider if damaged.
SIM card contacts may be dirty. Clean
the SIM card contacts with a dry cloth.
If problem continues, replace SIM card
with a known good SIM card. If
problem persists, return the unit to your
Service Provider for service.
Power down the Satellite IP Modem
and try again.
SIM card may be damaged. Visually
inspect the SIM card and return it to
your Service Provider if damaged.
3
SIM card access has been
blocked. Please contact
your Service Provider.
4
SIM card has been
improperly changed during
an active session. Power
down and try again.
5
SIM card is not
responding. Power down
and try again.
Failure to access the SIM
card due to too many failed
attempts with an invalid PIN.
You replaced a SIM card
with another after the
Modem was turned on.
Hardware failure to access
the SIM card.
SIM card contacts may be dirty. Clean
the SIM card contacts with a dry cloth.
If the problem continues, replace SIM
card with a known good SIM card. If
the problem persists, return the unit to
your Service Provider for service.
This occurs after 3 failed attempts to
enter the PIN. The SIM card is locked.
Enter the PUK to unlock the SIM c ard .
The SIM card must be replaced when
the unit is turned off. Make sure the unit
is turned off before replacing the SIM.
Power down the Satellite IP Modem
and try again.
SIM card may be damaged. Visually
inspect the SIM card and return it to
R-BGAN Satellite IP Modem User Manual
46
Page 57

Number and Description Cause Solution
your Service Provider if damaged.
SIM card contacts may be dirty. Clean
the SIM card contacts with a dry cloth.
If problem continues, replace SIM card
with a known good SIM card. If
problem persists, return the unit to your
Service Provider for service.
6
A required data field is
missing from the SIM card.
Please contact your Service
Provider.
7
This subscriber is not
allowed to connect to the
network. Please contact
your Service Provider.
8
This terminal is not allowed
to connect to the network.
Please contact your Service
Provider.
9
This user has no
subscription, service is not
allowed. Please contact
your Service Provider.
10
This user terminal was
detached by the network.
Cause unknown. Power
down and try again.
Absence of a required data
field on the SIM card.
Network connection failure
because the user is not
allowed to connect to the
Network.
Network connection failure
because the Modem is not
allowed to connect to the
Network.
Network connection failure
because you are not
identified as a subscriber to
the service.
Network connection broken
with an unknown cause.
SIM card was incorrectly programmed
and is missing one or more required
fields. The SIM card must be replaced
by another from your Service Provider.
Your authorisation has been removed
by your Service Provider (SIM card IMSI
is not authorised). Contact your Service
Provider to regain service.
The Modem authorisation has been
removed by your Service Provider
(Modem IMEI is not authorised).
Contact your Service Provider to regain
authorised service.
Contact your Service Provider to
receive authorised service. Your
Service Provider should check the
subscription entries in the Home
Location Registry.
Power down the Satellite IP Modem
and try again. If the problem continues,
contact your Service Provider.
11
Network connection
failure – Invalid parameters
used for network attach
procedure. Please contact
your Service Provider.
12
Network connection
failure - LLC or SNDCP
failure. Power down and try
again.
13
Network connection
failure – Unknown PDP type.
Please contact your Service
Provider.
14
Network connection
failure - User authorisation
Network connection failure
due to use of invalid
parameters.
Network connection failure
caused by LLC or SNDCP
failure.
Network connection failure. Power down the Satellite IP Modem
Network connection failure
because the user is not
Contact your Service Provider.
Power down the Satellite IP Modem
and try again. If the problem continues,
contact your Service Provider.
and try again. If the problem continues,
contact your Service Provider.
Contact your Service Provider to regain
authorised service. Your Service
R-BGAN Satellite IP Modem User Manual
47
Page 58

Number and Description Cause Solution
failed. Please contact your
Service Provider.
15
Network connection
failure – Service option not
supported. Please contact
your Service Provider.
16
Network connection
failure - Service option not
subscribed. Please contact
your Service Provider.
17
Network connection
failure - N-SAPI has already
been used. Power down
and try again.
18
Network connection
failure – Regular PDP
deactivation by network.
Power down and try again.
19
Network connection
failure - SM network failure.
Power down and try again.
authorised for service.
Network connection failure
because the service option is
not supported.
Network connection failure
because user was not was
not subscribed to the service
option.
Network connection failure
because network assigned
an N-SAPI that is already
being used.
The connection was
deactivated by the Network.
Connection failure due to
SM network failure.
Provider should check the subscription
entries in the Home Location Registry.
Contact your Service Provider to regain
authorised service. The Service Provider
should check the subscription entries in
the Home Location Registry.
Contact your Service Provider to regain
authorised service. The Service Provider
should check the subscription entries in
the Home Location Registry.
Power down the Satellite IP Modem
and try again. If the problem continues,
contact your Service Provider.
Power down the Satellite IP Modem
and try again. If the problem continues,
contact your Service Provider.
Power down the Satellite IP Modem
and try again. If the problem continues,
contact your Service Provider.
20
Network connection
failure – Too many failures to
activate PDP context.
Power down and try again.
21
Network connection
failure - Network assigned
an invalid IP add ress. Po wer
down and try again.
22 Network connection
failure – No response from
network. Power down and
try again.
23
Network connection
failure – Protocol error
received from network.
Power down and try again.
24
Network connection
failure – GPRS stack could
not attach to MUX
interface. Power down and
try again.
Too many failed attempts (4)
to connect to the Network.
Assignment of an invalid IP
address by the network
during connection.
Network connection failure
due to lack of a response
from the network.
Network connection failure
due to a protocol error.
Internal software error. Power down the Satellite IP Modem
This failure may occur because of a
weak signal due to obstructions or
geographic position (such as extreme
latitude or longitude). Contact your
Service Provider to verify coverage for
your location.
Power down the Satellite IP Modem
and try again. If the problem continues,
contact your Service Provider. The
Service Provider should verify that you
have the correct network settings.
Power down the Satellite IP Modem
and try again. If the problem continues,
contact your Service Provider.
Power down the Satellite IP Modem
and try again. If the problem continues,
contact your Service Provider.
and try again. If the problem continues,
contact your Service Provider.
R-BGAN Satellite IP Modem User Manual
48
Page 59

Number and Description Cause Solution
25
Network connection
failure - GPRS stack could
not detach from MUX
interface. Power down and
try again.
26
SIM card error - IMSI field
is longer than 8 bytes and is
invalid. Please contact your
Service Provider.
27
GPRS software internal
failure - GPRS stack
message subscription
failure. Please contact your
Service Provider.
28
Terminal Equipment has
been disconnected from
the User Terminal. Please
establish the connection
29
Network access blocked
– GPS fix is too old. Power
down and try again. UT will
attempt to reacquire
connection after receiving
a new GPS fix.
30
Network service is not
availabl e – Invalid position
for selected LAI. Please
power down and contact
your Service Provider.
38
Network access blocked
- Stored GPS data may not
reflect true location. Pl ease
obtain a new GPS location.
39
User Info encoded in SIM
is not supported at your
reported location.
40
Network connection
failure - Please update
System Information versions
with SysInfo Upgrader and
GPS fix, then reboot the UT.
Or contact your service
provider.
Internal software error. Power down the Satellite IP Modem
and try again. If the problem continues,
contact your Service Provider.
SIM card may have been
programmed incorrectly.
Internal software error. Power down the Satellite IP Modem
The connection between
Terminal Equipment and User
Terminal has been removed,
or
The interface cable between
Terminal Equipment and User
Terminal is not plugged in
properly.
The GPS fix is invalid or UT is
unable to obtain the valid
GPS fix.
Network connection failure
due to invalid position
Connection failure due to
invalid GPS information
The User Info encoded in the
SIM card is not allowed for
wireless service in the current
area.
The System Information file (s)
and the GPS position are
unknown.
SIM card was incorrectly programmed.
The SIM card must be replaced by
another from your Service Provider.
and try again. If the problem continues,
contact your Service Provider.
Remove and reinsert the interface
cable from both the PC and the
Modem. When done reboot the UT.
Verify that the Modem has an open
view of the sky to get a GPS fix.
If the problem continues, contact your
Service Provider.
If the problem continues, contact your
Service Provider.
Verify that the Modem has an open
view of the sky to get a current GPS fix.
If the problem continues, contact your
Service Provider.
Contact your Service Provider.
Upgrade the System Information fil e by
using the System Information Upgrader
tool. Also please verify that the Modem
has an open view of the sky to get a
GPS fix. When done reboot the UT.
If the problem continues after
R-BGAN Satellite IP Modem User Manual
49
Page 60

Number and Description Cause Solution
rebooting the UT with latest System
Information file(s) and valid GPS fix
please contact your Service Provider.
101
This user was detached
by the network. Trying to
reattach…
103
Network connection
failure – PLMN is not
allowed. Reacquiring
connection.
104
Network connection
failure - LA is not allowed.
Reacquiring connection…
105
Network connection
failure – Roaming is not
allowed. Reacquiring
connection.
106
Network connection
failure - User terminal
implicitly detached by the
network. Reacquiring
connection…
Connection broken by the
Network.
Network connection failure
due to PLMN not allowed.
Network connection failure
because the Satellite IP
Modem is in a Location Area
(LA) where service is not
allowed.
You are using a SIM card
from a carrier that does not
have a roaming agreement
with your Service Provider.
Network connection failure
because Modem was
implicitly detached by the
Network.
Power down the Satellite IP Modem
and try again. If the problem continues,
contact your Service Provider.
If the problem continues, contact your
Service Provider.
If the problem continues in other areas
where service is allowed, contact your
Service Provider.
If the problem continues with an
authorised SIM card, contact your
Service Provider.
If the problem continues, contact your
Service Provider.
107
Network service is not
available – Network
resources not available.
Reacquiring connection…
108
Network service is not
available. Reacquiring
connection…
109
Network service is not
available – No network.
Reacquiring connection…
110
Network service is not
available - Cell access
barred. Reacquiring
connection…
111
Network service is not
available – Limited network
service. Reacquiring
connection…
112
Network service is not
Network service not
available due to lack of
network resources.
Network service not
available.
Network service not
available.
Network service not
available because cell
access is barred.
Network service not
available due to limited
service.
Network service not
available because the GPS
The spot beam is dark and cannot be
illuminated for Regional BGAN service.
If the problem continues, contact your
Service Provider.
The spot beam is dark and cannot be
illuminated for Regional BGAN service.
If the problem continues, contact your
Service Provider.
If the problem continues, contact your
Service Provider.
If the problem continues, contact your
Service Provider.
If the problem continues, contact your
Service Provider.
You should verify that the Modem has
an open view of the sky to get a GPS
R-BGAN Satellite IP Modem User Manual
50
Page 61

Number and Description Cause Solution
available - Invalid position.
Reacquiring connection…
113
Network service is not
availabl e – Invalid position
for the selected Service
Provider. Reacquiring
connection…
114
Network service is not
available - Invalid position
for selected RAI.
Reacquiring connection…
115
Network service is not
available – Unknown cause .
Reacquiring connection…
116
Network connection
failure - Insufficient
resources. Reacquiring
connection…
117
Network connection
failure – PDP rejected for
unspecified reason.
Reacquiring connection…
position is not valid.
Network connection failure
because the of an invalid
GPS position.
The GPS fix does not match
the selected Routing Area
Information (RAI).
Network service not
available – cause unknown.
Network connection failure
due to insufficient resources.
Network connection failure –
unknown cause.
fix. If the problem continues, contact
your Service Provider.
Verify that the Modem has an open
view of the sky to get a GPS fix. If the
problem continues, contact your
Service Provider.
You should verify that the terminal has
an open view of the sky to get a
current GPS fix. If the problem
continues, contact your Service
Provider.
If the problem continues, contact your
Service Provider.
If the problem continues, contact your
Service Provider. Network may be
down.
If the problem continues, contact your
Service Provider. Network may be
down.
118
Network connection
failure - Service option
temporarily out of order.
Reacquiring connection…
119
Network connection
failure - PDP deactivated by
network. Reacquiring
connection…
120
No network connection
- User initiated PDP
deactivation.
121
Network connection
failure - Missing or invalid
APN. Please provide correct
information and try again.
122
Network connection
failure - Rejected by GGSN.
Please re-enter User
Network connection failure
because service option is
temporarily out of order.
Network connection failure. If the problem continues, contact your
The Modem was powered
down while connected to
the network.
Network connection failure
because the APN is missing
or invalid.
Network connection failure
due to rejection by the
GGSN.
If the problem continues, contact your
Service Provider. Network may be
down.
Service Provider. Network may be
down.
You will generally not see this code. In
order for you to deactivate the PDP,
you must power down the terminal. If
the problem continues, contact your
Service Provider.
Contact your Service Provider to get
the correct network settings.
Verify that your Service Provider User ID
and password are correctly set on the
Network Settings screen. If they are
R-BGAN Satellite IP Modem User Manual
51
Page 62

Number and Description Cause Solution
ID/Password and try again.
123
Network connection
failure - Requested QoS
rejected by network. Please
modify parameters and try
again.
124
Network connection
failure - Invalid transaction
id. Reacquiring
connection…
125
Network connection
failure – Unknown Session
Manager error. Reacquiring
connection…
126
Network access
blocked - UT will attempt to
reacquire connection.
Network connection failure
because the requested QoS
was rejected by the
Network.
Network connection failure
due to invalid transaction ID
Network connection failure
due to unknown session
manager error.
Network connection failure
because network access is
blocked.
correct and the problem continues,
contact your Service Provider.
Modify the QoS settings and try again.
If the problem continues, set all QoS
settings to the default val u es and try
again. If the problem continues with
the default values, contact your
Service Provider.
If the problem continues, contact your
Service Provider.
If the problem continues, contact your
Service Provider.
Network access is blocked. The
network will send the Modem a timer
value, and the Modem will attempt to
connect again when the timer is
complete. If the problem continues,
contact your Service Provider.
127
Network access
blocked – Radio priority is
less than threshold. UT will
attempt to reacquire
connection.
128
GPS fix is too old.
Modem will attempt to
reacquire connection after
receiving a new GPS fix.
129
Network access
blocked - GPS location may
be too old. If condition does
not clear, please obtain a
new GPS location.
134
Network service is not
available - Invalid position
Network access is blocked
due to the user’s priority.
Notification of a GPS fix
during or after Network
connection procedure.
GPS fix may be too old.
Connection failure due to
invalid GPS information for
You are blocked from Network access
due to your network priority. If the
problem continues, contact your
Service Provider.
A new GPS fix is sent to the network
that is more current than the one sent
when the connection was acquired.
The Modem will reacquire the
connection. If the problem continues
and a new connection cannot be
made, contact your Service Provider.
Verify that the Modem has an open
view of the sky to get a GPS fix. If the
problem continues, contact your
Service Provider.
Verify that the Modem has an open
view of the sky to get a current GPS fix.
R-BGAN Satellite IP Modem User Manual
52
Page 63

Number and Description Cause Solution
for selected LAI.
Reacquiring connection...
135
Stand-by-mode –
Normal operation will
resume automatically when
sending or receiving data”
Global beam
If the problem continues after
rebooting the UT with latest System
Information file(s) and valid GPS fix
please contact your Service Provider.
Power saving mode is active This is only a UT status report. No user
action is required
R-BGAN Satellite IP Modem User Manual
53
Page 64

G
LOSSARY
APN: Access Point Name. APNs can be assigned to each external network interface to allow
communications among multiple Internet Service Providers (ISPs).
required in your network, on the Satellite IP Modem Control Pad Network Settings screen
you can enable APN and enter the value supplied by your Service Provider.
Bluetooth: Bluetooth is a wireless technology interface method aimed at simplif ying the
communications among devices such as computers, modems, and mobile phones. It is
one of the three communications interfaces supported by the Satellite IP Modem.
Bluetooth Device Name: A text label given to Bluetooth-based devices. On the Satellite IP
Modem Control Pad Bluetooth screen, the defa ult name of the Modem is “Regional
BGAN Satellite IP Modem.” You can click on and select the current name field, enter a
new name, then select the Change Name button to apply the new name.
Bluetooth Passkey: A kind of Personal Identification Number given to a Bluetooth-based device is
used to prevent unauthorised Bluetooth devices from bonding with it. On the Satellite IP
Modem Control Pad Bluetooth Passkey screen, the d ef ault passkey is “blue.” To increase
security, you should change this passkey to a sequence of letters and numbers of your
choosing up to a maximum of 10 characters. For another device to bond to the Modem
with a Bluetooth Passkey, that passkey must be entered on the other device.
If use of multiple ISPs is
Bonding: In the Bluetooth interface, this term (sometimes referred to as “pairing”) refers to the
ability of Bluetooth-based devices to establish a connection with each other. On the
Satellite IP Modem Control Pad Bluetooth screen, by enabling or disabling bonding, you
can determine whether other Bluetooth devices can or cannot bond with the Modem. If
bonding is enabled, the other device must have the Modem’s Bluetooth Passkey.
Compass: When going through the antenna Pointing Process, you reference the compass on
the Satellite IP Modem to get the correct direc tion needed for the antenna.
Control Pad: The Satellite IP Modem Control Pad program leads you to a series of menus used for
Modem administration tasks, such as checking the current Modem status or setting
network parameters.
R-BGAN Satellite IP Modem User Manual
54
Page 65

DHCP:
Discoverability: In the Bluetooth interface, this term refers to the ability of Bluetooth-based
DNS: Domain Name Service, a static, hierarchical name service for TCP/IP hosts. The network
Ethernet: Ethernet is a local area networking method used widely throughout the computer
Fault Code: A number which uniquely references an error in a hardware or software system. In
Dynamic Host Configuration Protocol. DHCP is a communications protocol that lets
network administrators manage centrally and automate the assignment of IP addresses
in an organization's network. Using the Internet Protocol, each machine that can
connect to the Internet needs a unique IP address. You must make sur e tha t the
Windows network settings on your PC are set to allow the network to choose IP settings
automatically.
devices to “find” each other when they are in the same proximity. On the Satellite IP
Modem Control Pad Bluetooth screen, by enabling or disabling discoverability, you can
determine whether the Satellite IP Modem is d iscoverable or not discoverable by other
devices using Bluetooth.
administrator configures the DNS with a list of host names and IP addresses, allowing users
of workstations configured to query the DNS to specify remote systems by host names
rather than IP addresses. On the Satellite IP Modem Control Pa d Network Settings screen,
a primary and possibly a secondary DNS address supplied by your Service Provider must
be assigned.
industry. It is one of the three communications interfaces supported by the Satellite IP
Modem.
the Satellite IP Modem, if there is a fault detected, the fault code and a description are
displayed at the bottom of the Modem Control Pad Home and Status screens.
GPS: Global Positioning System. When the GPS receiver in the Satellite IP Modem gets a bearing
on a GPS satellite, the receiver computes and stores the Modem’s locati on on earth.
That location is used in the Pointing Process to obtain your location relativ e to the
Regional BGAN Satellite.
Inmarsat Regional BGAN Satellite IP Modem: Referenced throughout this document as the
Satellite IP Modem, this device implements and manages Regional BGAN satellite
communications between your computer and Service Provider’s network via one of the
three supported interface methods – USB, Ethernet, or Bluetooth.
Interface Lights: The interface lights on the Satellite IP Modem panel – USB, Ethernet, and
Bluetooth – 1) indicate the state of the currently-active interface during Normal
Operational Mode, or 2) serve as a bar graph to indicate relative signal strength during
Pointing Mode.
R-BGAN Satellite IP Modem User Manual
55
Page 66

Launch Pad: The Satellite IP Modem Launch Pad, displayed on your computer, is a list of options
that allow you to set up or modify Modem network and communications parameters,
monitor Modem system performance, and upgrade Modem software.
Normal Operational Mode: In this mode, the Satellite IP Modem is connected to your network,
allowing you to perform standard system activities such as Internet browsing. The other
mode of Modem operation is Pointing Mode.
Pointing Mode: In this mode, using the Satellite IP Modem Protractor and Compass, and
referencing the Pointing Screen for indications of signal strength, you manipulate the
Modem antenna to get the optimum GPS location and Inmarsat Regional BGAN Satellite
signal strength for your network connection. Pointing is required during Modem setup or if
the Modem has been moved from its previous location. Once you have obtained the
best antenna position, you can enter Normal Operational Mode and be ready to
perform standard activities.
Protractor: An instrument that measures ang les, the Satellite IP Modem protractor provides the
current angle of the antenna so that you can adjust it to the antenna angle specified on
the Pointing Screen.
QuickStart Wizard: Displayed on your computer, the Satellite IP Modem QuickStart Wizard is a
programme that guides you through the Modem installation and setup procedures,
including interface selection and antenna pointing.
SIM: Subscriber Identification Module. Your Service Provider issues you a SIM, containing your SIM
Personal Identification Number (PIN) and other security-related information. You insert the
SIM into the Satellite IP Modem SIM holder as part of Modem hardware setup. If you
configure the Modem to enable SIM PIN security, each time you invoke the Modem
Control Pad after turning on the Modem, PIN authorisation is required in order to use the
system.
SIM PIN: A Subscriber Identification Module (SIM ) Personal Identification Number (PIN) may be
supplied by your Service Provider. If SIM PIN entry is enabled on the Satellite IP Modem
Control Pad Security Management screen, a prompt requests you to enter the SIM PIN
each time you run the Control Pad. This helps prevent unauthorised use of your SIM.
Static IP Address: A static Internet Protocol (IP) address is a number that is assigned to a
computer by an Internet Service Provider (
Internet. Computers use IP addresses to locate and talk to each other on the Internet. If
Static IP addressing is enabled on the Satellite IP Modem Control Pad Network Settings
screen, you must enter an IP address supplied by your Service Provider in the Static Public
Network IP Address field that follows.
USB: The Universal Serial Bus interface is a standard protocol for many computer peripheral
devices, including modems, scanners, digital cameras, printers, and others. It is one of
the three communications interfaces supported by the Satellite IP Modem.
ISP) to be its permanent address on the
R-BGAN Satellite IP Modem User Manual
56
Page 67

N
OTES
R-BGAN Satellite IP Modem User Manual
57
Page 68

 Loading...