

Hudson River Saranac Insert, Saranac FreeStanding Operating & Installation Instructions Manual

PELLET STOVE
OPERATING & INSTALLATION INSTRUCTIONS
Saranac Insert
Saranac Free
Standing Model
Please read this entire manual before installation and use of this pellet fuel burning room
heater. Failure to follow these instructions could result in property damage, bodily injury or
even death.
Contact your local building officials about restrictions and installation inspection
requirements in your area.
Save these instructions.
1871 Route 9H
Hudson, NY 12534
U.S.A.
Phone: 518-828-6363
Fx: 518-828-5639

TABLE OF CONTENTS
Introduction ..................................................................................................... 3
Safety Information ..................................................................................... 4 - 5
Specifications .................................................................................................. 6
Dimensions ................................................................................................ 6 - 7
Operating Instructions .............................................................................. 8 - 11
Thermostat Installation ................................................................................. 12
Clearances to Combustibles ................................................................... 13 - 14
Installing Your Room Heater ................................................................. 15 - 23
Mobile Home Installations ............................................................................ 24
Insert Pellet Stove .................................................................................. 25 - 27
Vent Termination Locations ......................................................................... 28
Maintenance ........................................................................................... 29 - 32
Optional Accessories .................................................................................... 33
Troubleshooting ..................................................................................... 34 - 36
Wiring Diagram ............................................................................................ 37
Replacement Parts List ................................................................................. 38
Warranty ................................................................................................ 39 - 40
2

INTRODUCTION
Thank you for purchasing the Saranac pellet stove. The Saranac is available as an insert
or a freestanding stove. The Saranac has been tested and listed for installation in
residential, mobile homes and alcove installations.
This heater has been certified to ASTM E1509-04 Standard Specification for Room
Heaters, Pellet Fuel-Burning Type.
The performance of you pellet stove can be affected by the type of pellet fuel burnt in the
appliance. It is important to use only pellet fuel that is dry and free from dirt or other
impurities.
The Pellet Fuel Industry has established standards for wood pellet manufacturers. It is
recommended that the fuel used in this appliance meet or exceed the following
specifications:
Fines (fine particles)…….1% maximum through a 1/8" screen
Bulk Density…………….minimum 40 lbs per cubic foot
Size……………………...maximum 3/8" diameter by 1-1/2" long
Ash Content……………..1% maximum (Premium grade)
……………..3% maximum (Standard grade)
Moisture Content………..8% maximum
Heat Content…………….minimum 8,200 btu/hr
It is important to note that the ash content of the fuel (and frequency of operation)
determine the frequency of cleaning required for your unit. A high ash fuel may result in
your unit having to be cleaned daily while a low ash content fuel may permit a longer
time between cleaning.
Occasionally impurities in the fuel will cause a hard mass build up in the burn pot. This
build up may block the air flow through the burn pot affecting the performance of your
unit. Check the burn pot daily for any blockage. If necessary remove the burn pot liner
(once unit has cooled) and clean the liner and the burn pot.
Since Inca Metal has no control over the quality of pellet fuel used in this unit they
assume no responsibility for the end users choice in wood pellets.
Caution: Be sure to store the pellet fuel a minimum of 3' (0.9 m) away from the pellet
stove.
Please note that the rating label may be found on the inside of the hopper lid for the
freestanding unit and on the hopper cover for the insert.
3

SAFETY INFORMATION
Be sure to read the entire owner’s manual prior to installing and operating this pellet fuel
burning heater.
Failure to follow these instructions could result in property damage, bodily injury or even
death.
This stove’s exhaust system works with negative combustion chamber pressure and a
slight positive chimney pressure, it is extremely important to ensure that the exhaust
system be sealed and airtight. The ash pan and viewing door must be securely fastened in
order for the unit to be airtight. This appliance will not operate using natural draft or
without a power source for the blowers.
The use of grates or other methods of supporting the fuel is not permitted.
This unit is designed to burn pellet wood fuel only. Do not use any other type of fuel,
this will void any warranties stated in this manual. THE USE OF CORDWOOD IS
PROHIBTED BY LAW.
This appliance is designed for residential installation according to current national and
local building codes. It is also approved as a mobile home heater which is designed for
connection to an outside combustion air source.
It is recommended that the exhaust vent be cleaned bi-annually or after every two tons of
pellets.
Soot or creosote may accumulate when the stove is operated under incorrect conditions
such as an extremely rich burn (black tipped lazy orange flames). Do not operate the
stove if the flame becomes dark or sooty or if the burn pot overfills with pellets. Turn the
stove off and call your dealer.
The grounded electrical cord should be connected to a standard 120 volt, 60 hertz
electrical outlet. Ensure that the electrical cord is not trapped under the appliance and
that it is clear of any hot surfaces or sharp edges.
Be sure that the structural integrity of the home is maintained when passing venting
through walls, ceilings or roofs.
The ash pan and viewing door must be locked securely for proper and safe operation of
the pellet stove.
DO NOT PLACE UNBURNED OR NEW PELLET FUEL IN ASH PAN. A fire in the
ash pan may occur.
Do not abuse the glass by striking or slamming the door. Do not attempt to operate the
unit with broken glass. Replacement glass must be purchased from an Inca Metal dealer.
Do not attempt to clean the glass while unit is hot. To clean the glass, use a soft cotton
cloth and mild window cleaner, gas or woodstove cleaner.
4

SAFETY INFORMATION (continued)
Do not operate your stove if you smell smoke coming from it. Turn it off, monitor it and
call your dealer.
Repair and servicing of your stove may only be done by a qualified technician.
Disconnect the power cord before performing any maintenance or repair. NOTE:
Turning the stove to "off" does not disconnect all power from the unit.
The stove will not operate during a power outage, if this happens check for smoke
spillage and open a house window if necessary.
Keep foreign objects out of the hopper.
Contact your local building officials to obtain a permit and information on any
installation restrictions or inspection requirements in your area. Notify your insurance
company of your new stove.
Allow the stove to cool before performing any maintenance.
Ashes must be disposed of in a metal container with a tight lid and placed on a noncombustible surface well away from your home.
Check the venting system, at least twice a year, for creosote build up.
CAUTION:
DO NOT CONNECT TO ANY AIR DISTRIBUTION DUCT OR SYSTEM.
NEVER USE GASOLINE, GASOLINE TYPE LANTERN FUEL, KEROSENE,
CHARCOAL LIGHTER FLUID, OR SIMILAR LIQUIDS TO START OR
FRESHEN UP A FIRE IN THE HEATER. KEEP ALL SUCH LIQUIDS WELL
AWAY FROM THE HEATER WHILE IT IS IN USE.
HOT WHILE IN OPERATION. KEEP CHILDREN, CLOTHING AND
FURNITURE AWAY FROM THE HEATER. CONTACT MAY CAUSE SKIN
BURNS. YOUNG CHILDREN SHOULD BE SUPERVISED WHEN THEY ARE
IN THE SAME ROOM AS THE STOVE.
5
SPECIFICATIONS
Heating Specifications:
Burn Rate…………………………………*50,000 btu/hr or 4.8 lbs. of fuel per hour
Hopper Capacity………………………….50 lbs.
*Depends on quality and heating value of pellet fuel.
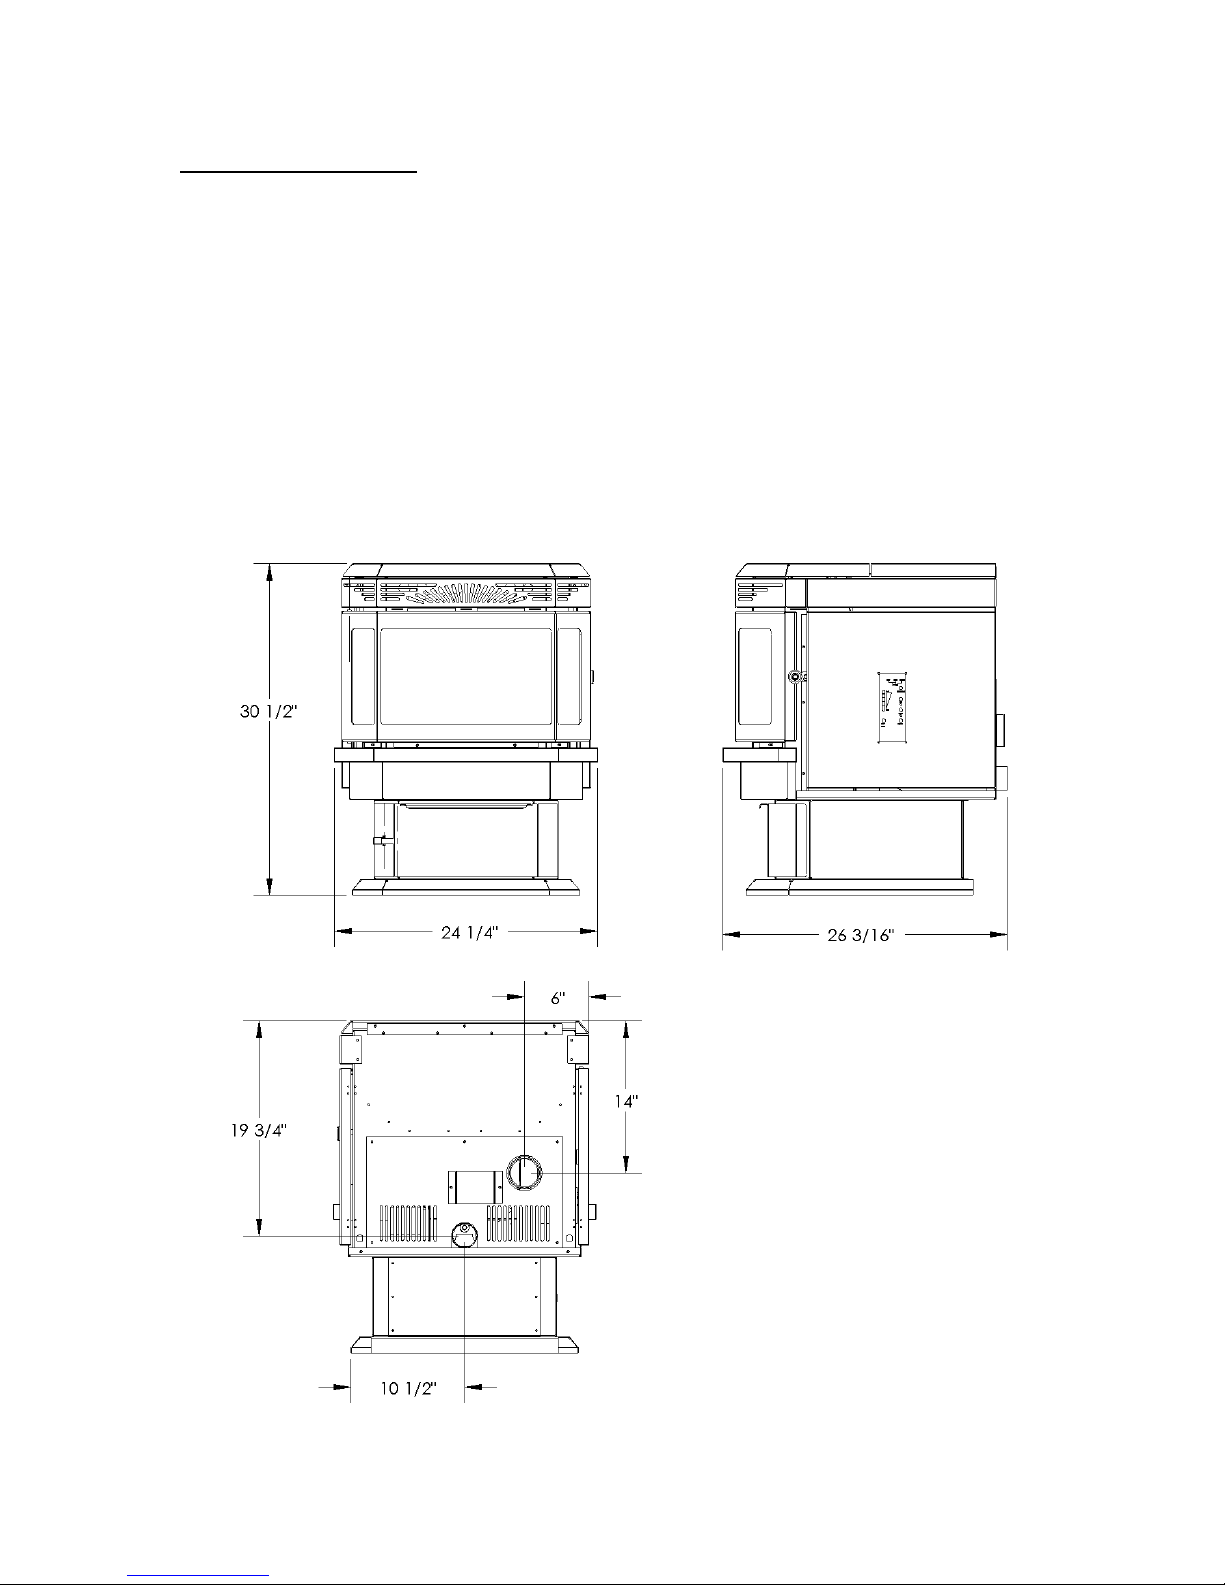
DIMENSIONS
Figure 1
6
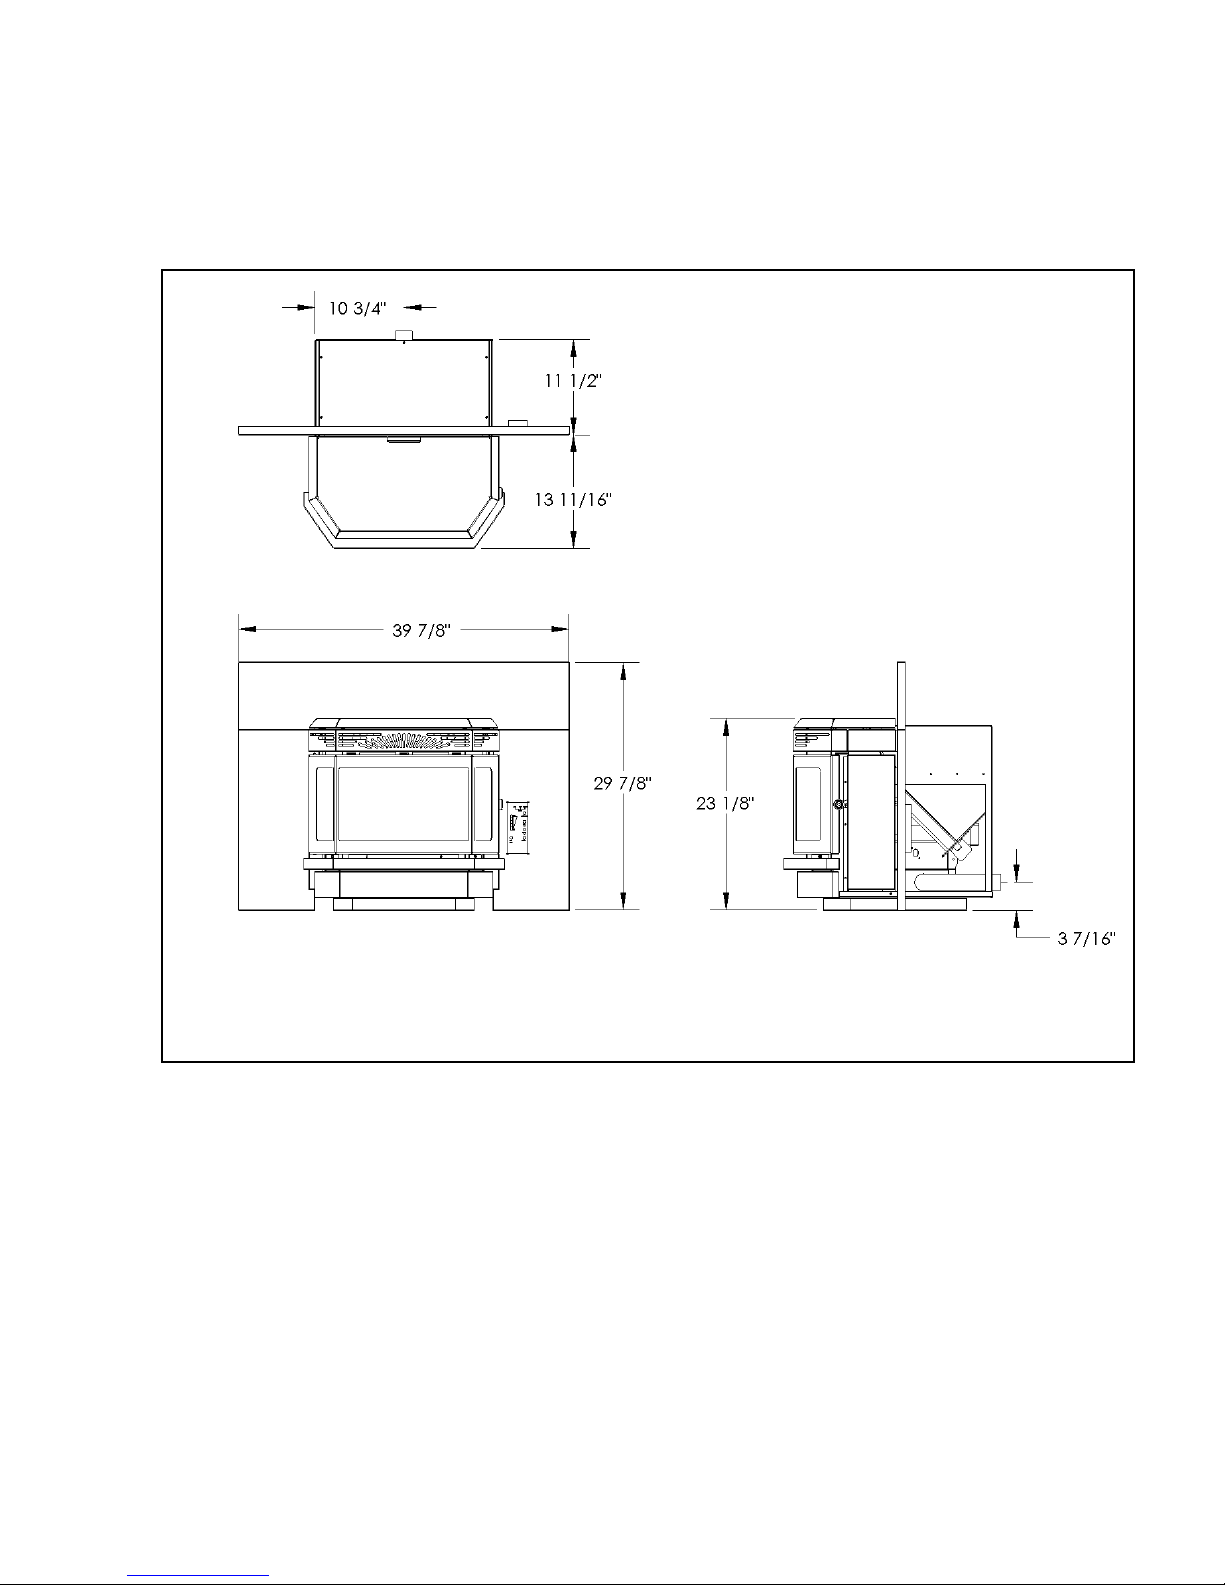
DIMENSIONS
The minimum installation dimensions, of the insert opening, are 32” (813 mm) wide x
22-3/4” (578 mm) high x 12-1/4” (311 mm) deep.
Figure 2
7

OPERATING INSTRUCTIONS
Filling the Hopper
This pellet stove is available as a freestanding unit or as an insert, therefore there is a
different method of filling the hopper for each type of unit.
To open the hopper lid, on the insert, pull slightly forward and up. To open the hopper
lid on the freestanding unit simply lift up.
CAUTION: Do not overfill the hopper.
Pre-start check up
Remove the burn pot (only if unit is cool) and clean out any ash debris. Be sure to install
the burn pot in the correct position (see page 29).
The blowers and automatic fuel supply are controlled from a panel located on the right
hand side of the stove.
Note: During the first time your unit is fired it may omit an odor as high temperature
paint cures. Maintaining a smaller fire (for the first few hours) will help to minimize this.
Avoid placing any items on the stove top during this period as the unit's paint could be
permanently damaged.
Lighting Instructions
When first operating the pellet stove, switch it to manual mode, so you can have full
control of the pellet stoves control board functions and familiarize yourself with how the
pellet stove works. It is in this mode that the heat level for the AUTO and T-STAT mode
is set.
To Start up a Cold Stove
Press and release the On/Off button. The green light above the On/Off button will flash
to indicate that the start up cycle has started. The light above the Auger button will turn
on, intermittently, indicating the activation of the auger which is feeding the pellets into
the burn pot. At this time the electric igniter is activated. The igniter takes a few minutes
to heat up enough to ignite the pellets in the burn pot. This may take as little as 3 minutes
or as much as 8 minutes. If no flames appear prior to 15 minutes the stove will shut
down and will need to be turned back on again.
Once the flame has been established, the start up cycle will end, this takes between 10 15 minutes. At this point, if the stove is in the manual mode, it will default to the lowest
heat level setting. If the stove is in either the AUTO or T-STAT mode the heat output
will vary in accordance with the commands from the thermostat.
8

OPERATING INSTRUCTIONS
To Start up a Hot Stove
If the stove is warm at re-start, the On/Off button must be pressed down and held for 2
seconds or more until the Heat Level light is lit.
When first starting a new pellet stove, or when you completely empty the hopper of
pellets, you can press and hold the AUGER button to get the pellets into the burn pot
quicker. See AUGER button description on page 10.
The convection air flow will change in accordance with the heat setting. Convection air
flow is at maximum when the heat setting is at maximum. Air flow will be at a minimum
when the heat setting is at a minimum. If the user wishes to turn the convection fan on
maximum, at any heat setting, they may do so by pressing the FAN button.
If the flame goes out, or the heat output is too high on minimum heat level setting, use the
AUGER TRIM button to make adjustments. See the AUGER TRIM button description
on page 11.
To Shutdown Stove
Turn off the unit by pressing the On/Off button. The stove will enter the shutdown cycle
where the pellets will stop feeding to allow the fuel in the burn pot to be used up. The
exhaust blower and convection fan will continue to operate until the flames are out and
the unit has cooled down. Once this has been accomplished the stove will shut down
completely.
In the AUTO mode the turning the thermostat all the way down can also be used to turn
off the stove.
DO NOT TURN OFF THE UNIT BY DISCONNECTING THE ELECTRICAL
POWER TO THE UNIT. THIS WILL CAUSE THE UNIT TO MISS THE
PROPER SHUTDOWN CYCLE, CAUSING THE RELEASE OF SMOKE INTO
THE HOUSE AND OVERHEATINGOF THE STOVE.
9

OPERATING INSTRUCTIONS
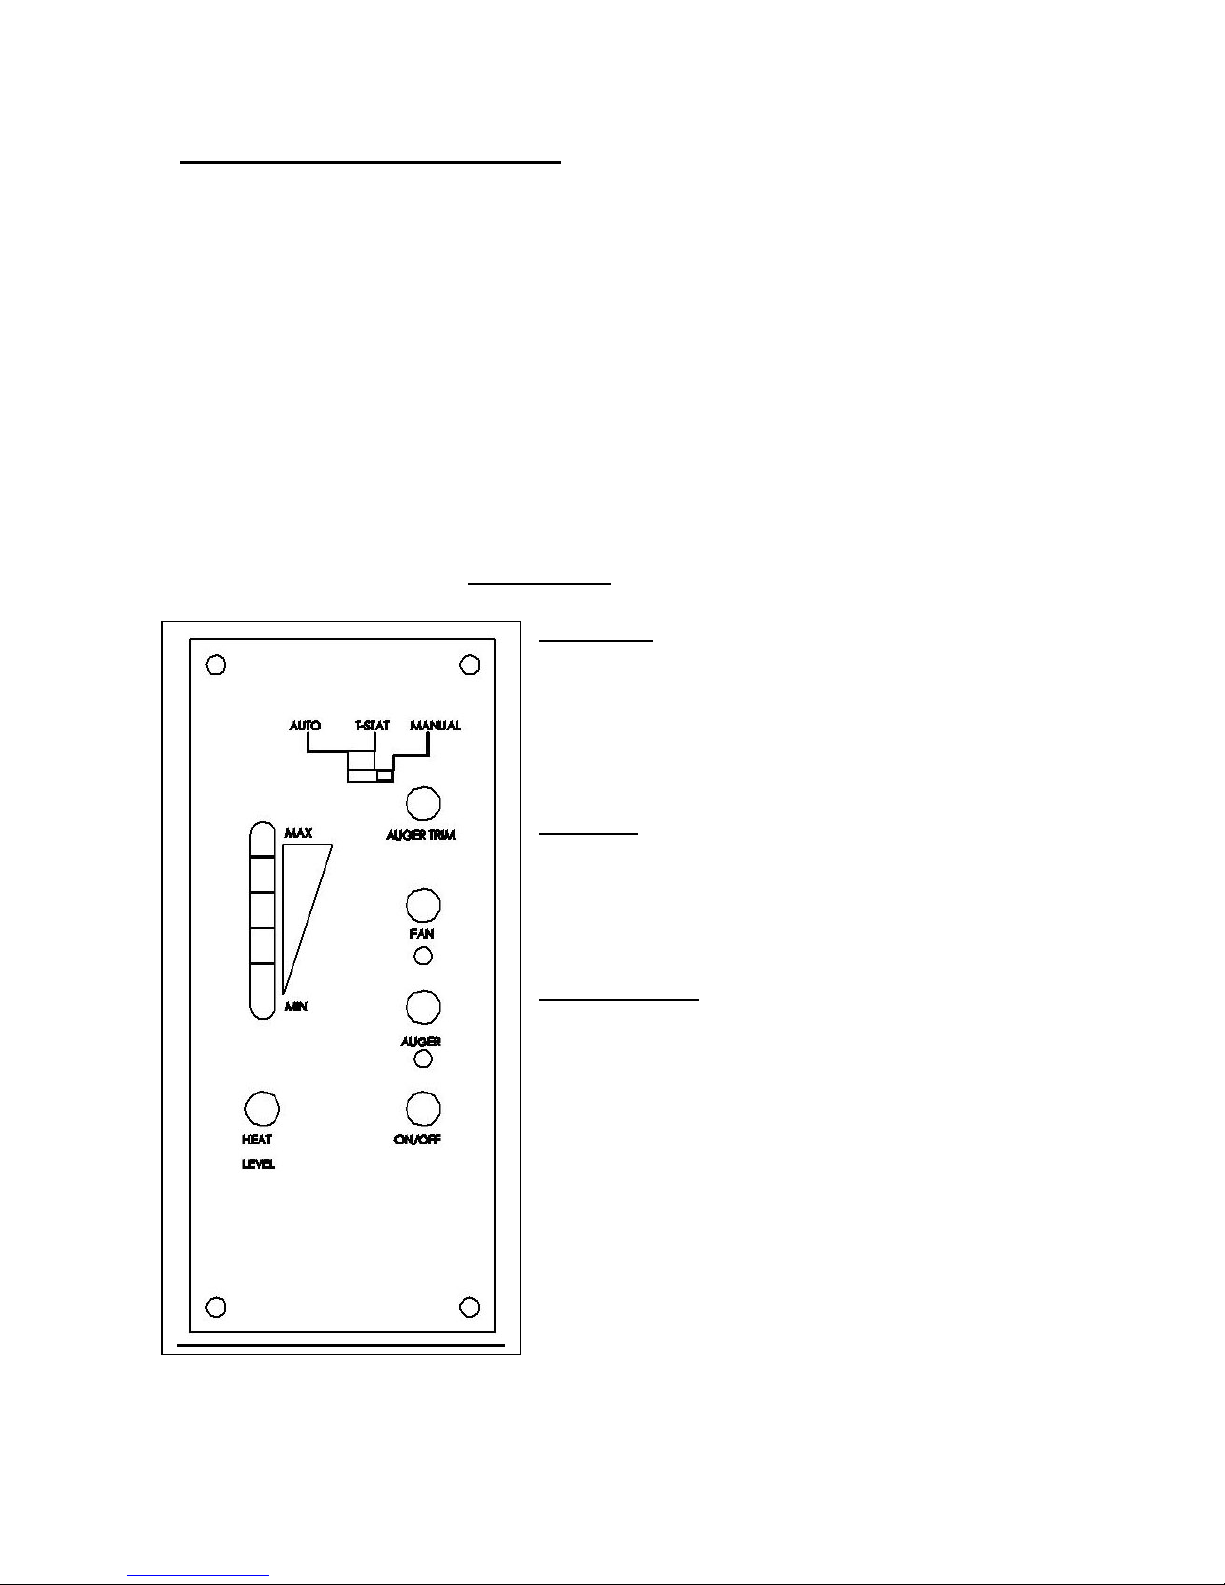
Control Board Functions
AUTO/T-STAT/Manual Switch: This switch selects the pellet stove operating mode.
Slide the switch to Manual (the far right position) to be able to manually select the heat
settings and controls.
If you have a remote thermostat attached and wish to have the pellet stove controlled by
the thermostat slide the switch to T-STAT (the middle position) to operate the pellet
stove in variable heat mode. The thermostat will control the heat output of the pellet
stove alternating between the lowest heat level and the highest heat level pre-selected by
the user.
The AUTO setting (far left position) is similar to the T-STAT setting except that the
stove will alternate between shutdown (stove turned completely off) and restart to the
user selected heat level, when commanded by the thermostat. When using a thermostat
the T-STAT position is recommended. This setting provides a more even heat output, for
better comfort, and will extend the life of the ignition system components. In addition
the constant flame, in the stove, will serve as a warning for people and pets to keep away
from the stove while in operation.
After switching between modes the stove should be turned Off and back On to reset the
control to operate in that mode.
On/Off Button: This button is used to turn the unit on and off. If the stove is cold prior
to start-up press and release the On/Off button. The green light above the On/Off switch
will flash to indicate start up cycle has started. Fuel pellets will start to feed into the burn
pot. The electric ignition system will be automatically activated, flames in the burn pot
will normally appear between 3 - 7 minutes. Once the flame has been established, the
start up cycle will end, this takes between 10 -15 minutes. At this point the user will be
able to make heat level adjustments.
If the stove is warm at restart the On/Off button must be pressed down and held for 2
seconds, or more, until the minimum heat level setting light is lit.
Heat Level: When pressed this increases the heat level setting one level. Pressing the
button will cycle the heat setting from minimum to maximum and back again. The
convection fan speed will also increase with the heat level setting. When the light is
flashing during the start up cycle the heat level button will not respond to the
adjustments. When the light is solid, indicating the start up cycle is finished, it will then
respond (only in manual mode).
Fan: Use this button to override the automatic fan speed control to turn the convection
fan on high. The smart control on this pellet stove will vary the fan speed in accordance
with the heat level setting. It is recommended to let the controller automatically adjust
the speed of the fan for optimum efficiency and minimal fan noise.
Auger: Pressing and holding this button will turn on the auger to speed feeding of pellets
into the burn pot, when first using the pellet stove or when you completely empty the
hopper of pellets and restarting after reloading the hopper. You can load the auger faster
by pressing and holding this button (until you see pellets dropping into the burn pot).
This button will turn off after 1 minute and must be released and pressed again if you
want to continue to manually operate the auger.
10
OPERATING INSTRUCTIONS
Control Board Functions (continued)
Auger Trim: This is used to change the feed rate on the minimum heat level for various
quality of pellet fuel. This will help to keep the flames from extinguishing on the
minimum heat level setting. It is also used to lower heat output on the minimum heat
level setting.
Push and release the Auger Trim button until the heat level 1 and 5 lights appear. This
will slightly increase the feed rate on the minimum heat level setting to keep the burn pot
flames from going out.
Push and release the button until the heat level 1 and 4 lights appear, this will reduce the
pellet feed rate on the minimum heat level setting. Use this setting to reduce the heat
level output on low.
Push and release the button until just the heat level 1 setting light is on, this is the factory
setting and works for most types of fuel.
Figure 3 Control Panel
Open Door
If the door is opened, while the unit is operating, it
must be closed within 30 seconds or the unit will go
into vacuum error mode. If this happens, close the
door, turn the control panel switch to "OFF" then
back to the setting it was previously at.
Refueling
For maximum performance we recommend that you
do not let the hopper drop below 1/4 full. KEEP
LID CLOSED AT ALL TIMES EXCEPT WHEN
REFILLING. DO NOT OVERFILL HOPPER.
Safety Features
1. Your unit is equipped with a "high
temperature limit" thermo snap disc. This
snap disc serves to shutdown the auger in
the case of an over temperature situation
(such as convection fan failure). This disc
has a manual reset button that will have to
be reactivated once the unit has cooled
down.
2. If the combustion fan malfunctions a
vacuum switch will automatically shut down
the auger (see also Open Door section
above).
If either of these situations occur contact your dealer as a service call may be
required.
11
THERMOSTAT INSTALLATION
An optional thermostat is available for use with this unit. A thermostat can help you
maintain a constant room temperature. A milli-volt thermostat is required.
NOTE: Your thermostat should be installed by an authorized dealer or service person.
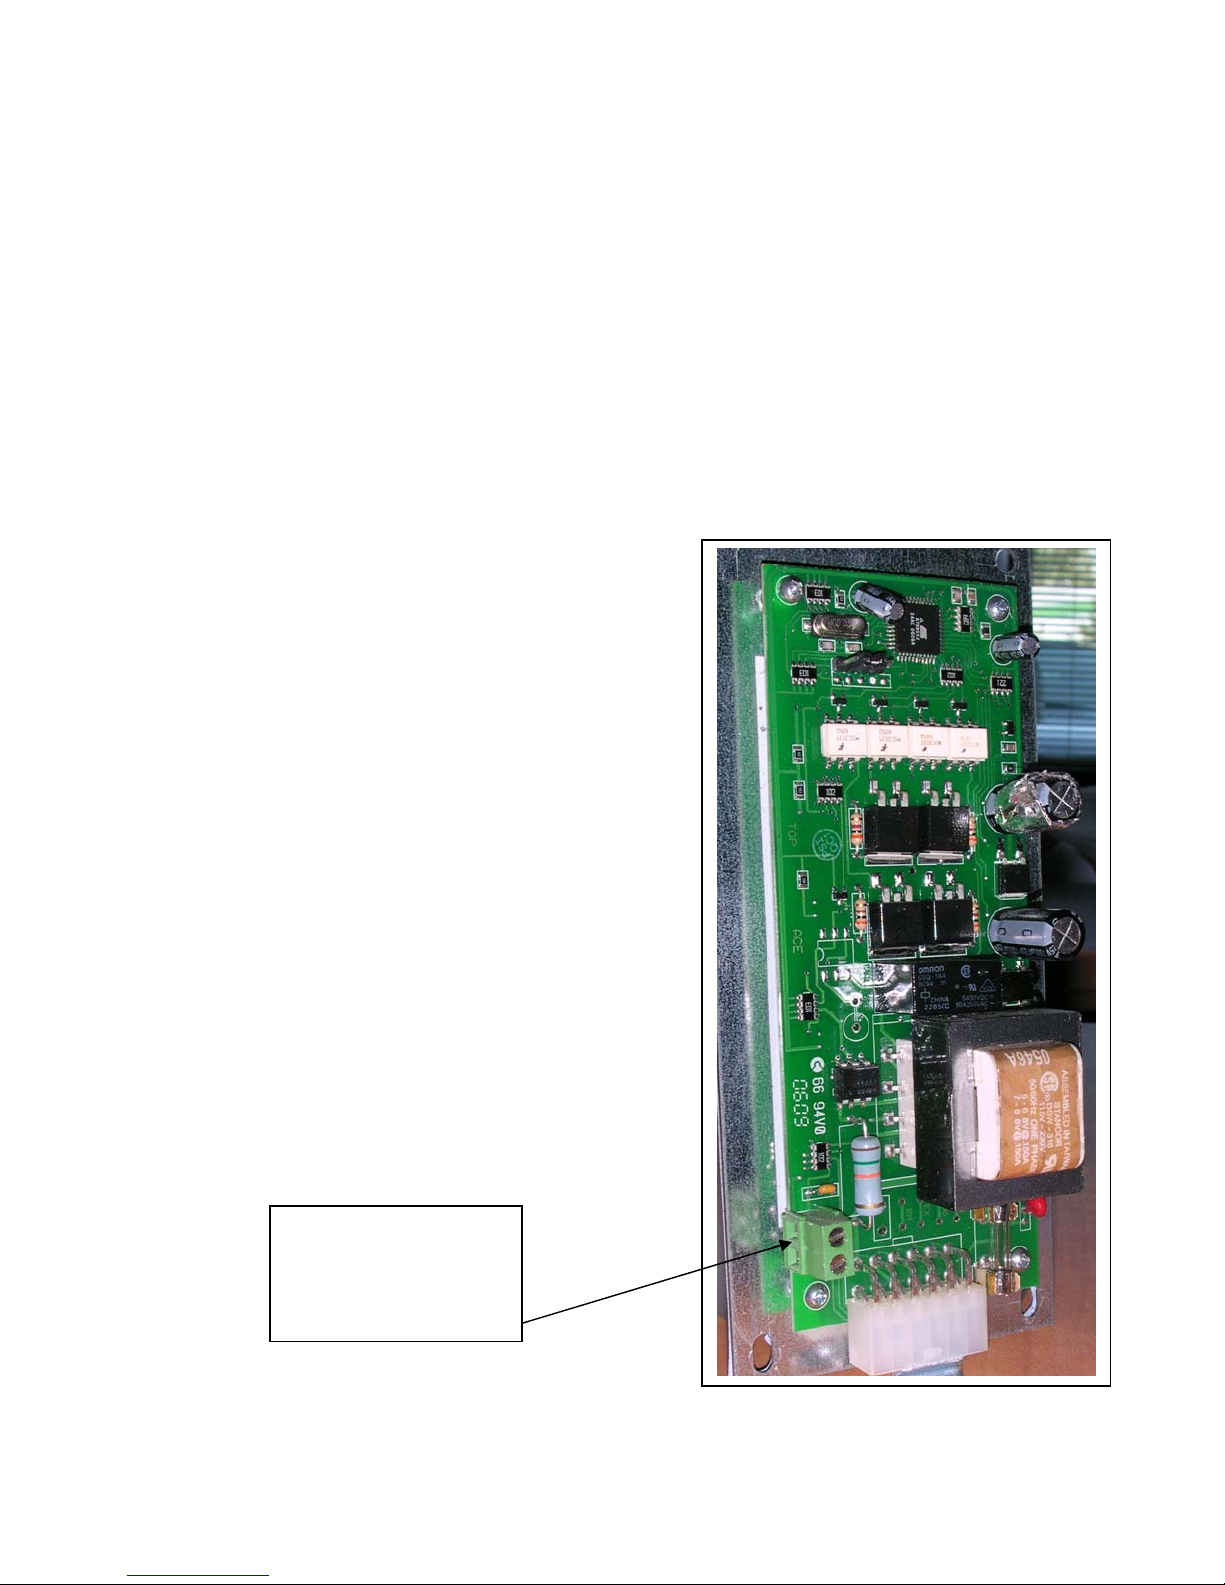
To Install Thermostat:
• Disconnect unit from power supply.
• Open right side panel to gain access to rear of control panel.
• Take the thermostat wires and connect to the green screw terminal on the rear of
the control panel (see Figure 4).
When the room cools to below the thermostat setting the stove will automatically restart
and run at the last feed rate setting. When the room is warm enough the unit will shut
off. The exhaust fan will continue to run until the stove cools.
Figure 4
screw connection for
thermostat
12
 Loading...