

Page 1
FOG® PROPANE INSECT FOGGER
Instruction
Manual
IMPORTANT: Read this manual all the way through before trying to use fogger for the first
time. If you do not understand something, please call the number below.
Hudson Model 62691
H. D. HUDSON MANUFACTURING COMPANY
Hastings, MN 55033-1142
1-800-9-SPRAYER (1-800-977-7293)
Consumer Care Line — 24 hours a day, 7 days a week!
www.hdhudson.com
Page 2
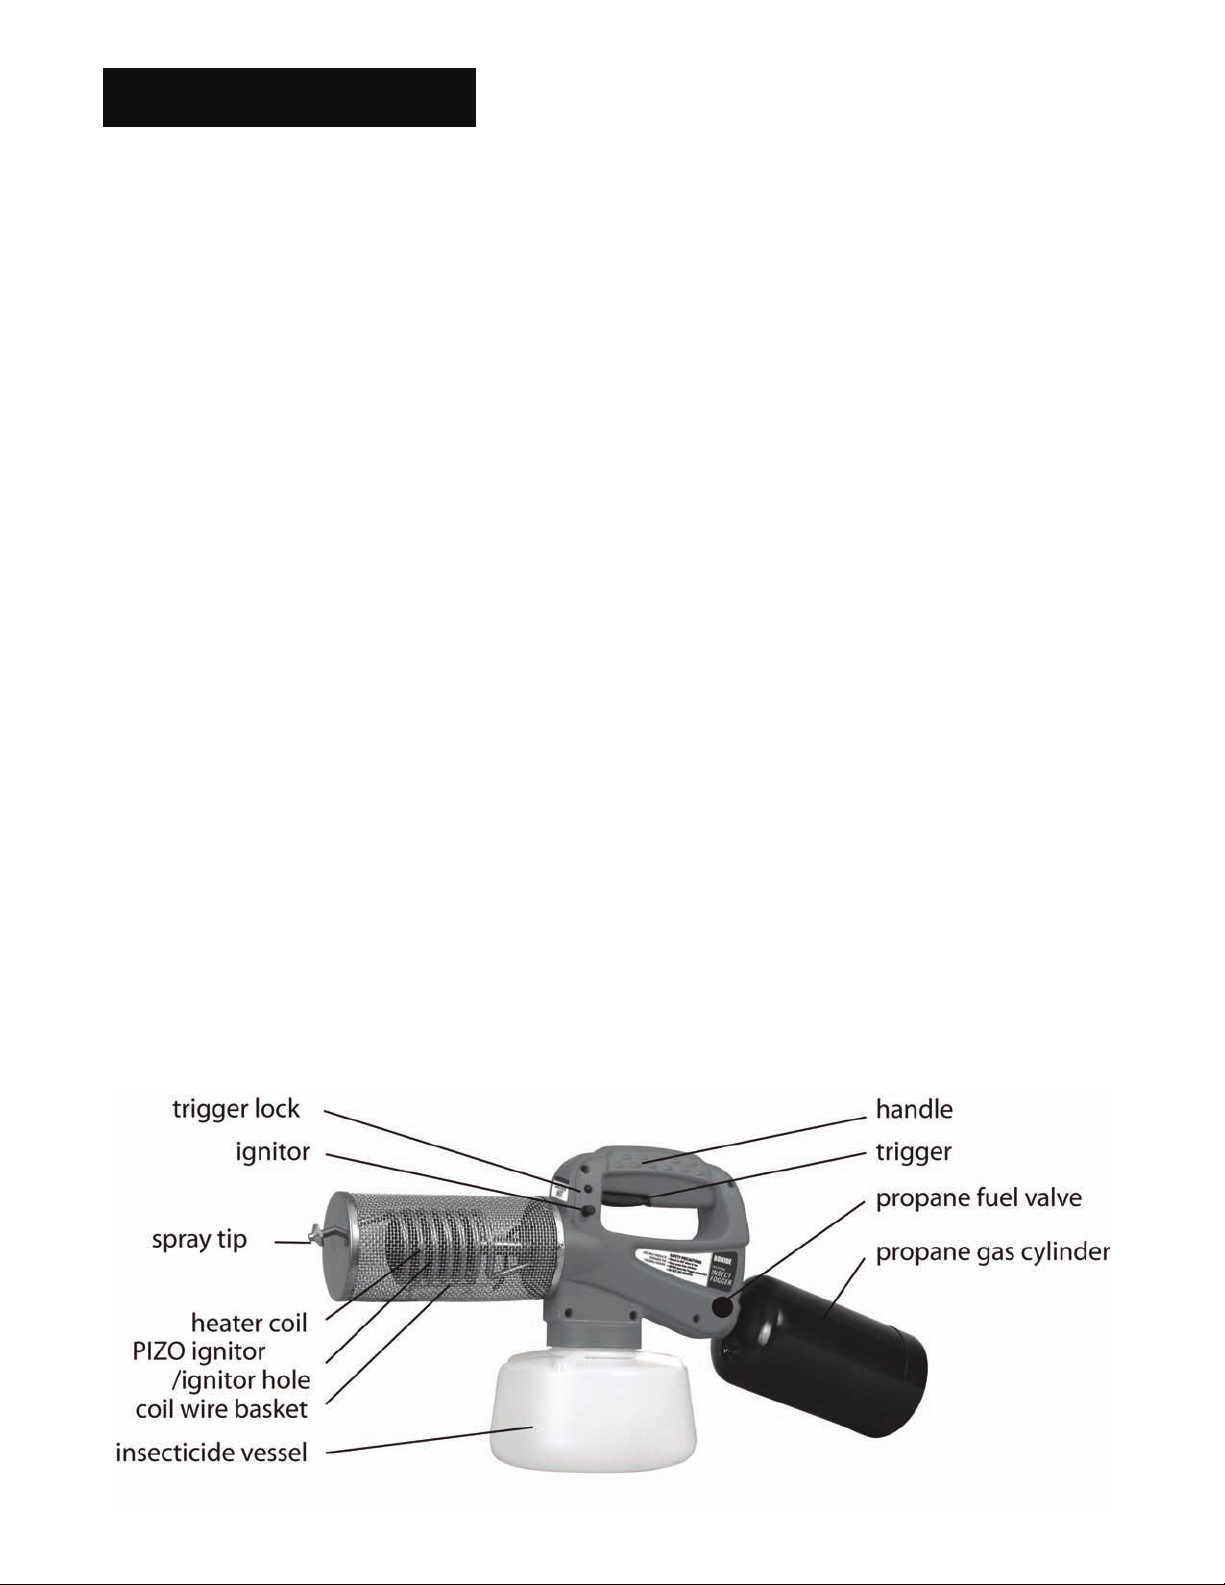
LETS GET STARTED!
Get familiar with the product and its uses (See diagram).
1. Insecticide Vessel — This container holds your liquid Fog™ Insecticide. Use only
products designed for thermal fogging.
2. Handle/Body of the Fogger — This takes the Fog Insecticide from the
Insecticide Vessel delivering it to the heater coil. Attached to the rear is a
propane fuel channel for a bottle of propane gas (sold separately). This gives the
Fogger the ability to fog insecticide. Located on the Handle/Body of the Fogger
are the following:
3. Black Propane Fuel Valve — This is located on the side of the Handle. The
propane fuel valve turns on the propane to begin the fogging process. Always
make sure that the propane fuel valve is turned clockwise to a stop when storing
the Fogger.
4. Handle — Underneath the Handle is a Trigger. This feature controls when the
fog is released from the Fogger. By pumping this Trigger, the insecticide is turned
into fog.
5. Trigger Lock — This button is located on the top front of the Fogger Handle.
When the button is pushed in to the right, the trigger is locked. You will be unable
to pull on the trigger. Always lock the Trigger when the Fogger is not being used
and during igniting.
6. Ignitor — Below the Trigger Lock is the Ignitor. By pushing in the Ignitor, a spark
lights the heater coil to create the heat. To test the Ignitor, go into a dark room
and push in the Ignitor button, without the propane gas cylinder attached. You
should see a spark just below the heater coil. If you do not see a spark the heater
coil will need to be ignited with a lighter or match.
7. Coil — The coil is protected by a wire basket on the end of the Handle opposite
the propane tank. This is the area in which the fog is released. WARNING, this
area will be HOT. KEEP AWAY FROM YOUR BODY AND FLAMMABLES.
Page 3

PREPARATION
1. Lock Trigger Button — Push the button at the front of the Fogger to lock the
trigger.
2. Insecticide Vessel — Fill the plastic insecticide vessel with insecticide. Be
sure that you do NOT overfill. Screw on the vessel until secure to ensure
safety while using the Fogger. Using any product other than specified
chemicals formulated for thermal foggers could clog the vapor coil and result
in an unsafe condition and will void any warranty.
3. Locating the Propane Fuel Valve — The propane fuel valve is located on the
right side of the Fogger adjacent to the propane fuel channel. Make sure that
the propane fuel valve is closed.
4. Inserting the Propane Gas Cylinder — Locate the channel in the back of the
Fogger. Inspect the cylinder and fogger to make sure that both are clean and
free of debris. Lightly push the cylinder into the channel and turn clockwise
until the cylinder is in place. Hand tighten.
OPERATING YOUR FOGGER
1. Verify that the trigger is locked in place by pulling the trigger. The trigger should
not move.
2. Always make sure that the Fogger is placed on a level surface to ignite and
preheat.
3. Open propane fuel valve no more than a 1/4 turn counter clockwise.
4. Push in the ignitor button to initiate a spark. The heater coil will ignite.
5. If the ignitor does not spark, close fuel valve. Wait 1 minute and repeat lighting
procedure. Be sure to move over a few feet to avoid the fumes in the immediate
area.
6. If the ignitor does NOT light the heater coil, close fuel valve and wait one minute.
Using a lighter or a match, place flame in ignitor hole then turn the propane fuel
valve slowly until the coil ignites.
7. Once lit, pre-heat the Fogger for 1 to 2 minutes. Failure to do so may result in
damage of the Fogger.
8. The Fogger is ready to operate. Release the trigger lock. WARNING! DO NOT
TOUCH THE HEATER COIL OR HEATER COIL WIRE BASKET. IT WILL BE
HOT! KEEP OUT OF THE REACH OF CHILDREN!
9. To release the insecticide, pump the trigger handle every 3 to 4 seconds. If a
flame appears, STOP PUMPING IMMEDIATELY. Excess insecticide is present
causing the flame to appear. Turn off the propane fuel valve and place the
Fogger on a non-flammable surface. Allow Fogger to sit undisturbed for 10
minutes and return to Step 1 of Operating the Fogger.
Page 4

10. Use the Fogger about 5 feet away from the target area with the wind at your
back. This will avoid having the fog blow back towards you and not on the
desired location.
OTHER USAGE TIPS
ALWAYS operate the Fogger with the coil wire basket level with the ground.
DO NOT TIP UPSIDE DOWN OR ON ITS SIDE.
NEVER use directly on plants or outdoor shrubs. Use the Fogger in the
direction of the areas intended to use.
NEVER use the Fogger in extreme temperatures or harsh winds.
The best time to use the Fogger is at dusk when the wind and temperatures
will allow the insecticide fog to settle on the intended area and be most
effective.
The Fogger can be used as a wet or dry Fogger. The rate of pumping controls
the wetness or dryness of the fog. We recommend that you pump the Fogger
every 3 to 4 seconds to achieve maximum effect. A dry fog is always
recommended.
The fog should be white in color. If it appears brown or yellow, you are
pumping the Fogger too slowly and the fog will be too dry. However, if you are
pumping too quickly, the end of the fogger will be wet.
TURNING THE FOGGER OFF
1. Lock the trigger by pushing the trigger lock to the right side.
2. The insecticide may continue to fog for a few minutes.
3. Once the fog is stopped, turn off the propane fuel valve. It may take several
additional minutes for the Fogger to cool down.
STORAGE
1. ALWAYS store the Fogger in a cool place that is well ventilated. Keep out
of the reach of children and pets.
2. ALWAYS remove the propane gas cylinder from the fogger.
3. NEVER store the fogger with insecticide in the insecticide vessel or
damage to the unit WILL occur.
Page 5

WARNING! READ THESE SAFETY PRECAUTIONS BEFORE USING
1. CAUTION: Read entire instruction booklet before operating.
AVOID breathing insecticide fog or vapors.
2.
3. ALWAYS pre-heat your fogger for one to two minutes, while keeping the
fogger level with the ground. Failure to pre-heat the heater coil may cause
an uncontrolled flame. Failure to pre-heat the heater coil may also clog the
heater coil, damaging your fogger.
4. Only use Insecticide designed for thermal fogging.
5. ALWAYS operate your fogger with the heater coil level to the ground.
Pointing the fogger down may allow liquid propane to plug the burner,
cause flame-up, or uncontrolled burn.
6. DO NOT OVER-TIGHTEN THE PROPANE FUEL VALVE. Your fogger will
continue to burn, for a short while, (1-2 minutes) after the valve is turned off.
Over tightening will cause serious damage to your fogger.
7. We recommend the use of the 14.1 oz., tall style propane cylinder (3”
diameter X 10.5” long). The use of the shorter, 16 oz. lantern cylinders may
cause flame-up or uncontrolled burn.
8. ALWAYS inspect the threaded outlet of the propane fuel cylinder and
remove any dirt that may be there.
9. WARNING! Operate the Fogger only in well-ventilated areas. Always keep
the Fogger away from flammable materials. Do not smoke while filling and
operating unit. Do not fog near uncovered foodstuffs, cooking and eating
utensils or open fires. Contamination, fire or explosion could occur.
10. DO NOT operate the Fogger in areas when people and pets are present.
Keep the Fogger, cylinder and insecticide out of reach of children.
11. Improper attachment of propane gas cylinder to fogger may result in a gas
leak. Care must be taken not to cross thread the cylinder into the valve.
12. WARNING! Keep face, hands and clothing away from coil wire basket at all
times. The coil wire basket becomes very hot while in operation. You could
suffer serious burns if you touch it. Always keep children and pets away.
13. WARNING! The trigger lock should be engaged at all times except fogging
(push button to right.) This will prevent accidental pumping of insecticide
into coil. An accumulation of insecticide in the coil may cause liquid
discharge when lighting the unit. Such a concentrated discharge may
ignite, or stain clothing, outdoor carpeting, etc., and may be harmful to
grass and foliage.
14. NEVER leave Fogger unattended when the burner is lit. Keep children and
pets away.
15. Do not overfill insecticide vessel. Turn off propane valve and allow unit
to cool before refilling.
Page 6

16. ALWAYS understand and follow the insecticide label instructions.
17. Propane gas cylinders are high pressure. DO NOT handle cylinders
roughly. Follow instructions on cylinder label for use and storage.
18. NEVER store propane gas cylinders indoors or attached to the Fogger.
Always store cylinders in a cool, well ventilated space.
19. CAUTION! DO NOT incinerate cylinders or insecticide vessel. Propane
cylinder vessels should be disposed of properly when empty.
TROUBLE SHOOTING GUIDE — WARNING! Let unit cool before servicing!
Symptom Probable Cause Corrective Action
No fog — Burner
works.
2) Pump plugged. 2) Remove Insecticide Vessel. With
1) Spray tip and/or end of
heater coil obstructed or
clogged.
1) LET UNIT COOL! Remove Spray tip
and check for blockage. Clean spray
tip to remove blockage. With spray tip
removed, use a pipe cleaner to clear
out carbon build-up that may be
inside the burner coil. Replace spray
tip and tighten securely.
fogger on its side, carefully remove
Plastic Pump Assembly Cover (be
aware of spring & bearing inside
cover) from fogger. Insert a small wire
into hole in bottom of Pump Assembly
(clearing any blockage). Carefully
replace Plastic Pump Assembly cover
with spring & bearing inside.
4) Improper fogging material. 4) Use only insecticide for thermal
No fog — burner not
working.
2) Propane tank attached
3) Burner assembly fails to
Dripping. 1) Spray tip loose 1) Tighten spray tip securely
2) Excessive insecticide
3) Not at operating
Poor fog quality. 1) Improper fogging material. 1) Use only Bonide insecticide.
2) If fog is thin or yellowish
3) If fog is wet and dripping. 3) Decrease your pumping rate.
3) Piston cup worn.
1) Propane cylinder empty. 1) Replace propane cylinder.
improperly.
light or will not stay lit.
output.
temperature.
pumping rate is too low.
3) See parts & service on next page.
fogging.
2) Check to see if propane cylinder is
properly attached.
3) Check igniter. Test lighting unit using
a match.
2) Decrease your pumping rate.
3) Wait 60 seconds before pumping.
2) Increase your pumping rate.
Page 7

Flare up or
uncontrolled
burning.
2) Insecticide ignited 2) Stop pumping immediately. Turn
Piezo ignitor will not
spark.
1) Fogger pointed toward the
ground.
Ignitor broken or worn out. Replace ignitor.
1) Always operate your fogger level with
ground. New propane bottles may be
more likely to flare.
propane valve off. Flame will stop
after excess insecticide is eliminated.
DIAGRAM
SPARE PARTS AND FACTORY SERVICE
If problems persist or you need the common replacement parts listed below,
please phone us for more information or service. NOTE: Do not ship unit to
factory without our prior approval and authorization number. Unauthorized
shipments will not be opened or acknowledged.
Page 8

COMMON REPLACEMENT PARTS
PART# DESCRIPTION COST*
5546 Coil Wire Basket Call for current.
5547 Insecticide Vessel Call for current.
5548 Pump Assembly Call for current.
5549 Piezo Ignitor Call for current.
*plus $5.00 shipping and handling.
CONTACT INFORMATION
1-800-9-SPRAYER (1-800-977-7293)
Instructions for replacing the Piezo Ignitor
1. Remove retainer screws (2) from each side of heat shield, then remove
spray nozzle from heater coil.
2. Remove Coil wire basket. Some gentle
tapping may be required on the end of the
fluid distribution tube.
3. With fogger lying on its side, remove
assembly screws.
Page 9

4. Remove upper half of housing to
reveal inside of fogger.
5. Using needle nose pliers, open
ignitor crimp while holding structure
firmly in place.
6. Lift out old ignitor and replace with new ignitor.
Ignitor tip should be within 1/8 inch of coils.
Retighten crimp while holding ignitor firmly in
place.
Page 10

7. NOTE: Be sure pump rod is attached to pump handle.
8. Replace blue ignitor button cap on ignitor.
NOTE: brass round points downward; black square points upward.
9. Place upper housing over
assembly unit until halves line up
and ignitor works. Replace 6
screws.
Page 11

10. Replace coil wire basket.
Reinstall nozzle.
11.
Test ignitor in a dark area to
12.
verify spark.
WARRANTY INFORMATION
We warrant that this product is fit for consumer (homeowner) use as directed in this manual
and free from operating problems for a period of 90 days from date of purchase. Hudson will
repair or replace suspect materials upon our examination/inspection of a suspected unit.
Repair or replacement will be at the discretion of Hudson. If you feel you have a warranty
claim, please contact Hudson at 1-800-9-SPRAYER. The line is open 24 hours daily. (See
page 8 of this Instruction Manual) to determine a course of remedy.
No warranty whatsoever shall apply if this fogger is purchased or used for
professional or commercial application.
This warranty service is an exclusive remedy and we are not responsible for any
consequential or incidental damages or injury to persons or property. Warranty shall not
apply to any product that has been subject to misuse, negligence or accident, or been
damaged in shipment or mishap or which has been modified or repaired by unauthorized
persons or been used in a manner inconsistent with manufacturer directions. This warranty
only applies to products owned by persons purchasing directly from Hudson or from our
approved distributors and retailers. The right is reserved to incorporate subsequent design
and parts changes after publication and without reissue of descriptive literature or catalogs.
We make no other express warranty. Implied warranties including fitness and
merchantability are limited to 90 days from date of consumer purchase. The buyer must
assume all responsibility for use of this product when not used in strict accordance with
directions or established safe practice, or when used under abnormal conditions, or filled
with an unsuitable liquid.. Manufacturer’s liability is limited to product replacement or repair.
NOTE: Limitation on duration of implied warranty and/or consequential damages may not
apply to you if your State does not permit them. This warranty gives you specific
legal rights in addition to rights which you may have under state law.
Distributed by H. D. Hudson Manufacturing Company.
Made in China.
Page 12

THANK YOU FOR PURCHASING A HUDSON FOGGER!
For best results, use
Hudson Fog™ Mosquito
and Flying Insect Killer!
Available in Convenient,
Economical
1/2-Gallon Size.
Ask for Hudson Item 62692FG.
Page 13

For very large yards or for professional application,
choose a Hudson Fog
®
Atomizer Sprayer!
Hudson Fog® electric atomizer sprayers
can apply a wide variety of chemicals
including wettable powders. They emit an
Ultra Low Volume of penetrating mist with
adjustable and precise control of output.
An Ultra Low Volume mist hangs in the
area and covers a wide area
economically. Ideal for mosquito control,
eliminating smoke odors, protecting
against plant disease, etc. When used
indoors, mist penetrates cracks and
crevices for more effective pest control.
Model 99598 has hose and strap. Use outdoors.
Model 99598 is ideal for indoor use.
AVAILABLE AT QUALITY RETAILERS
For a complete catalog of Hudson sprayers and dusters
for homeowner or for commercial and professional use,
visit us on the web:
www.hdhudson.com
83631
 Loading...