

Hudson Boat Owner's Manual
Owners Manual
1930 Mallard Rd.
London, Ontario, Canada
N6H 5M1
519-473-9864
www.hudsonboatworks.com

2
CONTENTS
INTRODUCTION 3
INSURANCE & TRANSPORTATION 4
INSURANCE 4
TRANSPORTATION 4
CAR TOP 5
TRAILERING 6
ASSEMBLY 7
TOOLS 7
PARTS 8
FOOT ASSEMBLY (WITHOUT SHOES AND SHOE PLATE) 8
SEAT ASSEMBLY 9
SLIDES 10
RIGGER (SWEEP) 11
RIGGING 12
FEET 12
RIGGER 15
RIGGER 15
SPREAD (SCULLING) 17
SPAN (SWEEP) 17
HEIGHT 19
PITCH 21
BACKSTAY (SWEEP) 22
SLIDES 23
STEERING (2-/4-X) 24
CLEANING 26
PROTECTION 26
LUBRICATION 27
SALT WATER ROWING 27
STORAGE 28
FAQ’S - RIGGER DIMENSIONS 29
SWEEP 29
SCULLING 30
FAQ’S – CHANGING WHEELS/BEARINGS 31
FAQ’S – REPLACING THE NEW FIN 32
FAQ’S – HOW TO LIFT AND CARRY THE BOATS 34

3
INTRODUCTION
Thank you for choosing Hudson. Your boat is a high performance racing machine, and taking
the time to rig it properly will help you get the most out of it. With minimal preventative
maintenance, your Hudson will give you years of trouble free pleasure. We have designed this
owners manual to cater to all levels, and there are probably one or two things specific to
Hudson Boats that even the most experienced coaches can learn (these are highlighted as tips).
ORIGINAL MANUFACTURING DIMENSIONS AND CODES

4
INSURANCE & TRANSPORTATION
We have chosen to make this the first thing you read, because chances are that before you rig
(assemble) or wash your boat, you will have to move it. Your boat represents a large
investment that can be damaged in transport, on water, and even on the rack. Please refer to
the FAQ How to lift and carry the boat, as the 4-/x/+’s and 8+’s should be lifted by the rigger,
or by the sides of the boat, and not the inspection port.
INSURANCE
Upon delivery your boat becomes your responsibility, and we recommend that you initiate
insurance from the delivery date. Please consult with a broker to find the best coverage for
you. Make sure that it is very clear that what you are insuring is a rowing shell, and that the
broker understands everything that entails. If your broker has no solutions, you may want to
ask other members at your club how they insure their boat.
For our U.S. customers we recommend:
Leonard Insurance Group
1-800-sculler (US only)
610-789-9600
Email: scullerjon@aol.com
For our Ontario customers we recommend:
Petek Insurance Inc.
Lisa Jeffries
1-877-738-3512
TRANSPORTATION
There are two ways to transport your boat; on top of your car, or on a boat trailer. Before we
discuss that, there are a few things you need to do to prepare the boat:
• For the majority of transportation applications the
rigger will be removed from the boat.
• We recommend that the nuts & bolts stay on the boat
to prevent the bolts from scratching other riggers in
transport.
• To ensure long life of the Velcro on the shoes, fasten
them before travel.
• You can use the provided bungee to fix the seat to
the slides (see photo), or you can remove the seat
altogether by sliding it to the stern of the slides and
bumping the bow of the seat with the heel of your
hand (this requires some care in the singles and the
lightweight double to not damage the paint).
• Check that all the slide wing nuts and the feet wing
nuts are tight to prevent them from falling out and
possibly causing damage to other boats.
5
Please note: When packaging a rigger with a backstay for transportation, we recommend that
you loosen the top nut before you rotate the backstay. The port backstay will overtighten the
top nut, and could cause damage when you rotate the backstay in line with the rigger arm.
For all forms of transportation we highly recommend that you check that all ties downs and
racks are secure before you depart. We also recommend that you check the tie downs and
racks at every service stop, as changes in weather, and wind shear may affect the straps. We
also recommend that you remove any tags from the straps. These tags can, and have abraded
the paint over a trip.
Car top
Hudson builds racks for 1x’s and our 2-/x’s which are designed to attach to your cars roof rack
(most factory racks will work, but we recommend aftermarket racks for more security). You
can transport a single with the rigger mounted, just make sure that the rigger: cannot strike
the car in high wind, will not interfere with the operation of your car doors, and does not
protrude beyond the side of the car.
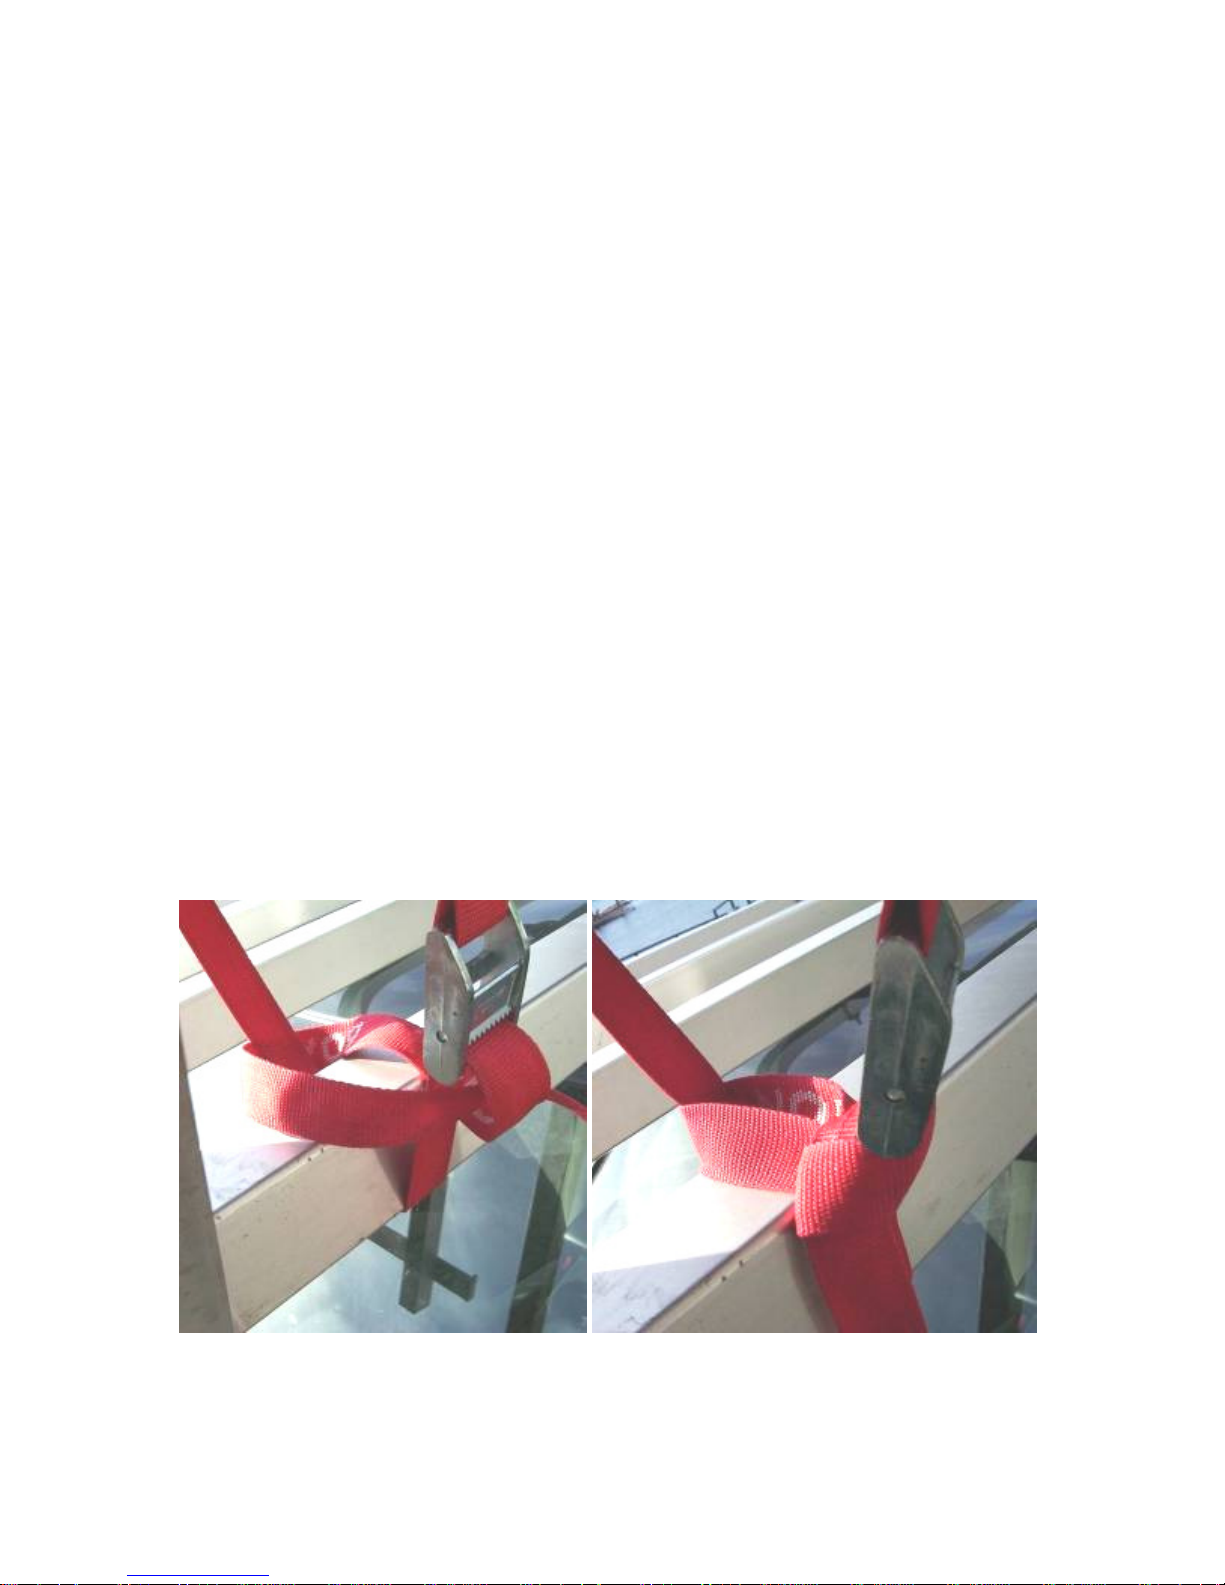
With the hull upside down on the rack, put a strap around the boat and the rack ~4 inches from
the sling. Ensuring that the webbing is flat all the way around, feed the end through the cam
and draw the webbing through until the boat is secure. Then tie both sides of the strap
together, by looping around the other side and creating a knot just below the cam. (see photos
below) For longer trips, or if you are traveling through areas of high wind, we recommend you
tie a safety rope over the boat to the tow mounts at the front of the car. This requires extreme
care, The rope should be tied such that even if it does loosen it cannot get caught in the
wheels of the car. If this happens and the rope is over the bow of the boat, the rope will snap
the bow off. The safety rope should be tight enough to keep the boat from flying off the roof,
but loose enough for the rack to take out the brunt of the road vibrations.
The stern of the boat furthest from your back bumper should have a red flag attached to alert
following drivers. State and Provincial Laws differ, so please consult you M.O.T. or D.O.T. for
rules regarding car topping.

6
Trailering
Trailers are the most common way to move crew and club boats. With a few precautions, you
can make sure that your boat makes it to its destination safely (please note we are providing
information to safely load your boats, refer to you automobile and trailer manufacturer for
safe trailering);
• Load boats to weight the tongue according to the directions of your trailer/tow
• Check that any boats loaded on the trailer will not make contact with the tow vehicle
• Strap the boats down with cam straps (provided with your Hudson), with the cam ~ 2”
• Thread the strap through the cam making sure the webbing lies flat against the hull,
• Test the tightness by trying to move the boat side to side, if it moves draw on the end
• Once it is tight enough so the boat does not slide back and forth, tie the strap off
• Thread the strap back under the rack, and cinch and knot the strap around itself a few
For eights:
Make sure there are three contact points, and make sure the contact points are level, if they
are not use a shim to support the boat. Make sure to securely strap the boat at these three
points.
For Smaller Boats:
Using two contact points, it is ideal if one of these points is the stern most rigger mounting
pad. If the bow does not meet a trailer rack in the cockpit, use a bit of foam to protect the
boat and tie it off on the bow deck, using caution to not overtighten on this end.
vehicle.
in sharp turns, or dips in the road.
above the gunnel, positioned such that it does not make contact with the hull.
and draw on the end of the strap.
of the strap again.
against itself just below the cam. This will prevent the strap coming any looser should
the cam fail.
times.

7
ASSEMBLY
Hudson Boats are designed for simplicity and maximum flexibility in how you choose to set up
your boat.
TOOLS
7/16” wrench - Almost all of your adjustments can be performed using just one tool, the 7/16”
wrench (11mm also works). This is the only tool you need to take your rigger off the boat and
put it back on. Once you have rigged your boat to your specifications, this is the only tool you
should have to carry for your boat.
Tip: Using the box end (closed end) of the wrench lessens the risk of damage to the hull. The
sharp edges of the open end can easily scratch, or damage the hull if it slips. The other safe
option is to use a 7/16” nut driver.
¾” wrench - The only other wrench you’ll need for rigging is a ¾” (19mm will work) for
adjusting the span or spread, and once you‘ve set it, you can forget it.
Tip: While we use a 7/16” and ¾” wrench, the bolt shaft diameter determines the size. For
example the bolt that threads into the top of the pin has a 7/16” hex head, but the shaft
diameter is ¼” (the nut securing the base of the pin has a diameter of ½”). All of the 7/16”
nuts and bolts for Hudson Boats have a thread pitch of 20, which means there are 20 threads
per inch (the ½” nut at the base of the pin has a thread pitch of 13). The other dimension of
the bolt is the length of the shaft, or in other words the total length without the head. So the
proper designation for the bolt that threads in the top of the pin is: ¼” – 20 Hex Head Stainless
Steel X 3/8”.
Flathead Screwdriver or 5/16” (8mm will work) nut driver/wrench- If you have a sweep boat,
you’ll have backstays, and will need a flathead screwdriver (but a dime will do the trick in a
pinch) or a 5/16” (8mm will work) wrench to adjust the hose clamps.
Tape Measure - For measuring heights and span/spread you’ll need a tape measure. Whether
you choose standard or metric, it makes sense to use a tape measure that measures only
standard or metric (so that the lines show on both sides) for optimum accuracy.
Box level - To measure feet and oarlock height accurately and to check lateral pitch, a 48’ box
level serves a dual purpose. If you’re not interested in lateral pitch, a straight edge will do.
Pitch Meter - The blocks that the pins sit in come out of the factory pitched at 0 degrees in
both stern and lateral directions. The pitch meter comes in handy to double check that you’ve
put the pitch bushings in the oarlock properly.
Internal Snap Ring Pliers – You’ll only need these if you want to change the bearings out of your
wheels. (See FAQ’s Changing Wheels and Bearings)
8
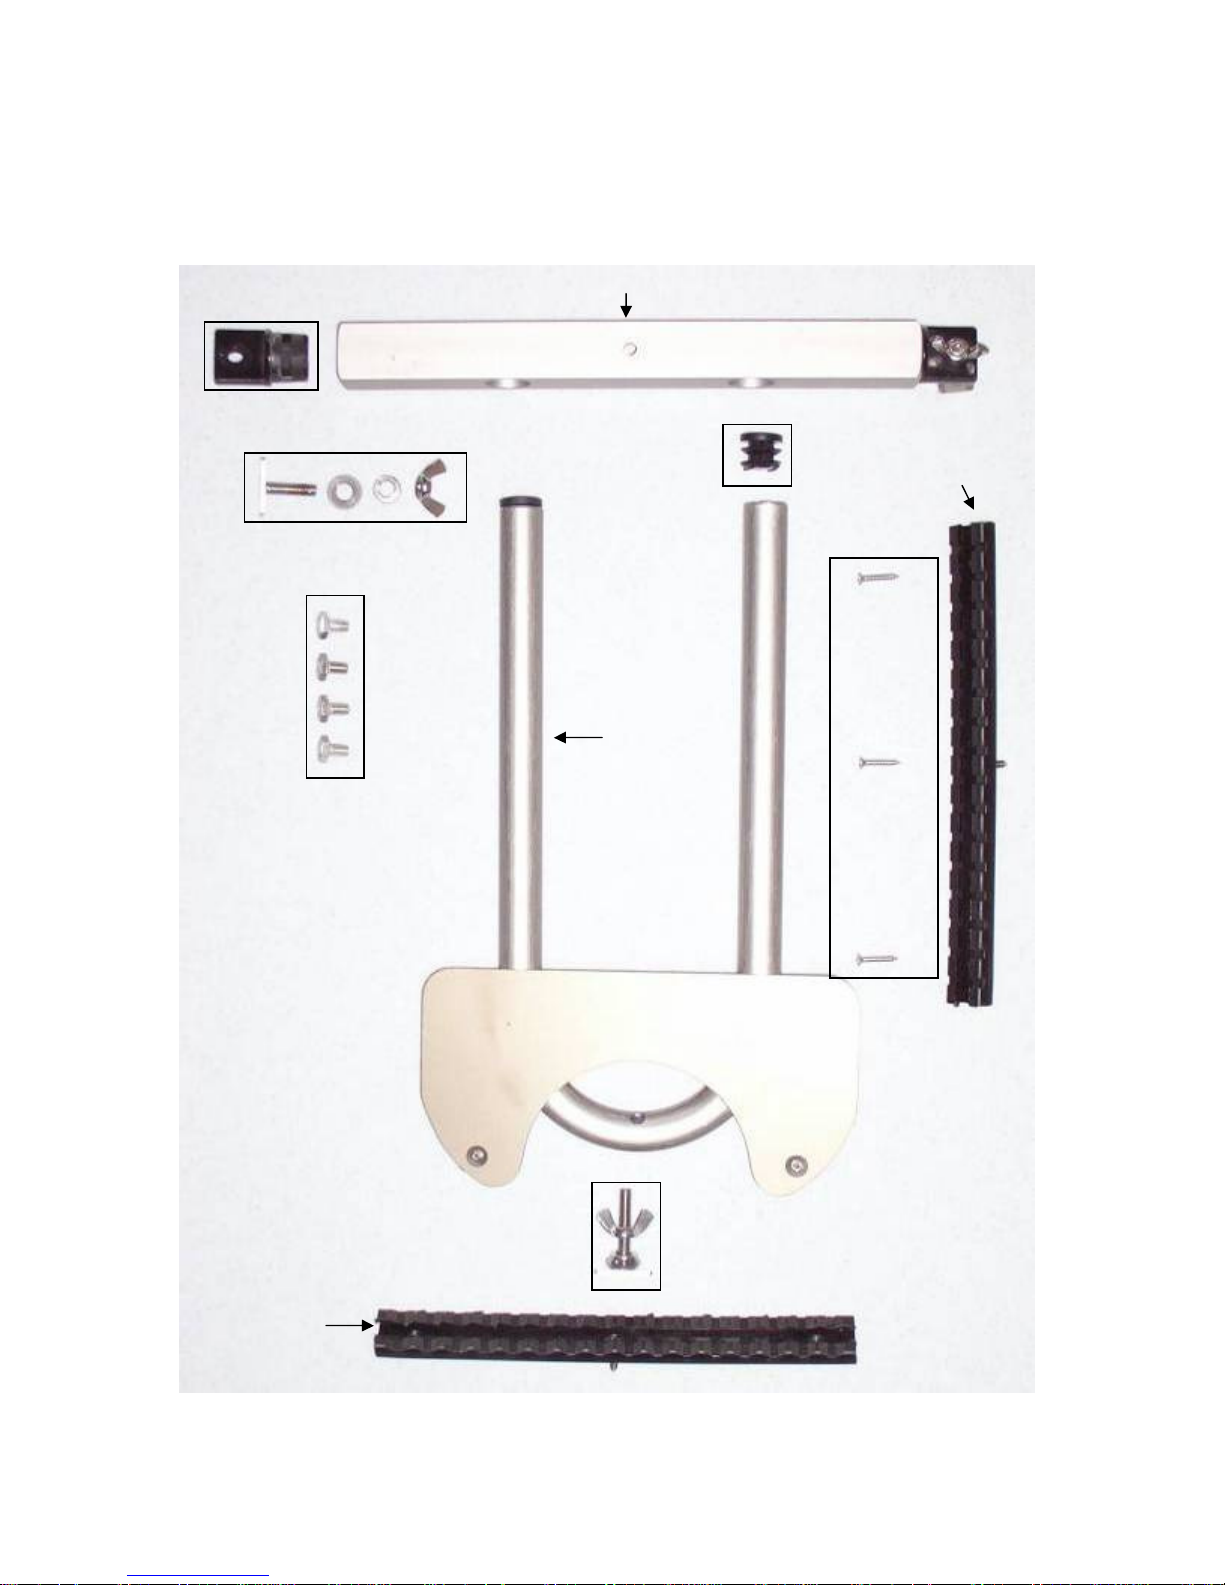
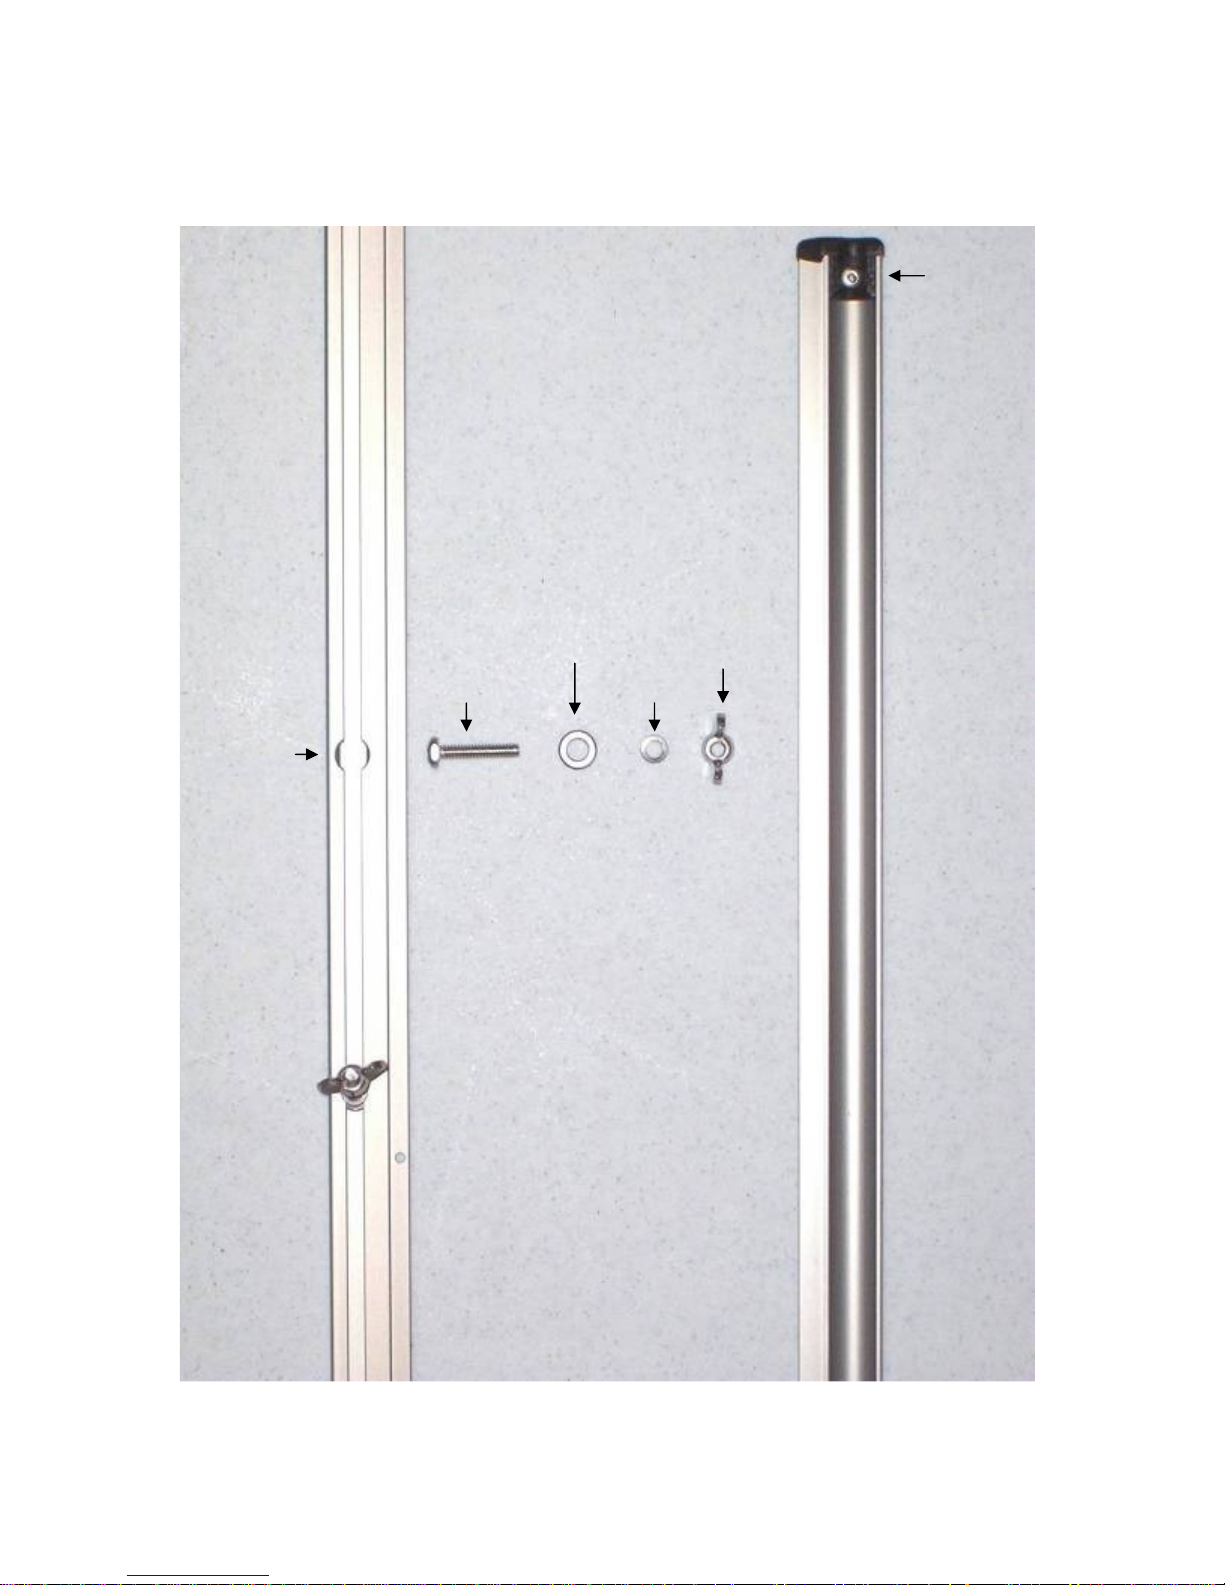
End Piece
Toe Bar
PARTS
Please use this section to help identify the parts referred to in this manual.
Foot assembly (without shoes and shoe Plate)
Foot Stretcher
1” Stretcher Bolt (side), Flat
Washer, Lock Washer and Wing
¼” x ½”
Bolts
(they thread
in the back
of the toe
bar and
shoe plate to
maintain
angle and
height)
Hairpin Plug
Notched
Channel
(side)
Channel
Screws
Hairpin
1 ½” Stretcher Bolt (centre),
Curved Washer, Lock
Washer and Wing Nut
Notched
Channel
(Centre)
9
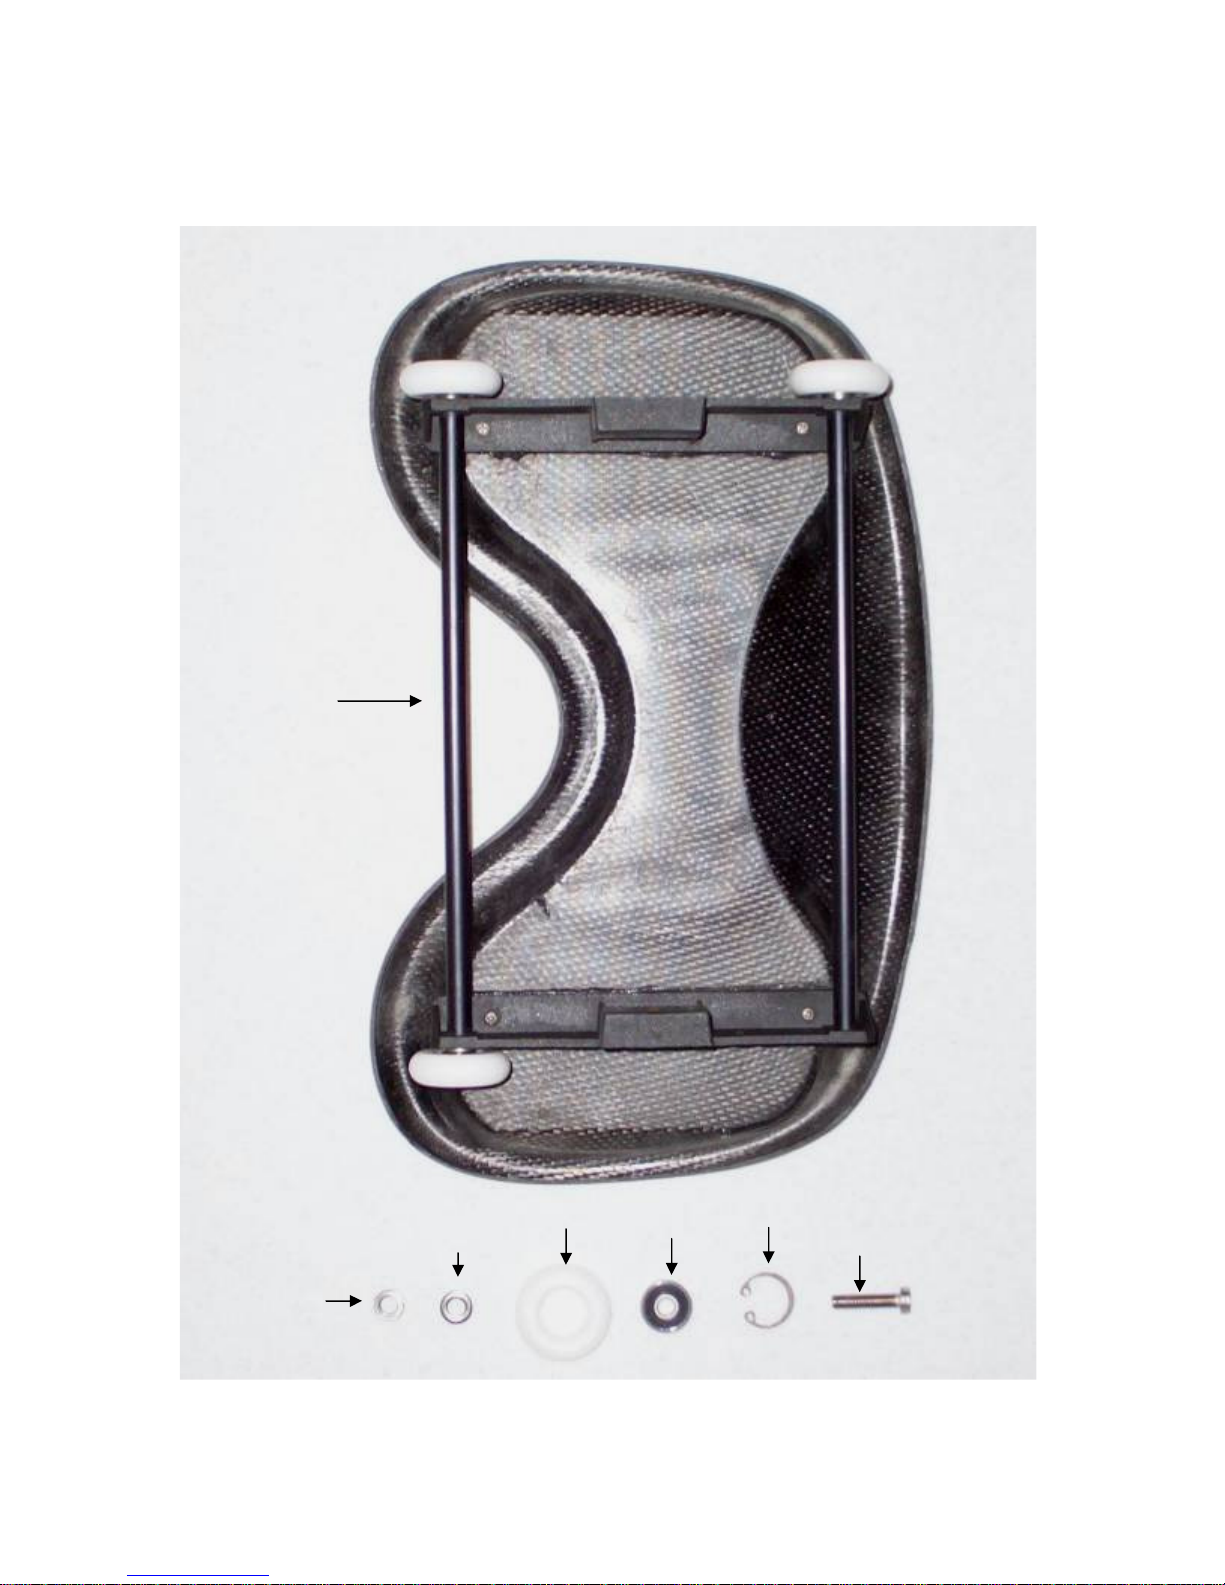
Lock Washer
Bolt
Flat Washer
Seat Assembly
Axle
Furk
Seat Top
Wheel
Bearing
Snap Ring
10
Flat Washer
Slides
Underside of Slide
Slide Bolt
Slide End
Wingnut
Lock Washer
Slide Bolt
Removal
Hole
11
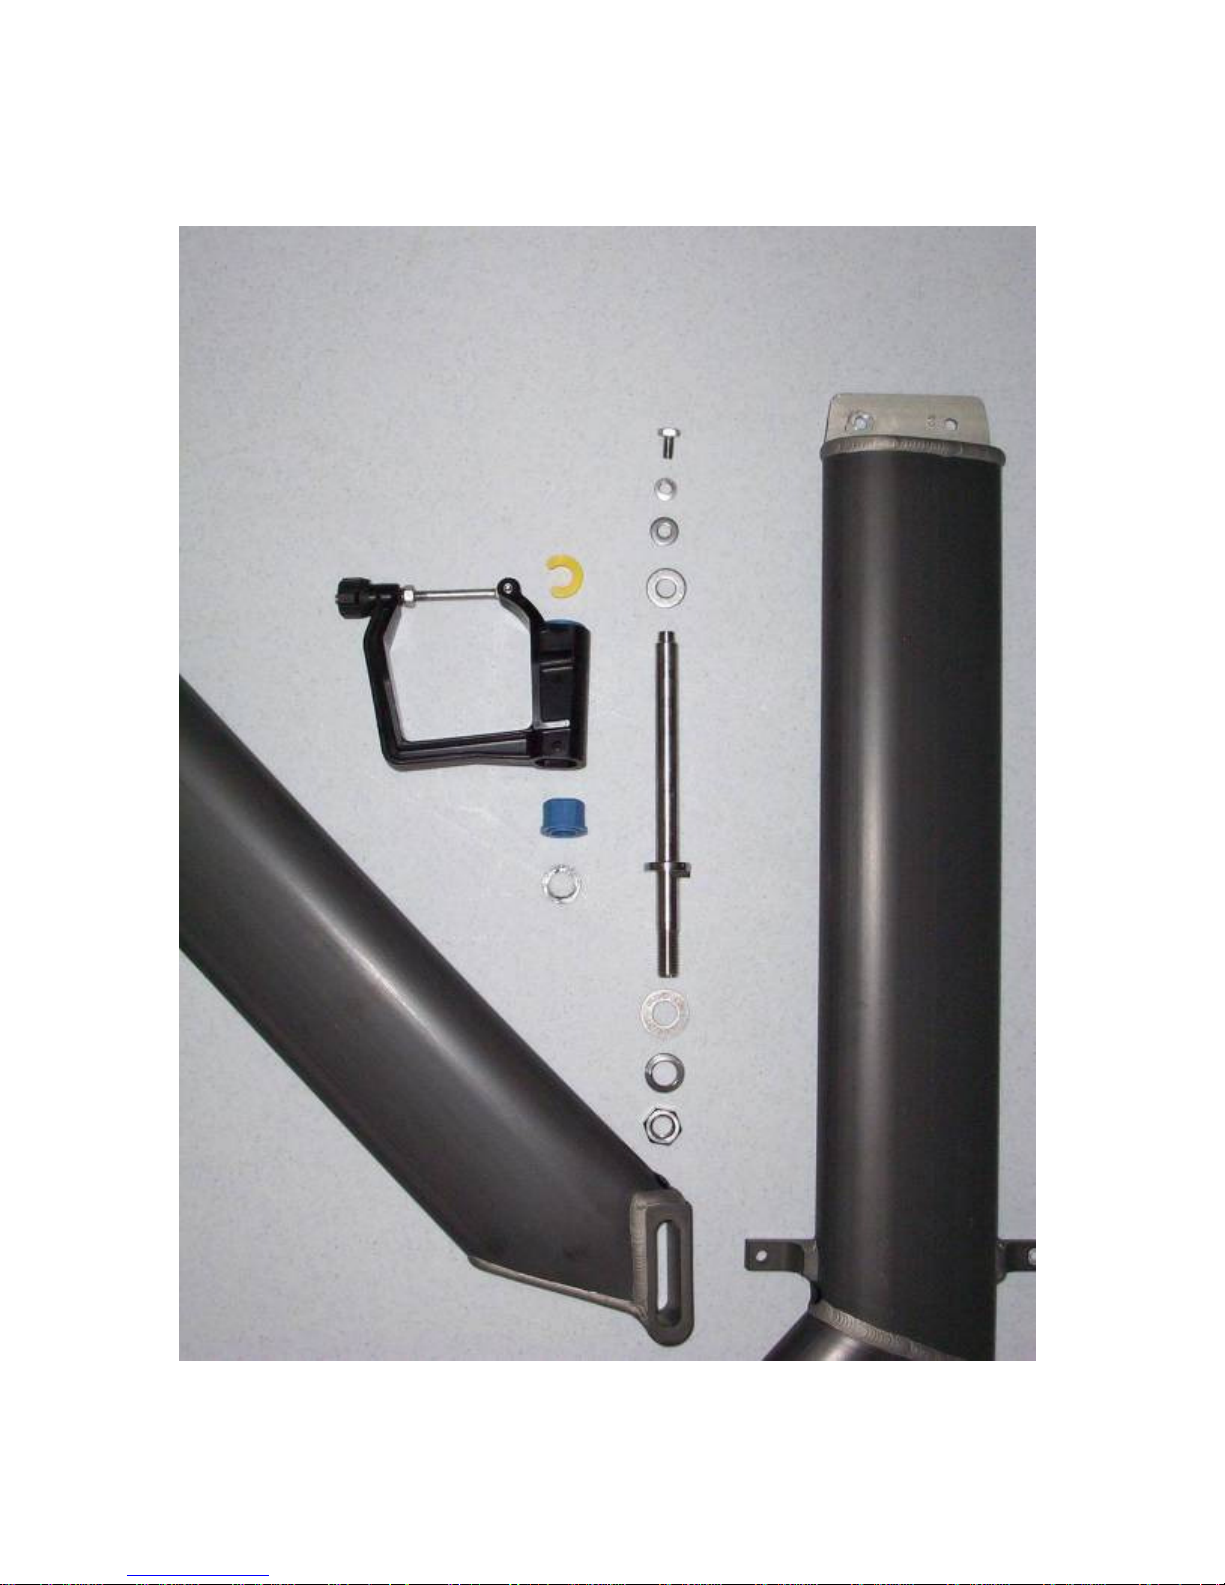
Speed Wa
sher
Sweep Angle Mount
Rigger (Sweep)
¼” x 3/8” Bolt
¼” Lock Washer
¼” Flat Washer
3/8” Backstay
Washer
Oarlock
Sweep
Pin
Pitch Bushing
Height Washer
½” Flat
Washer
½” Lock
Washer
½” Nut
PPiinn
BBlloocckk
Rigger
Shoe
Mount
 Loading...