

Hubsan ZINO PRO User Manual
®
ZINO PRO
《User Manual》
Version 2.0


Disclaimer & Warning
All users must read product operating instructions as well as this liability
disclaimer before using any Hubsan product. By using a Hubsan product(s),
users are accepting the terms and conditions of Hubsan liability and operational guidelines. This product is not suitable for minors under 14 years of
age. While operating a Hubsan product(s), users also accept all liability and
responsibility for their own behavior, actions as well as any consequences
resulting thereof while using a Hubsan product(s). These products may only
be used for purposes that are proper and in accordance with local regulations, terms and any applicable policies / guidelines Hubsan may make
available. Users agree to comply with these terms and conditions, along
with any and all relevant policies / guidelines set forth by Hubsan.
Instructions
Some product flight functions are restricted in certain areas. Once you use
this product, you are deemed to have read carefully the relevant ICAO
regulations, local airspace control provisions and the regulations governing
UAVs. You assume all liability for any non-compliance with the foregoing,
are responsible for the consequences for your actions as well as any indirect
and / or direct liability that arises as a result of these limitations.
Flight environment requirements
(1) Select an open environment devoid of high rise buildings and tall
obstructions (such as trees and poles). Near buildings and obstacles, flight
control signals and GPS signals can be severely weakened; GPS functions
such as GPS mode and Return to Home may not function properly.
(2) Do not fly in bad weather conditions (such as in wind, rain or fog).
(3) Fly the aircraft in ambient temperatures of 0-40 ℃.
(4) When flying, please stay away from obstructions, crowds, high voltage
lines, trees, water, etc.
(5) To avoid remote control signal interference, do not fly in complex
electromagnetic environments (such as venues with radio stations, power
plants and towers).
(6) The aircraft cannot be used in or near the Arctic circle or Antarctica.
(7) Do not fly in no-fly zones.
(8) Do not operate the aircraft near high pressure lines, airports or areas
with severe magnetic interference.

IMPORTANT SAFETY INFORMATION
OPERATION
Be extremely careful and responsible when using the aircraft. Small
electronic components can be damaged due to crashes or exposure to
moisture / liquid. To avoid any injuries, do not use the aircraft with broken
or damaged components.
MAINTENANCE
Do not try to open or repair the units by yourself. Please contact Hubsan or
Hubsan authorized dealers for service. For more information, please visit the
official website at www.hubsan.com.
BATTERY
Do not disassemble, squeeze, impact, burn, drop or trample the battery. Do
not short-circuit or put the battery terminal in contact with metal. Do not
expose the battery to temperatures above 60 ° C. Charge the aircraft battery
prior to flight. Use a Hubsan dedicated charger for charging. Keep the
battery out of the reach of children and away from any kind of moisture.
FLIGHT
Please be mindful of personal safety and the safety of others while flying.
-Do not fly in bad weather conditions.
-Do not attempt to catch the aircraft while it is in flight.
-This product is intended for experienced pilots over the age of 14.
-After every flight, completely disarm the aircraft motors and disconnect the
aircraft from power. Then, you may power off the remote control.
READ THE DISCLAIMER AND SAFETY GUIDELINES FIRST BEFORE USE.
Symbol Explanation:
Prohibited Operation
Important Notice
USAGE ADVICE
(Hubsan has created the following operational and safety materials):
Quick Start Guide
Instruction
Explanation / Reference
01

Hubsan Safety Advisory Notice for Lithium-Polymer (LIPO) Batteries
LiPo batteries are different from conventional batteries in that their chemical
contents are encased in a relatively lightweight foil packaging. This has the
advantage of significantly reducing their weight but it does make them more
susceptible to damage if roughly or inappropriately handled. As with all
batteries, there is a risk of fire or explosion if safety practices are ignored:
● If you do not plan to fly the aircraft for a long time, store the battery ~50%
charged to maintain battery performance and life.
● Please use Hubsan chargers for battery charging.
● Discharge the battery at 5C current or below. To avoid discharge related
battery damage, do not prolong the discharge time.
● Do not charge on carpet to avoid fire.
● Batteries need to be recharged if unused for over 3 months.
1. Do not disassemble or reassemble the battery.
2. Do not short-circuit the battery.
3. Do not use or charge near sources of heat.
4. Do not put the battery in contact with water or any kind of liquid.
5. Do not charge batteries under sunlight or near fire.
6. Do not puncture or subject the battery to force of any kind.
7. Do not throw or manhandle the battery.
8. Never charge a battery that has been damaged, become deformed or
swelled.
9. Do not solder on or near the battery.
10. Do not overcharge or over discharge the battery.
11. Do not reverse charge or reverse the battery polarities.
12. Do not connect the battery to a car charger / cigarette lighter or any kind
of unconventional power source.
13. This battery is prohibited for non-designated devices.
14. Do not touch any kind of liquid waste or byproduct from batteries. If skin
or clothes come in contact with these substances, please flush with water!
15. Do not mix other types of batteries with lithium batteries.
16. Do not exceed the specified charging time.
17. Do not place the battery in a microwave or in areas of high pressure.
18. Do not expose the battery to the sun.
19. Do not use in environments with high static electricity (64V and above).
20. Do not use or charge in temperatures below 0 ℃ and above 45 ℃.
21. If a newly purchased battery is used, leaking, possesses a bad smell or
other abnormalities, return immediately to the vendor.
22. Keep away from the reach of children.
23. Use a dedicated battery charger and follow all charging requirements.
24. Minors who use the battery and its dedicated unit must be supervised by
an adult at all times.
02

Contents
Important safety information
Using this manual
Read Before the First Flight
1.Aircraft
1.1 Aircraft Diagram
1.2 Aircraft battery charging
1.3 Aircraft battery installation
1.4 Propeller installation and
disassembly
2. Remote Controller
2.1 Remote Controller Diagram
2.2 Remote Controller Features
2.3 Connecting Your Mobile Device
2.4 Charging Remote Controller
2.5 Remote Controller Antenna
Angle
3 Flight
3.1 Download the X-Hubsan App
3.2 Main Interface Guide
3.3 Pairing the Aircraft
3.4 Calibration
3.4.1 Horizontal calibration
3.4.2 Compass Calibration
3.4.3 GPS Accuracy Test
3.5 Staring/Stopping the Motors
4. Flight Controller
4.1 Flight Control Mode
4.2 Flight Orientation Indicator
(Single-Color Lamp)
04
04
4.3 Return-to-Home(RTH)
4.4 Search the Drone Apron
04
4.5 Intelligent Flight Mode
04
05
4.5.1 Headless Mode
4.5.2 Creative video
05
4.5.3 Image Tracking
4.5.4 Orbiting
05
4.5.5 Waypoint
05
4.5.6 Line Fly Mode
07
07
4.6 Camera and Gimbal
4.6.1 Camera
08
4.6.2 Camera TF Slot
4.6.3 Gimbal Pitching Axis
08
Adjustment
08
09
4.7 Intelligent Protection
09
Function
11
4.7.1 Low Power Failsafe
11
4.7.2 Loss Of Flight Control
11
Failsafe
12
Frequently Asked Questions
13
Parts & Accessories Diagram
Disclaimer
Safety Guidelines
14
14
14
15
17
18
18
18
19
19
19
20
21
21
21
22
22
22
23
24
1 Aircraft
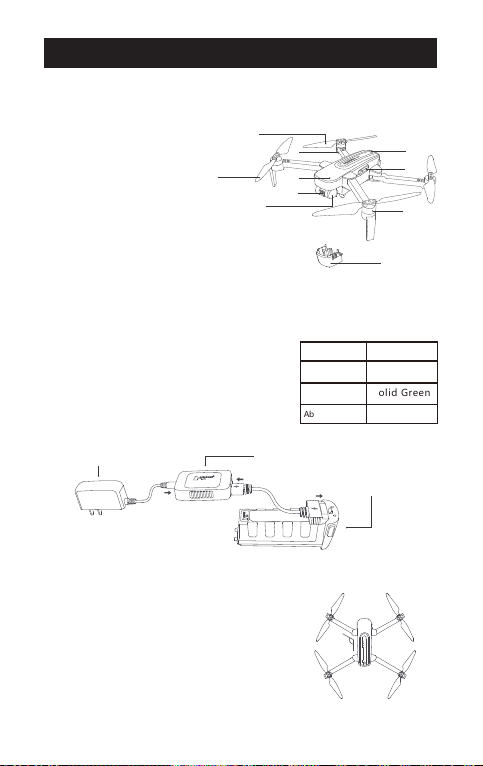
1.1 Aircraft Diagram
1. Propeller A
2. Propeller B
1
3. LED indicator
4. Motor
5. Body shell
6. 4K HD Camera
7. Micro-SD/TF Slot
2
8
8. Gimbal
9. Power
10. Gimbal Protection Guard
1.2 Aircraft battery charging
Charging::
Aircraft lithium battery capacity:
3000mah, 11.4V equipped with standard
adapter and Balance Charger, charging
time is about 4 hours.
Wall Adapter Balance Charger
1.3 Aircraft battery installation
Extend the front arms first then extend
the rear arms to the maximum angle.
Pinch the sides of the battery and push
the battery in until you hear a click.
Make sure the battery is locked in. To
remove the battery, hold the head of
the aircraft and pinch the sides of the
battery then pull the battery out.
3
5
6
10
Balance Charger LED Status:
Standby mode Green Fast Blink
Charging Solid Red
Full
Solid Green
Abnormal charge Red Fast Blink
Aircraft Battery
120°
9
7
4
04
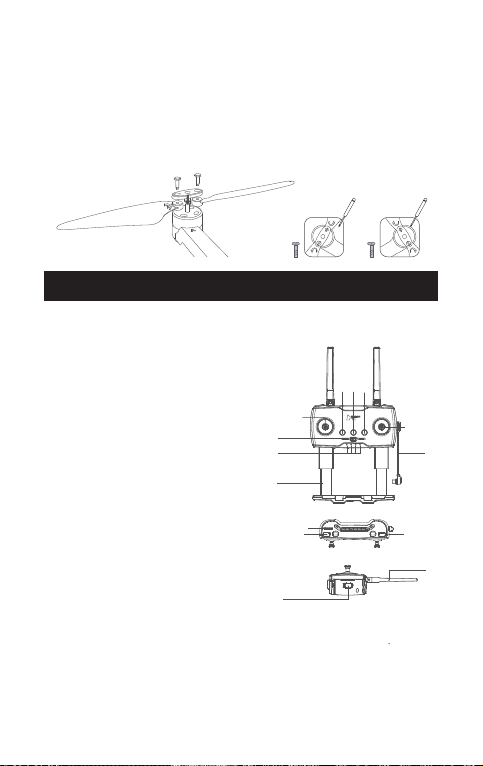
1.4 Propeller installation and disassembly
B
B
B
A
A
A
Before installing propellers for the first time, please check that
each Propeller A is matched with motor A and each Propeller B is
matched with motor B. Then use the provided screws to secure
each propeller. Tighten the screws clockwise to install them.
When the propellers need to be replaced, unscrew the propellers
by loosening the screws counterclockwise and then removing
the damaged propellers.
2 Remote Controller
2.1 Remote Controller Diagram
(1). Throttle / Aileron stick
(2). Elevator / Rudder stick
1. Throttle / Rudder Joystick
3 54
2. Elevator / Aileron Joystick
3. Return to Home (Aircraft
Returns to Takeoff Point)
4. Power (Long press)
5. Auto Takeoff / Land
6. Expert / Normal Mode
7. Power Status LEDs
8. Photo
9. Video
1(2)
6
7
1
2(1)
10
8
9
10. Gimbal Adjustment Wheel
11. Charging / Adapter Port
12. WIFI Antenna
11
13. Adapter Cable
When installing the mobile device, place the device in its dedicated frame and avoid pressing the device's buttons with the frame.
13
12
05
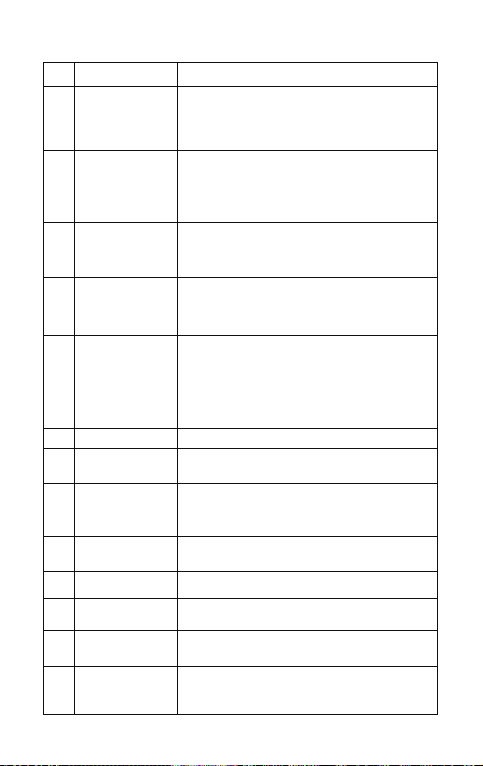
2.2 Remote Controller Features
Key / Switch Function
S/N
Throttle / Rudder
(1)
(2)
Stick
Elevator / Aileron
Stick
Throttle / Aileron
1
Stick
Elevator / Rudder
2
Stick
3 Return to Home
4 Power Switch
Auto Takeoff /
5
Land
Normal / Sport
6
Land
Power Status
7
LEDs
8 Photo
9 Video
Gimbal
10
Adjustment
Remote control
11
charging / patch
cord interface
Push the stick forward or backward and the
quadcopter will ascend or descend (respectively).
Push the stick left or right and the quadcopter will
fly left or right (respectively).
Push the stick forward or backward and the
quadcopter will fly forwards or backwards (respectively). Push the stick left or right and the quadcopter will rotate counterclockwise or clockwise
(respectively).
Push the stick forward or backward and the
quadcopter will ascend or descend (respectively).
Push the stick left or right and the quadcopter will
rotate counterclockwise or clockwise (respectively).
Push the stick forward or backward and the
quadcopter will fly forwards or backwards (respectively). Push the stick left or right and the
quadcopter will fly left or right (respectively).
Long press to enter the return mode, short press
to exit one button to return to the air;
During the flight, the remote control "Beep...
Beep..." prompt (once every three seconds) (RTH in
the aircraft GPS normal and search.
Can only be enabled when there are 6 or more
stars)
Long press to power on or off.
Long Press to auto takeoff or land.
Normal mode (left): The aircraft flies at the
maximum speed set by the APP
Expert mode (right): The maximum flight speed of
the aircraft is 10m/s
The 4 LEDs are battery indicators. Each LED
represents 25% of the battery.
Short press to take photos.
Long press to start recording. Short press to end
recording.
Controls the angle of the gimbal.
(1) Remote control charging interface
(2) Mobile device patch cord interface
06
Key / Switch Function
S/N
Low battery warning for the aircraft or remote
12
12
Low Battery
Warning
Standby
protection
control:
Remote control "Beep...Beep..." prompt (one time
per second)
The remote control has no operation for 10
minutes after standby, the remote control
"Beep...Beep..." Tips (once every three seconds)
After 3 minutes of prompting the sound, the
remote control will automatically shut down, and
there will be operation within 3 minutes, and the
prompt tone will stop
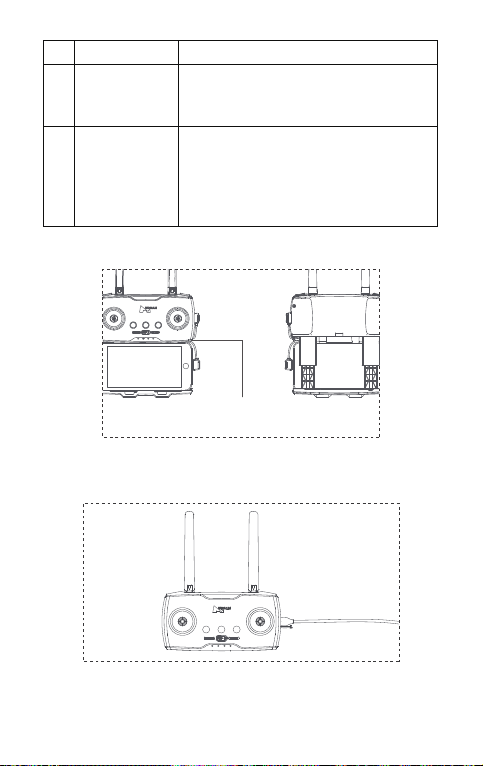
2.3 Connecting Your Mobile Device
®
A compartment for extra cables
2.4 Charging Remote Controller
The remote is charged using the Micro USB cable as shown:
®
The remote control charging time is about 2.5 hours.The remote
control battery indicator light flashes during charging.When
charging is complete, the LEDs will be solid green.
07
2.5 Remote Control Antenna Angle
(1) Adjust the angle of the remote control antenna and try to
face the flight direction of the aircraft as much asap;
(2) Long-distance state, the distance between the two antennas
is properly tightened to maintain the antenna directivity;
(3)Closer state, the two antennas are properly separated to
maintain a wide receiving range;
(4) Do not form an occlusion or cross between the antennas.
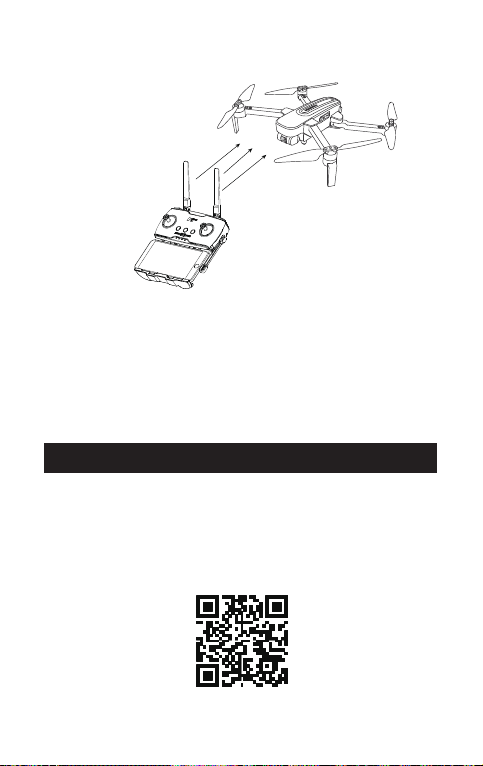
3 Flight
3.1 Download the X-Hubsan App
Before flying, users must download the X-Hubsan APP.
Download the APP for free by scanning the code on the right or
by downloading it via the App Store (iOS) and Google Play
(Android).
08
 Loading...