

Page 1
Zino 2
《User Manual》
V2.0
Page 2

Page 3

DISCLAIMER & WARNING
All users must read product operating instructions as well as this liability disclaimer
before using any Hubsan product. By using a Hubsan product(s), users are accepting
the terms and conditions of Hubsan liability and operational guidelines. This product
is not suitable for minors under 14 years of age. While operating a Hubsan product
(s), users also accept all liability and responsibility for their own behavior, actions as
well as any consequences resulting thereof while using a Hubsan product(s). These
products may only be used for purposes that are proper and in accordance with local
regulations, terms and any applicable policies / guidelines Hubsan may make available. Users agree to comply with these terms and conditions, along with any and all
relevant policies / guidelines set forth by Hubsan.Part of the details of this document
may change with the upgrade of the product software version. Please read the
upgrade details carefully before upgrading the software version. The instructions will
not be notified again.
INSTRUCTIONS
Some product flight functions are restricted in certain areas. Once you use this product, you are deemed to have read carefully the relevant ICAO regulations, local
airspace control provisions and the regulations governing UAVs. You assume all
liability for any non-compliance with the foregoing, are responsible for the consequences for your actions as well as any indirect and / or direct liability that arises as a
result of these limitations.
FLIGHT ENVIRONMENT REQUIREMENTS
(1) Select an open environment devoid of high rise buildings and tall obstructions
(such as trees and poles). Near buildings and obstacles, flight control signals and GPS
signals can be severely weakened; GPS functions such as GPS mode and Return to
Home may not function properly.
(2) Do not fly in bad weather conditions (such as in wind, rain or fog).
(3) Fly the aircraft in ambient temperatures of 0-40 ℃.
(4) When flying, please stay away from obstructions, crowds, high voltage lines, trees,
water, etc.
(5) To avoid remote control signal interference, do not fly in complex electromagnetic environments (such as venues with radio stations, power plants and towers).
(6) The aircraft cannot be used in or near the Arctic circle or Antarctica.
(7) Do not fly in no-fly zones.
(8) Do not operate the aircraft near high pressure lines, airports or areas with severe
magnetic interference.
Page 4

IMPORTANT SAFETY INFORMATION
OPERATION
Be extremely careful and responsible when using the aircraft. Small electronic
components can be damaged due to crashes or exposure to moisture / liquid. To
avoid any injuries, do not use the aircraft with broken or damaged components.
MAINTENANCE
Do not try to open or repair the units by yourself. Please contact Hubsan or Hubsan
authorized dealers for service. For more information, please visit the official website
at www.hubsan.com.
BATTERY
Do not disassemble, squeeze, impact, burn, drop or trample the battery. Do not
short-circuit or put the battery terminal in contact with metal. Do not expose the
battery to temperatures above 60 ° C. Charge the aircraft battery prior to flight. Use a
Hubsan dedicated charger for charging. Keep the battery out of the reach of children
and away from any kind of moisture.
FLIGHT
Please be mindful of personal safety and the safety of others while flying.
-Do not fly in bad weather conditions.
-Do not attempt to catch the aircraft while it is in flight.
-This product is intended for experienced pilots over the age of 14.
-After every flight, completely disarm the aircraft motors and disconnect the aircraft
from power. Then, you may power off the remote control.
READ THE DISCLAIMER AND SAFETY GUIDELINES FIRST BEFORE USE.
Symbol Explanation:
Prohibited Operation
Important Notice
Instruction
Explanation / Reference
Page 5

HUBSAN AIRCRAFT USES SMART BATTERY
● If you do not plan to fly the aircraft for a long time, store the battery ~50%
charged to maintain battery performance and life.
● Please use Hubsan chargers for battery charging.
● Discharge the battery at 5C current or below. To avoid discharge related
battery damage, do not prolong the discharge time.
● Do not charge on carpet to avoid fire.
● Batteries need to be recharged if unused for over 3 months.
1. Do not disassemble or reassemble the battery.
2. Do not short-circuit the battery.
3. Do not use or charge near sources of heat.
4. Do not put the battery in contact with water or any kind of liquid.
5. Do not charge batteries under sunlight or near fire.
6. Do not puncture or subject the battery to force of any kind.
7. Do not throw or manhandle the battery.
8. Never charge a battery that has been damaged, become deformed or swelled.
9. Do not solder on or near the battery.
10. Do not reverse charge or over discharge the battery.
11. Do not reverse charge or reverse the battery polarities.
12. Do not connect the battery to a car charger / cigarette lighter or any kind
of unconventional power source.
13. This battery is prohibited for non-designated devices.
14. Do not mix other types of batteries with lithium batteries.
15. Do not exceed the specified charging time.
16. Do not place the battery in a microwave or in areas of high pressure.
17. Do not expose the battery to the sun.
18. Do not fly in places with strong interference( high-voltage line, power
stations, base stations, high-speed rail lines, signal towers, etc.)
19. Do not use or charge in temperatures below 0 ℃ and above 45 ℃.
20. If a newly purchased battery is used, leaking, possesses a bad smell or
other abnormalities, return immediately to the vendor.
21. Keep away from the reach of children.
22. Use a dedicated battery charger and follow all charging requirements.
23. Minors who use the battery and its dedicated unit must be supervised by
an adult at all times.
Page 6

Contents
Disclaimer
Important safety information
Battery use precautions
1 Aircraft
1.1 Aircraft Spare Part
1.2 Aircraft Battery
1.2.1 Aircraft Battery Charging
1.2.2 Aircraft Battery Installation
1.2.3 Intelligent Flight Battery Function
1.2.4 Precautions For Low Tempera-
ture
1.2.5 Precautions For Battery
1.3 Propellers
2 Remote Controller(America Mode 2)
2.1 Names Of Remote Controller Compo-
nents
2.2 Remote Controller Features
2.3 Charging The Transmitter Battery
2.4 Remote Control Diagram
2.5 Remote Control Antenna Angle
2.6 Transmitter Calibration
3 Flight
3.1 Download The X-hubsan 2.0 App
3.2 Main Interface Guide
3.3 Pairing The Aircraft
3.4 Aircraft Calibration
3.4.1 Horizontal Calibration
3.4.2 Compass Calibration
3.4.3 Gps Accuracy Test
3.5 Staring/stopping The Motors
4 Flight Controller
4.1 Flight Control Mode
1
4.2 Flight Orientation Indicator
( Single-color Lamp)
1
4.3 Eturn-to-home(Rth)
3
4.4 Search The Drone Apron
3
4.5 Flight Mode
3
4.5.1 Headless Mode
4
4.5.2 Creative Video
5
4.5.3 Follow Mode
4.5.4 Orbiting
5
6
4.5.5 Waypoint
4.5.6 Line Fly Mode
6
4.5.7 Time-lapse Photography
6
4.5.8 Panorama Mode
7
4.6 Gimbal Camera
4.6.1 Camera Settings
8
Gimbal Pitch Axis Adjust-
4.6.2
9
ment
10
4.6.3 Tf Card
10
5 Faq
10
Limitation Of Liability
10
Fcc Information
11
11
13
13
13
14
15
16
16
16
17
18
18
18
19
19
20
20
21
22
23
24
24
24
25
25
Page 7
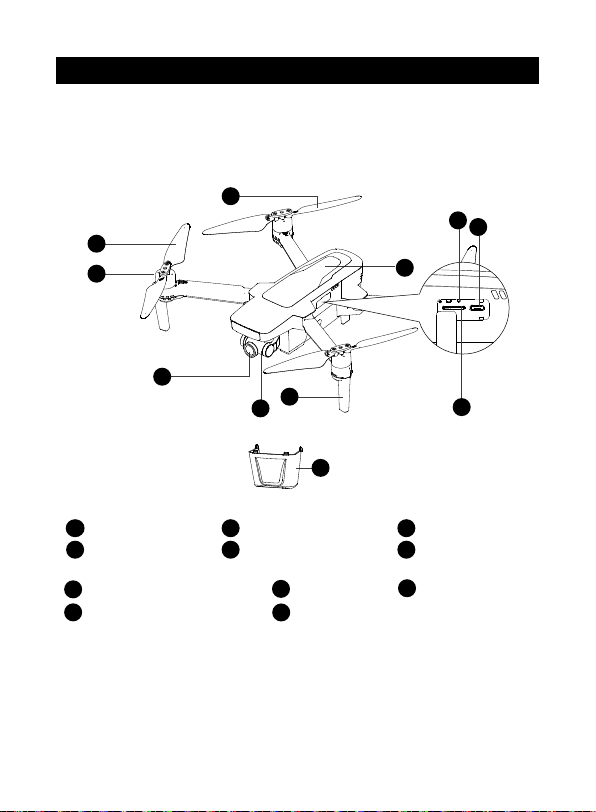
1.Aircraft
1.1 Aircraft Spare Part
2
3
6
1
9
11
5
4
7
8
10
1 3
Propeller A
2
Propeller B
7
3-axis gimbal
8
Gimbal Protection Guard
Motor
4
Tripod
(With Antenna)
9
Bind key
10
TF Slot
1
5
Body shell
6
4K HD Camera
11
USB Slot
Page 8

14
15
12
Intelligent Battery
13
Battery level indicator
13
16
Rear LOGO
12
14
Battery power switch
15
Battery buckle
16
Auxiliary altitude
hold system
2
Page 9

1.2 Aircraft Battery
1.2.1 Aircraft Battery Charging
Aircraft Lithiun Battery Capacity: 3800mAh, 15.2V lithium battery equipped with a
standard charger,charging time is about 110 minutes.
① Connect the power adapter to AC power (100V-240V, 50-60Hz).
② Connect the Intelligent Flight Battery and the power adapter with Intelligent
Flight Battery turned off
③ Intelligent Flight Battery Level indicator will flash and indicate current battery
lever under charging
④ Intelligent Flight Battery is fully charged when power indicator lights are all off.
Please remove the Intelligent Flight Battery and power adapter to complete
charging.
Note: After using the battery, please re-charge it in time (at least 50%) to avoid
long-term storage of the battery and affecting battery life.
Balance Charger Charger Adapter
Aircraft Battery
1.2.2 Aircraft Battery Installation
1
Prepare the aircraft battery
Put the battery into the battery compartment,
2
and press the buckles on both sides of the
battery until the buckles pop out
Check if the battery buckles snaps
3
into place
3
1
3
2
Page 10

1.2.3 Intelligent Flight Battery Function
(1) Power display: The battery has a power indicator, which can display the current
battery power.
(2) Battery storage self-discharge protection: After the battery is fully charged and
stored for 10 days without any operation, the battery will automatically turn on the
self-discharge mode to protect the battery (there may be slight heating during
discharge).
(3) Balance protection: automatically balance the battery cell voltage to protect the
battery.
(4) Charging temperature protection: When the battery temperature is below 5 °
Cor above 40 ° C, battery will be damaged. So battery will not start charging at this
temperature,
(5) Charging over-current protection: High-current charging will seriously damage
battery. When charging current is too large, the battery will stop charging.
(6) Overcharge protection: Overcharging will seriously damage the battery. When
the battery is fully charged, it will automatically stop charging.
(7) Over-discharge protection: Excessive discharge will seriously damage the
battery. When the battery is not in use. Battery will cut off the output when it is
discharged to a certain voltage. While over-discharge protection won't start during
the flight.
(8) Short circuit protection: When the battery detects a short circuit, it will cut off
the output to protect the battery.
(9) Cell damage detection: When the battery detects that the battery is damaged or
the battery is seriously unbalanced, it will indicate that the battery is damaged.
(10) Hibernation protection: When the battery is on, the battery will turn off the
output after 20 minutes and will enter into no-working state to maintain the power
if no electrical equipment is connected. When the battery power is less than 5%, if
the machine is locked but not turned off, it will automatically shut down. If the
machine is turned off, the battery will automatically enter the sleep state to prevent
over-discharge. At this time, short press the battery switch, the power indicator will
not light up, the battery can be waken up by charging again.
(11) Communication: The aircraft can obtain battery information in real time
through the communication interface on the battery such as voltage and power.
Battery switch
Short press to check the battery level, it will turn off
after 3 seconds
Short press first and then long press to turn
on / off, the indicator light turns on / off
4
Page 11

1.2.4 Precautions for Low Temperature
(1) If the battery is used in a low temperature environment (-10 ° C to 5° C), please fully
charge and keep the battery warm before use.
(2) The battery cannot be used in an environment below -10 ° C.
(3) In a low temperature environment, it is recommended to stop the flight immediately when the APP prompts “Low Battery Alarm”.
(4) In a low temperature environment, it is recommended that the battery be preheated to 5 °C or higher before flight.
(5) In low temperature environments, the aircraft's wind resistance will be reduced due
to the battery output power limitation. Please operate with caution.
(6) Before flying in a low temperature environment, you can insert the battery into the
aircraft to warm up for 1 to 2 minutes, and take off after the battery is fully warmed up.
1.2.5 Precautions For Battery
Be sure to fully charge each time before using the Intelligent Flight Battery.The Intelligent Flight Battery must be use a Hubsan dedicated power adapter for charging.
(1) The temperature of the Intelligent Flight Battery is high after the flight is over. The
Intelligent Flight Battery must be cooled to room temperature before charging the
battery.
(2) The charging temperature range of the intelligent flight battery is 5 ° C to 40 ° C. If
the temperature of the battery cell is not in this range, the battery management system
will prohibit charging. The optimal charging temperature range is 25 ± 3 ° C. Charging
in this temperature range can extend the battery life.
5
Page 12

1.3 Propellers
B
B
B
A
A
A
Before installing the propeller, please carefully check the letters beside the aircraft
motor and the letters on the propeller. The two letters must be the same when
installing; When the blade is damaged or needs to be replaced, remove the screw
counterclockwise to remove the propeller.
2. Remote Controller(America Mode 2)
2.1 Names Of Remote
Controller Components
2-1
465
1
9
7
3
13
1) Mobile Device holder
2-1)Throttle / Rudder Stick
2-2) Forward / backward / left /
right flight control levers
3) Return to Home
4) Power
5) F / N / S mode:
Movie mode / normal mode /
2-2
sport mode
6) Display
7) Photo
12
8) Video
9) Gimbal Adjustment Wheel
10) Custom keys
11) Antenna
12) Remote control extension cable
10
8
13) Charging / Adapter Port
14 Lanyard hole
15) Rocker storage
16) Cable storage
11
14
6
15 1516
Page 13

2.2 Remote Controller Features
Key / Switch Function
S/N
Throttle / Rudder
(1)
Stick
Push the stick forward or backward and the quadcopter will ascend or descend (respectively). Push the
stick left or right and the quadcopter will fly left or
right (respectively).
Elevator / Aileron
(2)
Stick
Throttle / Aileron
1
Stick
Elevator / Rudder
2
Stick
3
Return to Home
4
Power Switch
F / N / S mode
5
(Movie / Normal /
Sport mode)
6
Display
7
Photo
8
Video
Gimbal Adjustment
9
Wheel
Push the stick forward or backward and the quad
copter will fly forwards or backwards (respectively).
Push the stick left or right and the quadcopter will
rotate counterclockwise or clockwise (respectively).
Push the stick forward or backward and the quadcopter will ascend or descend (respectively). Push the
stick left or right and the quadcopter will rotate
counterclockwise or clockwise (respectively).
Push the stick forward or backward and the quadcopter will fly forwards or backwards (respectively).
Push the stick left or right and the quadcopter will
fly left or right (respectively).
Long press to enter home mode, short press to exit
and return to home;
During the flight, the remote control "Beep... Beep..."
prompt (once every three seconds)
Press first a short press and then a long press to
power on or off
Movie mode: Flying speed of the aircraft 1m / s
Normal mode: the aircraft flies at the maximum
speed set by the APP,12m / s
Sport mode: the maximum flying speed of the
aircraft is 20m / s
Display flight parameters
Short press to take photos.
Long press to start recording,
short press to end recording
Controls the angle of the gimbal.
7
Page 14

Key / Switch Function
S/N
Press and hold the Fn button, turn the gimbal adjustment
Wheel to adjust tthe brightness of the remote control
display at the same time.
The remote control buzzer beeps when a low battery is
triggered or RTH Press the Fn button for 1.5 seconds, and
the beep will stop. Long press the Fn button again 1.5
seconds to restore the beep.
10
Custom keys
Charging /
11
Adapter Port
Custom keys,set the function on the APP and save it in
when the APP is not connected, [short press] Fn doesn't
work.
Function one: Exit the current flight mode. APP is performing various functions.
In the mode, short press Fn to exit the current mode and
the aircraft hover.
Function two: short press Fn to execute gimbal return.
Function three: no function Settings)
Charge the remote control or connect with a mobile device
Low Battery
12
Warning
Standby
13
Protection
Low battery warning for the aircraft or remote control:
Remote control "Beep...Beep..." prompt (one time per
second)
The remote control has no operation for 10 minutes after standby, the remote control "Beep...Beep..." Tips (once every three
seconds)
After 3 minutes of prompting the sound, the remote control will
automatically shut down, and there will be operation within 3
minutes, and the prompt tone will stop
2.3 Charging The Transmitter Battery
The remote is charged using the Micro USB cable as shown:
The remote control charging time
is about 2.5 hours.The remote
control battery indicator light
flashes during charging.When
charging is complete, the LEDs
will be solid.
8
Page 15

2.4 Remote Control Diagram
4
1
3
7
8
9 9 10 11 12 13
5 6
2
1 Aircraft Battery
2 Remote Controller Battery
5
Aircraft GPS Satellite
6
Aircraft Signals
9
Photo / Video
10
Flight Distance
12
Aircraft speed
3
Propellers Status
4
Aircraft Mode
7
Heading Angle
8
Character Area
Compass Calibration /
11
Headless Mode
13
Photo / Video
9
Page 16

2.5 Remote Control Antenna Angle
(1) Adjust the angle of the remote
control antenna and try to face the
flight direction of the aircraft as much
as possible;
(2) Long-distance state, the distance
between the two antennas is properly
tightened to maintain the antenna
directivity;
(3) Closer Sate, the two antennas are properly separated to maintain a wide receiving range;
(4) Do Not Form an occlusion or cross bettern the antennas.
2.6 Transmitter Calibration
(1)Pull the both joysticks to the upper left corner, and simultaneously press and
hold the power button to turn on the transmitter, release the power button and
joysticks after hearing the transmitter make some beep sounds and the LED indicator light continues to flash in cycle.
(2)Rotate the both joysticks to the maximum angle clockwise for at least 3 times,
then release the joystick.
(3)Long press any button(except the power button) on the transmitter, when the
transmitter beeps 3 times and the LED indicator light become solide, the transmitter calibration is complete.
(4)Shut down and restart the transmitter.
3 Flight
3.1 Download The X-hubsan 2.0 App
Before flying, users must download the X-Hubsan 2.0 APP.
Download the APP for free by scanning the code
as shown or by download it via APP Store (IOS)
Or Goggle Play.
10
X-Hubsan 2.0
Page 17

3.2 Main Interface Guide
Home Page
Flight Status
Motor
Status
FPV
(Video)
Signal
Remote
Control
Signal
Aircraft
GPS
Signal
Aircraft
Battery
Level
Setting
Not Connected
Flight Mode
Auto Takeoff / Auto RTH
00.000000 , -000.0000
45.877503 , -106.123984,65m
Headless On / Off
Gimbal Pitch
Location
Aircraft SpeedAircraft GPS
SPEED 0.0M/S
H: 0.0m D: 0.0m
100%
11V
Camera
Setting
Photo /
Video Switch
Take Photo /
Video
Gallery
Altitude DistanceTransmitter GPSAltitude Ball
Note: This is the interface in Map mode
3.3 Pairing The Aircraft
(1) Run X-Hubsan 2.0 APP, choose the aircraft model.
(2) Short press the aircraft power button and then long press for a few seconds to
turn it on.
(3) Short press the transmitter power button and then long press for a few seconds
to turn it on, connect the transmitter to your mobile device with the RC cable.
Not connected
Before Pairing After Pairing
Not connected
11
Page 18

(4) Start binding (This step is only required when first binding or replace the trans-
Controller
Scan aircraft
HUBSAN_ZINO2_XXXXXX
Connect
Refresh
Controller
mitter, do it manually.)
1. Go to APP - Setting - Controller, transmitter connection method: Leas
Transmitter model
HT018A
Set transmitter and aircraft connection
Joystick setting
Custom button Fn
2. Using a pin to long press the aircraft bind button to enter binding mode.
3. Select "Set transmitter and aircraft connection" and scan aircraft.
4. Select the aircraft and connect.
Tips:
1. Using a pin to long press the aircraft
bind button to enter binding mode;
2. Click "Refresh" to refresh the aircraft
list, please make sure the your mobile
device and transmitter is connected before
refreshing;
3. Select the aircraft and connect.
You have to complete the binding process on APP when first use or replace the
transmitter, and then you can fly the aircraft with the transmitter directly without
connecting to the APP.
Tips:
-The binding process has been completed in the factory. Generally, user only need
to do the first 3 steps.
-After entering binding mode, all 4 LEDs flash rapidly and become solid after binding successfully.
-Please keep the distance between the aircraft and transmitter within 1 meter when
binding.
Leas
No function
12
Page 19

3.4 Aircraft Calibration
3.4.1 Horizontal Calibration
During the flight, when the aircraft has a significant horizontal deviation, please
land the drone, lock the motor, and place it on the horizontal ground. Then enter
the APP setting interface, select horizontal calibration, the aircraft will automatically
perform the calibration, the four heading lights will flash, and it will stay on after
the calibration is completed. Do not move the aircraft during calibration.
Aircraft
Aircraft model Parameter unit
Waypoint parameters
Device binding
The aircraft is bound to the current mobile device, and on
longer establish a binding with other devices.
Calibration
Metric Unit (m/s)
Start binding
Compass calibration
Horizontal Calibration
3.4.2 Compass Calibration
When using for the first time, the compass calibration will pop out before takeoff.
Follow the instructions on your screen, rotate the aircraft horizontally the n point
the aircraft nose down and rotate it c lockwise. The compass calibration message
will disappear once it is complet ed. You must complete the compass calibration
before flying the aircraft for the first time.
The compass is susceptible to interference by electronic equipments,magnetic
interference and metals and interference could lead to erratic behavior and loss of
control. Regular calibration helps to keep the compass and its readings accurate. In
the "Settings", select "Compass Calibration" under "Calibration".
13
Page 20

3.4.3 GPS Accuracy Test
After entering the APP interface, tap on "Aircraft", select "GPS
Accuracy Test" then tap on "En able / Restart GPS Accuracy Test".
The aircraft will automatically proceed to test.
Aircraft
GPS Accuracy Test
Current GPS Accuracy
5m
Start GPS Accuracy Test
GPS Accuracy Test Timeout
15
Return altitude setting
The aircraft will rise to the set RTH altitude before
activate RTH
3.5 Starting/Stopping the Motors
Motor starting condition
(1) The aircraft, remote control and mobile phone have been connected;
(2) The aircraft has been calibrated by the compass (four Orientation lights are
always on);
14
Page 21

(3) The aircraft must be placed horizontally
(4) It is not recommended to take off forcefully when the GPS satellite signal
is not reached.
Connected
Starting the Motors
Push both stick to the bottom outer corners to start the motors. Once the motors
have started spinning,Release both sticks simultaneously.
Stopping the Motors
When the motor is running,Push both stick to the bot tom outer
corners to stop the motors. Release both sticks once motors stop.
Forced to Stop
When flying in the air, the motor c an be forced to stop in 2 seconds with outer
eight bar. Use this function with caution, as it can cause the aircraft to fall and may
endanger personal safety.
4 Flight Controller
4.1 Flight Control Mode
Flight Speed
Movie Mode
Normal Mode
Sport Mode
Maximum speed 1m/s
Maximum speed is 12m / s, which can be adjusted in the
APP settings by 10% -100%
The maximum speed is 20m / s, the sport mode is only
available in the GPS mode.
15
Page 22

(The flight controller judges the GPS signal and switches the corresponding mode)
GPS
Mode
Optical
flow
mode
Attitude
mode
With good GPS conditions, using GPS fixed point and optical flow
assist.
When the aircraft is hovering, and the GPS quantity is insufficient,
using the optical flow fixed-point mode.
The effectively fixed height of optical flow mode is 3 meters and
greater than 3 meters for attitude mode.
In this mode, the maximum speed of the aircraft is 3m / s. The intelligent mode is not available. Please fly with caution.
When GPS and optical flow effects are weak, the only manual flight
is available, and intelligent mode is prohibited. In attitude mode, the
aircraft's fixed point is abnormal. Please land as soon as possible.
Flight Control Mode
4.2 Flight Orientation Indicator ( Single-Color Lamp)
Calibration
Power On And
Start Up
Compass
Calibration
Horizontal
Calibration
All 4 LEDs flash slowly
Calibrate Compass 1:All 4 LEDs flash in cycle
Calibrate Compass 2:All 4 LEDs flash in vertical pairs alternately
All 4 LEDs flash slowly
Flight Mode
Normal Mode
Low Power
Indicator
Loss Of Flight
Control Indicator
Headless Mode
RTH
Photo
Video
Light-Off
All 4 LEDs are solidly lit
Fore / frontal blue LEDs stay solidly lit and the rear
red LEDs flash rapidly
The front Orientation light flashes slowly in blue, and
the rear Orientation light is steady red. (When there is
a conflict with low battery, priority is displayed.)
Fore/front blue LEDS flash in vertical pairs alternately
and rear red LEDs stay solidly
Fore / frontal blue LEDs stay solidly lit and the rear
red LEDs flash slowly
Rear red LEDs flash once
Rear red LEDs flash alternately
Long press the camera button.
16
Page 23

4.3 Return-to-home(Rth)
There are three types of RTH: One-key RTH, Low Battery RTH,and Failsafe RTH.
When taking off, GPS ≥ 6 stars, the aircraft successfully recorded to the return
point. If there is no GPS signal forced take-off, the position with the latest GPS ≥ 6
stars is recorded as the return point.
RTH-Process
1. Record "Home Point" 2. Trigger return conditions
3. Adjust t he direction of the head
4. Return to the return altitude set by APP
(1) Regardless of the current height of the aircraft, if the aircraft is within 5
meters of the horizontal distance, land directly;
(2) If the horizontal distance is 5 meters away and within 20 meters, return at the
current altitude;
(3)In 20 meters away,if the altitude of aircraft is more height than the return
altitude ,it will re turn directly; If no, it will rise to up to the return alt itude ,and
then RTH ;
5. Search for the drone apron during the landing process (Make sure this function is on).
One-key RTH
APP one-Key RTH / remote control one-Key RTH
Low Battery RTH
The flight controller will display a notice when a low battery warning is triggered.
The aircraft will automatic ally re turn to the Home Point if the current power is
enough,otherwise it will land directly. when without GPS signal or signal is not
strong that will land directly.
Performance requirements:
(1) The appropriate low-voltage protection voltage is automatically calculated
according to the altitude and distance of the flight;
(2) After the low power forced landing or crash, if the power is lower than 10%,
enter the protection mode: turn off the picture transmission, but save normal
data communication.
Failsafe RTH
When t he aircraft loses connection with t he remote control for more than 5
seconds, the aircraft automatically returns or land directly.Performance requirements:
(1) After the aircraft loses control for 5 seconds, it triggers automatic return;
(2) If t he connection is restored during the return flight, the return flight can be
canceled;
(3) Landing directly when there is no GPS signal or the signal is not strong.
(4) After the aircraft re-establishes the connection, the priority control signal
establishes a connection. The connection is not established until 10 seconds after
the signal is transmitted, and the image connect ion can also be forced by the
shortcut button.
®
17
Page 24

4.4 Search The Drone Apron
45.877503 , -10 6.123984,65m
H: 0.0m
D: 0.0m
45.877503 , -106.123984,65m
H: 0.0m
D: 0.0m
When the aircraft landed or returned to a height of about 10 meters from
the ground, it will automatically enter the search for the drone apron function.
Connected
100%
11V
45.877503 , -106. 123984
(1) The gimbal overlooks the search for the drone apron [H], Apron
requirements: 1 Sharp contrast, 2 white "H" lettering, 3 Apron without
obstruction.
(2) The aircraft will first pan to the top of the apron and locks the
apron, then descend smoothly after successful recognition. When
landing to a height of less than 3 meters, the aircraft pan/tilt will
resume normal view and no longer adjust the posit ion of the aircraft
and land directly. If an error is identified or other unexpected circum
stances occur, press the stop button to exit the function.
(3) If the aircraft has not been found to the apron or critical low
battery when it has landed 5 meters, the aircraft will land directly.
(4) The search for the drone apron function cannot be performed in
video mode.
(5) If needn't, please turn it off in the settings.
SPEED 0 .0M/S
T: 0% R: 0%
E: 0%
A: 0%
4.5 Flight Mode
4.5.1 Headless Mode
100%
T: 0% R: 0%
11V
E: 0%
A: 0%
Connected
45.877503 , -106.123984
Record a flight path,the direction of the nose is the direction of advance,the
heading and forward direction of the aircraft are independent of the direction of
the nose during flight.
SPEED 0.0M/S
18
Page 25

4.5.2 Creative Video
100%
11V
45.877503 , -106.123984,65m
H: 0.0m
D: 0.0m
100%
11V
Panorama Photography:
(1) Select the direction of rotation (clockwise / counterclockwise);
(2) Set the rotation angle, the range of rotation angle (90 ° -360 ° ,accuracy 1°);
(3) Set the speed (2-30 ° / sec, accuracy 1);
(4) Click GO, the aircraft rotates in place in the hover position,shooting during the
rotation + storage Video recording;
(5) During the execution, you can click the exit button to exit the mode and save
the video.
Connected
Angle
Speed
ccw
cw
E: 0%
A: 0%
4.5.3 Follow Mode
Enter into follow mode to choose the Image tracking and GPS follow.
Connected
N o r m a l
M o d e
Waypoint
M o d e
O r b i t
M o d e
Follow
Mode
45.877503 , -106.123984
C r e a t i v e
V i d e o
Image Tracking:Select the target on the APP. After the selecting successfully, tap on
"Go" and the aircraft will follow the movements of the target. The range of tracking
altitude and distance is 5-15 meters. This function cannot be turned on within 5
meters of the distance between the person and the aircraftGPS Follow: the aircraft
will follow the control device to fly when turning on the GPS follow.
SPEED 0.0M/S
T: 0% R : 0%
E: 0%
A: 0%
19
Page 26

4.5.4 Orbiting
100%
11V
45.877503 , -106.123984,65m
H: 0.0m
D: 0.0m
45.877503 , -106.123984,65m
H: 0.0m
D: 0.0m
100%
11V
Tap on "Mode Selec tion" then "Orbit Mode" to set the current location or the
position of the mobile device as the center.During Orbit mode, you can adjust the
speed and direction by moving the control stick left and right and adjust the orbit
radius by moving the control stick forward and backward.
Connected
N o r m a l
M o d e
Waypoint
M o d e
O r b i t
M o d e
Follow
Mode
45.877503 , -106.123984
C r e a t i v e
V i d e o
SPEED 0.0M/S
T: 0% R : 0%
E: 0%
A: 0%
4.5.5 Waypoint
The aircraft will fly along the flight path drawn on-screen or saved ,you can
adjust the speed of the aircraft during flight .
Connected
Waypoint
Tap one and enter into
the operation interface
45.877503 , -106.123984
Waypoint
Planning
SPEED 0.0M/S
Waypoint
Memory
T: 0% R: 0%
E: 0%
A: 0%
Waypoint Planning: You can preset the waypoint parameters such as the number of
waypoin ts, the altitude of each waypoints and other parameters. The aircraft will
follow the preset parameters after you activate waypoint mode. You can control the
flying speed during flight or you can pause or resume the Waypoint mode.
20
Page 27

Waypoint Memory: After entering the mode, fly the aircraft and tap on "Memorize
100%
11V
45.877503 , -106.123984,65m
H: 0.0m
D: 0.0m
Preview Route
Angle:0°
D i s t an c e:10m
Sp e e d:1.0m/s
1m/s
8m/s
100m
0°
360°
10m
Waypoints" on the APP and the aircraft will mark the location. After memorizing all
the waypoints, upload and execute, then the aircraft will fly according to the
memory.
If the aircraft is not in the starting position, the aircraft will fly to the starting
position before starting this function.
4.5.6 Line Fly Mode
Tap on "Mode Selection" then "Line Fly Mode".Set the angle,distance
and speed of the aircraft.
Performance requirements:
1. Set the angle (0 ~ 360 °, accuracy 1 °);
Set the distance (10-100 meters, accuracy 1 meter); set the speed (1-8 m / s, accuracy 0.1);
2. Once setup is complete, the aircraft will execute Line Fly mode.
During the flight, pilots can take photos or videos manually , or pause / resume /
stop the flight at any time.
During the flight, the throttle stick is co ntrollable and the other directions are
uncontrollable;
3. You can pause/resume/stop the flight at any time.
4. When the aircraft is low on battery or lost connection,the aircraft will always set
Return to Home as the priority mission.
Connected
Line Fly Mode
R: 0%
T: 0%
E: 0%
A: 0%
45.877503 , -106.123984
SPEED 0.0M/S
21
T: 0% R: 0%
E: 0%
A: 0%
Page 28

4.5.7 Time-lapse Photography
When you choose time compressor mode, you can choose free time-lapse
and surround time-lapse.
Hover mode
free
time-lapse
surround
time-lapse
100%
11V
Free Time-lapse
The aircraft will take a certain number of photos and compose time-lapse
videos automatically according to the parameters which you set. During the
process of shooting, the user can control the flight of the aircraft freely.
(1) choose free time-lapse;
(2) set the shutter interval taken by the aircraft, the time of video generated
and the maximum flight speed;
(3) after done, please click ‘GO’ and start shooting.
Hover mode
The Shutter
Interval
The Time
Of Video Generated
The Maximum
Flight Speed
2s
3s
0.5m/s
100%
11V
15s
GO
30s
3.0m/s
22
Page 29

Surround Time-lapse
The aircraft will take a certain number of photos and compose
time-lapse video automatically according to the circle point of
interest and the parameters which you set. During shooting, operating lever will automatically quit the task.
(1) select surround time-lapse
(2) set the shutter interval taken by the aircraft, the time of video
generated and the maximum flight speed
(3) set the circle direction, and position the circle center by adjusting the circle radius and the direction of the aircraft nose
(4) after done, please click ‘GO’ and start shooting.
Hover mode
The Time Of
Video Generated
The Maximum
Flight Speed
The Circle Radius
3s
0.5m/s
10m 500m
100%
11V
30s
cw
GO
3.0m/s
ccw
4.5.8 Panorama mode
In the panoramic mode, you can choose spherical, 180 ° , vertical
shooting and wide angle shooting.In this mode, the aircraft will
perform the shooting task automatically. After the shooting done,
you can view photos and videos from the TF card, also export
photos and videos and composite it. During shooting, the user will
quit the task automatically.
Wide Angle
Shooting
100%
11V
Hover mode
Spherical 180°
Vertical
Shooting
23
Page 30

4.6 Gimbal Camera
E: 0%
T: 0%
R: 0%
A: 0%
45.877503 , -106.123984,65m
Pitch 35°
Yaw 25°
Roll 45°
H: 0.0m
D: 0.0m
0
50
45.877503 , -106.123984,65m
H: 0.0m
D: 0.0m
100%
11V
(1)
(2)
(2)
4.6.1 Camera Settings
Click the setting icon for camera on the main interface of the APP and you can set
the resolution, white balance, color and other parameters as follows:
Connected
45.877503 , -106.123984
SPEED 0.0M/S
Video Resolution
4K
Frame Rate
30FPS
white balance
Auto
网格线
Color
Normal
Video Forma MP4
4.6.2 Gimbal Pitch Axis Adjustment
APP Ddjustment
Method 1: long press the blank of the video preview interface and the mobile
device will vibrate once. When the icon appears at the position which you press,
you can adjust gimbal pitch axis by sweeping your finger up and down the screen.
Method 2: you can fine tune the angle of gimbal pitch by clicking up-down button
on the slider of gimbal pitch axis.
Connected
45.877503 , -106.123984
SPEED 0.0M/S
Transmitter Adjustment
You can adjust the angle of gimbal pitch
by fiddling with the control thumb-wheel
of gimbal pitch.
24
Page 31

4.6.3 Tf Card
(1) support TF card, U3 above 16G/32G/64G/128G;
(2) hot plug is supported. It is recommended to plug in the TF card after switch off
the power.
5 FAQ
1.The mobile device and remote control cannot be connected
(1) Check whether the status of the APP control signal icon has changed
(2) For USB Settings on android phones, check out "Android phone connection
tutorial"
2. Aircraft cannot be searched
(1) Restart the plane, remote control and x-hubsan 2.0 APP
(2) Update the aircraft firmware
(3) Check whether the TF card slot of the drone is keeps on red light, if it flashing,
means the aircraft is abnormal
3. Picture transmission stuck or easy to lose control and disconnected
(1) Adjust the antenna Angle to the aircraft, without the block between them
(2) Change the flight site, please do not fly in tall buildings, or near signal tower
(3) Update the latest firmware
4.The aircraft is hovering unsteadily
(1) Change the flight site, please do not fly near tall buildings and signal towers
(2) Do the compass calibration and horizontal calibration of the aircraft
(3)Judge whether the wind is too strong to affect the flight
5. Aircraft GPS accuracy is not precise or cannot pass the GPS accuracy test
(1) in the open area of the outdoor with GPS over 6 satellite
(2) Walk around near the aircraft
(3) Replace the mobile device
6.The battery cannot charge
Replug the charger and battery
7. with short flight time
Battery overcharge or high temperature environment can easily lead to reduction of
battery life, it is recommended to keep the remaining 50% or so, full charge again
before use
25
Page 32

8. The tilt Angle of the gimbal is too large or the gimbal show abnormal
(1) Restart the aircraft to recalibrate the gimbal
(2) Check on the APP to see whether the gimbal status is normal
9. Gimbal initialize failed
Before starting the aircraft, take off the protective cover of the gimbal
10.The picture is not clear
(1) Check whether the lens protective film is peeled off
(2) Fly in a well-lit environment
(3) Shooting parameters setting in camera Settings of APP
(4) Video source files are saved in TF card files with suffix AA
11. Lens fogging
(1) humid climate causes lens foggy, change aircraft storage location
Place some desiccant in the protective cover of the gimbal when storage
12. Picture or video is lost
(1) Perform completing recording operation after recording video, otherwise it may
lead to video damage or loss
(2) Check whether the TF card is broken
13. constant-height flight by flow cannot be used
(1) The current environment light is weak, please fly on outdoor with sufficient light
(2) detect whether the optical flow lens at the bottom of the aircraft is worn or
covered by foreign matter
26
Page 33

Limitation of Liability
Hubsan accepts no liability for damages, injuries or any legal responsibi
li-ties incurred directly or indirectly from the use of Hubsan products under
the following conditions:
1.Damages, injuries or any legal responsibilities incurred when users are
drunk, under the influence of drugs or anesthesia, dizzy, fatigued, nauseous
and / or affected by other conditions both physical and mental that could
impair sound judgment and / or personal ability.
2. Subjective misjudgment and / or intentional mis-operation of products.
3. Any and all mental damage, trauma, impairment, illness, compensation
caused / solicited by accidents involving Hubsan products.
4. Product operation in no-fly zones (i.e. natural reserves).
5. Malfunctions or problems caused by modification, refit, replacement or
use with non-Hubsan accessories / parts, failure to follow the guidance of
the manual in assembly or operaiton.
6.Damages, injuries or any legal responsibilities caused by mechanical
failures due to natural wear and tear (aircraft flight time clocking in 100
hours or above), corrosion, aging hardware, etc.
7. Continued flight after low voltage protection alarms are triggered.
8. Knowingly flying aircraft under abnormal conditions (such as when water,
oil, soil, sand or other unknown material are inside the X4, the aircraft and /
or transmitter are incompletely assembled, the main compo-nents have
obvious faults, obvious defect or missing accessories, etc).
9. Flying in the following situations and / or environments: areas with mag
netic interference (such as high voltage lines, power stations, broadcasting
towers and mobile base stations), radio interference, govern-ment regulat
ed no-fly zones, if the pilot loses sight of the X4, suffers from poor eyesight
or is otherwise unsuited for operating Hubsan products.
10. Aircraft use in or exposure to bad weather, such as a rain, wind, snow,
hail, lighting, tornadoes and hurricanes.
11. Products are involved in / exposed to collisions, fire, explosions, floods,
tsunamis, manmade and / or natural structure collapses, ice, avalanches,
debris, landslides, earthquakes, etc.
27
Page 34

12. The acquisition, through use of Hubsan products (specifically but not limited to
aircraft), of any data, audio, video that results in infringement of law and / or rights.
13. Misuse and / or alteration of batteries, product / aircraft circuits, hardware
protections (including protection circuits), RC model and battery chargers.
14. Any malfunction of equipment or accessory, including memory cards, that
results in the failure of an image or video to be recorded or ot be recorded in a way
that is machine readable.
15. Users who engage in reckless, unsafe flying (with or without sufficient training).
16. Non compliance with pre cautions, i nstructions, i nformation an d ope ration
guidelines / methods given through official Hubsan website announcements, product quick start guides, user manuals, etc.
17. Other losses, damages, or injuries that are not within the boundaries of Hubsan
responsibility.
RISK OF EXPLOSION IF BATTERY IS REPLACED BY AN INCORRECT TYPE.
DISPOSE OF USED BATTERIES ACCORDING TO THE LOCAL REGULATIONS.
HAZARDOUS MOVING PARTS KEEP FINGERS AND OTHER BODY PARTS AWAY.
Declaration of Conformity
Hereby, SHENZHEN HUBSAN TECHNOLOGY CO., LTD.,
declares this product is in compliance with the essential requirements and other
relevant
provisions of Directive 2014 / 53 / EU. A copy of the original Declaration of Conformity can be obtained at the following address: 13th Floor, Bldg 1C, SHENZHEN
NANSHAN SOFTWARE INDUSTRY BASE, Xuefu Road, Nanshan District, Shenzhen,
China
This product bears the selective sorting symbol for waste electrical and electronic
equipment (WEEE). This means that this product must be handled pursuant to European Directive 2012 / 19 / EU in order to be recycled or dismantled to minimize its
impact on the environment.
For further information, please contact your local or regional authorities. Electronic
products not included in the selective sorting process are potentially dangerous for
the environment and human health due to the presence of hazardous substances.
28
Page 35

FCC INFORMATION
This equipment has been tested and found to comply with the limits for a Class B
digital device, pursuant to Part 15 of the FCC Rules. These limits are designed to
provide reasonable protection against harmful interference in a residential installation. This equipment generates, uses, and can radiate radio frequency energy and, if
not installed and used in accordance with the instruc-tions, may cause harmful
interference to radio communications. However, there is no guarantee that interference will not occur in a particular installation. If this equipment does cause harmful
interference to radio or television reception, which can be determined by turning
the equipment off and on, the user is encouraged to try to correct the interference
by one or more of the following measures:
• Reorient or relocate the receiving antenna.
• Increase the separation between the equipment and receiver.
• Connect the equipment into an outlet on a circuit different from that to which the
receiver is connected.
• Consult the local dealer or an experienced radio / TV technician for help.
Changes or modifications not expressly approved by the party responsible for compliance could void the user's authority to operate the equipment.
This device complies with Part 15 of the FCC Rules. Operation is subject to the
following two conditions: (1) this device may not cause harmful interference, and
(2) this device must accept any interference received, including interfer-ence that
may cause undesired operation.
This equipment complies with FCC radiation exposure limits set forth for an uncontrolled environment. This equipment should be installed and operated with a minimum distance of 20cm between the radiator & your body. This transmitter must
not be co-located or operating in conjunction with any other antenna or transmitter.
Electrical and electronic equipment that are supplied with
batteries (including internal batteries)
WEEE Directive & Product Disposal
At the end of its serviceable life, this product should not be treated as household or general waste. It should handed over to the applicable collection point
for the recycling of electrical and electronic equipment, or returned to the
supplier for disposal. Internal / Supplied Batteries.
This symbol on the battery indicates that the battery is to be collected
separately.This battery is designed for separate collection at an appropriate
collection point.
29
Page 36

Please read the operating instructions carefully before use!
●Never leave units unattended when charging
●Unplug the charging cable immediately after charging
●Propellers may cause injury
●This product is not a toy
●Not suitable for children under 14 years of age
Product name: ZINO 2
Product Standard Number:Q / HBS 001-2017
Vendor: Shenzhen Hubsan Technology Co., Ltd
Address: 13th Floor, Block C, Shenzhen Software IndustrialBase,
Xuefu Road, Nanshan District, Shenzhen, Guangdong Province, China
Email: service@hubsan.com
WWW.HUBSAN.COM
Flight Academy
 Loading...