

Page 1
IXZ'AN'
Page 2
1 INTRODUCTION
ThankyouforbuyingHUBSANproducts.ThequadcopterisdesignedaSaneaSytouse,full
featuredRCmodelcapableofhovering,fastforward,andaerobaticflightmaneuvers.
please
read
the
manual
caiefutty
and
f6llow
all
instructions
in this'
Be
sure
to
retain
the
manual
for
future
reference,
routine
maintenance'
and
tuning'
1.1
lmPortant
Notes
ThisRCquadcopterisnotatoy,itut|lizesvarioushigh-techstoprovidesuperior
performance.
Pleasereadthismanualcarefullybeforeoperatingthisproduct'Anyimproperuseofthis
product
will
result
ln ,"rioui
in.;ury.
se
aware
of
yJur
personal
safety,
safety
of
others
and
your surrounding
environment'
Werecommendthatyouobtaintheassistanceofanexperiencedpilotbeforeattempting
to
fly
our
Product
for
the
first
time'
2
SAFETY
NOrlS
2.1
Coution
R/Cquadcopterhavepartsthatmoveathighspeed'thusposingacertaindegreeof
danger.Pilotsareresponsibleforanyactionsresultingindamageorinjuryfromthe
impioper
operation
of
their
R/C
aircraft
models'
Chooseawideopenspacewithoutobstacles.DonotoperateR/Caircraftnearbuildings,
crowdsofpeople,highvoltagecables,ortreestoensurethesafetyofyourself,others
and
your
model.
operatethisunitwithinyourability.Donotflywhentiredorafterdrinkingorwhen
impaired
by
medication.
l*p'op"'operation
may
cause
damage
to
people
and
property'
2.2
LiPo
BatterY
Recharging
Your
quadcopter
is
powered
by
a
Lithium-Polymer
(LiPo)
battery'
Neverrechargeyourbatterywhilstitisinsertedinyourmodel.ltcancatchfireleadingto
the
total
destruction
of
the
item'
lfyoudonotplantoflyyourmodelforaweekormore,storethebatteryapproximately
500/o
charged
to
maintain
battery
performance
and
life.
To
achieve
a
500/o
charge,
fly
the
model
until
the
battery
r"luir"s're.f,arging.
Charge
the
battery
for
half
the
time
typically
required
to
fully
charge
the
battery'
Page 3
SAFETY
ADVISORY NOTICE
I
Lithium-Polymer
(LiPo)
Batteries
]
LiPo batteries are differ from conventional batteries
in that their chemical contents are
encased
in a relatively insubstantial foil
packaging.
This has the advantage
of
significantly reducing their weight, but does
make them more susceptible to damage
if
roughly or
inappropriately handled. As with all batteries, there
is a risk of fire or
explosion if safety
practices
are ignored:
gt
Charge and store
LiPo batteries in a
location where a
battery
fire or explosion
(including
smoke hazard)
will not endanger life or
property.
M
Keep
LiPo batteries away from children and animals.
M
Consider how
you
would
deal
with a LiPo battery fire/explosior-r
as
part
of
your
normal home Fire Safety & Evacuation
Planning.
M
Never charge the LiPo battery that
has ballooned or swelled due to
over-/under-charging
or from a crash.
M
Nevercharge the LiPo batterythat
has been
punctured
or damaged in a crash
(After
a crash,
inspect the battery
pack
for the sign of damage.
Discard in
accordance
with
your
country's
recycling laws.).
M
Never charge the
LiPo battery in a moving
vehicle.
M
Never
over
charge the LiPo battery.
fl
Never
leave
the
LiPo battery unattended during recharging.
g
Do not charge
LiPo
batteries
near flammable materials or
liquids.
M
Ensure that charging leads are connected
correctly. Reverse
polarity
charging can
lead to battery damage
or a fire or explosion.
M
Have a
suitable fire extinguisher(electrical type) OR
a large bucket of dry sand near
the charging area . Do
not
try to
extinguish electrical
(LiPo)
battery
fires with water.
EI
Reduce risks from fire/explosion by storing
and charging LiPo batteries
inside
a
suitable container: a
LiPo Sack or metal/ceramic container
is advised.
M
Monitor recharging LiPo batteries
for signs of overheating.
M
Protect
your
LiPo
battery
from accidental damage during storage and
transportation.
(Do
not
put
battery
packs
in
pockets
or bags
where
they
can short
circuit or can come
into contact with sharp or
metallic objects.).
Bt
lf
your
LiPo battery
is
subjected
to a shock
(such
as
a helicopter crash)
you
should
place
it in a metal container and observe
for
signs
of swelling or heating
for at least
30 minutes.
M
Do
not attempt to disassemble or
modify or repair the
LiPo battery.
2.3 Prevent
Moisture
R/C
models are
composed
of
many
precision
electrical
components.
Store
the battery
and
model
in a dry
area at
room temperature.
Exposure to
water
or
moisture
may cause
the
model to
malfunction
resulting
in loss of
responsiveness,
or a
crash.
2.4
Proper Operation
For the
safety
purpose,
please
only use
hubsan's
spare
parts
for replacement.
2.5
Alwdys Be
Aware Of
The Rotating
Blades
When
in operation,
the
main
and tail
rotor blades
will be
spinning
at
high speed.
The
blades
are capable
of
inflicting
serious
body
injury and
damage
to the
environment.
Be cautious
of
your
actions
and careful
to
keep
your
body and
loose
clothing
away
from
the
blades.
Never take
your
eyes
offthe
model
or leave
it unattended
while
it is turned
on.
Stop
operation
immediately
if
the
model
flies out
of
your
view.
Once
landed,
immediately
turn
offthe
model and
transmitter.
2.6 Avoid
Flying
Alone
Beginners
should
avoid
flying alone
whilst
learning
flight
skills.
lt is advised
that an
experienced
pilot
be
in nearby
guidance.
3 SAFETY
CHECK
BEFORE
FLYING
CAREFIJLLY
INSPECT
THE
X4 BEFORE
EVERY
FLIGHT
.
Before operation,
please
check
the batteries
of the
transmitter
and
receiver
are
charged
enough
for the
flight.
.
Before turning
on
the transmitter,
please
check
that
the throttle
stick
is in the
full down
position.
.
Carefully check
rotor
blades
and rotor
holders.
Broken or
premature
failure
of
parts
will
result in a dangerous
situation.
.
Check
the battery
and
power
plug
are securely
fastened.
Vibration and
violent
flight
may
lead the
plug
to
loose and
result in loss
of control.
.
When turning
on
the unit,
please
follow the
power
on/off
procedure: for Power ON-
please
turn
on the
transmitter
first, and
then turn
on the
receiver.
For
Power OFF-
please
turn off the
receiver
first and
then turn
off the transmitter.
lmproper
procedure
may
cause
loss ofcontrol
ofthe
quadcopter.
Page 4
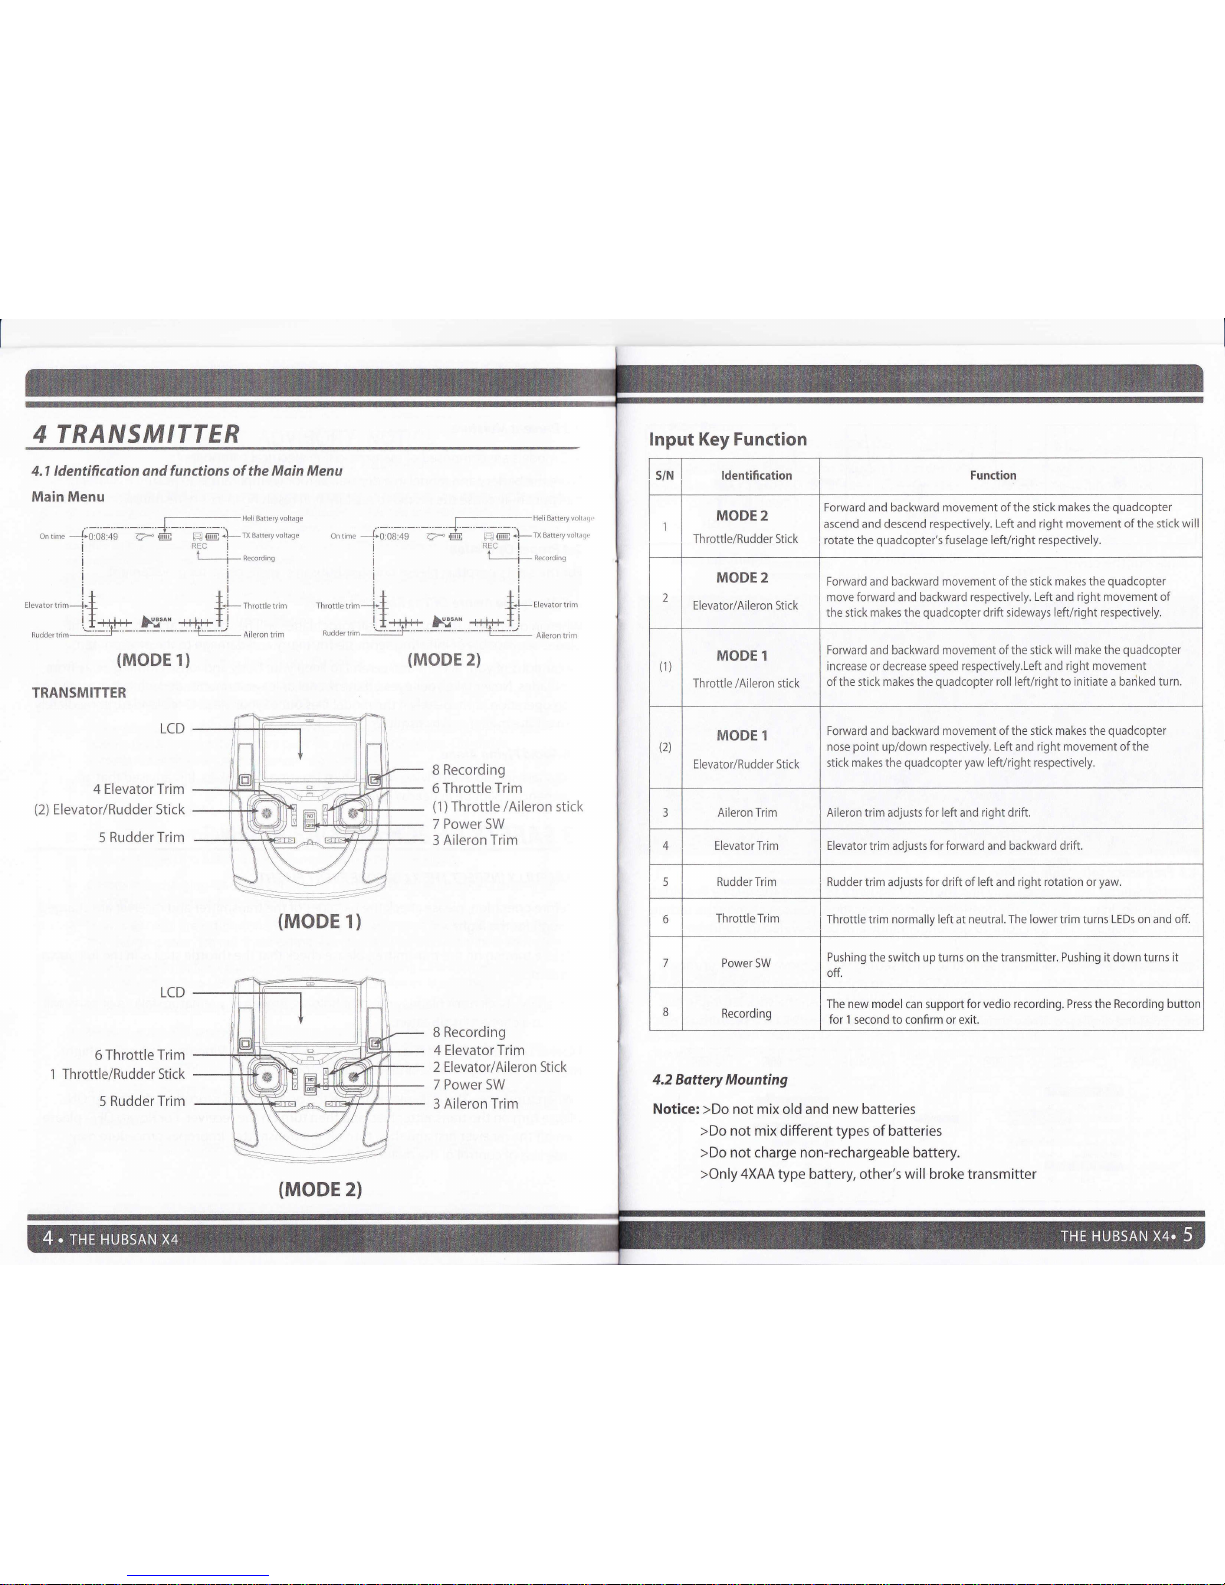
4 TRANSMITTER
4,1 ldentification andfunctions
of the Main Menu
Main Menu
Hell Battery volt.ge
(MODE
1)
TRANSMITTER
LCD
4 Elevator Trim
(2)
Elevator/Rudder Stick
5
Rudder Trim
(MODE
1)
LCD
6 Throttle
Trim
Throttle/Rudder Stick
5 Rudder Trim
L
rnronterim
_i']
It++{+
Nr.
n
'^da,
L'm
-rrml-
REC
I
-_J
:
I
-r!
+i_
T!
++r-+l
-"-tr:l::l
(MODE
2)
8 Recording
6 Throttle Trim
(1
)
Throttle
/Aileron
stick
7 Power SW
3 Aileron Trim
8 Recording
4 Elevator Trim
2 Elevator/Aileron Stick
7 Power 5W
3 Aileron Trim
ontime
--J-0:08:49
!
i
I
He i Batteryvoll.rt,
TXBafreryvollaq(,
Elevator trim
AilFron trlm
4.2 Battery Mounting
Notice:
>Do
not mix old and new batteries
>Do
not mix different types
of batteries
>Do not charge non-rechargeable battery.
>Only
4XAA type battery, other's
will
broke transmitter
lnput Key Function
s/N Identification
Function
1
MODE 2
Throttle/Rudder Stick
Forward and backward movement ofthe stick
makes
the
quadcopter
ascend and descend respectively. Left and right movement ofthe
stick will
rotate the
quadcopter's
fuselage left/right respectively.
2
MODE 2
Elevator/Aileron Stick
Forward and backward movement ofthe stick
makes the
quadcopter
move forward and backward respectively.
Left
and
right movement of
the stick makes the
quadcopter
drift sideways left/right respectively.
(1)
MODE 1
Throttle
/Aileron
stick
Forward and backward movement of the stickwill
make the
quadcopter
increase or decrease speed respectively.Left and
right movement
ofthe stick makes the
quadcopter
roll left/right to initiate a bariked
turn.
(2)
MODE
1
Elevator/Rudder Stick
Forward and backward
movement ofthe
stick
makes the
quadcopter
nose
point
up/down
respectively. Left and right movement ofthe
stick makes the
quadcopter
yaw
left/right respectively.
3
Aileron Trim Aileron trim adjusts for
left
and
right drift.
4
Elevator Trim Elevator trim adjusts for forward and backward drift.
5
RudderTrim Rudder
trim adjusts for drift of
left
and
right rotation or
yaw.
6
Throttle Trim
Throttle trim normally left at neutral. The lower trim turns LEDs on and off.
7
Power SW
Pushing the switch up turns on the transmitter.
Pushing it
down
turns it
ofl.
8
Recording
The new model
can support
for vedio recording. Press
the
Recording button
for 1 second
to confirm or exit.
(MODE
2)
Page 5
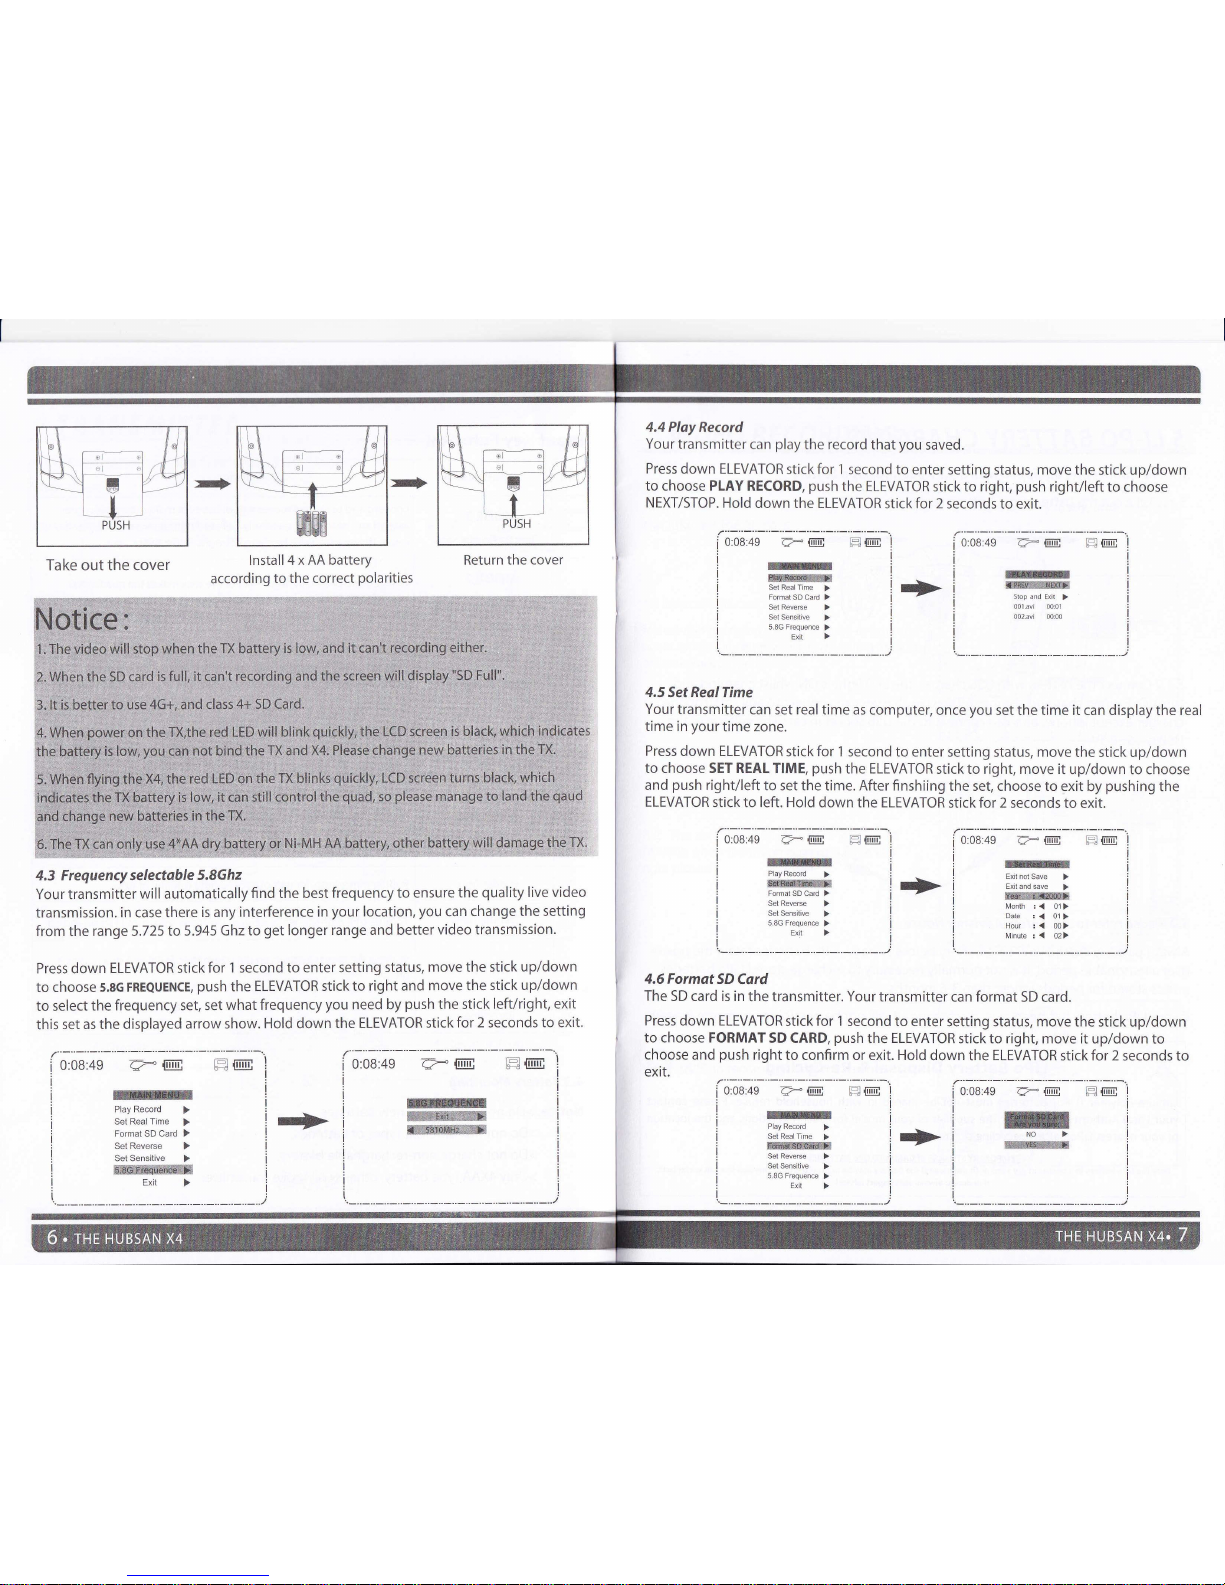
4.4 Play Record
Your
transmitter can
play
the record that
you
saved.
Press down ELEVATOR
stick for 1
second to enter
setting status, move the stick up/down
to choose PLAY RECORD,
push
the ELEVATOR
stick
to
right,
push
right/left
to choose
NEXT/SfOP. Hold
down the ELEVATOR
stick
for
2 seconds to
exit.
0:08:49
A- [E R@l
Take out the cover
lnstall4xAAbattery
according
to the correct
polarities
4.3 Frequency selectable
5,8Ghz
Your transmitter
will
automatically
find the best
frequency to ensure
the
quality
live video
transmission.
in case there
is any
interference in
your
location,
you
can
change the setting
from the range 5.725
to 5.945 Ghz
to
get
longer
range and better
video transmission.
Press down
ELEVATOR
stick for 1 second
to enter setting
status,
move the stick up/down
to choose s.sc
FREQUENce,
push
the
ELEVATOR stick to
right and move
the stick up/down
to
select the
frequency set, set
what frequency
you
need by
push
the stick
left/right, exit
this
set as the displayed
arrow show.
Hold down
the ELEVATOR
stick for 2 seconds
to exit.
4.5
Set Real Time
Your
transmitter can set real
time as computer, once
you
set the time it can display the real
time in
your
time zone.
Press
down ELEVATOR
stick for 1 second
to enter setting status, move
the stick up/down
to choose SET REAL TIME,
push
the ELEVATOR
stick to right, move it
up/down to choose
and
push
right/left
to set the time. After finshiing
the set, choose to exit
by
pushing
the
ELEVATOR
stick to
left.
Hold down the ELEVATOR
stick for 2 seconds
to exit.
0:08:49
?= @ lH@
K
WXX'EKXIK
Set Real Time
>
FormatsDcard >
5.8G Frequence
>
FIG
KXreX
FormatSDCard >
5 8G Frequence
>
0:08:49
A- @
-E@
re
Set Real Tlme
>
pxxrexmx
5.8G Frequence
>
>
+
re
ix&&Isxxxxx
Stop and Exit
>
00l.av
0001
002.av 00:00
I
4.6 Format SD
Cord
The
SD card is in
the transmitter. Your transmitter
can format SD
card.
Press
down ELEVATOR
stick
for 1
second to enter
setting status, move the stick
up/down
to choose FORMAT
SD CARD,
push
the ELEVATOR
stick to right, move it
up/down to
choose and
push
right
to confirm or exit. Hold
down the ELEVATOR stick for 2
seconds to
exit.
/.--"-"-"-"-"
i
0:08:49
3: @
!
i
mK
Format SD Card >
W
!
I
I
t
c-,@ [q@
mmx
XWsx
w
t= fiE
0:08:49
0:08:49
C- {E Hl
m
K
re&rx*xsax
Return
the cover
ra
irelNexe&
Ivonth
:<
01>
Date
:< 01>
Hour :
< 00>
Mnute : < 02>
+
._..*.._.._.._.',/
Page 6

5 LI-PO
BATTERY
CHARGING
5,1 The
quadcopter
equipped
with a 3,7V 380mAh
Lipo bottery
5.1.1
Take out the battery
from bottom
ofthe
X+
5.1.2
Connect
the battery
with USB charger,
the
LED light is ON
whilst charging
and
turns
OFF when charging
complete.The
USB charger can
connect
to any smartphone
charger
except
lphone, also can
connect to
the USB socket
in cars.The
voltage
ofthe
USB
is +5+0.5V.
5.2
Pleose refer to
2.2. Safety
Advisory
Notice
Always
partially
charge
your
LiPo battery before
storage.
LiPo batteries
retain the
power
over a
reasonable
period;
lt is
not normally
necessary to
recharge stored
LiPo batteries
unless stored
for
periods
longer than
3-6 months.
lf
your
LiPo
battery has
been over-discharged,
it will not be
possible
to
recharge
it
again.
6 VIDEO RECORDING
Note:
Always
turn OFF the
power
of the transmitter before
inserting
or
removing the SD card.
Always stop the
video recording function and
power
offthe battery
firstly, and then
you
can take out the SD card.
6.1
lnserttheSDcard
Note:Avoid removing the SD card and
re-inserting
again
too
quickly
otherwise the recording
module
will not work
properly
6.2 The screen
will
display
REC in red and
blinking when
recording is
started.(See
the
right
picture)
0:08:49
e- @ m@
Press the button to
switch ON/OFF
video recording
LiPo Battery
Disposal
& Re-Cycling
rtl
t,
Lithium-Polymer
(LiPo)
batteries
must
not be
placed
in with
household refuse.
Please contact
your
Local Authority
(Council)
or the supplier
of
your
model for
local regulations
and the location
of
your
nearest LiPo battery
recycling
centre.
TEMPORARY STORAGE
of DAMAGED
LiPo BATTERIES:
Bury the LiPo battery
in a bucket ofdly
sand or
(if
discharged)
the battery
may be neutralized by
immersion in a salt
water bath.
lf in doubt: always
seek expert advice!
6.3 StarUStop recording using the
remote
Page 7

7 START
TO
FLY
7.1
Power-On
(Failsafe)
Procedure
Your X4's
flight contoller
is coded
with a Power-On
failsafe.
This
is designed to
ensure that the
X4's motor
will not start
unless
it
detects
a suitable
radio-control
signal
when the
LiPo battery
is
connected.
The correct Start-Up
sequence
is
as
follows:
7.1.1
Make sure
the throttle stick
is in the
full down
position.
7.1.2Power
on the
transmitter and
the red
LED will be blinking.
Please do not
move any
other stick
or trim before
the
TX and X4 match
code and
bind, or the
X4 will drift.
The TX
LED
will turn
green
when the
TX binds with the
X4.
7.1.3 Apply
power
on the
X4 by connecting
the
battery
plug
with correct
polarity.
Please
disconnect
the X4 battery
plug
after
turning
off the
TX when
you
stop
flying.
7.,l.4
lnsert
the
battery to the bottom
of
your
X4.
Make sure the battery
and
wires are
pushed
into the end of the battery
compartment,
so they
will not negatively affect
the
center
of
gravity(COG)
and cause
unstable
flight. Please twist
the wires and squeeze
them
into the notched holder
as the
picture
shows,
to
prevent
inflight shaking
or
oscillations.
7.1.5 About LED lights:
After a
"beep",
and the
red LED on the transmitter
turns
green,
the 6 lights on
the X4
will be on solid indicating
that the bind code
is matched.
The LEDs will be on
and
night flying is
possible.
Press the lower throttle
trim for about
I
second
to turn
the
LEDs on or off. Even
if
you
select the LEDs off,
they will blink
when the lipo
power
is
low. NOTE: The LEDs
will blink when the
quadcopter
runs out
of
power
or
the X4
code does
not
bind
with the
TX.
i
lt
m
.tr{l
1ffi
J
\-
.-g
R
!---F
olllHmHIl[o
YJ:ffi
LIE'
)f
L
\r 7/
\:-/
(MODE
2)
I
Tip: You do
not need to adjust the
rudder trim if the
X4 keeps
yawing left
or
right
during
flight. The X4
will find the rudder central
point
automatically
in 3 seconds after
the
quadcopter
lands with throttle full down on
a level
ground.
Landing on a
level
ground
Page 8

7.2
Tronsmitter sticks ond
X4 control responses
CAUTION:
To avoid
loss of control:
ALWAYS move
the TX sticks S-L-O-W-L-Y!
Be aware
that control
inputs
will reduce available
lift . Be ready
to
use
a
little
extra
throttle to
maintain
height during
maneuvers.
+
Down
Throttle
(Collective
Power)
increases/decreases
the Flying Height
of
your quadcopter
S ADVANCED
PERFORMANCE
SETUP
8.1 Reversing
channel setup
lf
you
would like to
reverse any of the
stick functions
due to
personal
preference
then
follow
the instructions
below. Be aware
that this will change
the controls
back to
front.
Press down ELEVATOR
stick
for
'l
second
to enter setting
status,
move the stick
up/down
to
choose SET
REVERSE,
push
the
ELEVATOR stick
to right, move
it up/down to
choose
and
push
right to confirm
or exit.
Hold
down
the ELEVATOR
stick
for 2
seconds
to exit.
i;ft,6
--<-@ -
H@
I
';d;t--G--@
-
m@
I
t
x
MODE 2
Rudder
(Collective
Torque
MODE 1
Yaw) rotates
your quadcopter's
fuselage Left / Right
8.2
SENSITIVITY SET
UP
lf
you
would like to change
the sensitivity
of any of the stick
functions
then
follow
instructions below.
A higher sensitivity
will enable
larger/faster
movement of the
aircraft,while
a
lower
sensivity
will
enable
smaller/slower
movement.
Press
down ELEVATOR
stick for 1 second
to enter setting
status,
move the stick
up/down
to choose SET
SENSITIVE,
push
the ELEVATOR
stick to
right,
press
the
elevator/
aileron/
rudder trim to set
the sensitive.
Push the elevator
stick to
left to exit
this set. Hold down the ELEVATOR
stick for 2 seconds
to exit.
-
Format
SD Card
>
re
5.8G
Frequence
>
+
+
-
Elevator <Normal>
re
!
Rudder
<Normal>
I
I
i
i
0:08:49
C-@
m{E
-
r
Ele-vator r 50
Aileron:
50
I
Rudder : 50
!
i
I
-._.._.._.._""/
Elevator
(Cvclic
Pitch)
moves
vour
quadcopter
Forwards/Backwards
I
o:og:+g
I
I
i
i
I
i
I
I
I
[:1 l!!!!l;
?*@
I
Format
SD Card >
E
5.8G
Frequence
>
LEFT movemenl
CAUTION: Controls will oppeor
reversed
when the
model is flying towards
you
I
t'o
MODE 2
MODE 1
MODE
2
MODE 1
MODE 1
Aileron
(Cyclic
Roll) moves
your
quadcopter'sideways'
Left/Right
Page 9

.
EXPERT MODE
ln expert
mode,
the sensitivity
can be adjusted
even
further
(up
to 100) to
give
the
user even
more ability to
manoeuver
the aircraft.
Follow
instructions below
to switch
this on/off.
Press down
ELEVATOR stick
for 1 second
to enter setting
status,
move the stick up/down
to
choose
SET
SENSITIVE,
push
the
ELEVATOR stick to right, choose
NORMAL
MODE,
push
the
ELEVATOR stick
to right to
enter
into
the
expert mode,
press
the
elevator/ aileron/
rudder trim to set the
sensitive.
Push the ELEVATOR
stick to
left to exit this
set. Hold down
the ELEVATOR
stick for 2 seconds
to exit.
I
o:08:49
I
a: @, L=@
m
ryw
Elevator: 100
Aileron
: 100
Rudder : 90
rc
XKXWKXX
Elevator: 50
Aileron: 50
Rudder : 50
+
MODE
2
MODE 1
8.3.1
Left side flip
Push the
joystick
to the right side
and then
quickly
push
the
joystick
to the
left and then
release the stick to
the center
position
after the
flip.
8.3 Aerial
FlipTips.
+
+
MODE 2
MODE 1
Page 10

8.3.2 Right
sideflip
Push the
joystick
to the full
left side and then
quickly
push
the
joystick
to
full right and
release the stick to the
center after
the flip.
MODE2 MODE1
8.3,3
Forwordflip
Pull the
joystick
to the back and
then
quickly
the stick to
the center after the
flip.
push
thejoystickto
the front and
release
MODE 2
MODE
1
8.3.4
Backwordflip
Push
the
joystick
to the
front and then
quickly pull
the
joystick
to the
back and release
the stick
to the center after
the
flip.
9
PROPELLER
INSTALLATION
AND
REMOVAL
The
X4's
props
are
not identical.
Each
prop
is labeled with an
A or B.
When installing
replacement
props,
be certain
to install
them as shown.
The X4
will not
fly,
and
will
flip
and
crash if the
props
are not
installed in their
proper
locations.
lnstollotion:
Pinch the
prop
hub,
line up the hole
to the
shaft,
press
it firmly
but
gently
straight down.
MODE
2
MODE 1
Page 11

Removing Props: Hold the
prop,
insert the U wrench under the
prop, press
down and
the
prop
will
easily come off the
motor shaft.
The
propellors
are dangerous when the
quadcopter
is flying. To avoid injury or
damage,
please
consider installing the
protection
cover.
Instructions:
Remove the
props.
Position the cover's four holes with the motors.
Press each of them
on the motors, then re-install the
props
in their correct
positions
on the X4 .
When removing the
protection
cover,
please
remove the
props
first
as
in the above
steps, and
pinch
offthe
protection
cover from each motor.
After any crash landing,
please
check
to make sure the
protection
cover
is
still on tight,
and make sure the
body, motors and
props
are not damaged.
t
st-G
-C
No
PART NAME
QTY
PART NAME
white blade
B
I FPV RX
I
White blade
A
I
820
motor(clockwise)
2
Red blade A
I
820
motor(a nticlockwise)
2
Red blade
B
1
Li-po battery
1
Upper
shell
1
LED(Red)
2
Lower shell
1
LED(Blue)
2
Screw(PB1.4*3)
2
Batterv
box
1
Screw(PA1.4*4)
2
Rubber feet-1
2
Camera
PCB module
1
Rubber feet-2
2
*
The above U-wrench and
protection
cover
are not included and must be ordered.
Page 12

l.Transmitter and X4 will not bind.
Answer:
Throttle
position
needs to be fully minimized.
Please do not move the transmitter sticks
or
trims during
initial
power-on
binding.
2. Transmitter
LED light on and then suddenly off.
Answer:
Replace new AA batteries
3.
LCD
transmitter
not showing the setting
interface after hold down the
joystick
for 1 second.
Answer:
The
throttle
stick is not in the
lowest
position.
4The
quality
of the
video is not
good,
and it makes breaks.
Answer:
Please
use
brand HD SDHC card, such as Kingston
Micro
SDHC
class6 4G card.
5. Gyro
not working well
Answer:
(1)
Battery voltage too low.
(2)
Re-bind
(3)
Land on to the
ground
with the throttle
fully
minimized for 3 seconds and take off again.
6. Unable to Flip
Answer:
(1)
Press the Elevator stick one time to enter into the expert(flip)
mode.
(2)
ln the expert(flip)
mode.
the
sensitivity on each channel should be above 90%,
you
can
program
the sensitivity
in
the
setup menu. Please check manual 4.4 Stick Sensitivity
Adjustment.
(3)
Press the throttle stick
to turn
offanti-flip.
(4)
Lipo
power
is
too low and
needs to be recharged.
7.
Quadcopter
is
shaking or oscillating
with noise.
Answer: Please check to see that
the motors, canopy, body and
props
are all
properly positioned.
8. Switching between low and high rates on the transmitter not
very user-friendly.
Answer: Press the Elevator stick briefly only one time to switch
on/off the expert mode(red flashing
TX LED) and normal mode(green solid
LED). The word
"Expert"
will also appear at the bottom center
on the LCD.
9. Can not take off.
Answer:
(1)
Wrong installation of the
props.
Props are marked with
"A"(CW)
and
"B"(CCW). Please
check the
pictures
below
for
the
correct
order.
(2)
Wrong installation of motors. Please check to
make
sure
that
each
motor is installed in its correct
position.
There are two different types of
motors
with different motor wire colors. Please check the
pictures
below
for the correct
order.
White A
10.
LED
removal & installation.
Removal: Unscrew and remove the lower shell and the
rubber feet. Then
unsolder
the red and
yellow
wires.
lnstallation:
Solder the red wire on anode/positive
(+),
the
yellow
on cathode/negative
G),
press
the LED wires first, then the motor
wires
in the
leg
slots. lnstall the
lower
shell,
then the rubber
feet. You can determine the color of the LED lights by looking at the color of the
LED wire
insulation at the bottom of the LED lens: white color is white light, blue color
is
blue
light.
1 1. The motors
are
a little
gritty
and do not spin as freely after crashes.
Answer:
You
can
hear
grinding
and see
that
motor is not spinning freely by flicking the
prop.
Press the shaft down from the top of the
prop
and motor to
fix the
problem,
or replace the
motor.
1 2. The arm of the X4 separates after a hard landing or crash.
Answer: This is a special design to absorb the impact
from hard crashes. Simply force the arms to
snap back into the
joint
position
by
hand
as shown
in
the
picture.
1. First line up the wires with
the slots. The LED'S black
insulated cathodeG) wire
mlrsi be outermost
+
2. Line up the
LED to the round
holder slot. Press the wires
carefylly into the slot and secure
them neatly into the arm.
Red B
(Bottom
View)
(Top
View)
Page 13

13. One or
more motors stop
working
Answer:
(1)
Motor
is
damaged.
Replace the motor.
(2)
The motor connections(s)
are disconnected.
Resolder.
(3)
An FET on the flight controller
looks burned. Replace
the flight controller.
14. The X4 is still drifting excessively
when hovering even
after a
good
accelerometer
calibration.
Answer: Set it on a level surface and
shim the side that
it
drifts
to with a few sheets
of
paper
(the
number of sheets will vary depending
on the amount of drift),
so it can calibrate the
accelerometers
with a level offset angle.
15. The Camera can't record
Answer: Press the button
and the camera will recording,
when the recoding is finished
please
press
the button again to save
it. lf
you
don't want to save
it
please power
offthe
Quadcopter.
Please check the
battery in both TX and
X4, when
the
battery is low, it can't
record.
16: The LCD screen is not viewable outdoors with bright sunshine.
Answer: Checkthe
packaging
inside the box, there is an anti-glare sticker, it will help
you
to reduce
glare
in full sunshine. Peel the
protective
membrane and
put
it onto the screen.
1 7: The video is not being saved to the SD card.
Answer: Always stop the
video recording function and
power
off the battery first, after that
you
can
take out the SD card.
Always turn off the
power
to the
TX
before
inserting
or
removing the SD card. This allows the
memory to be
properly
saved to the SD card.
1
8 :
How
to
recover the factory
set.
Answer:
(MODE
1 transmitte0
Push the left
joystick
to the top on the
left,
and the
right
joystick
to the top
on the right, keep them
in this
position
and then turn on the transmitter, the LCD screen will show
"CALIBERATE
STICK",
Move the
joysticks
in a circling motion about 3 times, and then release the
joystick
and
press "any"
key 1 s to save and exist.
(MODE
2 transmitter)
Push the two
joysticks
to the top on the
left
and
keep
them
in
this
position,
and then turn on the
transmitter, the LCD screen will show
"CALIBERATE
STICK", Move the
joysticks
in a circling motion
about3times,andthenreleasethejoystickandpress"any"key
1stosaveandexist.
19: The
transmitter
will not
power
on.
Answer:
Check the battery connection.
lf the transmitter battery
power
is low,
you
will need
to
replace with new AA batteries .
Page 14

Hl
O7D SPARE PART
CHART
H107D-A01
Body Shell
HlA7-424
Battery
Hr07D-A02
Rubber feet
H107-432
Blue LED
H107D-A03
FPV RX
H107-A02
Props
H107-A06
USB Charger
Hl07-411
U wrench
H107C-A33
Red LED
ii
'*-
*r; ; ;X*rr_r-
'
-
tt
''3aY'1
lr:1:::,., ;-
trl:at:..":;tl:
:r(.i
-.:'
1 rr .
-
,t
, rr'-?
-
't9
,
'4.., .,-.- ,
H107-A23
Motor
H107-A07
Screw Set
H107C-420
M8 Protection
Cover
H107D-A03
X4 RX
Hl07D-A05
Transmitter
H107-A13
T-Shirt
Hl07D-A04
Hr07D-01
Camera module 4*AA
rechargeable
0.3
pixel
NI-MH
batterY
(2000mAhr
Electrical
and
electronic equipment
that
are supplied with
batteries
(includinq
internat
batteries)
WEEE Directive
& Product Disposal
At the
end of its serviceable life,
this
product
should
not be treated as household
or
general
waste. lt
should
be
handed over to the
applicable collection
point
for the recycling of electrical
and electronic
equipment, or
returned
to the supplier
for disposal.
lnternal / Supplied Batteries.
This
symbol on the battery indicates
that the
battery is to be collected separately.
This battery is designed
for separate collection
at an appropriate
collection
point.
X
I
':"t::*.ff-
&
Page 15

Question:
Can't
review
the video
on computer or the
video
size is 16:9.
Answer 1 : The resolution
of the video that
played
on the FPV transmitter is720.480
but stored
in SD card with 720*240 format
,
pls
convert it into 720.480 by the video converter when
play
on
the computer.
The video
conversion software can
be downloaded by the following
links:
http ://www.freemake.
com/free_vi deo_co nverter/
http ://www.
pcfreeti
me.com/C
N/i ndex. htm I
Answer 2 :
We recommend to
play
the
video
by the following media
http ://www.
kmpmedia. neU
Operation
progress:
l.download KMPmedia
(version
3.7)
2.open the video taken
by
X4 FPV
by the KMPmedia, right-click on the screen
and
choose
"Screen
Controls" and
"keep
1.33: 1
(4:
3TV)"
 Loading...