

Page 1
®
H122D X4 STORM
《H122D Quick Start Guide》
Version 1.0
Page 2

Step 1
The first flight configuration: Aircraft + HT015
Transmitter
Binding the aircraft and transmitter
1 . Pull and hold the throttle to its lowest position.
2.Hold down the Photo key and power the transmitter on. The
transmitter’s status LED will flash red; please do not press or touch any
other keys, buttons or sticks while this process is ongoing. Users may let
go of the Photo key and throttle. Connect the aircraft to its battery and
allow it to bind to the transmitter. The two must be very close to each
other; when the bind is successful, the binding status LED will turn green.
Step 2
Horizontal calibration (also known as Gyro calibration)
Horizontal calibration is required when the aircraft drifts on the horizontal
All illustrations are shown in Mode 2 (American hand)
Page 3

When using the horizontal calibration, please ensure that the aircraft is
on a completely flat surface. Aircraft motors should be completely
disarmed. Do not move the aircraft during calibration or calibrate on an
uneven/tilted surface, or there will be errors.
Hold the left stick to the
right side of its socket.
Start
Calibration complete
plane during flight. When this happens, land the aircraft and disarm its
motors. Follow the below steps to do a horizontal/gyro calibration.
1) Place the aircraft on a completely flat surface and then follow the below
calibration procedure. Hold the left stick to the right side of its socket.
Rapidly and continuously wiggle the right stick left and right until the rear
red LEDS flash alternately.
2) Calibration is complete when the LED indicators stop flashing. It is
recommended that users wait for 15-20 seconds after the calibration is
completed before flying again.
Rapidly and continuously wiggle
the right stick left and right until
the rear LEDS flash alternately.
Page 4
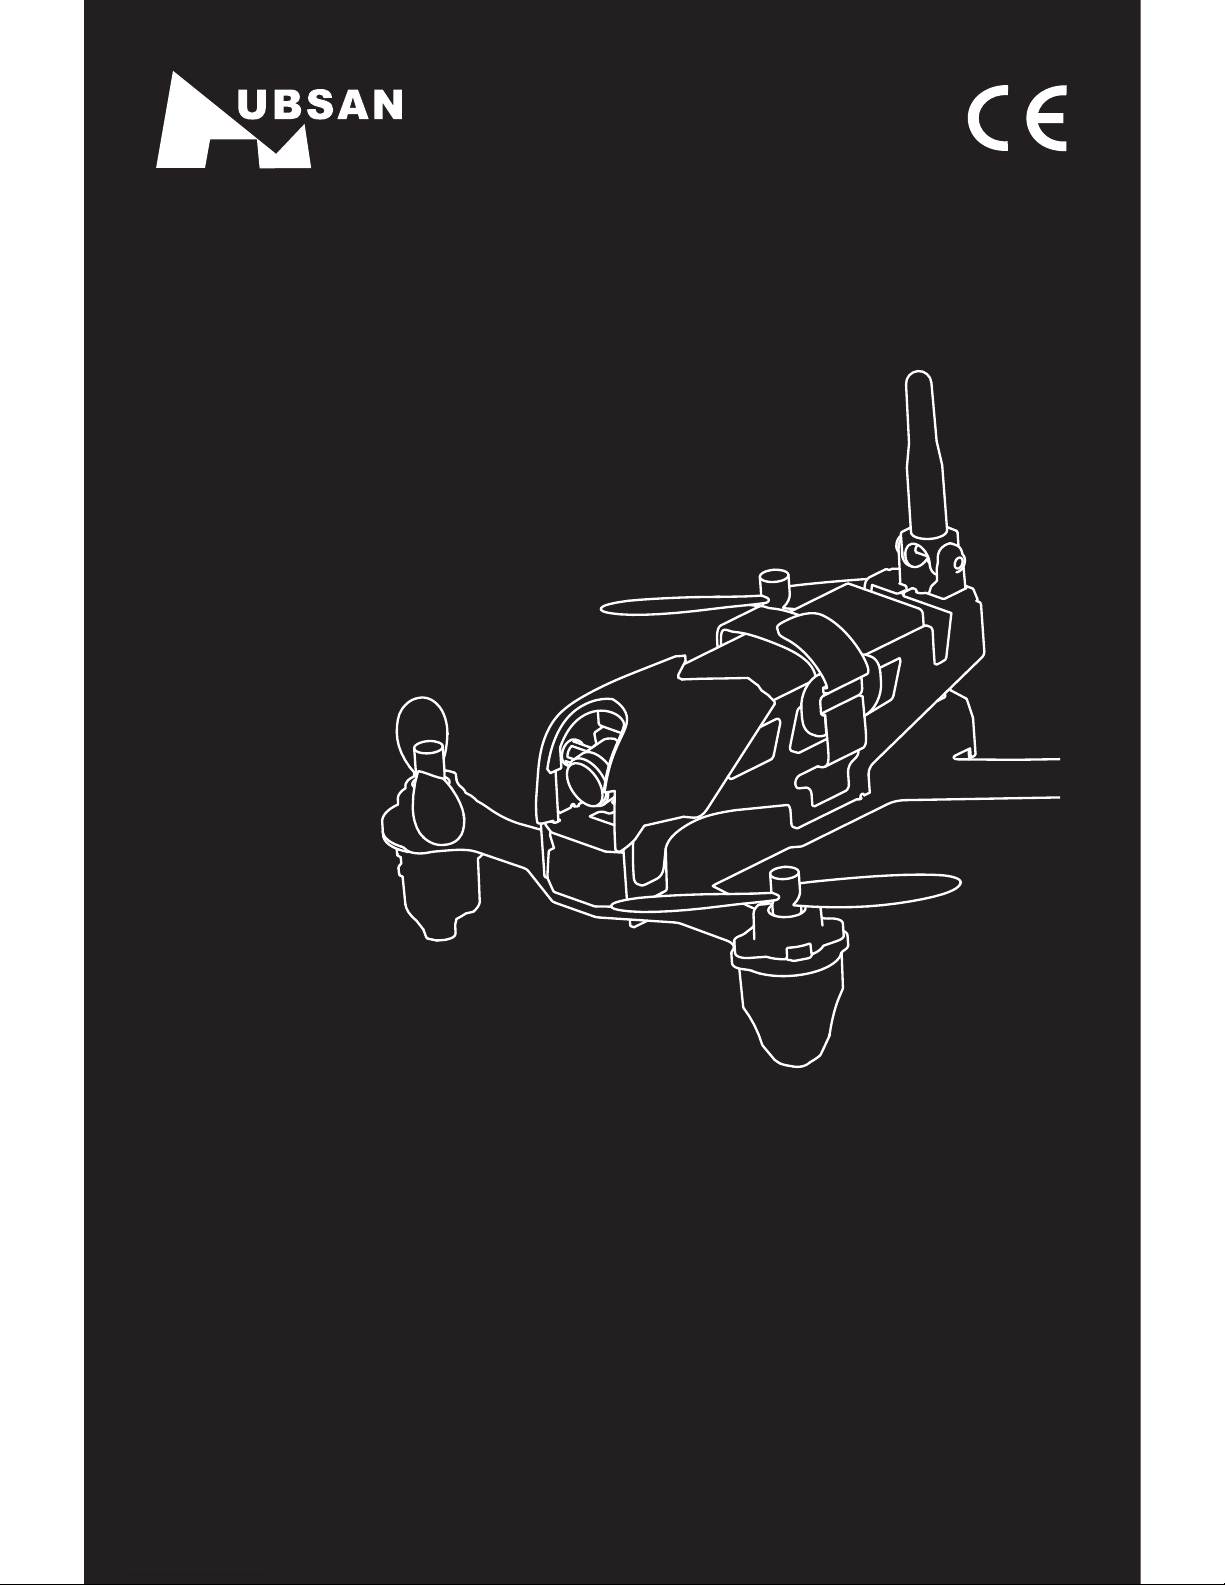
Step 3
Takeoff
Simultaneously pull the transmitter joysticks diagonally down-out to arm
the motors (as shown in the left figure). Pull the left joystick (throttle)
upwards to take off.
Landing
Slowly and gently pull the throttle joystick down until the copter has
completed its descent on the ground. Simultaneously pull the transmitter
joysticks diagonally down-out to disarm the motors (as shown in the left
figure).
Page 5
Step 1
Binding the aircraft and transmitter
1. Pull and hold the throttle to its lowest position. Hold down the Photo key
and power the transmitter on; allow the transmitter to enter binding mode.
2. Power the HS001 on by pushing the power switch up. Long press the
display’s binding button (shown below) to allow the HS001 to enter
binding mode. The display will beep three times.
The second flight configuration: Aircraft + HS001+
HT015 Transmitter+HV002 Video glasses
All illustrations are shown in Mode 2 (American hand)
Page 6

3. Connect the drone to its battery. While all units are in either binding or
pairing modes, please do not touch, press or move any of the transmitter
joysticks, buttons or keys. Doing so will cause the aircraft to drift or
perform unstably during flight. After binding is successful, the
transmitter’s binding status LED will be a solid blue.
Step 2
Horizontal calibration (also known as Gyro calibration)
Horizontal calibration is required when the aircraft drifts on the horizontal
plane during flight. When this happens, land the aircraft and disarm its
motors. Follow the below steps to do a horizontal/gyro calibration.
1. Place the aircraft on a completely flat surface and then follow the below
calibration procedure. Hold the left stick to the right side of its socket.
Rapidly and continuously wiggle the right stick left and right until the rear
red LEDS flash alternately.
2. Calibration is complete when the LED indicators stop flashing. It is
recommended that users wait for 15-20 seconds after the calibration is
completed before flying again.
Hold the left stick to the
right side of its socket.
Start
Calibration complete
Rapidly and continuously wiggle
the right stick left and right until
the rear LEDS flash alternately.
Page 7

After installing the display, check if the face panel is loose. If yes,
please readjust accordingly.
When using the horizontal calibration, please ensure that the aircraft is
on a completely flat surface. Aircraft motors should be completely
disarmed. Do not move the aircraft during calibration or calibrate on an
uneven/tilted surface, or there will be errors.
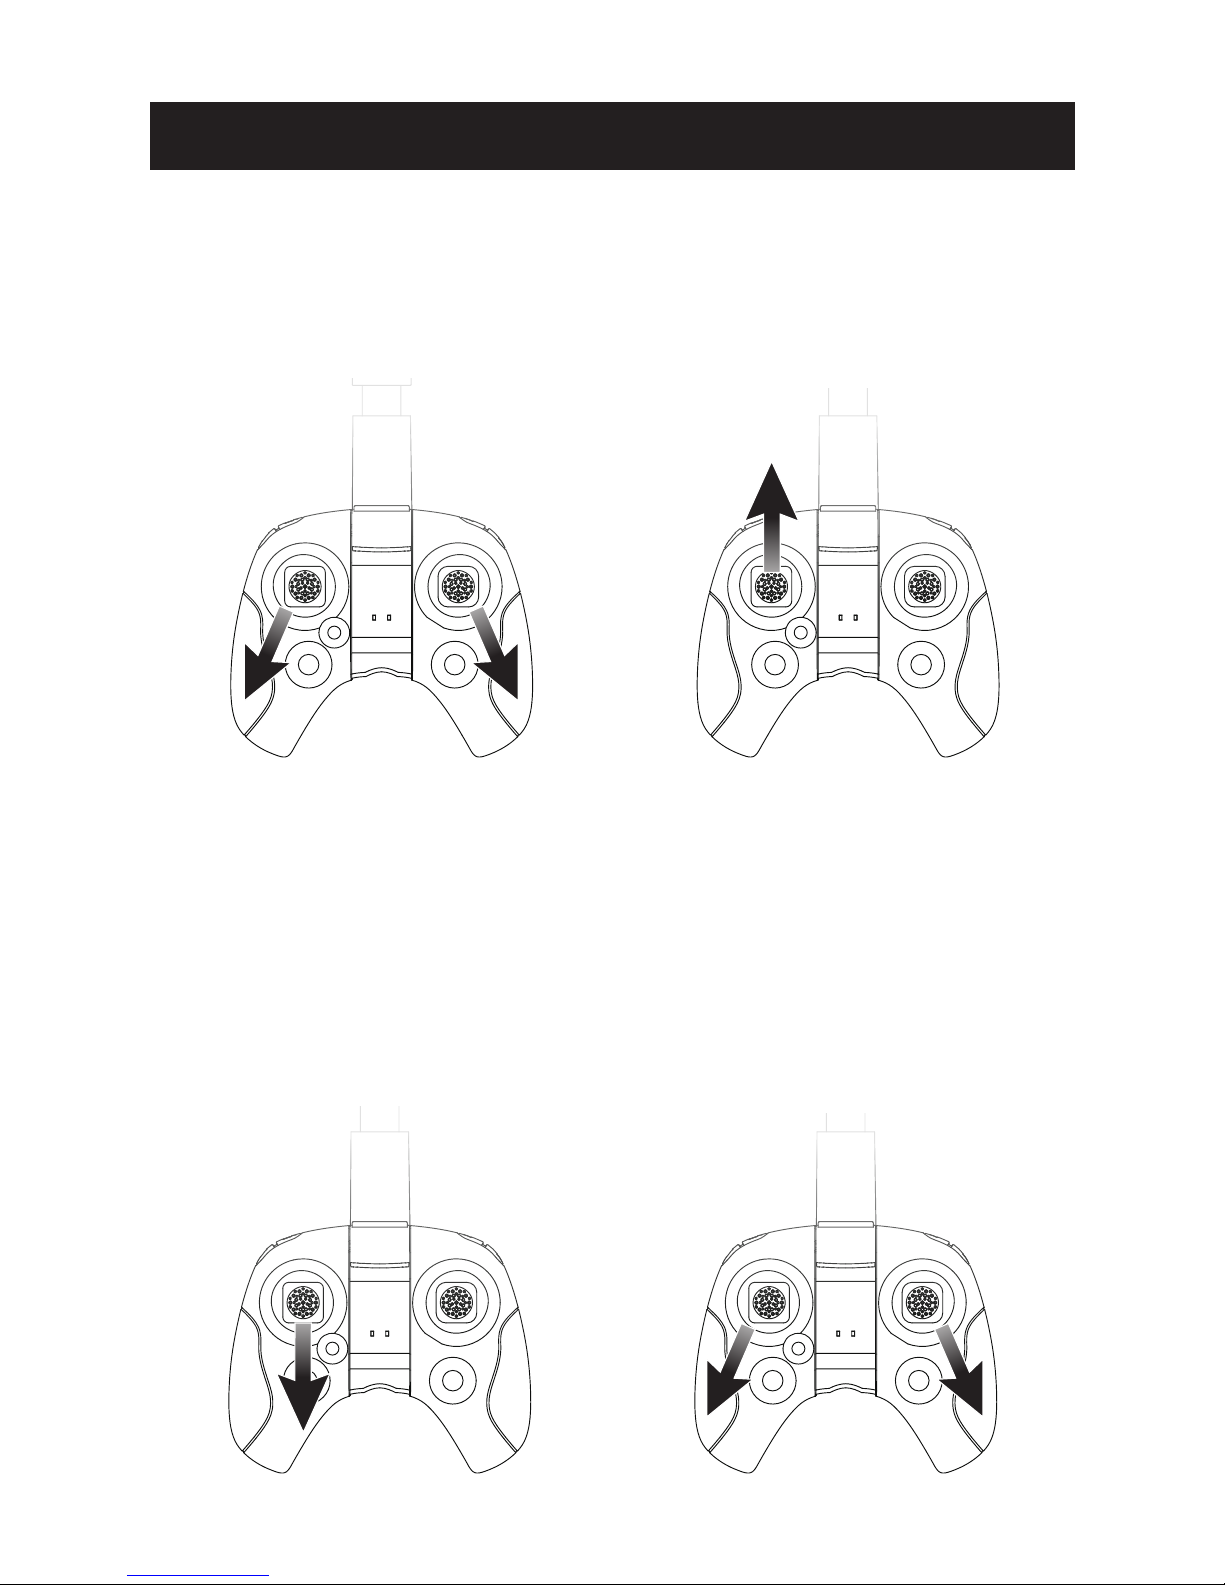
Installing the HS001 display
Option 1: Secure the HS001
display to the HT015’s mobile
device bracket.
Option 2 (with the HV002 video
goggles): Press the release key on
the HV002 goggles to release its
face panel. Install the HS001 into
the exposed compartment and
shut the panel. After the
installation, one may put the
goggles on and adjust to fit with the
adjustable head strap.
Step 3
Page 8

After flight, please completely shut off the aircraft, transmitter and
external display.
Step 4
Takeoff
Simultaneously pull the transmitter joysticks diagonally down-out to arm
the motors (as shown in the left figure). Pull the left joystick (throttle)
upwards to take off.
Landing
Slowly and gently pull the throttle joystick down until the copter has
completed its descent on the ground. Simultaneously pull the transmitter
joysticks diagonally down-out to disarm the motors (as shown in the below
figure).
Page 9

Getting to know your H122D
Aircraft head
Camera Head
Motor
LED
Propeller B
Aircraft
status LED
Battery strap
LiPo battery
5.8G antenna
Propeller A
TF card slot
Thank you for purchasing a HUBSAN product. The H122D is an easy to
fly racing aircraft, paired with a multifunctional remote control.
Page 10

Getting to know your HT015
Getting to know your HS001
Micro-SD
charging port
TF card slot
Battery compartment
Photo key
Video key
Aileron trim
Power switch
Mobile Device frame
Joystick
Joystick
Power button
Headlight power toggle
Binding status LED
Clear Screen key
Transmitter status LED
HT015 low power status LED
Page 11

Getting to know your HV002
Charging
status LED
5.8 Antenna
Sunshade
recess
Face panel release
LCD screen
Photo/Video
mode switch button
Photo/Video button
Main Menu
Speaker
Binding/Clear
screen button
Page 12

Installing and removing propellers
Installation: Before installing propellers for the first time, please check that
each Propeller A is matched with motor A and each Propeller B is
matched with motor B. Align the "I" with the flat side of the "D" shaped
motor shaft. Then use the provided screws and screwdriver to secure
each propeller. Propeller A’s are paired with black propeller screws and
are tightened counterclockwise. Propeller B’s are paired with silver
propeller screws and are tightened clockwise. (as shown below)
Removal: If propellers need to be changed, please uninstall as shown
below with a screwdriver. Propeller A’s are paired with motor A shafts and
are untightened clockwise. Propeller B’s are paired with motor B shafts
and are untightened counterclockwise.
Propeller A
Propeller B
Propeller B
Propeller A
Page 13

Note: Mind the differing colors of the A and B propeller screws!
<Figure 1>
Counterclockwise
to install
Clockwise to
install
Clockwise to
remove
Installation
Removal
Counterclockwise
to remove
“D” Shaft
Page 14

Charging and Installing the Aircraft battery
The H122D aircraft is paired with a rechargeable 7.6v, 710mAh Li-Po. Be
sure to use the provided Hubsan dedicated charger for charging. Fully
charge the battery before flight. Connect the charger’s USB adapter to a
PC terminal and then the battery to the charger. Charging time is
approximately 130 min; recommended flight time is 6.5 minutes. Be sure
to charge the battery before each flight.
Installation: Push the battery into its compartment with its lines facing
away from the unit. Connect it to the drone’s power line and coil the power
line into the compartment. Be careful to avoid entangling the power line
with the propellers.
Page 15

1. Aircraft and remote control are not pairing
(1) Check that the aircraft and remote control are both powered on.
(2) Turn off both the aircraft and remote control. Rebind the aircraft to the
remote control by following the rebind directions on page 1 of this guide.
2. No video on the screen or user is experiencing strong video
feed interference
(1) Check whether there are strong sources of wireless interference (i.e.
WIFI, electricity, radio tower frequencies, etc). If there are any, please
change your flight location.
(2) Rebind the copter to the transmitter, as the 5.8 and 2.4 frequencies
might be interfering with each other.
(3) Browse through the selection of available 5.8gHz frequencies to find a
clean channel.
3. Aircraft/video feed is shaking/shaky
(1) Check if the aircraft propellers are deformed or broken. Please replace
them.
(2) Check that all aircraft body screws are firmly in place.
(3) Check whether any motor shafts are broken. Motors must be replaced
if the shafts are broken.
4. Cannot take videos or pictures
(1) Check to see that the SD card is installed in the aircraft prior to
power on.
(2) Make sure the SD card is Class 10 or higher, contains 16GB or
32GB of storage and is formatted to FAT32.
Frequently Asked Questions
Page 16

Product Name:X4 STAR PRO
Company:Shenzhen Hubsan Technology Co., Ltd.
Address:13th Floor, Block 1, Tower C, Software
Industry Base, Xuefu Road,
Nanshan District, Shenzhen, China.
Factory:Dongguan Tengsheng Industrial Co., Ltd.
Address: A22# Luyi Street, Tianxin Village,
Tangxia Town, Dong guan, China.
Hotline:0769-82776166(China)
Warning:
Do not leave the quadcopter charging unattended. Always
disconnect the quadcopter from the charger immediately
after charging is complete.
This is not a toy, not suitable for children under 14.
Notice:Read the instruction manual carefully before use.
Propellers may cause injury; caution!
www.HUBSAN.com
User Manual
 Loading...