

Page 1
®
H123D X4 JET
《H123D User Manual》
Version 1.0
Page 2
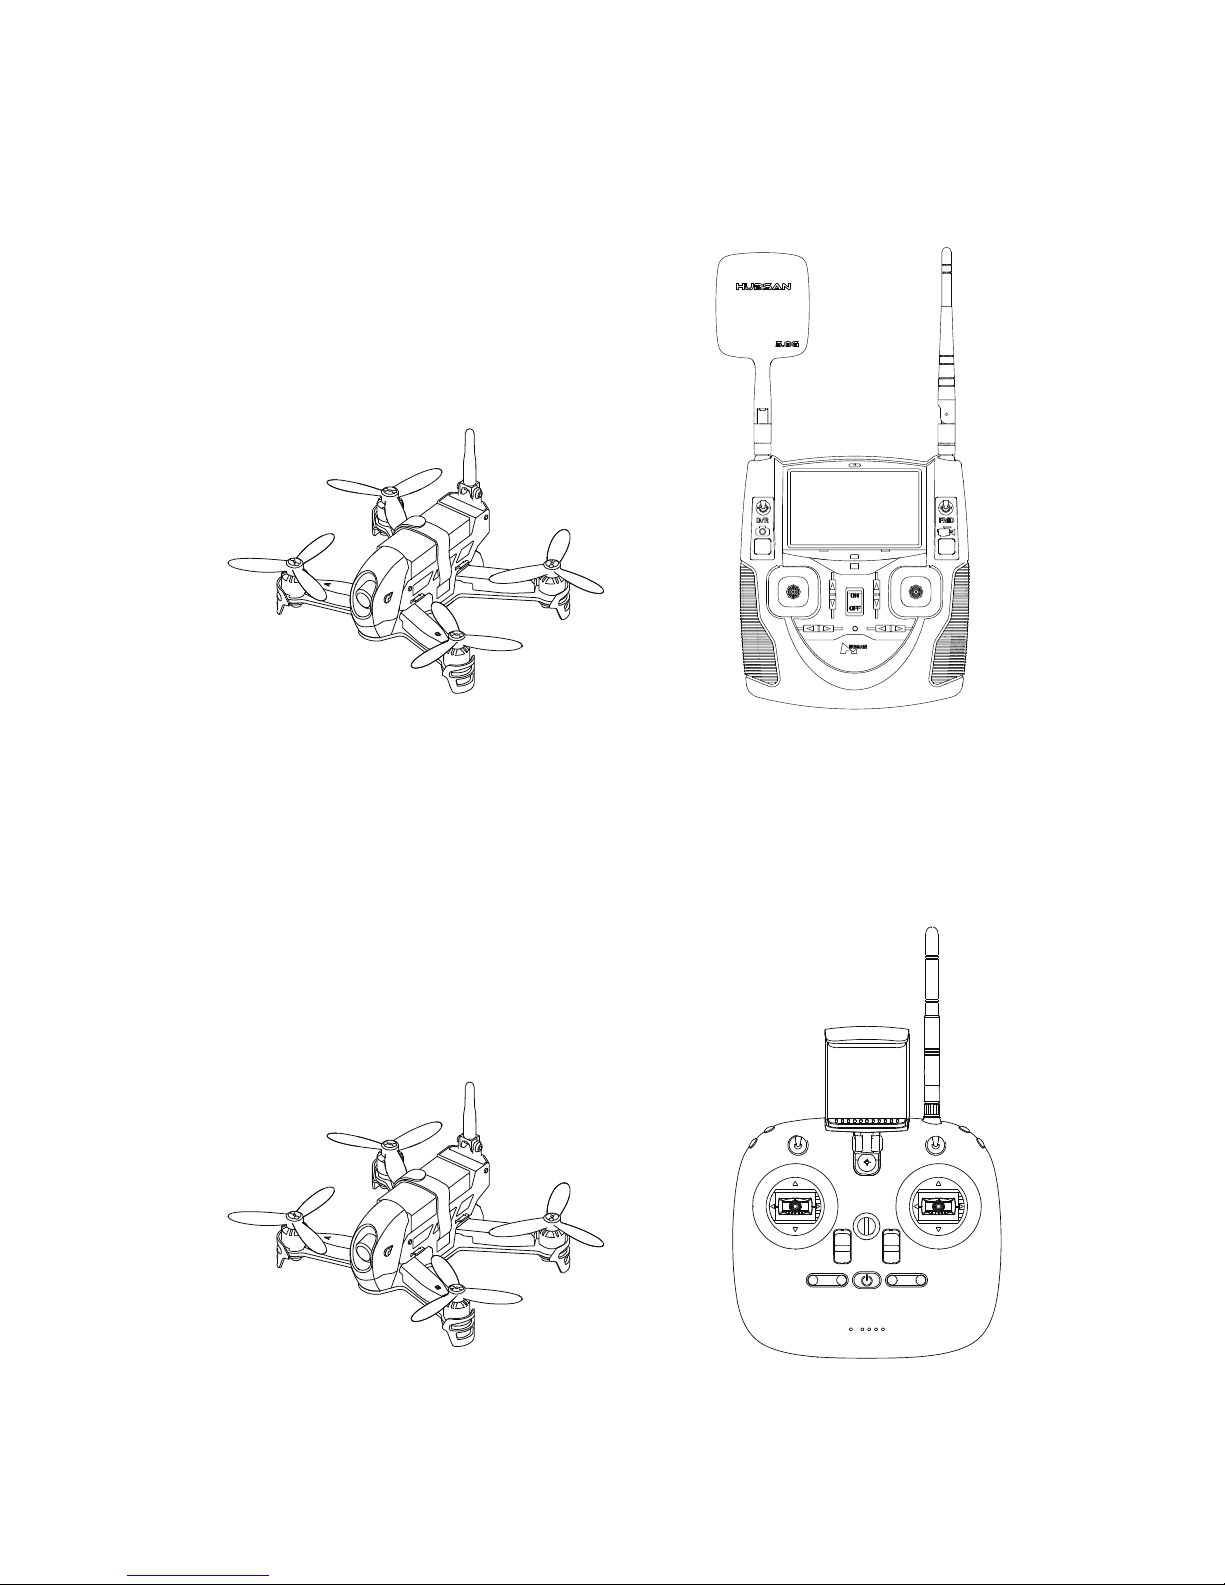
The First Flight Configuration:Aircraft + HT012D Transmitter
The Second Flight Configuration: Aircraft + HT011 Transmitter
2 DIFFERENT WAYS TO FLY, 2 CONFIGURATIONS
01
+
+
Page 3

IMPORTANT SAFETY INFORMATION
READ THE DISCLAIMER AND SAFETY GUIDELINES FIRST BEFORE USE.
OPERATION
Be extremely careful and responsible when using the quad.Small electronic
components can be damaged due to crashes or exposure to
moisture/liquid. To avoid any injuries, do not use the quad with broken or
damaged components.
MAINTENANCE
Do not try to open or repair the units by yourself. Please contact Hubsan
or Hubsan authorized dealers for service. For more information, please visit
the official website at www.hubsan.com.
BATTERY
Do not disassemble, squeeze, impact, burn, drop or trample the battery.
Do not short-circuit or put the battery terminal in contact with metal. Do
not expose the battery to temperatures above 60 ° C. Charge the aircraft
battery prior to flight. Use a Hubsan dedicated charger for charging. Keep
the battery out of the reach of children and away from any kind of
moisture.
FLIGHT
Please be mindful of personal safety and the safety of others while flying.
-Do not fly in bad weather conditions.
-Do not attempt to catch the aircraft while it is in flight.
-This product is intended for experienced pilots over the age of 14.
-After every flight, completely disarm the aircraft motors and disconnect
the aircraft from power. Then, you may power off the remote control.
Quick Start Guide
USAGE ADVICE
(Hubsan has created the following operational and safety materials):
Symbol Explanation:
Prohibited Operation
Important Notice
Instruction
Explanation/Reference
0202
Page 4

Hubsan Safety Advisory Notice for Lithium-Polymer (LiPo)
Batteries
LiPo batteries are different from conventional batteries in that their
chemical contents are encased in a relatively lightweight foil packaging.
This has the advantage of significantly reducing their weight but it does
make them more susceptible to damage if roughly or inappropriately
handled. As with all batteries, there is a risk of fire or explosion if safety
practices are ignored:
1. Do not disassemble or reassemble the battery.
2. Do not short-circuit the battery.
3. Do not use or charge near sources of heat.
4. Do not put the battery in contact with water or any kind of liquid.
5. Do not charge batteries under sunlight or near fire.
6. Do not puncture or subject the battery to force of any kind.
7. Do not throw or manhandle the battery.
8. Never charge a battery that has been damaged, become deformed or
swelled.
9. Do not solder on or near the battery.
10. Do not overcharge or over discharge the battery.
11. Do not reverse charge or reverse the battery polarities.
● If you do not plan to fly the quad for a long time, store the battery
~50% charged to maintain battery performance and life.
● Please use Hubsan chargers for battery charging.
● Discharge the battery at 5C current or below. To avoid discharge related
battery damage, do not prolong the discharge time.
● Do not charge on carpet to avoid fire.
● Batteries need to be recharged if unused for over 3 months.
03
Page 5

12. Do not connect the battery to a car charger/cigarette lighter or any
kind of unconventional power source.
13. This battery is prohibited for non-designated devices.
14. Do not touch any kind of liquid waste or byproduct from batteries. If
skin or clothes come in contact with these substances, please flush with
water!
15. Do not mix other types of batteries with lithium batteries.
16. Do not exceed the specified charging time.
17. Do not place the battery in a microwave or in areas of high pressure.
18. Do not expose the battery to the sun.
19. Do not use in environments with high static electricity (64V and
above).
20. Do not use or charge in temperatures below 0 ℃ and above 45 ℃.
21. If a newly purchased battery is used, leaking, possesses a bad smell
or other abnormalities, return immediately to the vendor.
22. Keep away from the reach of children.
23. Use a dedicated battery charger and follow all charging requirements.
24. Minors who use the battery and its dedicated unit must be supervised by an adult at all times.
04
Page 6

05
Important Safety Information
1. The H123D Aircraft
1.1 Aircraft Component Breakdown
1.2 Charging And Installing The
Aircraft Battery
1.3 Installing And Removing The
Propellers
1.4 Aircraft LED Indications
1.5 Adjusting The Aircraft Camera
Angle
1.6 Installing The TF (Micro-SD) Card
2 Transmitters
2.1 The HT012D Transmitter
2.1.1 HT012D Key Functions
2.1.2 Installing The Transmitter
Batteries
2.1.3 Transmitter Battery Installation
2.2 The HT011 Transmitter
2.2.1 Getting To Know The HT011
2.2.2 HT011 Function Breakdown
2.2.3 Battery Installation
3 Getting Ready To Fly
3.1 Flight Environment Requirements
3.2 Pre-Flight Checklist
3.3 Binding
3.3.1 Binding The HT012D And
Aircraft
3.3.2 Binding The HT011 And Aircraft
Table Of Contents
3.4 Horizontal Calibration
3.5 Takeoff/Landing
3.6 Basic Flight Operation
3.7 Acrobatics
3.8 Motor Stall Protection
3.9 Low Power Protection
3.10 Loss Of Flight Control
Protection
H123D Frequently Asked Questions
H123D Accessories
02
16
16
17
19
21
21
21
21
22
06
06
06
07
08
08
08
09
09
09
10
11
11
11
13
14
14
14
15
15
15
15
Page 7
06
1 The H123D Aircraft
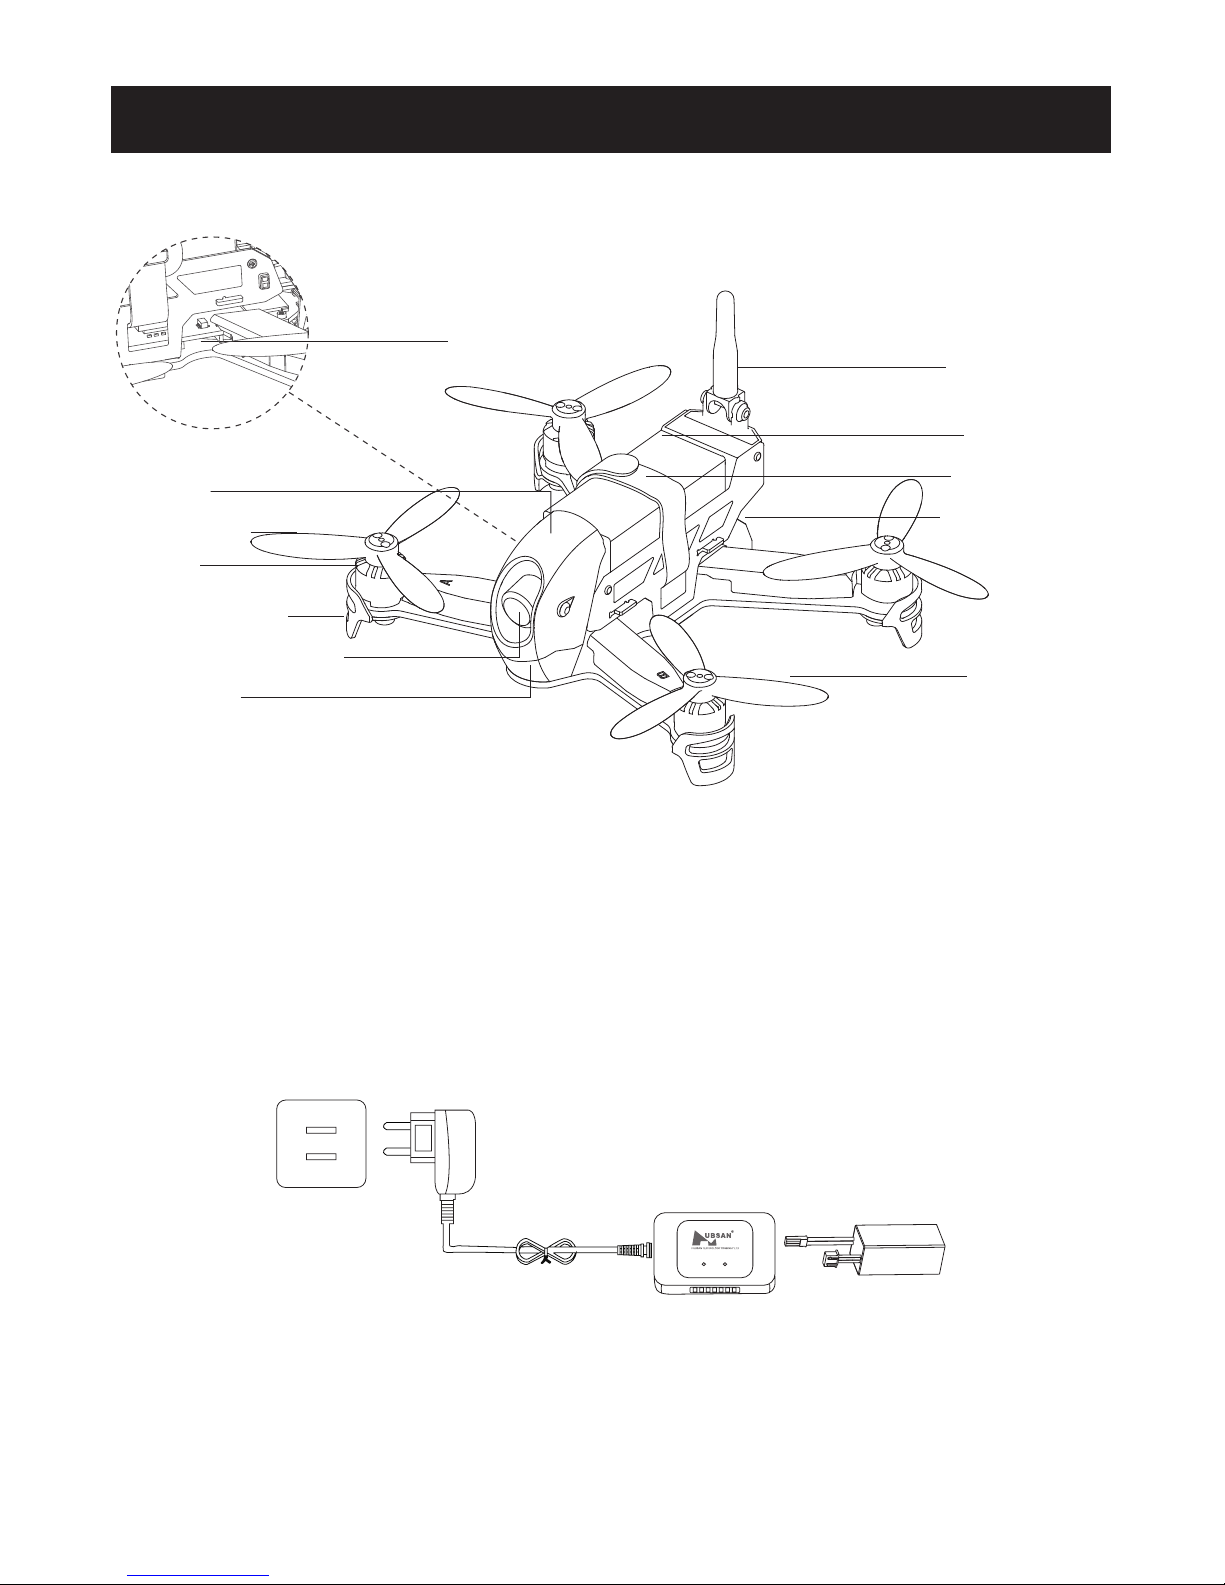
1.2 Charging And Installing The Aircraft Battery
The H123D aircraft is paired with a rechargeable 7.6v, 980mAh Li-Po. Be sure to use
the provided Hubsan dedicated charger for charging. Fully charge the battery before
flight. Connect the charger’s USB adapter to a PC terminal and then the battery to the
charger. Charging time is approximately 130min; recommended flight time is 10
minutes. Be sure to charge the battery before each flight.
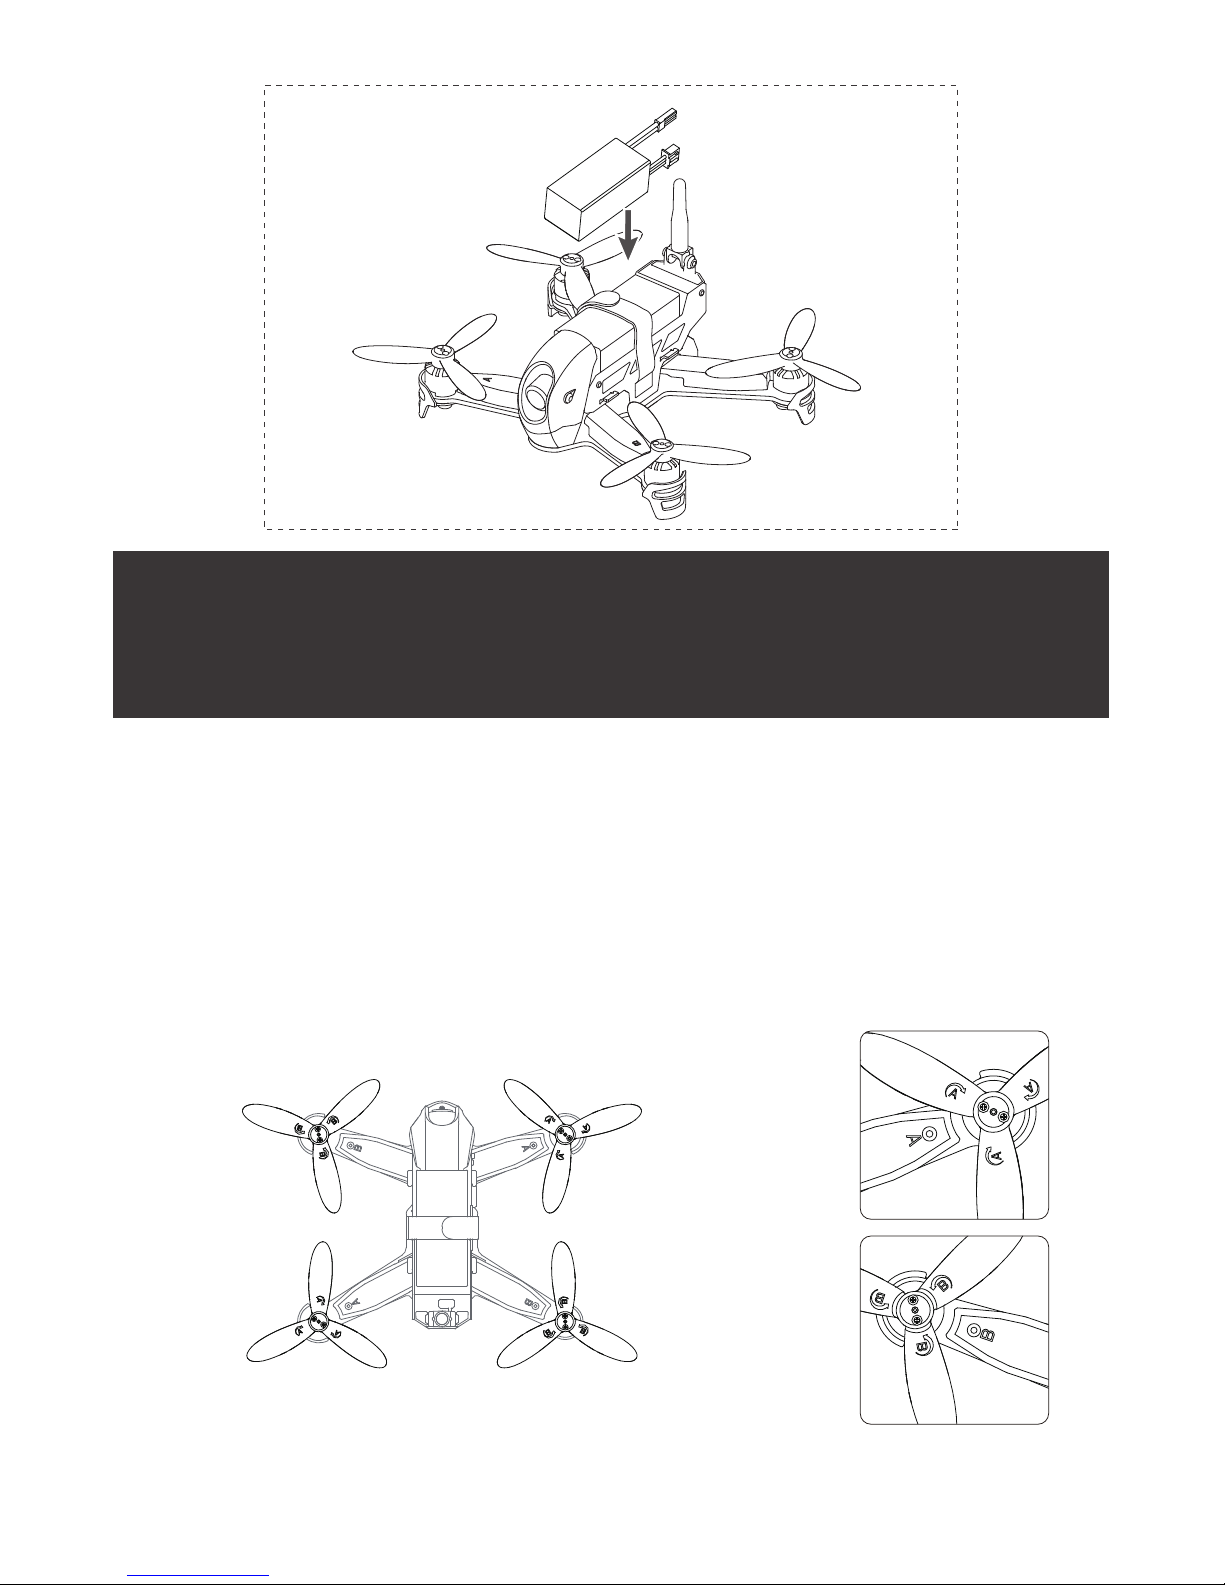
Installation: Push the battery into its compartment with its lines facing away from the
unit. Connect it to the drone’s power line and coil the power line into the
compartment (be careful to avoid entangling the power line with the propellers).
Fasten the battery in place with its velcro battery strap.
1.1 Getting To Know Your H123D
Propeller B
Aircraft Status
LED
Battery Strap
LiPo Battery
5.8G Antenna
SD card slot
720P Camera Head
Motor
Headlight
Propeller A
Motor Bracket
Canopy
Page 8
07
1.3 Installing And Removing Propellers
The aircraft propellers are triple bladed; each is marked with either an A or a B. Please
replace damaged propellers with genuine Hubsan stock.
Before installing the propellers for the first time, please check whether the propeller
and motor arm read "A" or "B”. The two letters should match. Only then use two
screws per propeller to tighten and secure each to its respective motor shaft.
● Make sure the battery is fully charged before each flight.
● Please do not leave unattended while charging.
● When charging is complete, disconnect the charger and battery from power
immediately.
If propellers need to be changed out, please remove the propeller screws first before
taking the existing propeller off.
A=A
B=B
Propeller A
Propeller B
Propeller B
Propeller A
Page 9

08
To change the aircraft’s camera angle, use a
screwdriver to loosen the screws holding the camera
head in place. Manually adjust the camera head
accordingly as desired (downwards 8 degrees max,
upwards 45 degrees max) and firmly tighten the
screws afterwards.
1.4 Aircraft LED Indicators
1.5 Adjusting The Aircraft Camera Angle
Locate the TF (Micro-SD) slot at the bottom of the
aircraft. Insert the Micro-SD into the aircraft to take
photos and make video recordings.
Installation:
1.6 Installing The TF (Micro-SD) Card
LED Status
TF Card Slot
Power On
Flight Control
Connection
Horizontal
Calibration
Photo
All 4 LEDs flash simultaneously
Left and right rear LEDs flash alternately.
All LEDs turn solid when calibration is complete.
When the user takes a photo, both rear LEDs
will flash together once.
Video
When the user records a video, both rear LEDs
will flash together slowly.
Both rear LEDs will flash together rapidly (this
indication takes priority over all others when
power is low).
When the aircraft is not connected to a
transmitter or has been disconnected from a
transmitter, the right rear LED will flash slowly.
Upon connection with a transmitter, the right
rear LED will become solidly lit.
Rear LEDs
(Both Red)
Headlight (White)
During normal flight, the headlight is a solid white. Users
may also opt to turn the headlight off.
Function And/Or Aircraft Status
Low Power
Page 10

09
2 Transmitters
2.1 The HT012D Transmitter
2.1.1 HT012D Key Functions
Manual Mode
Sport Mode
Acro Mode
Expert Mode
Normal Mode
Screen
No Function
Micro USB Port
3.5mm Video Port
No Function
Elevator/Rudder Joystick
Elevator Trim
Rudder Trim
Photo
Power
Throttle/Aileron Joystick
Aileron Trim
LED Indicator
Throttle Trim
Turn Headlight
ON/OFF (Long Press)
Video
Mode 1
(Japanese Hand)
5.8G Antenna 2.4 Antenna
Manual Mode
Sport Mode
Acro Mode
Screen
No Function
Micro USB Port
3.5mm Video Port
No Function
Throttle And Rudder
Photo
Power
Elevator/Aileron Joystick
Aileron Trim
LED Indicator
Elevator Trim
Video
Mode 2
(American Hand)
Expert Mode
Normal Mode
5.8G Antenna 2.4 Antenna
Throttle Trim
Turn Headlight
ON/OFF (Long Press)
Rudder trim
Page 11

10
No.
(1)
Key/Button/Switch
Throttle
/Aileron Joystick
Push the stick forward or backward and the quadcopter will ascend
or descend (respectively). Push the stick left or right and the
quadcopter will fly left or right (respectively).
Function
2.1.2 HT012D Key Functions
(2)
Elevator
/Rudder Joystick
Push the stick forward or backward and the quadcopter will fly
forwards or backwards (respectively). Push the stick left or right and
the quadcopter will rotate counterclockwise or clockwise
(respectively).
Throttle
/Rudder Joystick
Push the stick forward or backward and the quadcopter will ascend
or descend (respectively). Push the stick left or right and the
quadcopter will rotate counterclockwise or clockwise (respectively).
2
1
3
Elevator
/Aileron Joystick
Push the stick forward or backward and the quadcopter will fly
forwards or backwards (respectively). Push the stick left or right and
the quadcopter will fly left or right (respectively).
Aileron Trim Use the Aileron trim to adjust for left and right horizontal drift.
4 Elevator Trim Use the Elevator trim to adjust for forward and backward drift.
5 Rudder/Yaw Trim
Use the Rudder trim to adjust for counterclockwise and clockwise
rotation/yaw drift.
6 Throttle Trim
Throttle trim is normally centered. If the throttle channel is not
centered, use the Throttle trim to adjust.
7 Power Push up/ON to turn on the transmitter. Push down/OFF to turn off.
8
(8)
Photo
Press once to take a photo.
Video
Press to start and end video recordings.
Note: Photos cannot be taken while a video is recording. Attempts
to do so will stop in-progress recordings.
Normal Mode: Throttle 100%, Elevator 60%, Aileron 60%, Expert
Mode: Throttle 100%, Elevator 100%, Aileron 100%, Rudder/Yaw
9 USB Port Not supported for charging or upgrading.
10
Normal
/Expert Mode
Manual Mode: Operating under full stabilization- no acro is
possible.
Sport Mode: Operating under partial stabilization- no acro is
possible, but flight is relatively flexible.
Acro Mode: Operating with no stabilization- acro is possible and
flight will be very flexible.
(Novice pilots are recommended to use Manual Mode).
11 Flight Mode
Page 12

11
2.2 The HT011 Transmitter
2.2.1 Getting To Know The HT011
2.1.3 Transmitter Battery Installation
Video
Micro-USB Port (cannot be used to charge)
Photot
● Do not mix new and old batteries.
● Do not cross-use different types of batteries at the same time.
● Do not charge non-rechargeable batteries.
Slide open the
battery compartment.
Slide the battery door back
onto the compartment.
Install 4 AA batteries
(be sure to match polarities correctly).
Page 13

12
When this transmitter is paired with the H123D, some of the keys
and buttons will have no functions.
2.4 Antenna
Manual Mode
Sport Mode
Acro Mode
Joystick
2.4G Status LED
Power
Joystick
Clear Screen
(when paired with the HS001)
Binding Button
Battery Indicator LEDs
LED ON/OFF
Expert Mode
Normal Mode
Page 14

13
2.2.2 HT011 Function Breakdown
No.
(1)
Key/Button/Switch
Throttle
/Rudder Stick
Push the stick forward or backward and the quadcopter will ascend
or descend (respectively). Push the stick left or right and the
quadcopter will rotate counterclockwise or clockwise (respectively).
Function
(2)
Elevator
/Aileron Stick
Push the stick forward or backward and the quadcopter will fly
forwards or backwards (respectively). Push the stick left or right and
the quadcopter will fly left or right (respectively).
Throttle/Aileron
Stick
Push the stick forward or backward and the quadcopter will ascend
or descend (respectively). Push the stick left or right and the
quadcopter will fly left or right (respectively).
2
1
3
Elevator
/Rudder Stick
Push the stick forward or backward and the quadcopter will fly
forwards or backwards (respectively). Push the stick left or right and
the quadcopter will rotate counterclockwise or clockwise
(respectively).
Binding Power on the transmitter while holding down the binding button.
4 Power Switch Long press to power on/power off the transmitter.
5 Photo Short press to take photos.
Short press to turn on aircraft LEDs and short press again to shut off
LEDs.
6 Video Short press to start and end video recordings.
Not supported for charging or upgrading.
When paired with the HS001 display, push upwards to clear the
screen; push downwards to show content.
7
Normal
/Expert Mode
Normal Mode: Throttle 100%, Elevator 60%, Aileron 60%,
Rudder/Yaw 60%;Expert Mode: Throttle 100%, Elevator 100%,
Aileron 100%, Rudder/Yaw 100%
8
Flight Mode
Manual Mode: Operating under full stabilization- no acro is
possible.
Sport Mode: Operating under partial stabilization- no acro is
possible, but flight is relatively flexible.
Acro Mode: Operating with no stabilization- acro is possible and
flight will be very flexible.
(Novice pilots are recommended to use Manual Mode).
Battery Voltage LED (low power): If the aircraft voltage is at or
below 6.8V, the LED will slowly flash. If the voltage is above 6.8V, the
LED will be solid.
2.4G Status LED: If the transmitter is not paired/connected to a
device via the 2.4G frequency, the LED will be completely off. If the
transmitter is paired/connected to a device via the 2.4G signal, the
LED will be solidly lit.
9 LED ON/OFF
10 Status LEDs
11 Micro-USB Port
12 Clear Screen
Page 15

14
3 Getting Ready To Fly
It is recommended that users implement some kind of flight training (i.e using a
simulator for flight practice, seeking professional guidance, etc.) before flying. Please
select an appropriate environment for flight.
(1) Select an open environment devoid of high rise buildings and tall obstructions
(such as trees and poles).
(2) Do not fly in bad weather conditions (such as in wind, rain or fog).
(3) Fly the drone in ambient temperatures of 0-40 ℃.
(4) When flying, please stay away from obstructions, crowds, high voltage lines,
trees, water, etc.
(5) To avoid remote control signals interference, do not fly in complex
electromagnetic environments (such as venues with radio stations, power plants
and towers).
(6) The H123D cannot be used in or near the Arctic circle or Antarctica.
(7) Do not fly in no fly zones.
(8) Do not operate the aircraft near high pressure lines.
2.2.3 Battery Installation
3.1 Flight Environment Requirements
High Pressure Lines Airports RainMagnetic Interference
Page 16

15
(1) Make sure the aircraft battery and mobile device are charged and have
adequate power.
(2) Confirm that propellers and screws are properly installed.
(3) If you are taking pictures, insert the Micro-SD card required for taking pictures
and videos.
(4) Verify that the motors arm and spin smoothly.
(5) Ensure the camera lens is clean.
(1) Pull and hold the throttle to its lowest position.
(2) Hold down the Photo key and power the transmitter on. The transmitter’s status
LED will flash red; please do not press or touch any other keys, buttons or sticks
while this process is ongoing. Users may let go of the Photo key and throttle.
Connect the aircraft to its battery and allow it to bind to the transmitter. The two
must be very close to each other; when the bind is successful, the binding status LED
will turn green.
(1) Pull and hold the throttle to its lowest position.
(2) Hold down the binding key and power the transmitter on. Users may let go of
the binding key and throttle. Please do not press or touch any other keys, buttons
or sticks while this process is ongoing, or the aircraft may exhibit instability while
flying.
3.2 Pre-Flight Checklist
3.3 Binding
3.3.1 Binding The HT012D And Aircraft
3.3.2 Binding The HT011 And Aircraft
Mode 2 depicted
Mode 2 depicted
Page 17

Horizontal calibration is required when the aircraft drifts on the horizontal plane
during flight. When this happens, land the aircraft and disarm its motors. Follow
the below steps to do a horizontal/gyro calibration.
1. Place the aircraft on a completely flat surface and then follow the below
calibration procedure. Hold the left stick to the right side of its socket. Rapidly and
continuously wiggle the right stick left and right until the rear LEDS flash
alternately.
2. Calibration is complete when the LED indicators stop flashing. It is
recommended that users wait for 15-20 seconds after the calibration is completed
before flying again.
3.4 Horizontal Calibration
For both configurations, flight operation is mostly the same. This
manual will describe operation on the HT012D remote as an example.
3.5 Taking Off And Landing
Rapidly and continuously
wiggle the right stick left and
right until the rear LEDS flash
alternately.
Hold the left stick to the
right side of its socket.
Start
Calibration
Complete
Takeoff
Simultaneously pull the transmitter joysticks diagonally down-out to arm the
motors (as shown in the below figure). Pull the left joystick (throttle) upwards to
takeoff.
(Note: Novice pilots are recommended to use Sport Mode 0).
Arm Motors Takeoff
16
Page 18

3.6 Basic Flight Operation
Note: When flying the aircraft, be sure to slowly and firmly manage the controls.
With every joystick maneuver the aircraft will lose a little power, so be sure to use a
little extra throttle to keep the aircraft airborne.
(1) The throttle controls the aircraft's ascent and descent.
Landing
Slowly and gently pull the throttle joystick down until the copter has completed its
descent on the ground. Simultaneously pull the transmitter joysticks diagonally
down-out to disarm the motors (as shown in the right figure). After all motors have
come to a complete stop, release the joysticks.
Mode 2
(American Hand)
Mode 1
(Japanese Hand)
Land
Ascend
Descend
Disarm Motors
17
Page 19

(2) The rudder is used to control the aircraft’s rotations.
(3)The elevator controls the aircraft’s forward and backward movement.
(4)The aileron controls the aircraft’s left and right movement.
Clockwise Rotation
Forward
Backward
Left Right
Counterclockwise Rotation
18
Mode 2
(American Hand)
Mode 1
(Japanese Hand)
Mode 2
(American Hand)
Mode 1
(Japanese Hand)
Mode 2
(American Hand)
Mode 1
(Japanese Hand)
Page 20

3.7 Acrobatics
Make sure that the transmitter is set to Acro Mode before attempting acrobatics.
(1) Left Roll
Steady the throttle and push the aileron stick right. The aircraft will perform a left
roll. When the roll is complete, please center the aileron joystick and adjust the
aircraft's position accordingly.
(2) Right Roll
Steady the throttle and push the aileron stick right. The aircraft will perform a right
roll. When the roll is complete, please center the aileron joystick and adjust the
aircraft's position accordingly.
19
Mode 2
(American Hand)
Mode 1
(Japanese Hand)
Mode 2
(American Hand)
Mode 1
(Japanese Hand)
The H123D is capable of 360° rollovers and flips; you may use this
capability by following the below steps. To better perform flips and rolls,
please ensure that the aircraft is at a safe height from the ground. It is best
to roll and flip the aircraft while it is ascending, so that it more easily
maintains its height after flipping or rolling.
Page 21

(3) Front Flip
Steady the throttle and push the elevator stick forward. The aircraft will perform a
forward flip. When the flip is complete, please center the elevator joystick and
adjust the aircraft's position accordingly.
(4) Back Flip
Steady the throttle and pull the elevator stick backward. The aircraft will perform a
back flip. When the flip is complete, please center the elevator joystick and adjust
the aircraft's position accordingly.
Note: After flying, please power the aircraft off first, followed by the transmitter.
20
Mode 2
(American Hand)
Mode 1
(Japanese Hand)
Mode 2
(American Hand)
Mode 1
(Japanese Hand)
Page 22

H123D Frequently Asked Questions
3.8 Motor Stall Protection
When aircraft crashes or its propellers encounter blockage/obstruction, the motors
will automatically disarm to prevent further damage.
3.9 Low Power Protection
When the aircraft battery is low, the aircraft will beep and its rear LEDs will flash.
When the aircraft battery has reached its maximum flight limit, the aircraft will
slowly descend.
3.10 Loss Of Flight Control Protection
When the aircraft and transmitter lose connection after 3 or more seconds, the
aircraft will automatically descend.
1. Aircraft and remote control are not pairing
(1)Check that the aircraft and remote control are both powered on.
(2)Turn off both the aircraft and remote control. Rebind the aircraft to the
remotecontrol.
2. No video on the screen or user is experiencing strong video feed
interference
(1) Check whether there are strong sources of wireless interference (i.e. WIFI,
electricity, radio tower frequencies, etc). If there are any, please change your flight
location.
(2) Rebind the copter to the transmitter, as the 5.8 and 2.4 frequencies might be
interfering with each other.
(3) Browse through the selection of available 5.8gHz frequencies to find a clean
channel.
3. Aircraft/video feed is shaking/shaky
(1) Check if the aircraft propellers are deformed or broken. Please replace them.
(2) Check that all aircraft body screws are firmly in place.
(3) Check whether any motor shafts are broken. Motors must be replaced if the
shafts are broken.
21
Page 23

H123D Accessories
4. Cannot take videos or pictures
(1) Check to see that the SD card is installed in the aircraft prior to power on.
(2) Make sure the SD card is formatted correctly.
H123D-01
Canopy
H123D-02
Headlight Cover+Rear
Lamp Lens
H123D-03
Antenna Base+Antenna
Tube Sheath+ Rear
Canopy+ Battery Port
Cover
H123D-04
Motor Mount
H123D-06
ESC Guard A/B
H123D-07
ESC
H123D-08
Carbon Fiber Racing
Frame
H123D-05
Support Frame
Camera Head Mount
Camera Back Cover
H123D-10
PCB Motherboard
H123D-11
Screw Set (Complete)
H123D-19
Wall Adapter
H123D-20
Balance Charger
H123D-12
Propellers A/B (Screws
Included)
H123D-09
Camera Head
H123D-13
2.4G/5.8G Antenna
H123D-14
HT011-B Transmitter
H502-18
Transmitter Battery USB
Charger (7.4V)
H502-19
Screwdriver
H123D-16
HS001 LCD Display
(Sunshade Included)
H123D-17
Aircraft Battery
H123D-18
Brushless Motors
H123D-15
HT012D Transmitter
(Sunshade Included)
22
Page 24

25
Product name: X4 Jet
Vendor: Shenzhen Hubsan Technology Co., Ltd
Address: 13th Floor, Block C, Shenzhen Software Industrial Base, Xuefu Road, Nanshan District,
Shenzhen, Guangdong Province, China
Manufacturer: Dongguan Teng Sheng Industrial Co., Ltd.
Address: Dongguan City, Guangdong Province, Tangxia Tianke Branch City Road, A22
Telephone: 0769-82776166 (China)
Notice: Please read the operating instructions
carefully before use!
WWW.HUBSAN.COM
● Never leave units unattended when charging
● Unplug the charging cable immediately after charging
● Propellers may cause injury
● This product is not a toy
● Not suitable for children under 14 years of age
 Loading...