

Page 1

Flip tips
kindly
check
page 14-15
Page 2
1
INTRODUCTION
Thank you for buying HUBSAN products. The quadcopter
is
designed as
an
easy to
use, full featured
RC
model capable
of
all forms of rotary flight. Please read the
manual carefully and follow all precautions and recommendations within the manual.
Be sure to retain the manual for future reference, routine maintenance, and tuning.
1.11MPORTANT NOTES
This RC quadcopter
is
not a toy, it utilizes various high-tech products and technologies
to provide superior performance.
Please read this manual carefully before operating this product. Improper use
of
this
product can result
in
serious injury.
Be
aware of your personal safety, safety of others
and your surrounding environment.
We recommend that you obtain the assistance
of
an experienced pilot before
attempting to fly our product for the first time.
2
SAFETY
NOTES
2.1
CAUTION
RIC quadcopter have parts that move at high speed, thus posing a certain degree of
danger. Pilots are responsible for any actions resulting
in
damage or injury from the
improper operation
of
their R/C aircraft models.
Choose a wide open space without obstacles.
Do
not operate RIC aircraft near
buildings, crowds
of
people, high voltage cables, or trees to ensure the safety of
yourself, others and your model.
Operate this unit within your ability.
Do
not fly whilst tired, improper operation may
cause
in
danger.
2.2 LiPo Battery Recharging
Your quadcopter
is
powered by a Lithium-Polymer (LiPo) battery.
Never recharge your battery whilst it
is
inserted
in
your model. It can catch fire leading
to the destruction of the item.
Page 3

SAFETY
ADVISORY
NOTICE
[
Lithium-Polymer
(LiPo)
Batteries]
LiPo batteries differ from conventional batteries
in
that their chemical contents are
encased
in
a relatively insubstantial foil packaging. This has the advantage
of
significantly reducing their weight, but does make them more susceptible to
damage if roughly
or
inappropriately handled. As with all batteries, there is a risk
of
fire
or
explosion if safety practices are ignored:
Charge and store LiPo batteries in a location where a battery fire
or
explosion (including smoke hazard) will
not
endanger life
or
property
Keep LiPo batteries away from children and animals
Consider how you would deal with a LiPo battery fire/explosion as part
of
your
normal home Fire Safety & Evacuation Planning
Never charge a LiPo pack that has ballooned or swelled due to
over-/under-charging or from a crash
Never charge a LiPo battery pack that has been punctured or damaged
in
a
crash (After a crash, inspect the battery pack for the sign
of
damage. Discard
in accordance with your country's recycling laws.).
Do not charge LiPo batteries near flammable materials
or
liquids
Ensure that charging leads are connected correctly. Reverse polarity charging
can lead to battery damage or a fire
or
explosion
Never charge a LiPo battery
in
a moving vehicle
Only charge your LiPo battery using the supplied "balanced" charger
Have a suitable( electrical type) fire extinguisher near the charging area OR a
large bucket
of
dry sand. Do not try to extinguish electrical (LiPo) battery fires
with water
Reduce risks from fire/explosion by storing and charging LiPo batteries inside
a suitable container: a LiPo Sack
or
metal/ceramic container is advised
Monitor recharging LiPo batteries for signs
of
overheating
Never over charge a LiPo battery
Never leave a LiPo battery unattended during recharging
Protect your LiPo battery from accidental damage during storage and
transportation. (Do not put battery packs
in
pockets
or
bags where they can
short circuit
or
can come into contact with sharp
or
metallic objects.)
If your LiPo battery is subjected to a shock (such as a helicopter crash) you
should place it
in
a metal container and observe for signs
of
swelling
or
heating
for
at least 30 minutes
0 Do not attempt to disassemble
or
modify
or
repair a LiPo battery
Page 4

2.3 PREVENT MOISTURE
R/C models are composed
of
many precision electrical components.
It is critical to keep the model and associated equipment away from condensation and
other contaminants. Exposure to water or moisture may cause the model to
malfunction resulting
in
loss
of
responsiveness, or a crash.
2.4 PROPER OPERATION
For the safety purpose, please only use hubsan's spare parts for replacement.
2.5 ALWAYS
BE
AWARE OF THE ROTATING BLADES
When
in
operation, the main and tail rotor blades will
be
spinning at high speed. The
blades are capable of inflicting serious body injury and damage to the environment.
Be cautious of your actions and careful to keep your body and loose clothing away
from the blades. Never take your eyes off the model or leave it unattended while it
is
turned on. Once landed, immediately turn off the model and transmitter.
2.6 AVOID FLYING ALONE
Beginners should avoid flying alone whilst learning flight skills. It
is
advised that
an
experienced pilot be on hand for guidance.
3
SAFETY
CHECK
BEFORE
FLYING
CAREFULLY INSPECT BEFORE REAL FLIGHT
• Before operation, please check the batteries
of
the transmitter and receiver are
charged enough for the flight.
• Before turning on the transmitter, please check that the throttle stick
is
in
the
minimum position.
• Carefully check rotor blades and rotor holders. Broken or premature failure of parts
will result
in
a dangerous situation.
• Check the battery and power plug are securely fastened . Vibration and violent flight
may cause the plug to loosen resulting
in
loss of control.
• When turning
on
the unit, please follow the power on/off procedure: for Power ONplease turn on the transmitter first, and then turn on the receiver. For Power OFFplease turn off the receiver first and then turn off the transmitter. Improper procedure
may cause loss
of
control
of
the quadcopter .
Page 5
4
TRANSMITTER
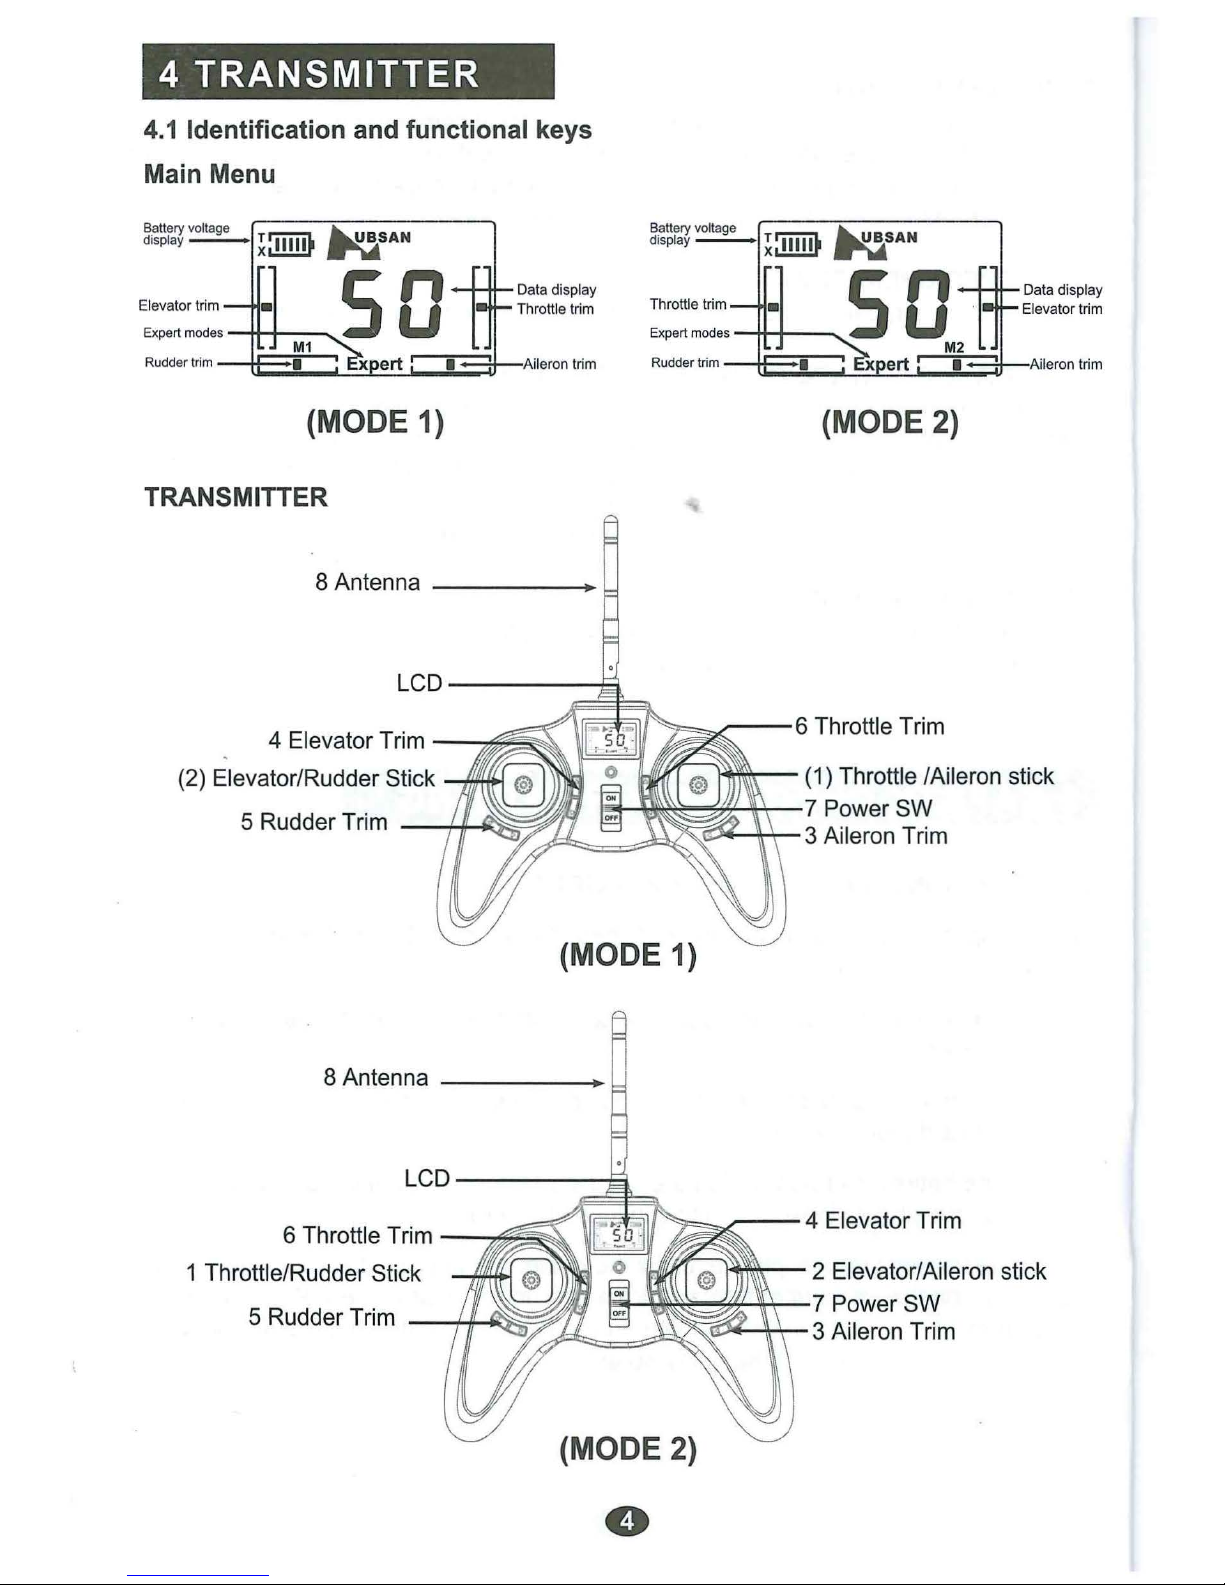
4.1
Identification and functional keys
Main Menu
Battery voltage
display -
Elevator trim
(MODE 1)
TRANSMITTER
Data display
Throttle trim
Aileron trim
Battery voltage
display -
(MODE 2)
8 Antenna
4 Elevator Trim
(2) Elevator/Rudder Stick
5 Rudder Trim
8 Antenna
6 Throttle Trim
1 Throttle/Rudder Stick
5 Rudder Trim
(1) Throttle /Aileron stick
Power
Aileron
Trim
(MODE
1)
4 Elevator Trim
2 Elevator/Aileron stick
Power
3 Aileron Trim
(MODE 2)
Page 6
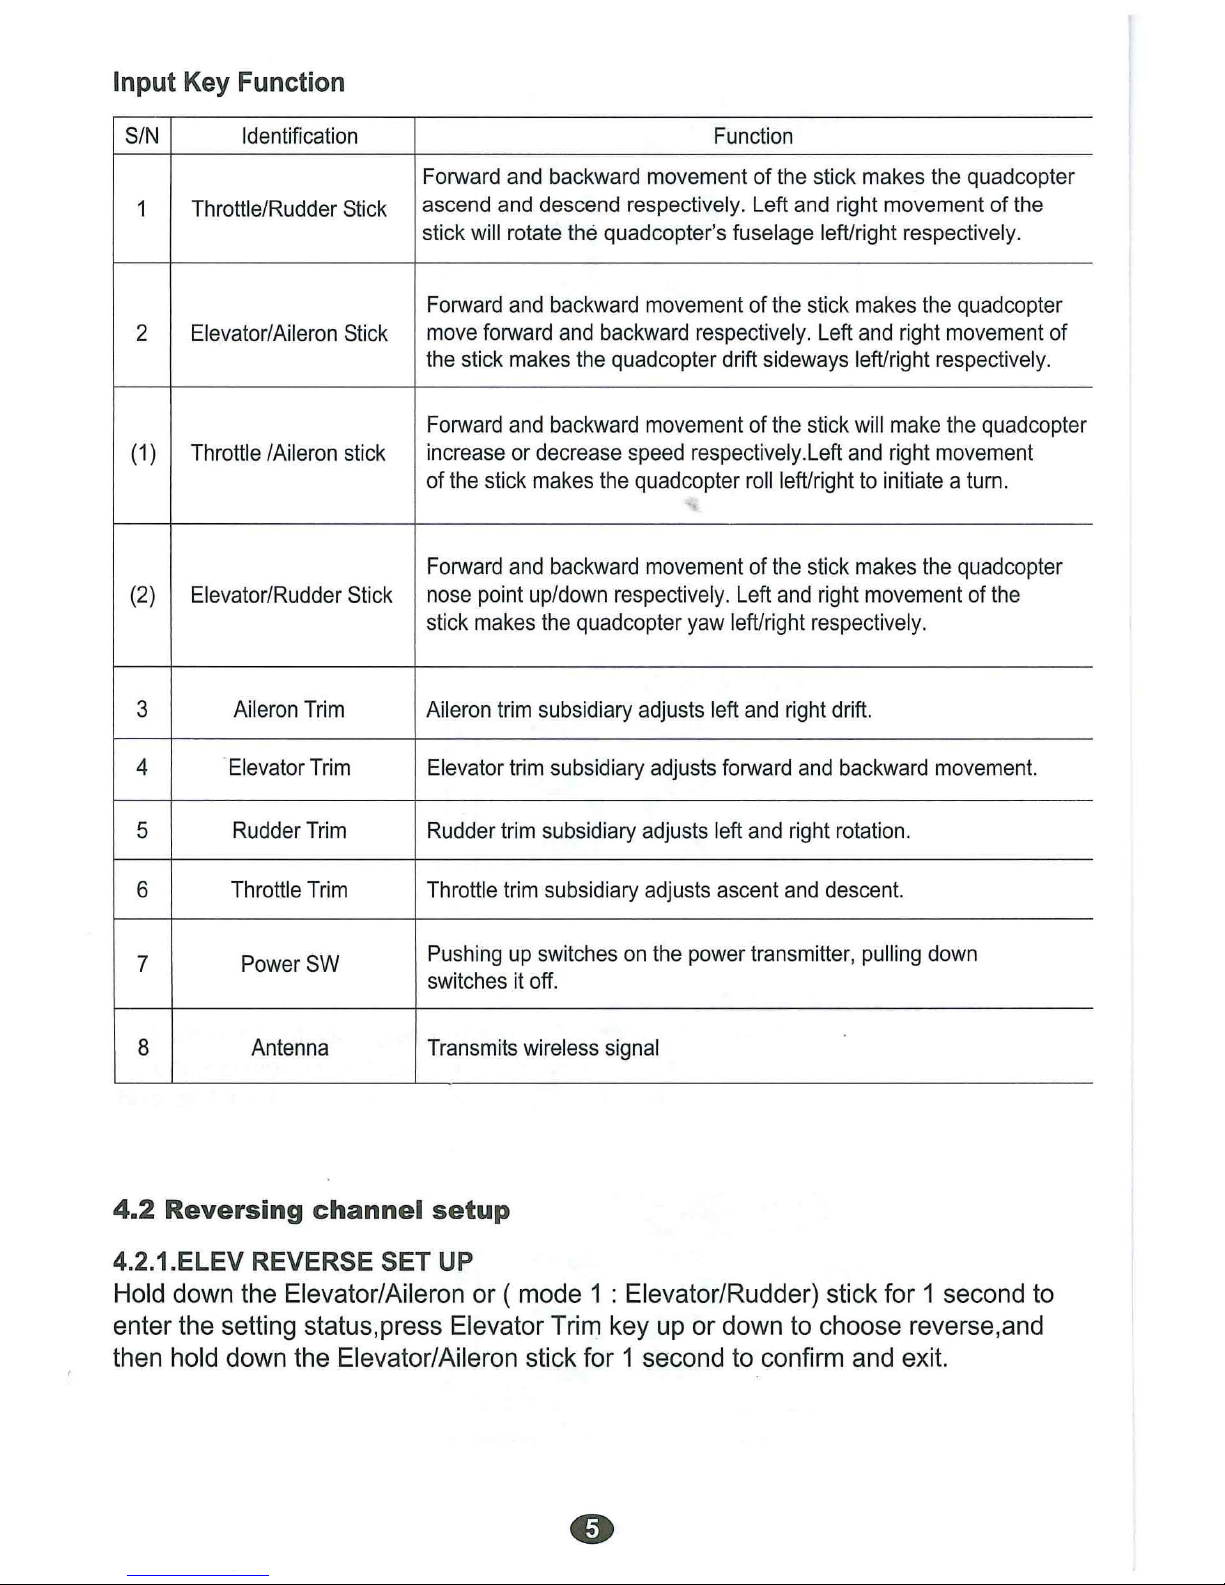
Input
Key
Function
S/N
Identification
Function
Forward
and
backward movement of
the
stick makes
the
quad
copter
1 Throttle/
Rudder
Stick
ascend
and
descend respectively. Left
and
right movement of
the
stick will rotate
the
quadcopter's fuselage left/right respectively.
Forward
and
backward
movement
of
the
stick
makes
the
quad
copter
2 Elevator/
Aileron
Stick
move
forward
and bac
kward
respectively .
Left
and
right mov
ement
of
the
stick
makes
the
quadcopter drift
sideways
left/right
respectively
.
Forward
and
backward
movement
of
the
stick
will
make
the
quadcopter
(1)
Throttle /Aileron
stic
k
increase
or
decrease
speed
respectively .
Left
and right
movement
of
the
stick
makes
the
quadcopter
roll
left/right
to
initiate a
turn
.
Forward
and
backward
movement
of
the sti
ck
makes
the
quadcopter
(2)
Elevator/
Rudder
Stick
nose
point up/
down
respectively.
Left
and
right
movement
of
the
stick
makes
the
quadcopter
yaw
left/right respectively.
3
Aileron
Trim
Aileron
trim
subsidiary
adjusts
left
and
right
drift.
4 'Elevator
Trim
Elevator
trim
subsidiary adjusts
forward
and
backward
movement.
5
Rudder
Trim
Rudder
trim
subsidiary
adjusts
left
and
right
rotation
.
6 Throttle
Trim
Throttle
trim
subsidiary adjusts ascent
and
descent.
7
Power
SW
Pushing
up
switches
on
the power transmitter,
pulling
down
switches
it
off.
8
Antenna
Transmits
wireless
signal
4 .2
Reversing
channel
setup
4.2.1.ELEV REVERSE SET UP
Hold down the Elevator/Aileron or ( mode 1 : Elevator/Rudder) stick for 1 second to
enter the setting status, press Elevator Trim key up or down to choose reverse,and
then hold down the Elevator/Aileron stick for 1 second to confirm and exit.
Page 7

[
.J
M1
•!
- - -
._
_ __ _
___
__ _ - - - - -
~22.~LEREVERSESETUP
Hold down the Elevator/Aileron or (mode 1 : Elevator/Rudder) stick for 1 second to
enter the setting status, press Aileron Trim key left or right to choose reverse,and
then hold down the Elevator/Aileron or (mode 1 : Elevator/Rudder) stick for 1 second
to confirm and exit.
i
[
.]
M1
i
-- -
:J-
4.2.3. RUDD REVERSE SET
UP
Hold down the Elevator/Aileron or (mode 1 : Elevator/Rudder) stick for 1 second to
enter the setting status,press Rudder Trim key left or right to choose reverse,and
then hold down the Elevator/Aileron or (mode 1 : Elevator/Rudder) stick for 1 second
to confirm and exit.
i i
s
E2
______
_
____
: -:J
Page 8

4.2.4. EXPERT MODE REVERSE SET UP
Hold down the Elevator/Aileron or (mode 1 : Elevator/Rudder) stick for 1 second to
enter the setting status, press Throttle Trim key
up
or down to choose reverse,and
then hold down the Elevator/Aileron or (mode 1 : Elevator/Rudder) stick for 1 second
to confirm and exit.
[.]
M1
,
'E
I
_ _ _ _
__
_ _ _ _ _ _
t
4.3
SENSITIVITY
SET
UP
4.3.1 RUDDER SENSITIVITY SET UP - NOR MODE
Hold down the Elevator/Aileron or (mode 1 : Elevator/Rudder) stick for 1 second to
enter the setting status, press Throttle/Rudder or( mode 1 :Elevator/Rudder) key until
the three-point dotted line symbol start to flash( see picture below), press Rudder
Trim to idea sensitivity and then hold down the Elevator/Aileron or (mode 1 :
Elevator/Rudder) stick for 1 second to confirm and exit.
[]
M1
s
[J
Flashing - : : !
- - - - - -
--------
- - - - -
4.3.2. ELEV SENSIVITY SET UP- NOR MODE
Hold down the Elevator/Aileron or (mode 1 : Elevator/Rudder) stick for 1 second to
enter the setting status, press Throttle/Rudder or( mode 1 :Elevator/Rudder) key until
the three-point dotted line symbol start to flash(see picture below),press Elevator
Trim to idea sensitivity and then hold down the Elevator/Aileron or (mode 1 :
Elevator/Rudder) stick
fo
r 1 second to confirm and exit.
Page 9

[]
s
M1
- - - - -
---------
- - - - -
4.3.3 AILE SENSIVITY SET UP- NOR
MODE
Hold down the Elevator/Aileron or (mode 1 : Elevator/Rudder) stick for 1 second to
enter the setting status,press Throttle/Rudder or( mode 1 :Elevator/Rudder) key until
the three-point dotted line symbol start to flash( see picture below), press Aileron
Trim to idea sensitivity and then hold down the Elevator/Aileron
or
(mode 1 :
Elevator/Rudder) stick for 1 second to confirm and exit.
[]
n
M1
_ _ _ _
___________
: _ _
4.3.4 RUDDER SENSITIVITY
SET
UP- EXPERT MODE
Hold down the Elevator/Aileron
or
(mode 1 : Elevator/Rudder) stick for 1 second to
enter the setting status, press Throttle/Rudder or( mode 1 :Elevator/Rudder) key until
the five-point dotted line symbol start to flash( see picture below), press Rudder
Trim to idea sensitivity and then hold down the Elevator/Aileron
or
(mode 1 :
Elevator/Rudder) stick for 1 second to confirm and exit.
so
[J
,
M1
M2
,
:
__
_ _ _ J
Page 10

4.3.5. ELEV SENSIVITY SET UP- EXPERT MODE
Hold down the Elevator/Aileron or (mode 1 : Elevator/Rudder) stick for 1 second to
enter the setting status, press Throttle/Rudder or( mode 1 :Elevator/Rudder) key until
the five-point dotted line symbol start to flash( see picture below),press Elevator
Trim to idea sensitivity and then hold down the Elevator/Aileron or (mode 1 :
Elevator/Rudder) stick for 1 second to confirm and exit.
[]
s n
M1
Expert !
-- -- -- -
--
4.3.6 AILE SENSIVITY SET UP- EXPERT MODE
Hold down the Elevator/Aileron or (mode 1 : Elevator/Rudder) stick for 1 second to
enter the setting status,press Throttle/Rudder or( mode 1 :Elevator/Rudder) key until
the five-point dotted line symbol start to flash( see picture below) , press Aileron Trim
to idea sensitivity and then hold down the Elevator/Aileron or (mode 1 :
Elevator/Rudder) stick for 1 second to confirm and exit.
S
[J
4.3Batte
ry
Mounting
Notice:
>Do not mix old and new batteries
>Do not mix different types
of
batteries
>Do not charge non-rechargeable battery.
Release the screw Take out the cover
lnstall4 x AAA battery
according to the correct polarities
Page 11

Return the cover
Fasten the screw
5
Li-Po
Battery
Charging
5.1
The quadcopter equipped with a 3.7V 240mAh Lipo battery
1.Take out the battery from bottom
of
the quadcopter.
2.
Connect the battery with USB charger, the LED light
is
ON whilst charging
and turns OFF when charging complete.
Page 12

5.2.Piease refer to 2.2. Safety Advisory Notice
Always partially charge your LiPo battery before storage. LiPo batteries retain a
charge over a reasonable period; It
is
not normally necessary to recharge stored
LiPo batteries unless stored for periods longer than 3-6 months.
If your LiPo battery has been over-discharged, it will not
be
possible to recharge it
again.
LiPo
Battery
Disposal & Re-Cycling
Lithium-Polymer
(LiPo)
batteries must not
be
placed
in
with household refuse.
Please
contact
your
Local
Authority (Council) or the supplier
of
your model
for
local regulations
and
the location
of
your nearest
LiPo
battery recycling centre .
TEMPORARY
STORAGE
of
DAMAGED
liPo
BATTERIES:
Bury
the
liPo
battery
in a bucket
of
Q!Y
sand
or
(if
discharged) the
battery
may be neutralized by immersion in a salt
water
bath.
If
in
doubt:
always seek expert advice!
6.
Start
to
fly
6.1
Power-On (Failsafe) Procedure
Your RC quadcopter's 4-in-1 Gyro Receiver
is
fitted with a Power-On failsafe.
This
is
designed to ensure that the quad copter's motor will not start unless it detects a
suitable radio-control signal when the LiPo battery
is
connected. The correct Start-Up
sequence
is
as follows:
6.1.1 Minimize the throttle to zero position
Page 13

6.1.2 Power
on
the transmitter
6.1.3 Switch on the quadcopter by connecting the battery cables with correct polarity
6.1.4 Insert the battery to the bottom
of
your quadcopter, make sure the battery
need to
be
pushed to the end
of
the battery compartment.
Tip: You no need to adjust the rudder trimming button if the quadcopter keep left
turn or right turn during flight, The quadcopter will find the rudder central point
automatically
in
3 secondes after the quadcopter landing on a horizontal ground
Landing
on a horizontal
ground
Page 14

6.2
Effect
of
Control
CAUTION: To avoid loss
of
control: ALWAYS move the controls S-L-0-W-L-Y! Be
aware that control inputs will reduce available lift (see 'Helicopter Principles
of
Flight').
Be
ready to use a little extra Throttle to maintain height during maneuvers.
{J.
Down
MODE2 MODE1
Throttle (Collective Power) increases/decreases the Flying Height
your
quadcopter
MODE2
MODE 1
Rudder (Collective Torque Yaw) rotates
your
quadcopter's fuselage Left I Right
Elevator (Cyclic Pitch) moves
your
quadcopter Forwards/Backwards
MODE 1
LEFT moveme
nt
mo
vement
CAU
TION: Controls will appear reversed
when
the model
is
flying
towards
you I
Aileron (Cyclic Roll) moves
your
quadcopter 'sideways' Left/Right
Page 15

6.3
Aerial Flip Tips.
Flip maneuver can
only
working
under
the EXPERT MODE, you need
to
press
cyclic
joystick
one time
to
switch
into
the expert mode.
[L
S
[J
MODE2
1
Expert
Your
quadcopter
can
do
360° evertion
by
pushing
the
joystick
quickly
on the
condition
that the
flight
surface
forming
a 30°angle
with
the
ground
and the
quadcopter
in the acceleration period
from
the
low
height
to
high
height.
6.3.1 Left side flip
Push the joystick to the right side and then quickly push the joystick from the right to
the left.
6.3.2 Right side flip
Push the joystick to the left side and then quickly push the joystick from the left to
the right.
/
Page 16

6.3.3 Forward flip
Push the joystick to the back and then quickly push the joystick from the back to the
front
MODE2
MODE 1
6.3.4 Backward flip
Push the joystick to the front and then quickly push the joystick from the front to the
back
MODE2
MODE 1
Page 17

H107 Spare Part
Chart
H107-A01
Body Shell
H107-A04
X4RX
H107-A07
Screw Set
H107-A02
Blades
H107-A05
Battery
H203-16
Transmitter
H107-A03
Motor
H107-A06
USB Charger
Page 18

H107 FAQ
. Transmitter and Quadcopter can not
be
binded
Answer: Throttle position need to be minimized to zero.
2.
Transmitter led light
on
and then suddenly off.
Answer: Replace new AAA batteries
3.
LCD transmitter not showing the setting interface after hold down the joystick for 1 second .
Answer: Throttle not
in
zero position
4.
Gyro not working well
Answer :
(1
)Battery voltage lower, (2) Re-binding (3)Land
on
to the groud for 3 seconds and
take off again.
5.
Unable to Flip
Answer: (1) Power not enough, (2) Press the cyclic joystick one time to enter into the expert(flip)
mode.
(3)1n
the expert{flip) mode, the sensitivity on each channel should
be
above 90%, you can
program the sensitivity
in
setting interface, please check manual4.3 Sensitivity set up.
6. Quadcopter shaking with noise
Answer: Please check if the canopy, chassis and rotors transformed or the chassis not firmly
joint with canopy.
?.
Switchi11g
between low and high rates on the transmitter not very user friendly.
Answer: Press cyclic joystick one time to switch on/off the expert mode and normal mode,
"expert" shows on/off on the LCD .
8. Can not take off
Answer:
(1
)Wrong installation on rotors, Rotors mark with A,B .please check here below picture
shows. (2)Wrong installation on motors,please check if each motor installed
in
correct position,
there are two different type of motors, you can tell apart from the motor cables, check below
picture shows.
{Top View)
(Bottom View)
Page 19

9.
The leg
of
the quadcopter easy to
be
taken apart.
Answer: This is a special design to absorb the impact from hard crash, Force the leg back
to the joint position by hand as picture shows.
 Loading...