

Page 1
1.1 Important Notes
This multi-functional RC model is not a toy.
In case of any injuries caused by improper operations, please read the instructions
carefully before use. Be aware of your personal safety, safety of others and your
surrounding environment. It is advised that beginners learn to fly the qudcopter under the
guidance of professional.
1.2 Caution
Propellers work in high speed, which may cause dangerous. User will be responsible for
any damages caused by improper operations.
Do not operate the quadcopter in crowds, buildings, airports or nearby high voltage
cables.
1.3 Li-Po Battery Safety Notes
The quadcopter is powered by a Lithium-Polymer battery.
If you do not plan to use the products for a long time, store the battery approximately 50%
charged to maintain battery performance and life.
● Before flight, check the batteries of quadcopter and controller are fully charged
● Before power on the remote controller, check the throttle stick is fully down
● Check the quadcopter is in good condition, broken parts will casue a risk of injury
● Always power on the remote controller first, then quadcopter. After using, always power
off the quadcopter first, then remote controller. Improper procedure may
cause the quadcopter lose of control.
Connect the battery to the Hubsan USB charger, then connect the USB charger to USB
devices, such as a computer or mobile power charger.
It takes around 30 minutes to fully charge the battery. The USB LED indicator is in red when
charging and light off when the battery is fully charged. Please unplug the charger and
battery when the charging is completed.
Flight time is around 5 minutes.
®
ITEM NO: H001
THE HUBSAN NANO
Q4 SE
PLEASE READ THE MANUAL CAREFULLY BERORE USE.
14+
INTRODUCTION
Thank you for buying the HUBSAN products. It is designed as an easy-to-use,
multi-functional RC model, capable of hovering, fast forward and acrobatic flight
maneuvers. Please read the manual carefully and follow all the instructions. Be sure to
keep the manual for future reference.
1. Safety Notes
● Risk of explosion if battery is replaced by an incorrect type.
● Dispose of used batteries according to the local regulations.
Important
3. Safety Check Before Flying
4. Charge the Li-Po Battery
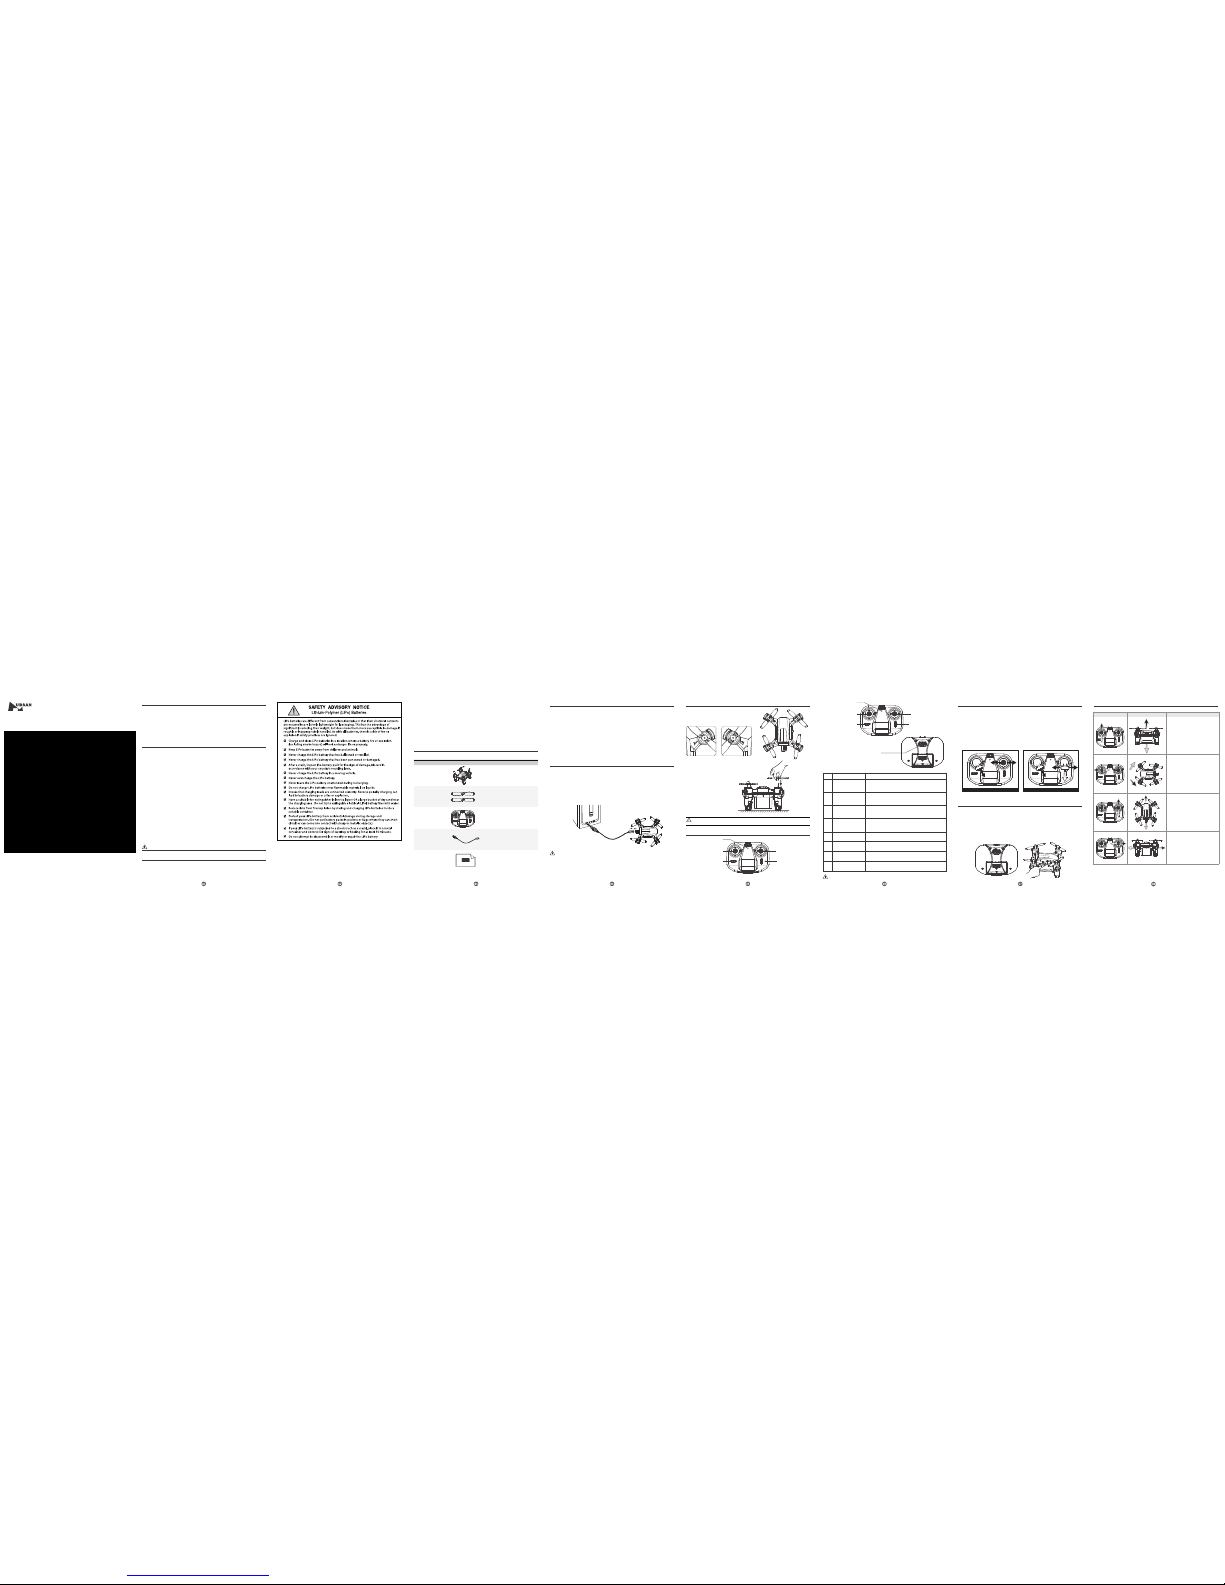
2. Items in the Box
Check all the items in the box before use.
1 Quadcopter 1PC
Equipped with
1pc of Li-Po Battery
4
USB Charger 1pc
For recharging the
Li-Po Battery
5
Manual 1PC
2 Propellers 8PCS
Propeller A: 4pcs
Propeller B: 4pcs
3 Remote
Controller
1pc
Equipped with
2 X AAA (Not Included)
S/N Part Name Photos Quantity Remarks
Quick Guide Instruction
The battery should only be charged with the HUBSAN charger to avoid overcharge.
6. Remote Controller
5 LED Indicator
4 Aileron Trim 3 Elevator Trim
(1) Throttle/ Aileron Stick
Mode 1
(2)Elevator/ Rudder Stick
7.1 Power-On
The quadcopter is designed with Power-On safety system, it ensures the motors will not
start undelss safety signals detected.
7.1.1 Turn on/off the remote controller by pushing power switch to left/right.
Make sure the Throttle stick is in the full down position, power on the remote controller, then
quadcopter. Do not push any sticks or trims before pairing is succeeded, or the quadcopter
will drift.
7. Start to Fly
6.1 Input Key Function
6.2 Quadcopter Calibration
Push the stick forward or backward and the quadcopter will fly
forward or backward; Push the stick left or right and the
quadcopter will rotate left or right.
Adjusts for forward and backward drift.
Adjusts for left and right drift.
Blink in red before binding;
Remain lighted in red after binding.
Turn on/off the remote controller.
S/N
Mode/ Control
Function
(1)
(2)
1
2
3
4
5
6
Mode 2
Throttle/ Rudder Stick
Mode 2
Elevator/ Aileron Stick
Mode 1
Throttle/ Aileron Stick
Mode 1
Elevator/ Rudder Stick
Elevator Trim
Aileron Trim
LED Indicator
Power Switch
Push the stick forward or backward and the quadcopter
will fly forward or backward;Push the stick left or right
and the quadcopter will fly left or right.
Push the stick forward or backward and the quadcopter will
ascend or decend; Push the stick left or right and the quadcopter
will fly left or right.
The throttle stick controls the ascent and
descent . Push up the stick and the X4
will ascend. Pull down the stick and the
X4 will descend. Move the throttle
stick above the center position to take
off. (Move the stick gradually to prevent
the X4 from ascending too quickly.)
The Rudder stick controls the rotate
direction Push the stick to the left and the
X4 will rotate counter-clockwise Push the
stick to the right and the X4 will rotate
clockwise. Pushing harder will cause the
X4 to rotate faster in the corresponding
directions.
4 Power Switch
2 Elevator/Aileron Stick
5 LED Indicator
4 Throttle/ Rudder Trim 3 Elevator/ Aileron Trim
1 Throttle/ Rudder Stick
Mode 2
Mode 2 Mode 1
7.2 Basic Flight
The manual will use Mode 2 as an example to illustrate the transmitter’s operation.
Transmitter (Model 2) Quadcopter Operation
Up
Down
Right Rotation
Left Rotation
Forward
Backward
Right Left
The Elevator stick moves the X4 forward
and backward.
Push the stick up the and the X4 will fly
forward.
Pull the stick down and the X4 will fly
backward.
The angle of stick movement corresponds
to the angle of tilt and flight speed.
The Aileron stick controls left and right
flight. Push the stick to the left and the X4
will fly to the left. Push the stick to the right
and the X4 will fly to the right. The angle of
stick movement corresponds to the angle
of tilt and flight speed.
5. Propellers
● Make sure that the A and B propellers are installed correctly. The quadcopter
will not fly if propellers are improperly installed.
(1) Attach the propellers to the corresponding motors that
are marked A and B;
A=A B=B
(2) Tighten the propellers to the motor shaft.
Quadcopter calibration is required when the quadcopter drifts during flight.
Land the quadcopter and place it on a horizontal surface for calibration.
Calibrating Procedures:
Mode 2
: Push the left stick to the bottom right, and move the right stick left to
right quickly, the 4 LED indicators on quadcopter will blink alternately, calibration
succeeded when the indicators stop blinking.
Mode 1
: Push the left stick to the bottom right, put the right stick to the lowest
and move left to right quickly, the 4 LED indicators on quadcopter will blink
alternately, calibration succeeded when the indicators stop blinking.
1.6 Always Be Aware of the Rotating Propellers
Be careful to keep your body away from the working propellers. Always keep the
quadcopter fly in sight. If above mentioned happens, pwer off the quadcopter
and the remote controller immediately.
1.7 Avoid Flying Alone
Beginners should avoid flying alone when learning flight skills.
Push the stick forward or backward and the quadcopter
will ascend or decend; Push the stick left or right and the
quadcopter will rotate left or right.
● Do not mix old and new batteries ● Do not mix different types of batteries
● Do not charge non-rechargeable battery.
1.4 Prevent Moisture
The quadcopter contains many precision electrical componets.
Store the battery and the quadcopter in a dry area at room temperature. Exposure
to water or moisture may cause malfunction resulting in loss of control.
1.5 Proper Operation
For safety, pnly use Hubsan spare parts for replacement.
Page 2
1. Transmitter and Quadcopter can not pair
Throttle position needs to be fully down. Please do not move any sticks or trims during
initial power-on binding.
2. Gyro not Working Well
1)Battery voltage is too low;
2)Re-bind;
3)Land the quadcopter on the ground with the throttle stick fully down, take off again
after 3 seconds.
3. Unable to Flip
Li-Po power is too low, re-charge the battery.
4. Quadcopter is shaking or making noise during flight
Check if motors, bodyshells and propellers are all properlly positioned or not;
Check if motors and propellers damaged or not.
5. Propellers work well, but cannot take off
1)Improper installation of the propellers. Check if the propeller A and propeller B installed
correctly or not
2)Improper installation of motors. Check if motor A and motor B installed correctly or not.
6. One or more motors stop working
1)Check if propellers squeeze motors;
2)Resolder if there is any broken motor connections.
3)Replace the motor.
7. Drifts
Make calibration as instructed below:
1)Make sure propellers, motors and quadcopter all in good condition, and the battery is
connected correctly with full power, bind the quadcopter and remote controller
2)Calibrating Procedures:
Mode 2: Push the left stick to the most right corner, and move the right stick left to
right quickly, the 4 LED indicators on quadcopter will blink alternately, calibration
succeeded when the indicators stop blinking.
Mode 1: Push the left stick to the most right corner, put the right stick to the lowest
and move left to right quickly, the 4 LED indicators on quadcopter will blink
alternately, calibration succeeded when the indicators stop blinking.
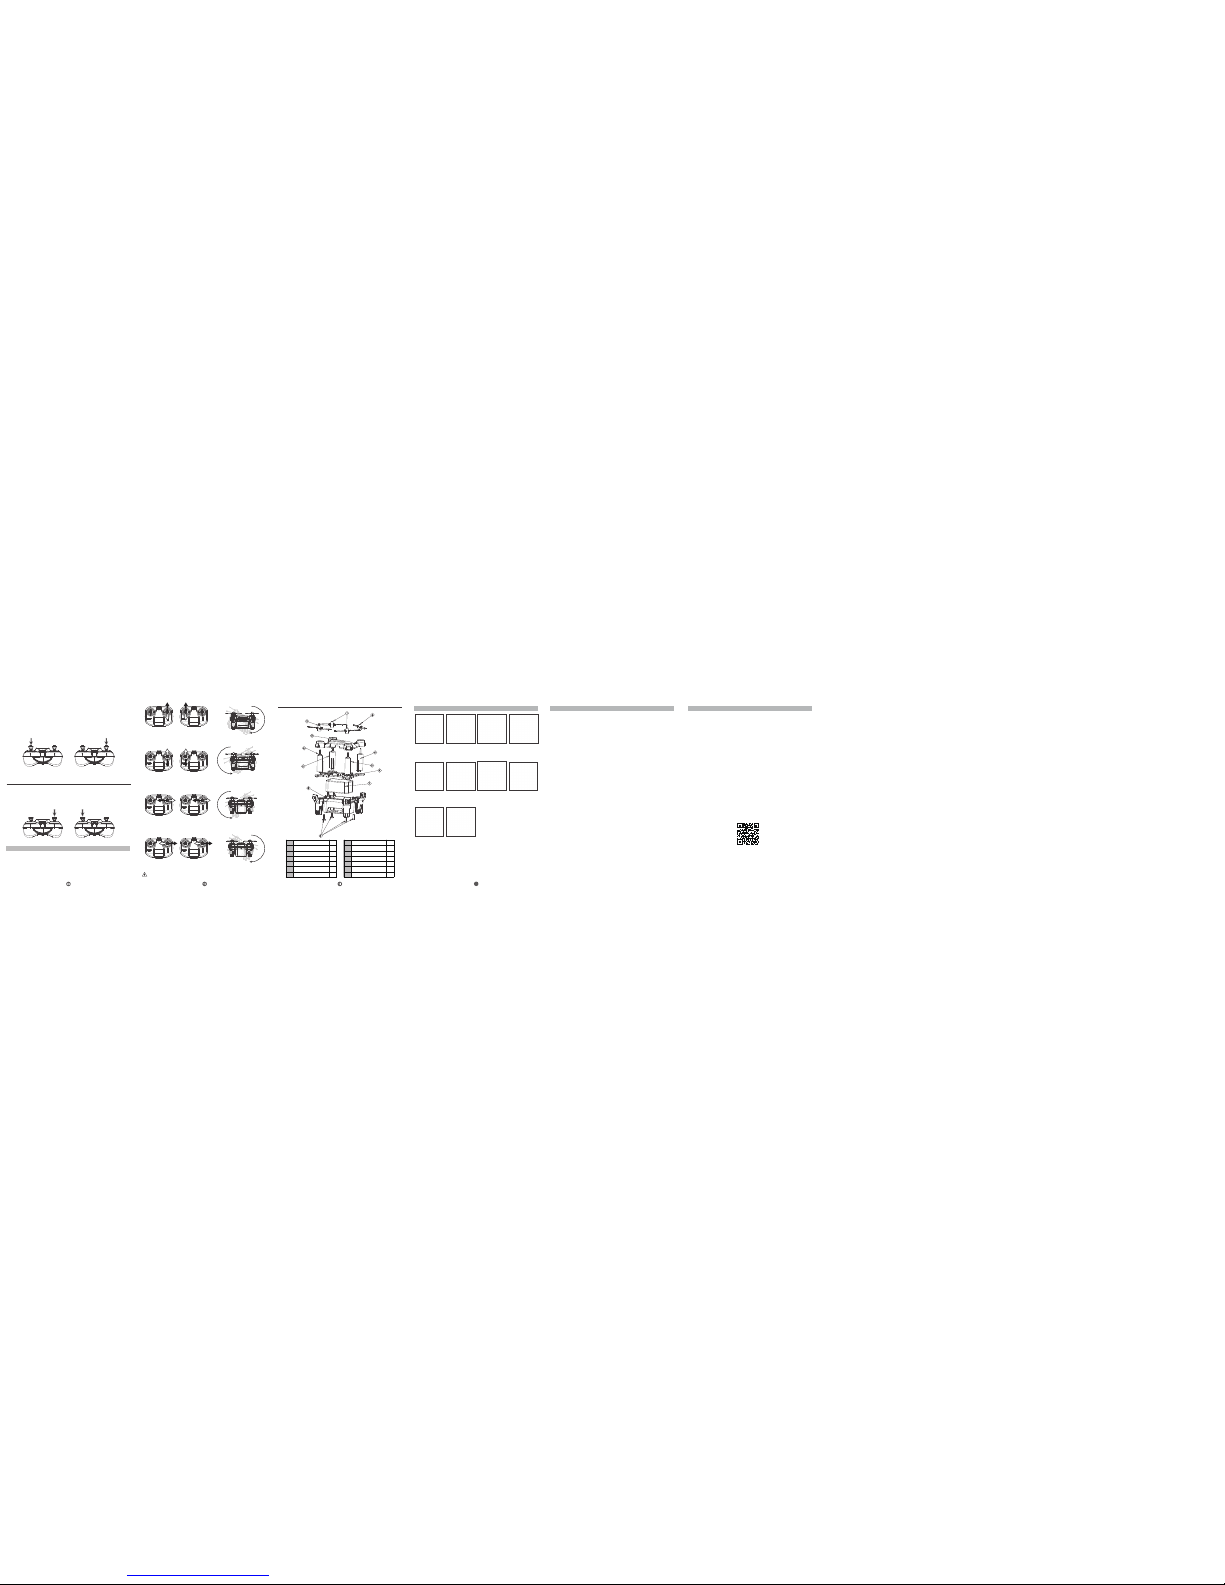
3. Exploded View
Mode 1Mode 2
Mode 1Mode 2
Mode 1Mode 2
Mode 1Mode 2
Mode 1Mode 2
Mode 1Mode 2
Normal Mode/ Expert Mode
The default setting is Normal Mode, and the Expert Mode can be activated to have a better
sensitivity on the performance of the quadcopter.
Press the Elevator stick for 0.5 second to shift between Normal Mode and Expert Mode,
indicated by “Beeps”.
Long press the throttle stick to enter into Flip Mode, indicated by “Beeps”.
The “Beeps”will last for 2 seconds. In this 2 seconds, push the accordance sticks to
perform the flips.
8.1 Forward Flip
Push the Elevator stick forward quickly. Release the stick to the center after flip.
8. ADVANCED PERFORMANCE SETUP
7.3 Headless Mode
Aerial Flip Mode
Headless Mode means the quadcopter default any directions (corresponding to the
directions of transmitter sticks) asits up head when the mode is activated.
2 front LED blink simultaneously when in Headless Mode.
Short press the Throttle stick for to enter/exit headless mode.
Short press the Throttle stick to enter into the headless mode, indicated by two“Beeps”.
Short press the Throttle stick again to exit the headless mode, indicated by one“Beep”.
8.2 Backward Flip
Push the Elevator stick backward quickly. Release the stick to the center after flip.
Flip Mode is not available when battery is low.
H001-01
Body Shell Set
H001-02
Screw
H001-03
Propeller A
H001-04
Propeller B
H001-05
Motor A
8.3 Left Flip
Push the Aileron stick to the left quickly. Release the stick to the center after flip.
8.4 Right Flip
Push the Aileron stick to the right quickly. Release the stick to the center after flip.
1
2
3
4
5
6
7
8
9
4
5
2
All Rights Reserved.
WWW.HUBSAN.COM
VERSION 1.0 EN
01
02
03
04
05
06
2
2
1
2
2
1
S/N Part Name Qty
Propeller A
Propeller B
Upper Body Shell
Motor A
Motor B
PCBA
07
08
09
1
1
4
S/N Part Name Qty
Li-Po Battery
Lower Body Shell
Screw PA1.0*4
H001 SPARE PART LIST H001 TROUBLESHOOTING
12
H001-06
Motor B
H001-07
PCBA
H001-08
Li-Po Battery
H001-09
Remote Controller
H111-06A
USB Charger
FCC Statement
Changes or modifications not expressly approved by the party responsible
for compliance could void the user's authority to operate the equipment.
This equipment has been tested and found to comply with the limits for a
Class B digital device, pursuant to Part 15 of the FCC Rules. These limits
are designed to provide reasonable protection against harmful interference in
a residential installation. This equipment generates uses and can radiate
radio frequency energy and, if not installed and used in accordance with the
instructions, may cause harmful interference to radio communications.
However, there is no guarantee that interference will not occur in a particular
installation. If this equipment does cause harmful interference to radio
or television reception, which can be determined by turning the equipment
off and on, the user is encouraged to try to correct the interference by
one or more of the following measures:
-- Reorient or relocate the receiving antenna.
-- Increase the separation between the equipment and receiver.
-- Connect the equipment into an outlet on a circuit different from that to
which the receiver is connected.
-- Consult the dealer or an experienced radio/TV technician for help
This device complies with part 15 of the FCC rules. Operation is subject to
the following two conditions (1)this device may not cause harmful
interference, and (2) this device must accept any interference received, including
including interference that may cause undesired operation
 Loading...