

Page 1
INSTALLATION INSTRUCTIONS - INTERCEPT SHEET 1 OF 3
SAVE THESE INSTRUCTIONS
INSTALLATION
INSTRUCTIONS
INTERCEPT
READ THOROUGHLY BEFORE INSTALATION
WARNING!
Failure to do so may increase the
use so fixture failures do not cause a hazard and use only in environments for which the product is specifically marked.
WARNING!
reproductive harm. Thoroughly wash hands after installing, handling, cleaning, or otherwise touching this product.
CAUTION!
luminaire operation and burning position. Luminaire label shows electrical and environmental requirements and
restrictions.
All electrical work must be done by a qualified electrician.
Turn off electric power to all affected circuits and allow to cool before servicing.
A regularly scheduled maintenance program should be established to retain optimum light output and reduce heat
retention. Dusting with a soft, clean, dry cloth is normally sufficient for the optical system. Any accumulation of dust or dirt
should be removed regularly.
Carefully read these instructions before installing product. If you do not understand these instructions, before starting any
work, contact your Hubbell Lighting distributor or [email protected] or (864) 678-1000
Give instructions to facility owner/manager for future reference.
Fixtures must be grounded and installed in accordance with the National Electrical Code and all local codes.
RISK OF PERSONAL INJURY, PROPERTY DAMAGE, FIRE AND DEATH.
This product contains chemicals known to the State of California to cause cancer, birth defects, and/or other
Follow ALL luminaire recommendations, product markings, instructions, restrictions and warnings regarding
Install and
NOTE:
This luminare is designed for outdoor lighting applications with ambient tempertures not exceeding 25°C
WARNINGS:
Dangerous voltages exist within the unit and all precautions usually observed in handling high voltage equipment should be observed
when replacing light engine or otherwise servicing luminares. Disregarding this warning could result in electrical shock and possible
injury to the individual installing or servicing this equipment. Installation and servicing should be done by qualified personnel.
Tools Required:
Torque Wrench with foot-pounds and inch-pounds settings
•
Hex Socket - 7/8, 1 1/8,1 7/8
•
(check tools required to install specific mount type)
93101021 Rev.A
Hubbell Lighting • 701 Millennium Boulevard • Greenville, SC 29607 • Phone: 864-678-1000
Due to our continued efforts to improve our products, product specifications are subject to change without notice.
© 2016 Hubbell Lighting• All Rights Reserved • For more information visit our website: www.hubbelloutdoor.com• Printed in USA
Page 2
INSTALLATION INSTRUCTIONS - INTERCEPT SHEET 2 OF 3
SAVE THESE INSTRUCTIONS
DRIVER AND WIRING
COMPARTMENT
LIGHT ENGINE
ASSEMBLY
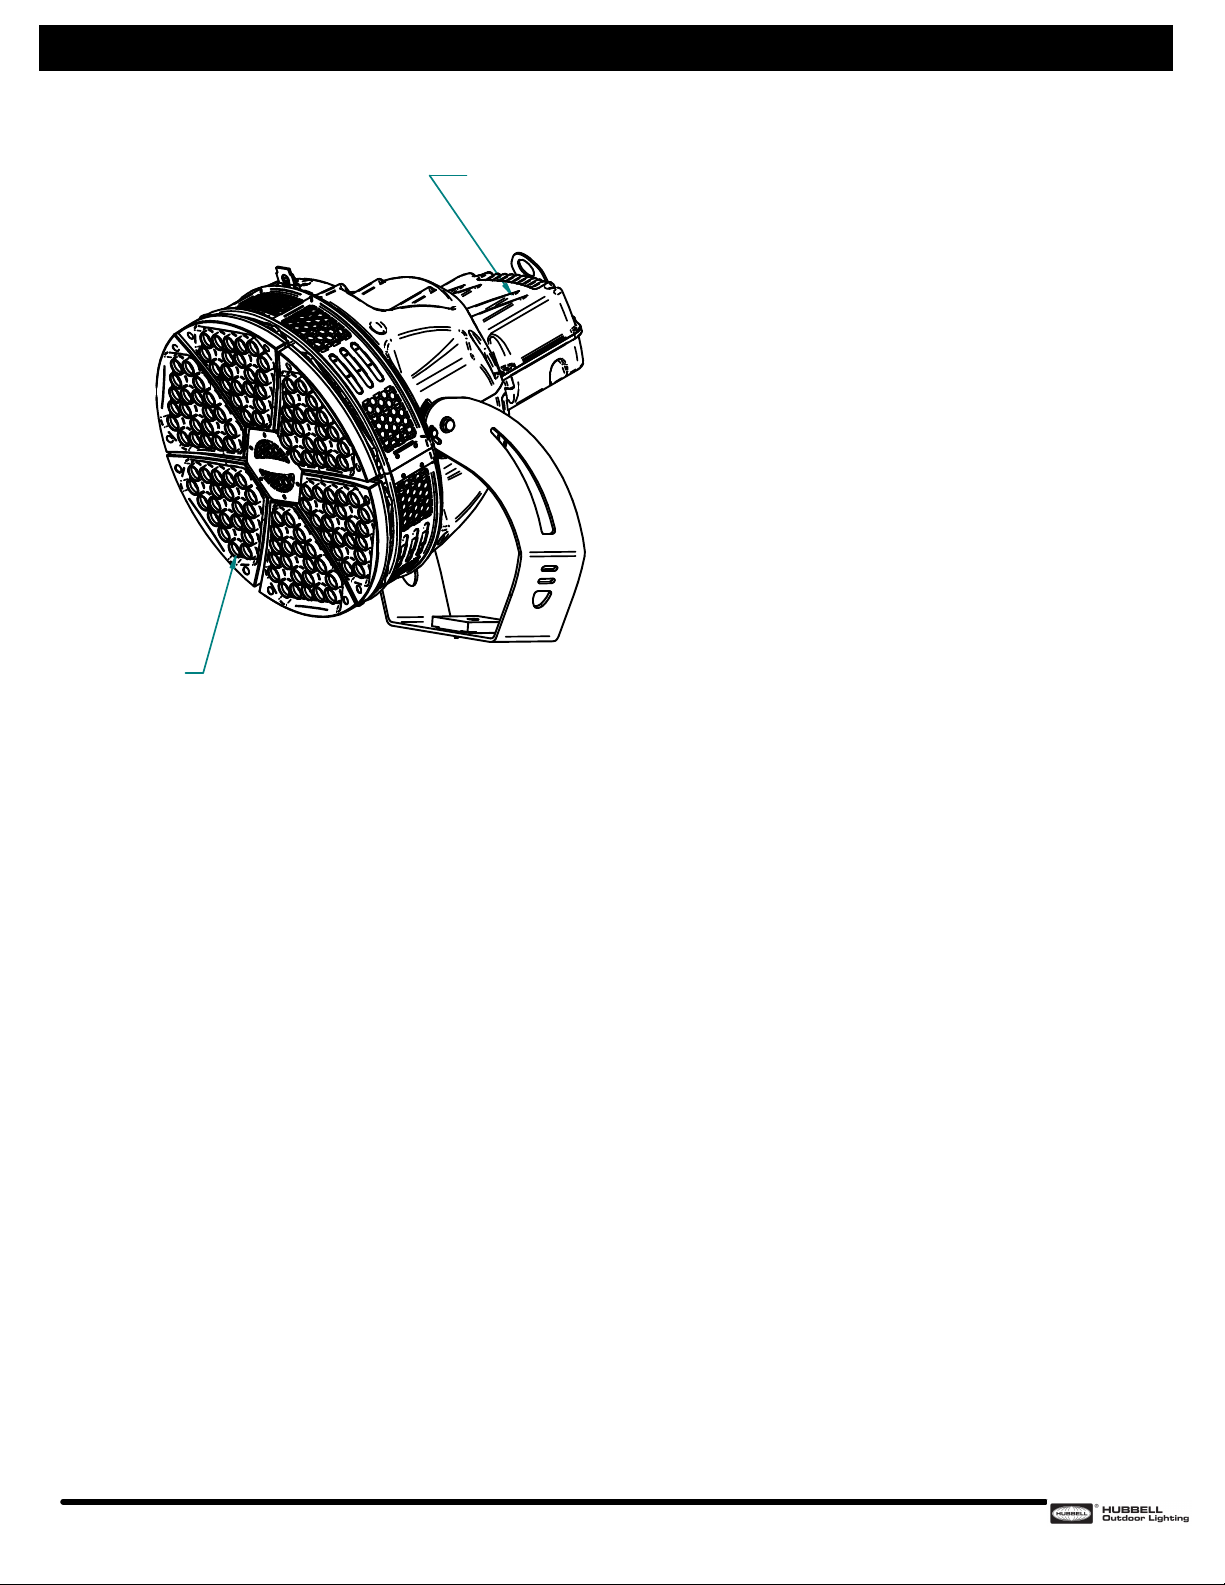
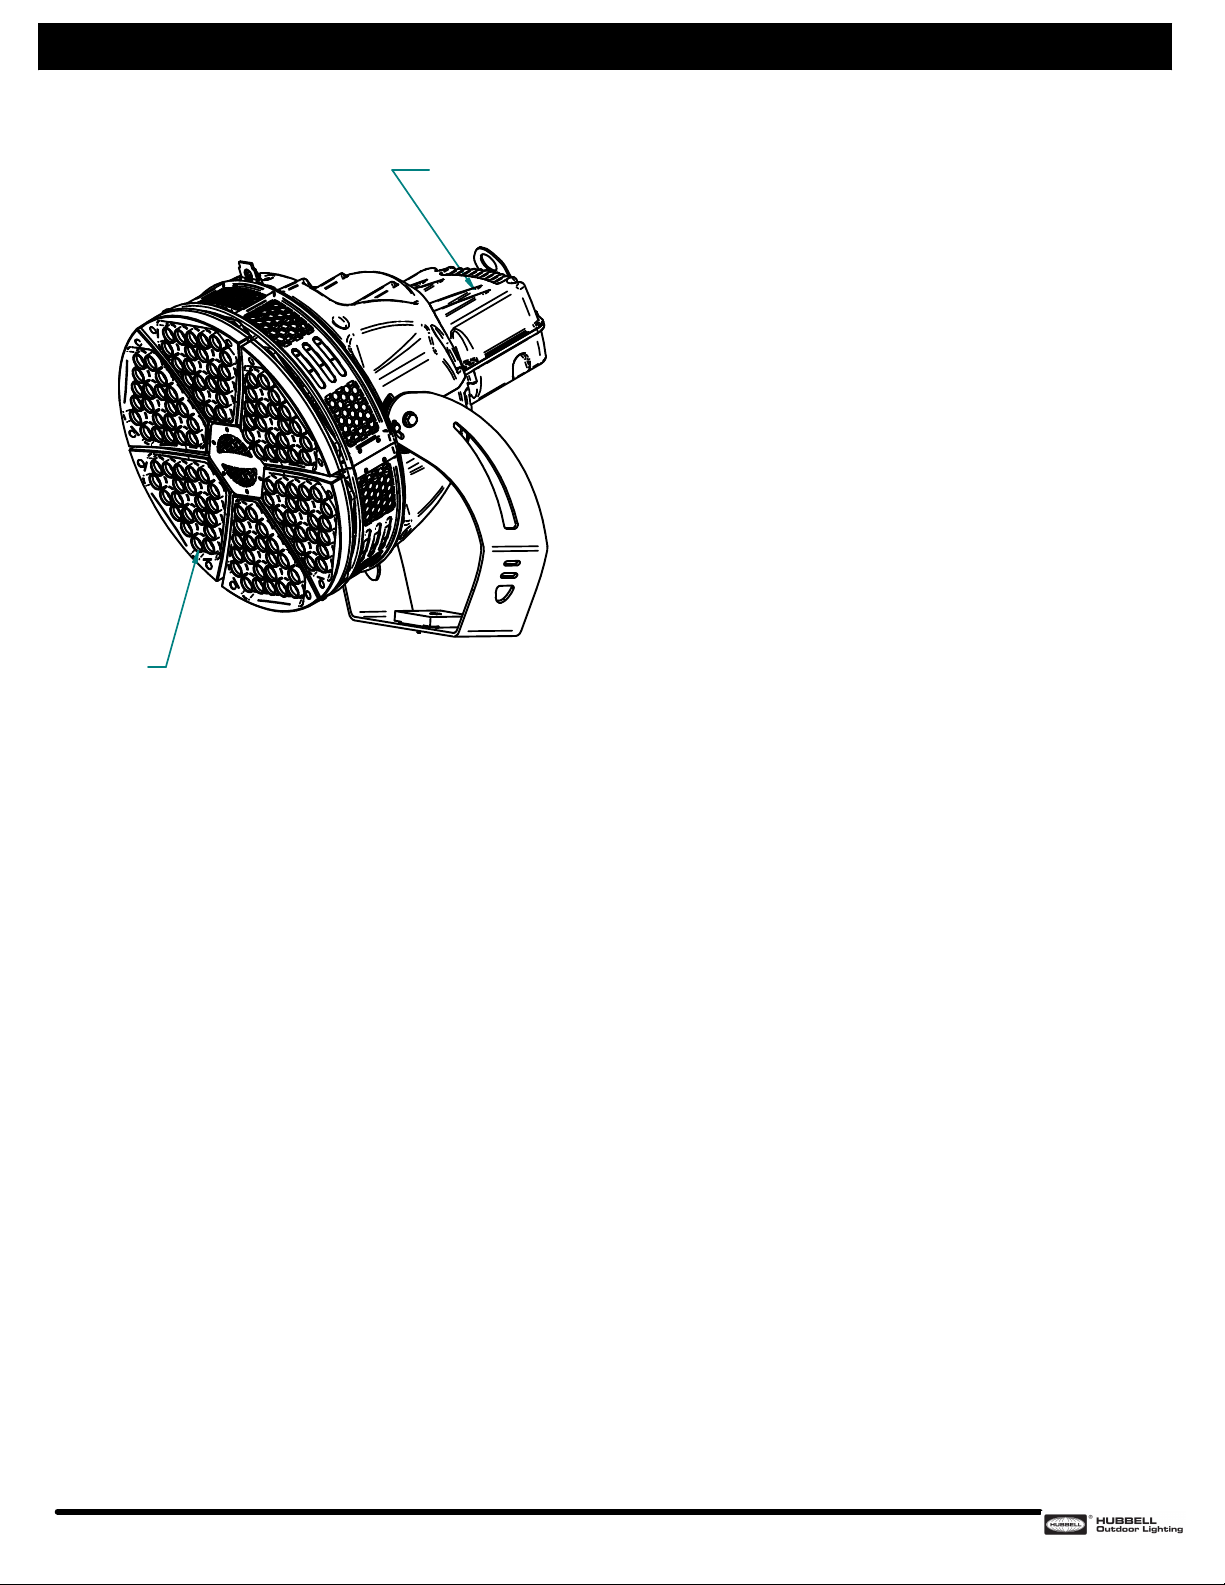
The Intercept uses a common fixture housing
assembly that sconsists of a driver box, wireway
compartment, and heatsinks in front that mount the
light engines. These features are common on all
versions of the Intercept family of fixtures.
Your Intercept fixture, the LEDs and drivers used on
this fixture are designed to provide many years of
efficient, maintenance free, high-performance lighting.
It is possible that come components may fail during
the projected life of the fixture and need to be
replaced. Hubbell has available replacement light
engine assemblies, drivers, and surge protectors in
the event of a failure.
These illustration shows the typical components
(standard and optional) that you may have on your
Intercept fixture.
Light Engines (3,4,or 6)
•
Driver(s) (1 or 2) located inside of driver
•
compartment.
Surge Protector (1) located inside of driver
•
compartment.
NOTES:
For replacement LED Assemblies and Drivers please contact Hubbell Lighting for any replacement parts.
Contact your local distributor or agent to confirm parts availability prior to ordering replacement parts.
Hubbell Lighting • 701 Millennium Boulevard • Greenville, SC 29607 • Phone: 864-678-1000
Due to our continued efforts to improve our products, product specifications are subject to change without notice.
© 2016 Hubbell Lighting• All Rights Reserved • For more information visit our website: www.hubbelloutdoor.com• Printed in USA
Page 3
INSTALLATION INSTRUCTIONS - INTERCEPT SHEET 3 OF 3
SAVE THESE INSTRUCTIONS
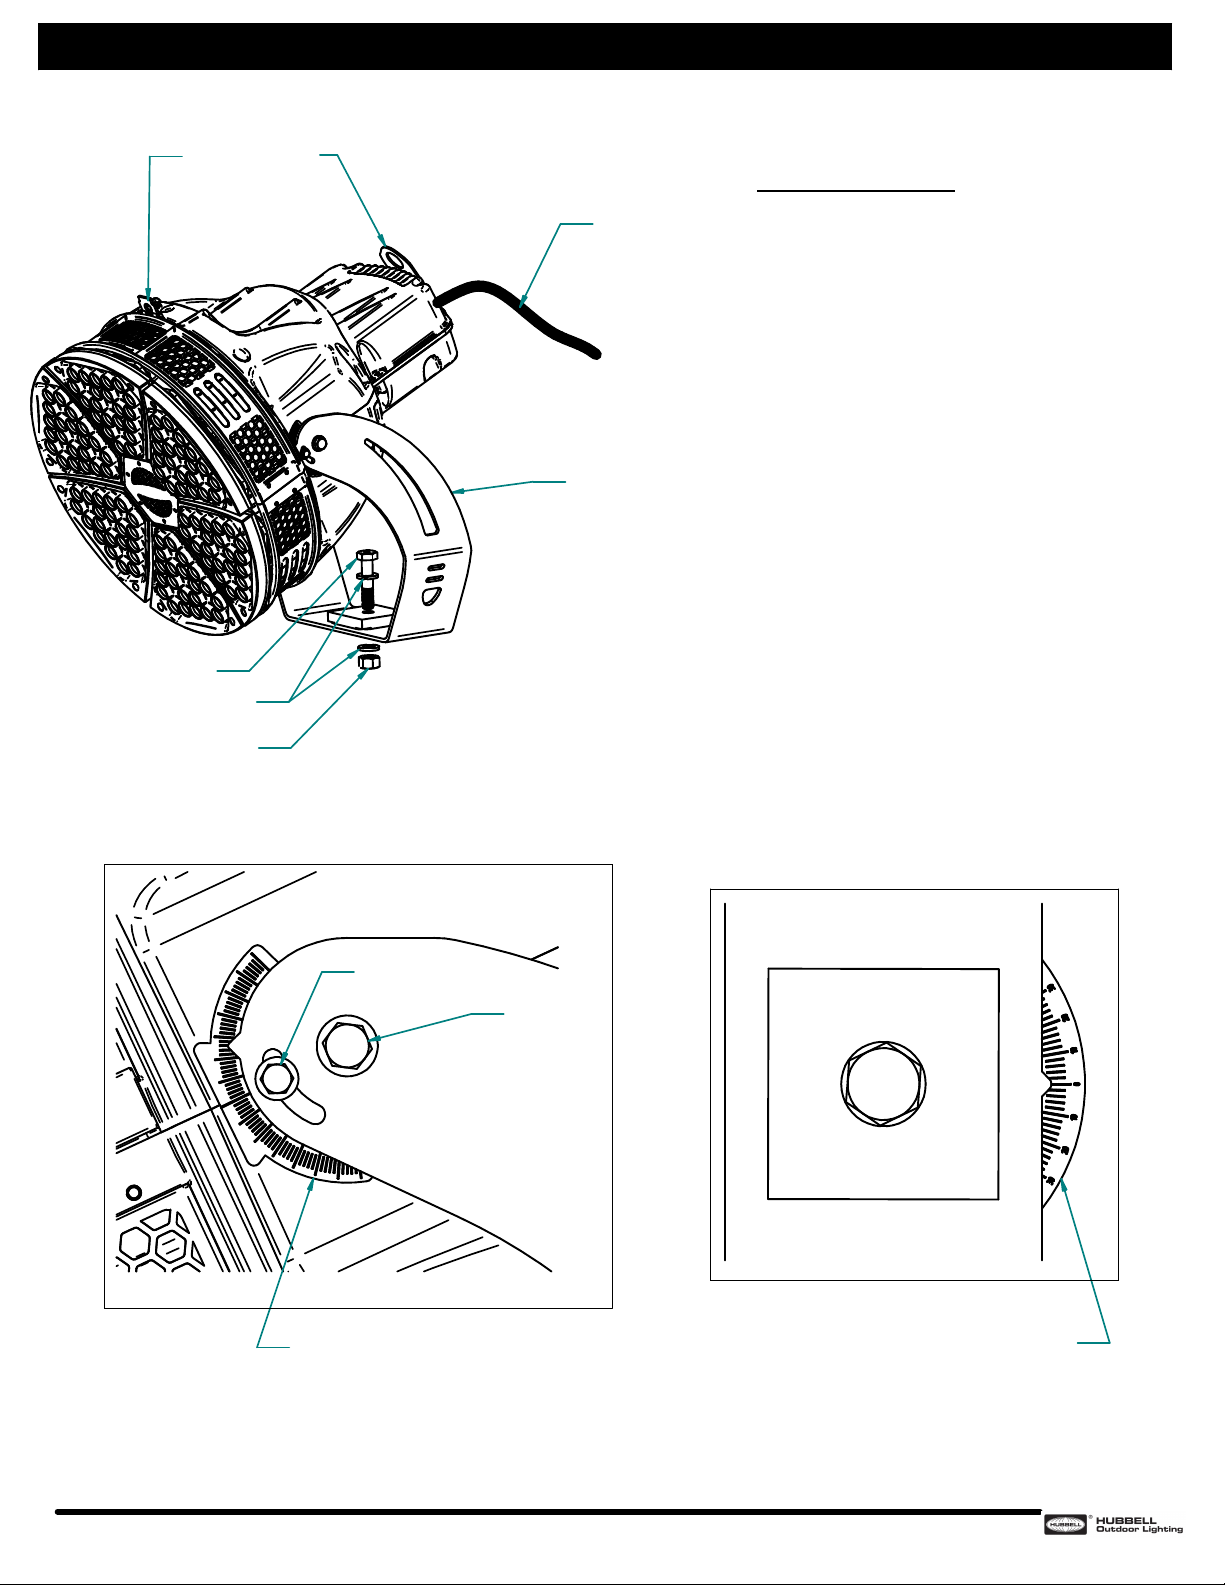
LIFTING POINTS
3/4-10 BOLT
3/4" FLAT WASHER
POWER CORD
YOKE
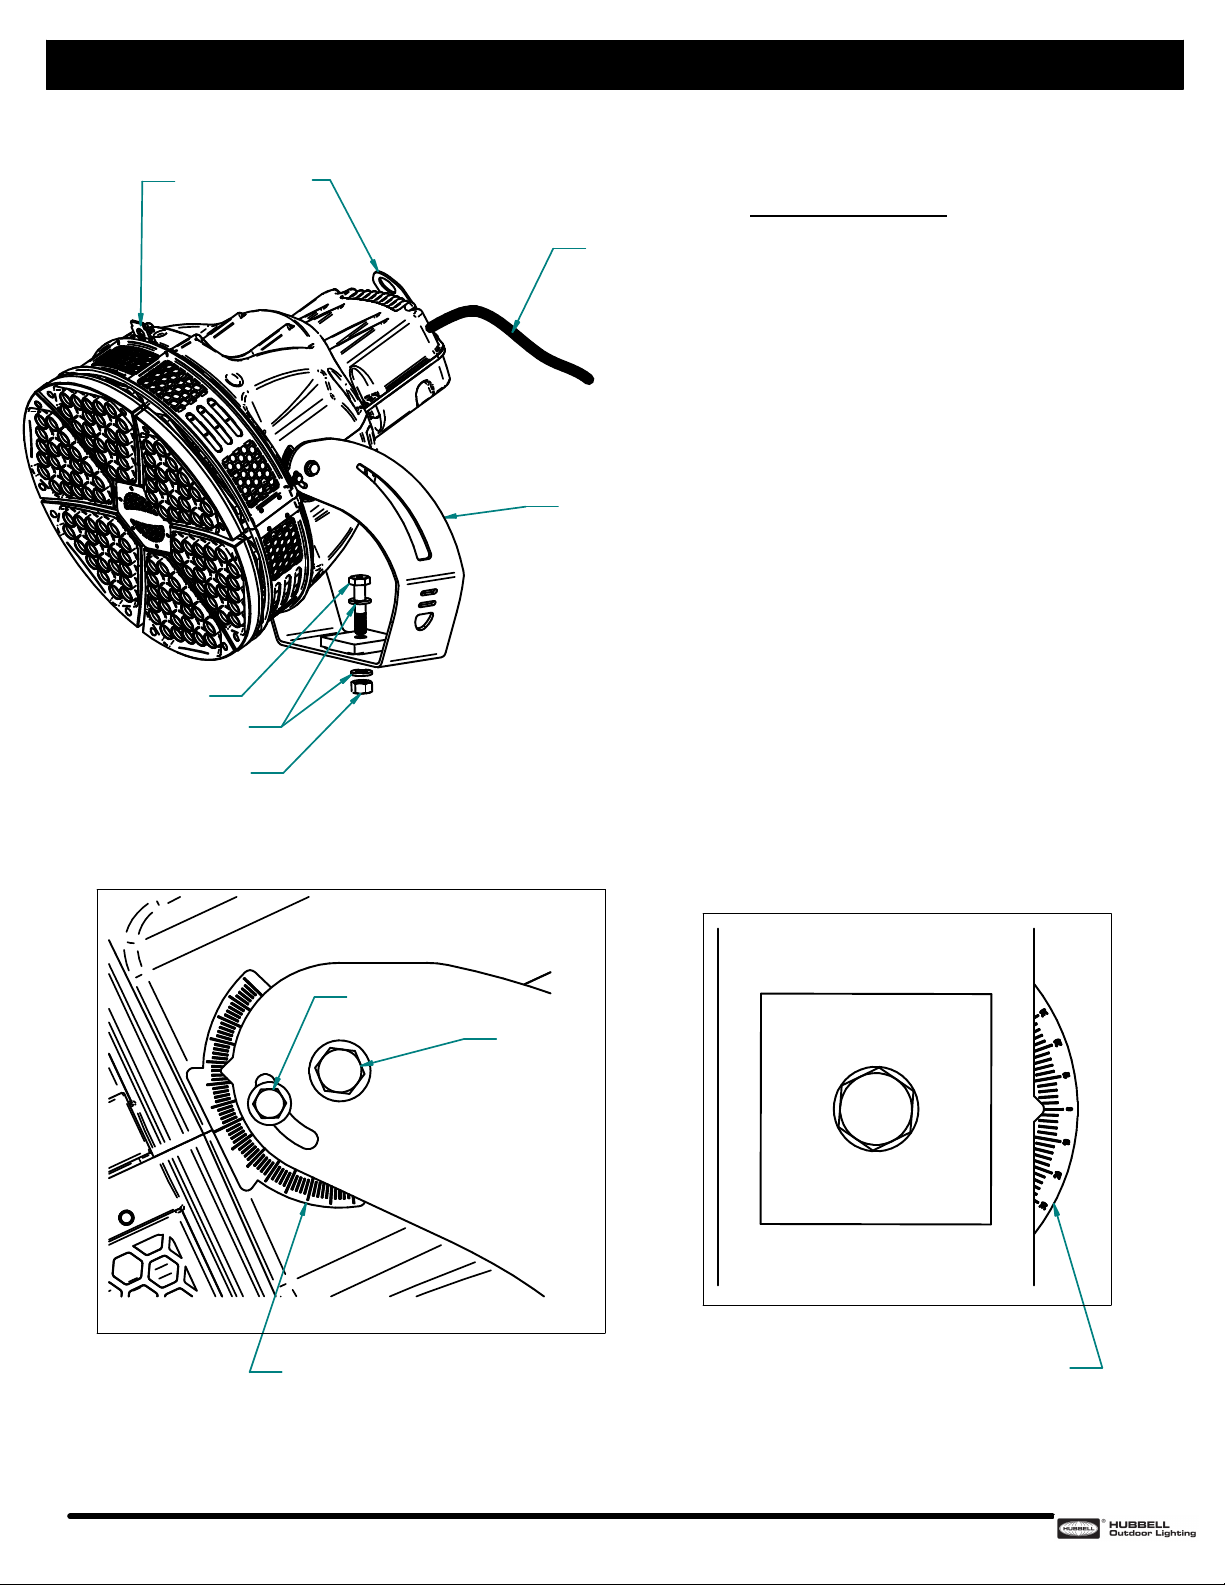
Intercept Yoke Mount
Fixture Installation:
Attach yoke to mounting surface with supplied
1.
hardware using 1 1/8" wrench socket: 3/4-10 bolt, (2)
3/4" flat washers, and 3/4" nut.
Position nut on the bottom side and hold the bolt
2.
stationary while torquing the nut. Torque 3/4-10 nut to
approx. 300 ft-lbs. Note install bearing block indented
side down and square to the yoke.
Aim fixture in appropriate fashion using vertical and
3.
horizontal protractors. See figure 1 and 2.
Attached provided power cable to supply power.
4.
Once fixture is positioned, tighten 5/16-18 bolts to
5.
12.5 ft-lbs and the 1/2-13 bolts to 60 ft-lbs.
3/4-10 NUT
FIGURE 1
FIGURE 2
5/16-18 BOLT
1/2-13 BOLT
VERTICAL AIMING
PROTRACTOR
HORIZONTAL AIMING
NOTES:
For replacement LED Assemblies and Drivers please contact Hubbell Lighting for any replacement parts.
Contact your local distributor or agent to confirm parts availability prior to ordering replacement parts.
Hubbell Lighting • 701 Millennium Boulevard • Greenville, SC 29607 • Phone: 864-678-1000
Due to our continued efforts to improve our products, product specifications are subject to change without notice.
© 2016 Hubbell Lighting• All Rights Reserved • For more information visit our website: www.hubbelloutdoor.com• Printed in USA
PROTRACTOR
Page 4
INSTRUCTIONS D'INSTALLATION D'APPAREIL FEUILLE 1 DE 3
SAUVEGARDEZ CES INSTRUCTIONS
INSTRUCTIONS
D'INSTALLATION
INTERCEPT
À LIRE ATTENTIVEMENT AVANT D'INSTALLER
AVERTISSEMENT! Les appareils d'éclairages doivent être mis à la terre et installés selon le Code canadien de l'électricité
et tous les codes locaux. Ne pas se conformer à ces codes pourrait conduire à DES SECOUSSES ÉLECTRIQUES ET UN
DANGER DE MORT OU D'INCENDIE. Installez l'appareil d'éclairage seulement dans les environnements pour lesquels il
est marqué, et de façon qu'un défaut ne puisse devenir un danger.
AVERTISSEMENT! Ce produit contient des produits chimiques reconnus par l'état de la Californie causer le cancer, des
malformations congénitales et d'autres sévices à la reproduction. Bien se laver les mains après l'installation, le nettoyage
ou après avoir touché le produit (particulièrement s'il est brisé).
ATTENTION! Suivre toutes les indications, marquages, instructions, restrictions et recommandations concernant
l'utilisation du luminaire ainsi que les dégagements requis et les précautions pour ne pas vous brûler. L'étiquette apposée
sur le luminaire indique les exigences électriques et environnementales ainsi que les restrictions applicables.
Tous les raccordements électriques doivent être faits par un électricien certifié.
Avant de faire l'entretien, coupez la source de courant et laissez se refroidir le luminaire.
Un programme d'entretien régulier devrait être établi pour conserver la luminosité optimale et réduire l'accumulation de
chaleur.
Un chiffon doux et propre est normalement suffisant pour dépoussiérer le système optique. Toute accumulation de
poussière ou saleté doit être retirée de façon régulière.
Lire attentivement les présentes instructions avant d'installer le produit. Si vous ne comprenez pas les présentes
instructions, communiquez avec votre distributeur de produits Hubbell Lighting, ou avec [email protected] ou
(864) 678-1000 au téléphone
Remettre les présentes instructions au propriétaire ou gestionnaire des installations pour référence ultérieure.
REMARQUE :
Le présent luminaire est conçu pour applications d'eclairage extérieures de température ambiante ne dépassant pas 25°C
AVERTISSEMENTS :
Une tension dangereuse est présente dans cet appareil. Toutes les précautions normalement prises en présence d pareillage à
tension secteur sont de mise lors du remplacement de làsemble d_233?clairage à DEL ou de tout entretien des luminaires. Ne pas
respecter le présent avertissement pourrait conduire à une décharge électrique et blessure au personnel d_stallation ou dàtretien.
L_stallation et làtretien doivent être faits par un personnel qualifié.
Outils requis :
Clé dynamométrique avec réglages pieds-livres et pouces-livres
Douille hexagonale - 7/8, 1 1/4,1 7/8
93101021 Rev.A
Hubbell Lighting • 701 Millennium Boulevard • Greenville, SC 29607 • Phone: 864-678-1000
Due to our continued efforts to improve our products, product specifications are subject to change without notice.
© 2016 Hubbell Lighting• All Rights Reserved • For more information visit our website: www.hubbelloutdoor.com• Printed in USA
Page 5
INSTRUCTIONS D'INSTALLATION D'APPAREIL FEUILLE 2 DE 3
DRIVER AND WIRING
COMPARTMENT
L'Intercept utilise un boîtier d'appareil d'éclairage
commun qui comprend un boîtier de commande, un
compartiment de goulotte et des dissipateurs
thermiques à l'avant qui permettent de monter les
moteurs d'éclairage. Ces fonctionnalités sont
communes à toutes les versions de la famille de
luminaires Intercept
Votre appareil Intercept, les voyants et les pilotes
utilisés sur cet appareil sont conçus pour fournir un
éclairage efficace, sans entretien et à hautes
performances pendant de nombreuses années. Il est
possible que certains composants tombent en panne
pendant la durée de vie prévue de l'appareil et doivent
être remplacés. Hubbell propose des ensembles de
moteur léger de remplacement, des pilotes et des
protecteurs de surtension en cas de panne.
Cette illustration montre les composants typiques
(standard et optionnels) que vous pourriez avoir sur
votre appareil Intercept.
LIGHT ENGINE
ASSEMBLY
Moteurs Légers (3,4 ou 6)
•
Pilote (s) (1 ou 2) situé (s) à l'intérieur du
•
compartiment du conducteur.
Protecteur de surtension (1) situé à l'intérieur du
•
compartiment du conducteur.
REMARQUES :
Pour toute pièce de remplacement comme l'ensemble à DEL ou le convertisseur d'alimentation, veuillez communiquer avec Hubbell Lighting.
Avant de commander, veuillez communiquer avec votre distributeur ou agent local pour confirmer la disponibilité des pièces.
Hubbell Lighting • 701 Millennium Boulevard • Greenville, SC 29607 • Phone: 864-678-1000
Due to our continued efforts to improve our products, product specifications are subject to change without notice.
© 2016 Hubbell Lighting• All Rights Reserved • For more information visit our website: www.hubbelloutdoor.com• Printed in USA
Page 6
INSTRUCTIONS D'INSTALLATION D'APPAREIL FEUILLE 3 DE 3
LIFTING POINTS
3/4-10 BOLT
3/4" FLAT WASHER
POWER CORD
YOKE
Intercept Yoke Mount
Fixture Installation:
Fixez l’étrier à la surface de montage à l’aide du
1.
matériel fourni à l’aide d’une douille pour clé 1 1/8":
boulon 3 / 4-10, (2) rondelles plates 3/4" et écrou 3/4".
Placez l’écrou sur le côté inférieur et maintenez le
2.
boulon immobile pendant le serrage de l’écrou.
Couple 3 / 4-10 écrou à env. 300 lb-ft. Remarque:
installez le bloc de roulement côté indenté vers le bas
et à l'équerre de la chape.
Visez le luminaire de manière appropriée en
3.
utilisant des rapporteurs verticaux et horizontaux. Voir
les figures 1 et 2.
Câble d'alimentation fourni fourni pour
4.
l'alimentation.
Une fois l’appareil en place, serrez les boulons
5.
5/16-18 à 12,5 lb-ft et les boulons 1 / 2-13 à 60 lb-ft.
3/4-10 NUT
FIGURE 1
FIGURE 2
5/16-18 BOLT
1/2-13 BOLT
VERTICAL AIMING
PROTRACTOR
Hubbell Lighting • 701 Millennium Boulevard • Greenville, SC 29607 • Phone: 864-678-1000
Due to our continued efforts to improve our products, product specifications are subject to change without notice.
© 2016 Hubbell Lighting• All Rights Reserved • For more information visit our website: www.hubbelloutdoor.com• Printed in USA
HORIZONTAL AIMING
PROTRACTOR
 Loading...