

Page 1

Geyser-R
Heat pump water heater
Installation manual
1 Version 2.9
Page 2

SAFETY INFORMATION
Please read carefully to prevent serious accidents or injury.
The Geyser-R Heat Pump Water Heater must be installed in the accordance with Local and
National codes as well as the installation instructions in this manual. Before beginning the
installation, carefully read the entire manual and check the local, state, and national codes
regarding building, electrical, and plumbing installations, or check with your local authorities
for clarification of these codes. Failure to install the Geyser-R in accordance with these
codes and the installation manual may result in property damage, bodily injury or death.
Disconnect all power before installing or servicing the Geyser-R.
There is a discharge fan located on the unit. Extreme caution must be exercised to
ensure that any foreign objects including fingers and hands remain clear of the fan area.
Do not stand, sit or place any objects on or beside the unit (clearances are stated in the
installation manual).
Do not allow children to play on or near the unit.
Make sure all power is disconnected and shut off before moving the unit.
Cover should not be removed with power on.
Internal components may be HOT. Please allow sufficient time for the unit to cool
completely before touching any internal components.
Ensure that the power receptacle for the Geyser-R is rated for 115 V. and at least 15 A.
Ensure that the electrical supply has a properly rated fuse or breaker protection rated
for at least 15 amps. It is suggested to use a dedicated outlet.
Always wear eye protection during installation.
Unit weight is approximately 70lbs. All lifting should be done with the handles located
on the side of the Geyser-R. Proper lifting should be used in the moving of the unit.
The Geyser-R must NOT be connected to an electric water heater with heating elements
larger than 240/5500 watts.
Please keep these instructions for reference!
2 Version 2.9
Page 3

SYSTEM REQUIREMENTS
The Geyser-R should only be installed in a dry/covered location. The Geyser-R is not designed
to be installed outside where it can be exposed to adverse weather condition. The ambient air
temperature in the installation area should not drop below 50°F (10°C). The cubic area of the
space needs to be 1,000 cubic feet or greater for proper air flow and to avoid excessive cooling
of the area. The Geyser-R can be installed in attics garages, or basements provided the above
criteria are met for proper installation.
The Geyser-R connects to a typical household outlet, 115V, 15 Amp. While the device requires
approx. 12 Amps momentarily upon power-up, the device draws 5-8 Amps during normal
operation. It is recommended that a dedicated 15 Amp Circuit be used to power the Geyser-R.
The Geyser-R is recommended for installation on electric water tanks of 40gallons (151.4 liters)
or greater.
A drain must be available to accommodate condensate generated during operation of the
Geyser-R. In high humidity environments, the Geyser-R is capable of generating as much as 50
pints (24 liters) per day. The condensate can be routed to a floor drain, sink, the house waste
line, or to the outside by way of the drain hose (provided).
Check with the codes in your area for the proper way to dispose of the condensate. A
condensate pump may be required (not included).
Most electric water tanks utilize two heating elements, one at the top of the tank and one at
the bottom. The heating element at the top of the tank is called the quick recovery element.
This is designed to heat water at the top of the tank if the temperature of the tank falls below
the set point of the thermostat. The lower element provides most of the heating in a typical
water heater.
The Geyser-R replaces the lower element in operation and provides the majority of the heating
requirements. The upper element is left on at the temperature you set it, and will only engage
if there is a need for quick recovery. Therefore in normal operation the Geyser-R will provide
all the hot water needed and the top element will not run.
The Geyser-R will remove moisture from the air. It is an efficient dehumidifier and many have
found that the unit provides all the necessary dehumidification for the space the Geyser-R is
located.
Moisture may occasionally cause frost to form on the evaporator. When the frost builds up, the
Geyser-R will go into a defrost cycle. This could occur as often as every two hours in a cold
humid environment. While in the defrost mode, a period of up to 6 minutes, the fan will
continue to run and the tanks lower element will provide heating for the tank, when the
defrost cycle is over the Geyser-R will resume heating the water.
3 Version 2.9
Page 4

INSTALLATION PARTS
The Geyser-R comes with the following installation kit:
Qty Description
1 4”x ¾” Nipple
2 ¾” Tee
1 Dip tube
2 ¾”FH x ¾” FIPS, with washers.
4 ¾”PEX x ¾” MIP
1 Teflon Tape
1 Red Wire nut
1 Strain relief
6’ Condensate tubing
4 Version 2.9
Page 5

You will need to provide the following components to complete the installation:
¾” Pex tubing.
Pex tubing crimps ¾”
Armaflex ¾” insulation (not split Rubatex)
Optional: 2 shut-off valves
Furthermore, a transfer pump is recommended to drain the tank.
This installation method is designed to bring the most efficiency for the system. Deviating
from the following installation procedure will affect the efficiency of the unit. Deviation
from the installation method could also damage the unit and void the warranty. PLEASE
read and follow the installation instruction carefully.
It is recommended that the Geyser-R be installed as close as possible to the water
heater. We recommend 4 feet if possible. This will ensure the most efficiency with the least
amount of heat loss through the piping.
5 Version 2.9
Page 6

INSTALLATION OF THE GEYSER-R
Note: The following installation instructions cover the installation of the Geyser-R in
conjunction with an electric water heater. Alternate water tanks may require an
alternative installation method not covered by this manual. It is recommended that you
contact Hubbell Electric Heater Company office (203-378-2659) and speak with technical
support to see if the Geyser-R can be used in a particular application other than an
electric water heater.
Survey the area where the Geyser-R is to be installed. Make sure the area is clear of
obstructions, clear of debris, and clean of significant dust and dirt that can get into the
unit or clog the filter.
Area should be at least 1,500 sq ft of open space.
Ambient air temperature should be at least 50°F (10°C). Temperatures lower than this
will cause the unit to defrost constantly and reduce the efficiency. If the temperature in
the space gets lower than 50°F (10°C), it is recommended that the unit be shut off until
a constant temperature above 50°F (10°C) can be maintained.
When choosing the placement of the Geyser-R, make sure the fan is not blocked or close
to a wall or other object that would inhibit air flow.
The Geyser-R should be placed on the floor or set on vibration isolation pads. Make sure
the unit is higher than the drain and the drain line has an unobstructed path to the
drain.
You can install the unit in an elevated position if desired. Make sure the unit is secure
and that the piping is not kinked or restricted in any way. The unit should not be
installed higher than the top of the water heater.
Piping should be kept to a minimum and as short as possible to minimize heat loss. 4
feet is the recommended length.
Check the overall condition of the existing water heater.
Make sure the drain is easily accessible.
Be sure shut off valves are in good condition and are in working order.
If unit is being installed in an attic it is recommended that both hard and soft foam be
placed on the joists to absorb any excess vibration.
Make sure there is an 115V outlet in close proximity to where the unit is going to be
installed.
DO NOT install the Geyser-R with an extension cord of any size.
6 Version 2.9
Page 7
INSTALLATION INSTRUCTIONS
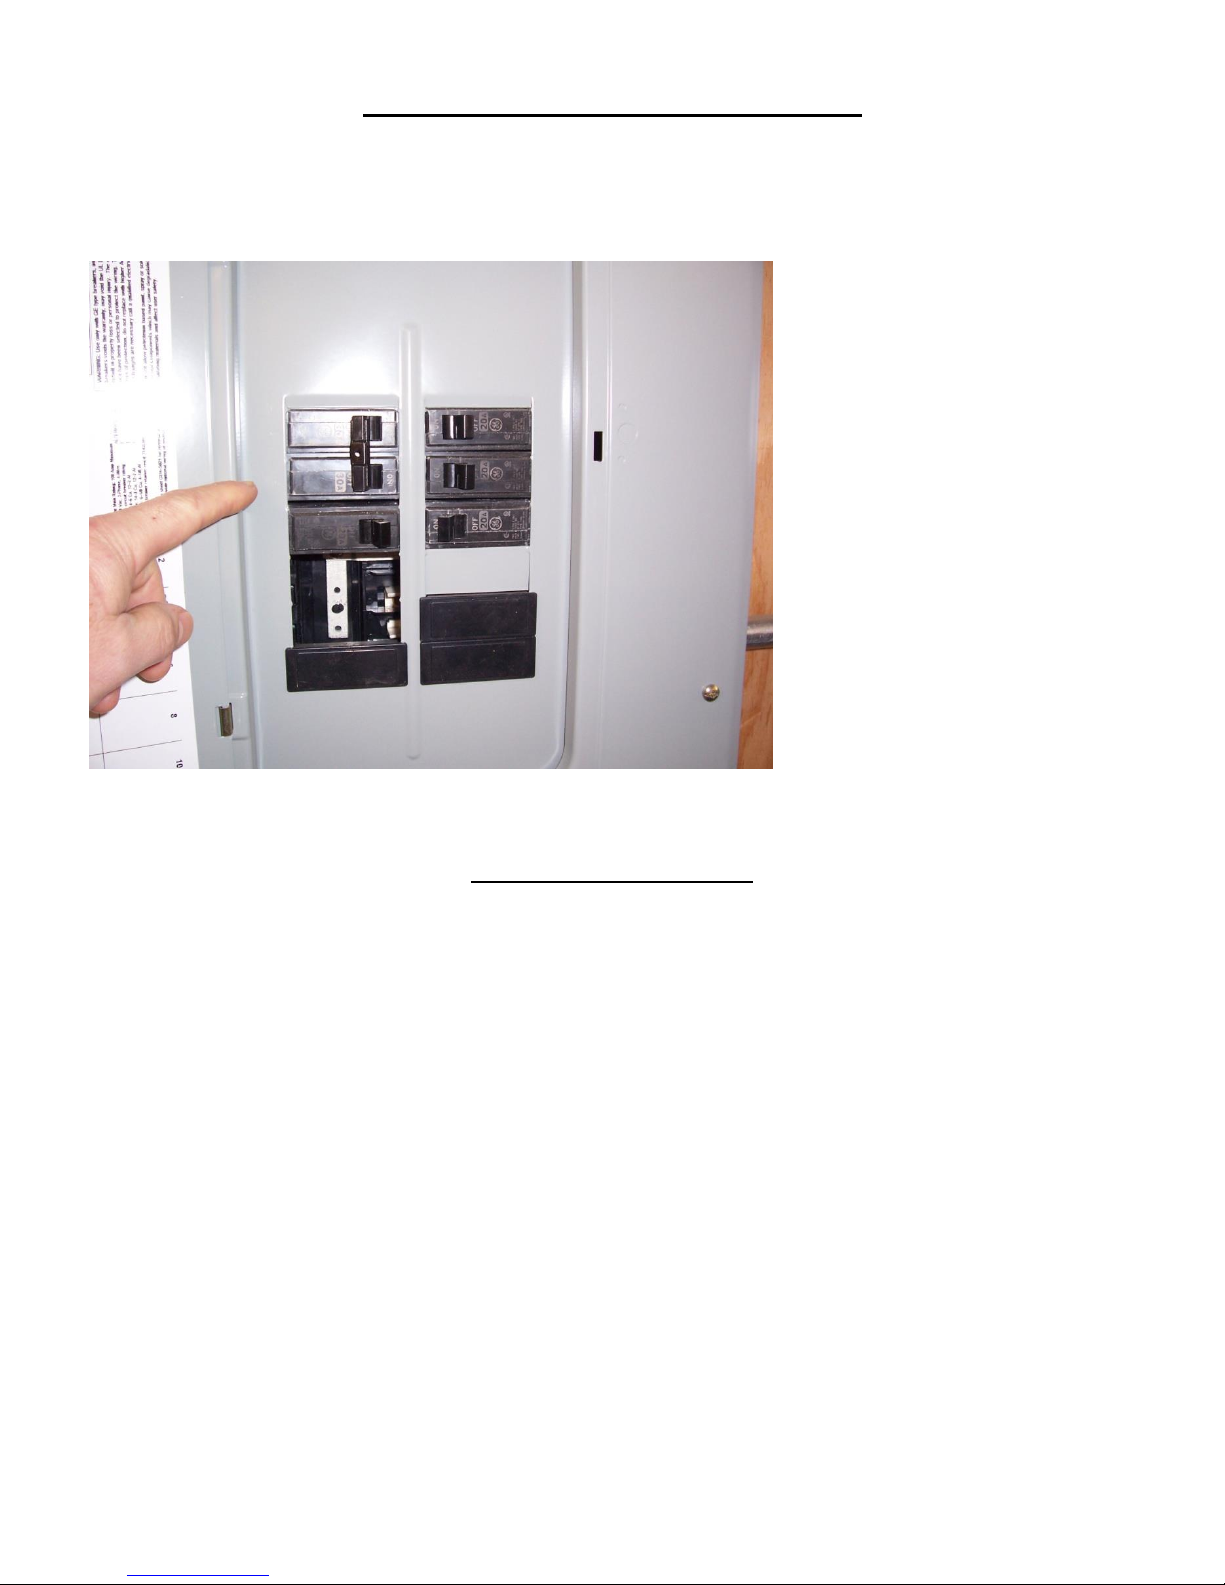
Turn off all power to the water heater at the circuit breaker in the electric panel.
Plumbing Installation
Turn off the cold water inlet at the service valve above the water heater.
Open one or more hot water faucets in the house to relieve the water pressure in the
hot water tank; leave these faucets open to allow air to freely enter the tank during
draining.
Drain the tank completely.
7 Version 2.9
Page 8
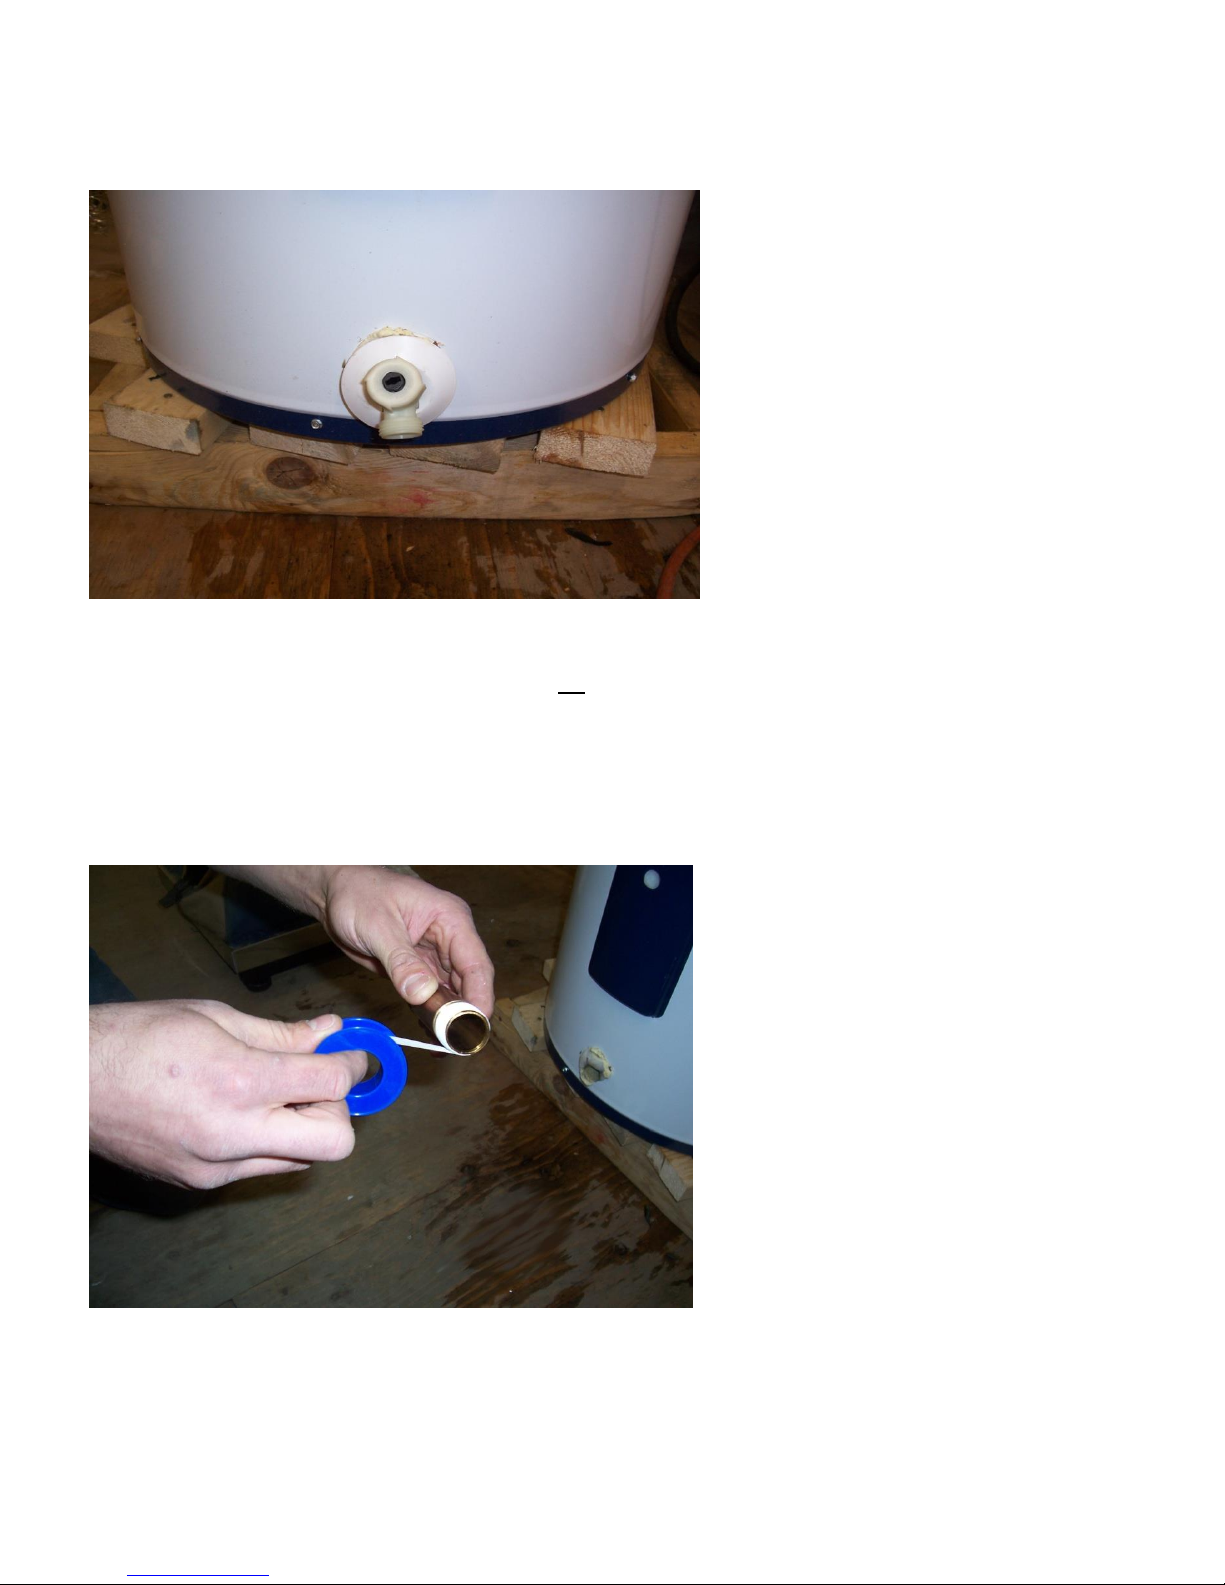
Remove the drain valve from the bottom of the tank and set aside for use in a later step.
Properly using thread seal tape, wrap all ¾” NTP* male threads.
*NTP fittings do not include fittings on Geyser front panel. These are standard hose thread
fittings.
8 Version 2.9
Page 9
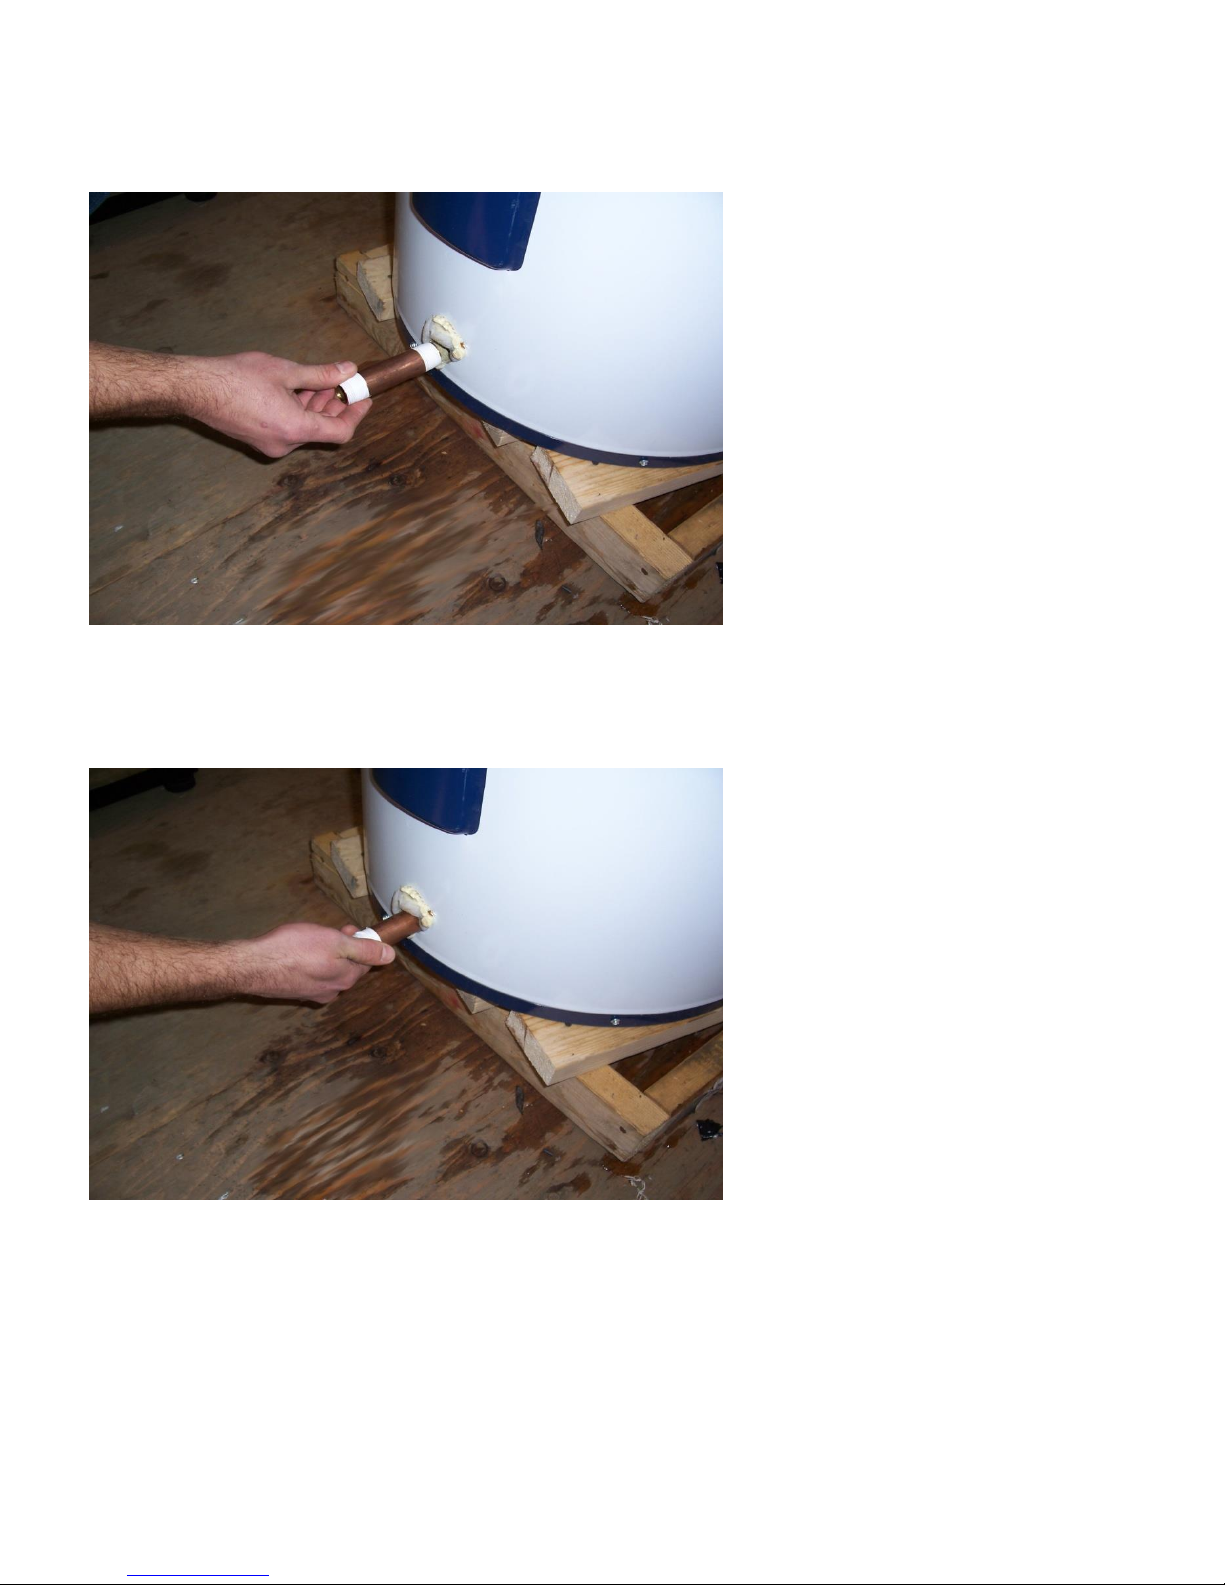
Install 4”x ¾” brass nipple into the drain valve opening.
Do not over tighten.
9 Version 2.9
Page 10

Screw one of the two brass “T” fittings into the end of the nipple installed in the drain
location.
Apply thread seal tape to both ends of the brass fitting with the plastic water-in feed
tube and screw into the “T”. Make sure the plastic slides in freely.
10 Version 2.9
Page 11

Install the second “T” on to the exposed end of the pipe with the plastic fitting.
11 Version 2.9
Page 12

Install the drain valve (removed from the tank) onto the exposed end of the fittings.
Carefully tighten assembly down so exposed end of the “T’s” are in a horizontal position
and the drain faces down.
12 Version 2.9
Page 13

Apply thread tape to two (2) of the ¾” PEX x ¾” MIP fittings.
Install the ¾” PEX x ¾” MIP fittings into the (2) two “T’s.”
Install the washer into the (2) two ¾” FH x ¾” FIPS fittings. Make sure the washer is
seated into the bottom of the fitting to ensure a proper seal.
13 Version 2.9
Page 14

Screw the remaining (2) two ¾”PEX x ¾” MIPS (using thread tape) into the (2) two ¾” FH
x ¾”FIPS fittings.
Tighten the (2) two ¾”FH x ¾”FIPS fitting onto the water inlet and water outlet on the
front of the Geyser-R.
14 Version 2.9
Page 15

Place the Geyser-R in the final location.
The Geyser-R should be placed as close as possible to the water heater to minimize heat
loss through the piping.
Optional: If desired, at this time add a shut-off valve to each line (this is an alternative
installation, that may reduce the unit efficiency slightly)
Cut your ¾” PEX to length.
Slip a ¾” Pex crimp onto hose.
Push PEX onto the PEX end of the ¾” PEX barb that is connected to the “T” on the
assembly at the drain valve of the water heater. Repeat for both inlet and outlet hoses.
Crimp the PEX onto the PEX barb at both “T’s” to secure the PEX lines.
15 Version 2.9
Page 16

Slide a measured length of Armaflex onto each of the PEX lines.
Now repeat the process of connecting, and securing the PEX to the (2) ¾” PEX barb
fittings on the water inlet and outlet of the Geyser-R.
CONNECT AS FOLLOWS:
o The PEX line that starts closest to the tank connects to the BOTTOM RIGHT
connection on the Geyser (water into Geyser)
o The PEX line that starts further from the tank connects to the TOP LEFT
connection on the Geyser (water out of Geyser)
Make sure Armaflex covers the hose and fittings to minimize heat loss.
Once you have the PEX tubing connected to both the unit and the water tank, you may
now open the cold water valve on the top of the tank to begin filling the tank (this will
also allow you to check the connections for leaks!).
Leave one faucet open in the house while filling to allow air in the tank and lines to
escape.
Once the water begins running through the faucet the system is full of water and you
can close the faucet.
16 Version 2.9
Page 17

Alternate Installation of the Geyser-R
Some tank manufacturers use a molded construction that does not allow for a dip tube to be inserted into the
bottom of the tank. In this case we recommend the water be heated by the Geyser-R, pulled from a “Tee” on the
cold water supply at the top of the tank. The hot water that exits the Geyser-R is to be returned to the tank through
a “Tee” at the drain valve.
Note: The following installation requires the cold water inlet to the water tank to be cut and a tee or
connector assembly will need to be soldered in place. Hubbell recommends this installation be done by a
licensed plumber.
When the supplied dip tube isn’t used in the system, the following installation method is suggested:
17 Version 2.9
Page 18

Electrical connection
Make sure all electric is shut off to the unit to avoid element damage.
Remove the cover that protects the bottom element and thermostat wiring and place it
aside.
Using a drill, make a hole (7/8”od) in the middle of the cover.
18 Version 2.9
Page 19

Attach the strain relief in the hole and tighten the nut on the back to hold the relief in
place.
Insert the electrical power line from the Geyser-R through the strain relief. There will be
two wires to insert, one will be a bare wire, the other will have a terminal connector on
it.
19 Version 2.9
Page 20

Carefully remove the plastic shield that covers the element terminal and thermostat.
Disconnect one of the wires from the lower element terminal.
Connect the wire with the fork connector to the terminal block.
20 Version 2.9
Page 21

Using the red wire nut (provided) connect the wire removed from the terminal of the
water tank to the stripped wire from the Geyser-R.
Place a piece of black tape over the red wire nut to hold it in place.
21 Version 2.9
Page 22

Replace plastic shield back over the terminal and thermostat.
Pull wires through strain relief and push metal cover back over thermostat and element.
Tighten the grommet on the front of the strain relief over the wires.
Secure the cover to the tank with the screws.
Attach the condensate drain line to the back of the Geyser-R below the filter and make
sure it is placed into a location where it can properly drain
Condensate gravity drain, make sure the condensate line is sloped down to the drain
location.
If the drain is higher than the condensate line (the line is sloping), a condensate pump
may be necessary to properly dispose of the condensate from the unit.
22 Version 2.9
Page 23

Plug unit into a 115V receptacle.
Turn power back on at the panel.
Turn on the Geyser-R.
23 Version 2.9
Page 24

FREQUENTLY ASKED QUESTIONS / TROUBLESHOOTING
On/off button
Green
Power is on and unit is in standby.
Green service light
Solid green
Unit is producing hot water.
Amber light is on
Solid amber
Unit is in the defrost cycle.
Red light is on
Solid Red
Question
Answer
I installed the Geyser and
turned power on but nothing
is happening
When the tank is refilled with cold water, initially the
top element of the tank will come on for Quick
Recovery. After about 15 – 30 minutes, the tank will
switch to the bottom element, at which point the
Geyser will engage.
I installed the Geyser, the first
time it engages, it operated
for about 10 – 15 minutes
after which it switched off
and the red light came on.
Most likely during the install air remained in the system
and the pump inside the Geyser is air-bound. Push the
red reset button next to the power switch and open the
drain valve slightly (there may be a 5 minute delay in
starting). This will allow the air to escape together with
some water (capture the water), allowing the pump to
operate normally.
Power was interrupted while
the Geyser was operating.
After power was restored, the
Geyser is now in standby
mode.
The Geyser has a 5 minute compressor timer. After 5
minutes have lapsed, the Geyser will go back into
normal operation.
The following are a sequence of lights and are used for assuring the proper function of the
Geyser-R and to help diagnose the unit if a problem occurs.
Unit is in over current. Lower element of the
water heater is on and heating water. Push the
red reset button next to the power switch. The
Geyser will now operate normally. (There may be
a 5 minute delay in starting). If the situation
persists, turn the Geyser off and call for service.
Call technical support at Hubbell Electric Heater
Co. 203-378-2659.
24 Version 2.9
Page 25

My Geyser is going into
Defrost Mode frequently.
The Geyser is located in an area where the ambient
temperature is low (below 50°F) and the humidity is
high.
I moved the Geyser while it
was operating. Now there is a
red light and the Geyser
won't run.
Moving the Geyser while it is operating can cause a
locked rotor condition in the compressor. Push the red
reset button next to the power switch. The Geyser will
now operate normally. (There may be a 5 minute delay
in starting)
How do I adjust the
temperature of the water in
my water tank.
Turn-off power to the water heater. Remove the water
heaters lower cover. Adjust the temperature with the
thermostat on the tank. Replace cover and turn power
back on.
The red light came on and the
Geyser switched off
Push the red reset button next to the power switch. The
Geyser will now operate normally. (There may be a 5
minute delay in starting). If the situation persists, turn
the Geyser off and call for service. Call technical support
at Hubbell. 203-378-2659.
25 Version 2.9
Page 26

26 Version 2.9
Page 27

Warranty
The Geyser-R, supplied by Hubbell Electric Heater Company and delivered new in the original
packaging is warranted by Hubbell as follows:
One (1) year warranty on workmanship and materials.
Six (6) year limited warranty on the sealed refrigeration system only.
This limited warranty begins on the original date of purchase or 180 days from the date the unit was
manufactured, whichever comes first. This warranty is only valid on Geyser-R units purchased and
installed in the United States and Canada. To receive this warranty Hubbell must be contacted for
determination of problems and service procedures. Original bill of sale must be presented as proof of
purchase upon request. Within the warranty period, replacement parts will be shipped to the service
company for replacement. Upon replacement the service company is responsible to return the
defective part to Hubbell at, 45 Seymour Street, Stratford, CT 06615.
Optionally, the entire Geyser-R may be returned, in the original box with protective packaging at the
customer’s expense for Hubbell to repair. Repair work will be done at Hubbell at no charge providing
the repair was determined to be required because of defective workmanship or materials. The
replacement part(s) assume the unused portion of the warranty. The warranty does not include labor,
or costs incurred for diagnosis, labor for repair, removal, or installing of replacement parts. Shipping
cost of replacement parts to and from Hubbell is not included.
The limited warranty covers manufacturing defects in materials and workmanship encountered in
normal use of this product as it is intended as a water heater, and shall not apply to the following,
including but not limited to: consumable items such as filters, damage that occurs in shipping, delivery,
or installation. Also applications and uses for which the Geyser-R is not intended, altered units or parts,
cosmetic damage, damage from abuse, neglect, fire, water, acts of nature, external plumbing, or leaks,
external wiring, utilities, parts, services, accessories, and failure to follow installation and operation
instructions.
Hubbell makes no warranty as to the fitness of the equipment for a particular use and shall not be
liable for any direct, indirect, or consequential damages in conjunction with this contract/and or the
use of the equipment.
Buyer agrees to indemnify and save harmless Hubbell Electric Heater Company from any claim or
demands against Hubbell Electric Heater Company for injuries or damages to third parties resulting
from buyer’s installation, use or ownership of the equipment.
27 Version 2.9
Page 28

Geyser-R Maintenance
The Geyser-R requires very little maintenance however to ensure long trouble free use, these items
should be checked periodically.
Air filter: The air filter on the back of the unit should be cleaned whenever it is visibly dirty. The
filter can be cleaned by simply hand washing in water. Replacement filters may be purchased from
Hubbell.
Evaporator: the evaporator underneath the filter can become clogged or dirty. It may be cleaned by
vacuuming or by a service provider and professionally cleaned. Do not use solvents containing bleach,
acetone, or flammable substances. Turn the unit off at the breaker before cleaning.
Drain and flush the water heater: Draining the tank every six months will help to ensure that
sediment does not build up in the tank and get into the Geyser-R. follow the directions from the tank
manufacturer for draining the tank.
Turning off / Storage of the Geyser: When the Geyser is turned off (for example in a vacation
home) and/or disconnected and stored (for example in a garage), very likely there will be water left in
the internal piping and components. Make sure to either store it in a place that will never freeze or
blow the water out off the unit if there is any chance of freezing temperatures. This will prevent the
water from freezing and splitting the pipes and components.
28 Version 2.9
Page 29

www.buytankless.com
29 Version 2.9
 Loading...